
Writing blog posts or articles is one of the most practical, sustainable, and cost-effective ways to generate website traffic and make money online.
However, while the idea of writing a blog post to gain exposure is simple, the process can be incredibly daunting if you have limited writing experience, as I did before starting my first website.
Recognizing the challenges writing presents, I’ve pulled together this guide outlining the exact step-by-step process I actively use for planning, writing, and publishing all of my articles, including this one.
To be clear, I won’t help you become a great writer – that takes years and, quite honestly, isn’t necessary to find success online. Instead, I aim to share my replicable framework that makes writing easier by breaking down the process of crafting a blog post into easy-to-digest chunks.
Most importantly, it’s a process that, regardless of your writing skills, can deliver results in the form of traffic that you can monetize, ensuring you use your time effectively to build your business.
Ready to learn how to write a blog post? Let’s go.
Article Contents
- Stay Organized with My Template
- Follow Along with an Example
- Part 1: Prepping to Write
- Part 2: Writing Your Blog Post
- Part 3: Uploading & Publishing
- Part 4: Tips for Writing Your Blog Post
Stay Organized with My Template
Every time I write a blog post, I start with a template. It’s super lightweight and nothing fancy, but it helps me stay organized and keep track of my research, and it’s where I create my outline.
In the upcoming section on prepping to write your blog post, I’ll show you step-by-step how I fill out my template with a real-life example so you know exactly how to do it yourself.
You can download a copy here. Once you arrive at the template, select ‘File > Make a Copy’ and save it to Google Drive. Alternatively, you can select ‘File > Download’ and save it on your computer for import into another program like Excel if that’s what you use.
The template itself is less important than having a straightforward way of compiling your research. If you prefer using a document, Evernote, Apple Notes, or any other piece of software, that’s perfectly fine. Do what works best for you – in my case, it’s a spreadsheet.
Of course, feel free to customize the template I shared. However, don’t get caught up in the template or make it overly complex; it’s merely a tool to help you create your blog post. We want to keep things simple.
If you’d like to see the completed example, you can check that out here.
Follow Along with an Example
To help you follow along in this article, I’ll use the following blog post topic as an example, which would be worth writing about if I had a website dedicated to coffee.
- Keyword: How to grow coffee beans
- Monthly Search Volume: 1,300
- Keyword Difficulty: 28 out of 100
- Average Article Length: 1,686 words*
- Max Article Length: 3,116 words*
*Refers to the average and maximum length in words for the top 10 articles ranking on Google when I searched for the keyword.
I selected this topic because it has a reasonable monthly search volume and relatively low competition, increasing the likelihood that my article will succeed in less time, i.e., low-hanging fruit.
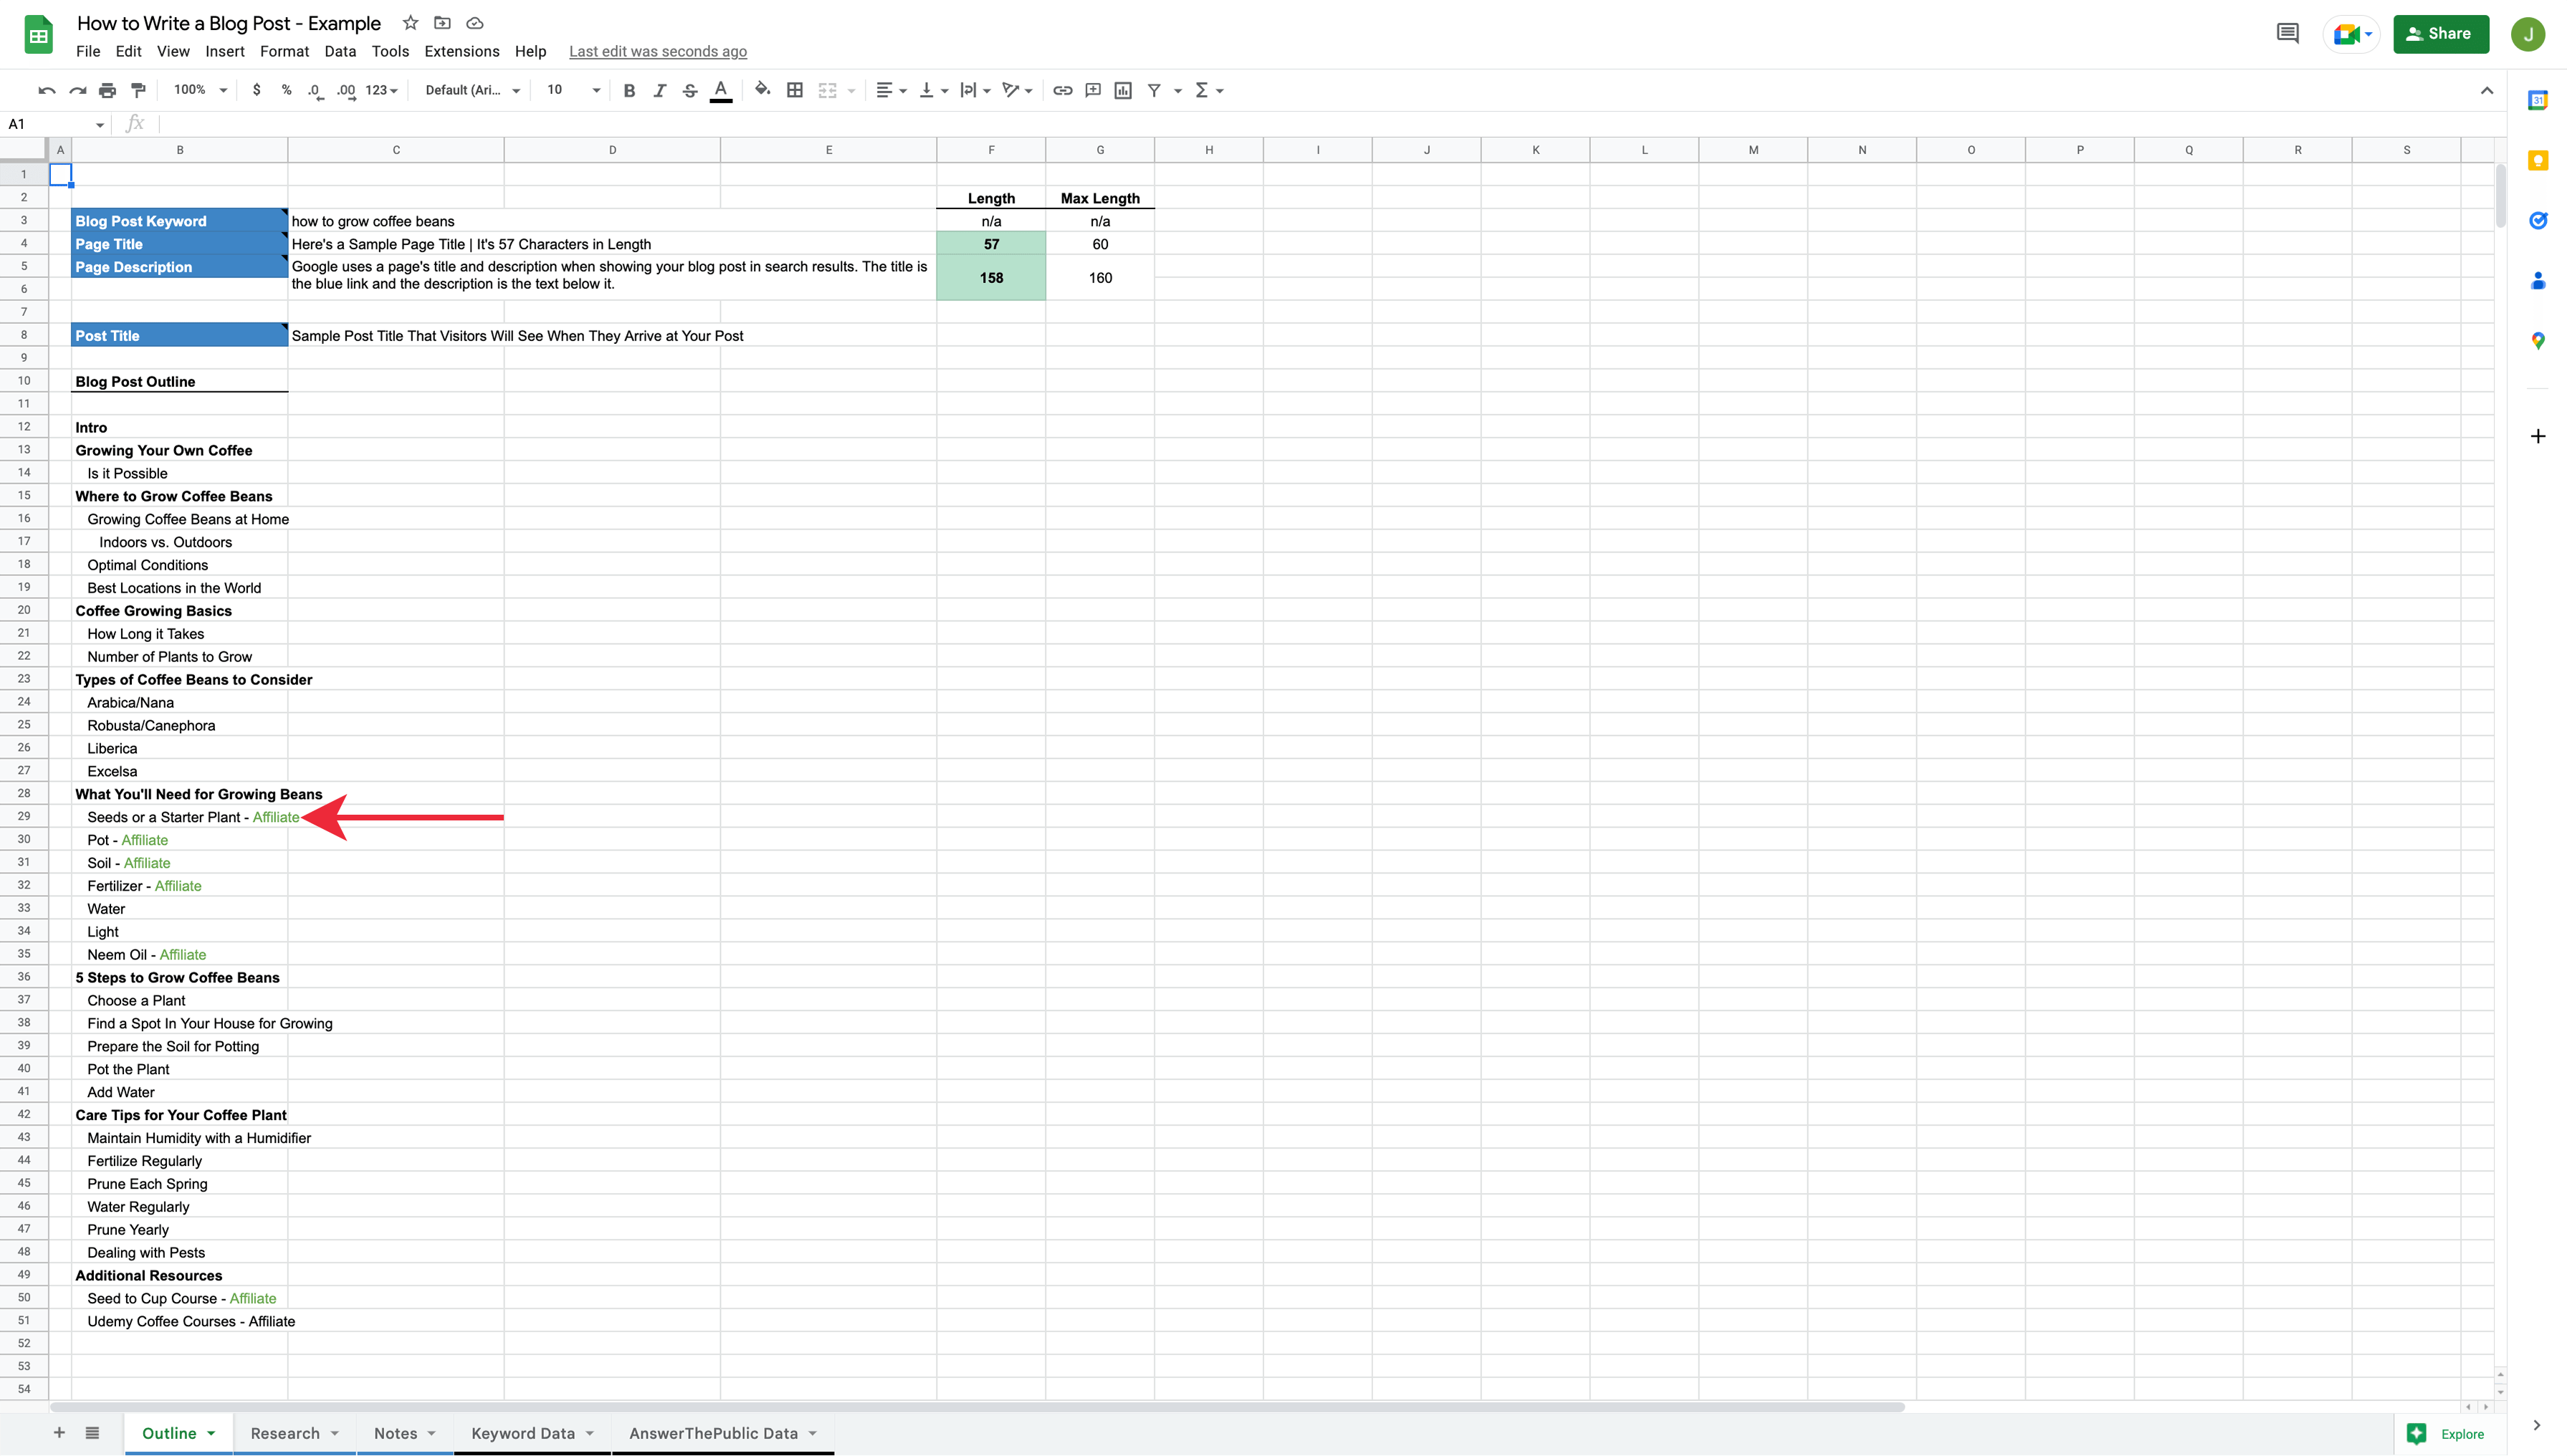
In addition, the average and max length in words for the top ten articles ranking on Google when searching the phrase is relatively low, so I’ll have to write less to create a competitive post.
I also like this topic because there are products relating to growing coffee beans that I can recommend in my article to earn affiliate commissions.
We’ll cover signing up for affiliate programs in a future post on Digiblend, so it’s okay if you still need to sign up for one. You can always start by recommending products in your articles and then come back and add the affiliate links later.
Part 1: Prepping to Write
One of the biggest mistakes beginners and first-time bloggers make when writing an article is that they jump to writing without adequate planning and research, which is fundamental to success.
If you’re reading this and are concerned about how much time you’ll have to invest in planning, don’t worry, we’ll keep our research lean. As a solo entrepreneur, I don’t have time for fluff work, and I expect the same is true for you; we won’t get any deeper into the weeds than is necessary.
However, a little planning goes a long way, making it significantly easier to write a cohesive blog post while dramatically increasing the likelihood that the article delivers the desired results, a.k.a, traffic, and money.
Identify a Worthwhile Topic
Before we start writing a blog post, we need to identify a topic people actively search for online. Doing so will ensure that there’s an audience who might discover our article and visit our website.
As a business owner, subject matter expert, or enthusiast, you may have a sense of the important or interesting topics in your niche, which will be helpful in our research. Still, we need to vet your ideas before moving forward to avoid wasting time and energy.
Keyword Research
In a nutshell, keyword research is the process of identifying relevant phrases or topics people search for online to inform highly targeted content creation that helps you generate traffic for your website.
My guide on keyword research covers everything you need to know about developing a list of high-value topics, including their search volume, competition, and how to select an idea that’s worth pursuing as a blog post. If you haven’t already read that, I encourage you to check it out and follow the process I outlined to narrow down a topic.
In it, I outlined two methods for doing your research. One approach is free, and the other uses some of my favorite paid tools to supercharge your efforts, including Ahrefs, Semrush, and Ubersuggest.
Once you have a keyword you’d like to use as your topic, jump back to this section to pick up where you left off.
If you’re still deciding whether to invest a few hours doing keyword research, that’s fine. You can always review this article in full before jumping in, then come back to do the research and select a topic later.
Brainstorm Ideas for the Post
Once you’ve selected a keyword to use as the subject for your blog post, one of the first places I like to start is by brainstorming any ideas I already have for my post.
If you took my advice about selecting an online business idea, you should be writing a blog post about a topic of genuine interest. Whether you’re an expert or not, you likely have some thoughts on what to cover in the blog post, so it pays to spend a few minutes jotting those down.
Head to the ‘Notes’ tab of the template I shared at the begging of this post and enter anything you can think of that might be worth covering. I’m no coffee expert, but I’ve added a few thoughts for my example.
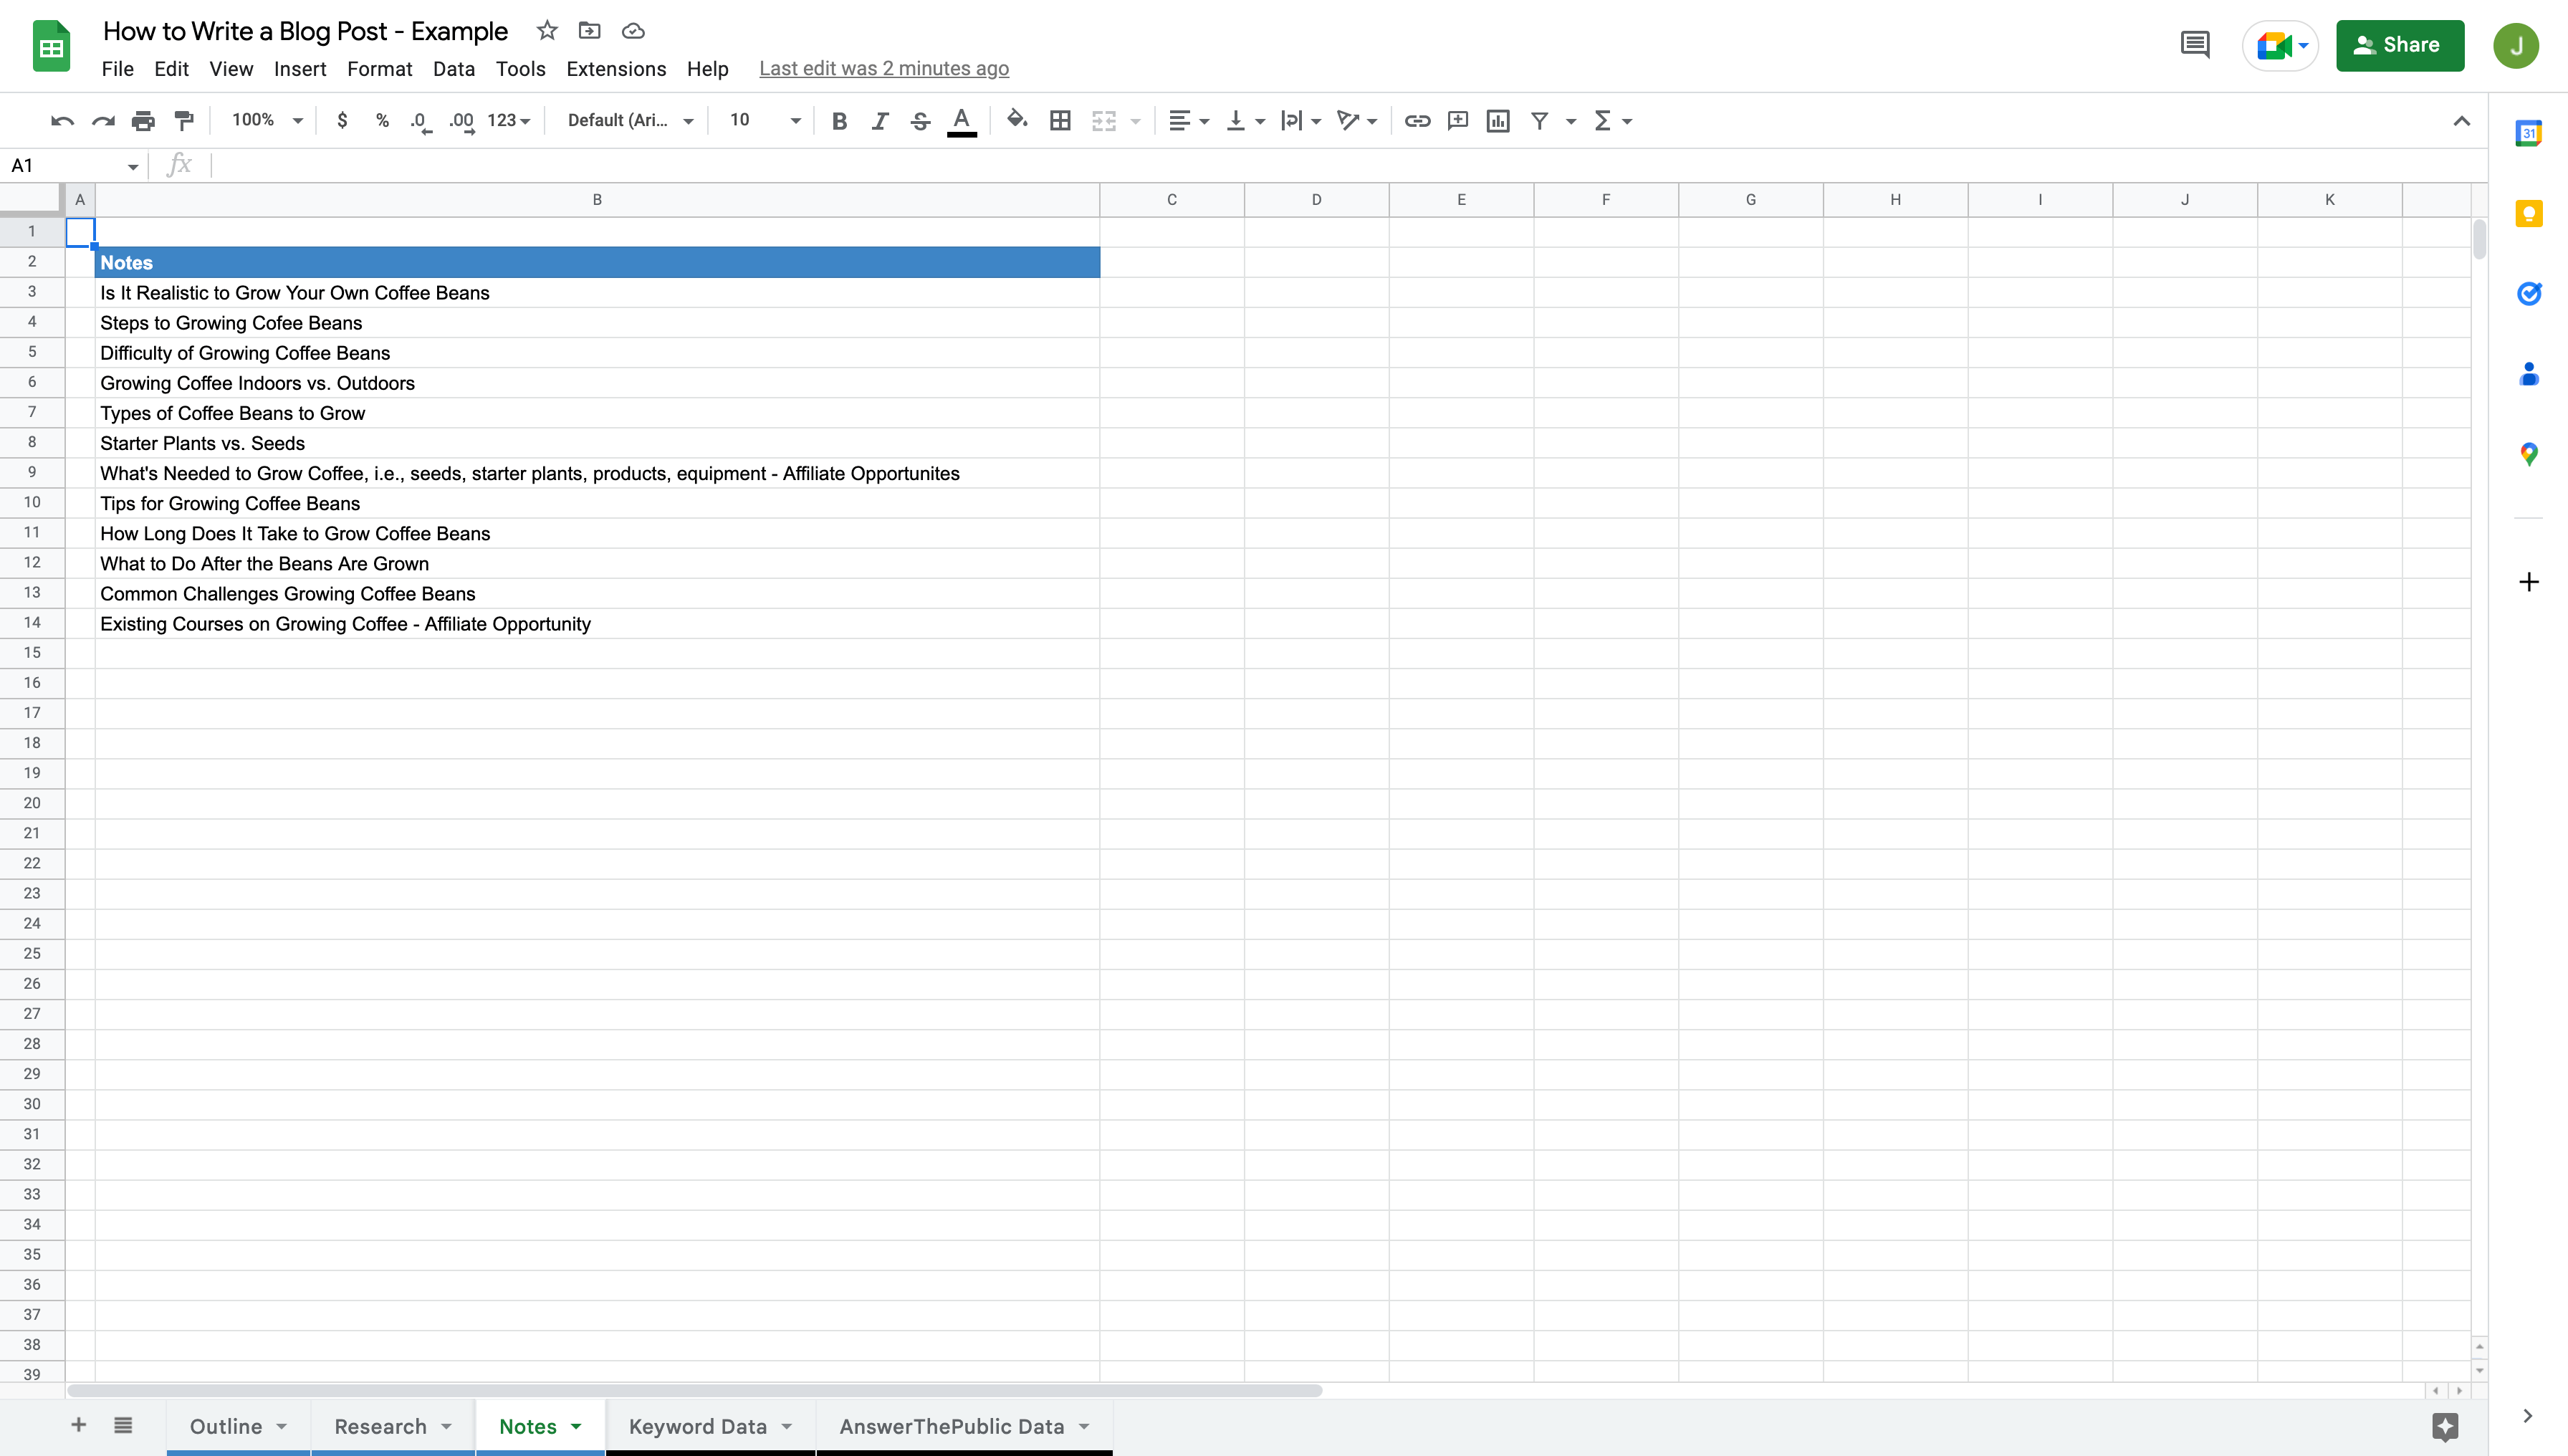
Be as thorough as possible, but only spend 10-15 minutes on it. The rest of this section will help provide more ideas.
Research Related Searches
Now that you’ve fleshed out some ideas, we want to dig deeper to understand the nuances behind the topic and the closely related searches that might be worth discussing.
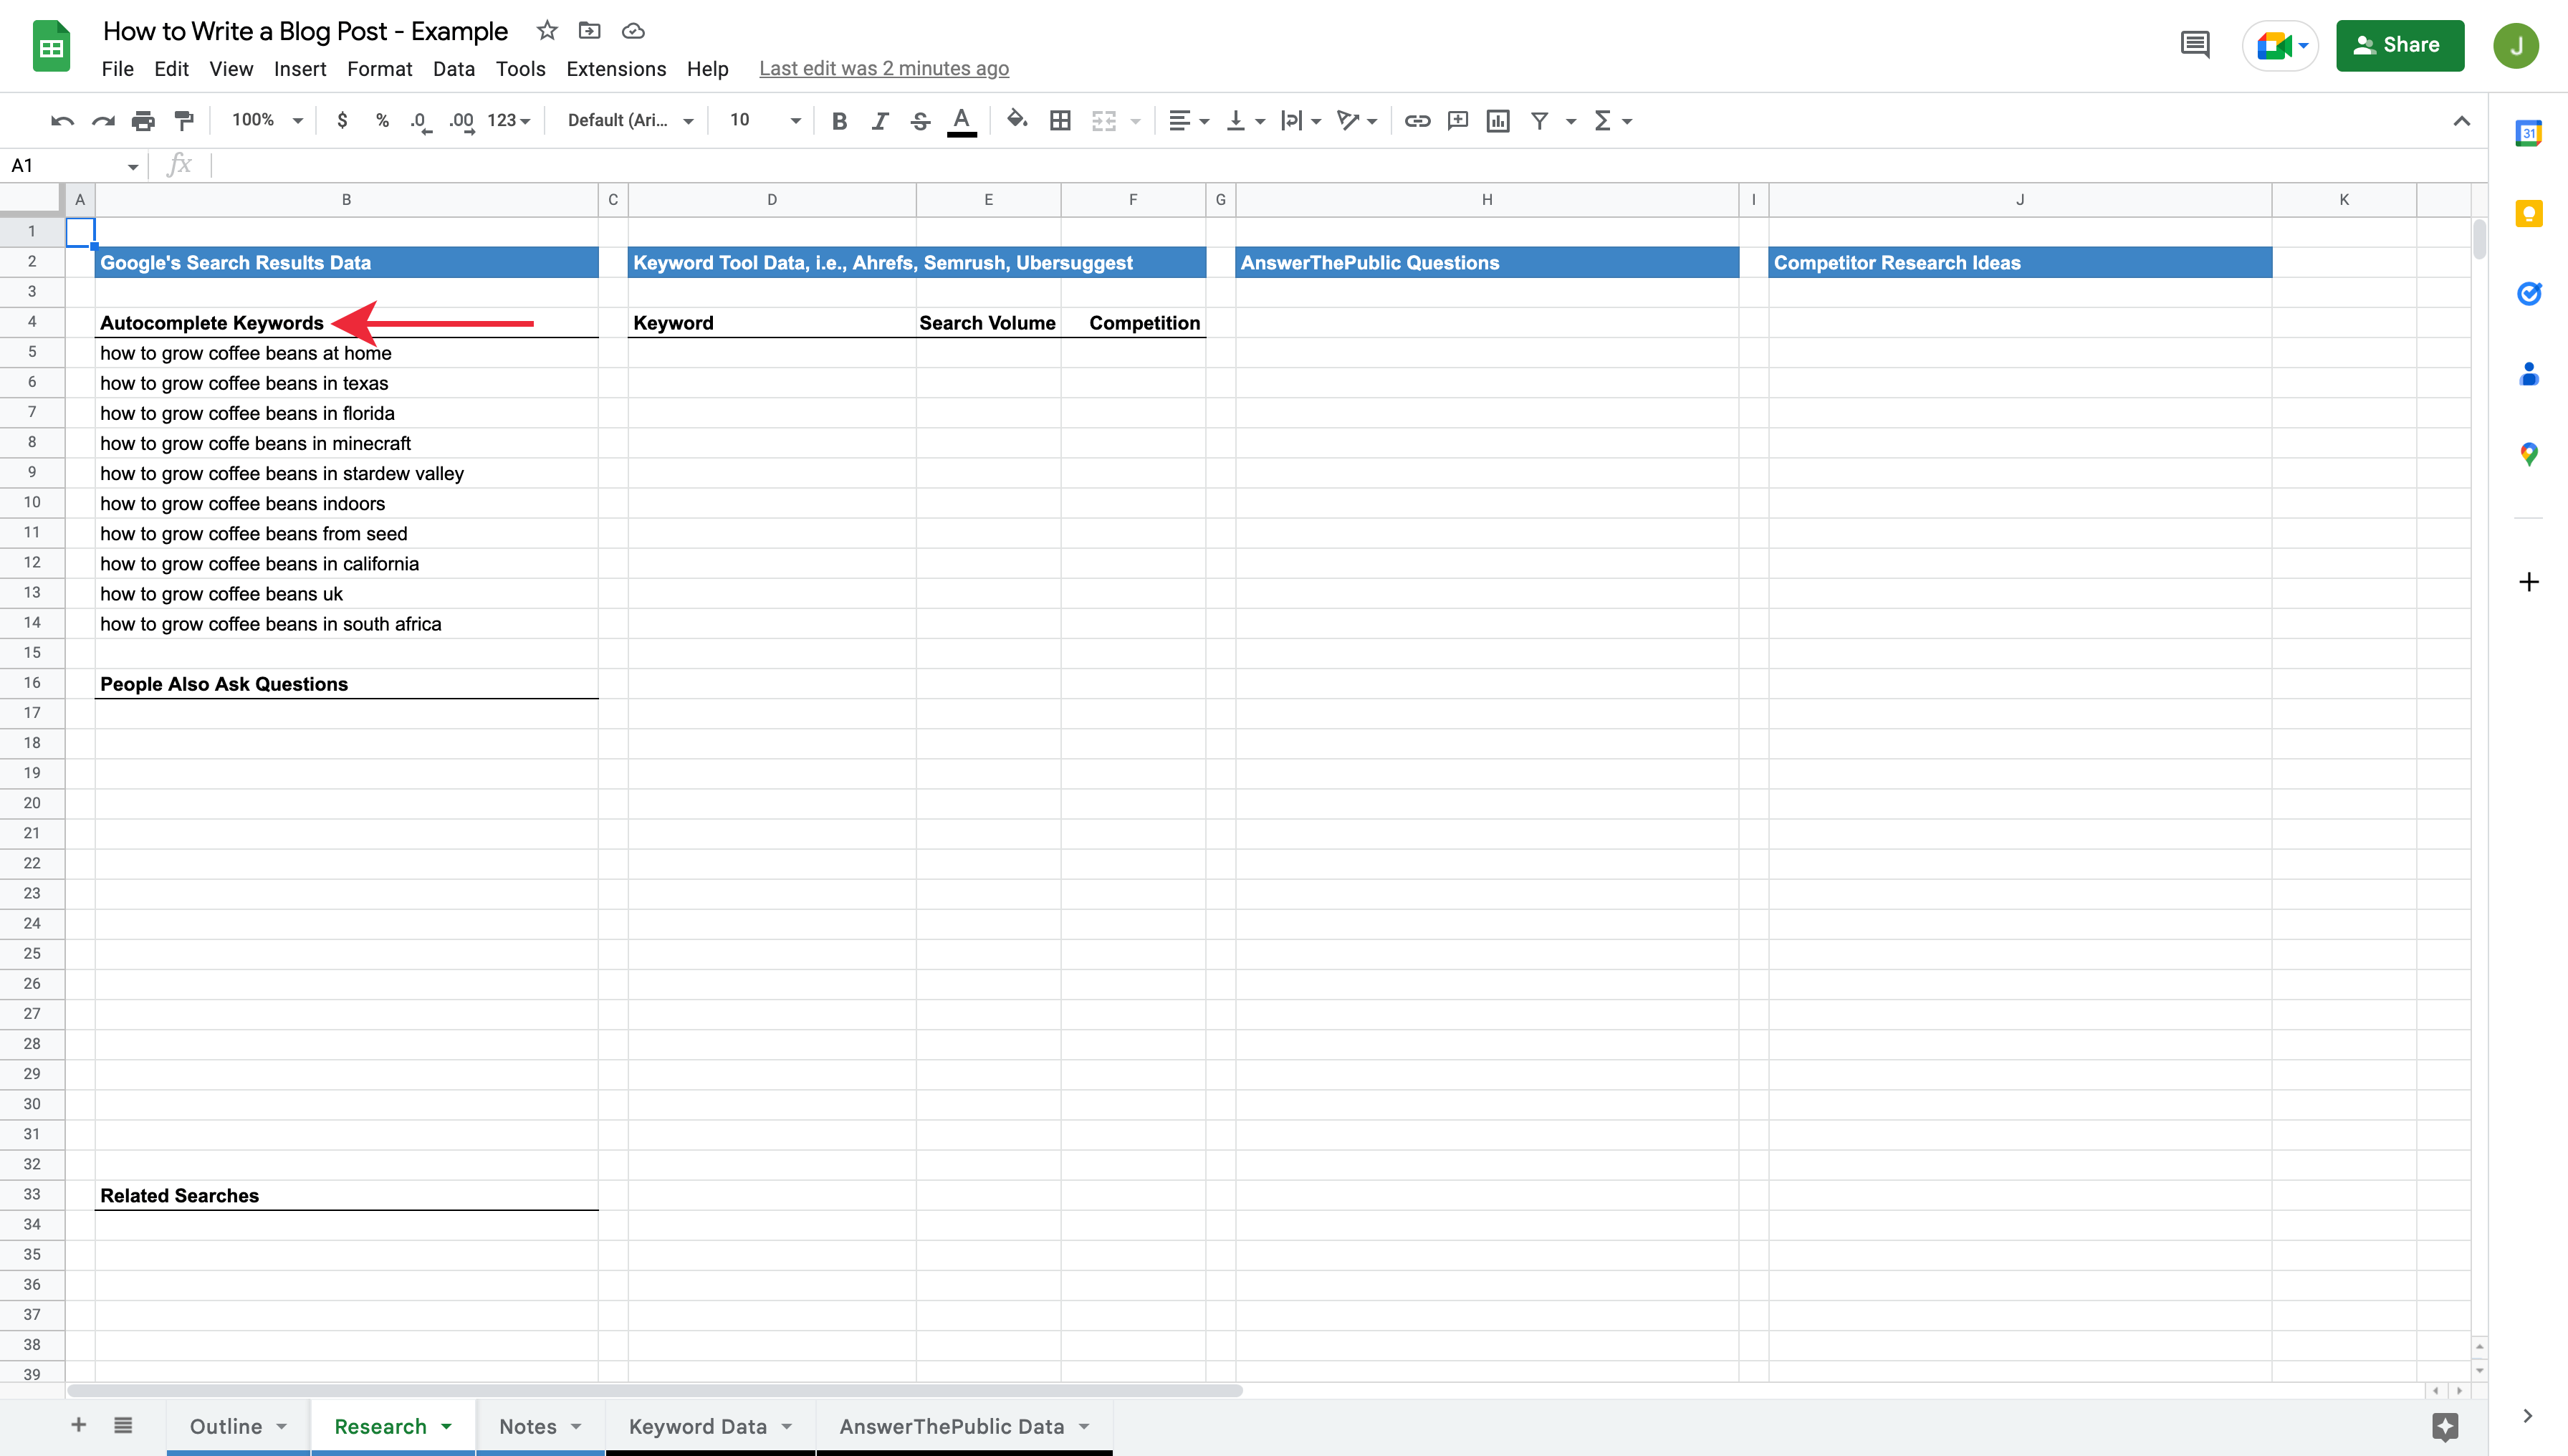
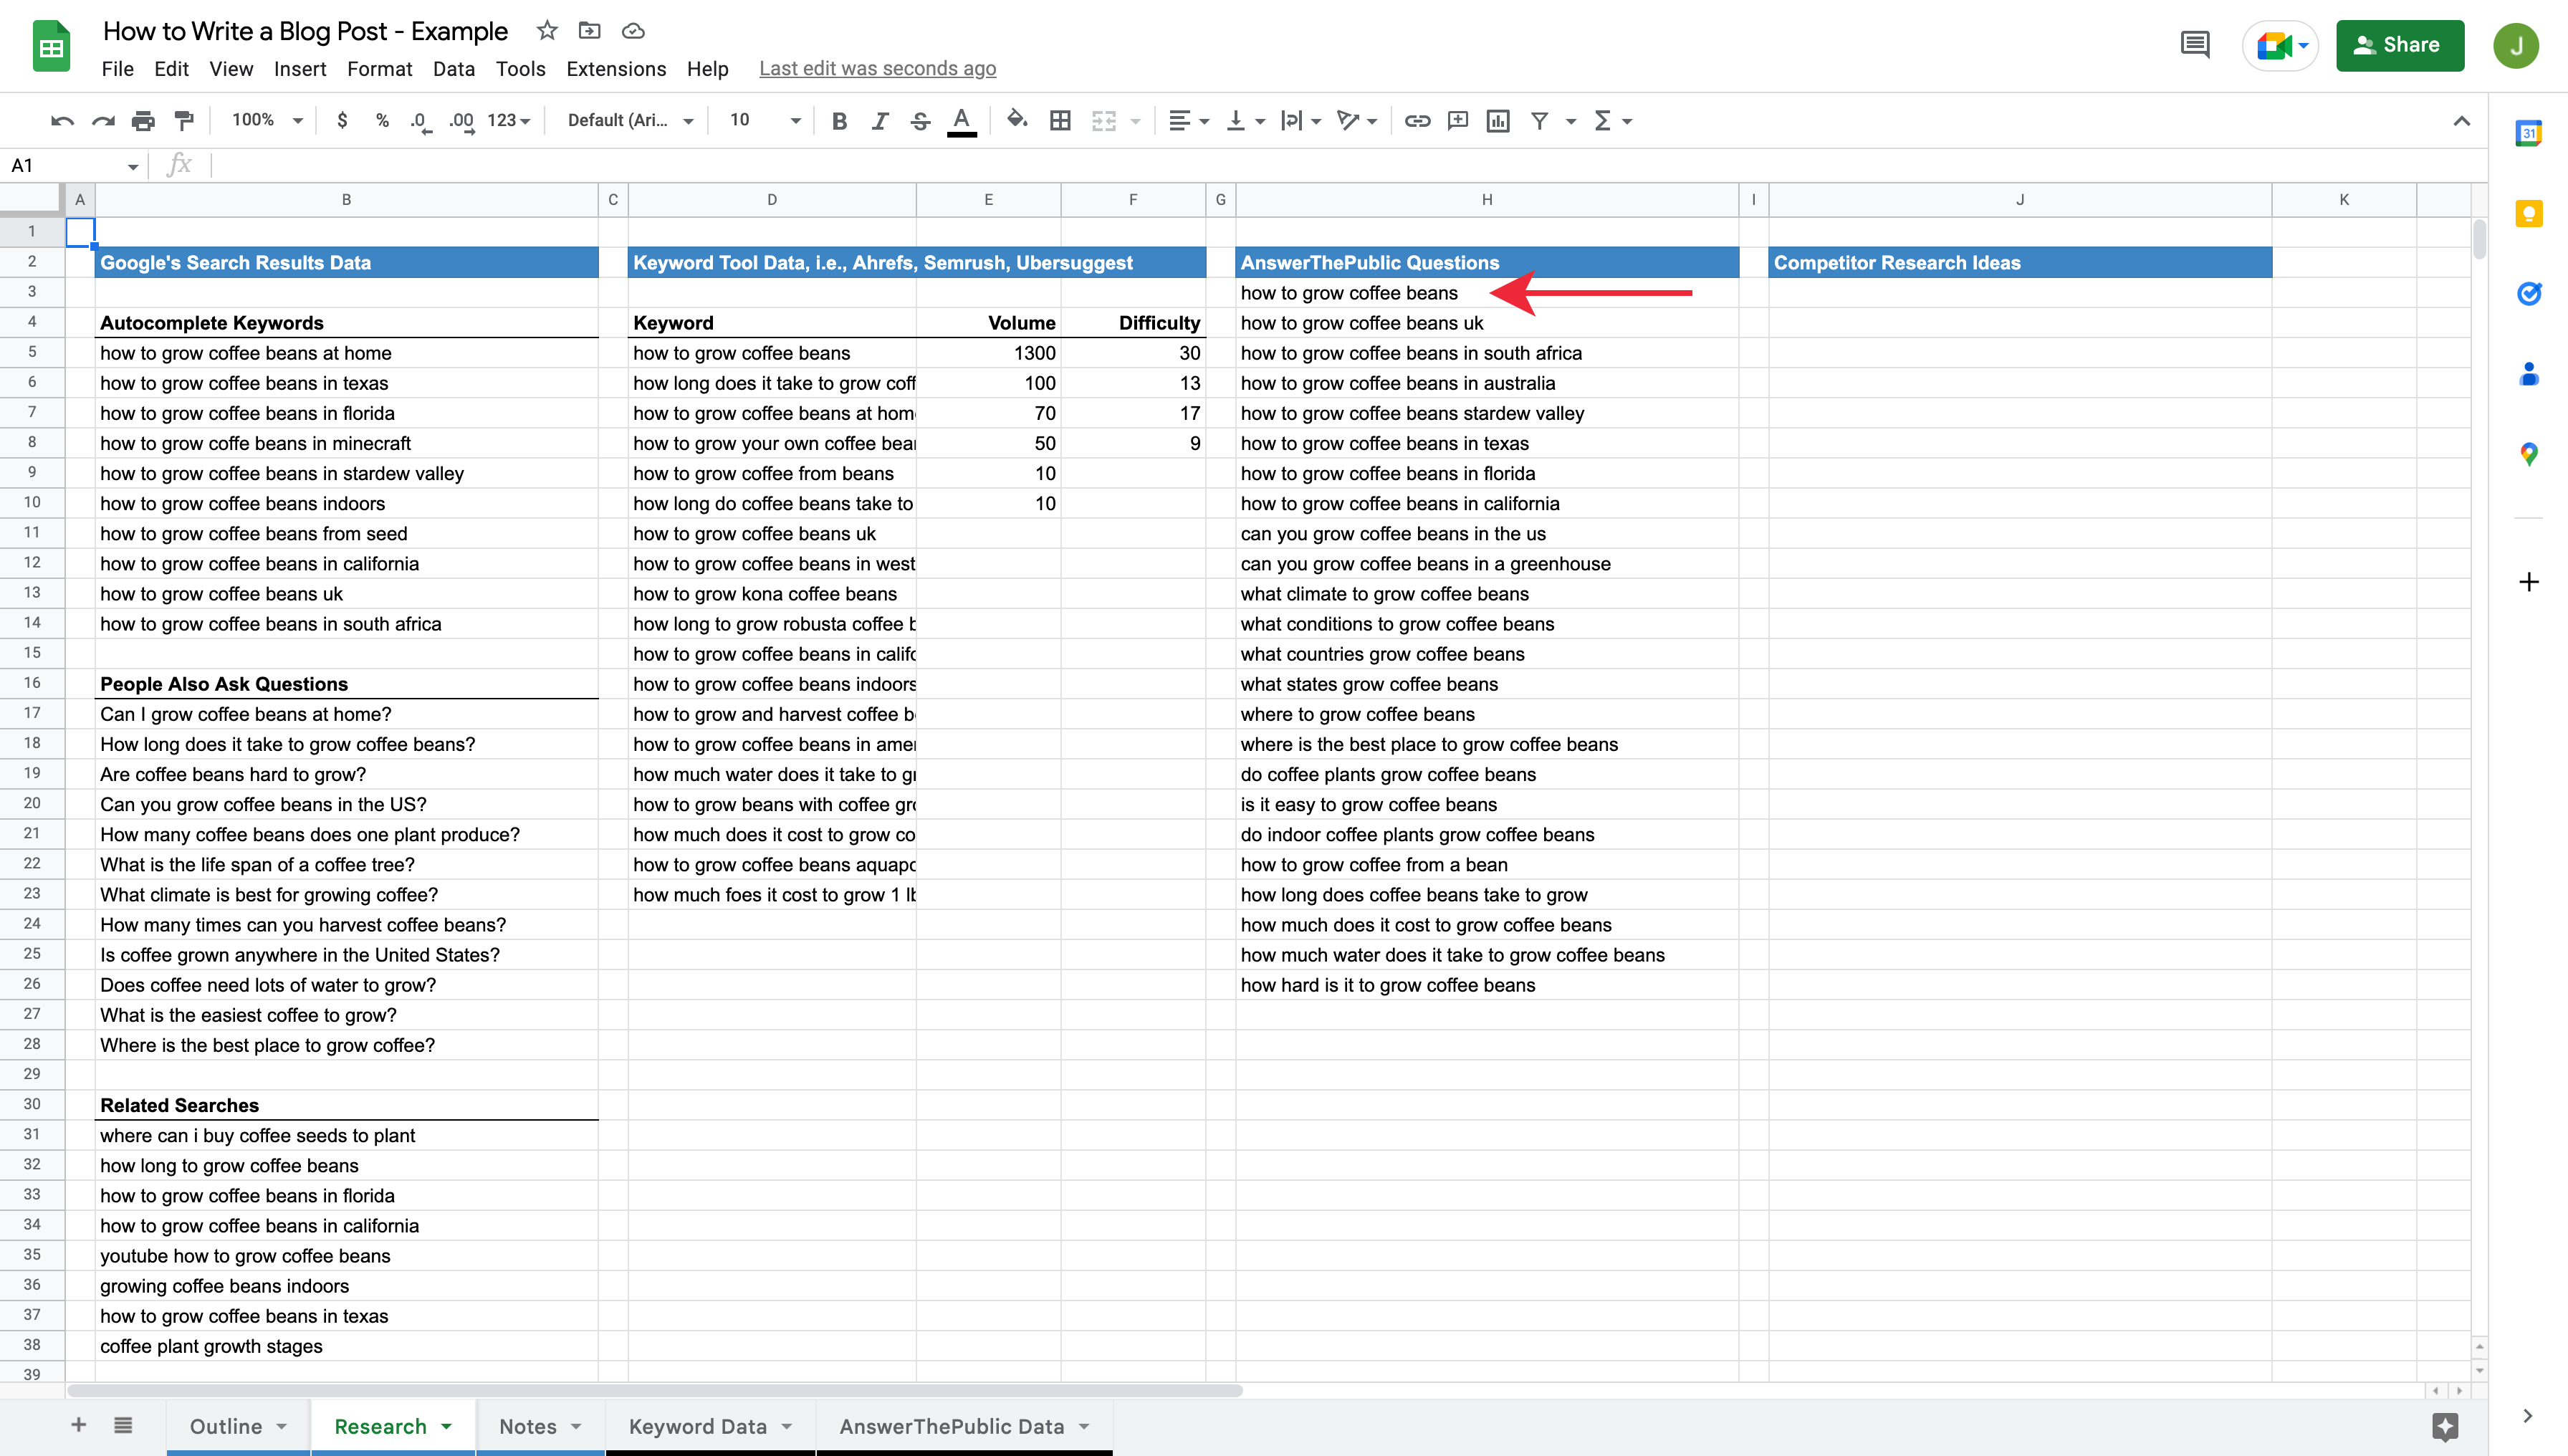
First, enter the primary keyword for the blog post topic you’ll be writing about in the template I provided at the beginning of this guide.

Google’s Autocomplete
Start by searching for the keyword you’re writing about on Google. After searching for the keyword, place your cursor at the end of the search box and type a space to bring up Google’s autocomplete.

Next, jump to your blog post template and enter these phrases into the ‘Research’ tab under the ‘Autocomplete Keywords’ section.
Google’s People Also Ask
Taking things a step further, check to see if there’s a ‘People Also Ask’ section on Google’s search results.
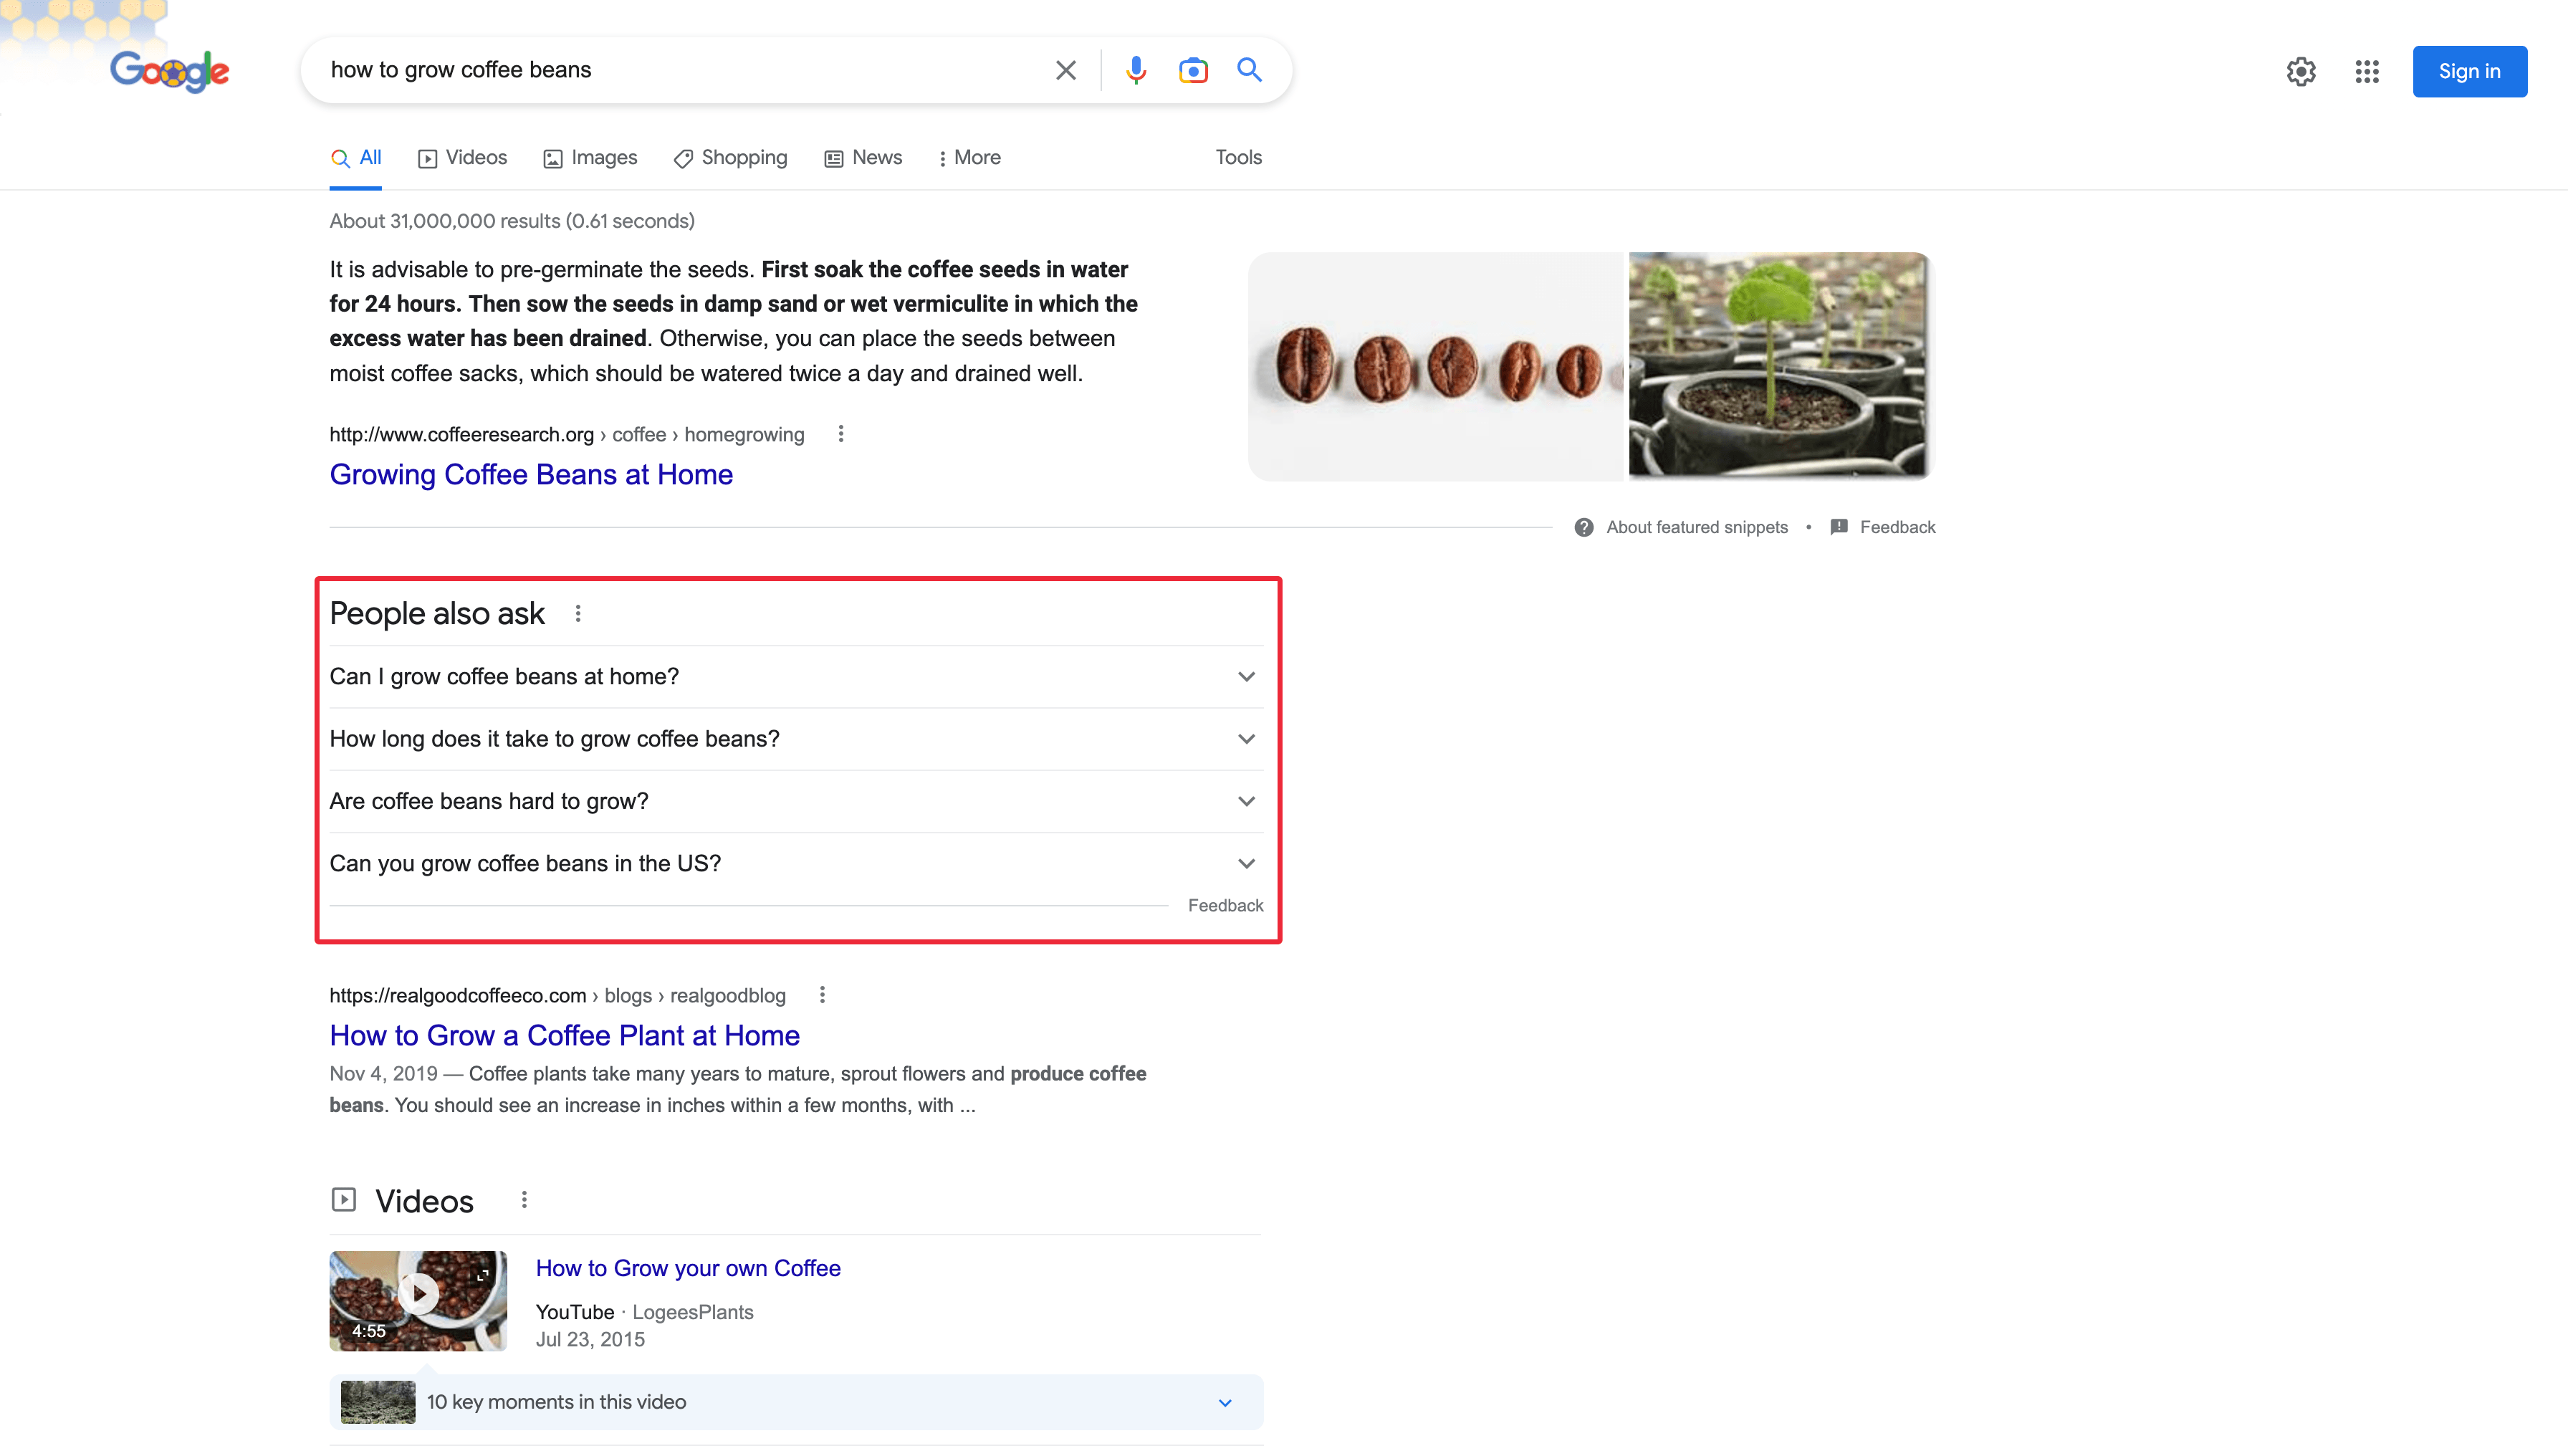
If so, click to expand and collapse a few questions, which will cause the list of questions to grow.
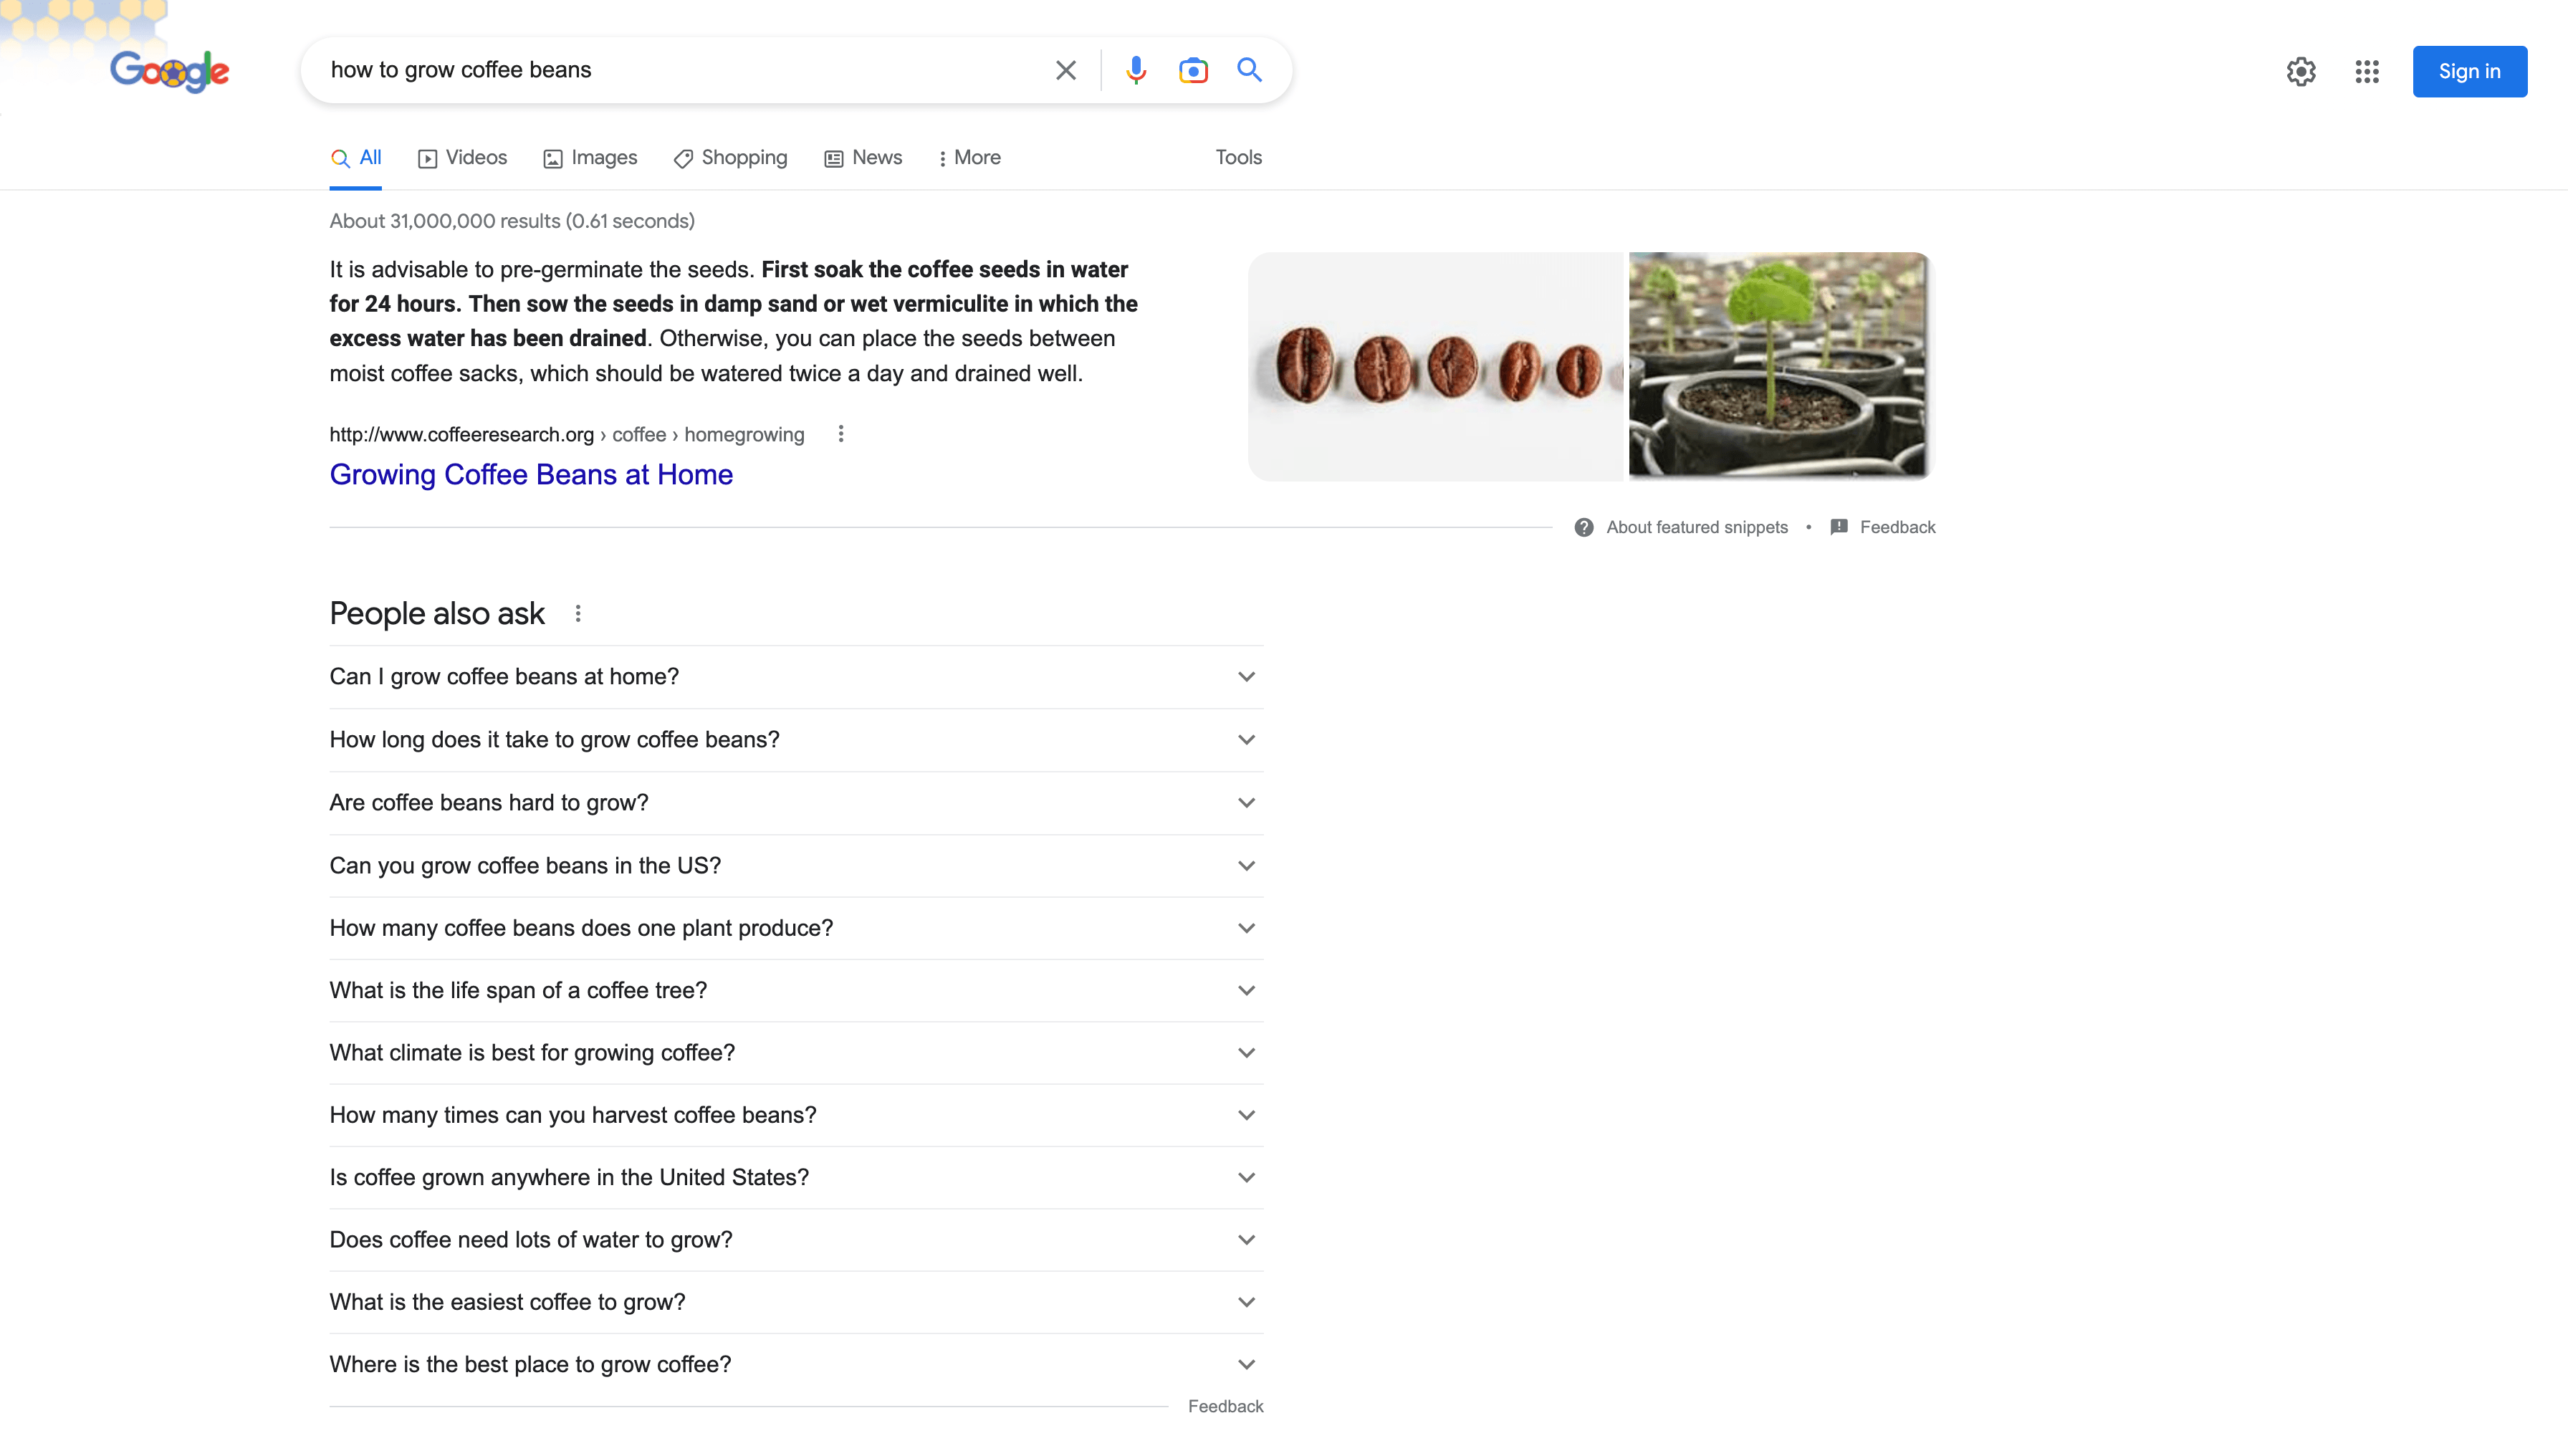
Then, copy that list of questions and paste them into your template’s ‘Research’ tab under the ‘People Also Ask Questions’ heading.
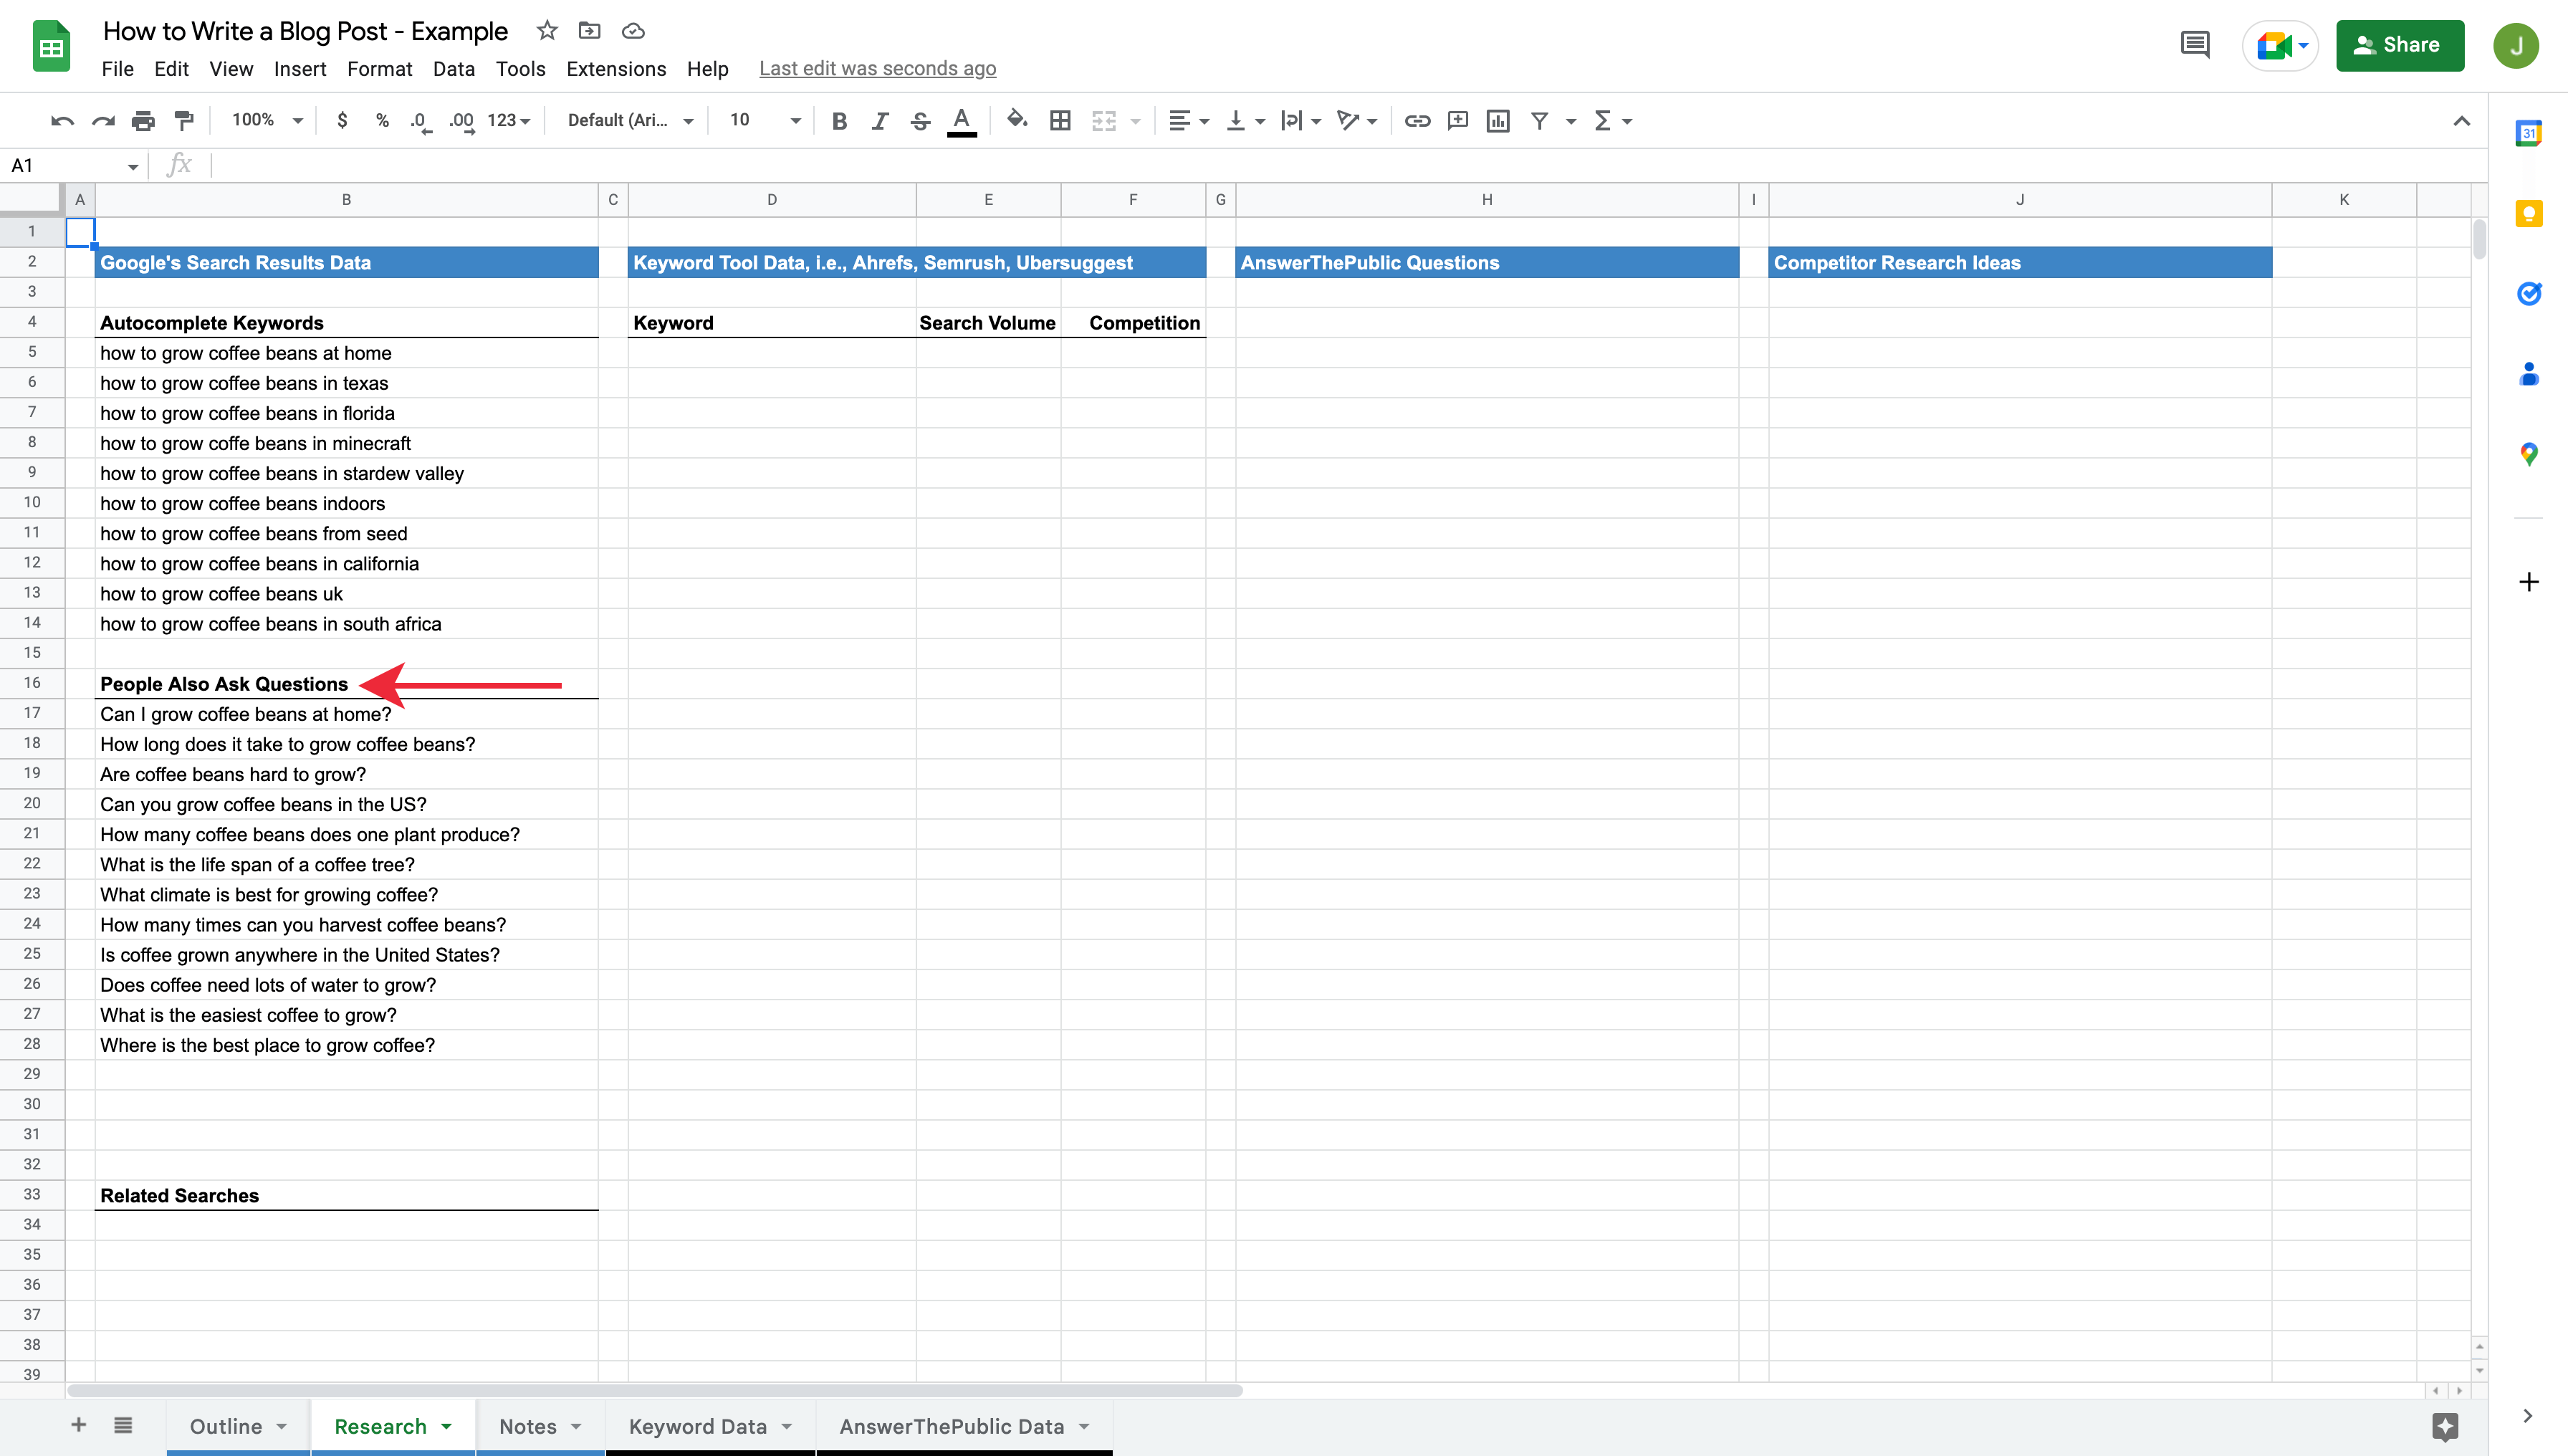
The last piece of information to grab, for the time being, is the related searches at the bottom of Google’s search results.
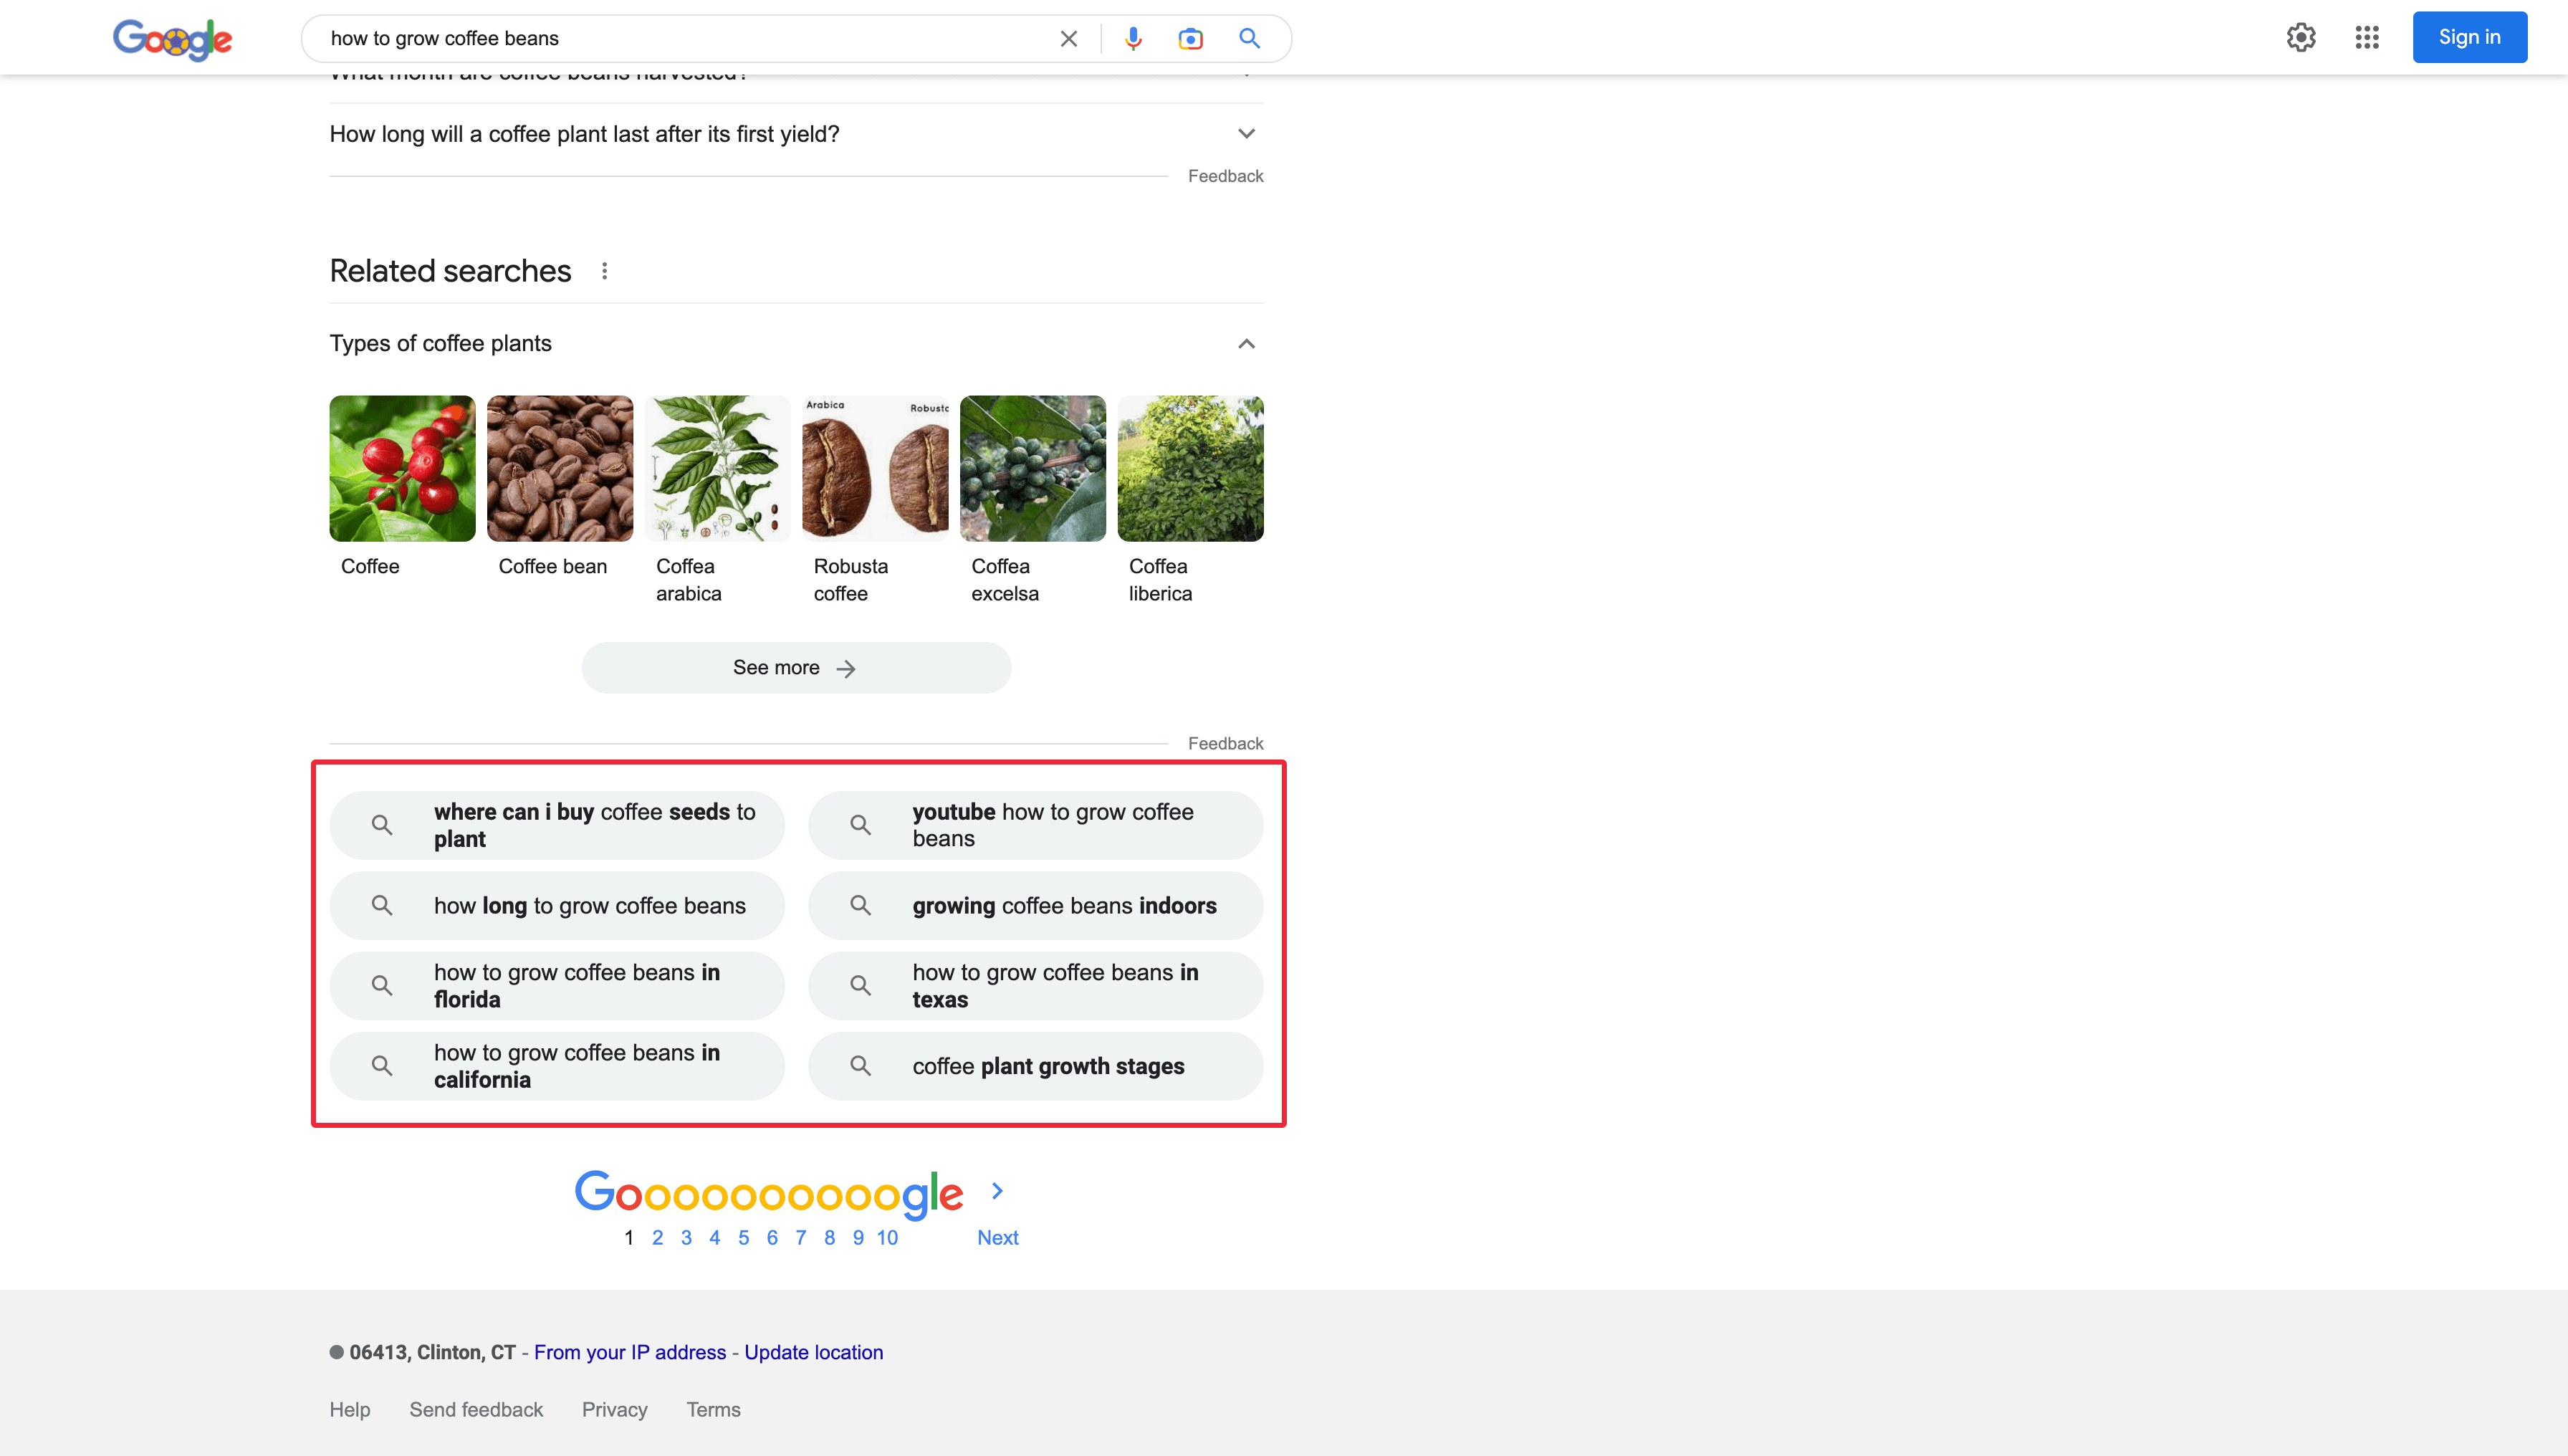
Copy and paste them into your template’s ‘Research’ tab under the ‘Related Searches’ heading.

Explore Related Keywords
Now that you have your research information from Google’s search results, let’s bring in more data from a keyword tool.
I’ll use Ahrefs, one of my favorite keyword research tools, for this task. Although I recommend using their paid Keyword Explorer, you can use their free keyword generator if you’re not a paid subscriber.
Free Method
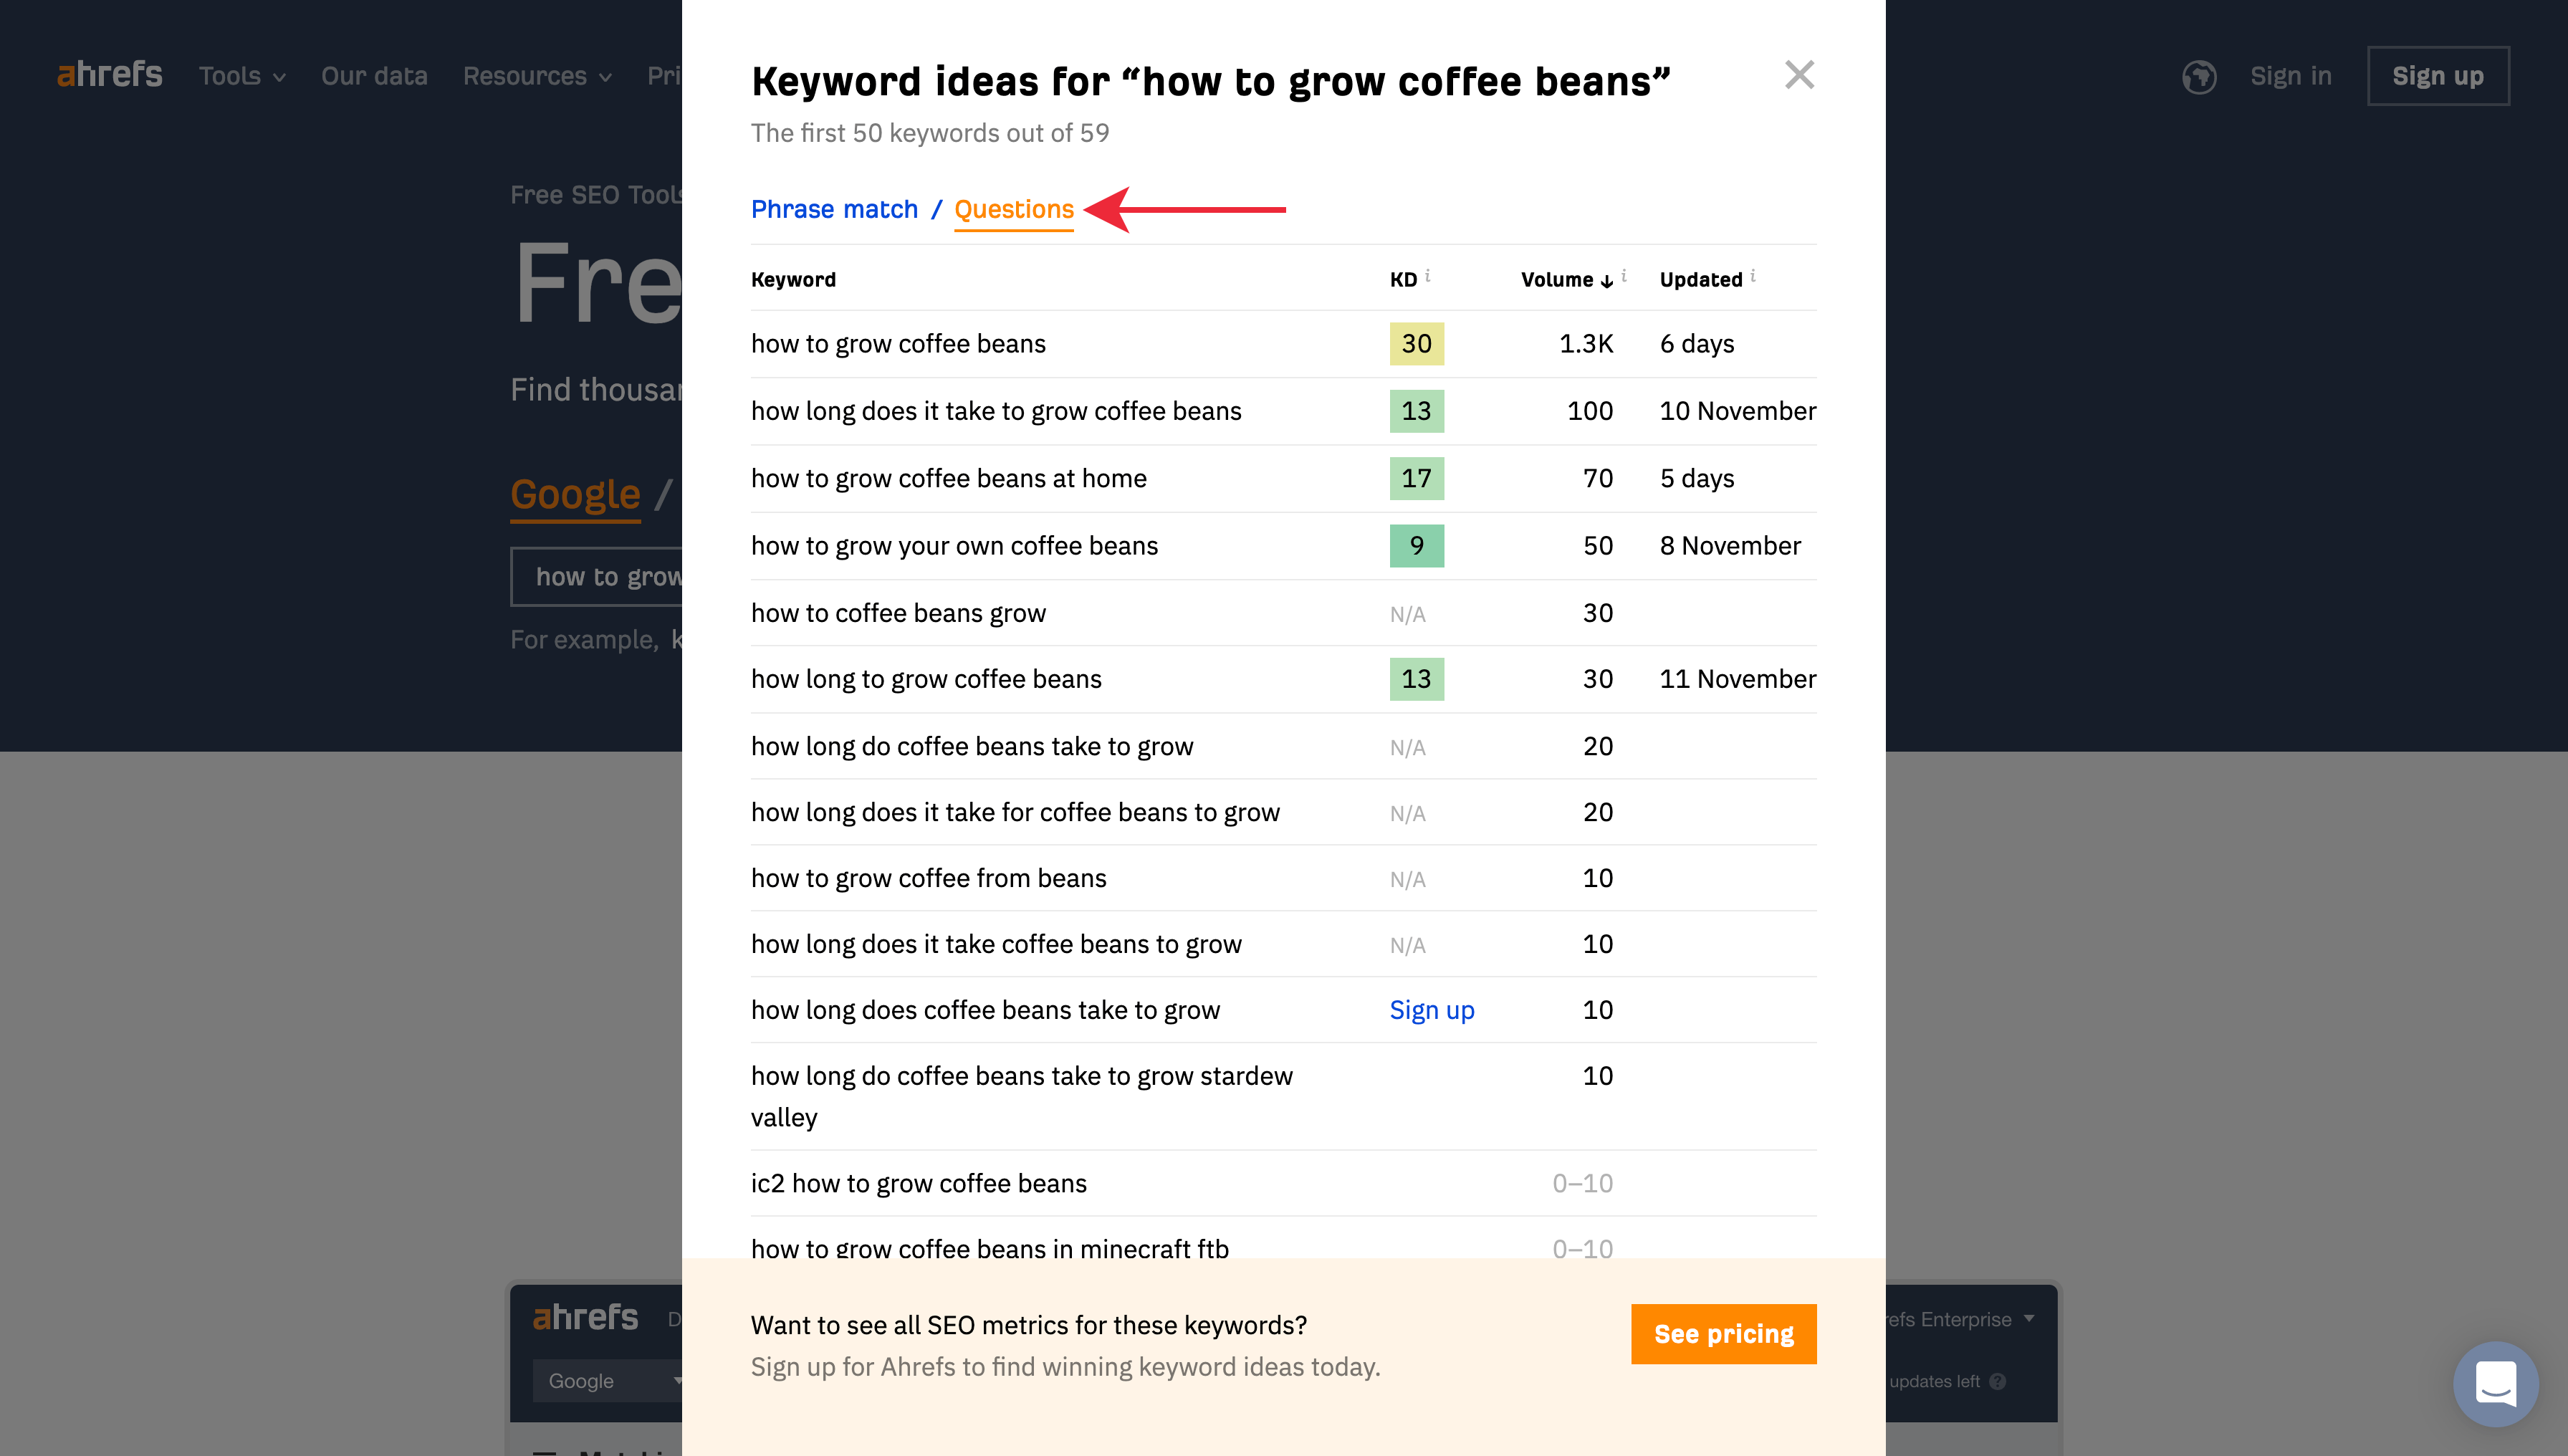
Start by navigating to Ahrefs’ keyword generator. Enter your blog post’s keyword and click the ‘Find Keywords’ button. Doing so will present you with a list of phrases that match your keyword and related questions.
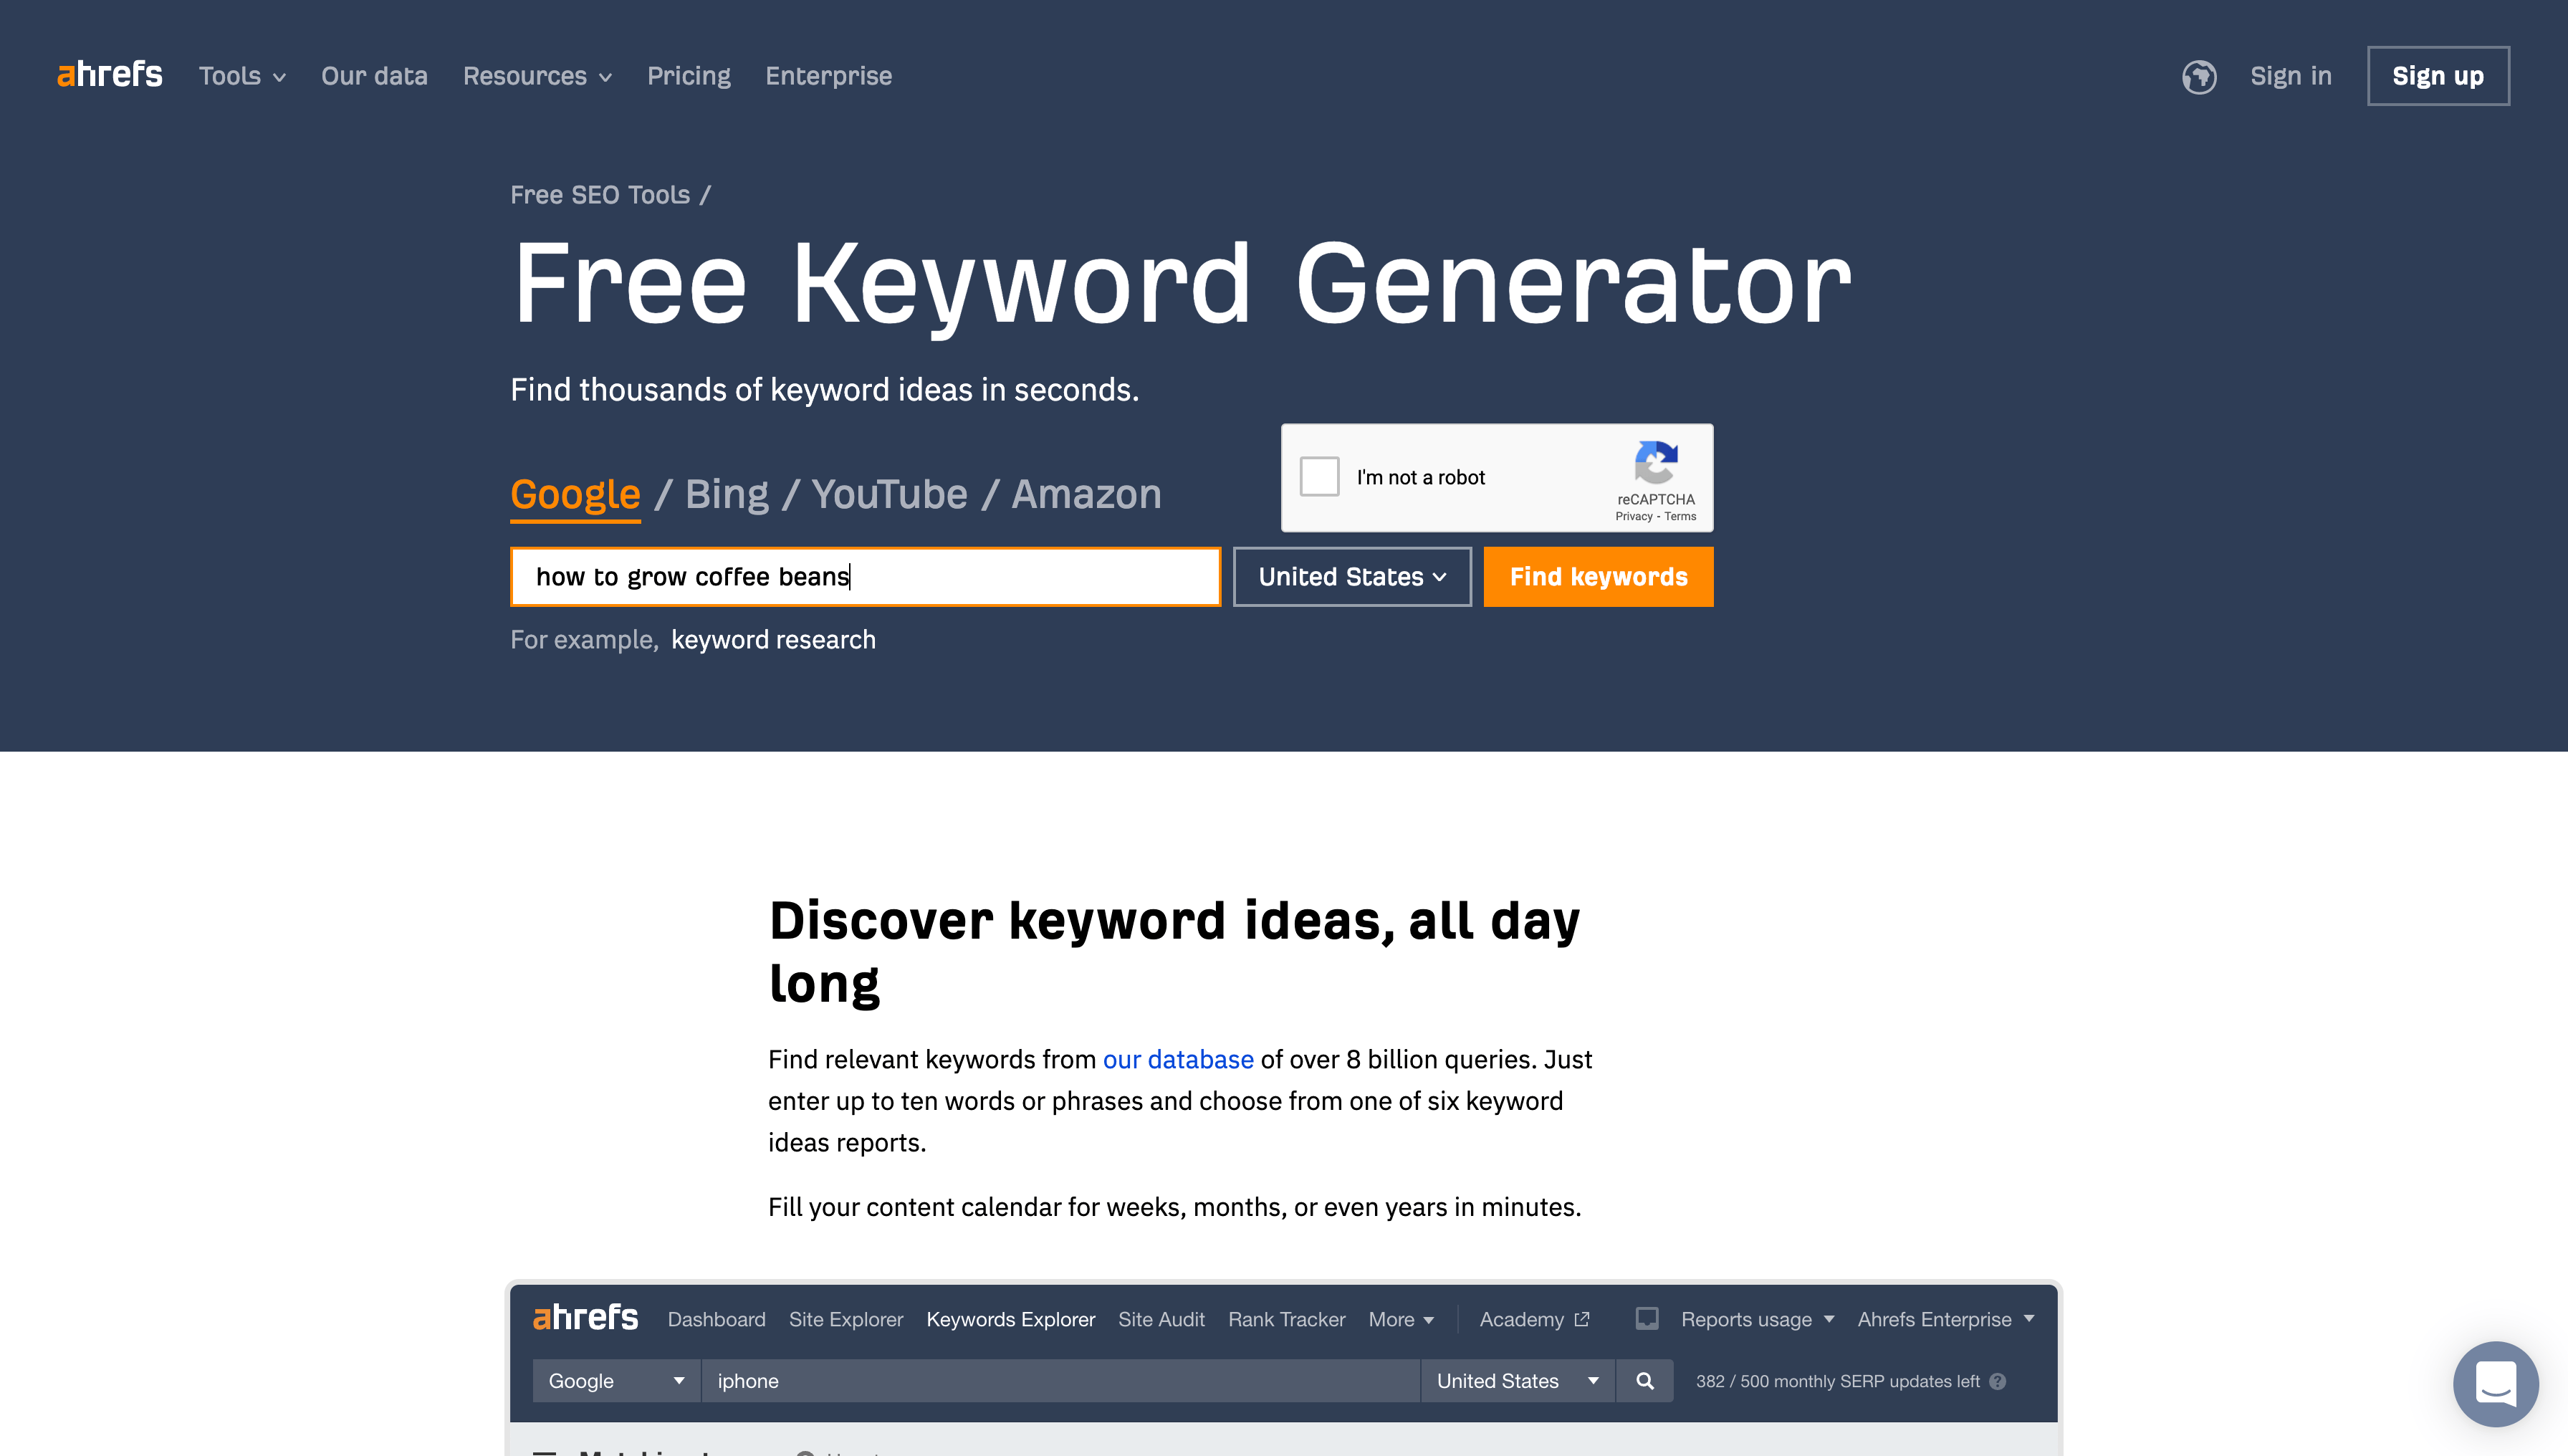
To view the ‘Questions,’ click the link for that section.
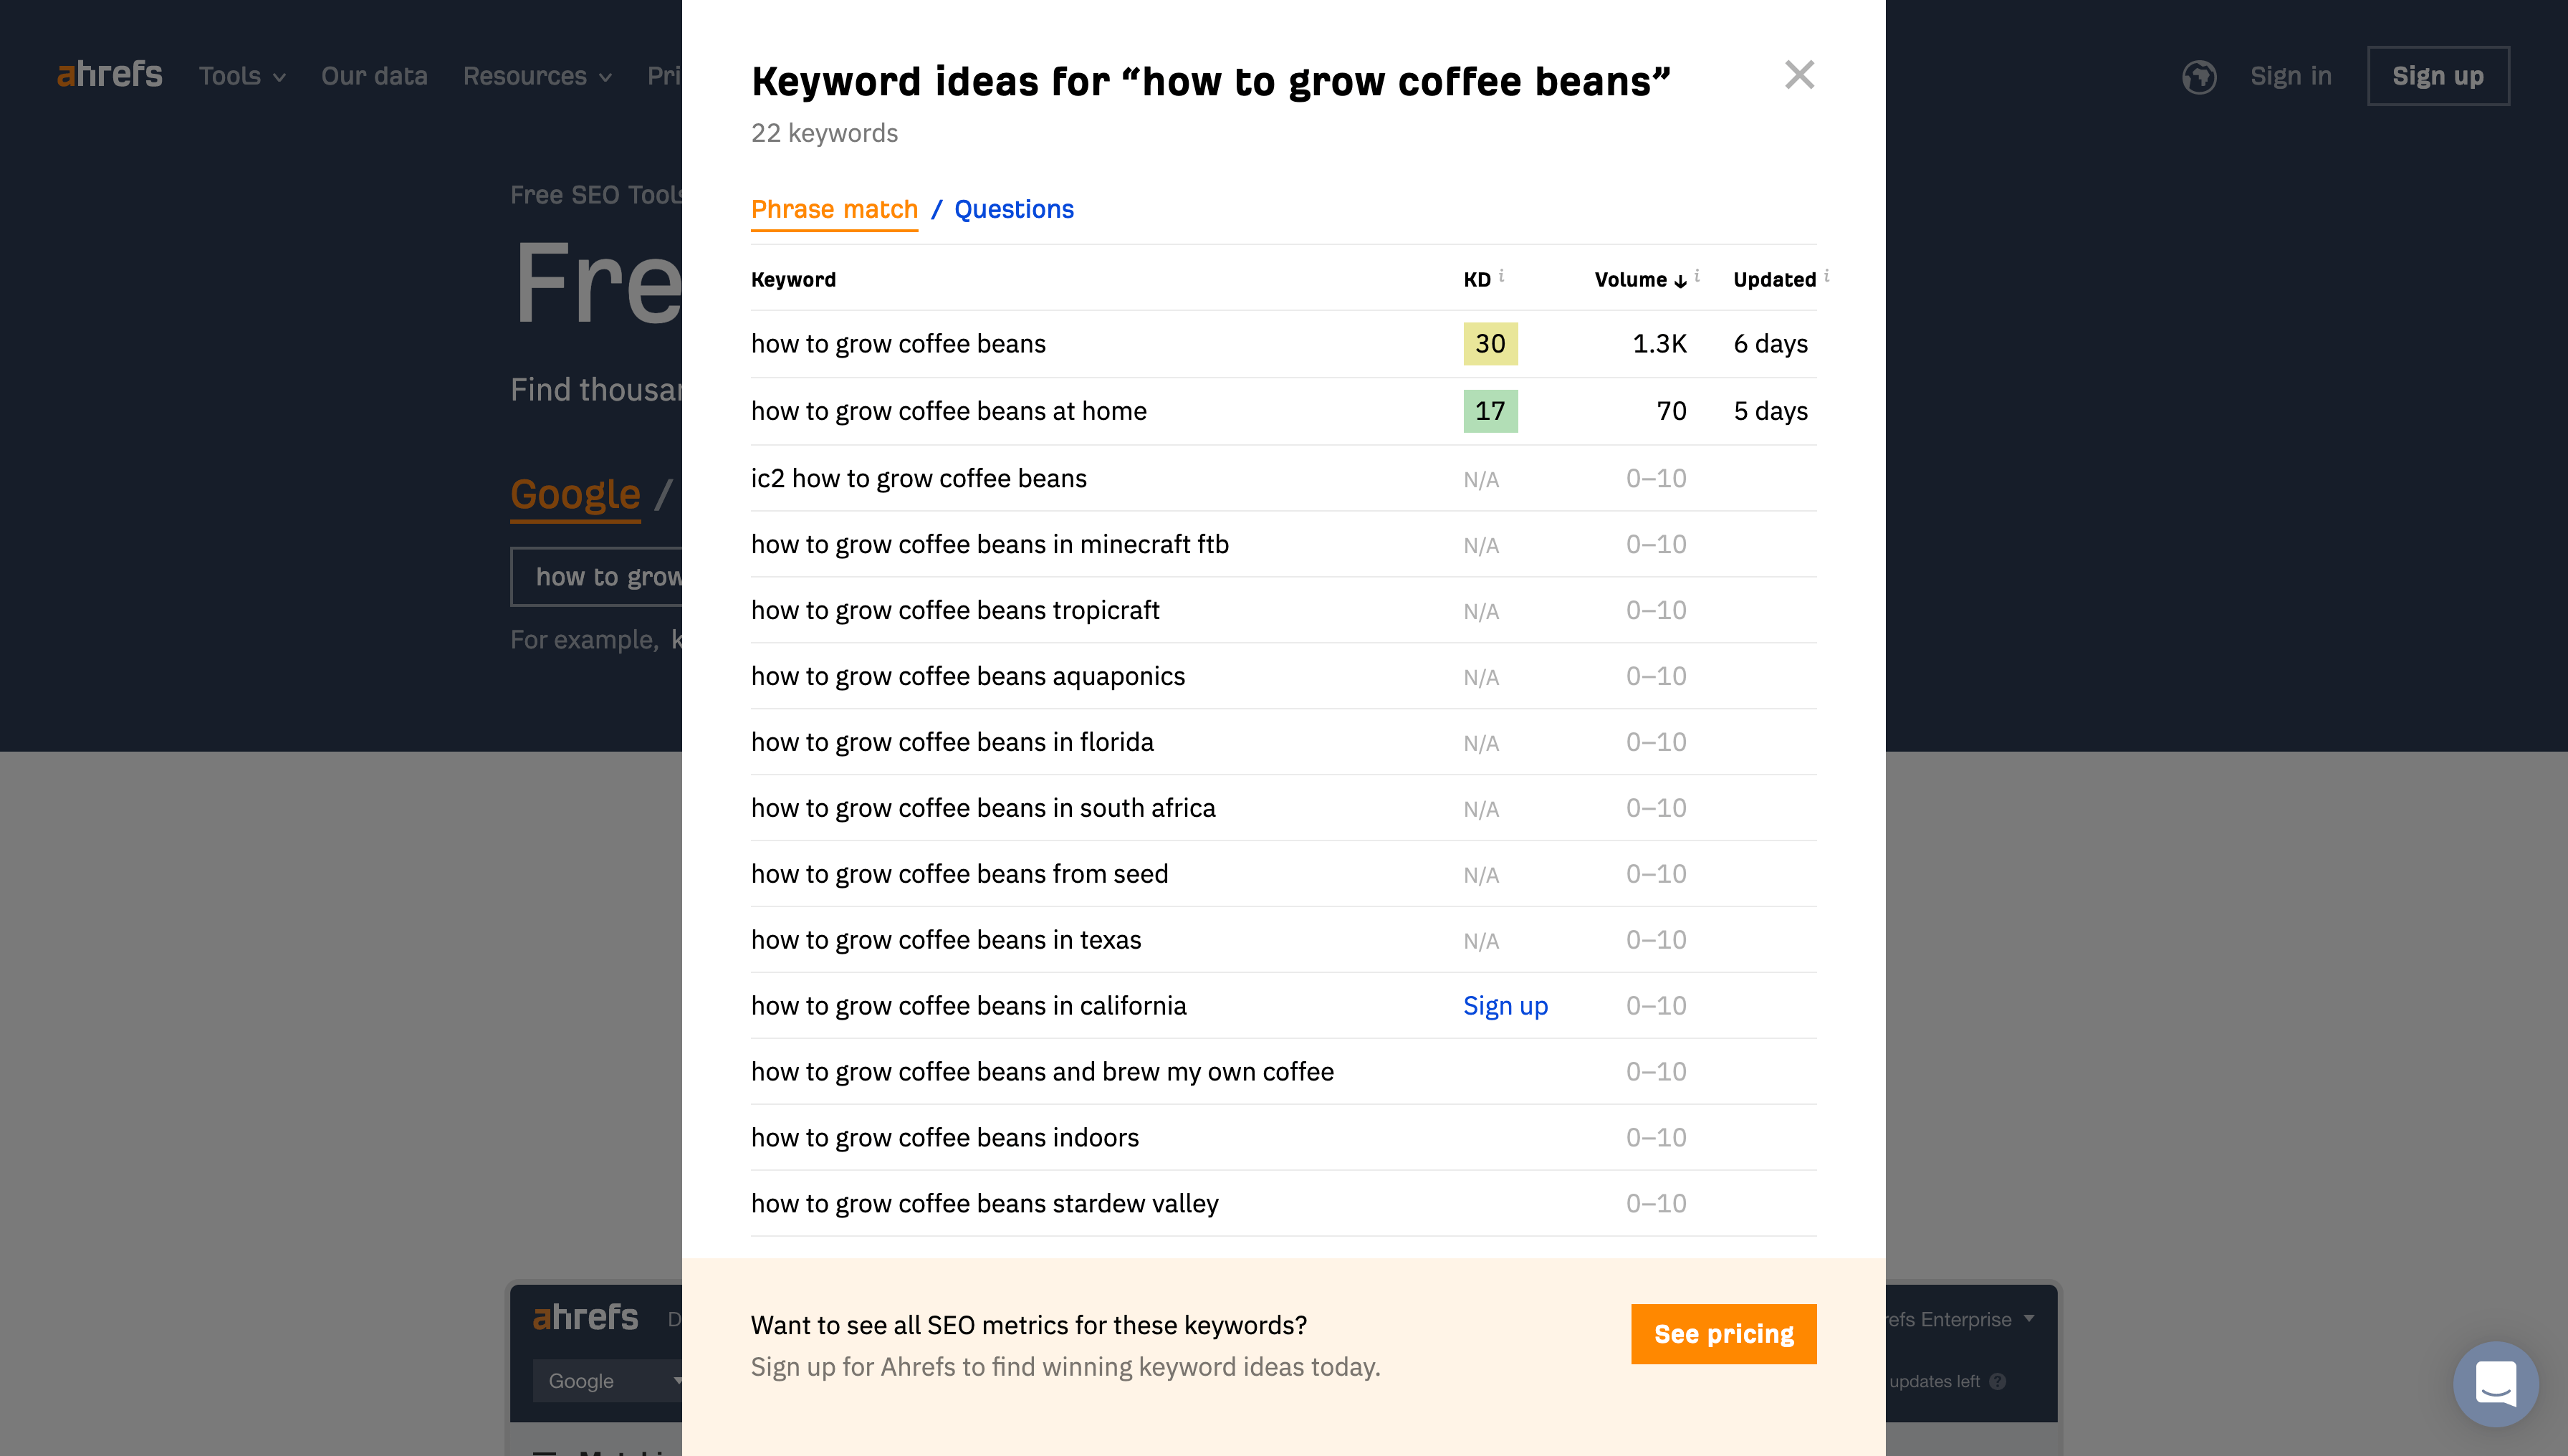
If you’re only going to use their free tool, jump to your template’s ‘Research Tab’ and enter the phrases and questions along with their ‘Volume’ and ‘Difficulty’ that you think would be interesting to consider as part of your blog post, so you have these for reference.
Paid Method
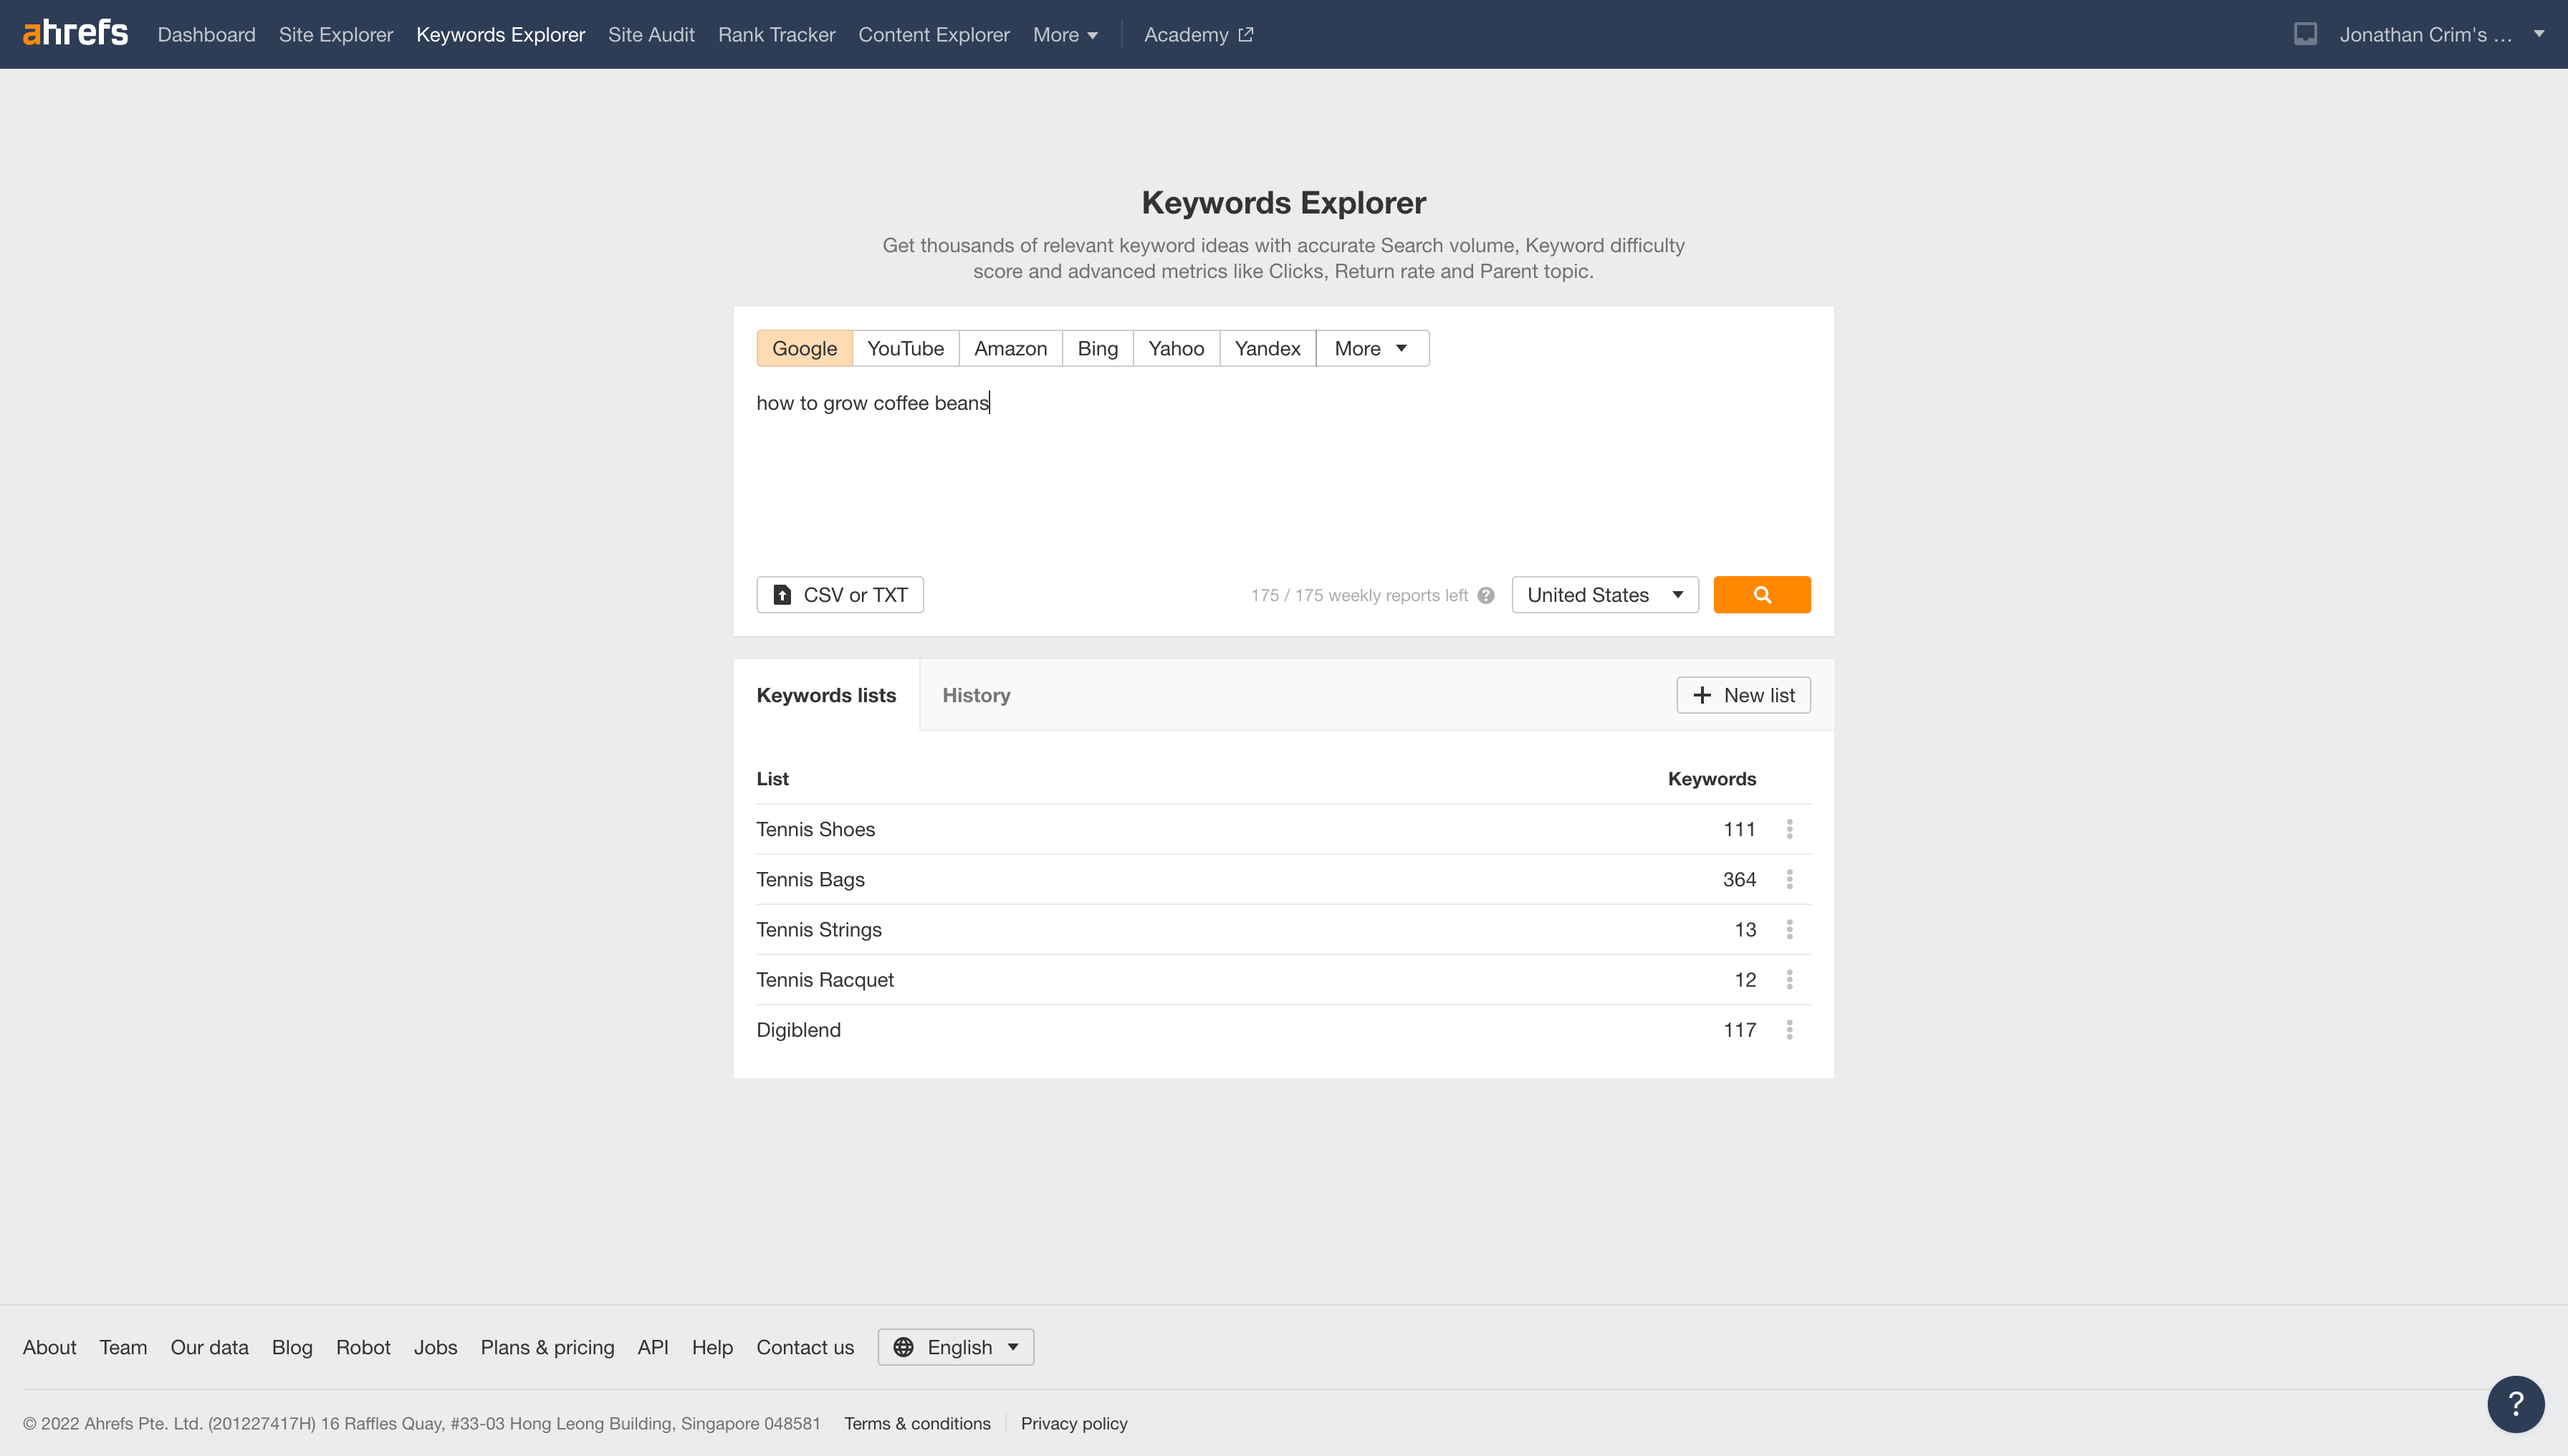
If you have access to a paid Ahrefs account, log in, head to their Keyword Explorer, enter your blog post’s keyword, and click search.
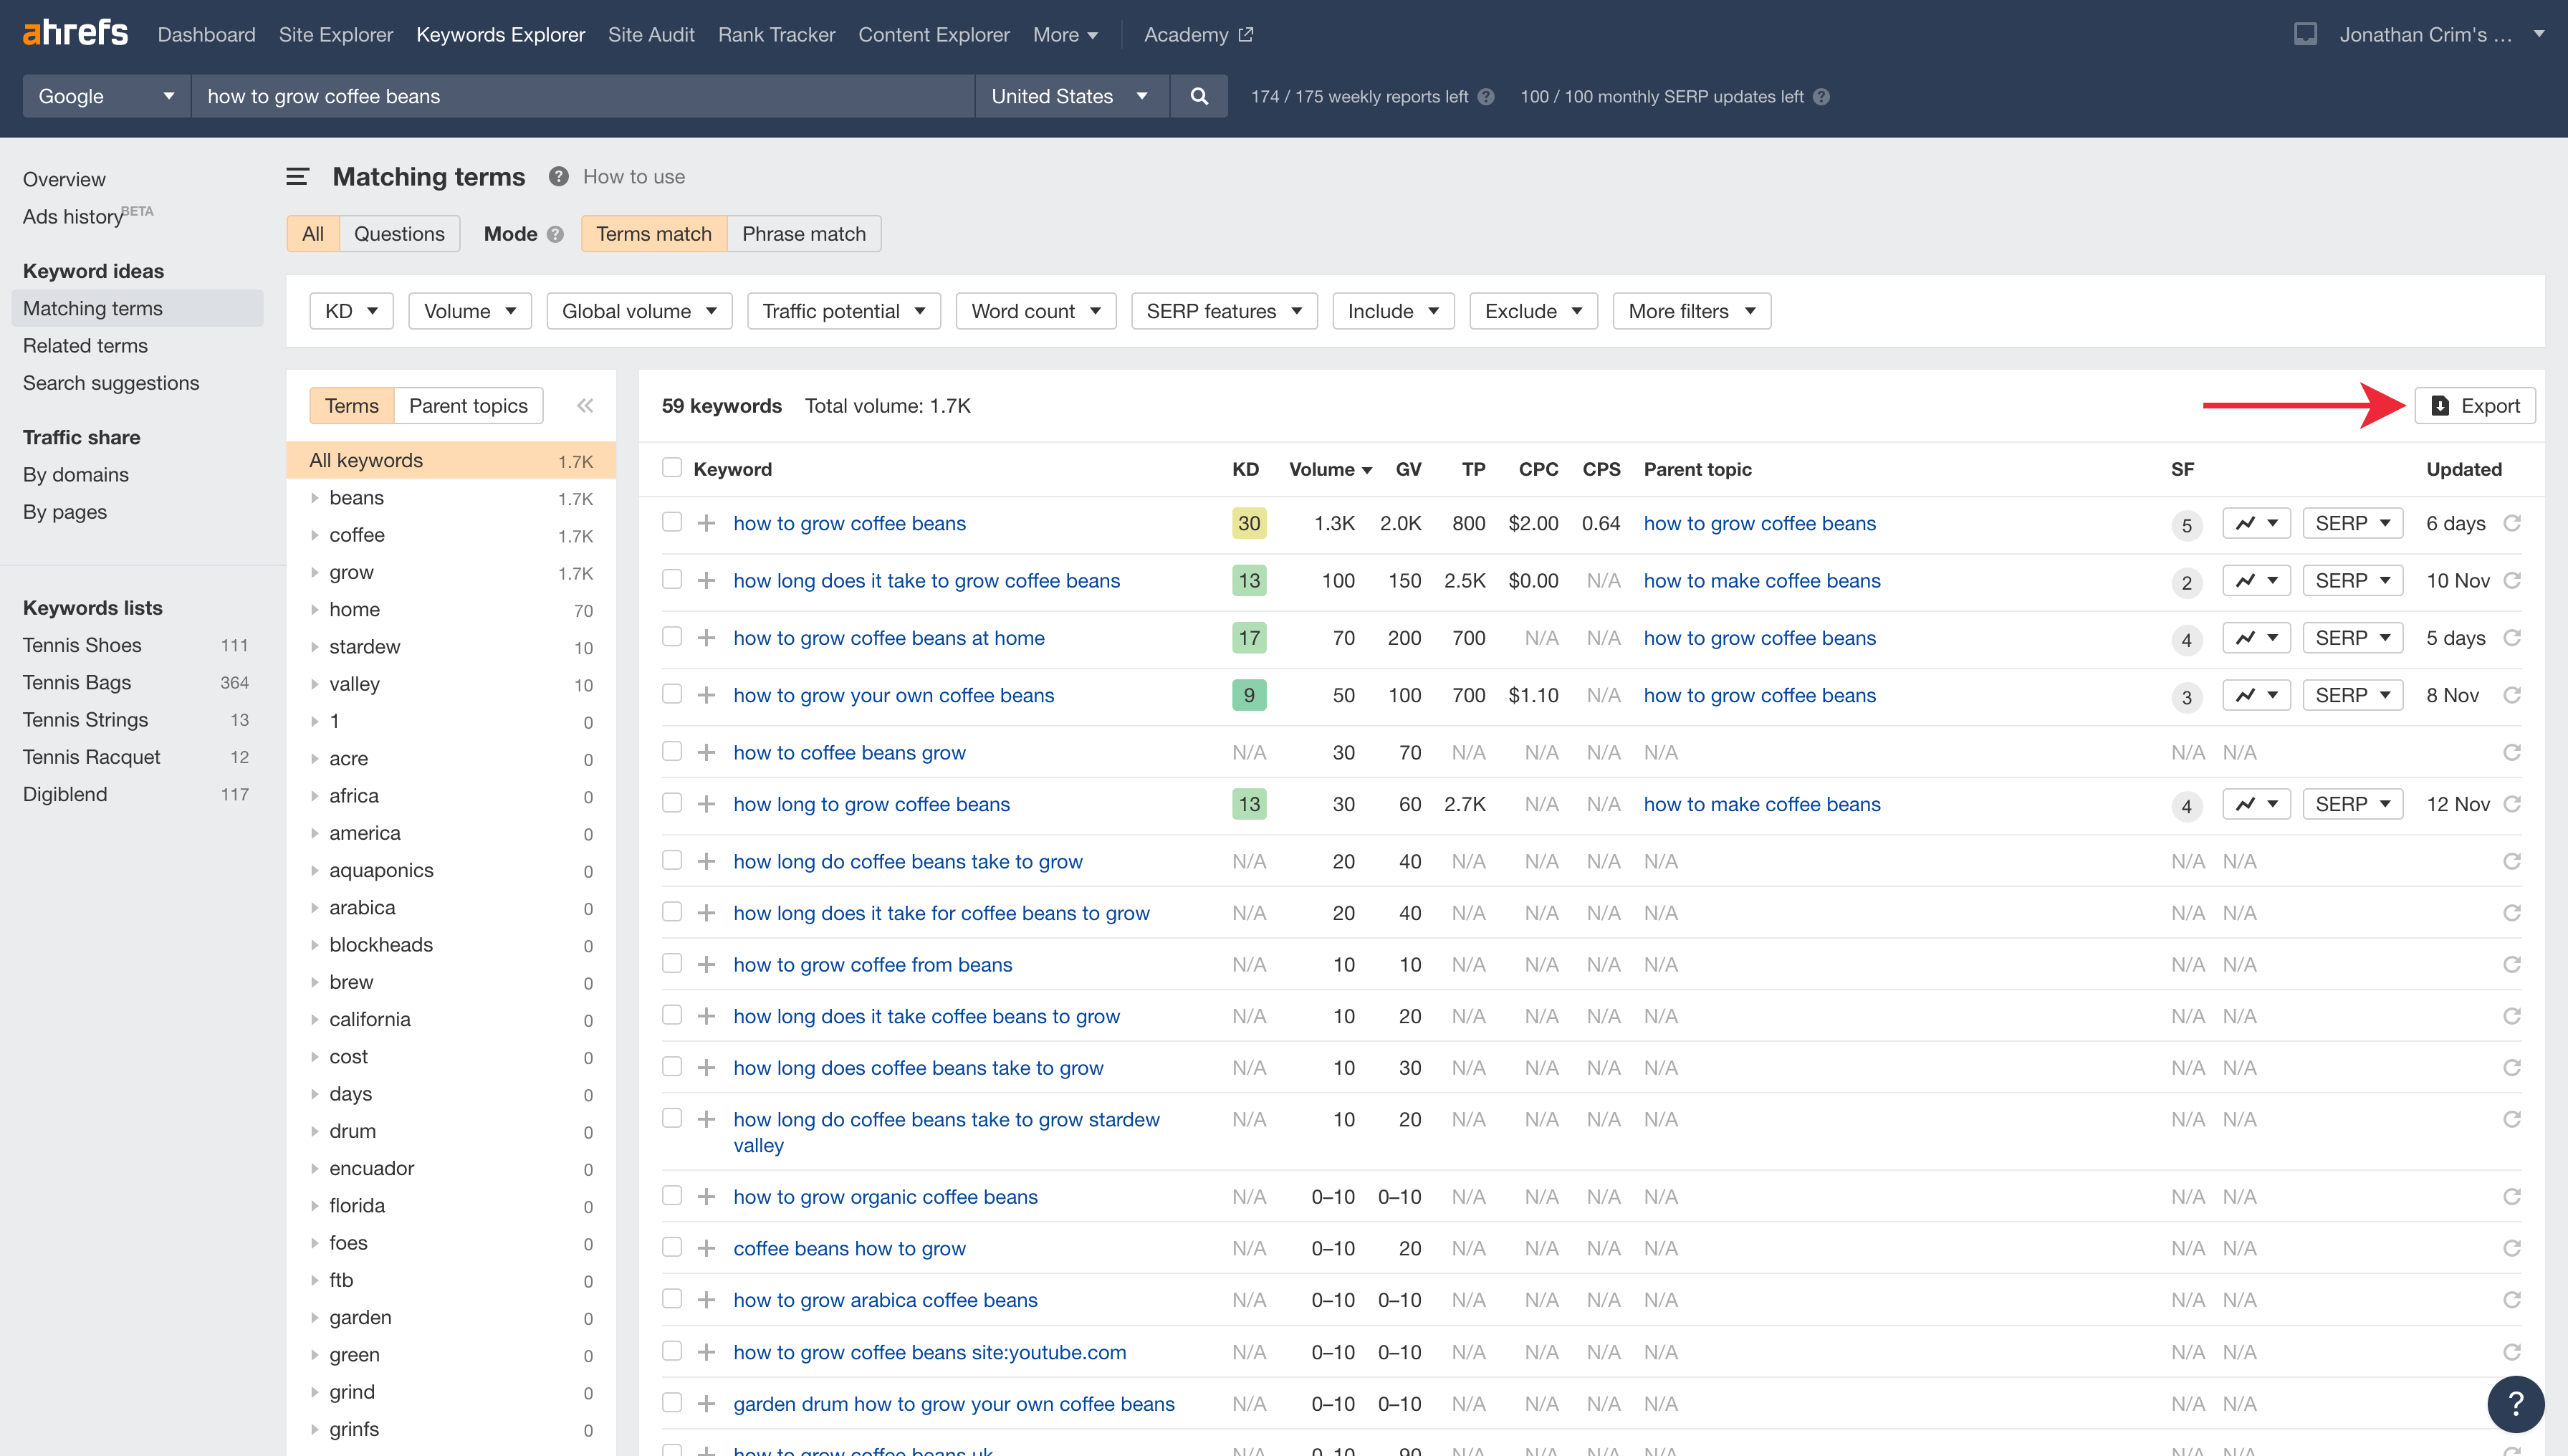
Click ‘Matching Terms’ from the results page in the left-hand navigation.

In this case, there are 59 matching terms. If you have hundreds or thousands of keywords, filter them down using a minimum volume, such as 10, 20, 50, or 100. Start with a lower volume filter and aim to trim the list of keywords to around 100.

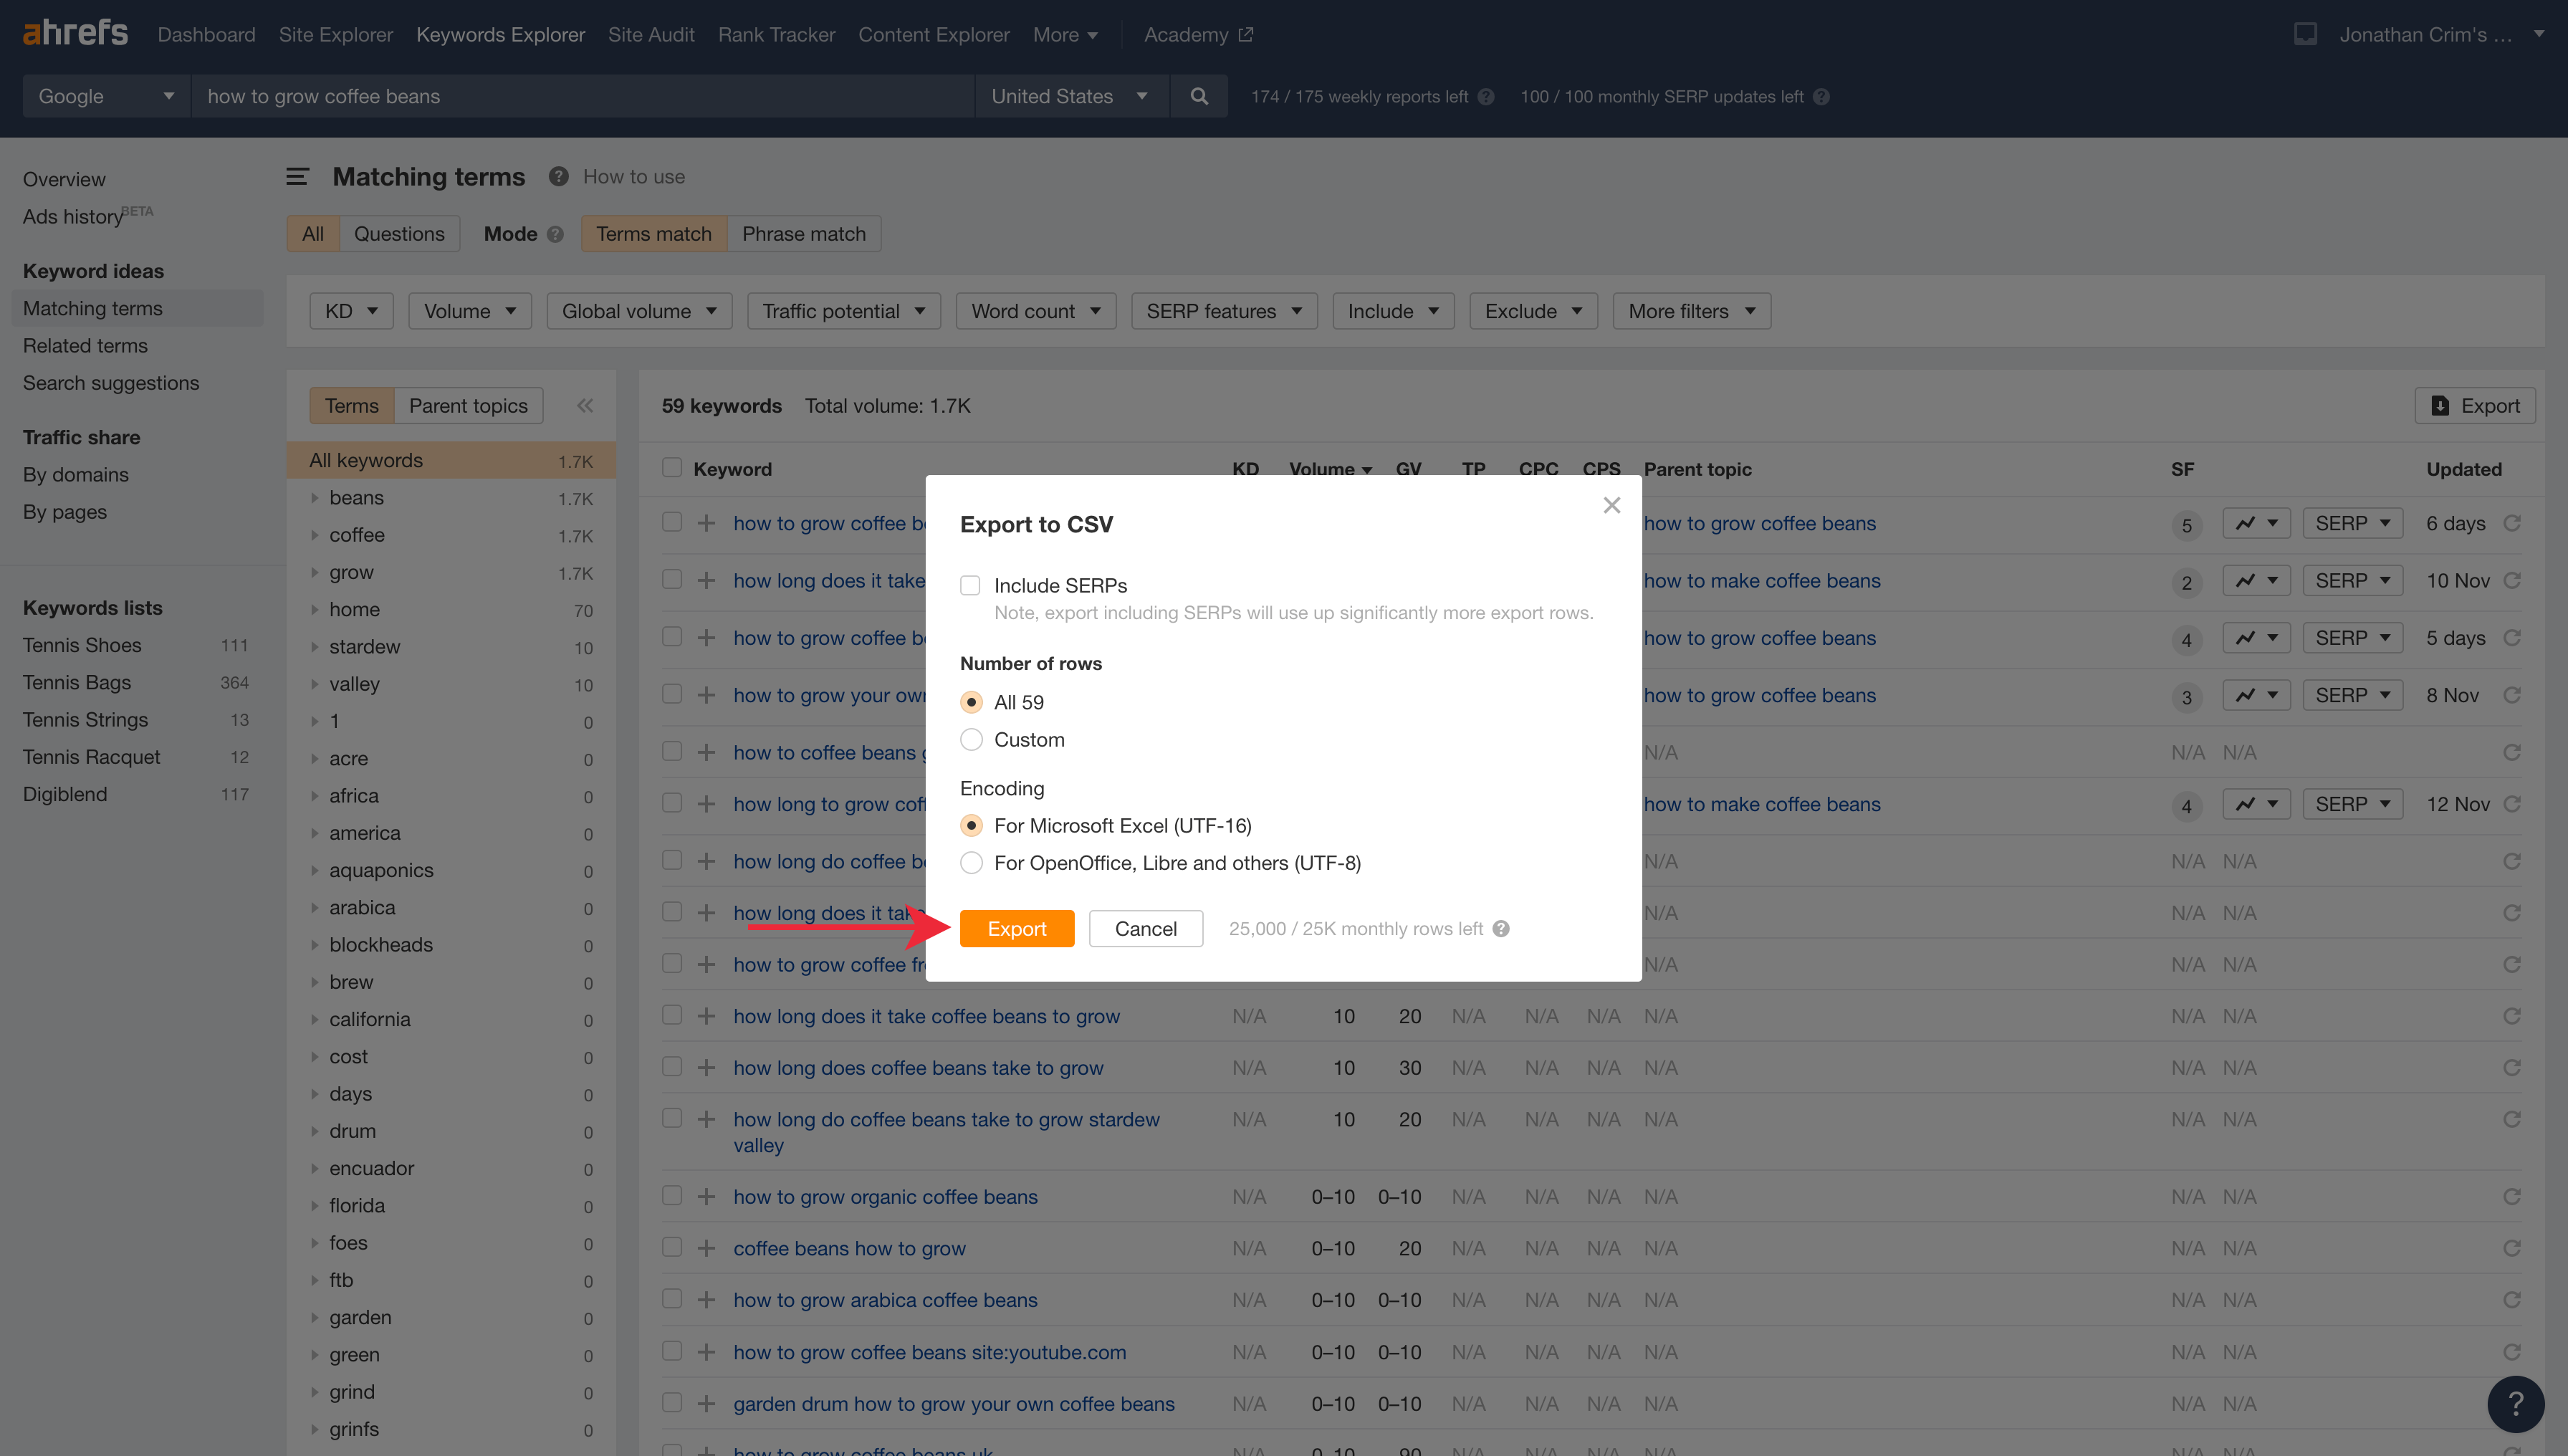
Once you have your list of matching terms, click the ‘Export’ button.
Then click once more to ‘Export’ the list.
Now, jump to your template and select the ‘Keyword Data’ tab.

Select ‘File > Import’ in Google Sheets to import the keywords.
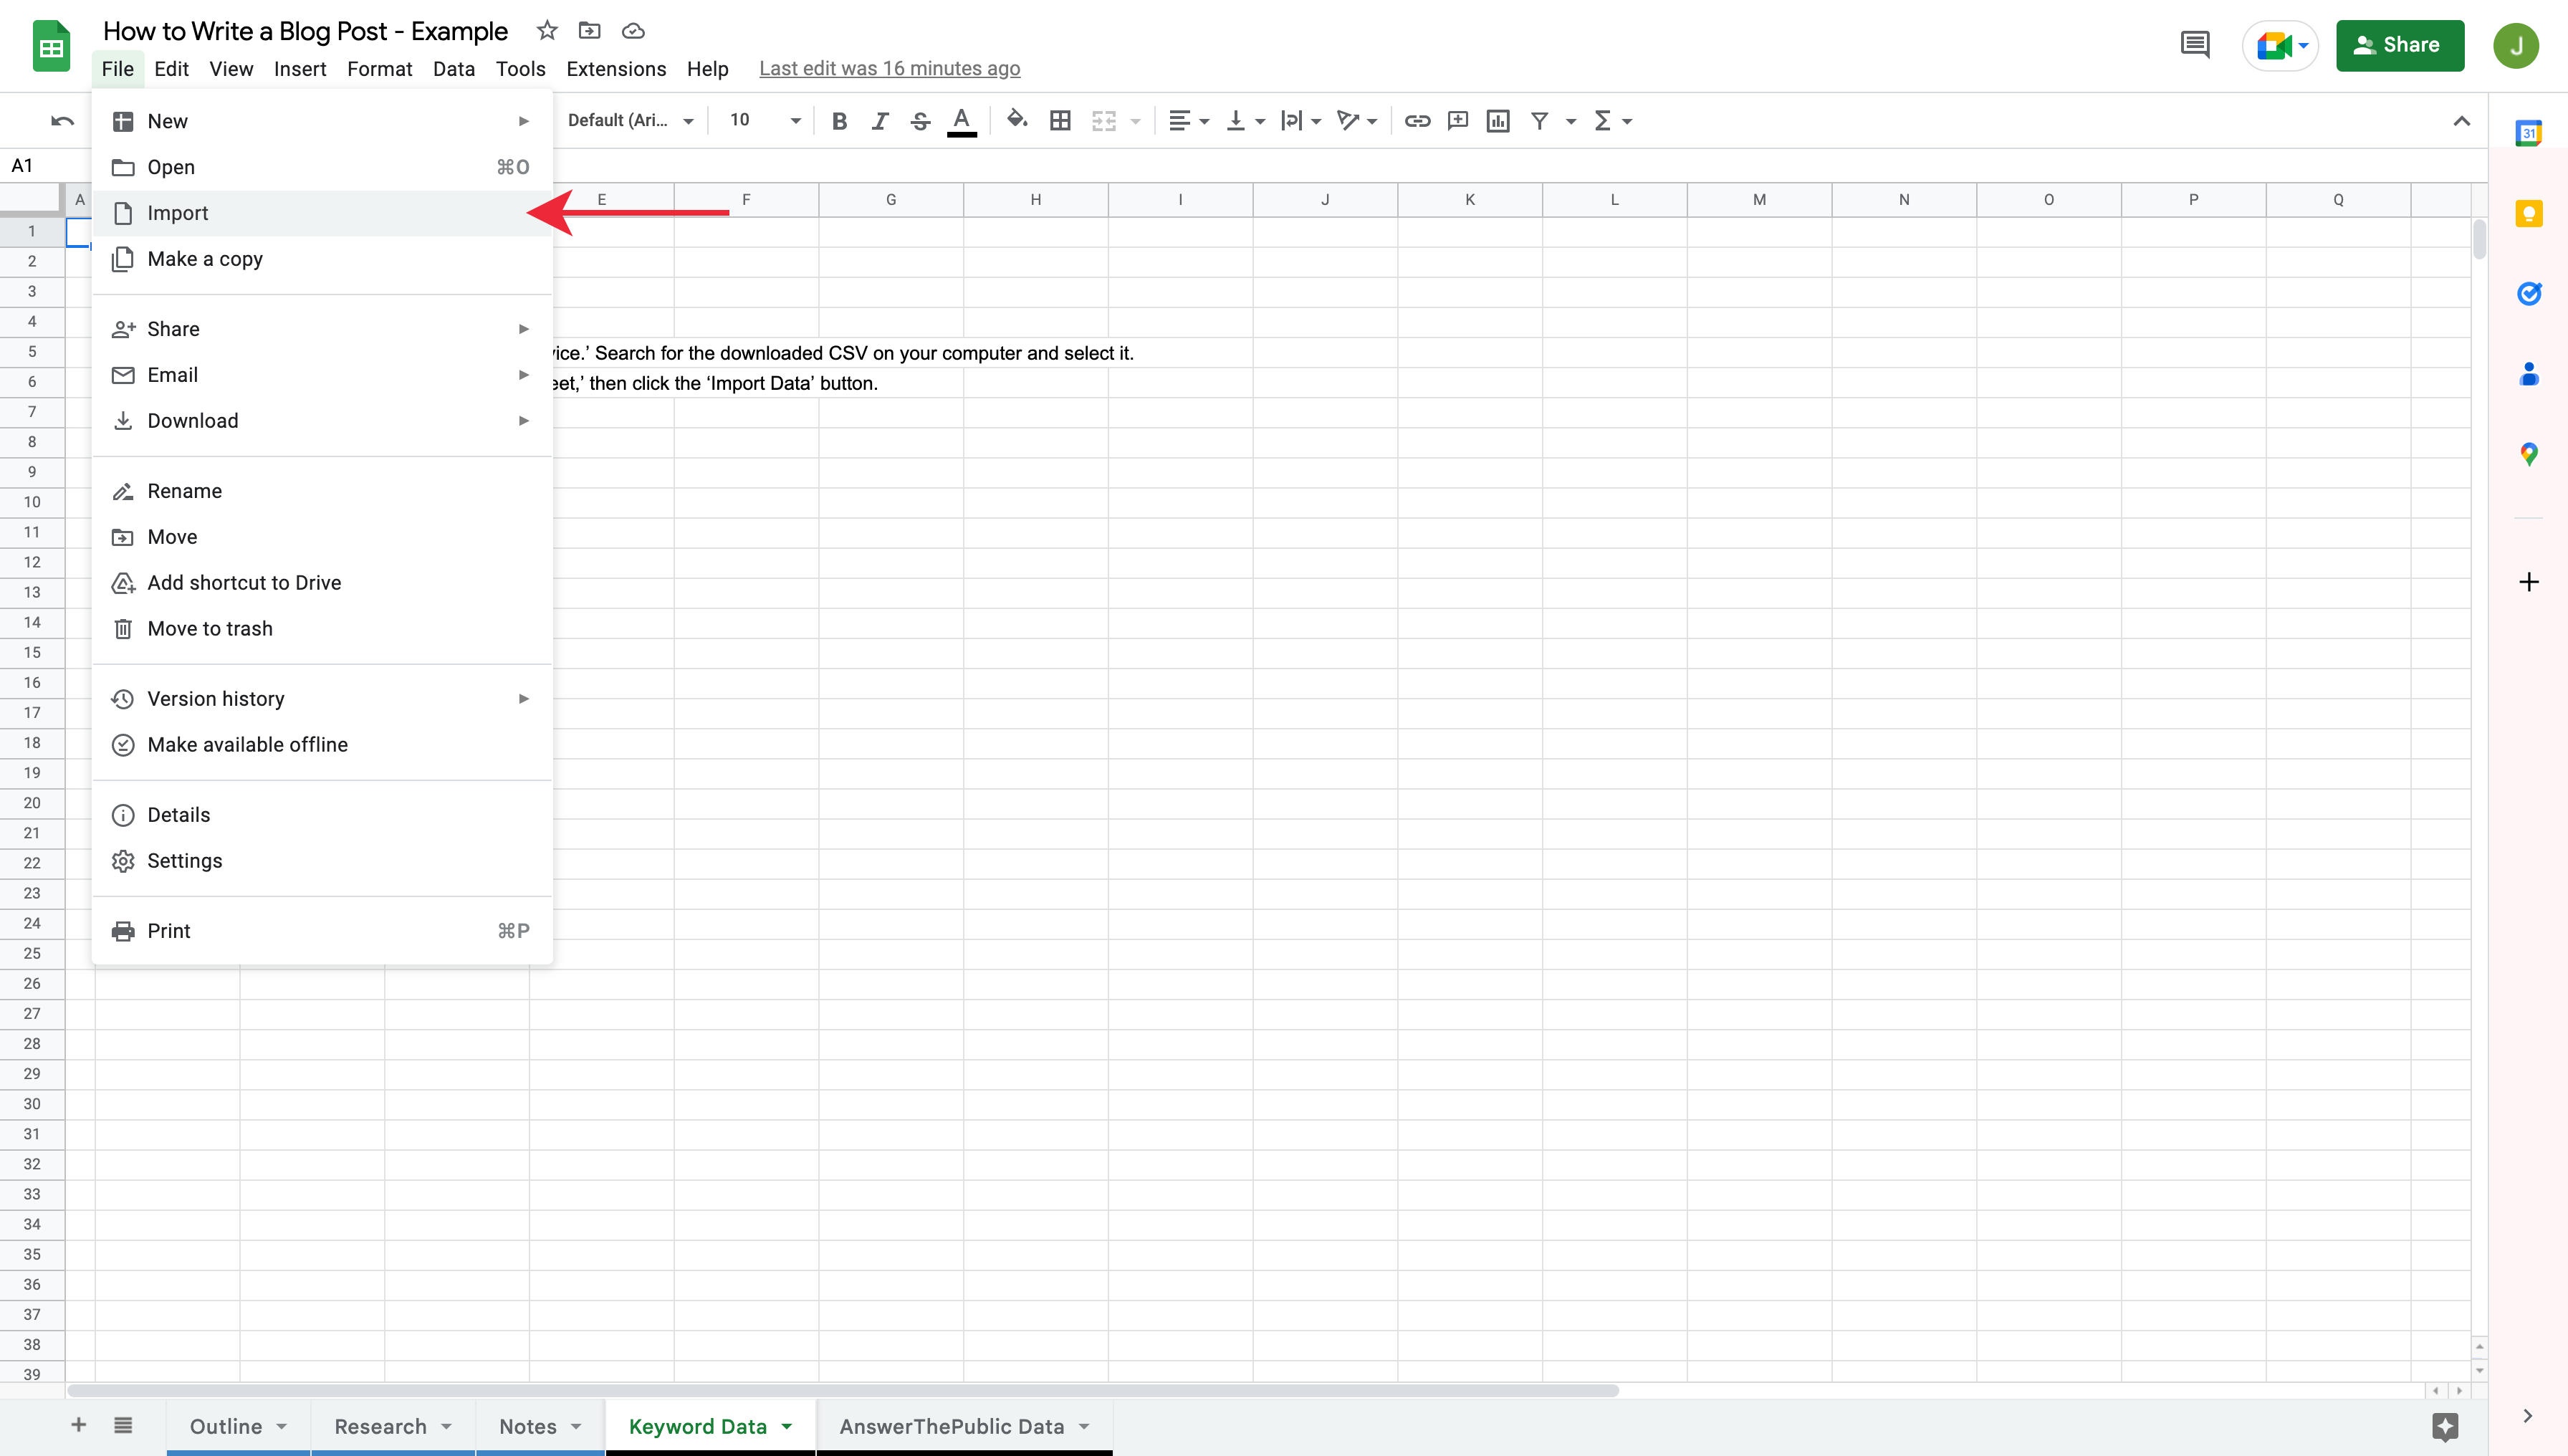
Click ‘Upload’ and ‘Select a File From Your Device.’
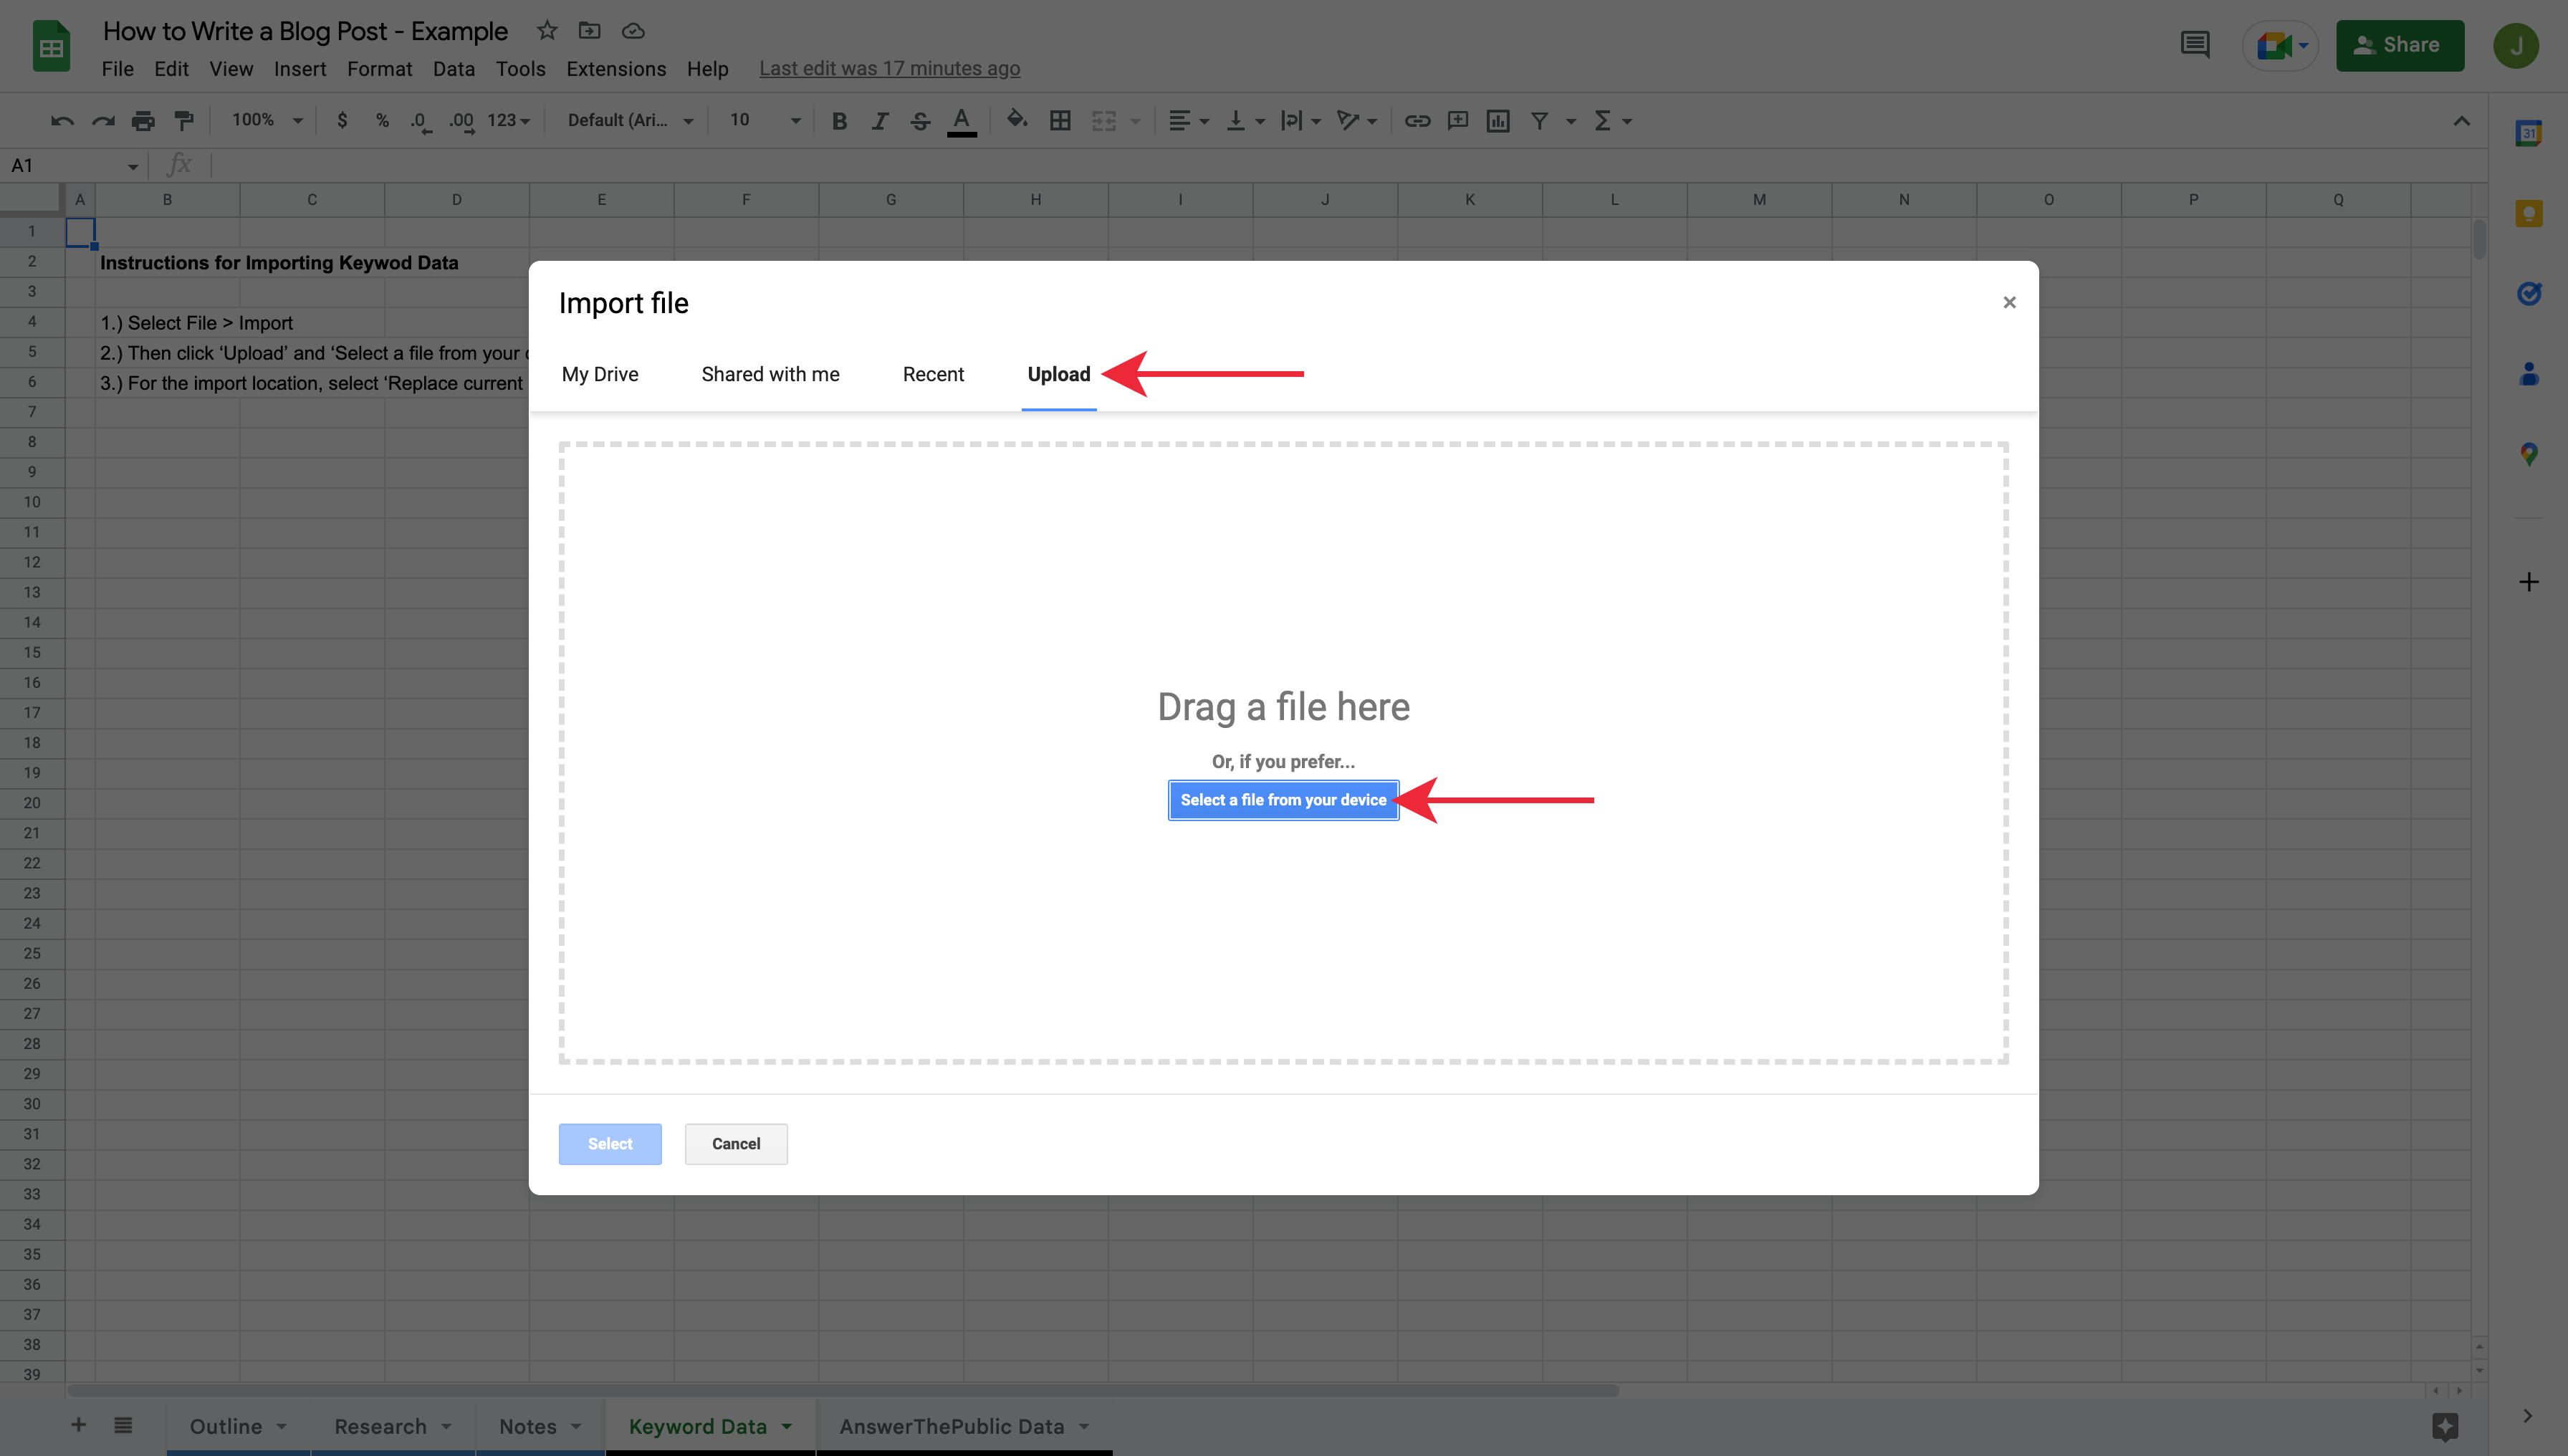
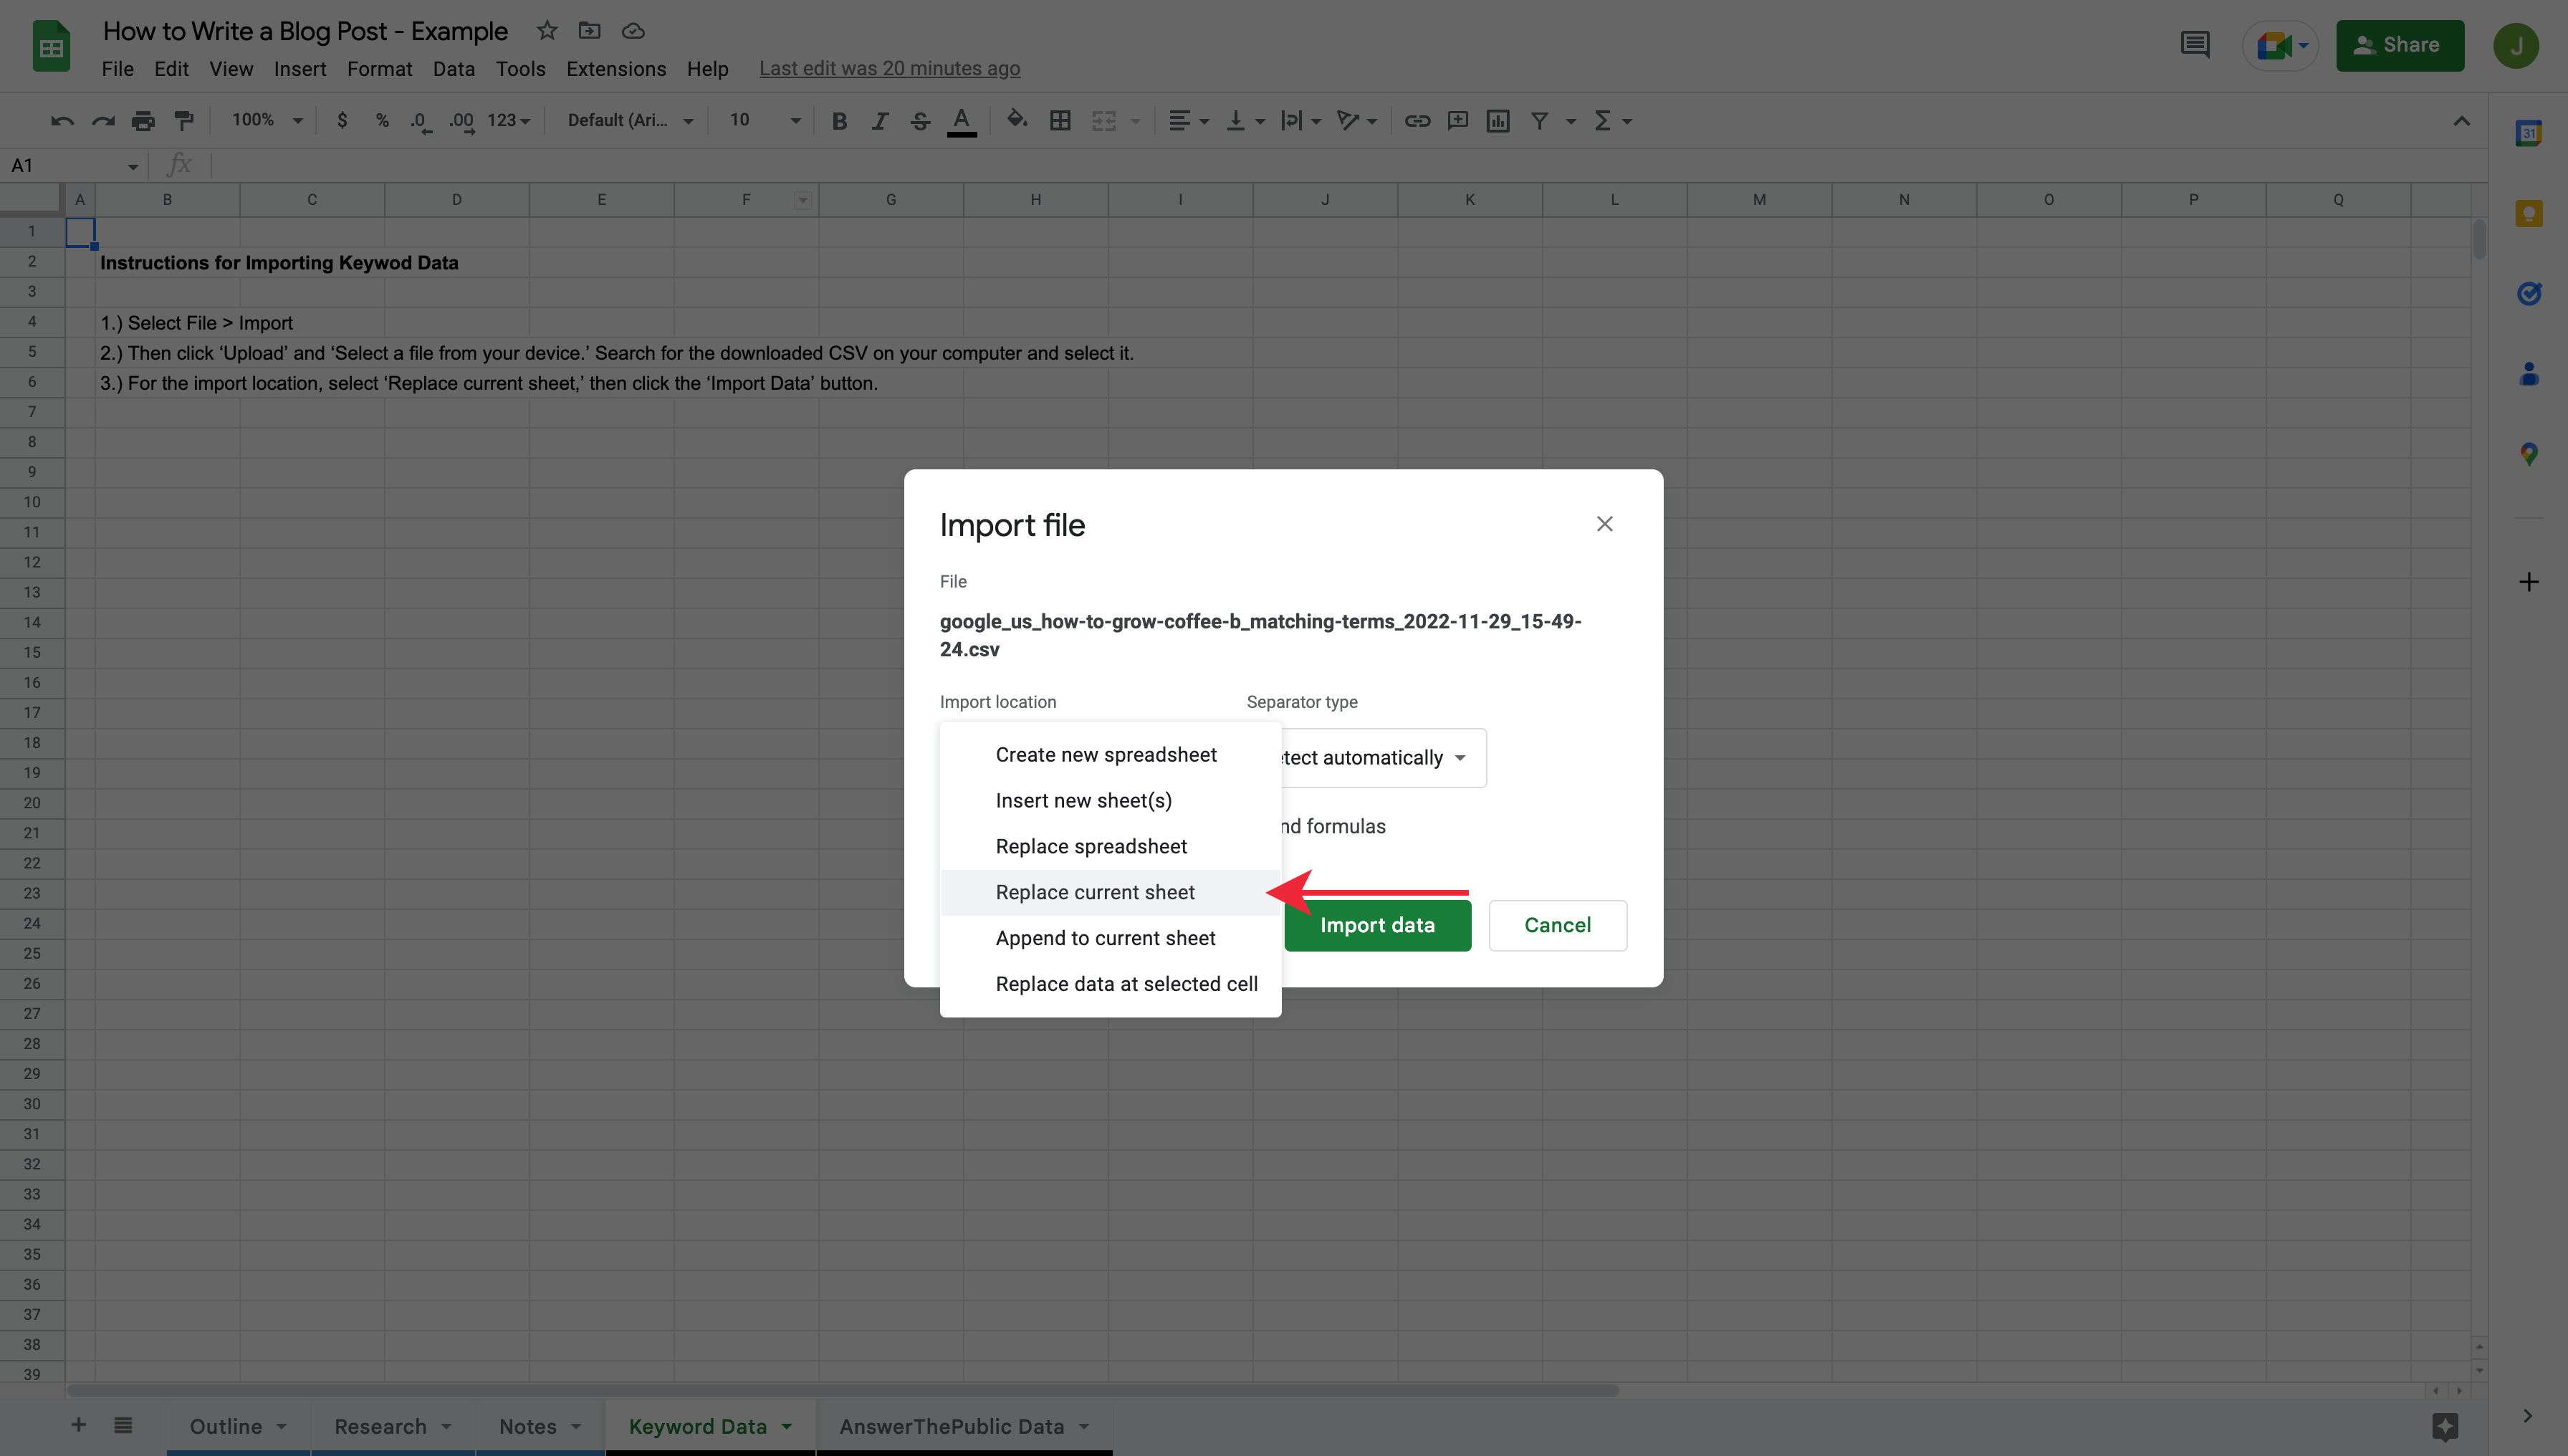
Search for the downloaded CSV on your computer and select it. Finally, select ‘Replace Current Sheet’ as the import location and click the ‘Import Data’ button.
After, all of your keyword data will upload to your spreadsheet.
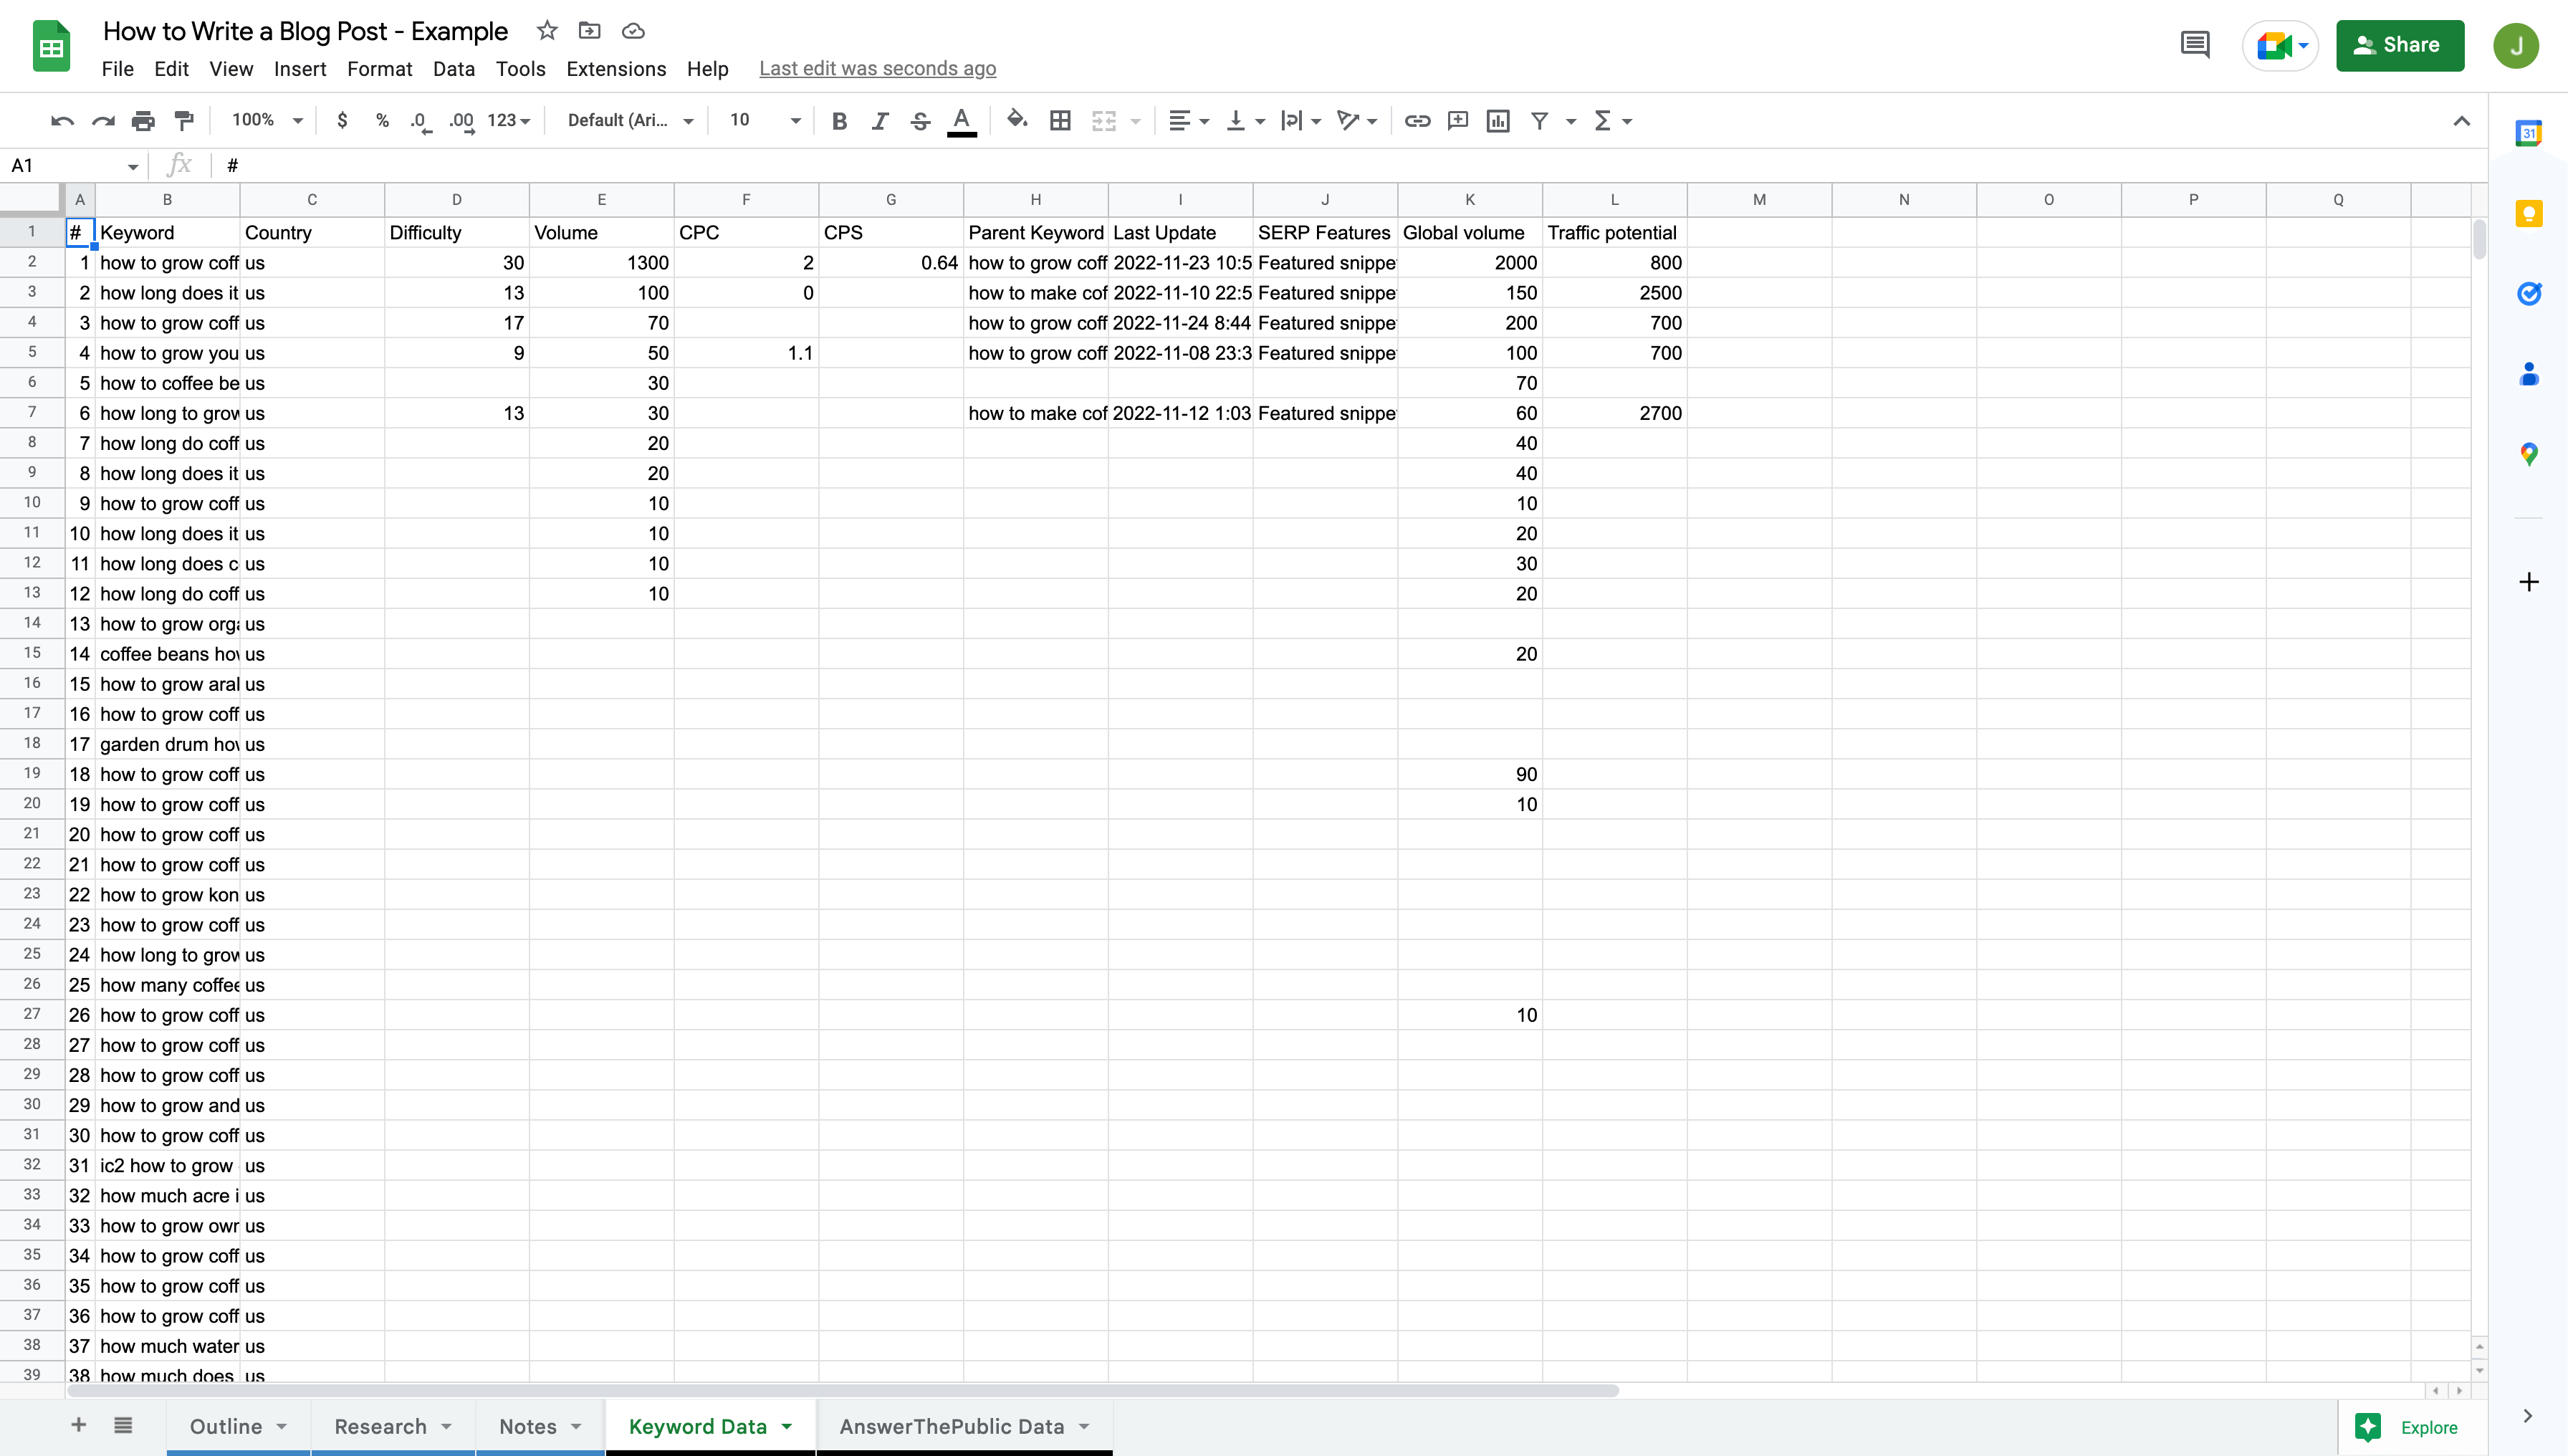
Next up, click to drag the ‘Volume’ and ‘Difficulty’ columns to the right of the ‘Keyword’ column and expand the ‘Keyword’ column.
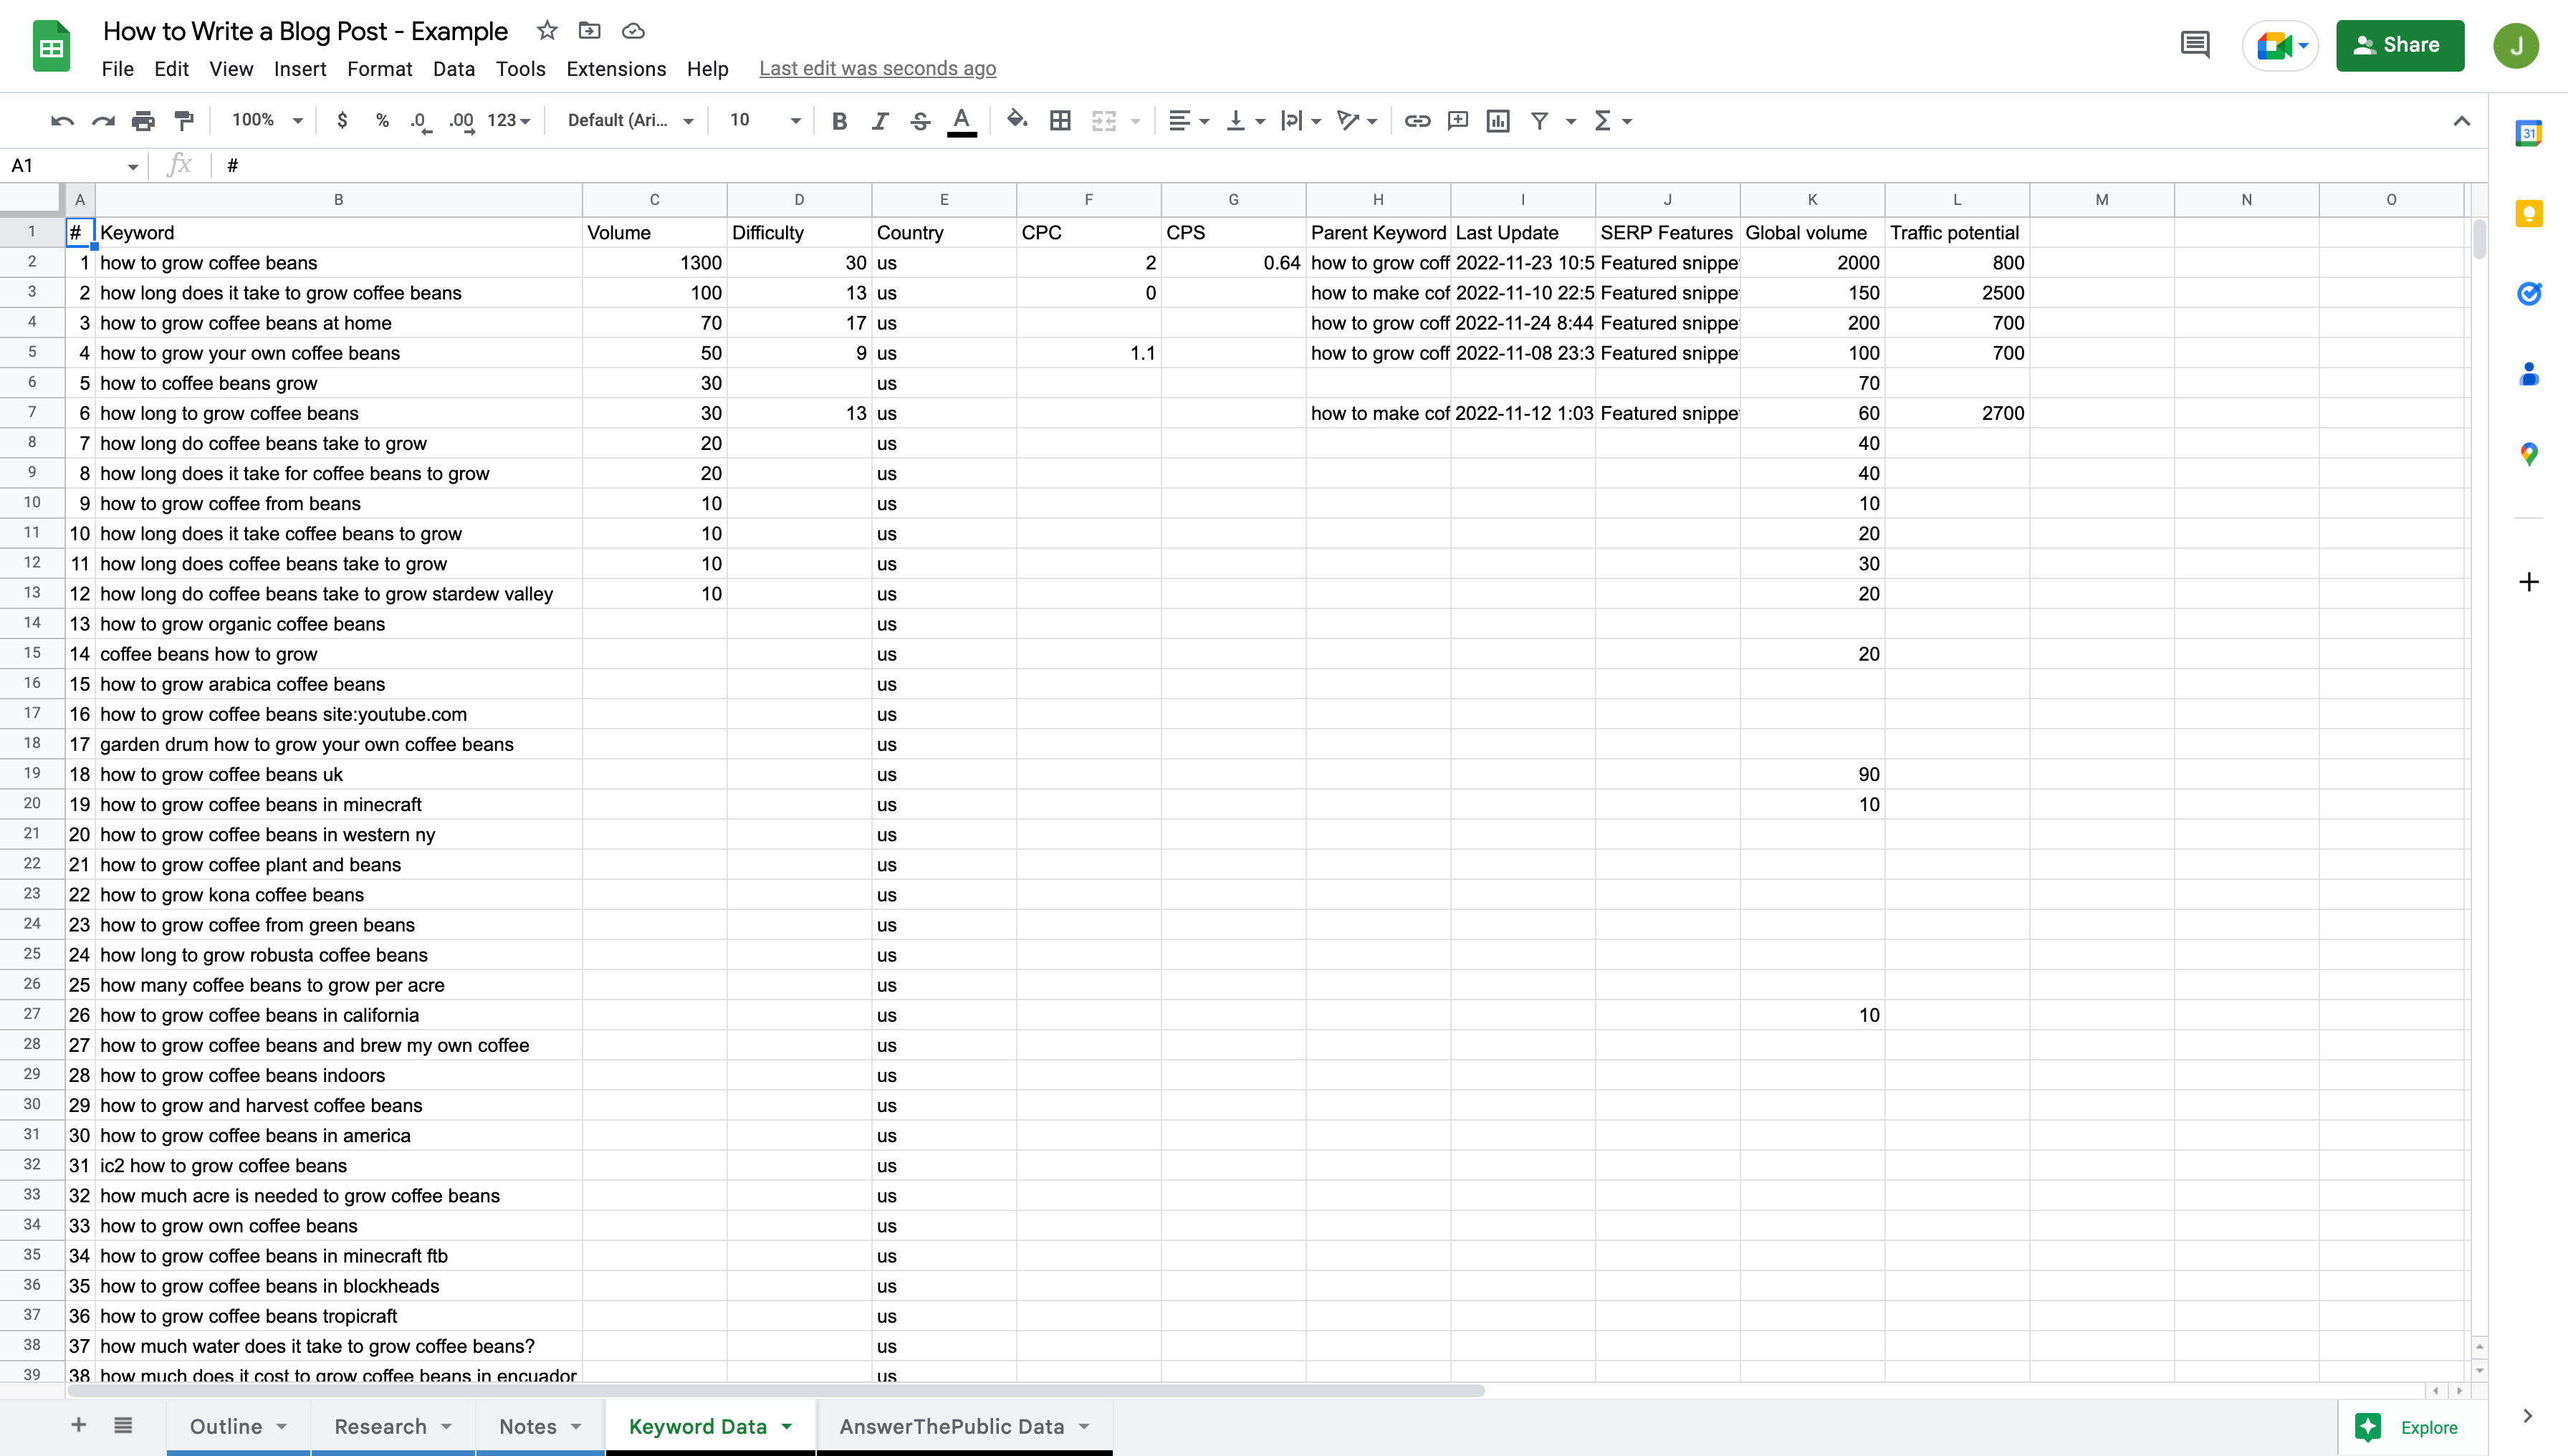
Highlight all the keywords that might be interesting to consider as part of your blog post. If there are duplicates or highly similar keywords, select the one with the most volume.

Then, copy and paste the keywords along with their volume and difficulty into the ‘Research’ tab under the ‘Keyword Tool Data’ section.

You’re all set with your additional keywords, which will be handy as you create your article’s outline.
Find Related Questions
To learn more about the questions people are asking regarding the topic for your blog post, we’ll use AnswerThePublic.
It’s a paid tool, but they’ll allow you to perform a few searches a day for free, so head to their website and enter your keyword.

Then, hit ‘Search’ to view results.
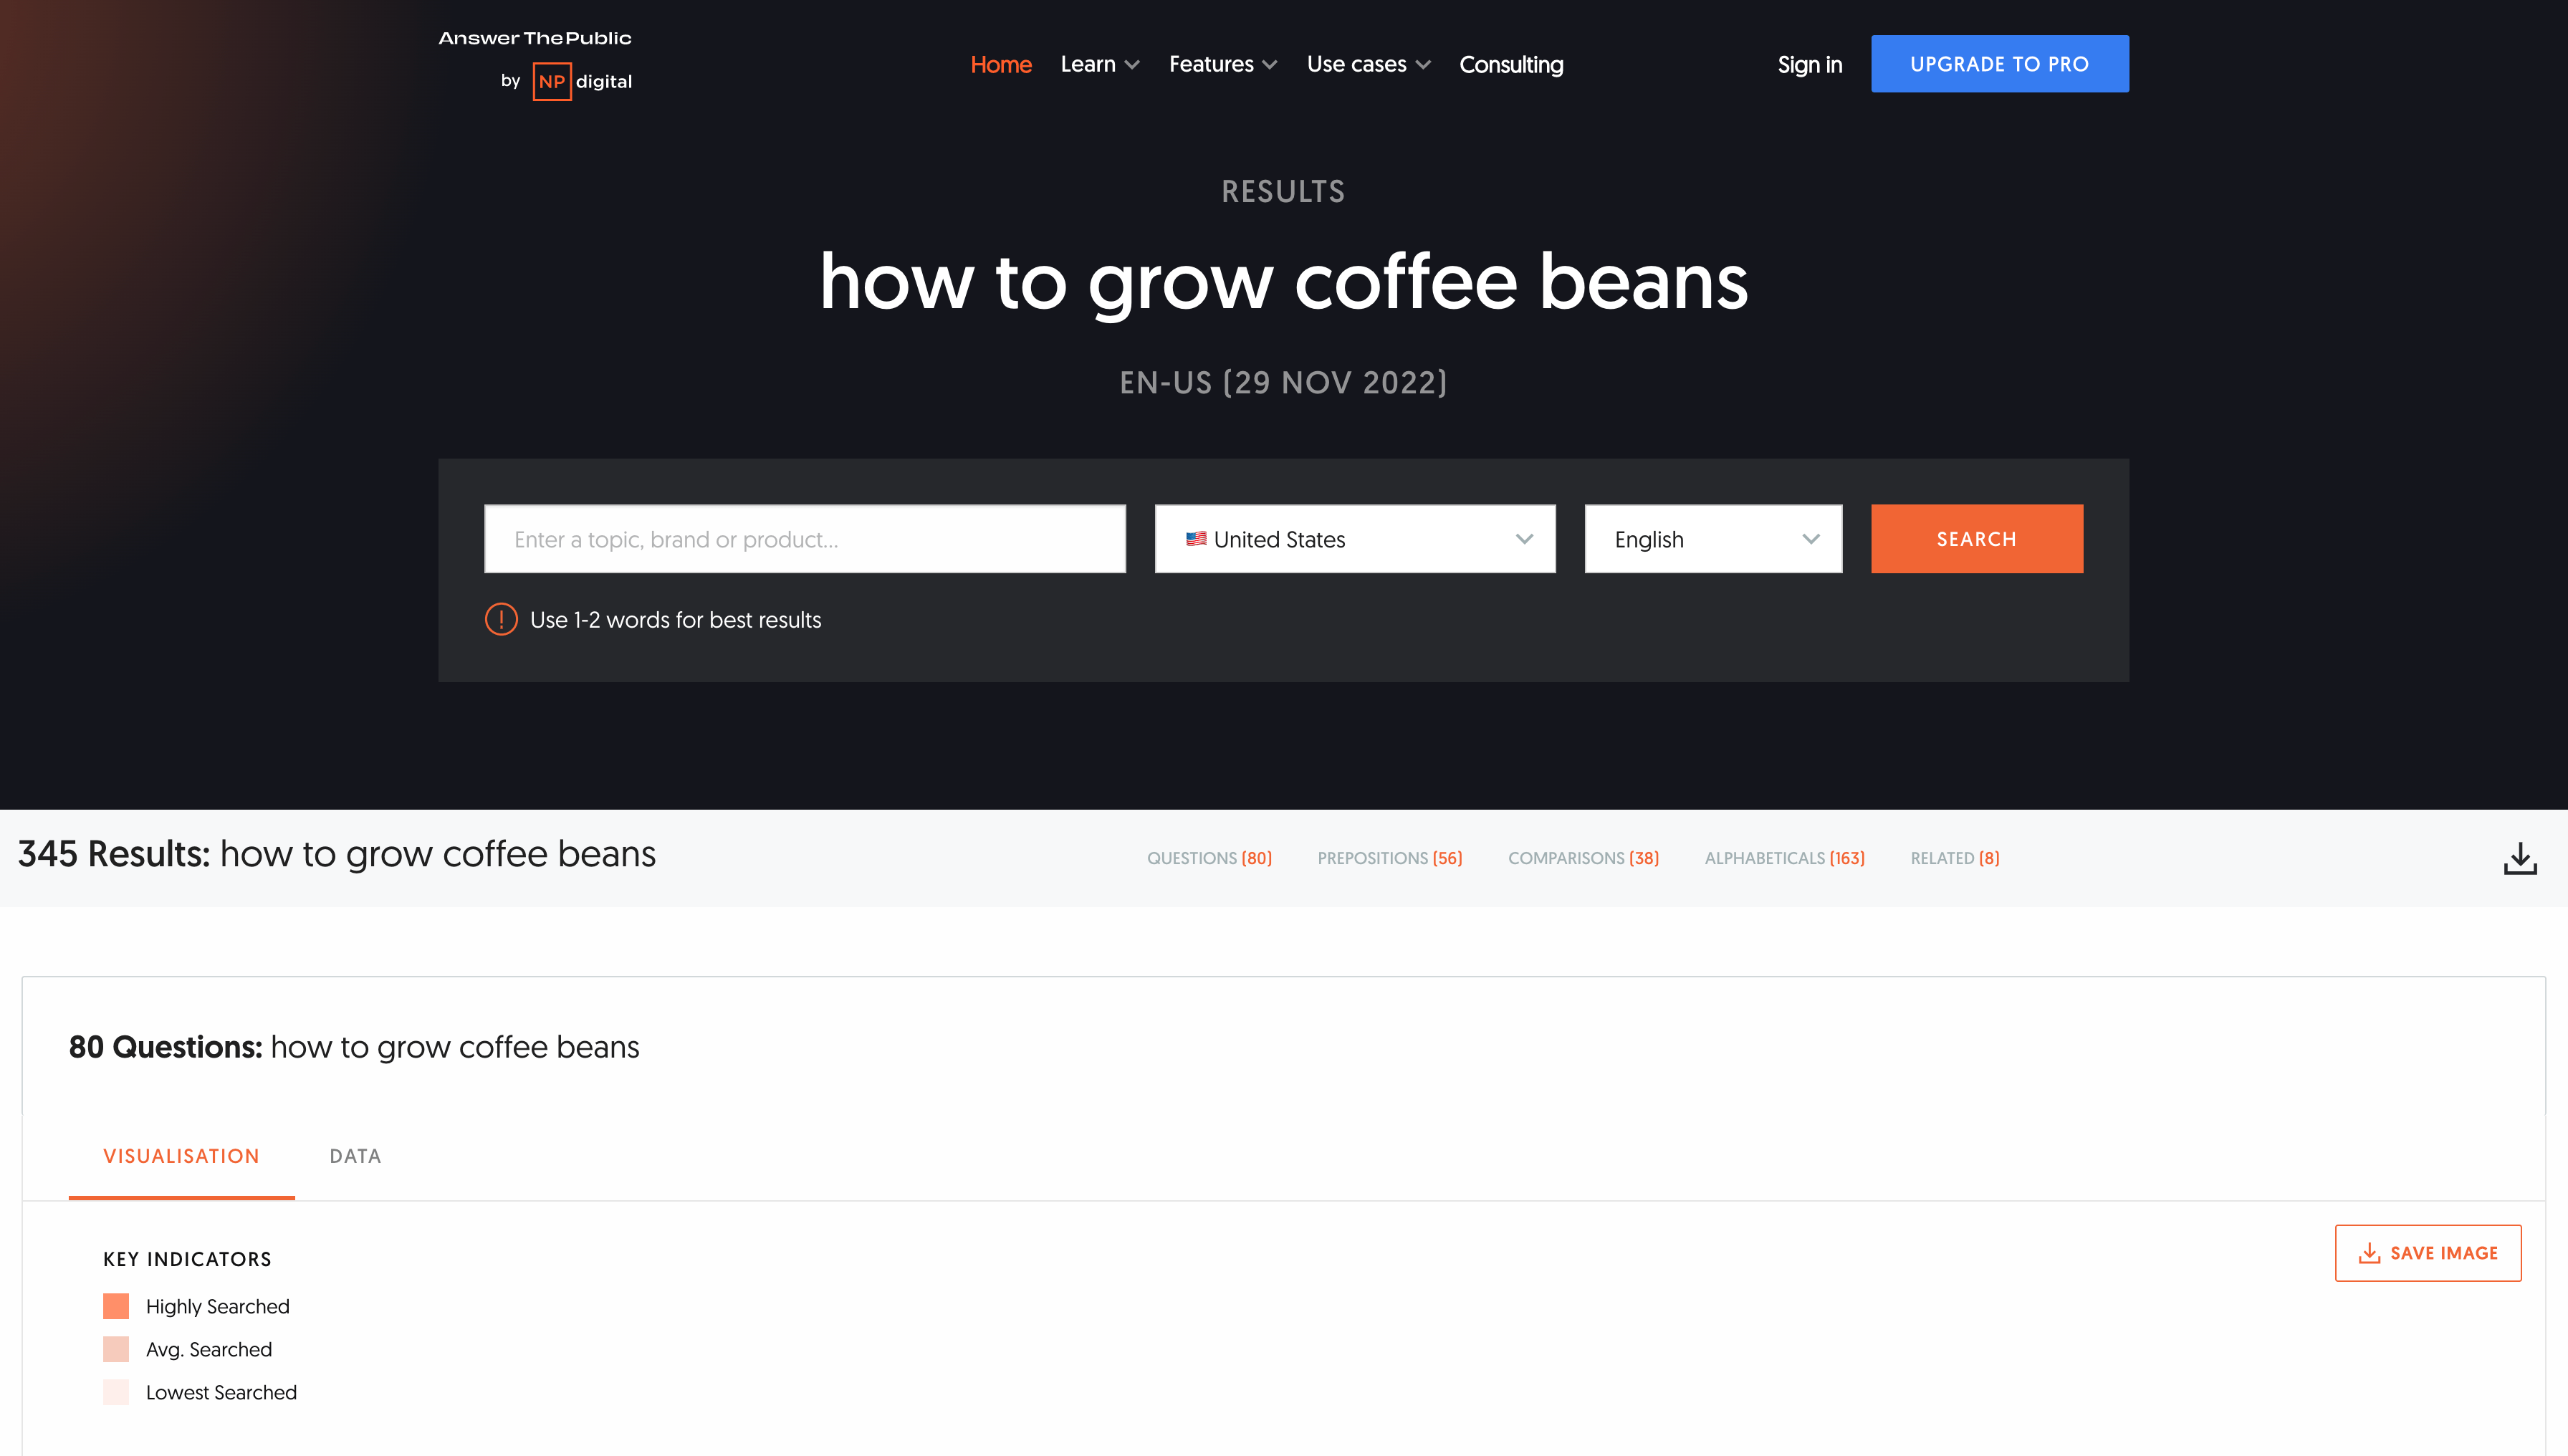
From the results page, click the ‘Export’ button.
Head back to your blog post template, select the ‘AnswerThePublic Data’ tab, and import the data following the same steps from the previous section for your additional keyword data.
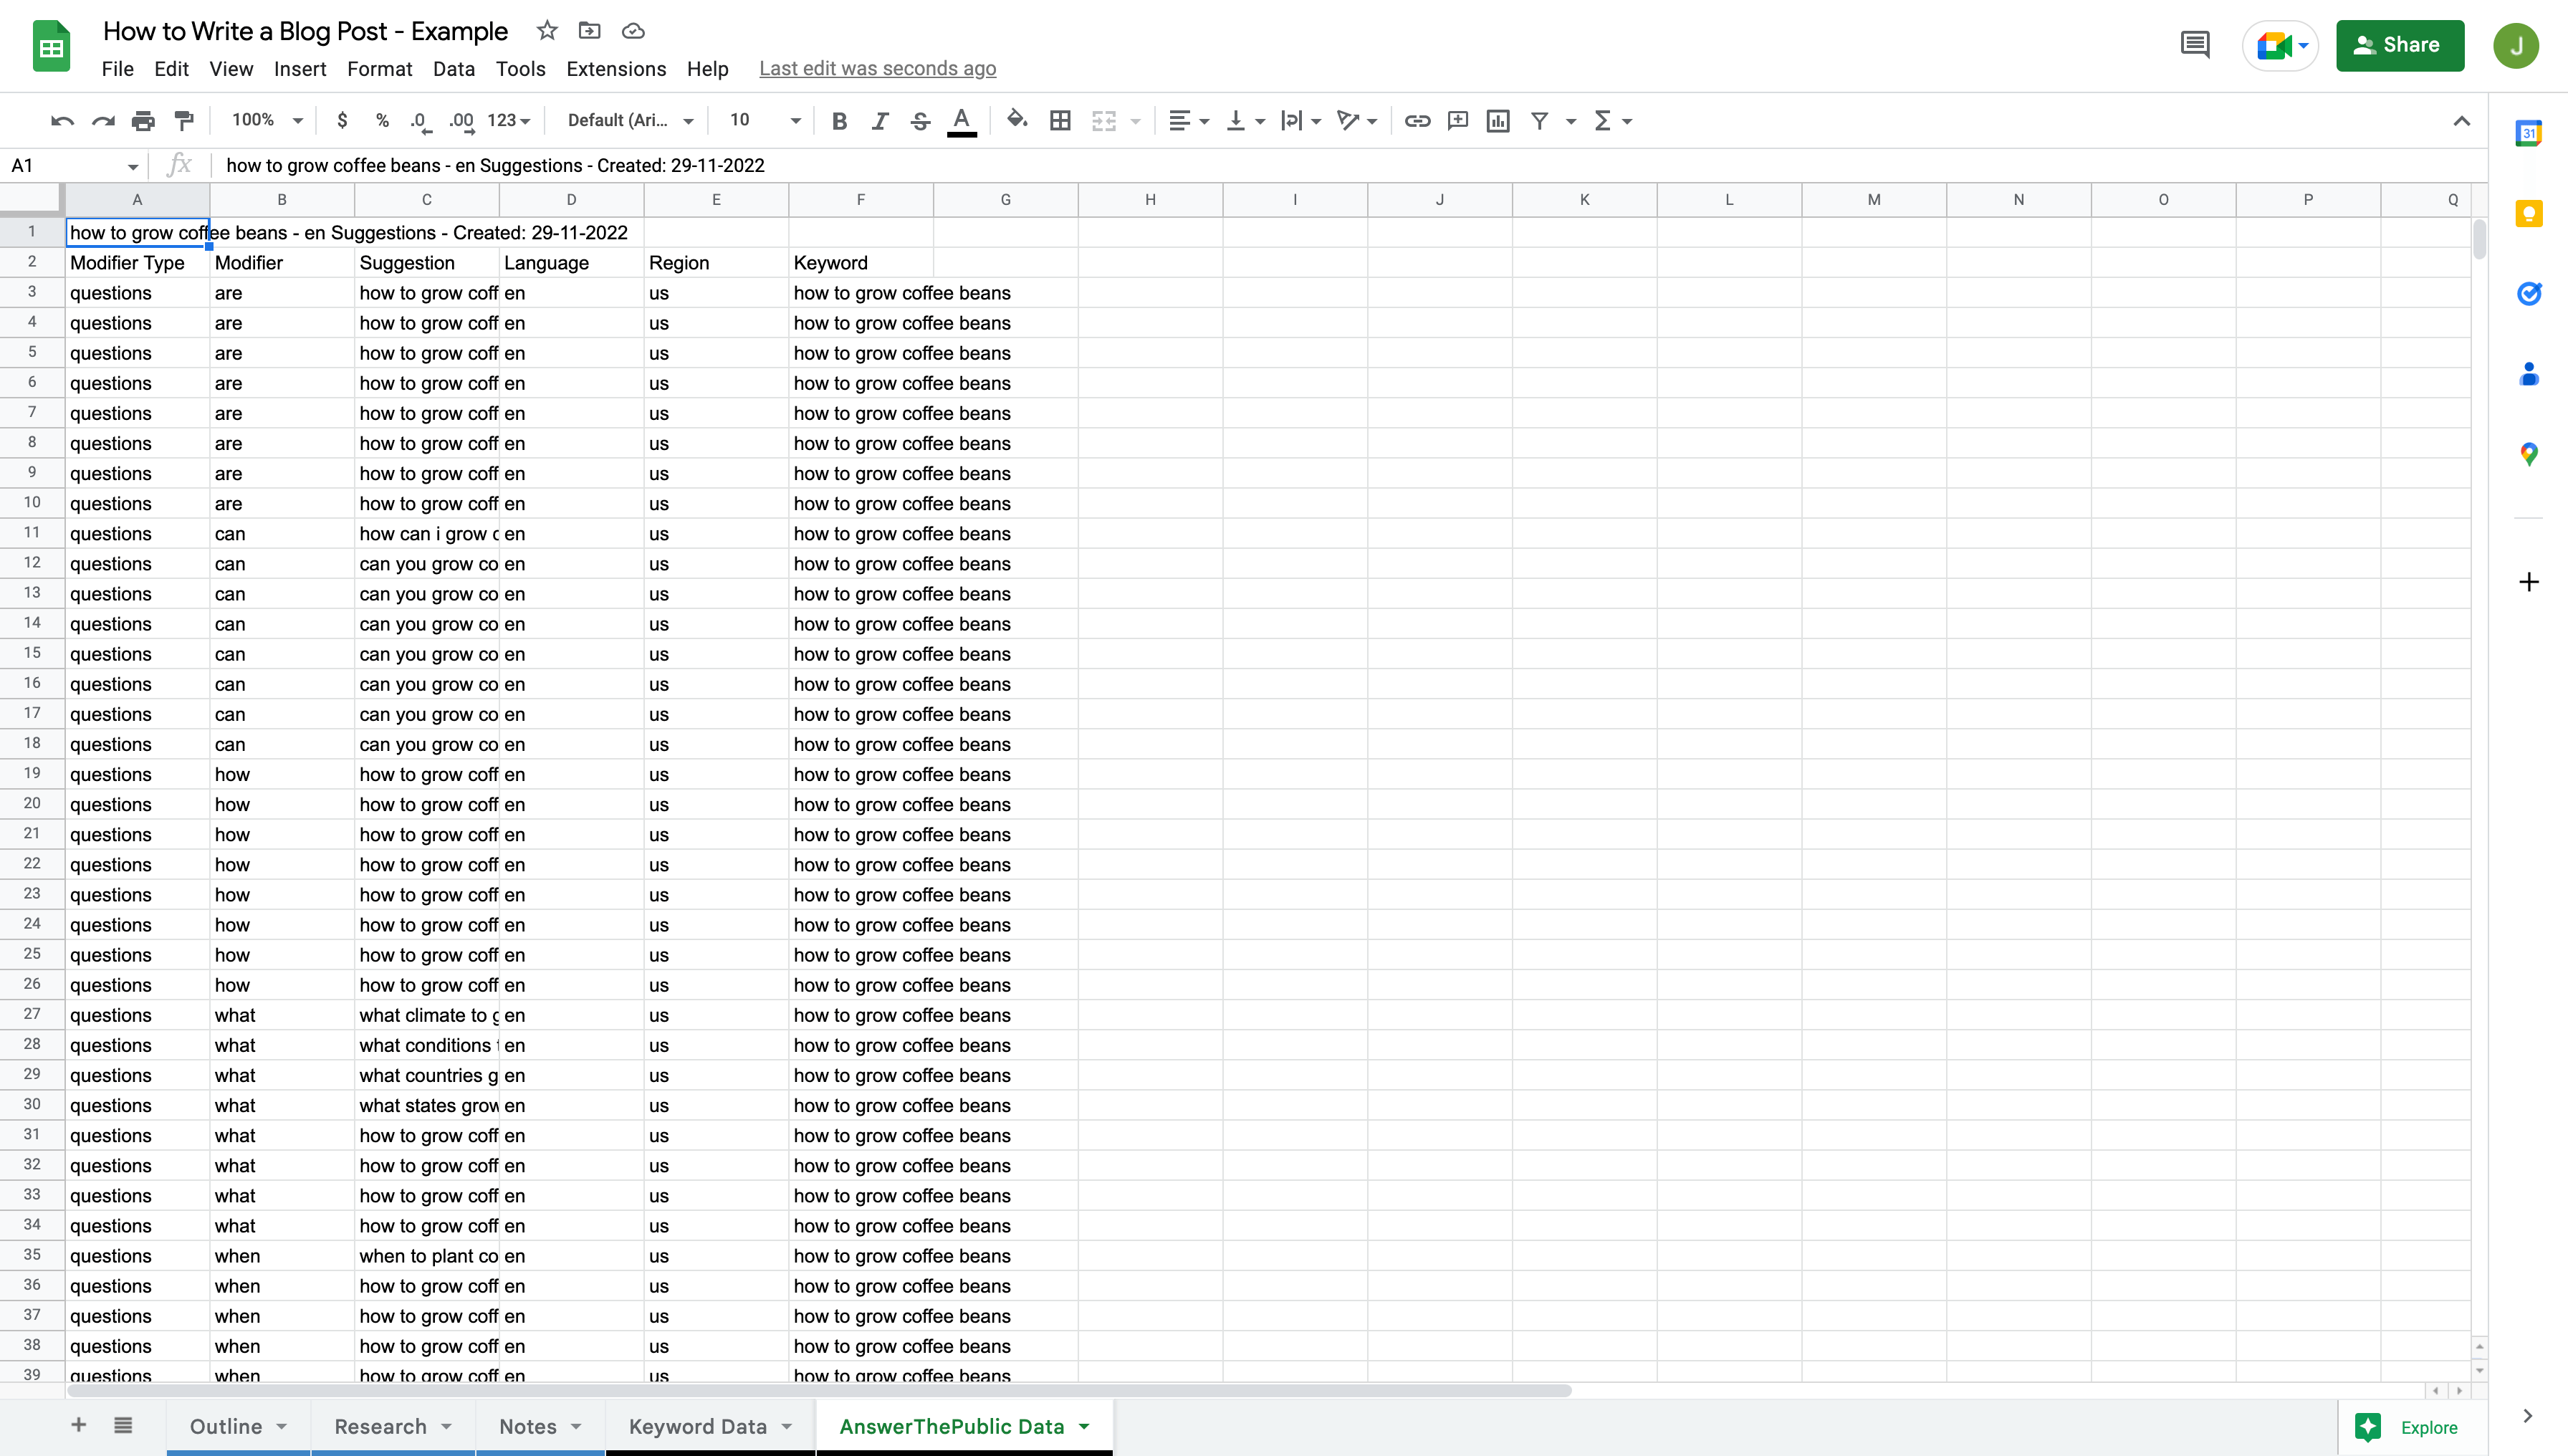
With the data imported, highlight all the keywords that might be interesting to consider as part of your blog post. Select the most relevant question if there are duplicates or similar phrases.
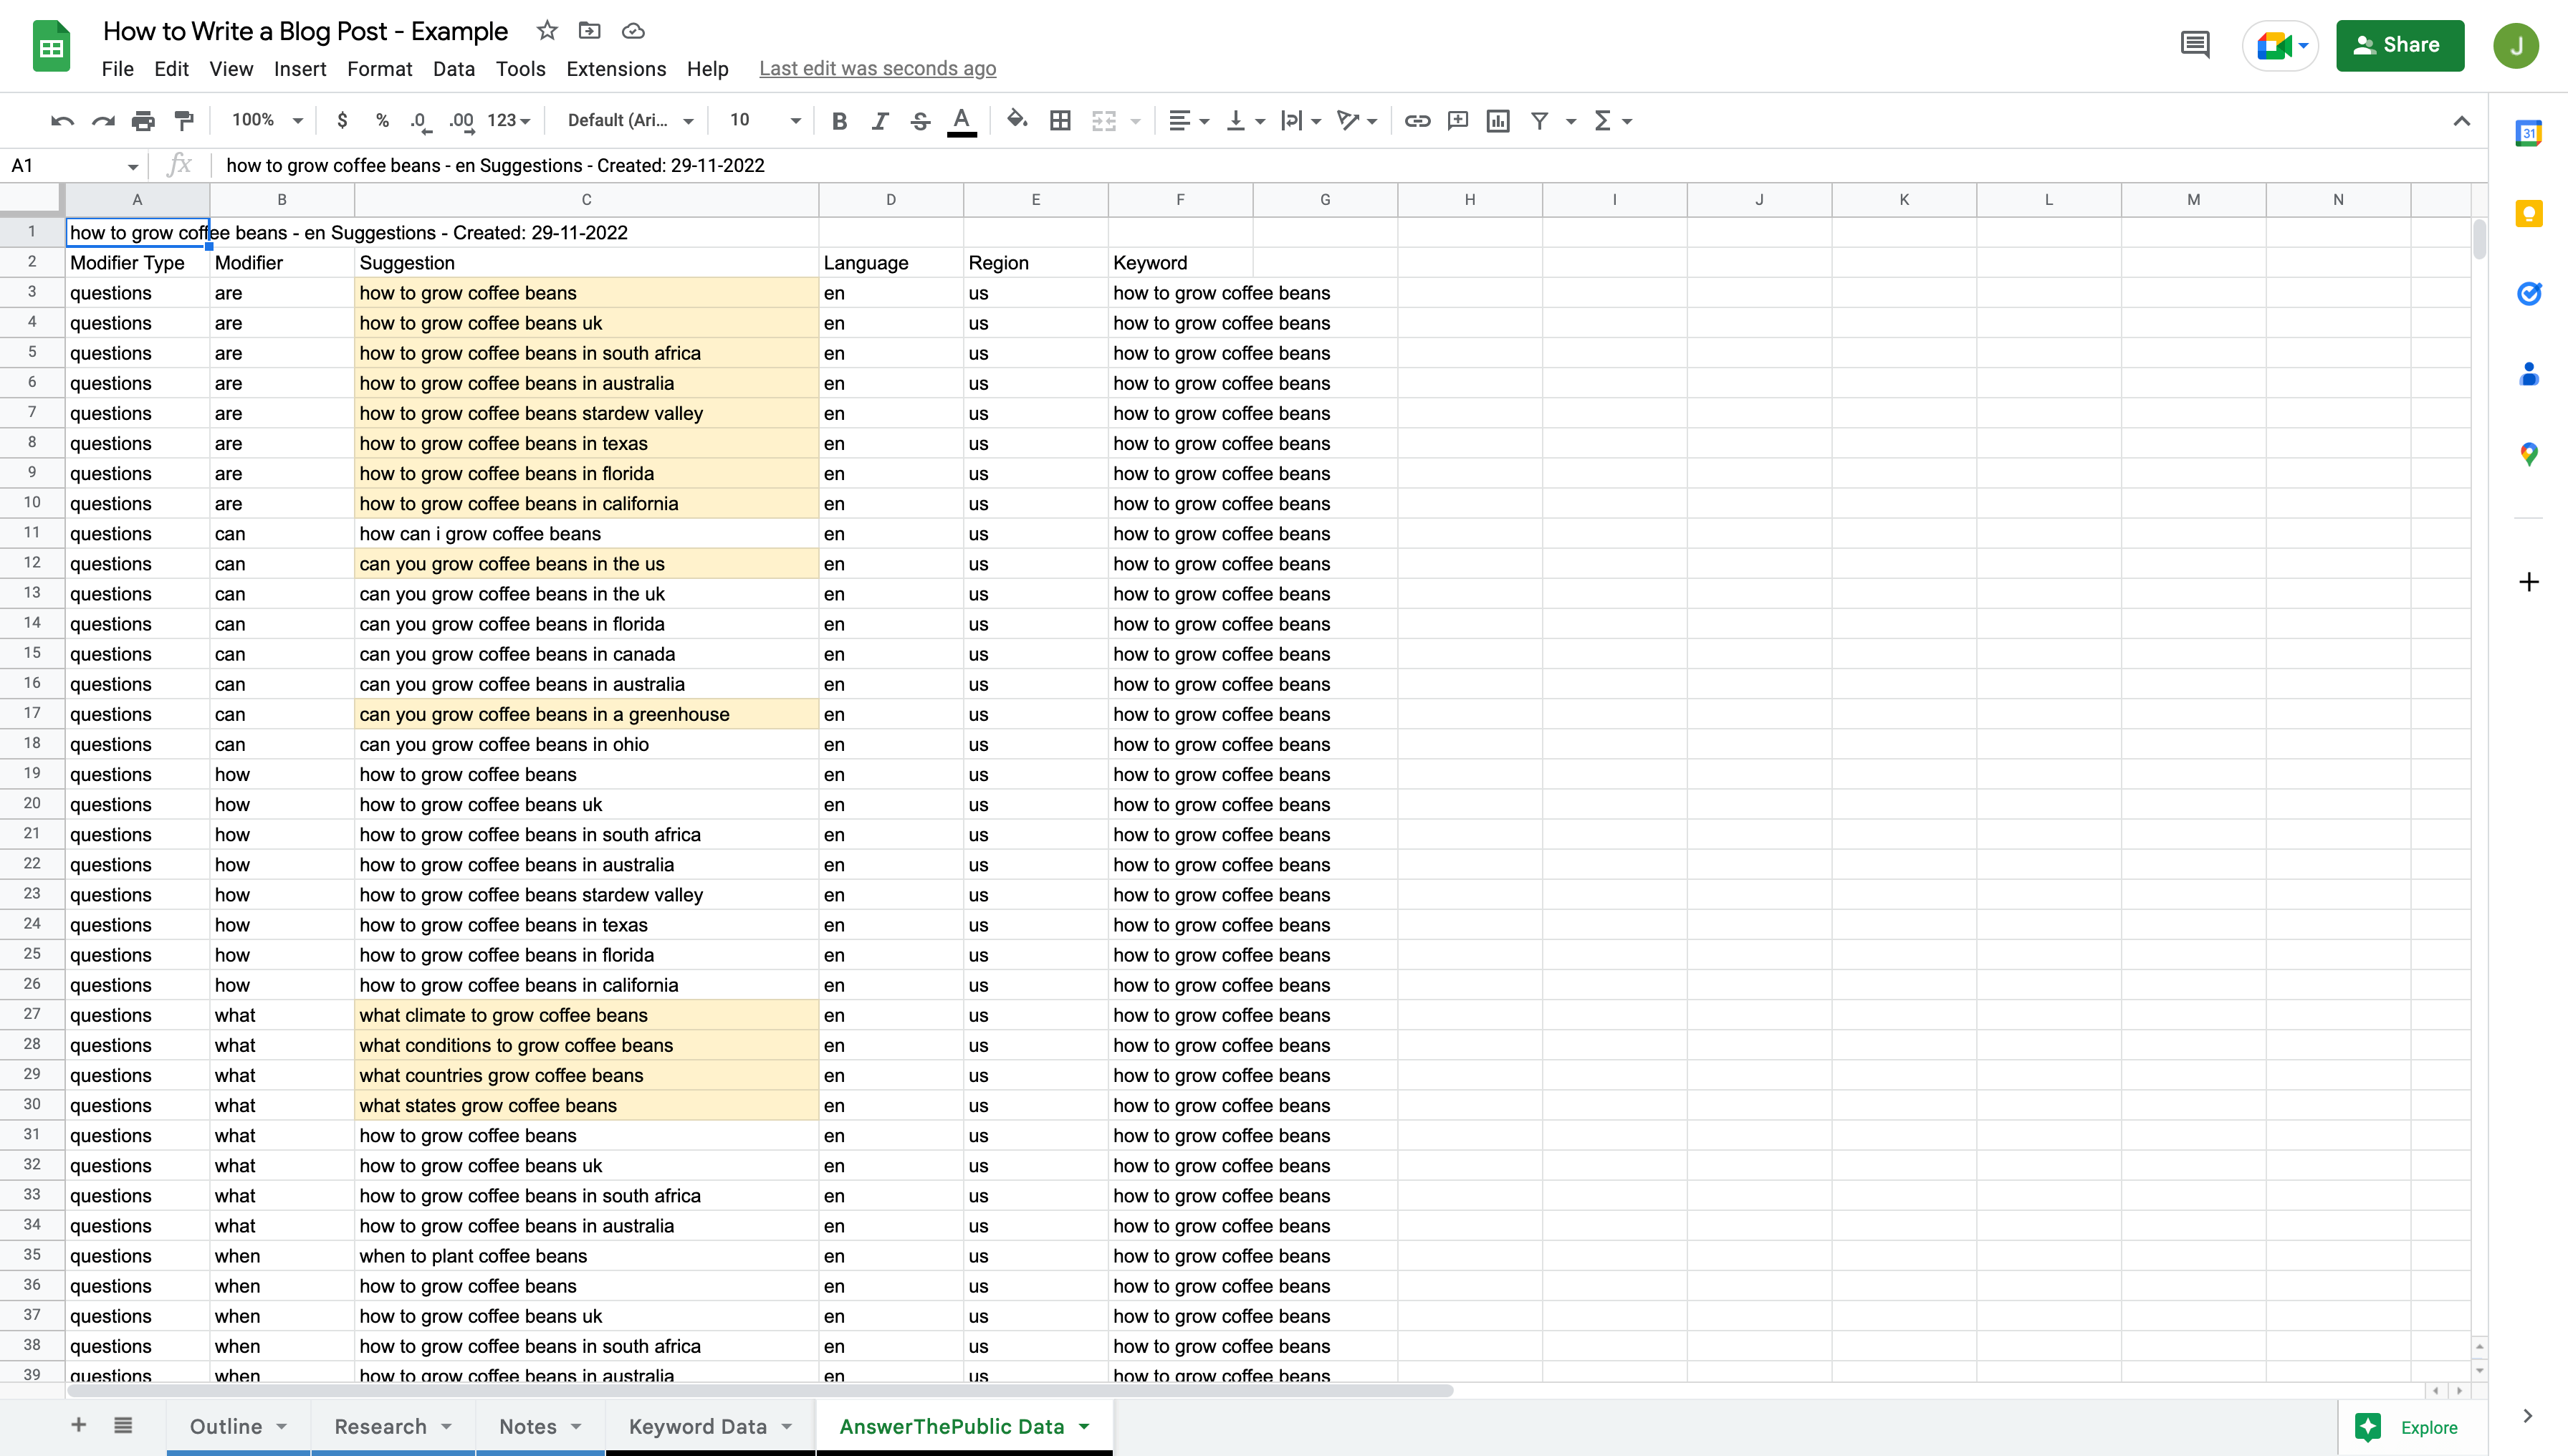
Then, copy and paste the highlighted question into the ‘Research’ tab under the ‘AnswerTheRepublic Questions’ section.
At this stage, your blog post template should be coming together nicely with plenty of ideas to include as part of your article. However, we’ll expand further by exploring the competition that already ranks on Google.
Get to Know Your Top Competitors
When writing a blog post, one of our goals will be to show up on the first page of results when someone searches for the topic on Google or any other search engine, increasing the likelihood that people click our post to generate traffic.
As a result, it pays to become familiar with the articles already ranking since Google deems them to be the best results for the search.
To do that, we’ll search for our topic’s keyword on Google and explore the results. Questions to ask ourselves include:
- Angle: How is each competitor approaching the topic? What angle is not being used by competitors that might be interesting?
- Sub-topics: What sub-topics do competitors cover that might be worth discussing in my post?
- Length: How long is each article? How long should mine be to cover the topic thoroughly and in a way visitors would appreciate?
As you review the top ten results on Google, scan each article looking for ideas you can incorporate into your own. Headings are an excellent place to look for sub-topics worth adding to your post.
Jot down any ideas you find in the notes in your template’s ‘Research’ tab under the ‘Competitor Research Notes’ heading.
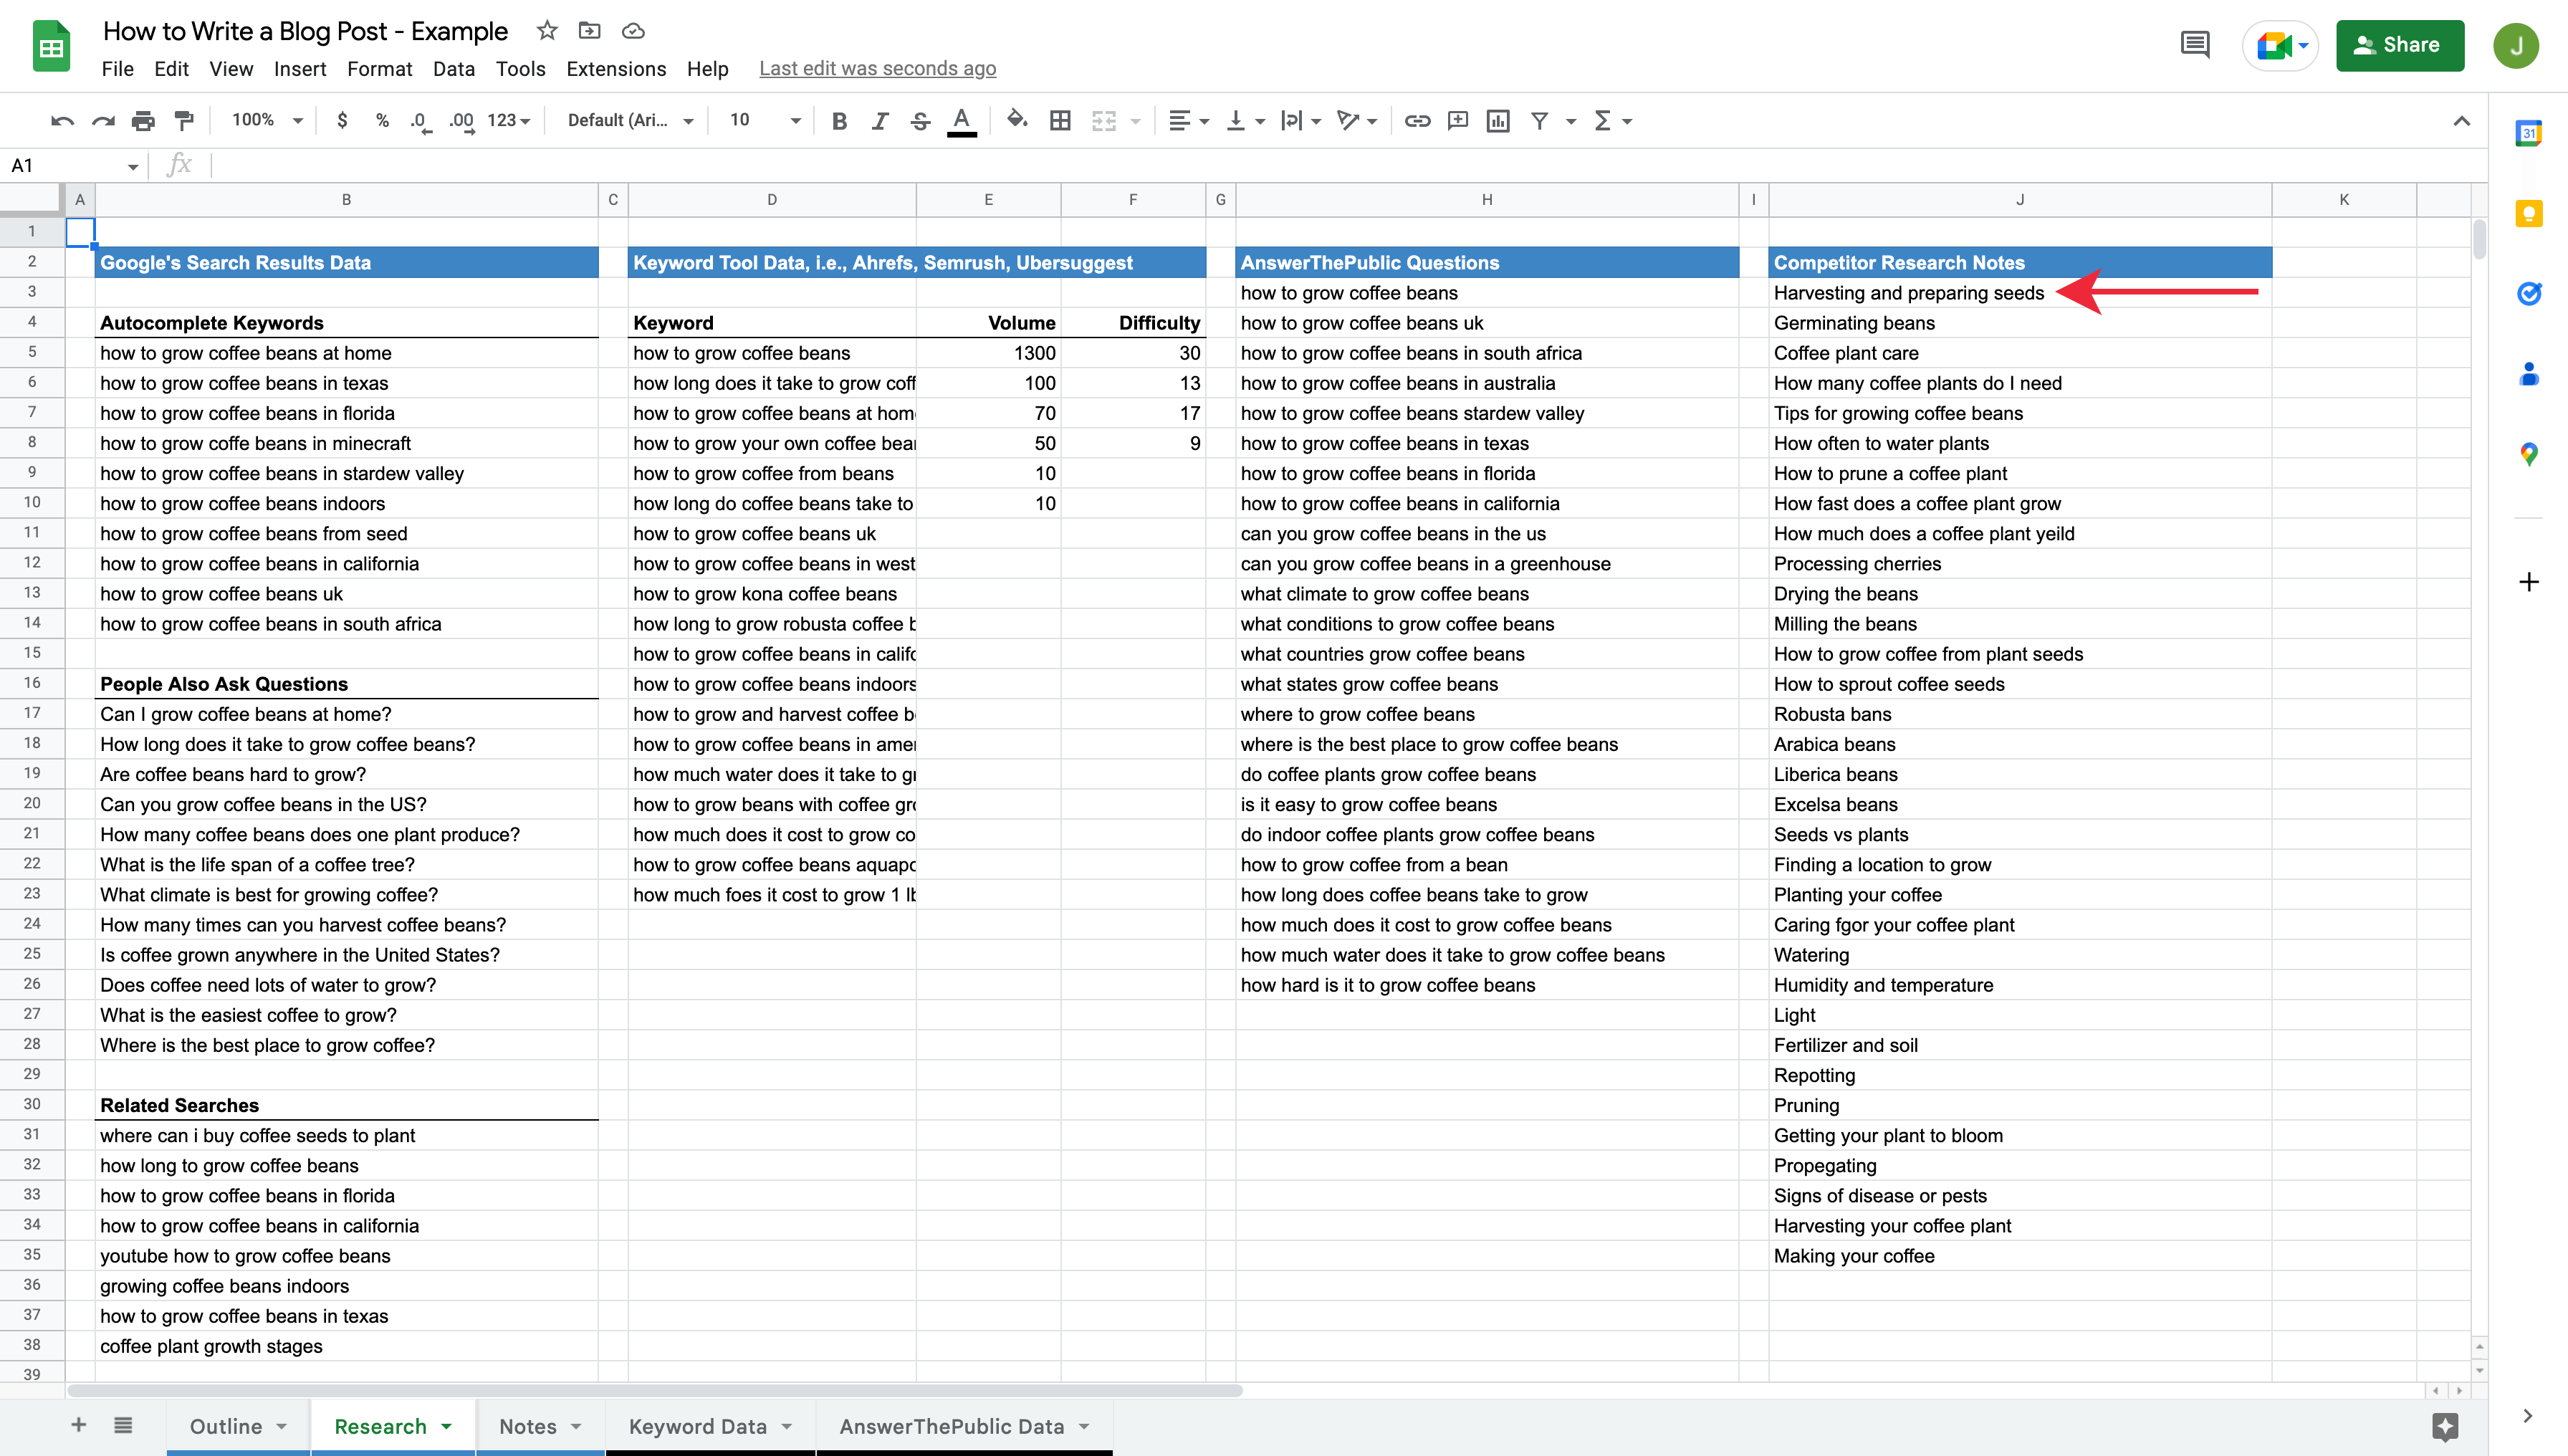
Your ‘Research’ tab should now be complete!
Set a Target Word Count
Before I start writing a blog post, I like to set a target word count that I can consider as part of creating my outline and track as I write the article.
As a baseline, I’ll review my top ten competitors in Google for the topic and check their content length. You can use this website to copy and paste the URLs of your competitors to uncover the size of their articles.
Although longer isn’t necessarily better, and word count isn’t a ranking factor for search engines, benchmarking against my competitors gives me a sense of how comprehensive their articles are.
My goal isn’t to write a longer blog post. It’s to create the best content for searchers exploring the topic, which often means writing a more detailed article than my competitors that fills in the gaps they missed and answers all of the searcher’s questions.
With that said, you can be thorough in what you cover in your blog post and concise in your writing. If you can create a better piece of content that’s shorter, then ultimately, that’s a good thing for the reader.
Create an In-depth Outline
Now that you have all your research for your article, it’s time to create your blog post’s outline, which will guide your writing.
Much like a book has chapters, it’s helpful to break your blog post into smaller easy-to-digest sections. Doing so helps with the readability of your article, but it also makes it easier to scan, assisting visitors in finding pieces of information they need more quickly.
It also takes a lot of the hard work out of writing. By thinking of what to cover and how you’ll organize your blog post ahead of time, you’ll remove a lot of friction in the process.
Start by reviewing everything you compiled in the ‘Research’ and ‘Notes’ tab of your blog post template and pulling out sub-topics for your article that you think would be valuable to cover.
In your blog post template’s ‘Outline’ tab, jot down any idea you think should be covered. Don’t feel like you need to write the outline perfectly in chronological order. I find it easier to write out possible sections of the blog post first and organize them after.
As you consider what to cover in the blog post, pay special attention to the keywords with the highest search volume from your research and make sure you find room for them in your outline, assuming there’s a natural fit for including them. Doing so will help ensure the article remains relevant to the searches people are doing on the topic.
Some things you want to cover might be obvious looking at your notes, while others might require you to piece some information together to provide visitors with a resource that goes above and beyond.
For example, while writing an outline for my post on how to grow coffee beans, I noticed people often search for specific locations, so I included a section on where to grow coffee beans. Doing so will allow me to discuss various locations and perhaps create a table showcasing multiple locations and whether they’re ideal for coffee plants.
If you add a section to your outline that you’re unfamiliar with, Google it to learn more so you can add more detail or expand upon it with additional sections where necessary.
Developing an outline is a bit like a puzzle; it takes time to piece things together in a logical order. It’s a fluid process, so it’s okay to reorganize, delete, or add ideas as you create the outline.
Here’s an example outline for my hypothetical blog post on ‘how to grow coffee beans.’
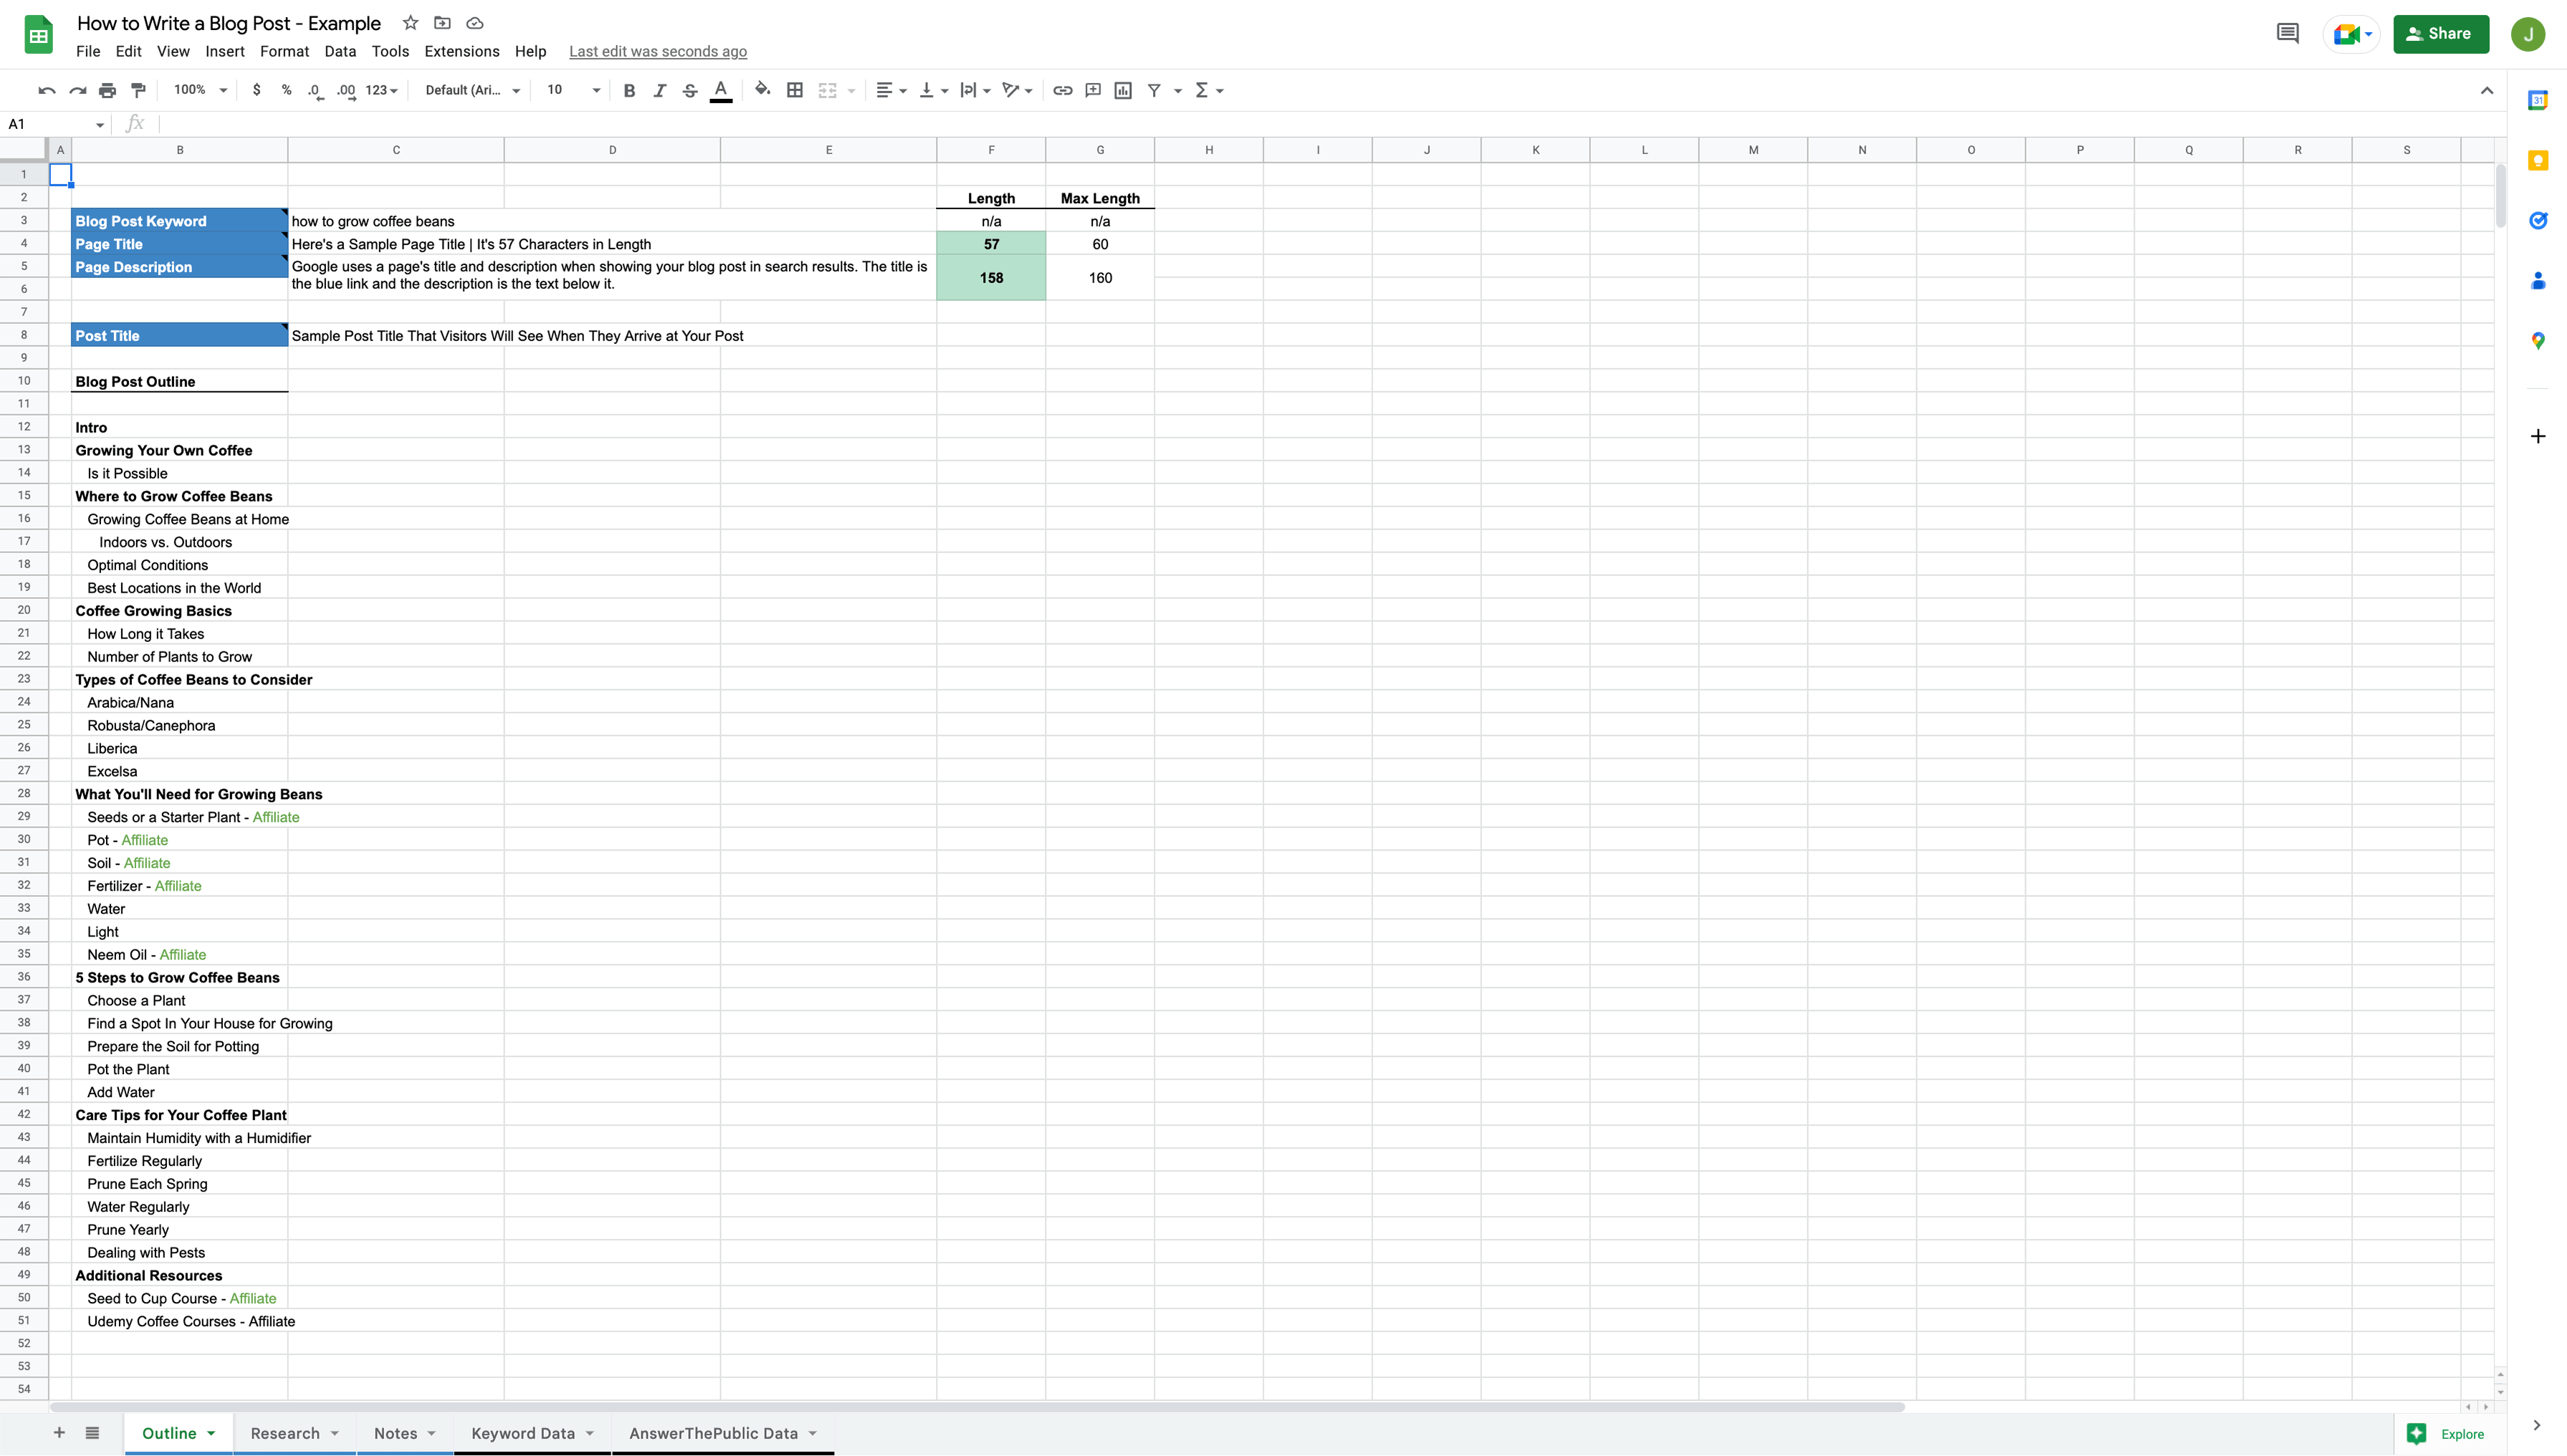
Keep in mind that I’m not an expert on growing coffee, and aside from being someone who used to drink it quite a bit, I know very little about growing the plants. Despite that, I came up with a reasonably thorough outline with little expertise.
Yours will be even stronger if you have an interest or expertise in the topic you’re writing about for your blog post. If not, hopefully, it shows how a little research goes a long way. Ultimately, the less familiar you are with a topic, the more research you’ll need to write thoughtfully about it.
In my outline, you’ll notice I made some small callouts where I felt there’s an opportunity to discuss a product or course I can recommend where there’s an affiliate opportunity. I’d encourage you to do the same, so you know ahead of time where you’ll be including these if applicable.
Finally, before you wrap up your outline, ask yourself if you feel it will result in a better blog post than the competition. If so, you’re on the right track. If not, keep at it until you’re confident it is.
Personally, I don’t see much value in writing about a topic if my blog post isn’t one of the best resources available.
Part 2: Writing Your Blog Post
Armed with your completed template, you’ve put yourself in an excellent position to write your blog post and hopefully started to build some confidence that you can get the job done.
My Secret Weapon
I’ve never considered myself a great writer. I didn’t excel at it when I was younger in school, and it’s not something that comes naturally to me, so I’ve always been open to constructive feedback and tools that can help improve my written communication.
Years ago, before starting my own business, I stumbled upon Grammarly. They offered a free Chrome extension that would help proofread my emails, and I found it incredibly helpful in polishing my writing.
Fast forward to today, and it’s one of the few tools I can’t live without, especially as a writer and small business owner. Although I still use it for sending emails, it’s my go-to proofreading tool for everything I write, including long-form content like this article you’re reading now.
Simply put, Grammarly makes me a better writer by offering easy-to-comprehend suggestions that go well beyond spelling and punctuation to ensure that my writing is as clear and engaging as possible.
The net result, I’m more confident in what I’m writing, which helps take some of the pressure off and makes it easier to hit publish.
If you have any hesitations about your writing, try it. It’s free to get started using, and I think you’ll love it. Plus, if your blog isn’t your full-time gig, you’ll get the added benefit of being able to use it for work.
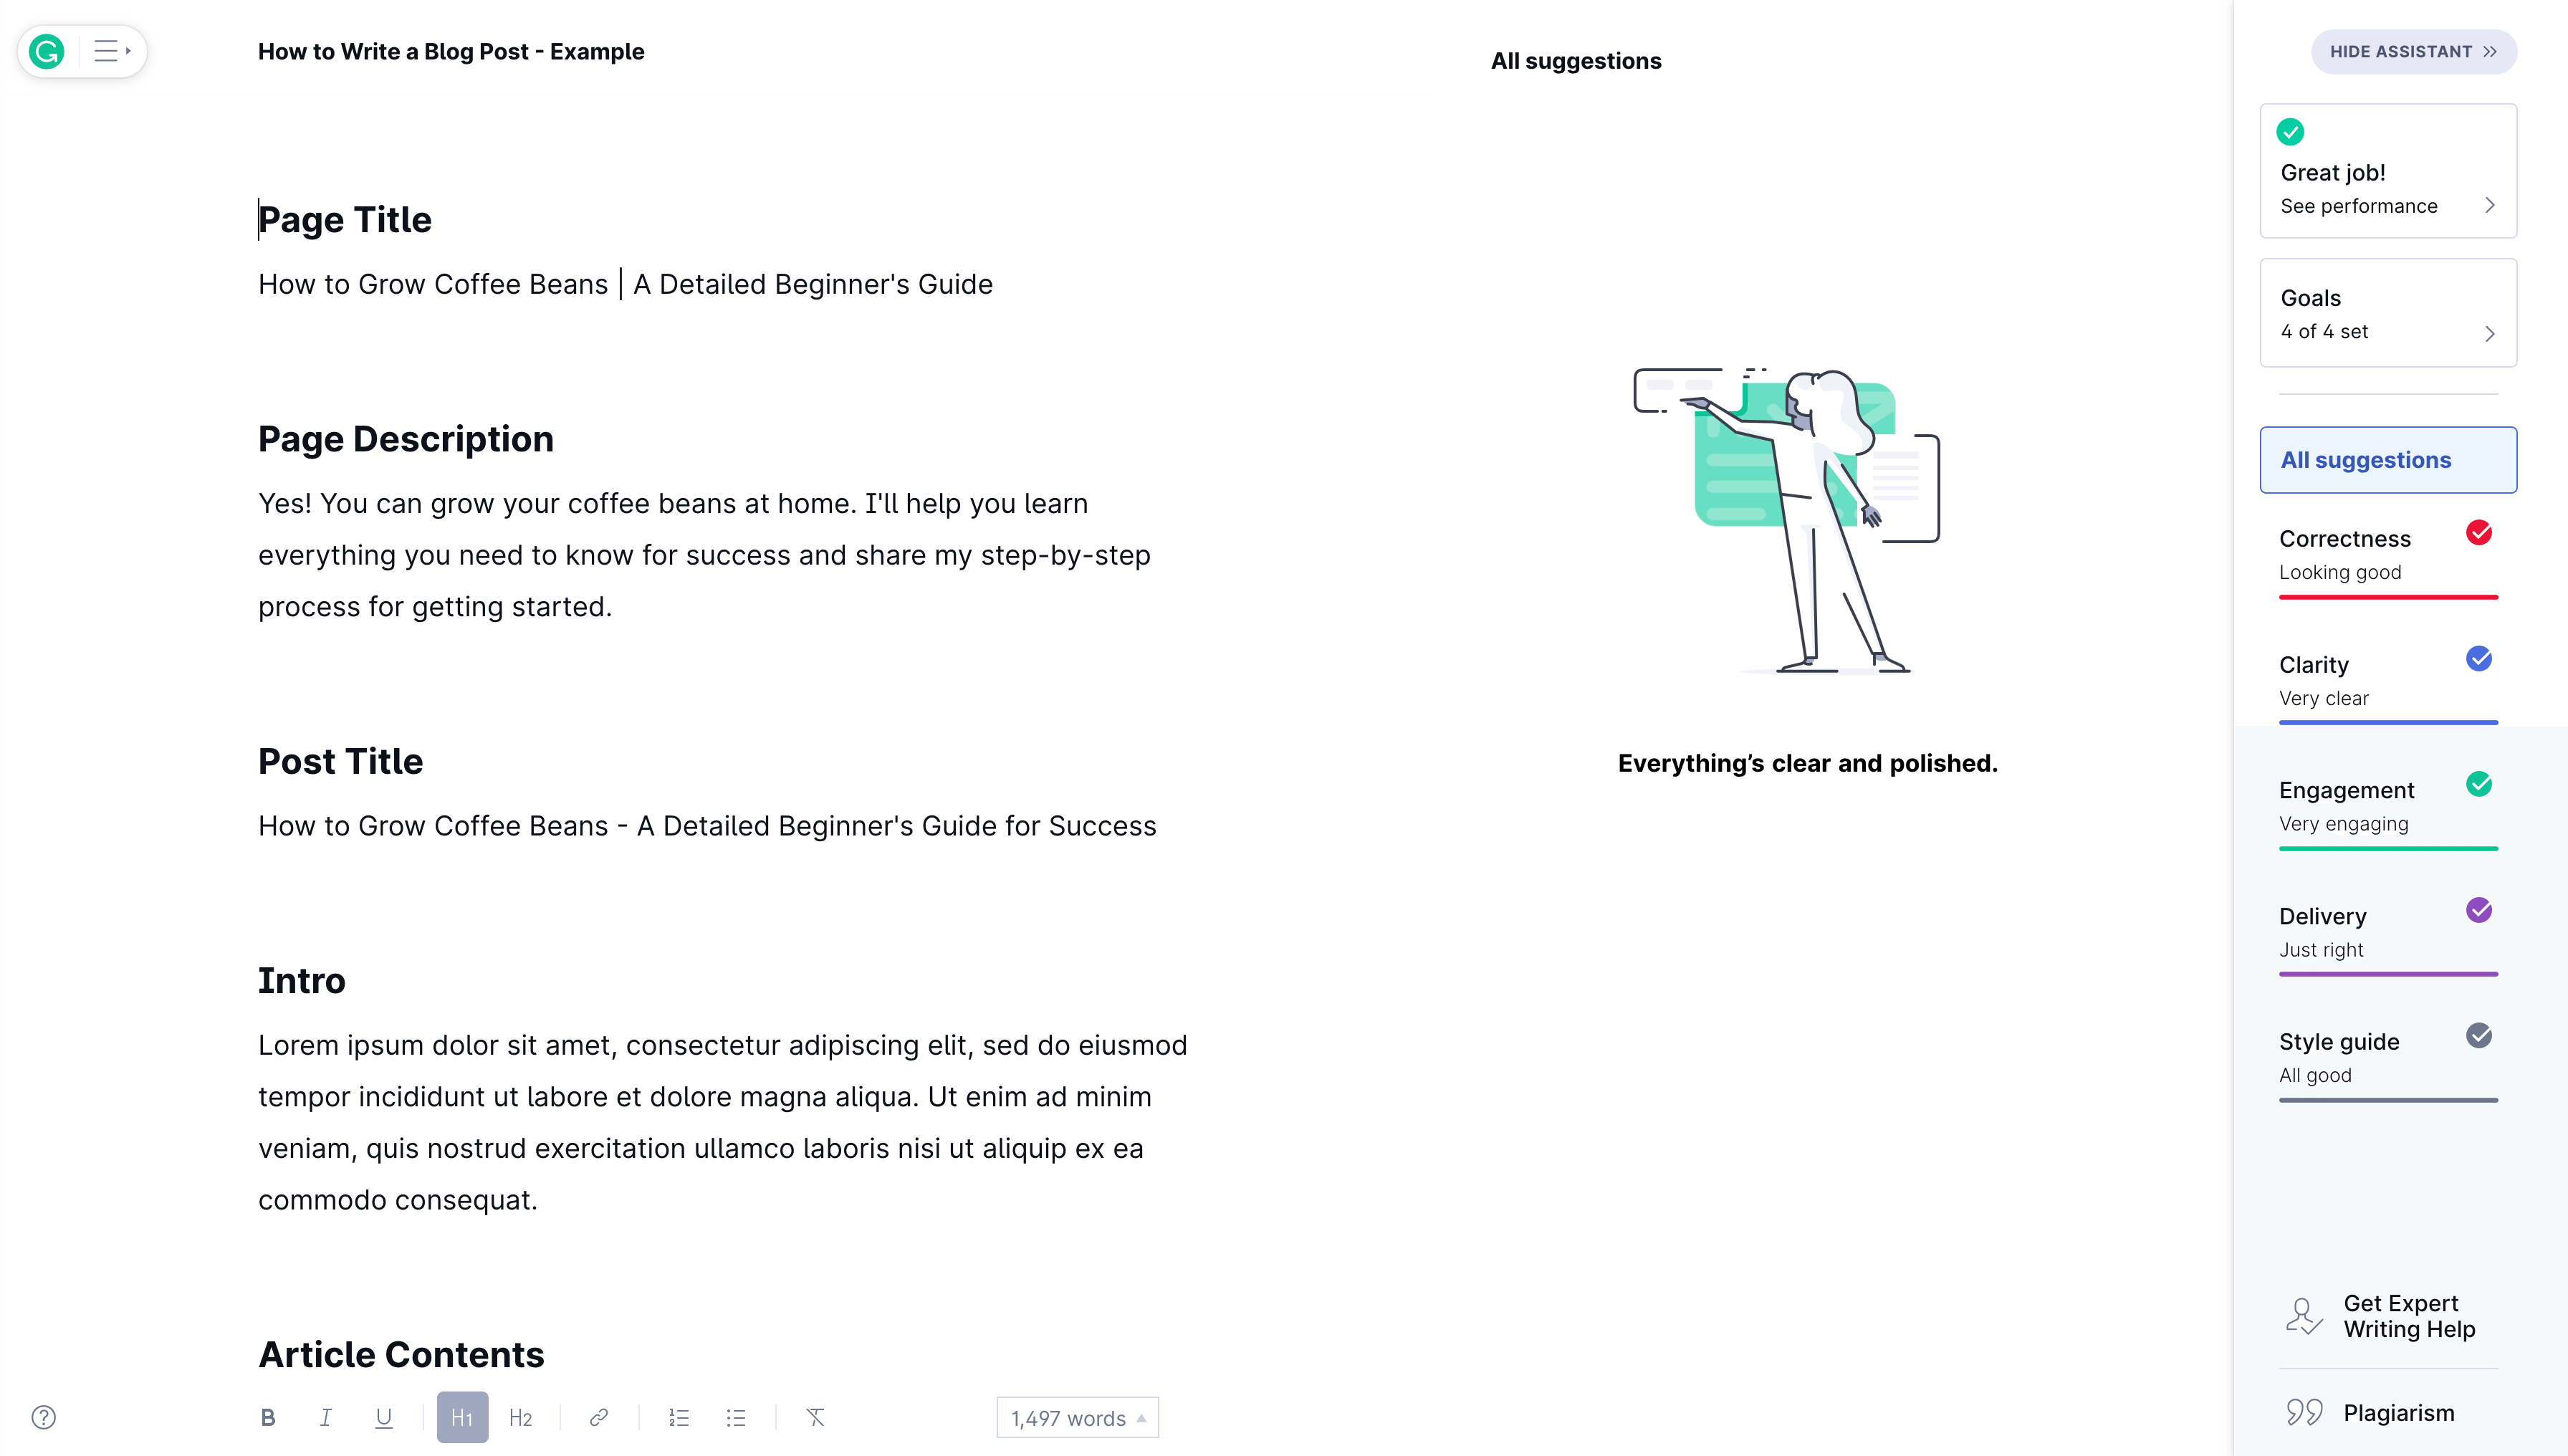
Develop a Working Title & Description
When writing a blog post, there are two titles you’ll want to consider, along with a description.
Page Title
The page title is what Google typically shows to users in their search results. It’s the familiar blue link you click to visit a website, which you can specify for each blog post. An effective page title describes what a user will see when clicking through and entices a user to click your result.
Although there’s no limit to how long your page title can be, Google will only display roughly 60 characters of it, so it’s beneficial to be thoughtful in what you write to persuade users to visit your site.

When writing your page title, include the primary keyword you’re trying to rank for to signal to users researching the topic and search engines that your blog post is about that specific topic.
Post Title
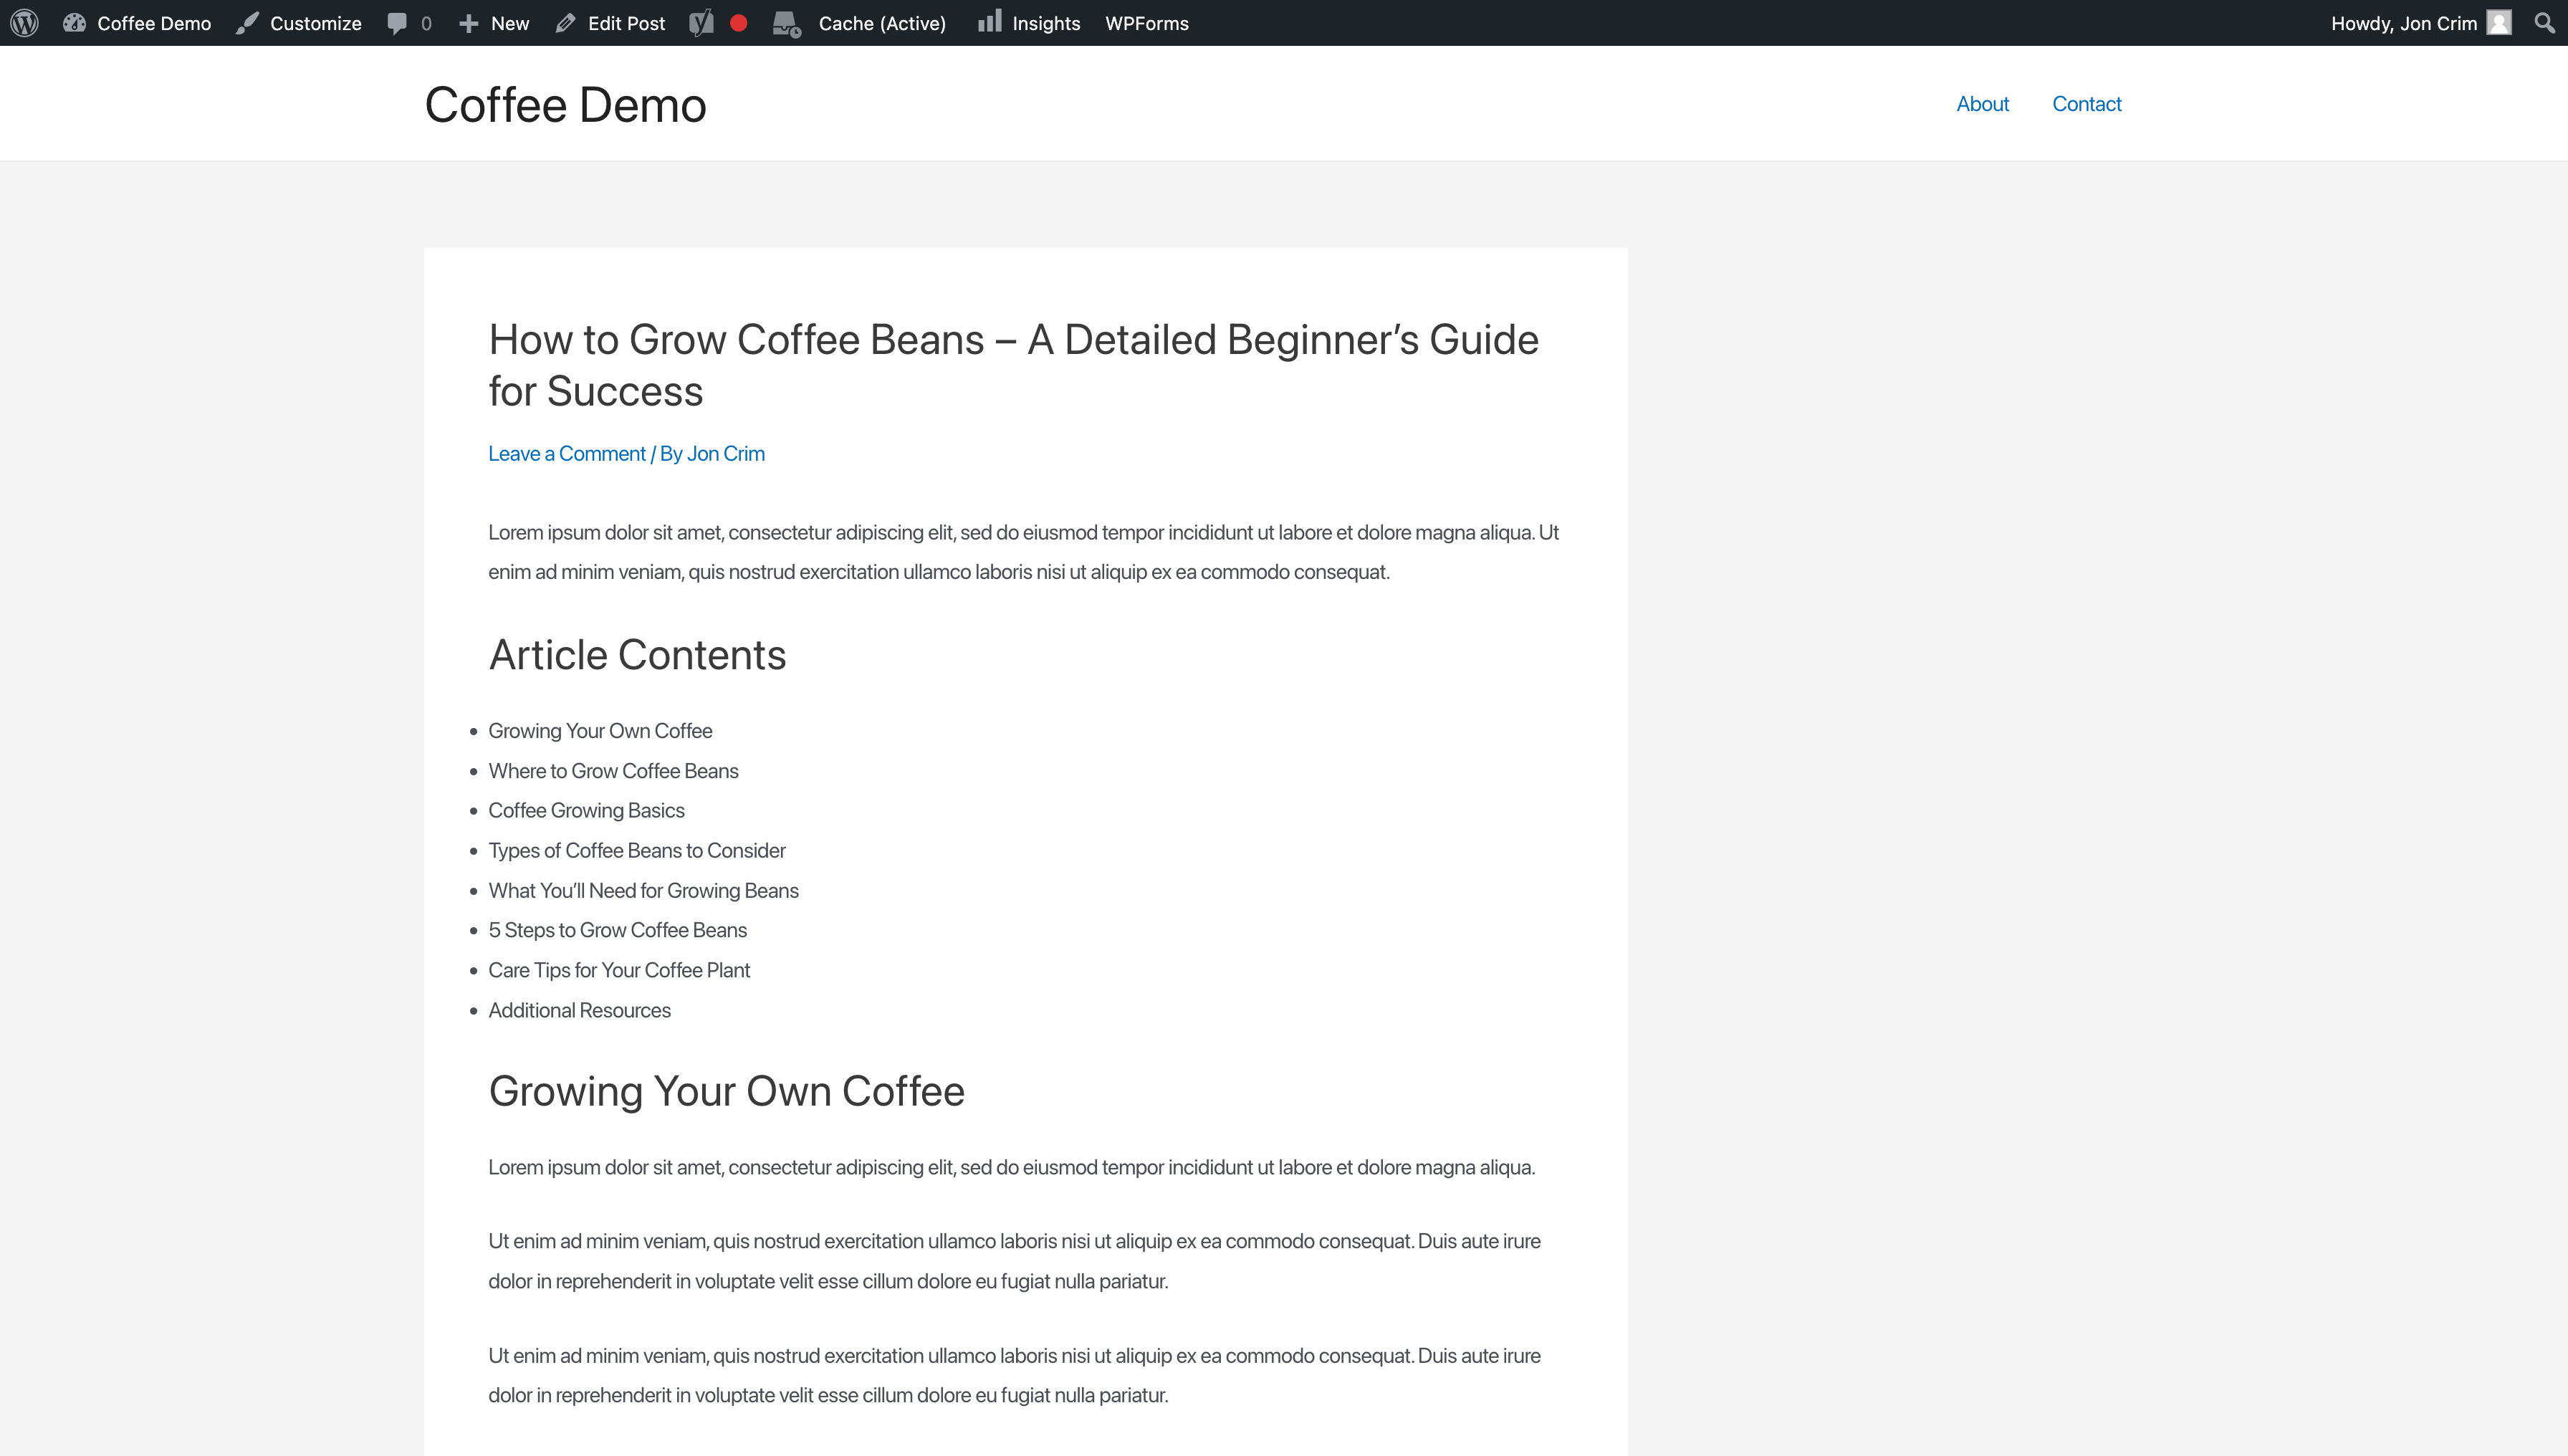
The post title is what you display to users once they visit your website at the top of your article, which you have complete control over. Here’s what that looks like for the above post.
Although they’re often similar or the same, they don’t have to be – I’ve swapped a pipe character for a dash in the above example. Keep in mind if they’re too different, you risk confusing the person visiting your site.
Again, be sure to include your post’s main keyword.
Page Description
Your post’s description is the text that Google will sometimes display below your page’s title in their search results when they deem it relevant or best to do so for their users.

Like the page title, it allows you to sell your blog post to people searching on Google and encourage them to click. There’s also a limit to the number of characters Google will display, so aim for under 160 characters.
I like to think through how to present my titles and description before I start writing because they set the tone for the blog post and what a visitor should expect to learn. However, I leave room to come back and edit or change them after I finish writing my article.
You can add these to your blog post template’s ‘Outline’ tab when ready. I’ve included a formula to track character count for those fields so you know how long your title and description are and can stay under the character counts I recommend.
Here’s what I wrote up for my example blog post.

Move Your Outline to a Document
Now that my titles and description are complete, it’s time to move your outline to a document or word processor for writing the post.
In my case, that’s Grammarly, but if you’re using Google Docs, Microsoft Word, Apple Pages, or any other software, that’s perfectly fine.
I like to start by copying and pasting my page’s title and description at the top, leaving space for my intro.
Then, I paste the rest of my outline and format my headings, so all that’s left for me to do is write the article.
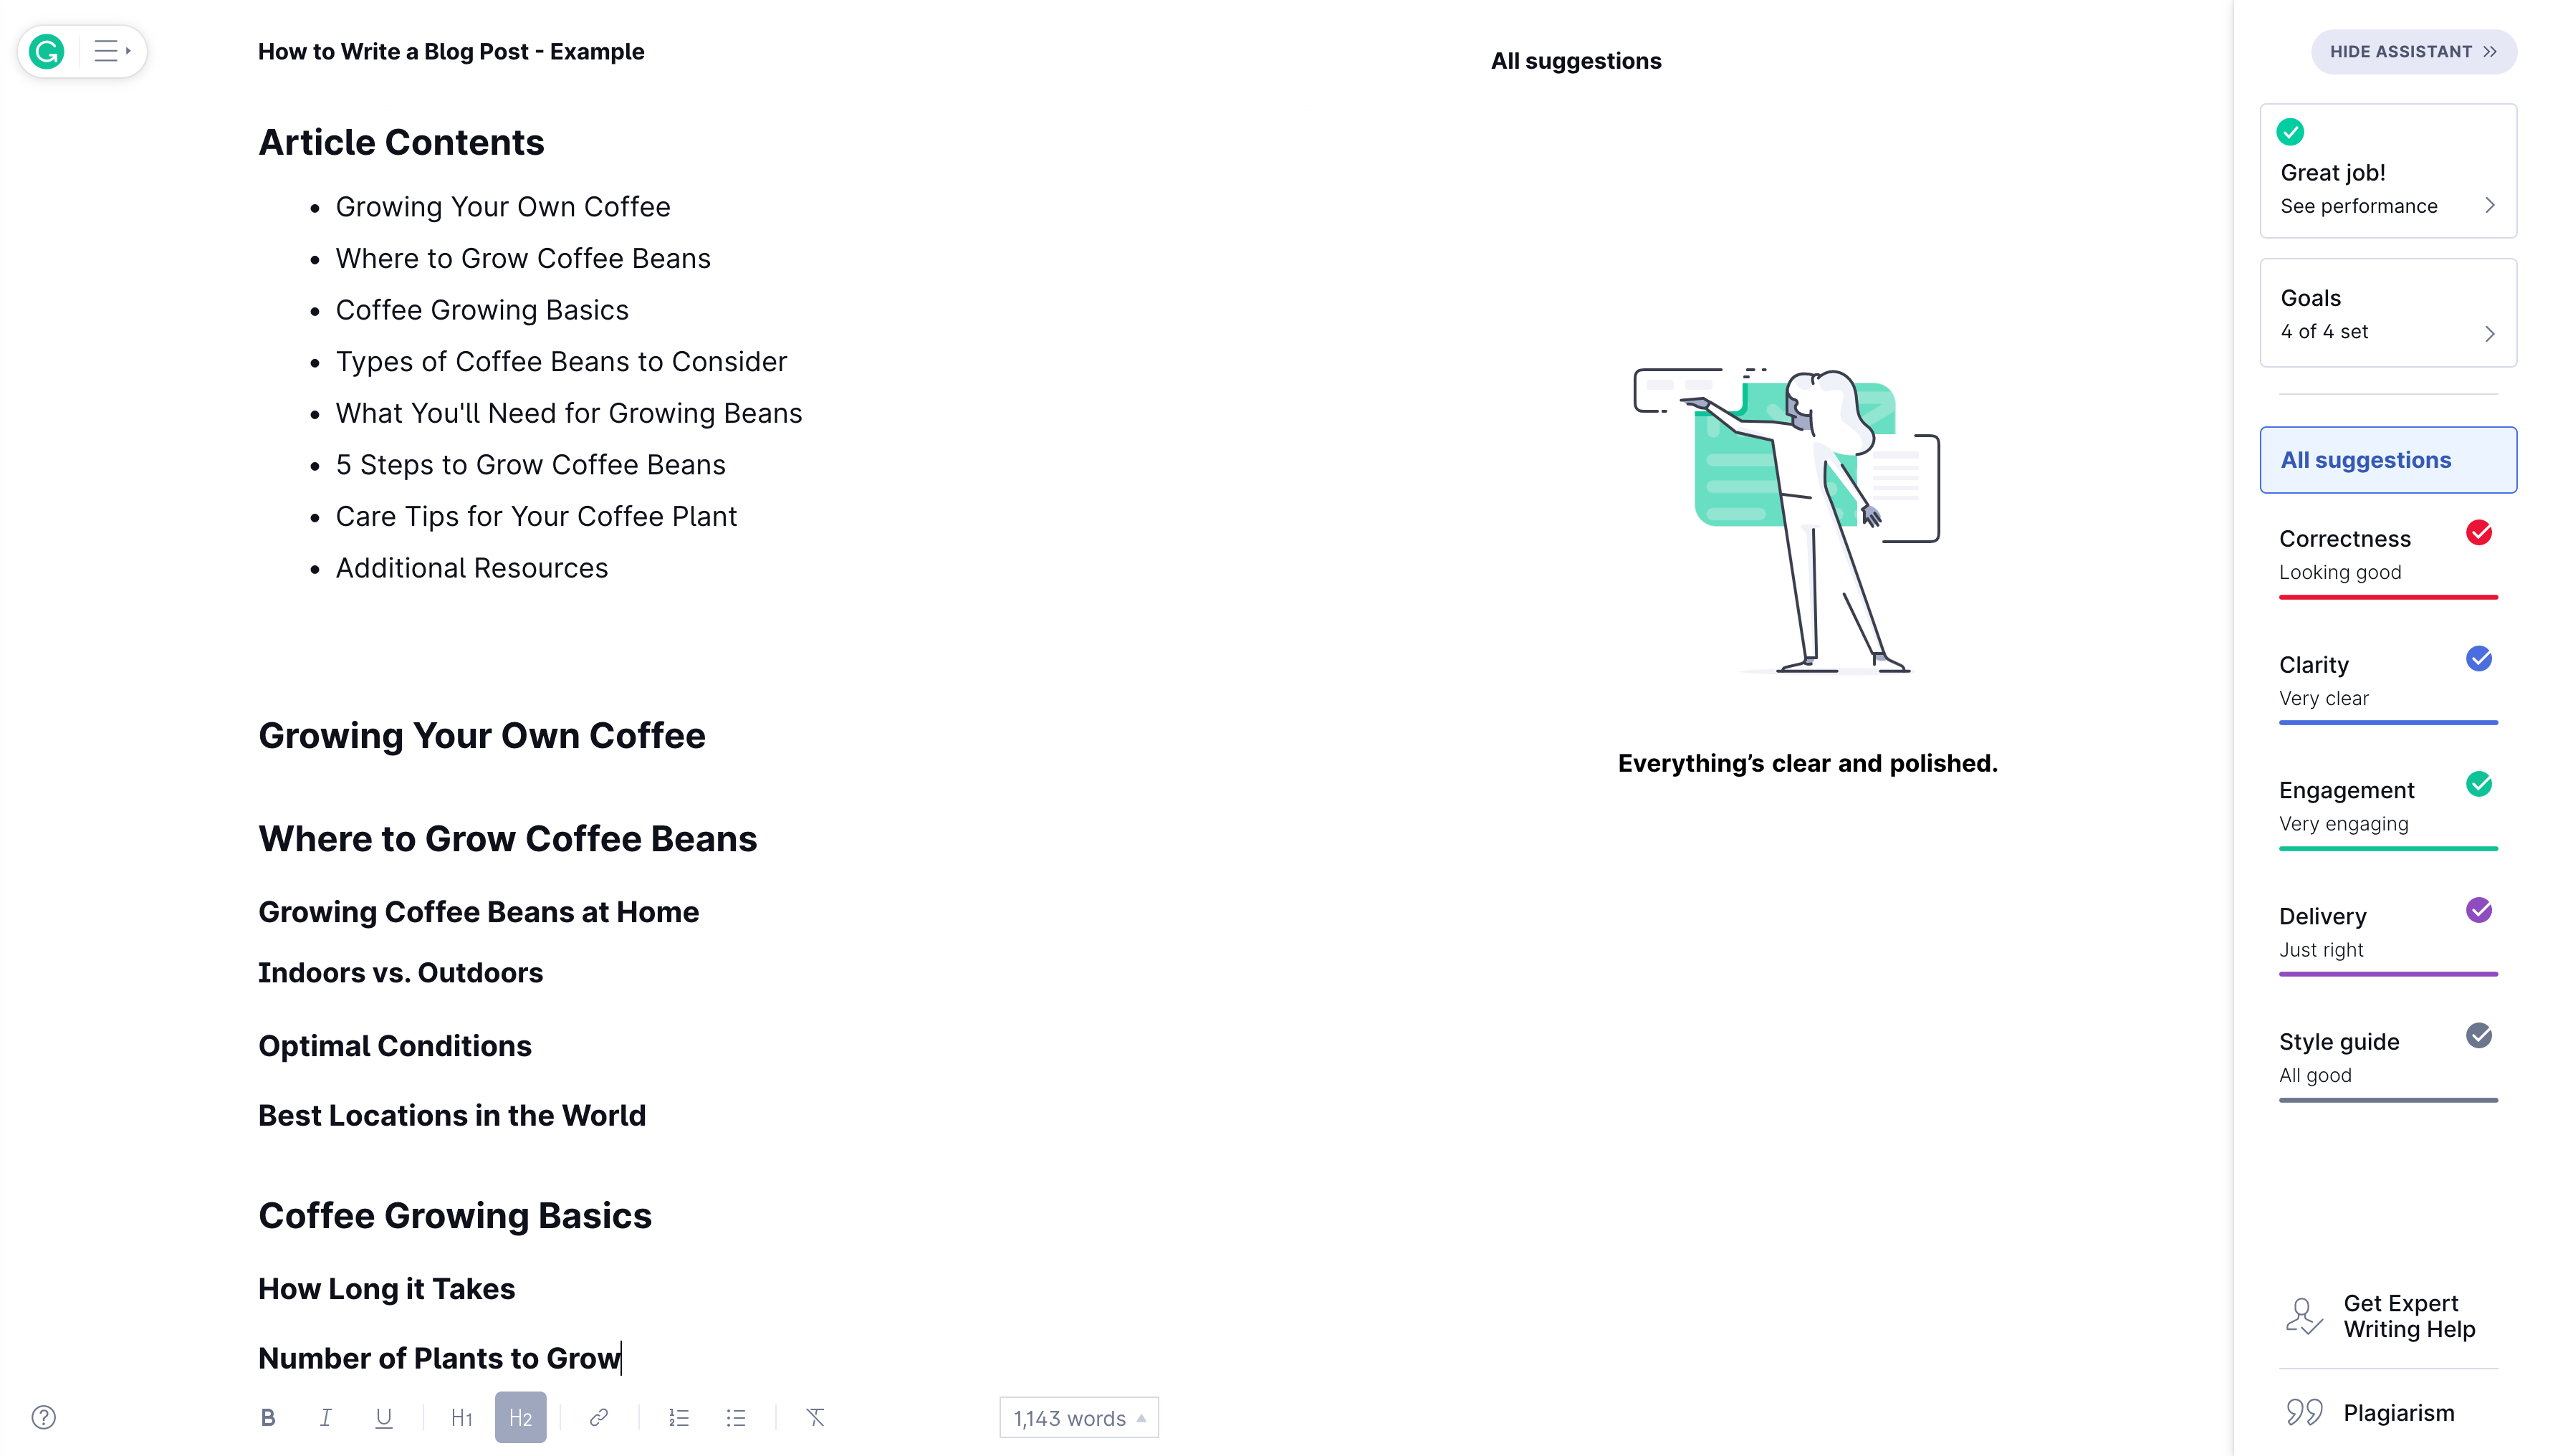
I like starting my blog posts this way because it helps me feel organized and sets me up to begin writing with a clear head.
Draft a Compelling Intro
When a visitor starts reading your blog post, you only have a few seconds to grab their attention and convince them to keep scrolling, so it pays to spend some quality time making sure it packs a punch.
For my intros, I often follow a simple two-step formula.
Step 1
I start by setting the stage and reminding visitors what they’re here to learn about and why reading about it is worthwhile.
Step 2
I give visitors a sense of what the blog post will cover, along with some context for how what they learn will help them.
That’s it. You can get as fancy as you’d like, but covering those few pieces of information in a compelling way is usually sufficient.
I like to think of my intros as mini sales pitches where the sale is getting them to read the rest of the blog post, and I want it to be clear what the article’s purpose is and what they can expect to learn.
As a side note, I always revisit my intro once I’ve finished writing the blog post because sometimes things evolve as I write, so I want the opening to reflect the article’s contents accurately.
Write One Section at a Time
After you write your intro, it’s time to get into the meat of your blog post and start the first section of your article.
It can feel daunting if you’re writing your first blog post. However, it’s crucial to recognize that because you put time and energy into your outline, you’ve already done the hard work.
Instead of focusing on the larger task at hand, keep your attention on the one section in front of you that you need to write.
In some cases, you might be able to develop that section off the top of your head, especially if you know the subject matter well. Other times, you might need to do more research about a specific section to ensure you’re writing accurately about the topic. Regardless, it’s one section.
Then, once you finish it, you move on to the next. Piece by piece, your blog post will start to come together. Although it sounds obvious, it’s easy to sike yourself out and get overwhelmed by the task.
Some sections will flow quickly, while others will be more challenging to write, and that’s normal. Be patient with yourself and take your time.
Incorporate Affiliate Mentions
Depending on the type of blog post you’re writing, there may be some opportunities to include affiliate mentions for relevant products you’re confident in recommending to your audience.
If so, take the time to build these into relevant sections of your article as you write it rather than trying to come back and squeeze them in after. Doing so will ensure they’re as organic as possible, building trust with readers and increasing the likelihood they’ll follow the links.
You can link these later when uploading your blog post to your content management system, e.g., WordPress, to generate commissions.
Add a Call to Action
For every blog post I write, I like to include at least one call to action. At the very least, I ask for feedback from my readers, which I can use to improve my article over time. Doing so is as simple as asking your readers a question and inviting them to leave a comment on your post.
Depending on the purpose of your blog, your call to action could be any number of things, including an email or account signup, a relevant product plug that you sell, or a contact form to get in touch.
Regardless, take the opportunity to add a call to action for your readers so that you can engage with them further. You’re working incredibly hard to write an informative blog post to gain exposure to people searching online, so it pays to give them a chance to deepen the relationship.
Proofread Your Post
It should go without saying, but before you consider your blog post done, make sure to proofread it.
If you’re using a service like Grammarly, you can get a lot of help along the way to improve your writing, but without fail, I always find a few errors that slip through the cracks when I read my post after I finish writing it.
And I’m not just talking about grammatical or spelling errors. I often find issues like repetitive language, awkward sentences, and sections lacking flow or clarity, which is okay because that’s how writing goes – it’s not always pretty. Sometimes, it takes a few revisions to get things right.
Of course, the beauty of blog posts is that they’re not permanent. If you discover an error or something you’d like to change after writing it, you can jump in and make the edit, but you should always strive to put your best foot forward the first time around.
Part 3: Uploading & Publishing
Once you finish writing your post, there are some finishing touches to consider before you push it live on your website.
Add Some Images
Whenever I write a blog post, I include at least one featured image at the top to help draw a visitor in when they first land on the page, which is the bare minimum I’d recommend for anyone posting an article.
However, I’d encourage you to take it a step further and add relevant images throughout your blog post. Doing so will help improve reader engagement, convey information more quickly, and break up the article, so it’s easier to digest.
Here are a few ideas to consider:
- Photos
- Screenshots
- Graphics
- Infographics
- Animated gifs
- Diagrams
- Graphs
You can take photos with your phone, use a service like Canva, Adobe Express, or Photoshop to create graphics, create a diagram or graph in a spreadsheet, or outsource your graphics on a website like Upwork.
The key to adding images is ensuring that they’re relevant and help support the message you’re trying to convey in your blog post. Adding images for the sake of having visuals won’t help your cause.
Upload Your Post
After finishing your blog post and creating some imagery to go along with it, you should be ready to upload the post to your content management system (CMS), e.g., WordPress, Shopify, Wix, Squarespace, etc.
In my guide on creating a website, I recommend WordPress, a market-leading CMS ideal for blogging, so I’ll review uploading with it.
Formatting Text
Start by logging into your WordPress admin. Once logged in, navigate to the ‘Post’ menu in the left-hand navigation and click the ‘Add New’ button to create a new post.

Copy the post title for your blog and paste it into the section of the page with the ‘Add title’ placeholder text.
Then, copy the entire contents of your blog post and paste it into the ‘Type / to choose a block’ placeholder text.
When I paste into WordPress, I like to paste plain text without formatting, which helps prevent visual issues and bloated code that can result when copying from some word processors.
You can use the following keyword shortcuts:
- Mac: Command + Shift and then hit V
- PC: Control + Shift and then hit V

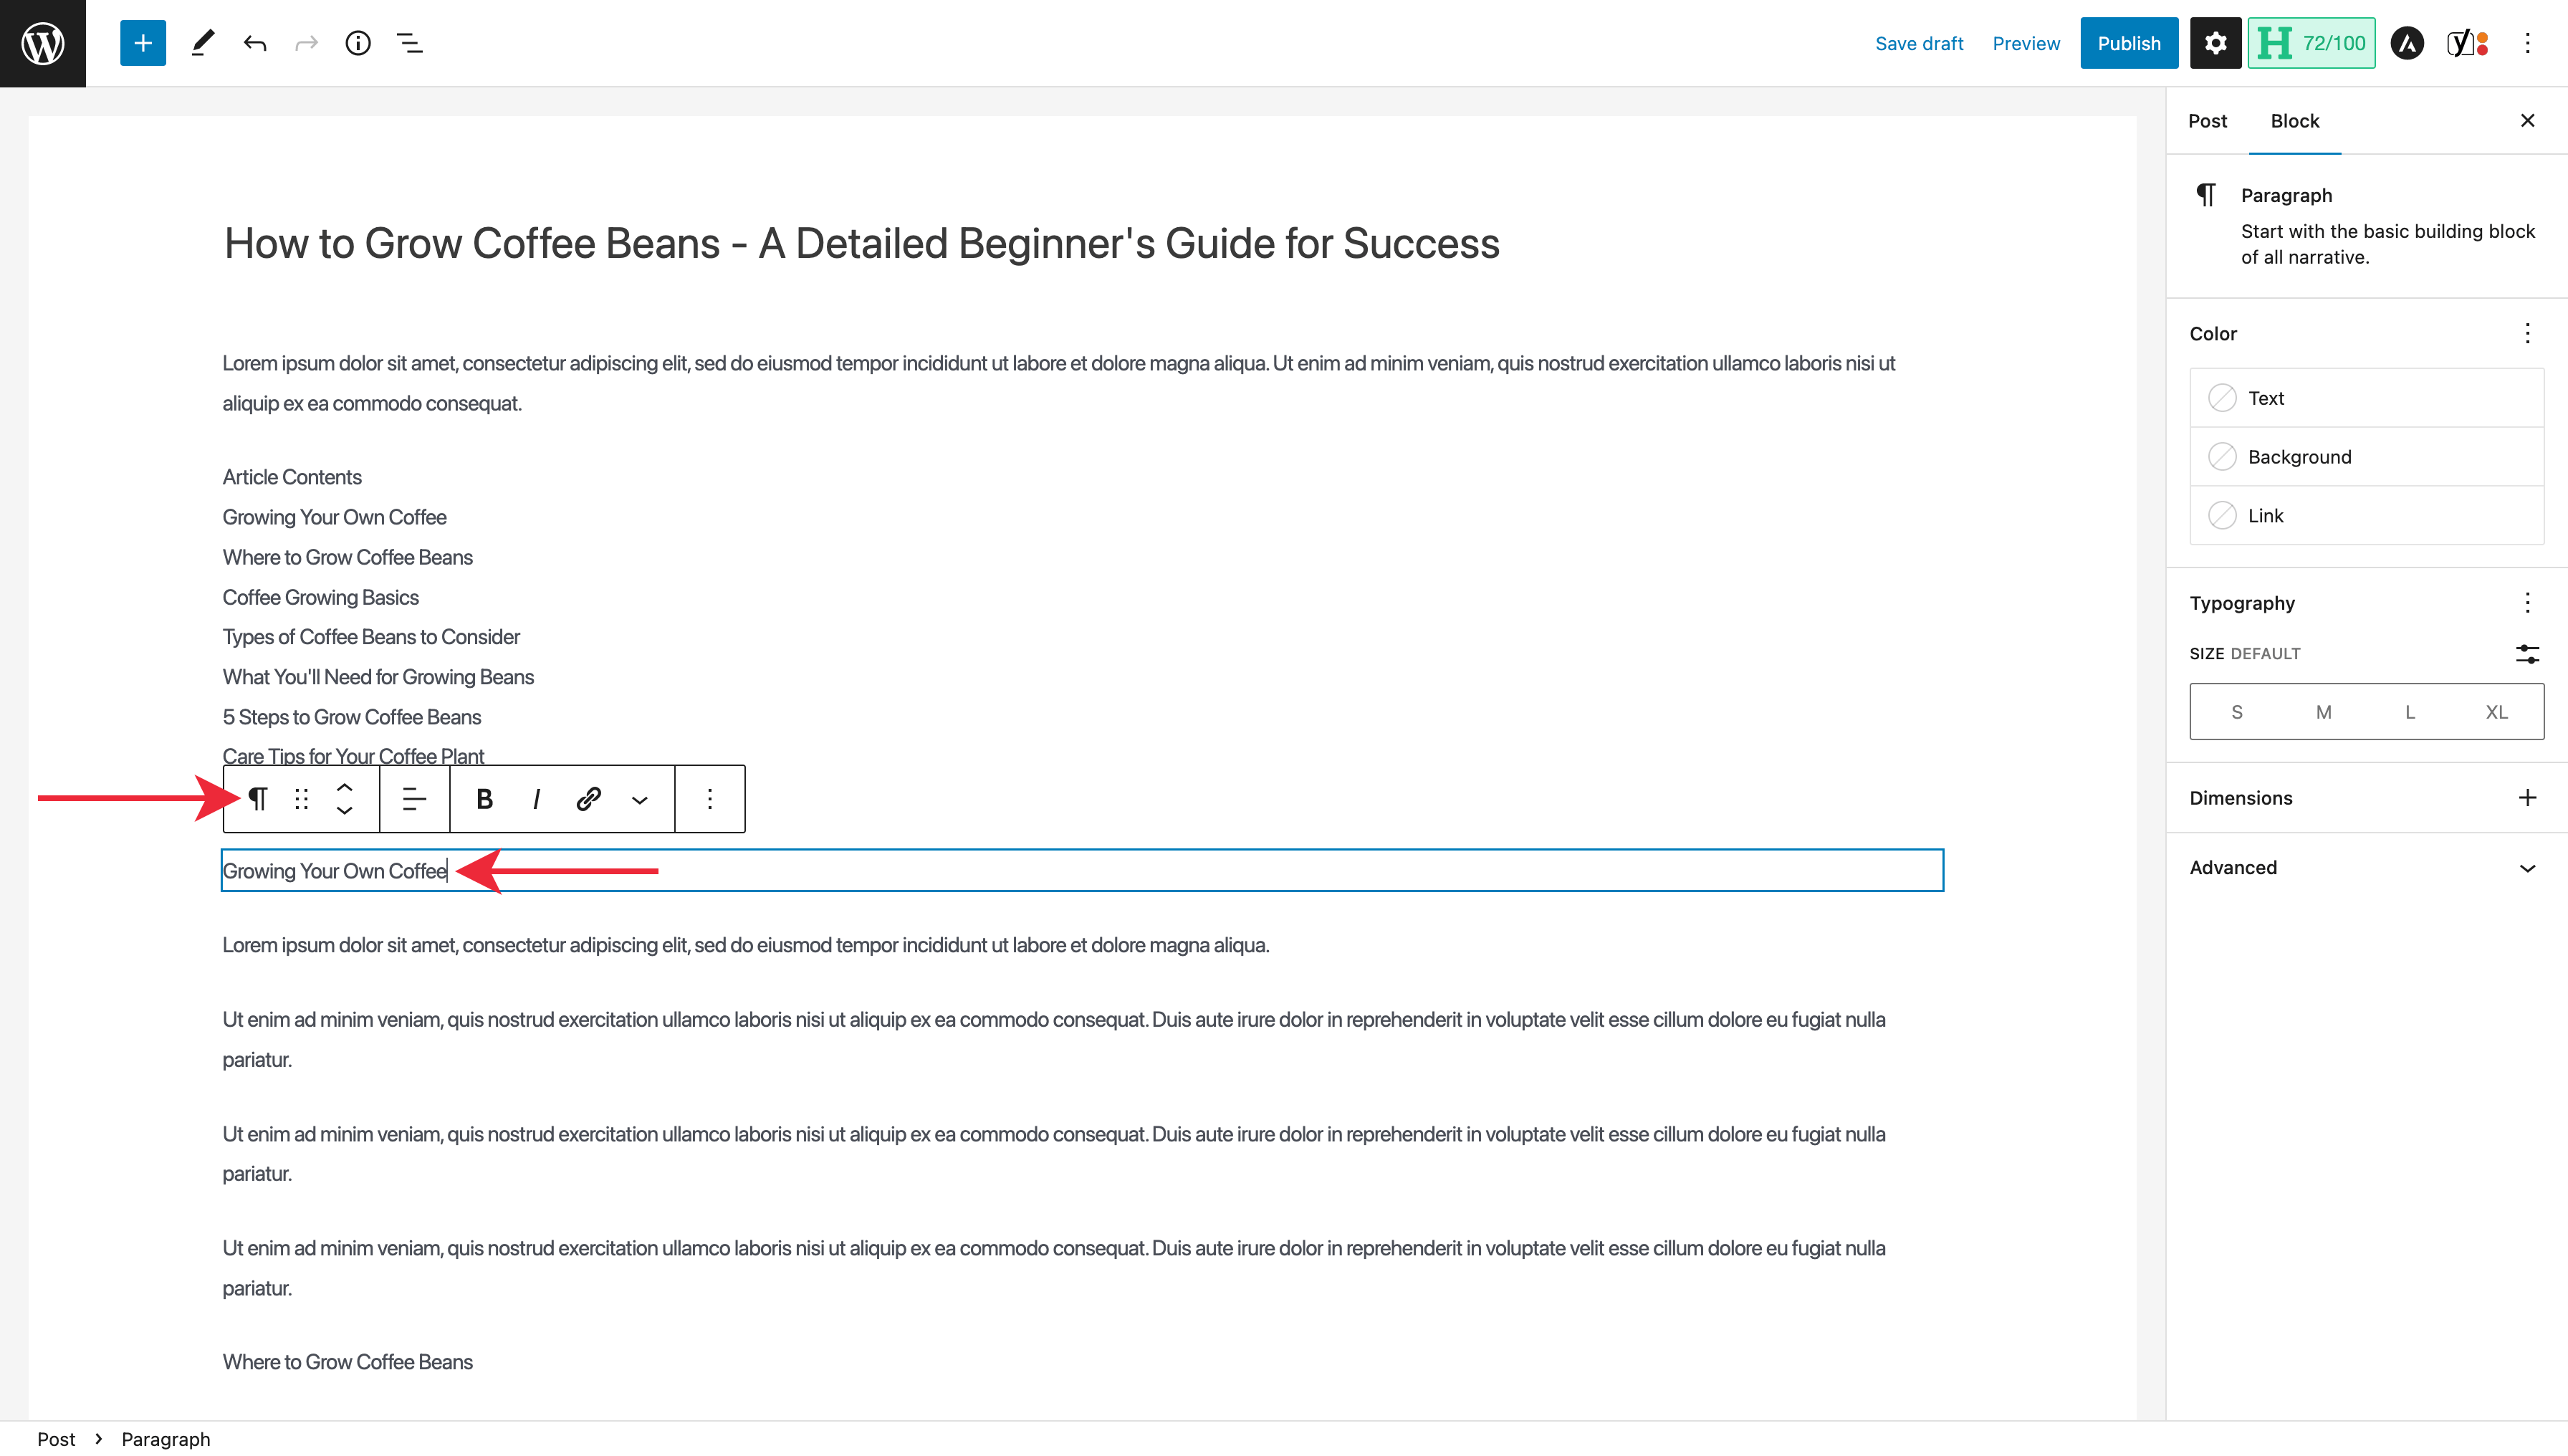
By default, WordPress will break up all of your pasted text into paragraph blocks, so I now need to go through and add my headings and format any of my text, such as bullet points.
To format a heading, select the heading.
Then click the paragraph icon from the floating menu and transform the text to a ‘Heading.’
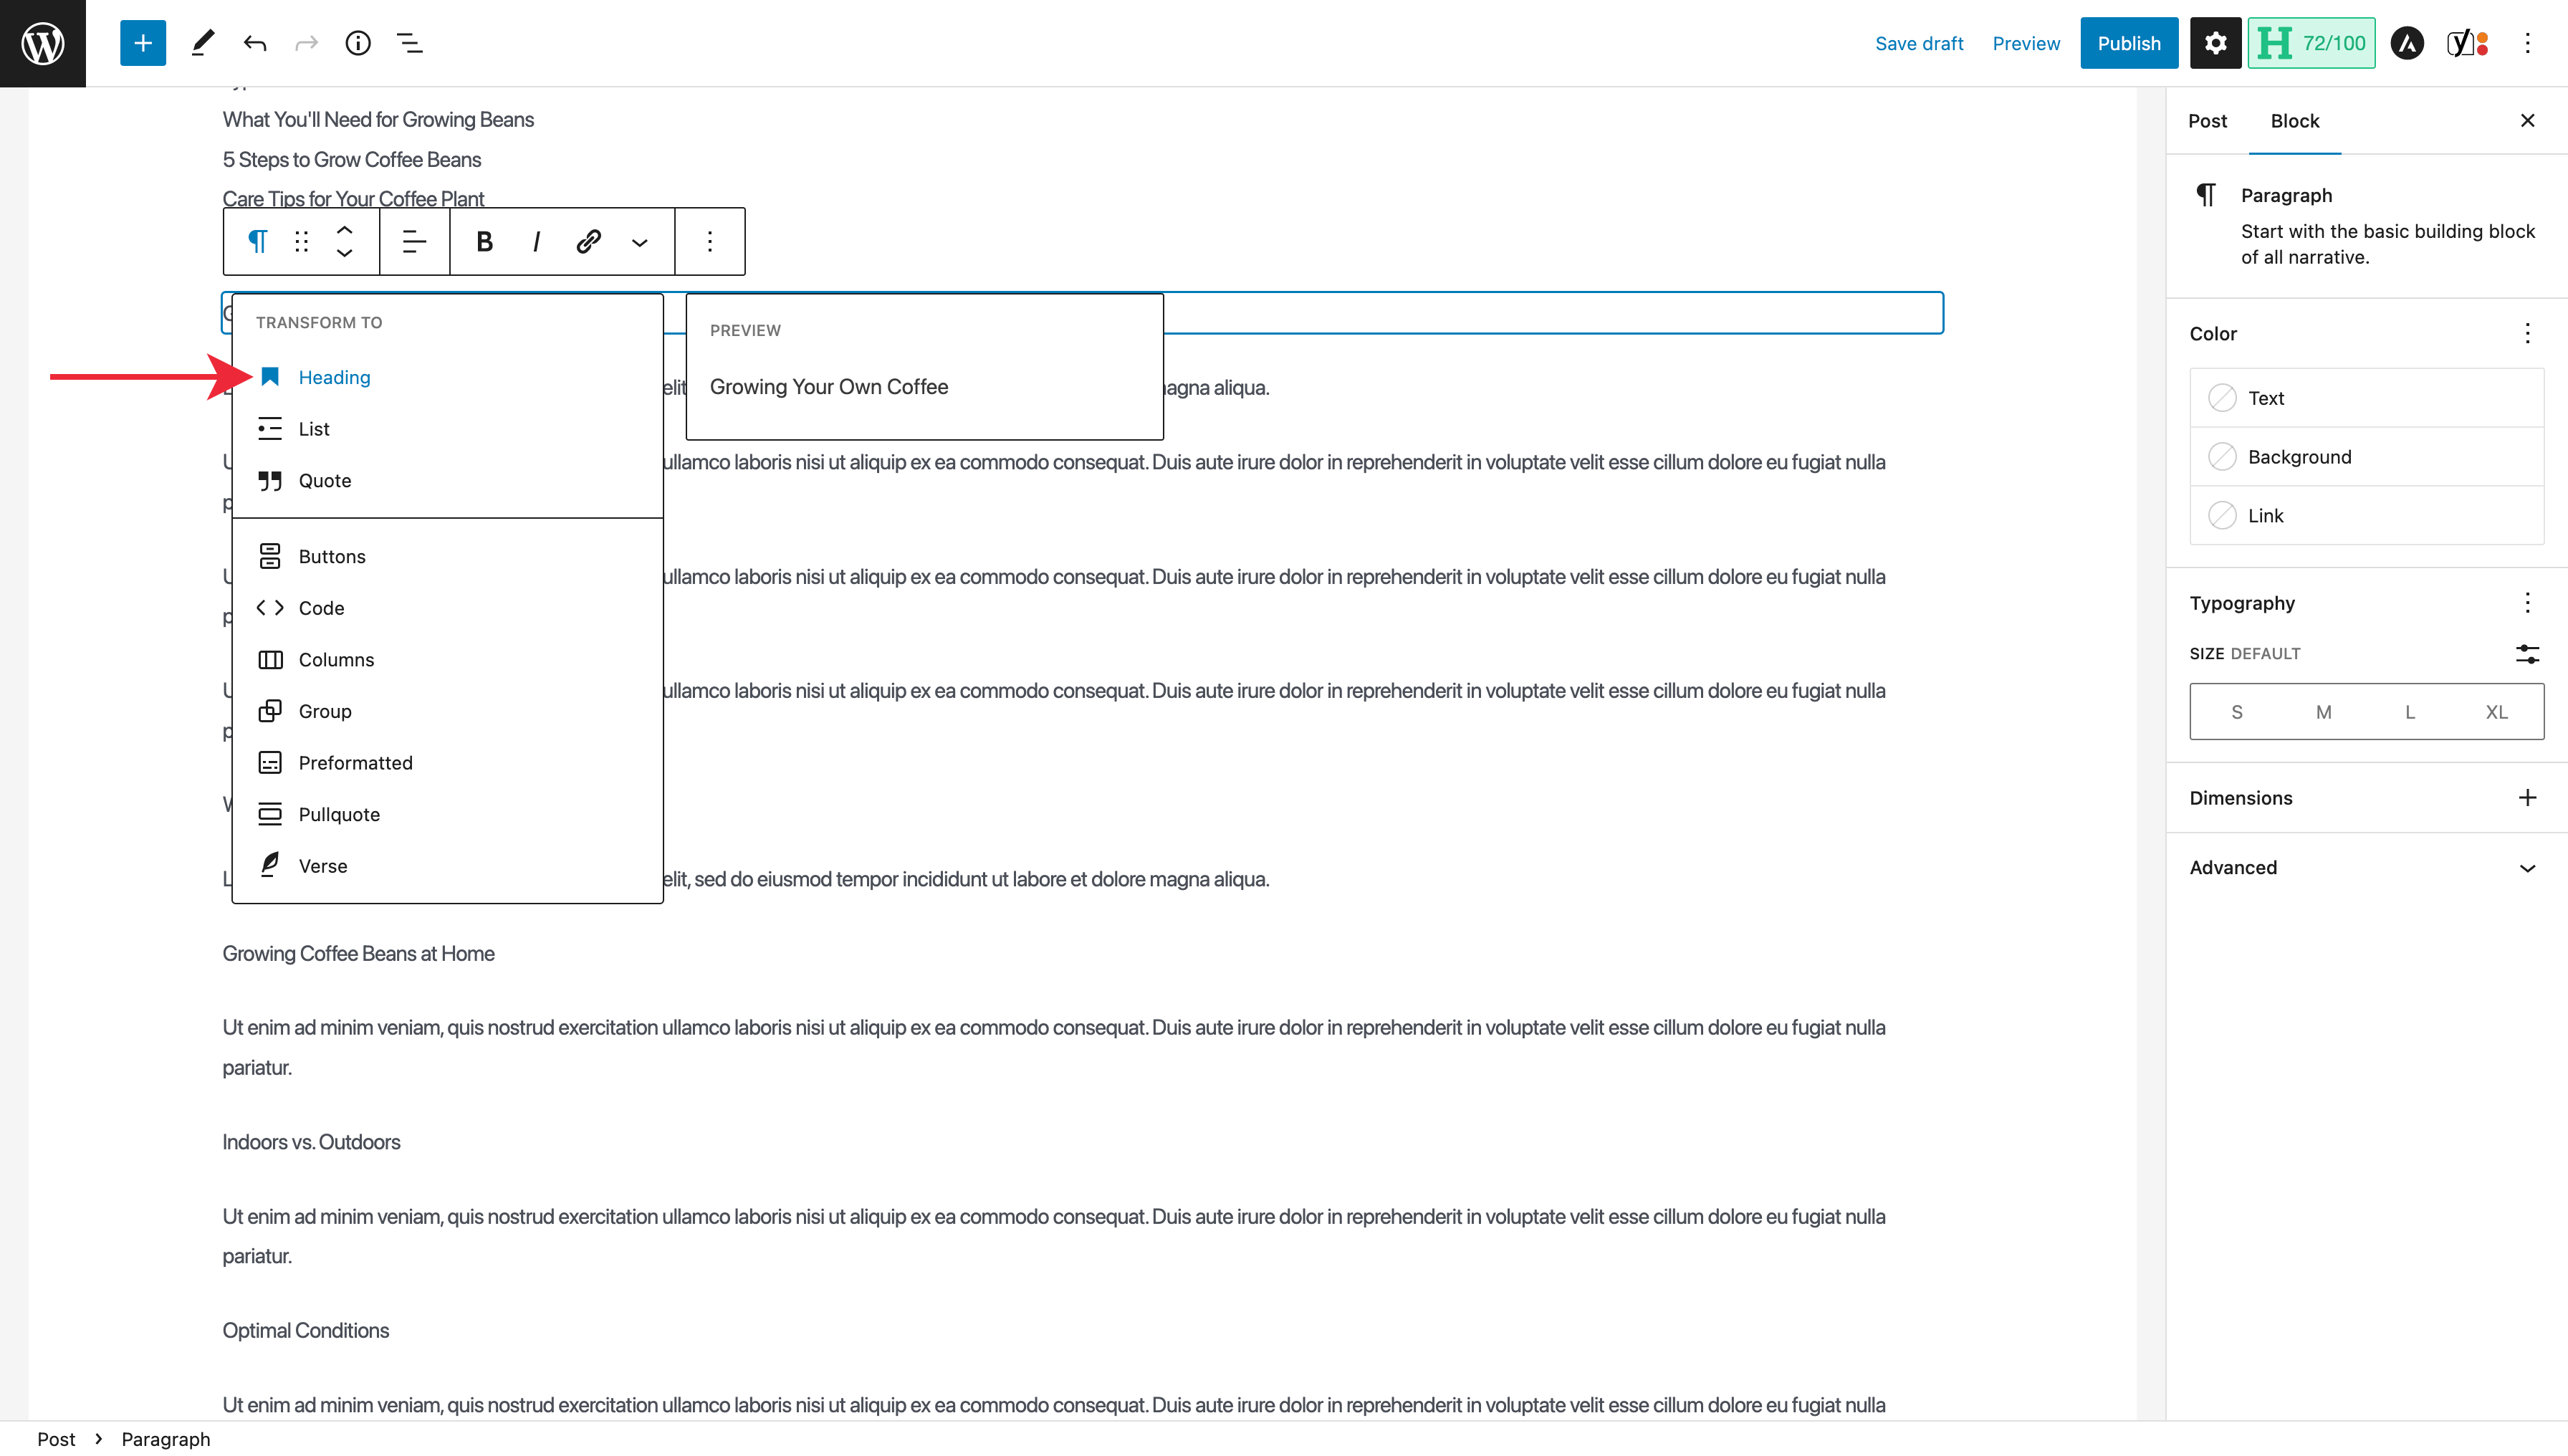
The paragraph text will update to a heading.
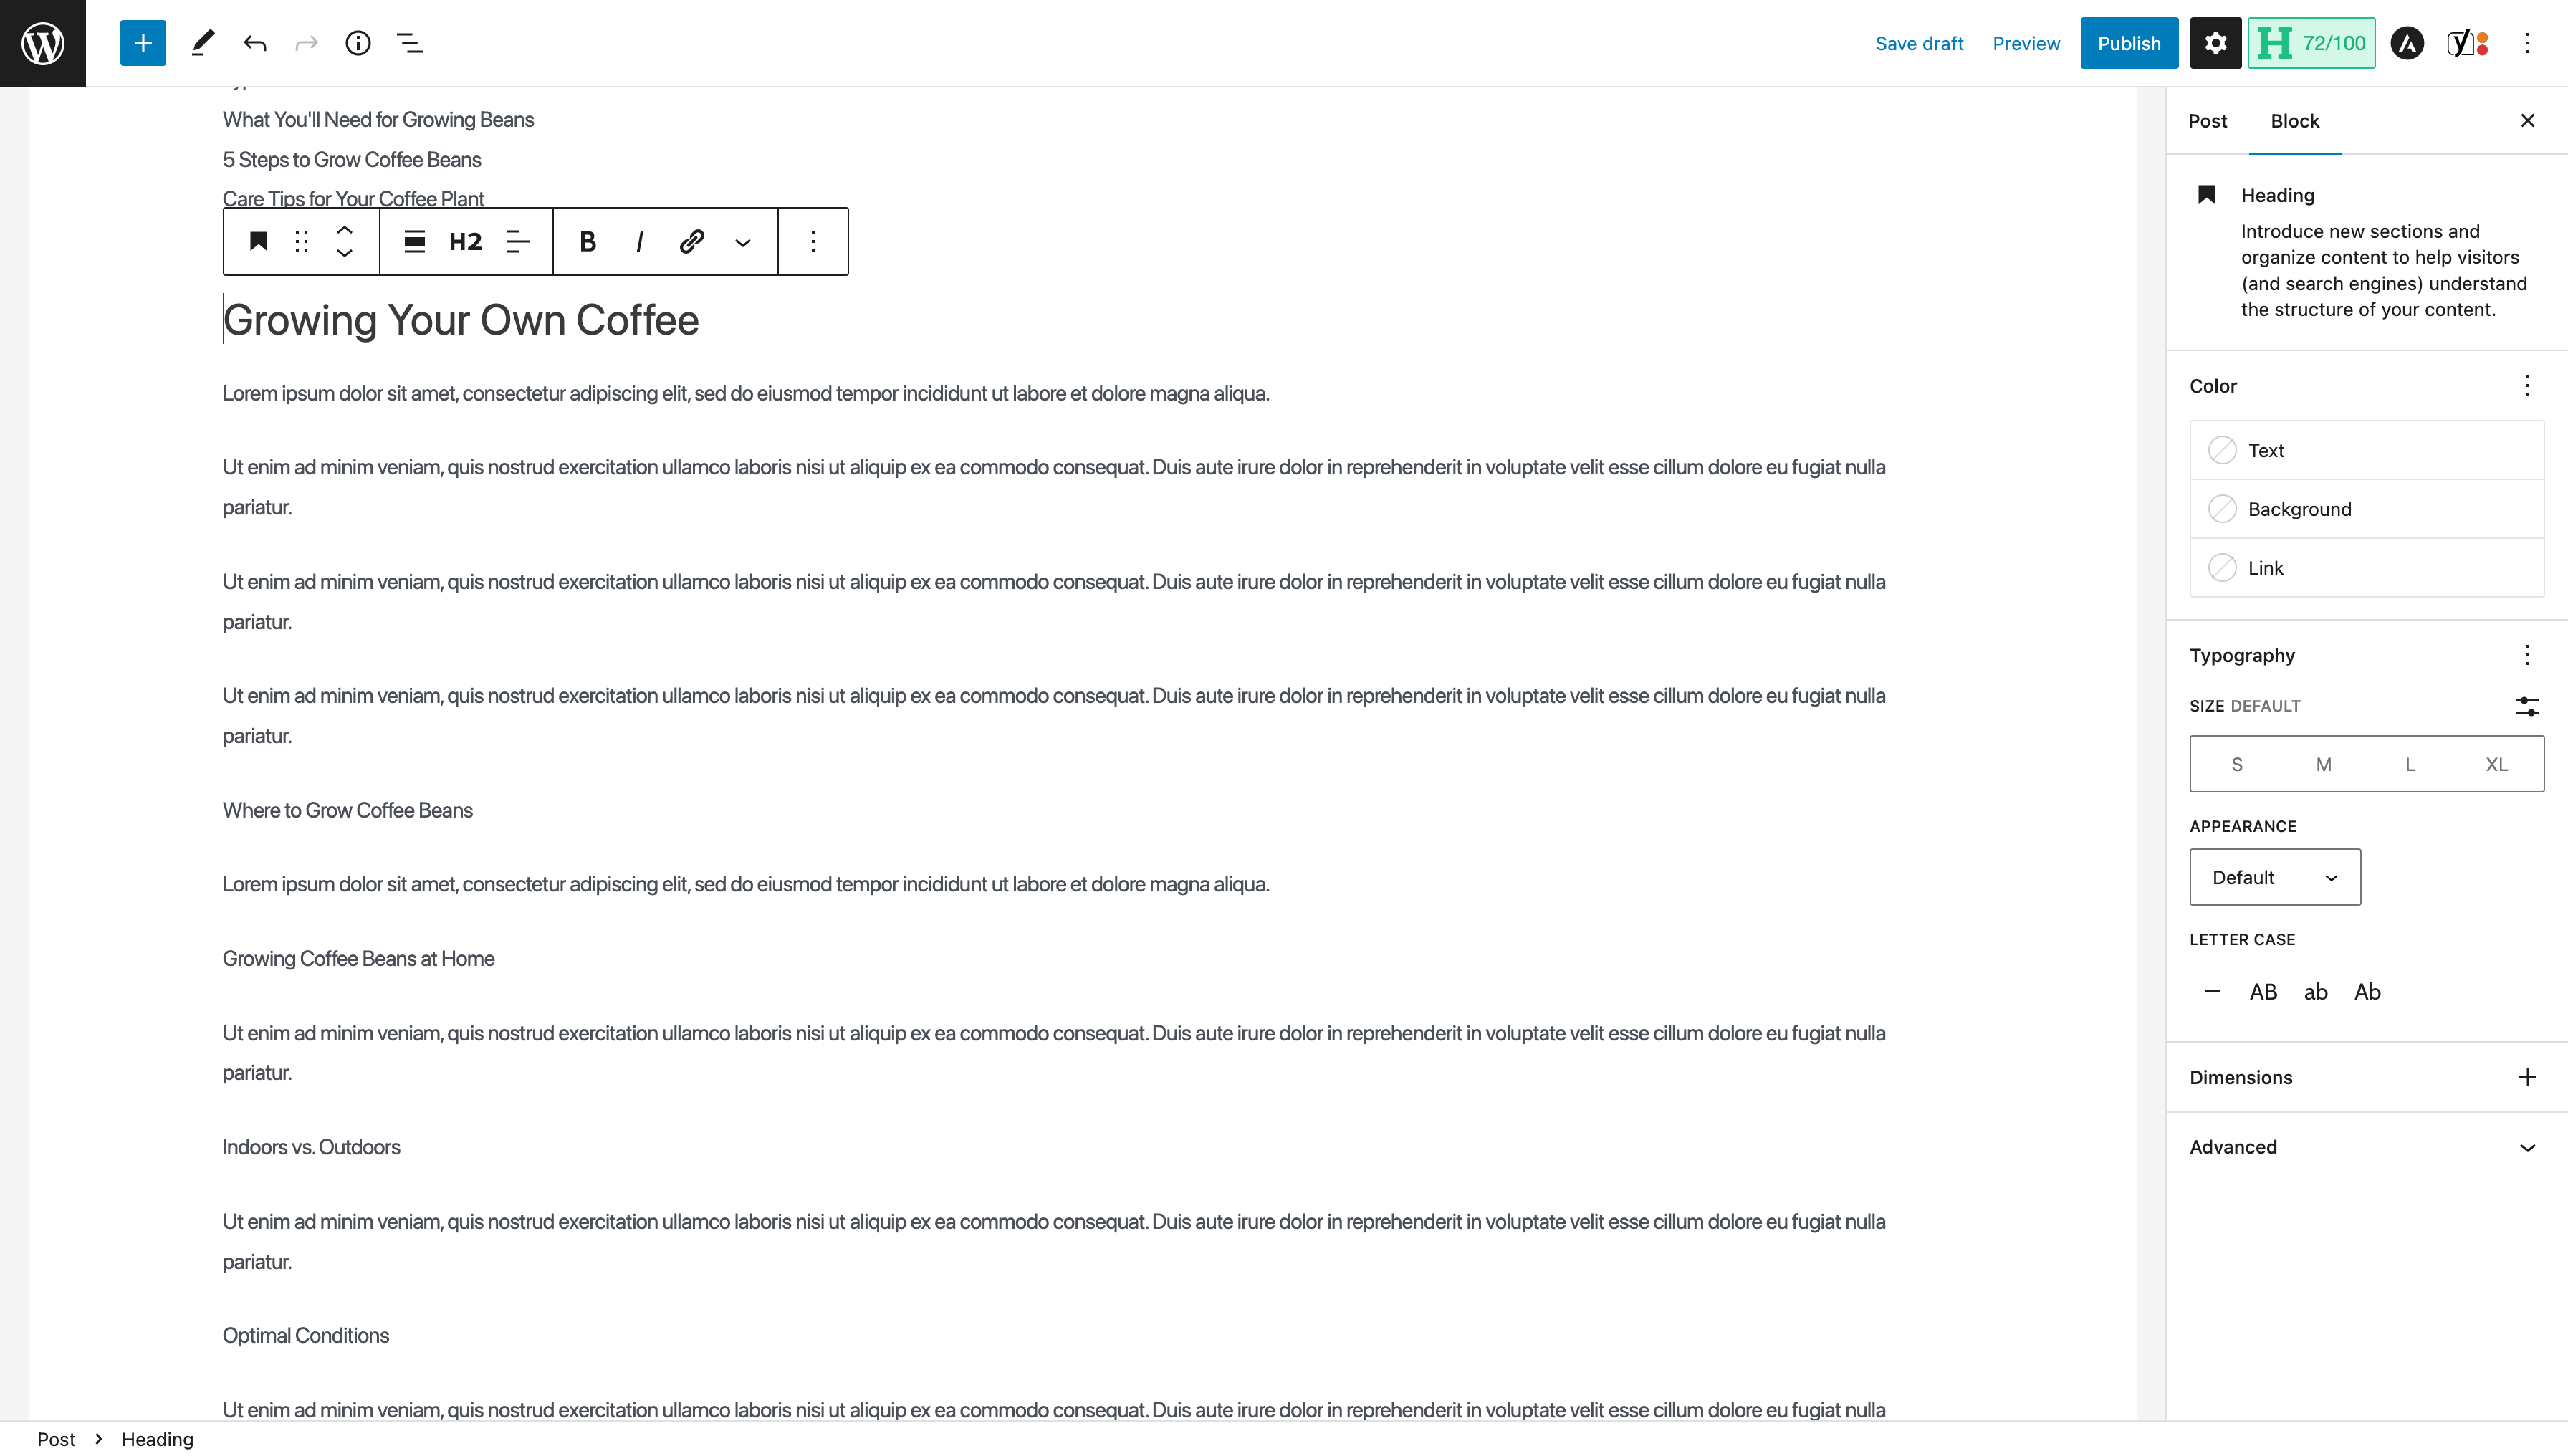
WordPress will default to an H2 heading, but you can change that by selecting H2 from the floating menu to choose an alternative if you’d like.
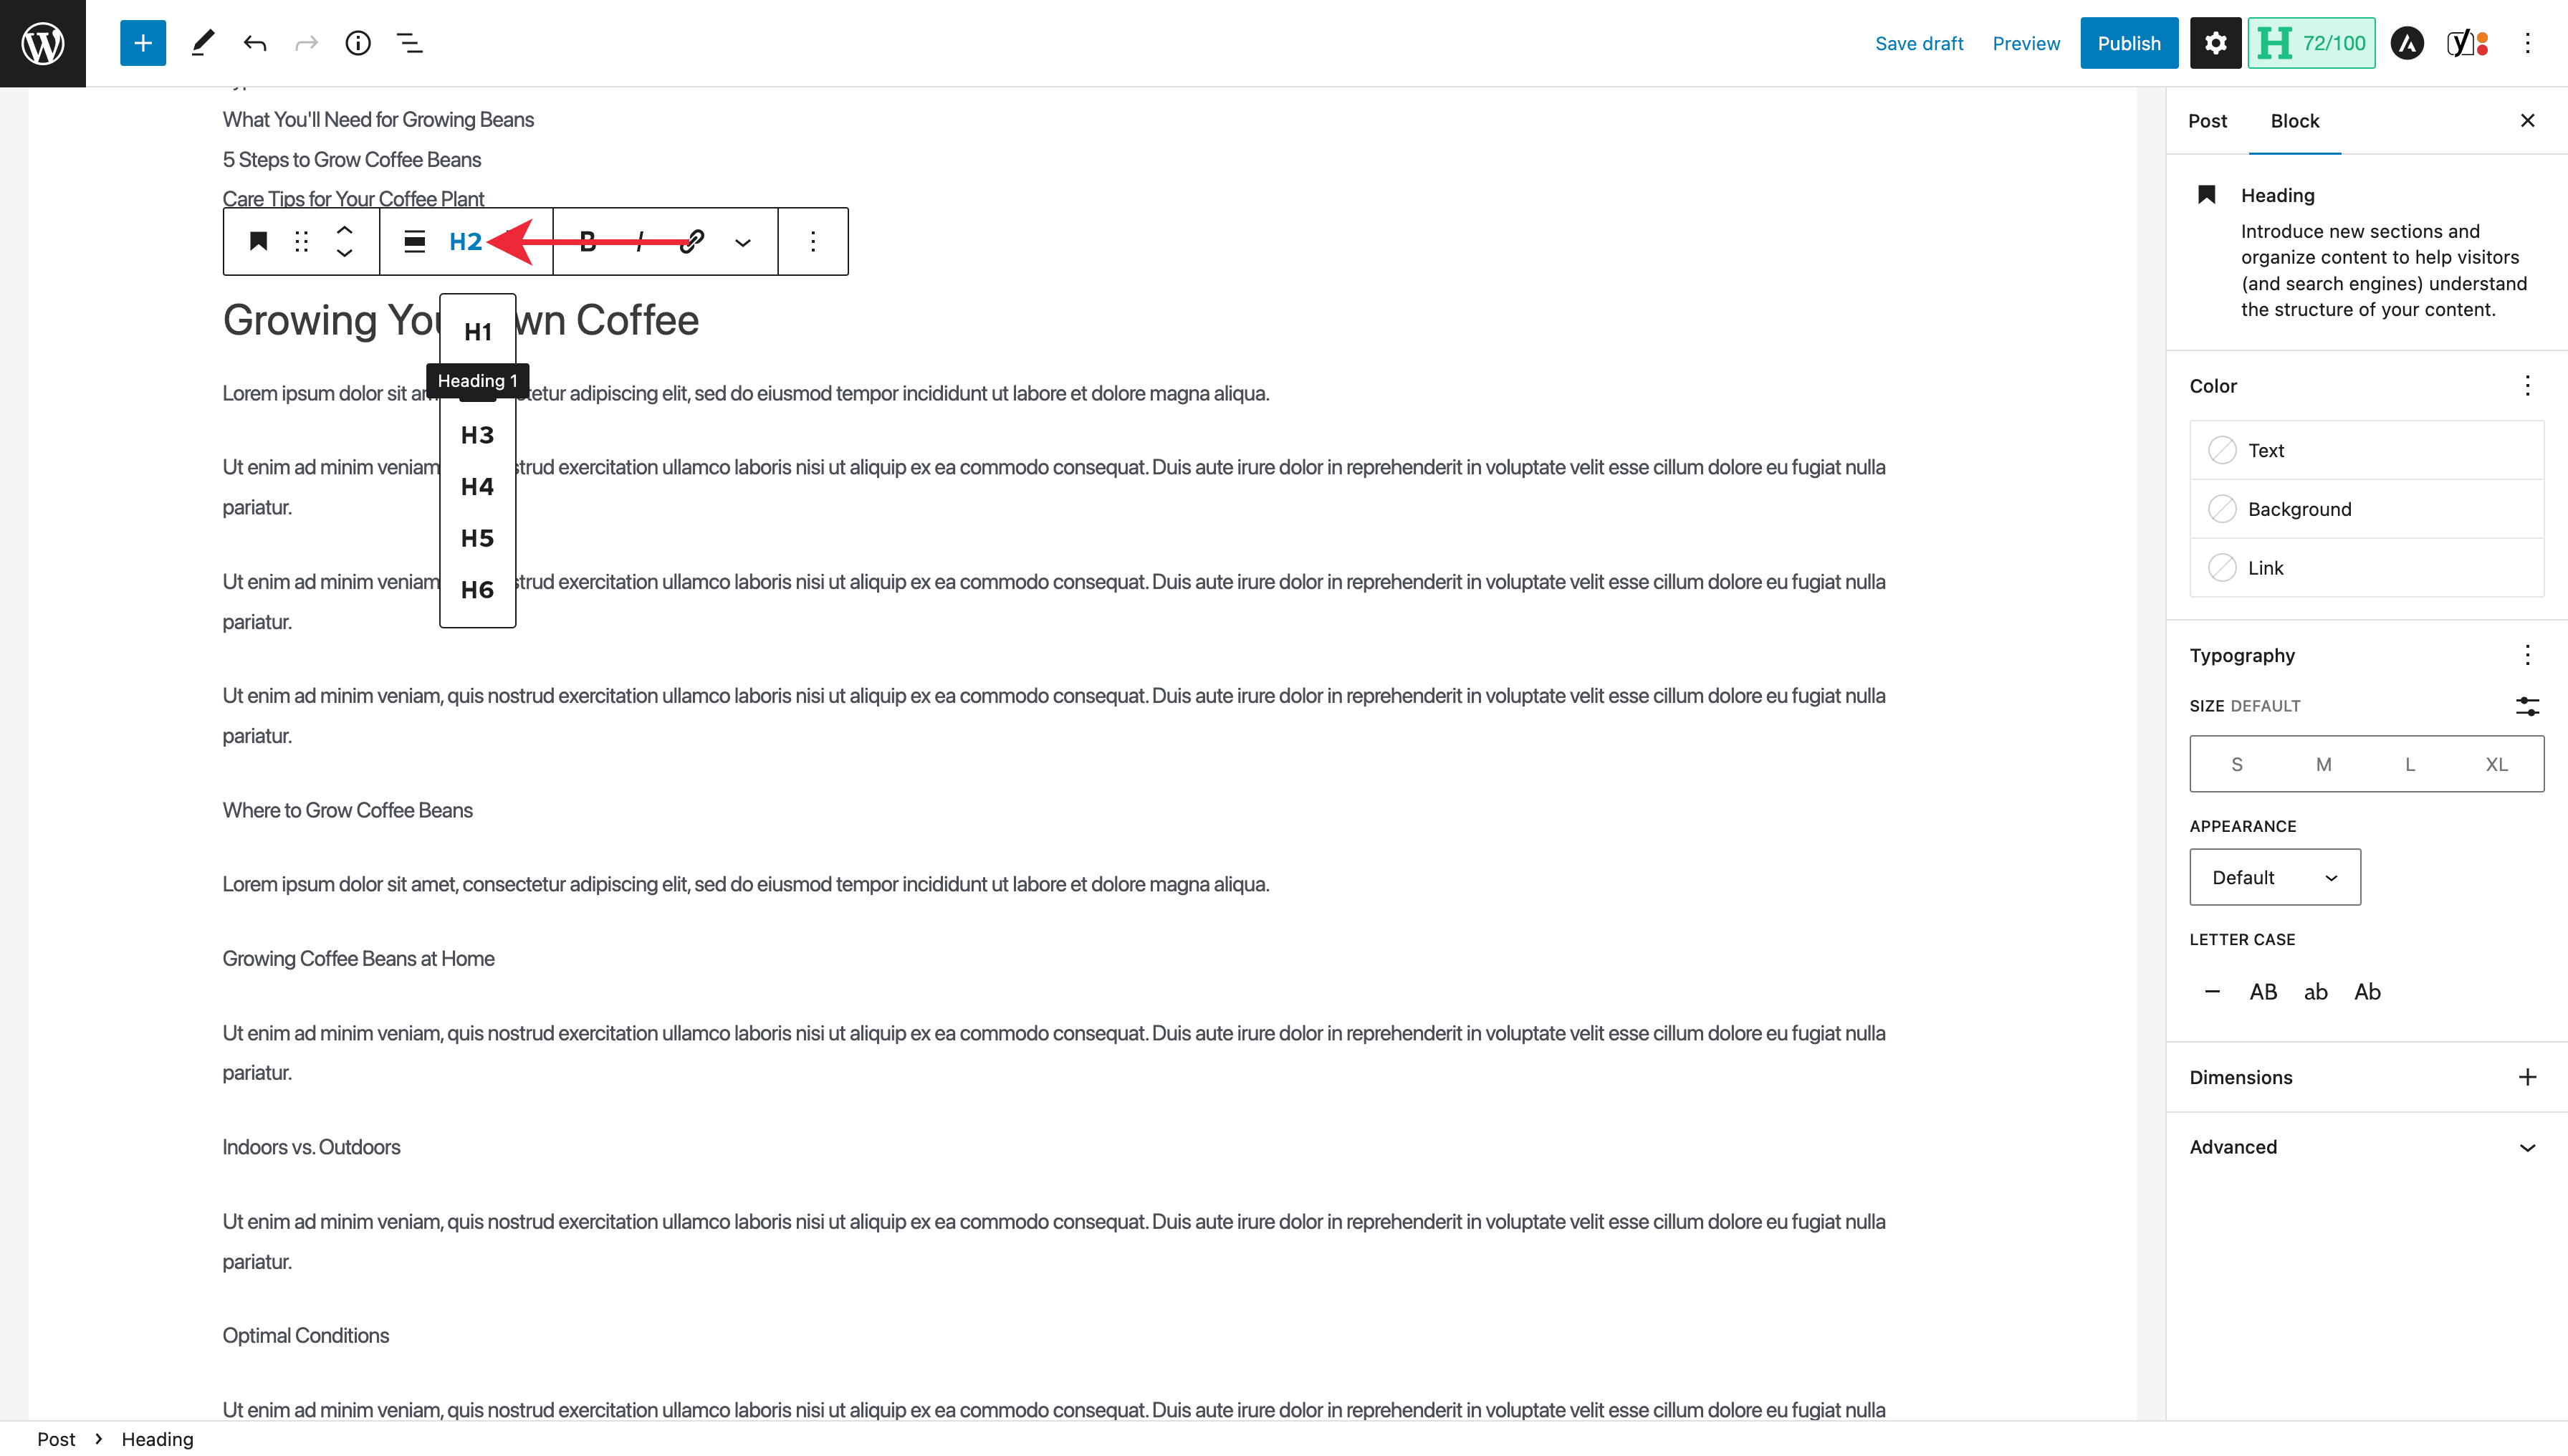
Headings in WordPress are ranked by levels from one to six, with H1 being the largest and most prominent and H6 being the smallest. You can use different heading sizes to organize and group sub-topics within your post.
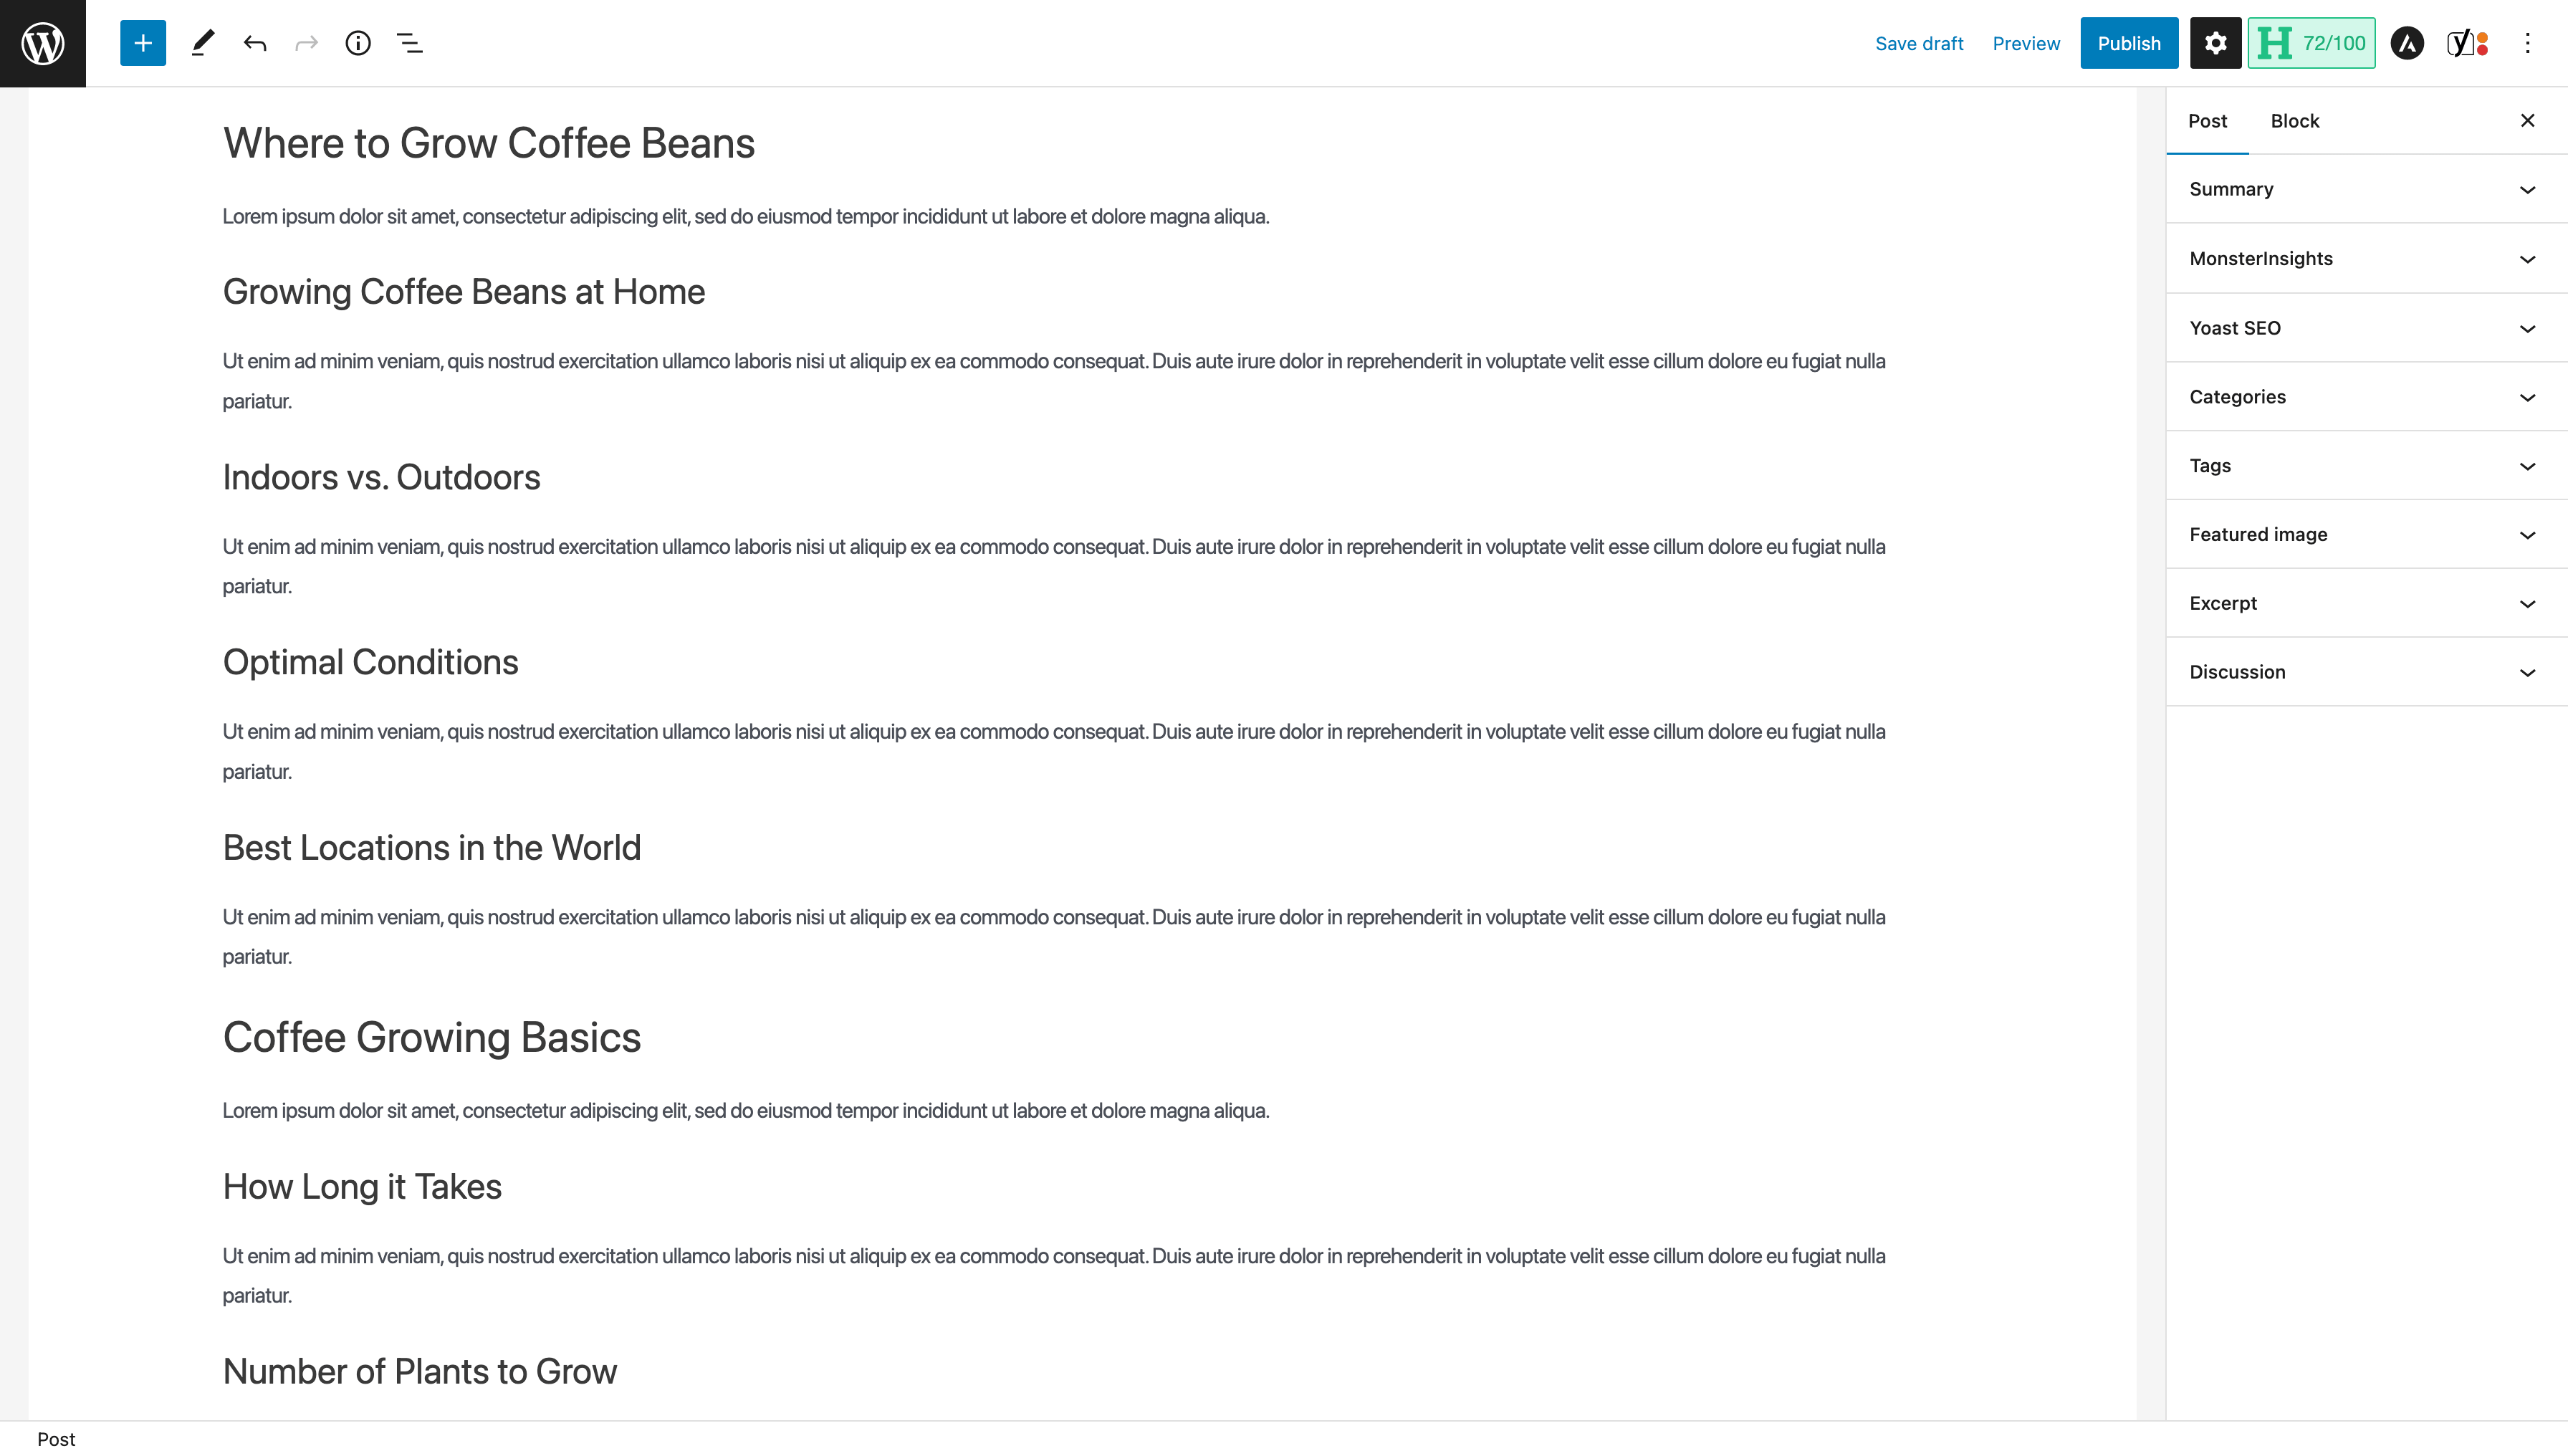
Here are a few examples of the headings I have for Digiblend:
H1 Heading
H2 Heading
H3 Heading
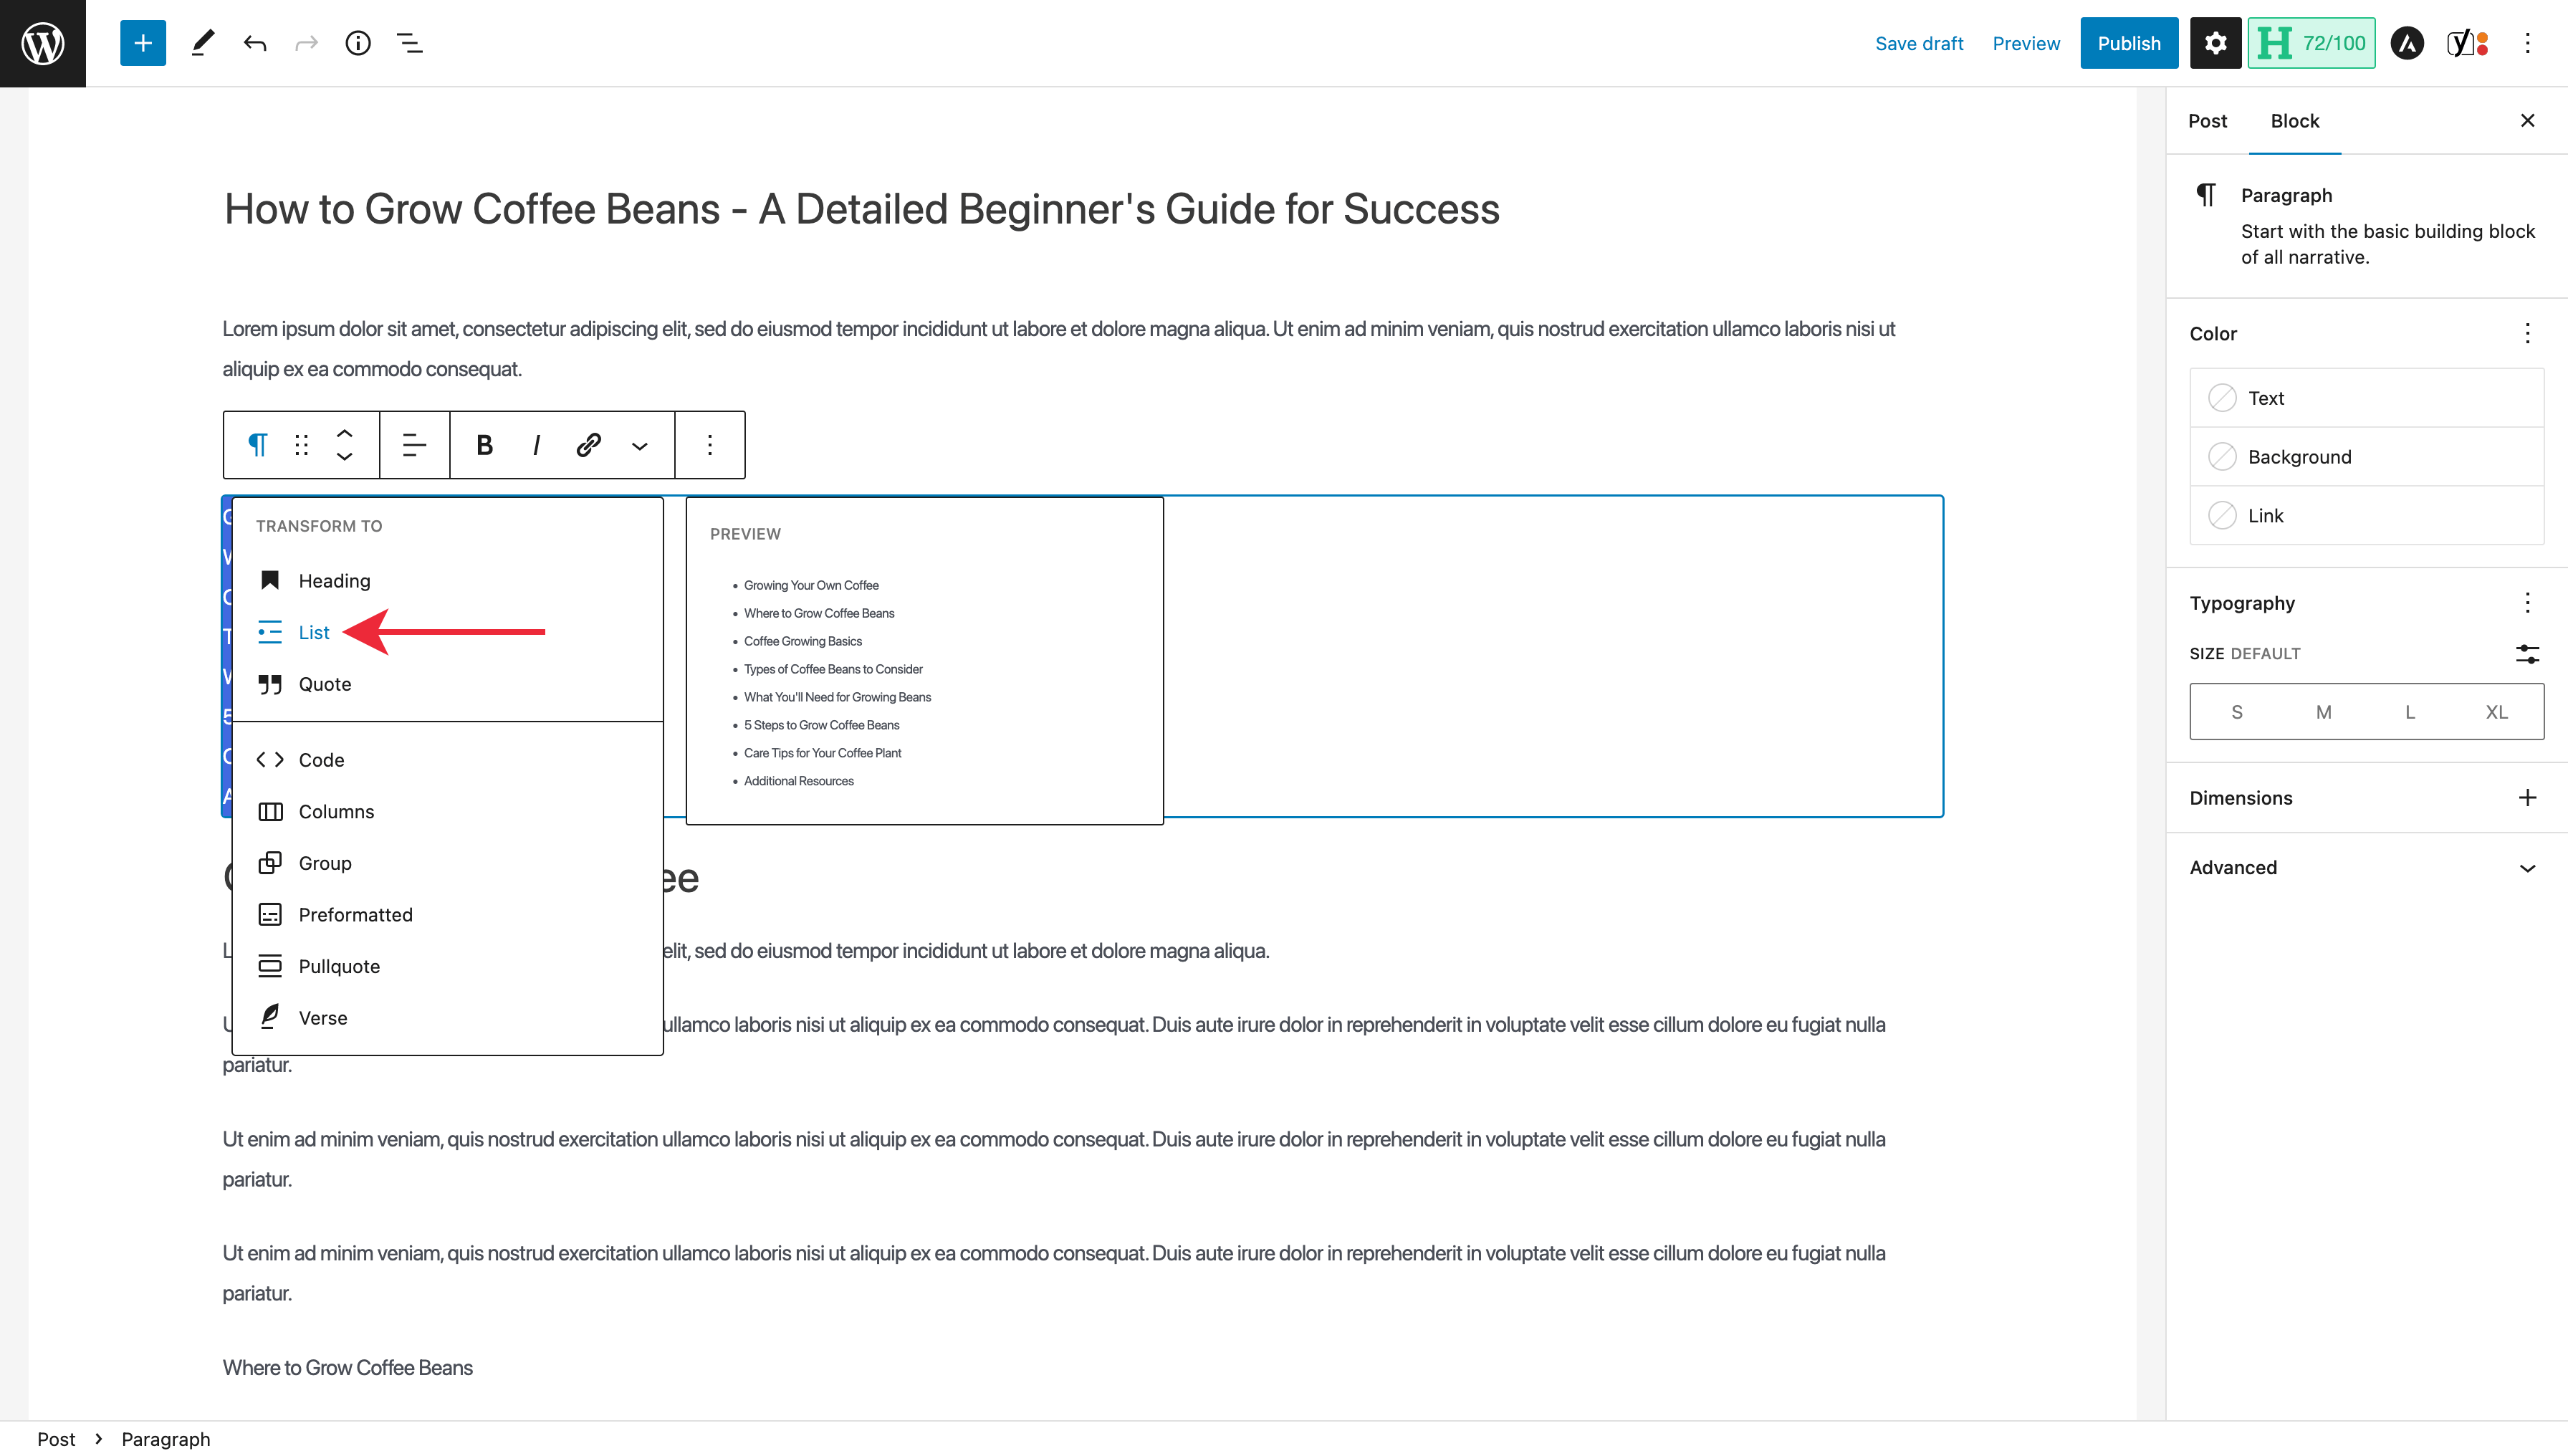
Here’s where you change a paragraph to a bullet list. Other formatting options are available under the formatting menu and in the settings panel on the right side of the screen.
You can preview your post by clicking the ‘Preview’ link at the top of the screen and then selecting ‘Preview in a new tab.’
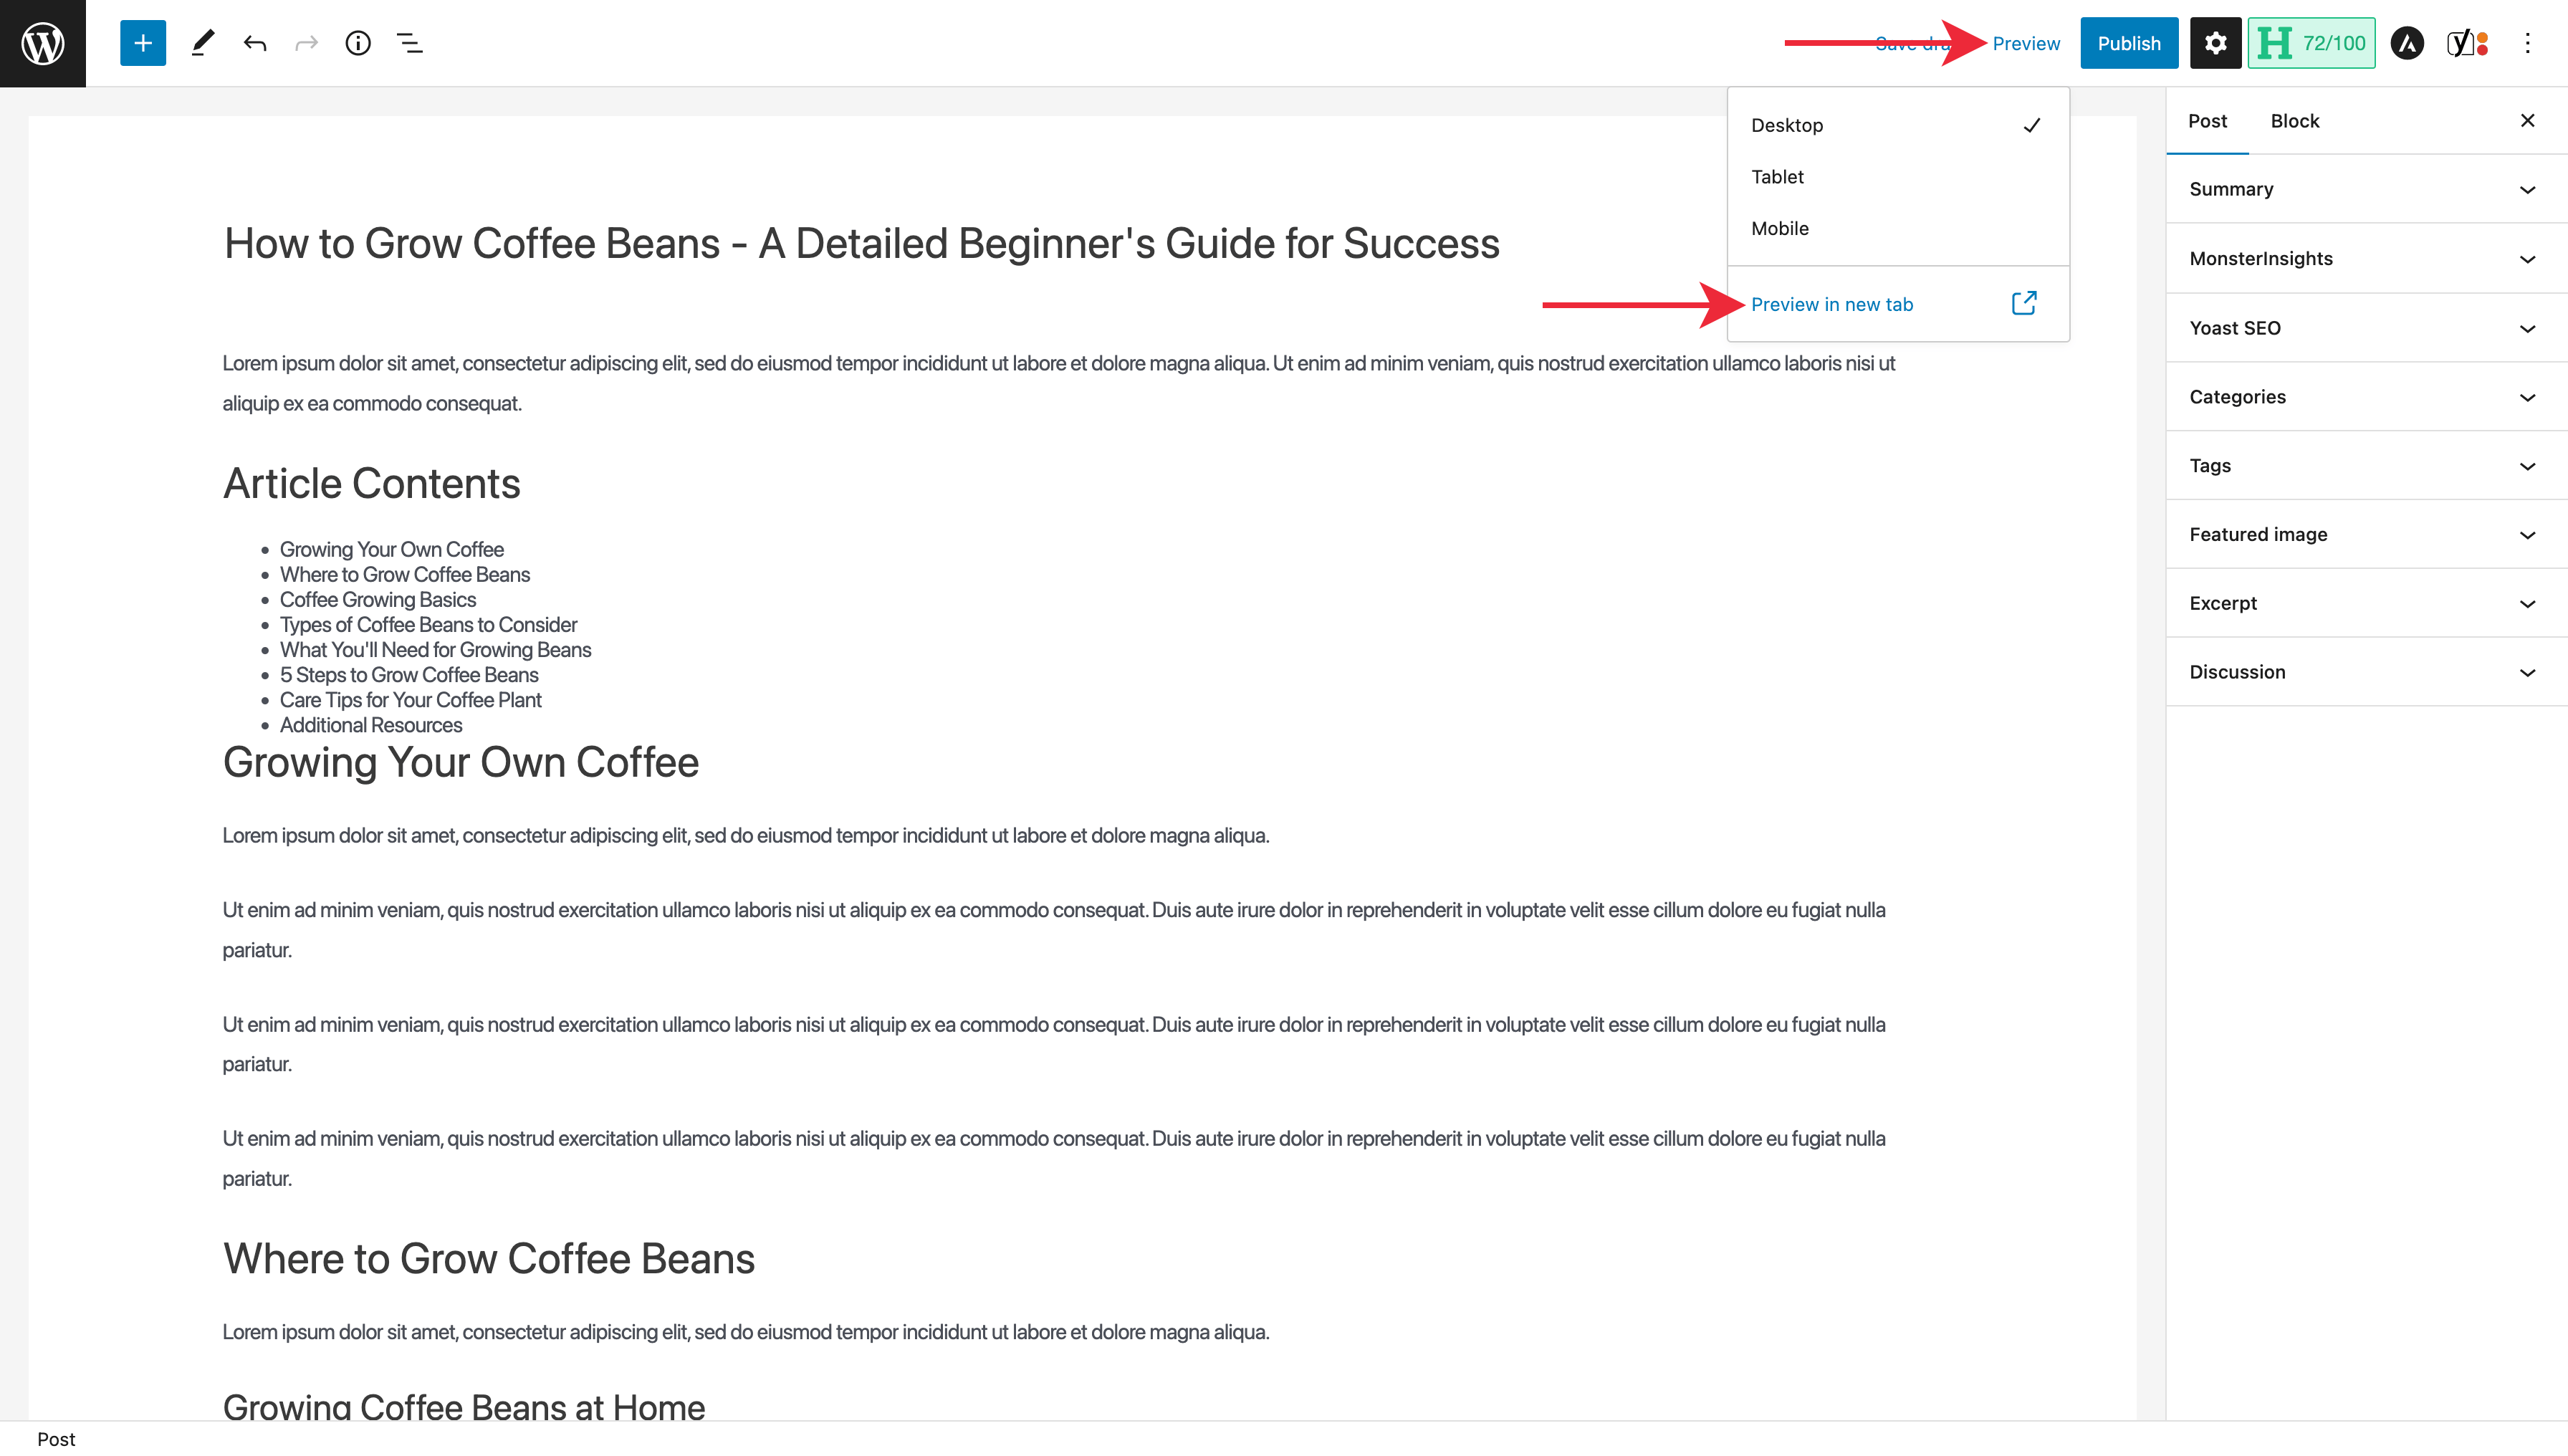
Here’s what my example looks like when previewing.
Uploading an Image
Once your post is formatted, we can add any images you created to your post to improve its overall visual appeal.
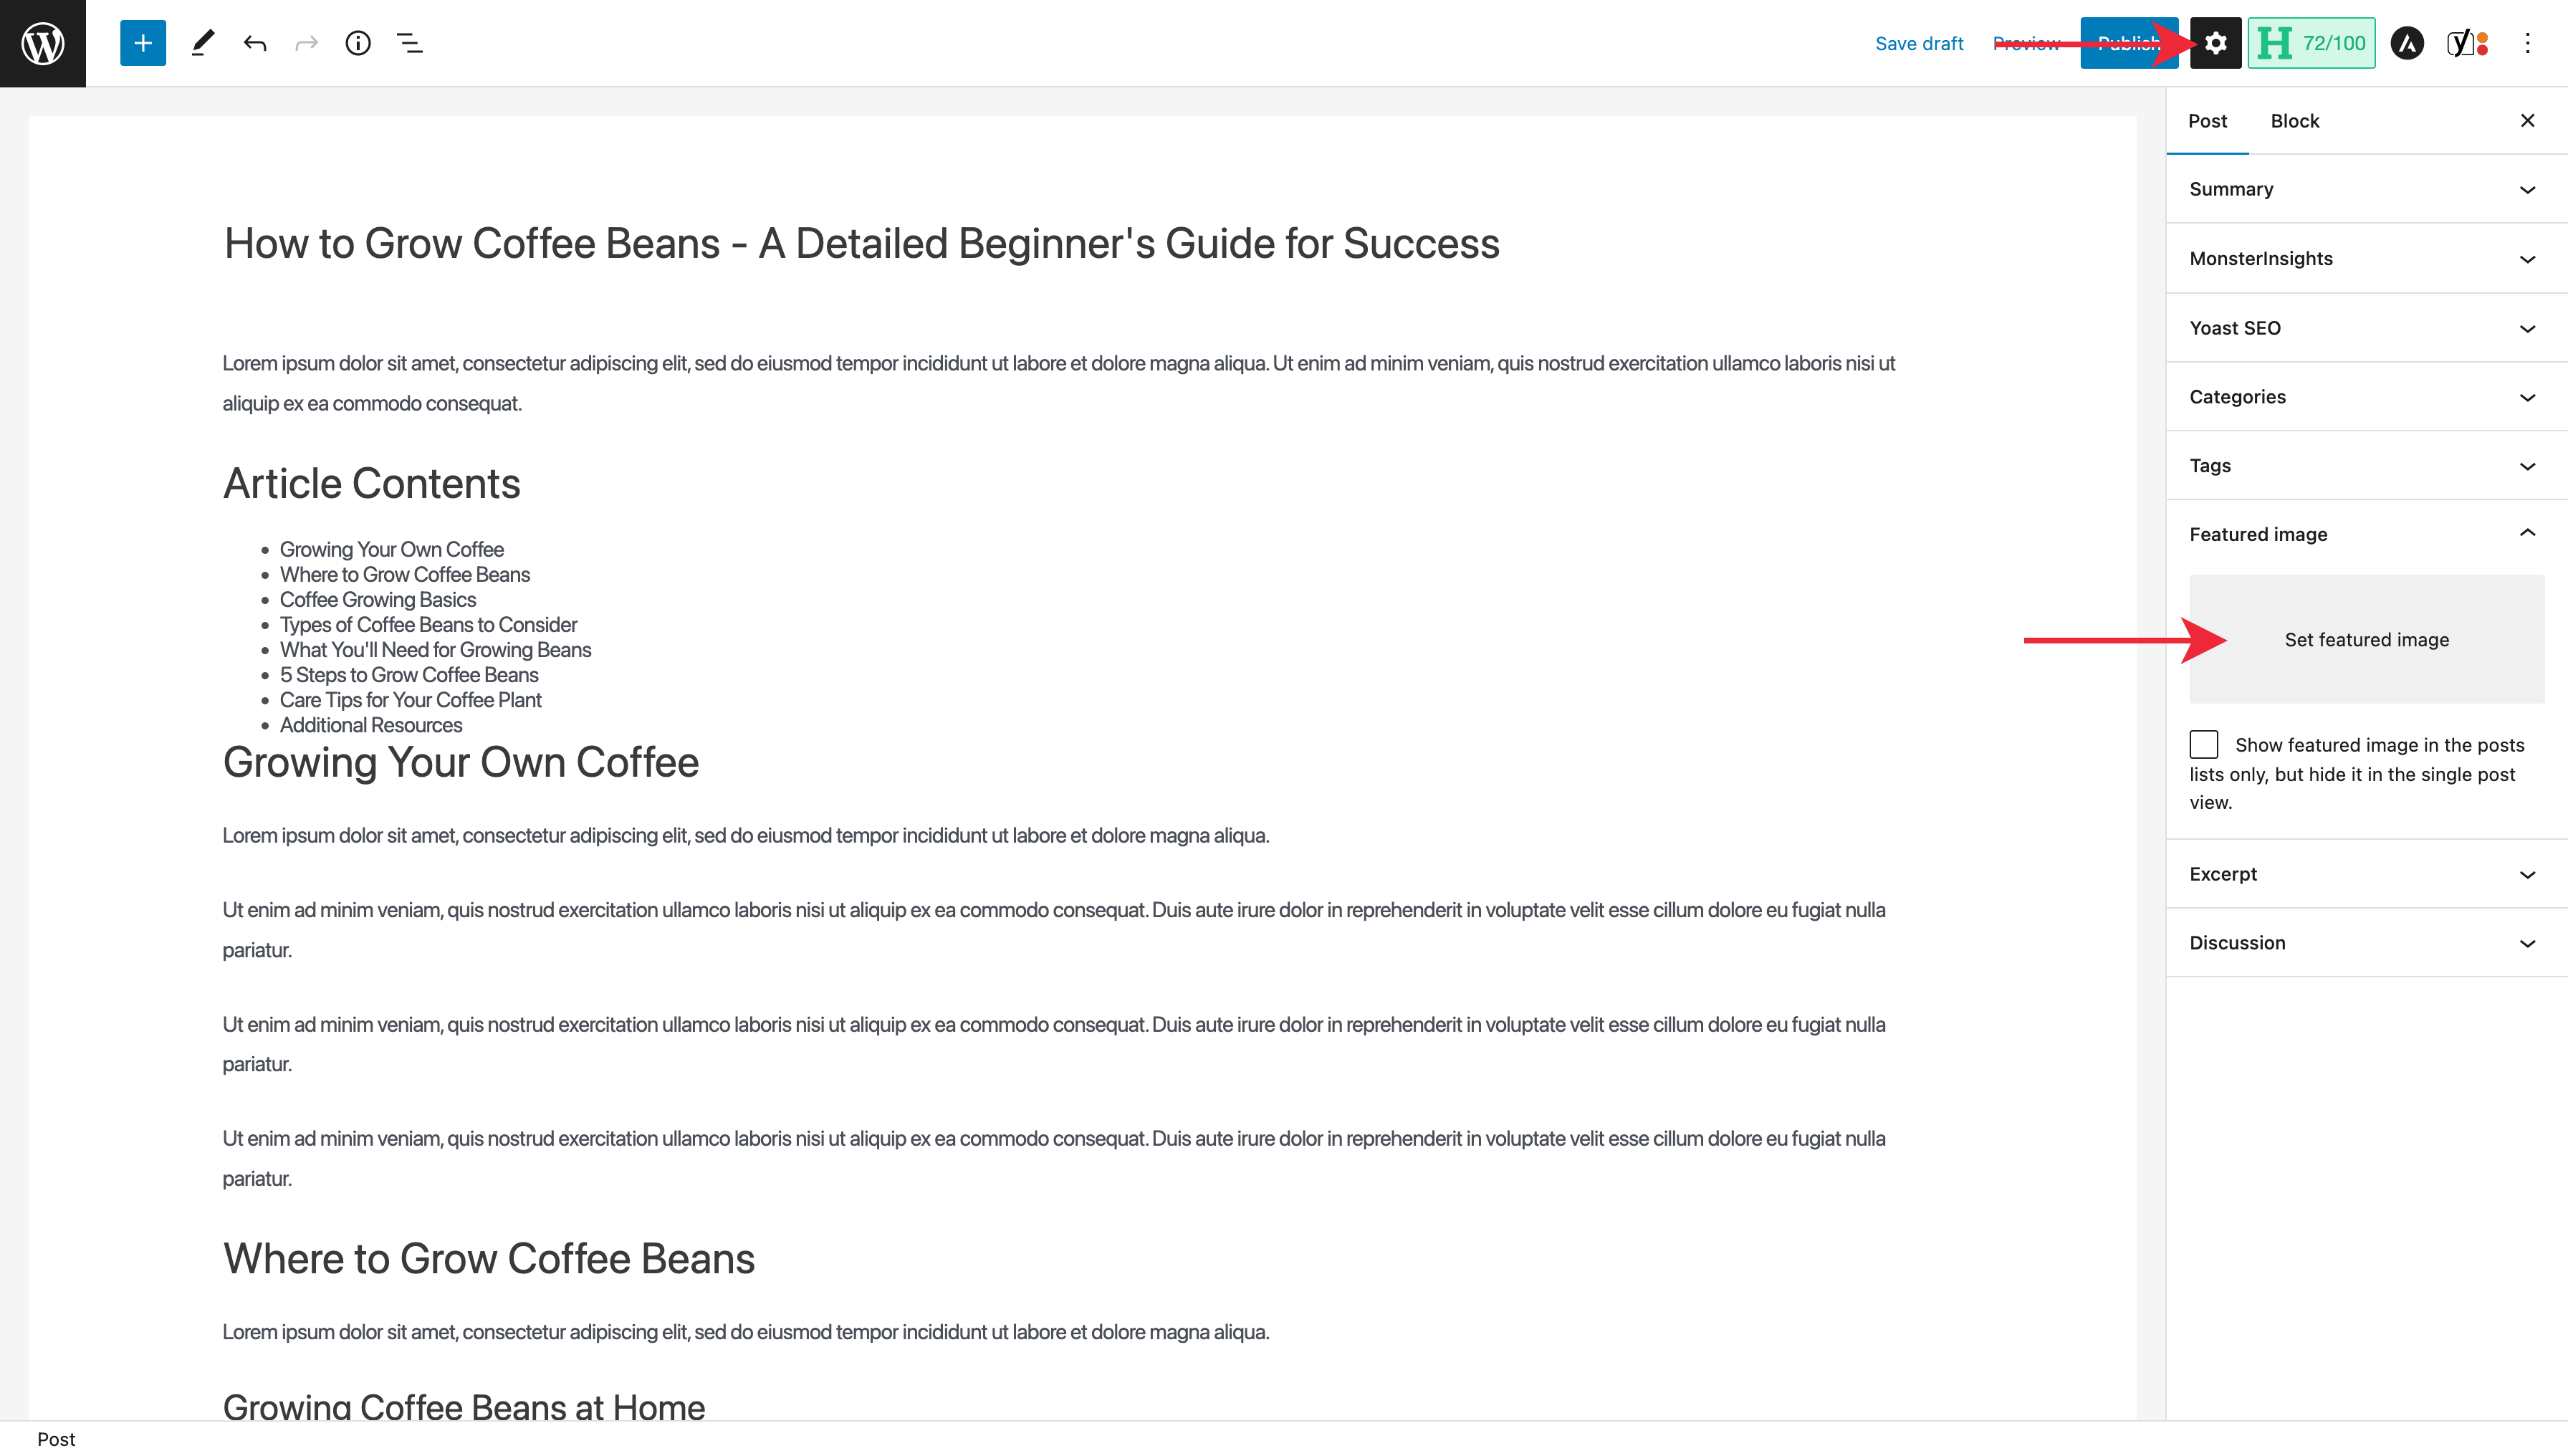
If you only created one image for the top of the post, we can add that as your post’s ‘Featured Image.’ First, select the ‘Gear’ icon to expose the post settings navigation, then expand the ‘Featured Image’ menu.
Once expanded, click on ‘Set featured image.’
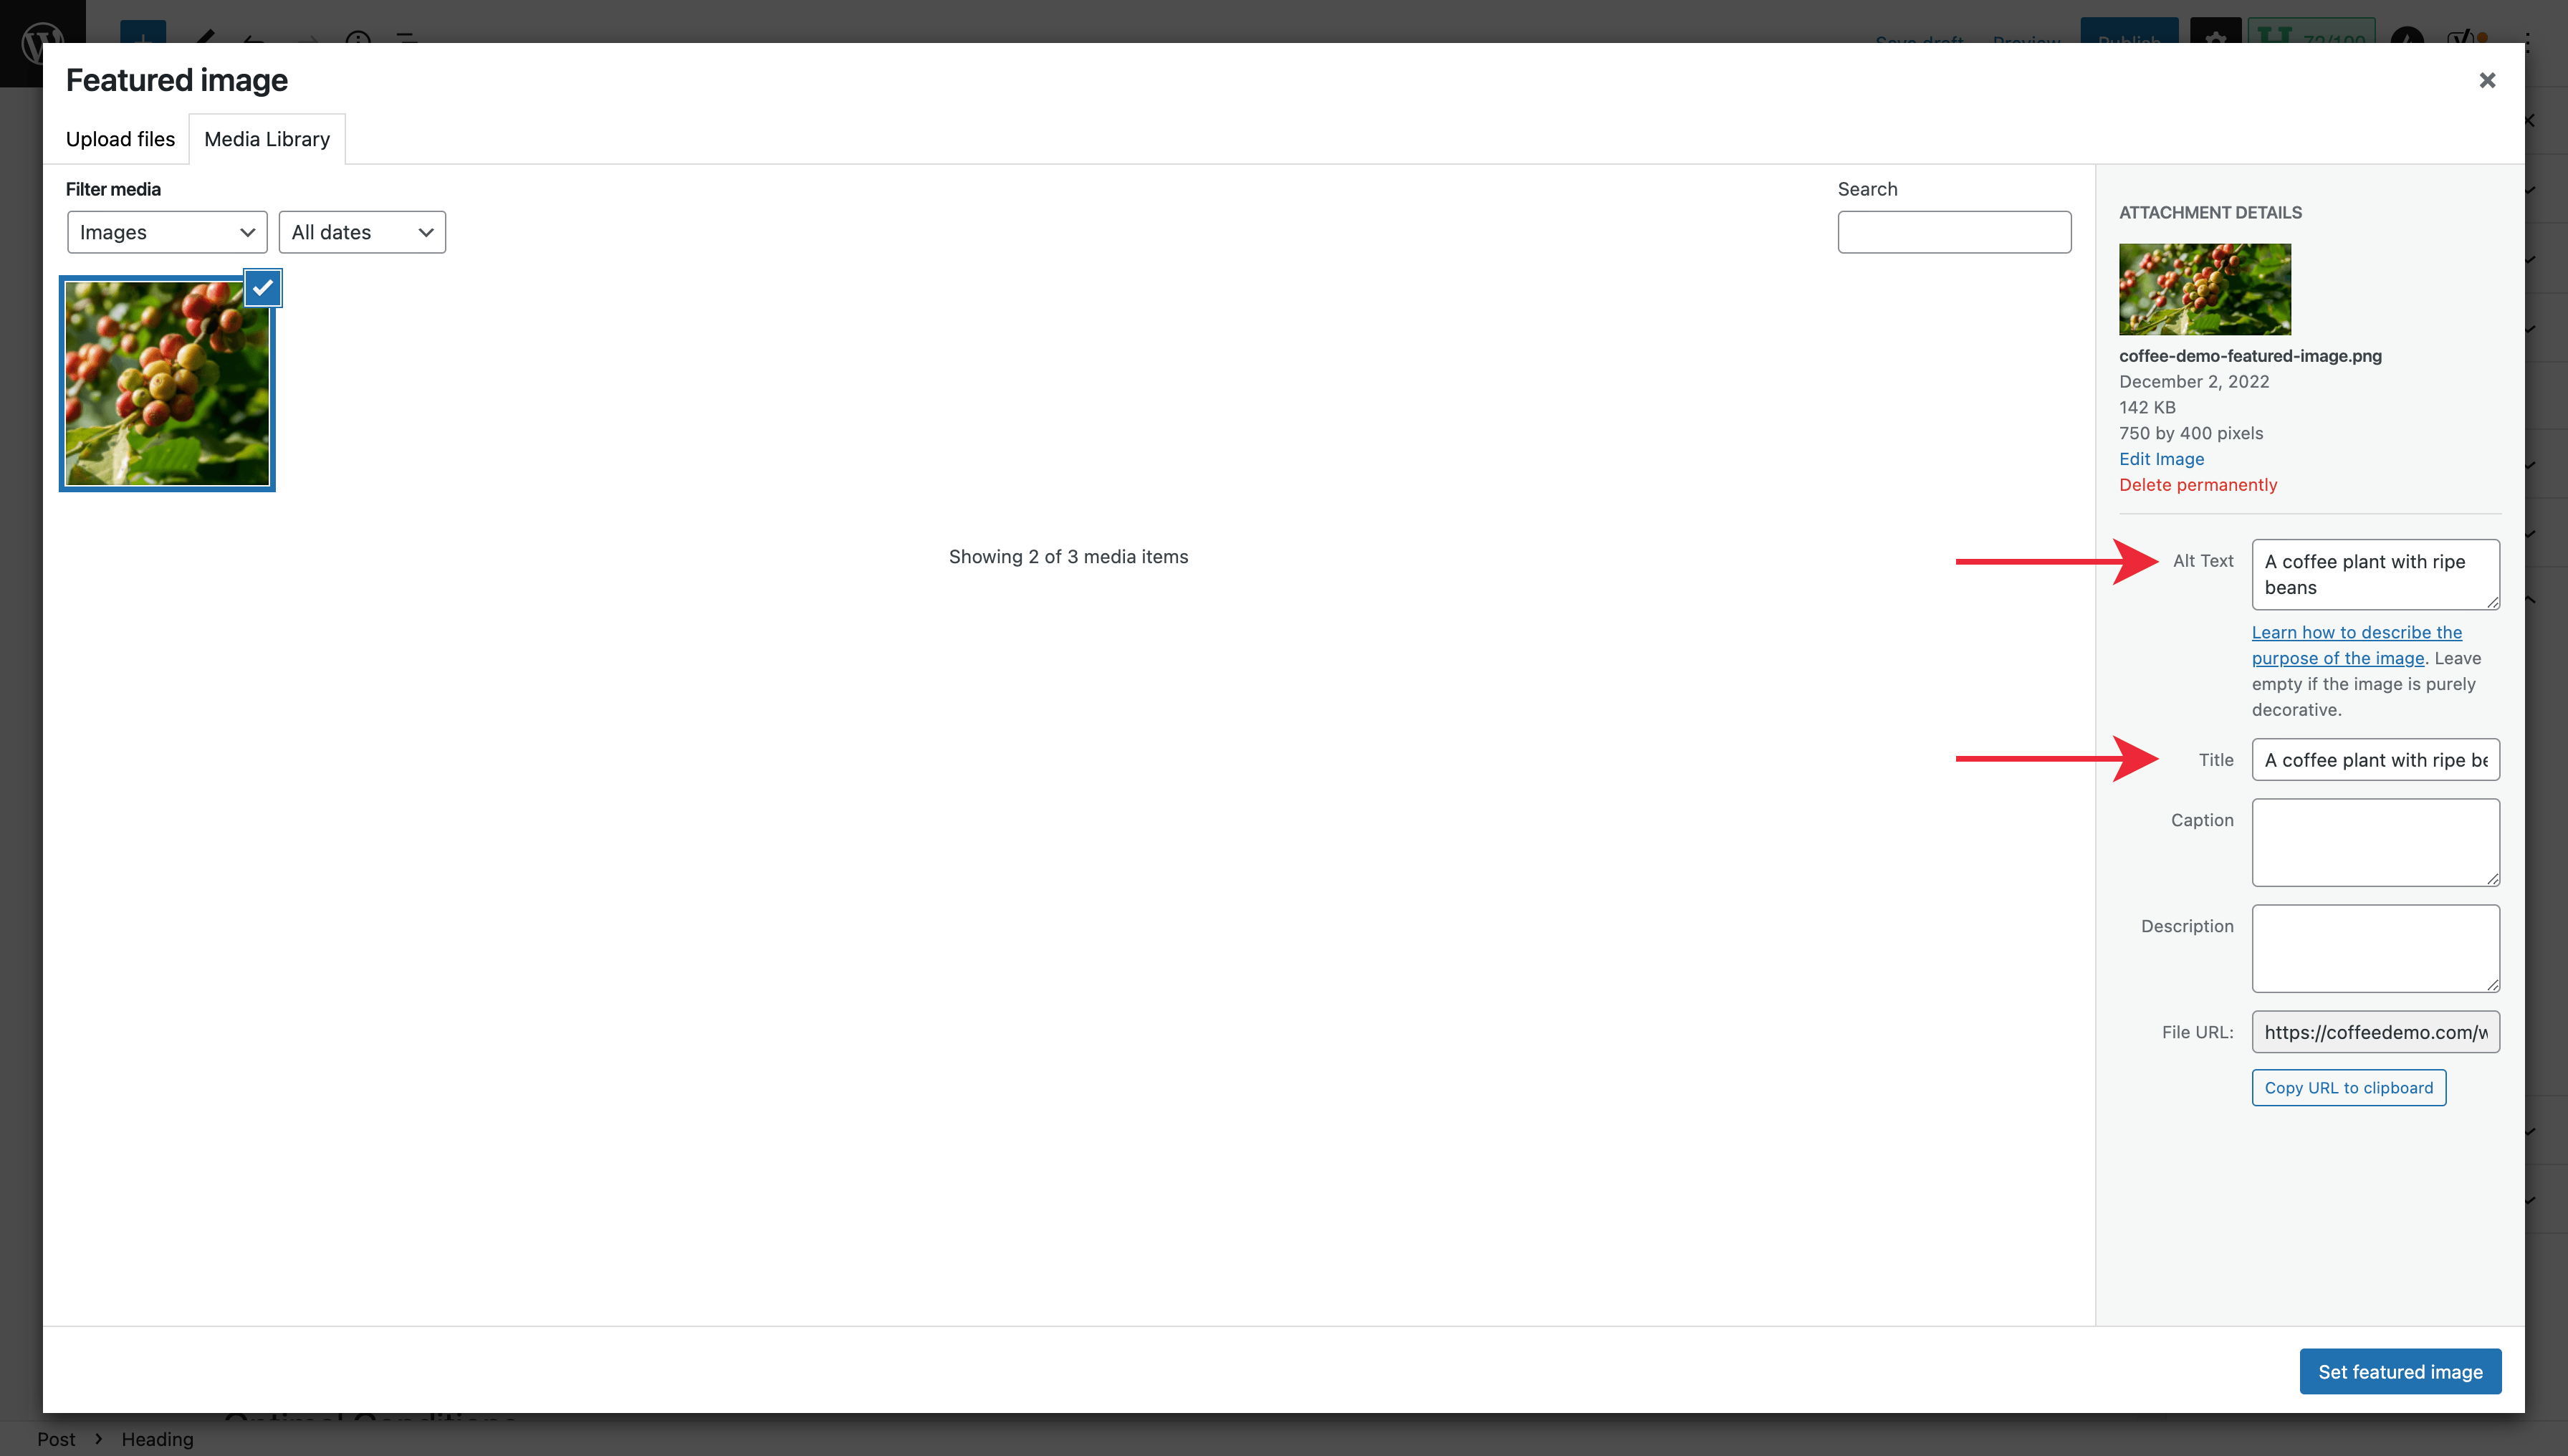
Choose the ‘Upload files’ tab and click the ‘Select Files’ button.

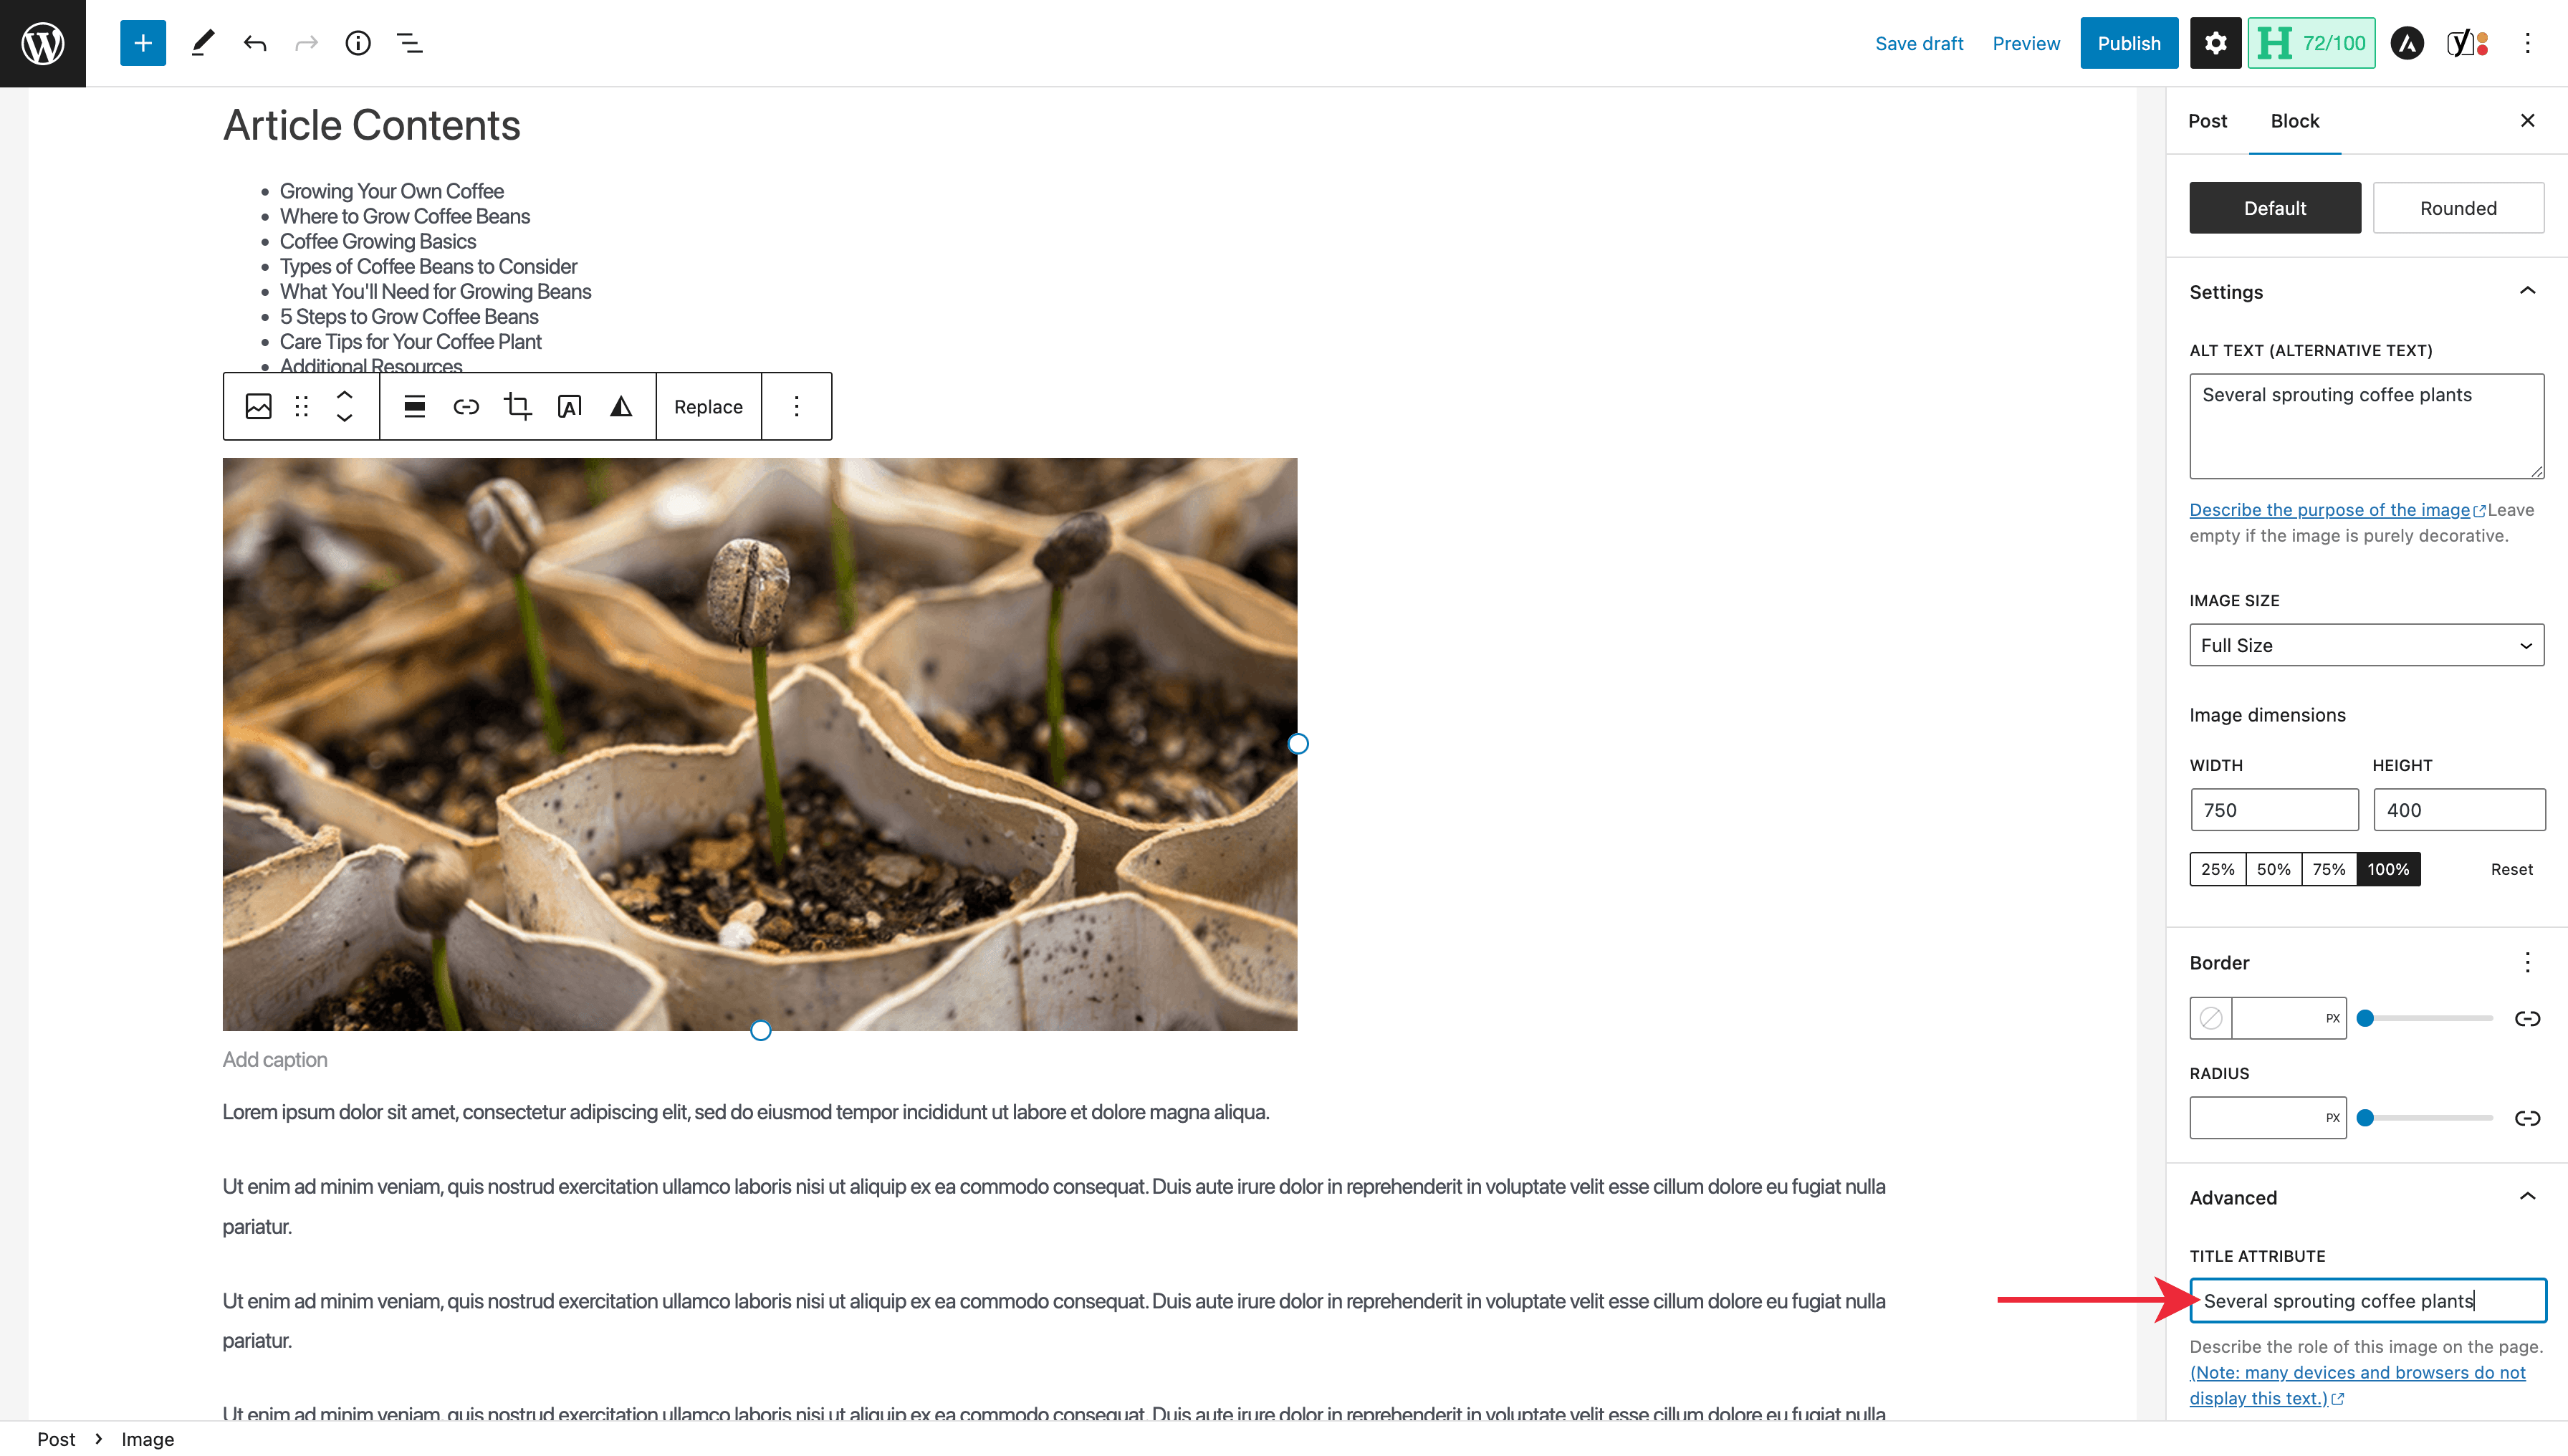
Navigate to your image on your computer and upload the file. Before setting the featured image, we’ll add ‘Alt Text’ and a ‘Title.’
The alt text is read aloud by screen reader software for visually impaired users, describing the image’s content. The title text displays as a brief description when you hover an image with your mouse on some web browsers. When writing these, try to be concise.
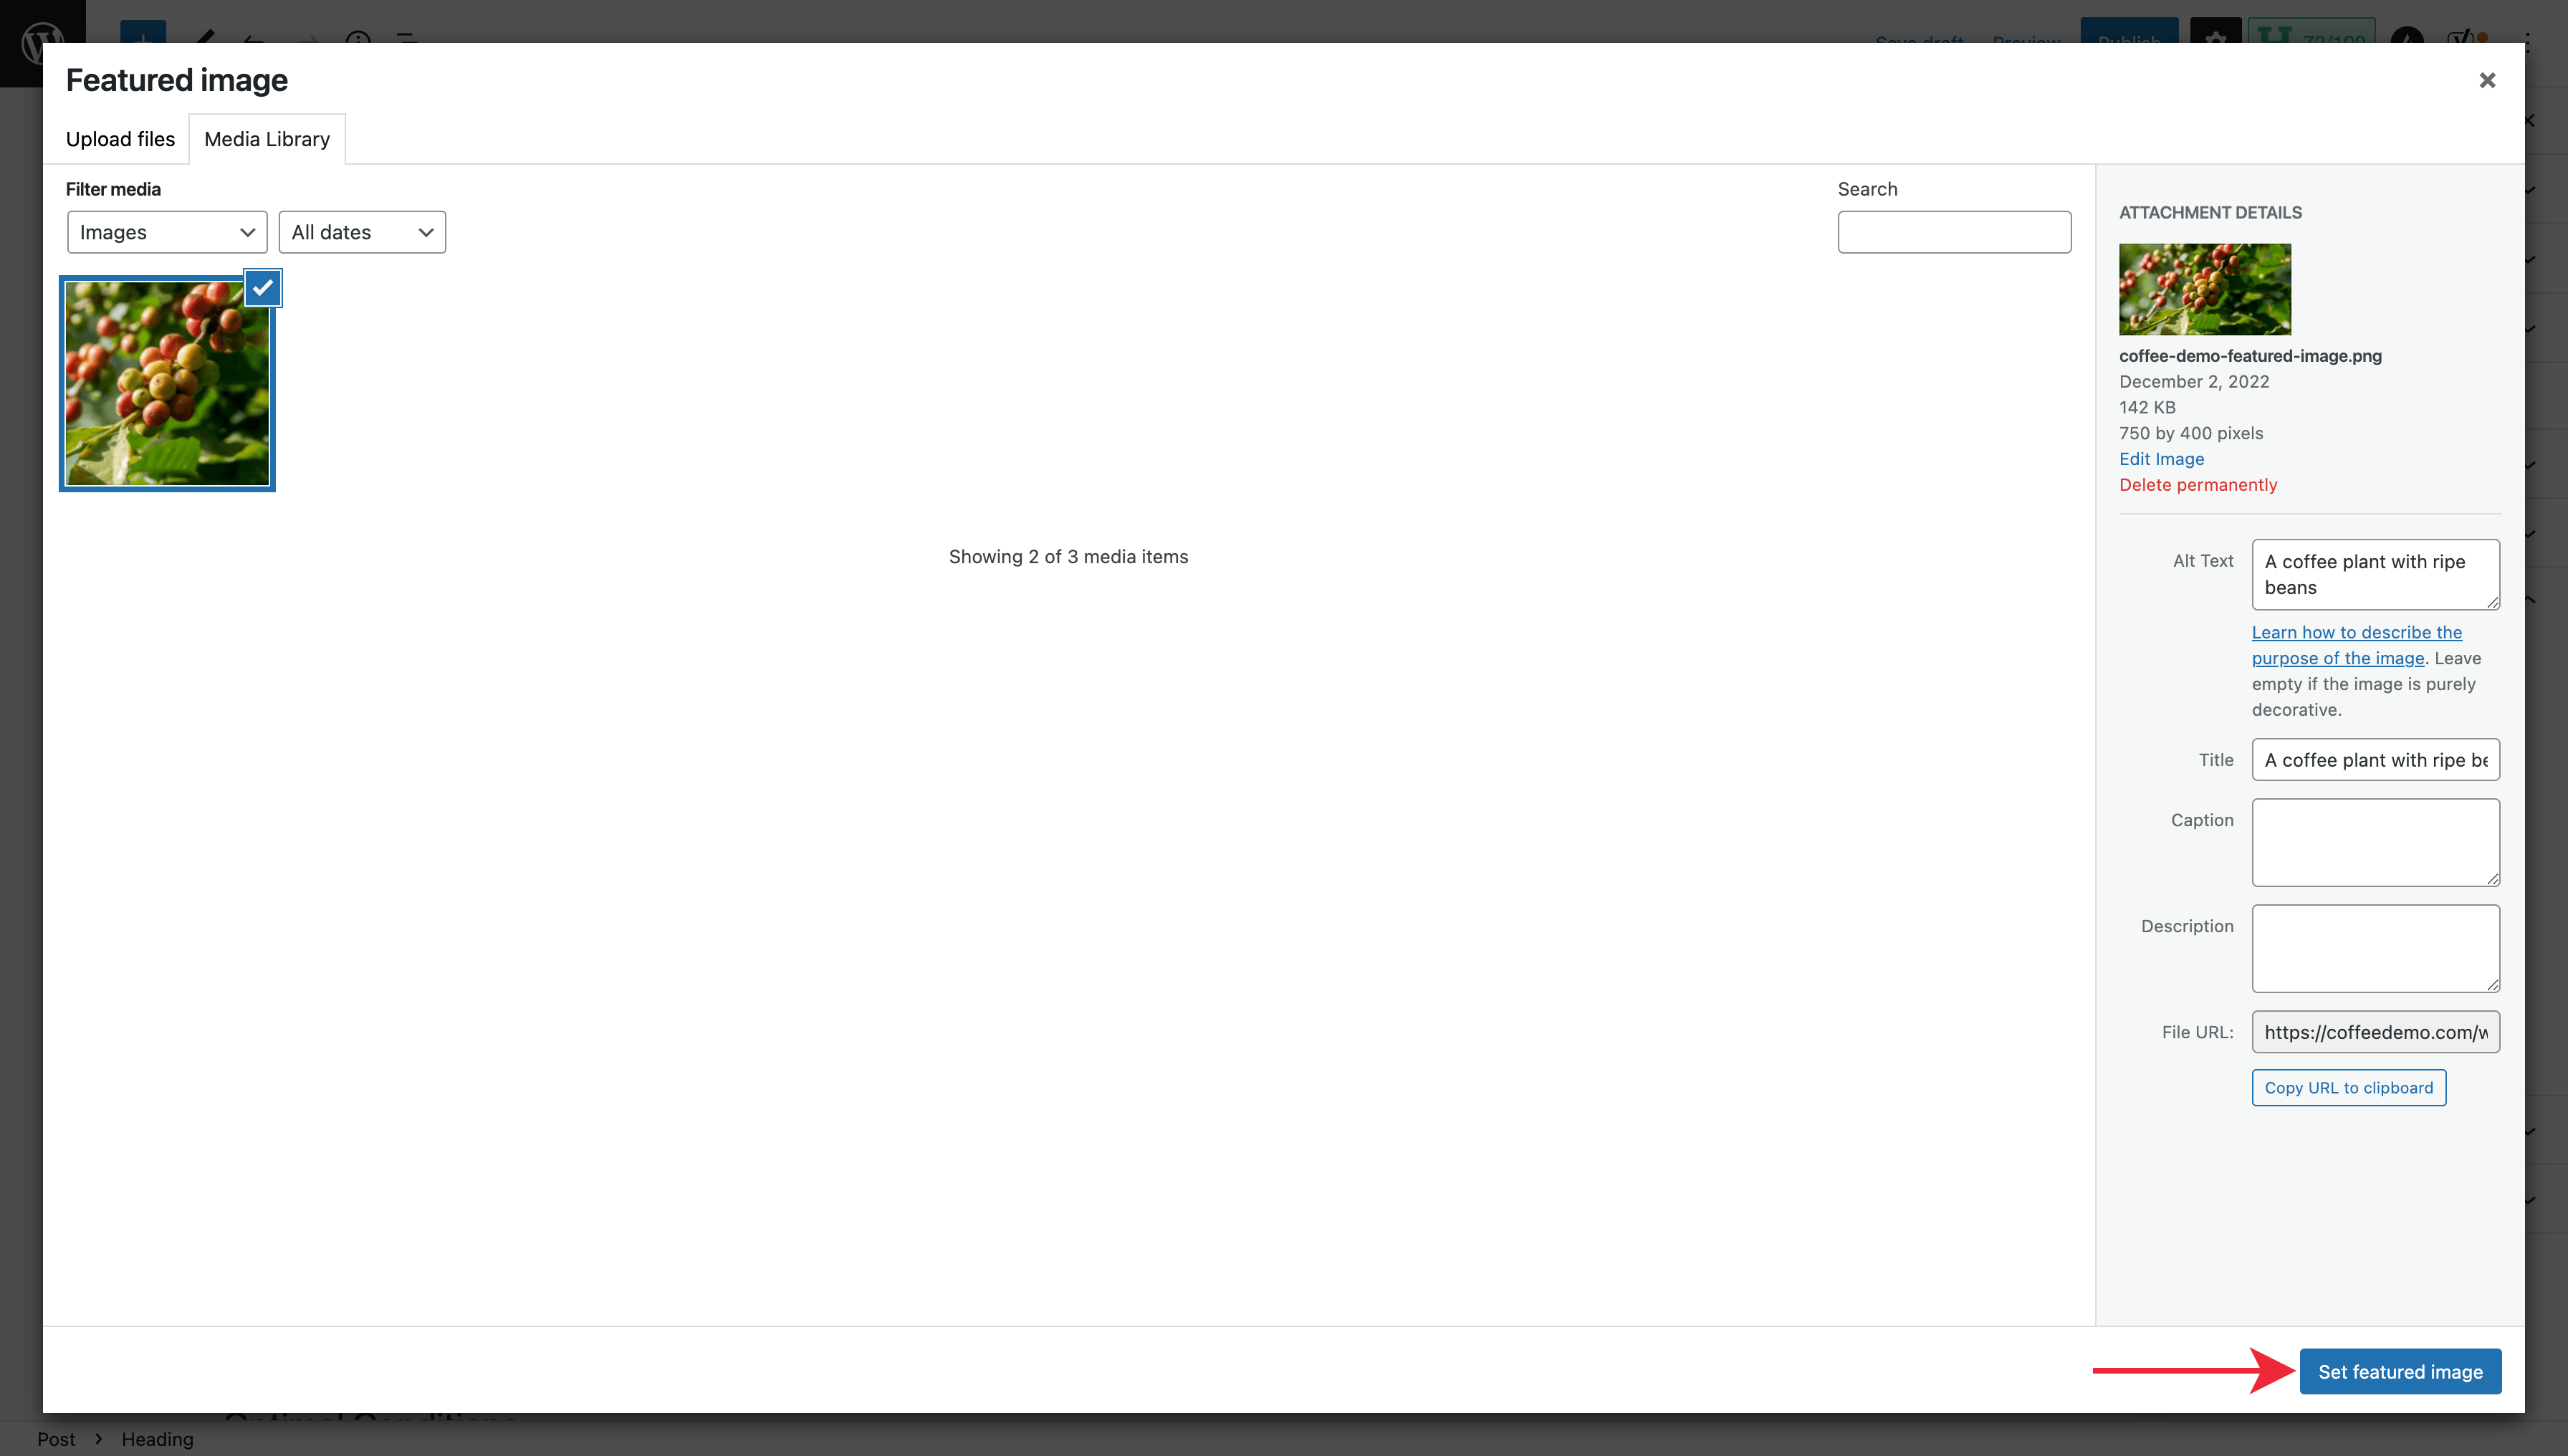
Next, click the ‘Set featured image’ button.
If you’d like to add images to the body of your post, click between any two paragraphs and select the ‘plus’ icon to add a new block.

From the popup, select ‘Image.’
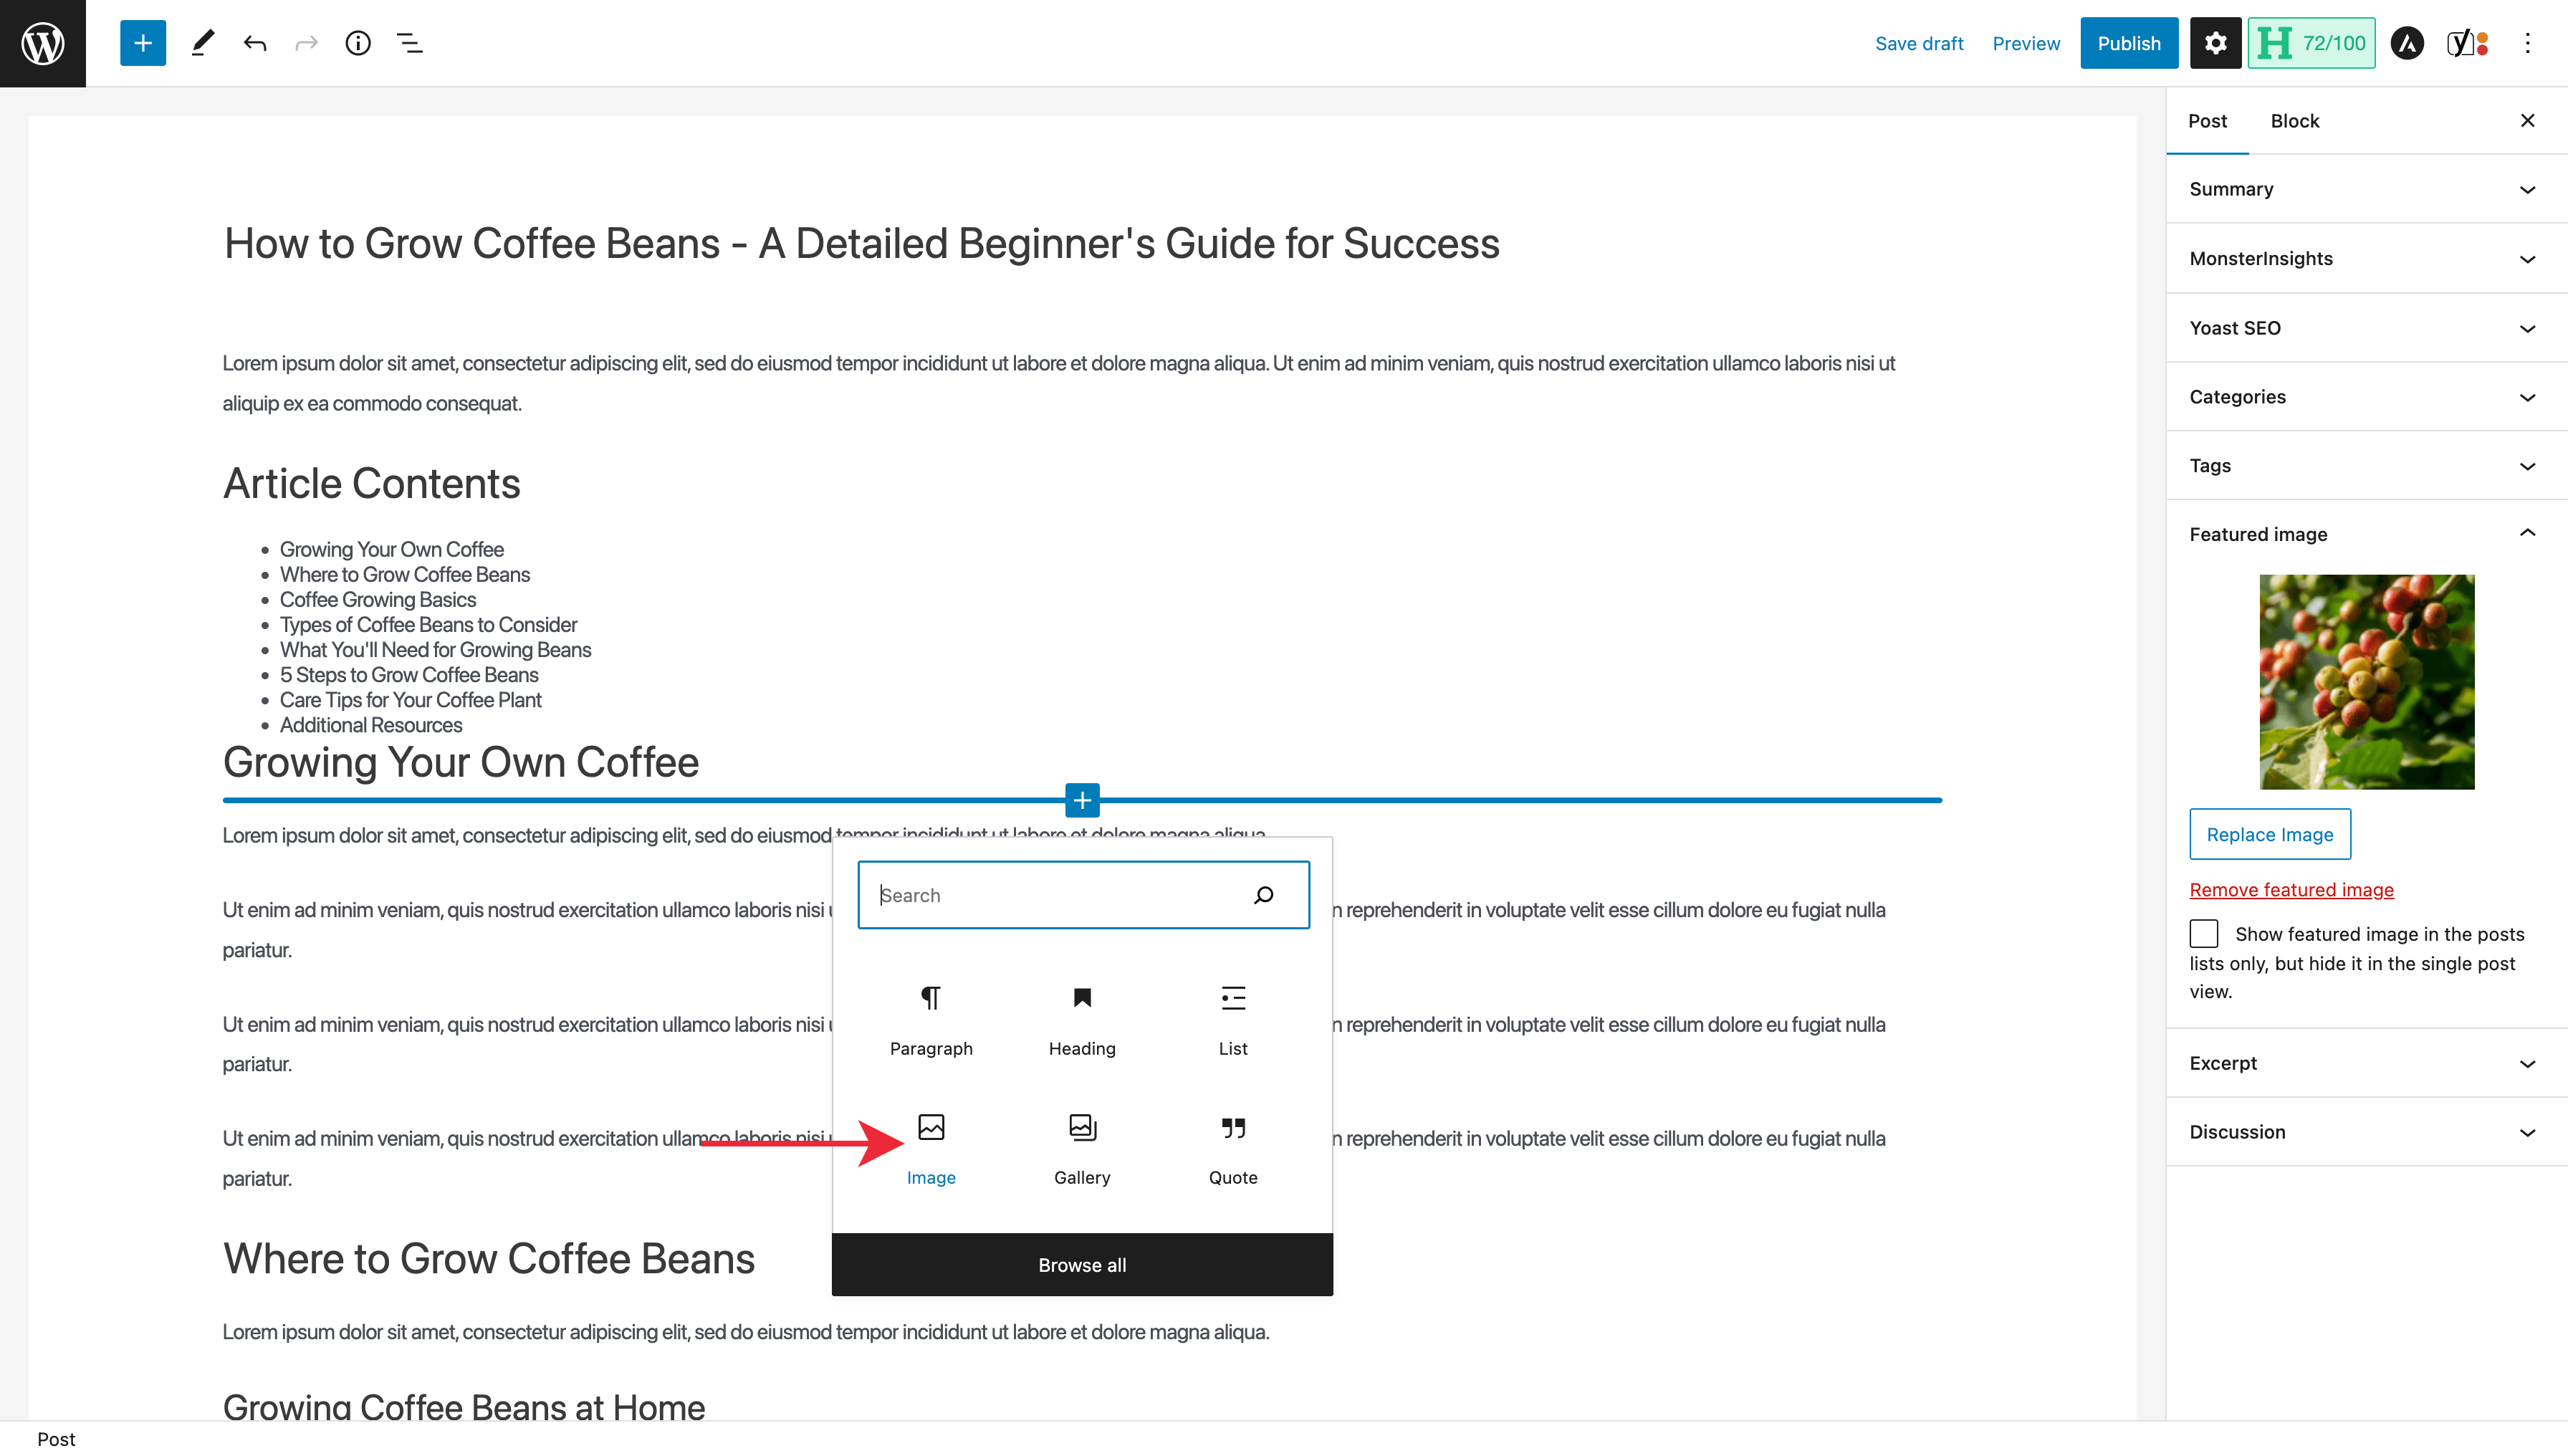
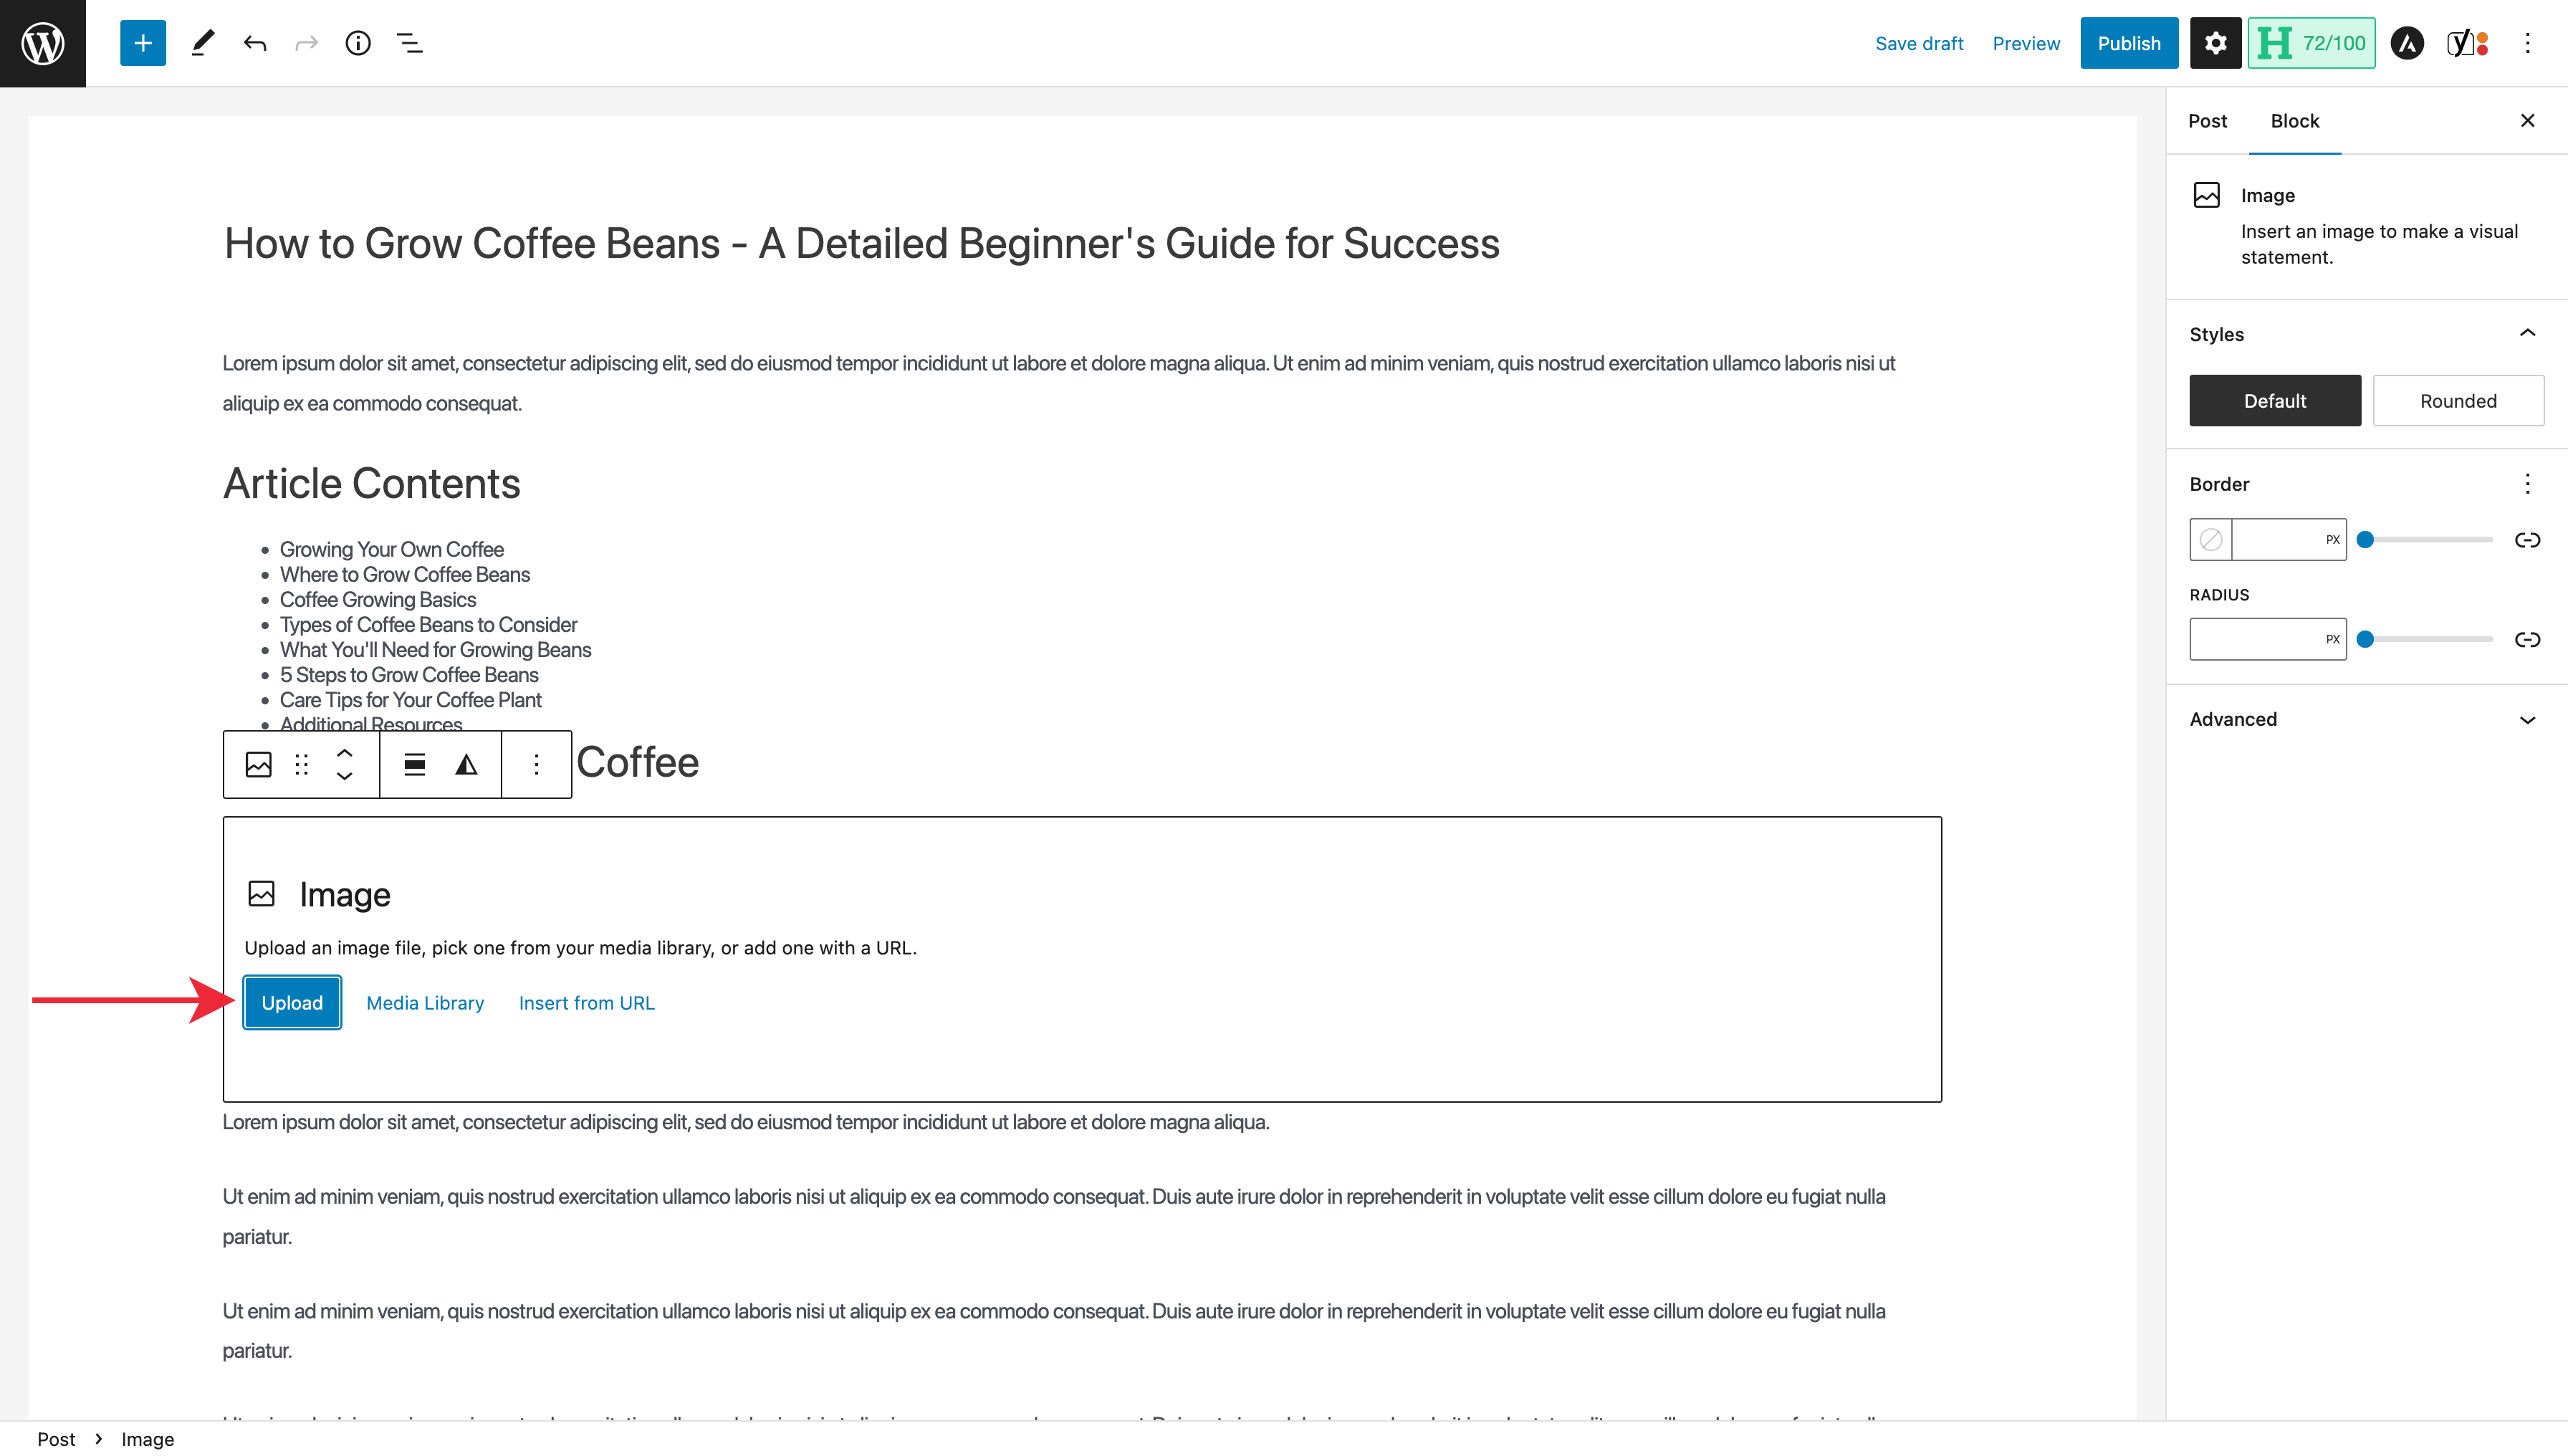
Then, click the ‘Upload’ button and select the image you’d like to upload to place the image within the body of the post.
To set the alt and title text for the images in your post’s body, click an image, select the three dots at the end of the floating formatting menu, and select ‘Show more settings.’
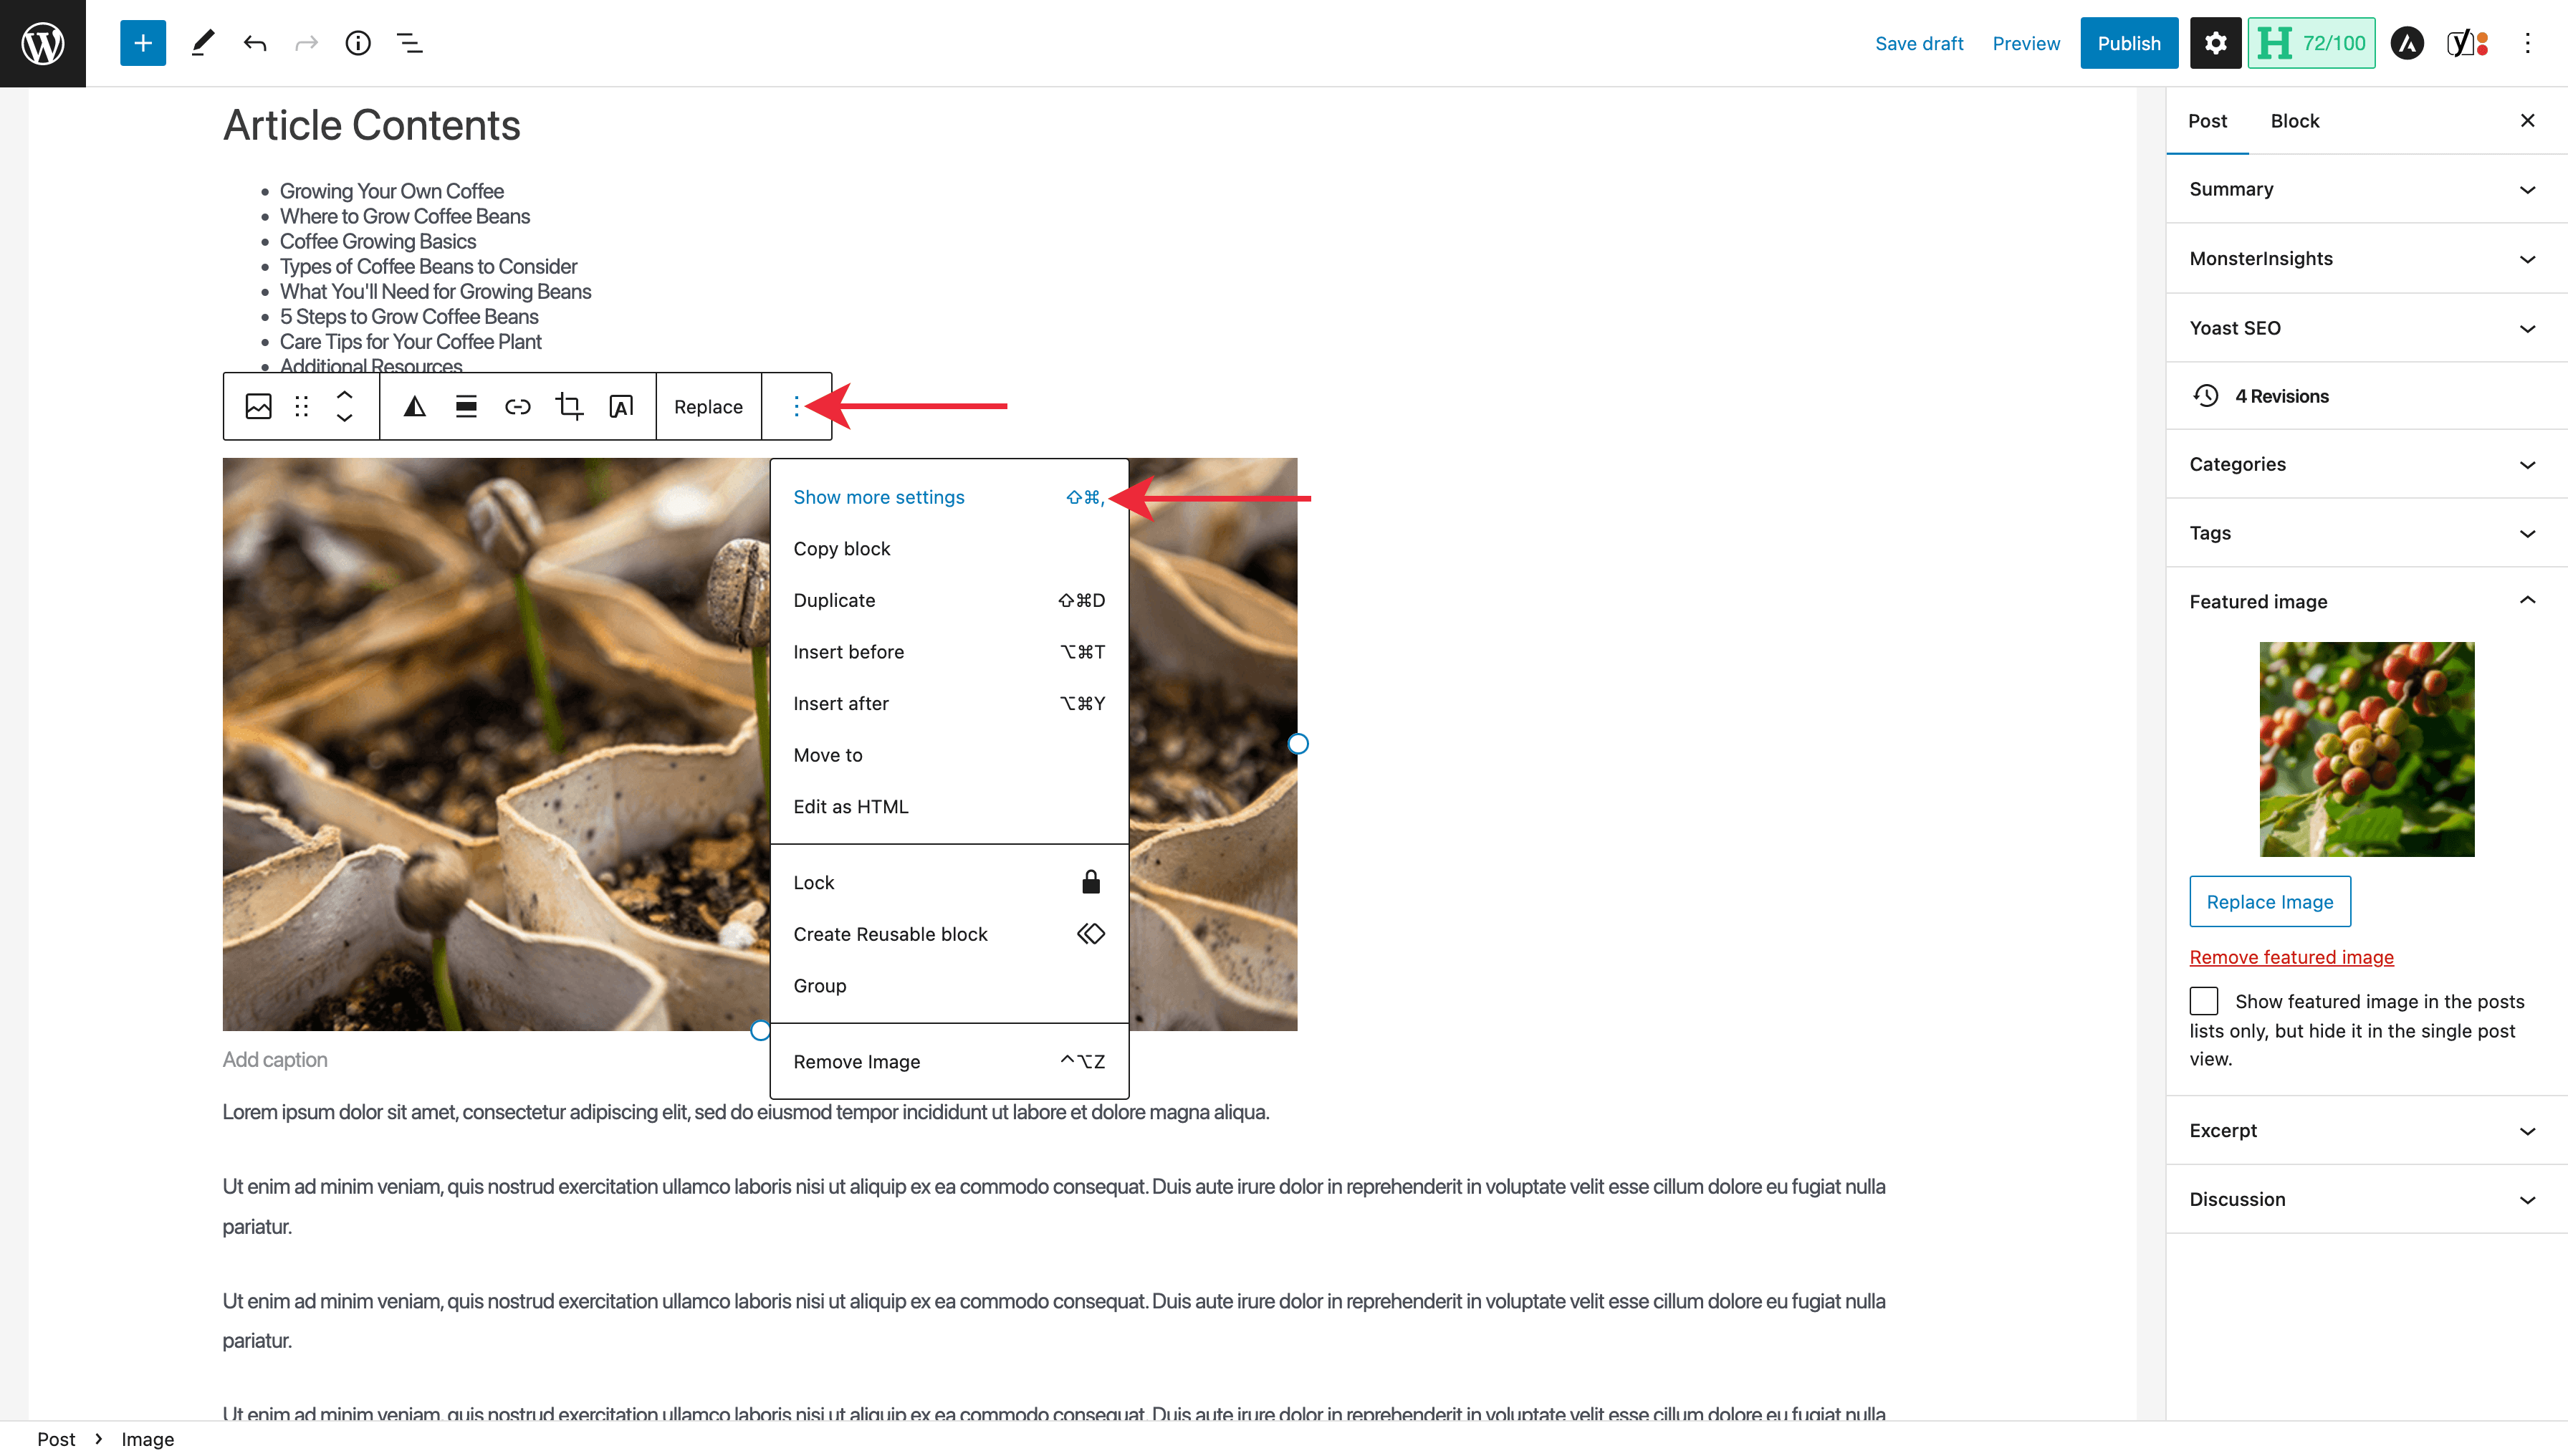
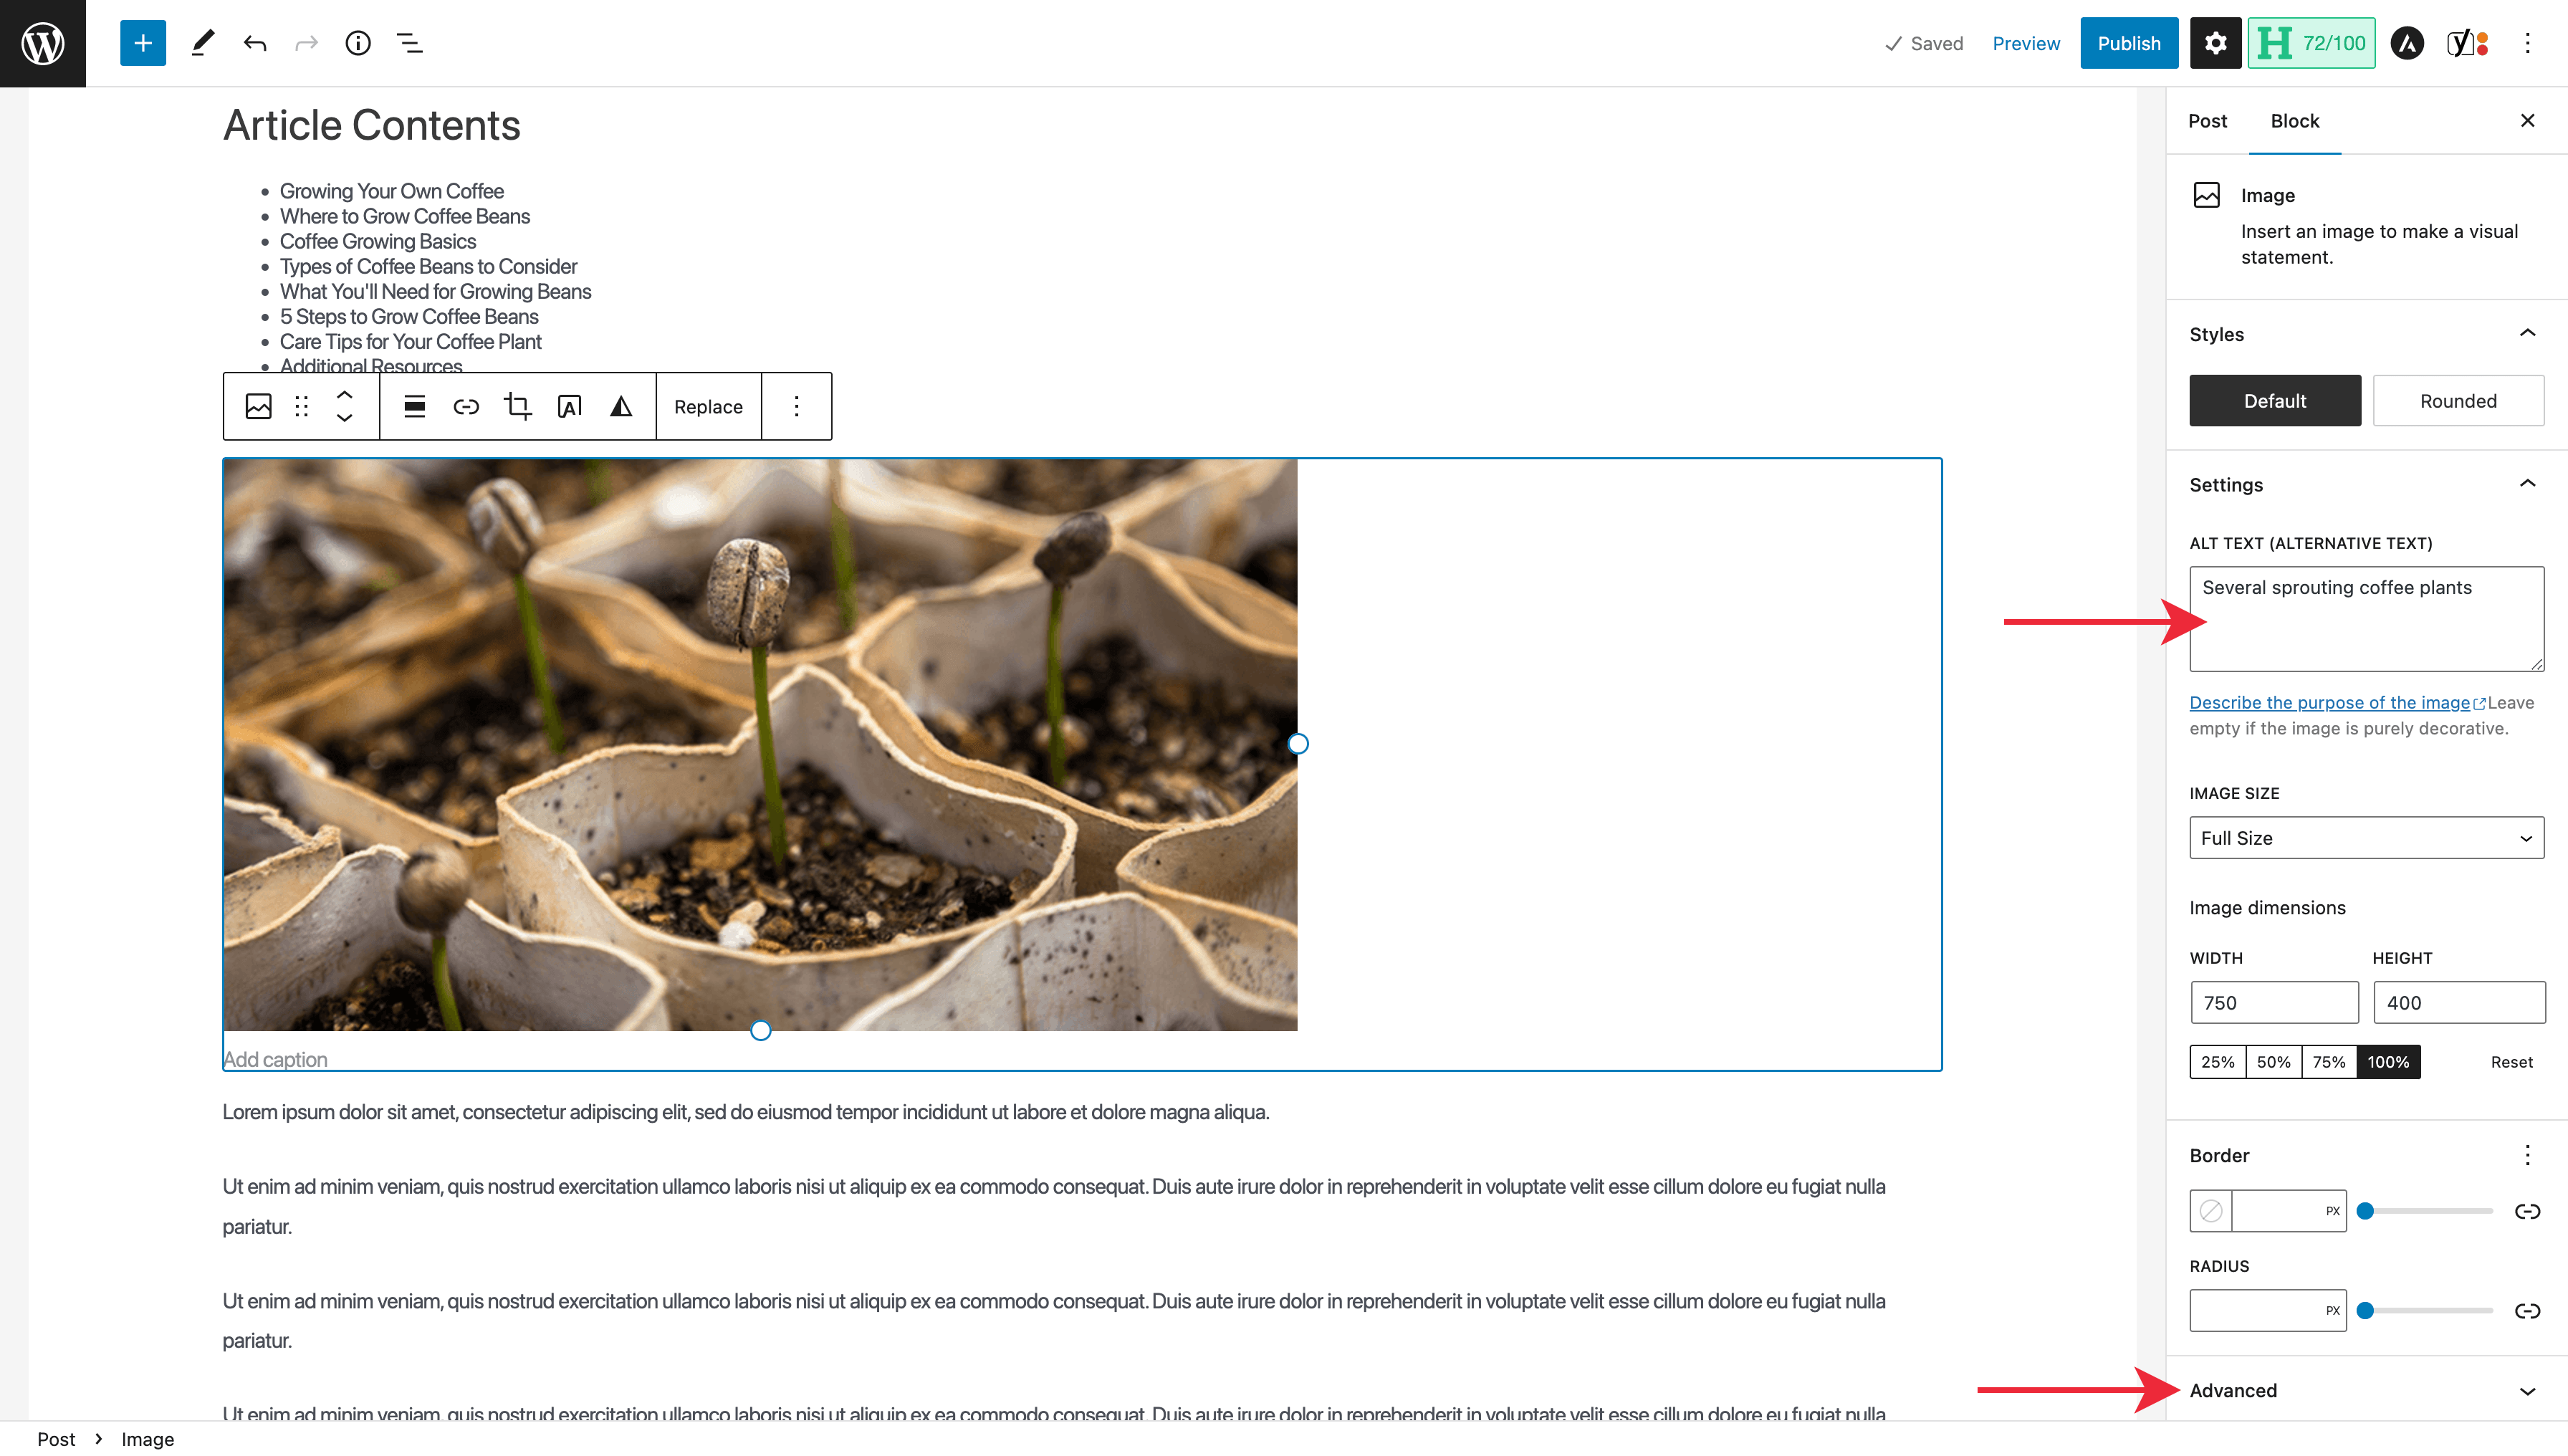
You can add the alt text in the appropriate box on the screen’s right-hand side. Then, click the ‘Advanced’ menu to display the field for the ‘Title Attribute,’ where you can add this text.
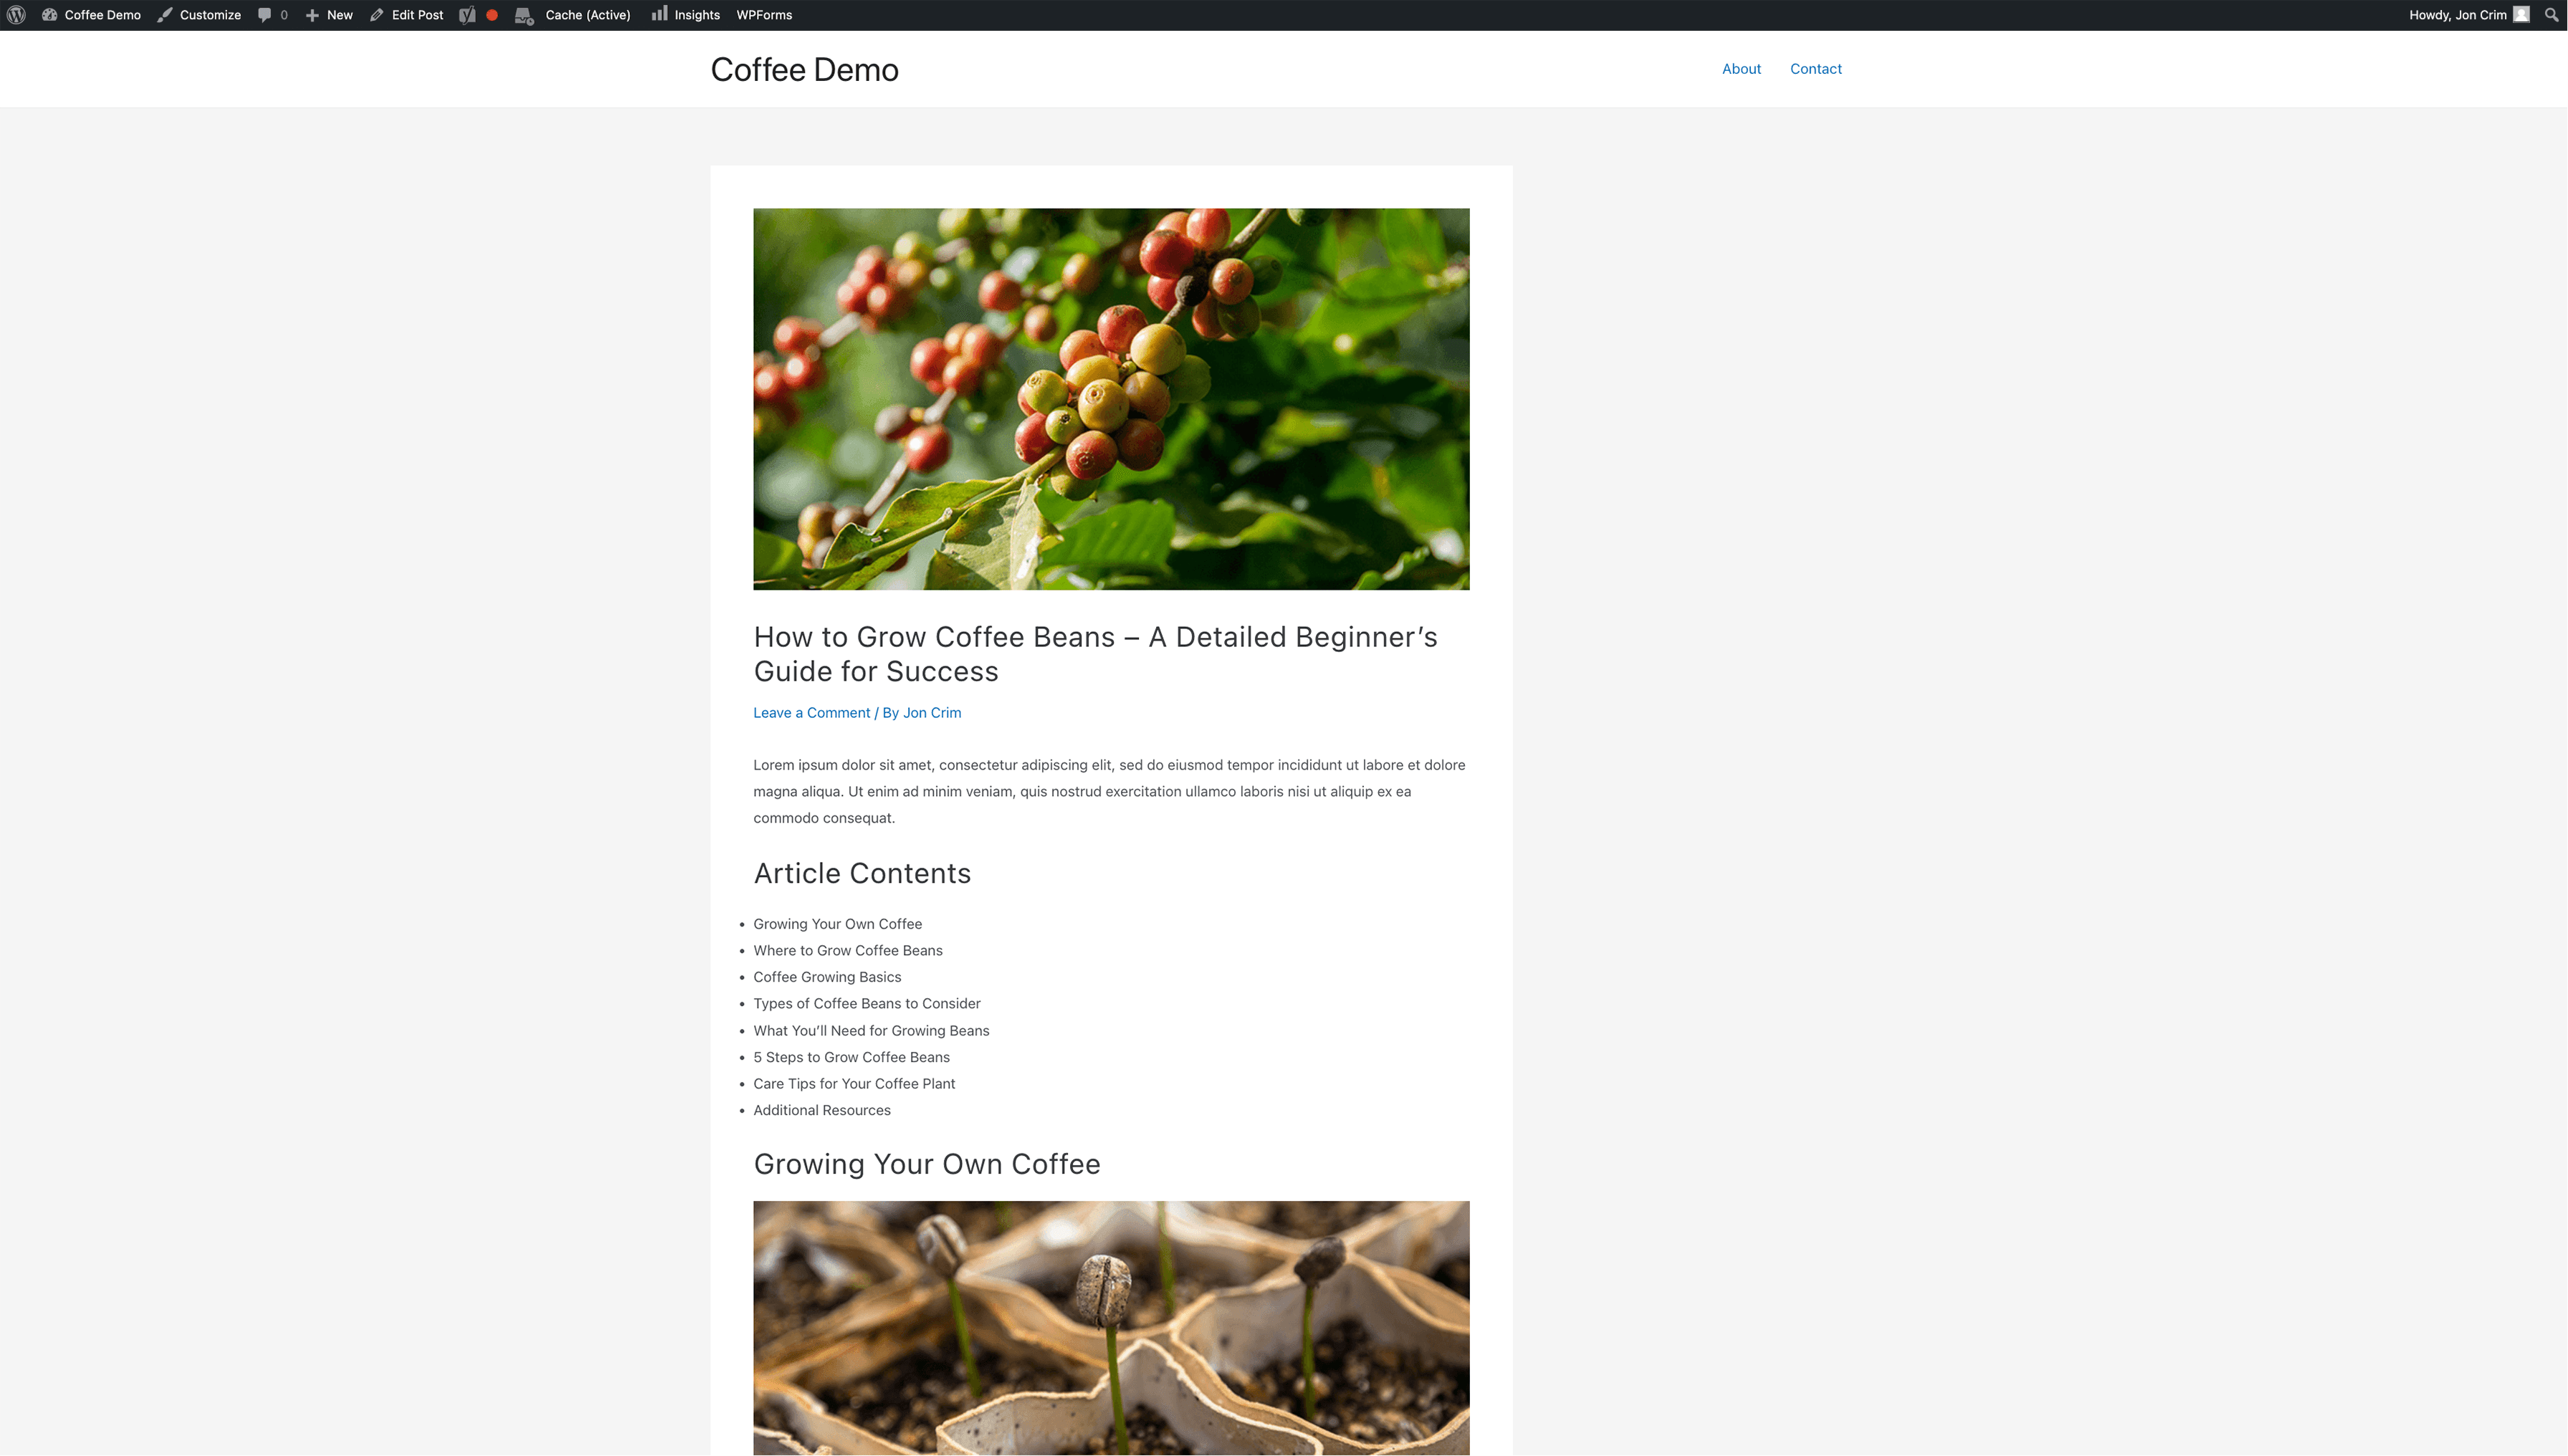
You can preview your post by clicking the ‘Preview’ link at the top of the screen and then selecting ‘Preview in a new tab.’ Here’s what my example looks like when previewing.
Notice how the ‘Featured Image’ automatically displays at the top of your blog post when previewing, which is the first thing a visitor will see.
Optimize for Search Engines & Sharing
Before we hit publish, we have a few small updates to make to our post within WordPress for search engines and social sharing.
Adding a Page Title & Description
When search engines crawl our blog posts, we want to ensure they have the essential attributes to rank our page.
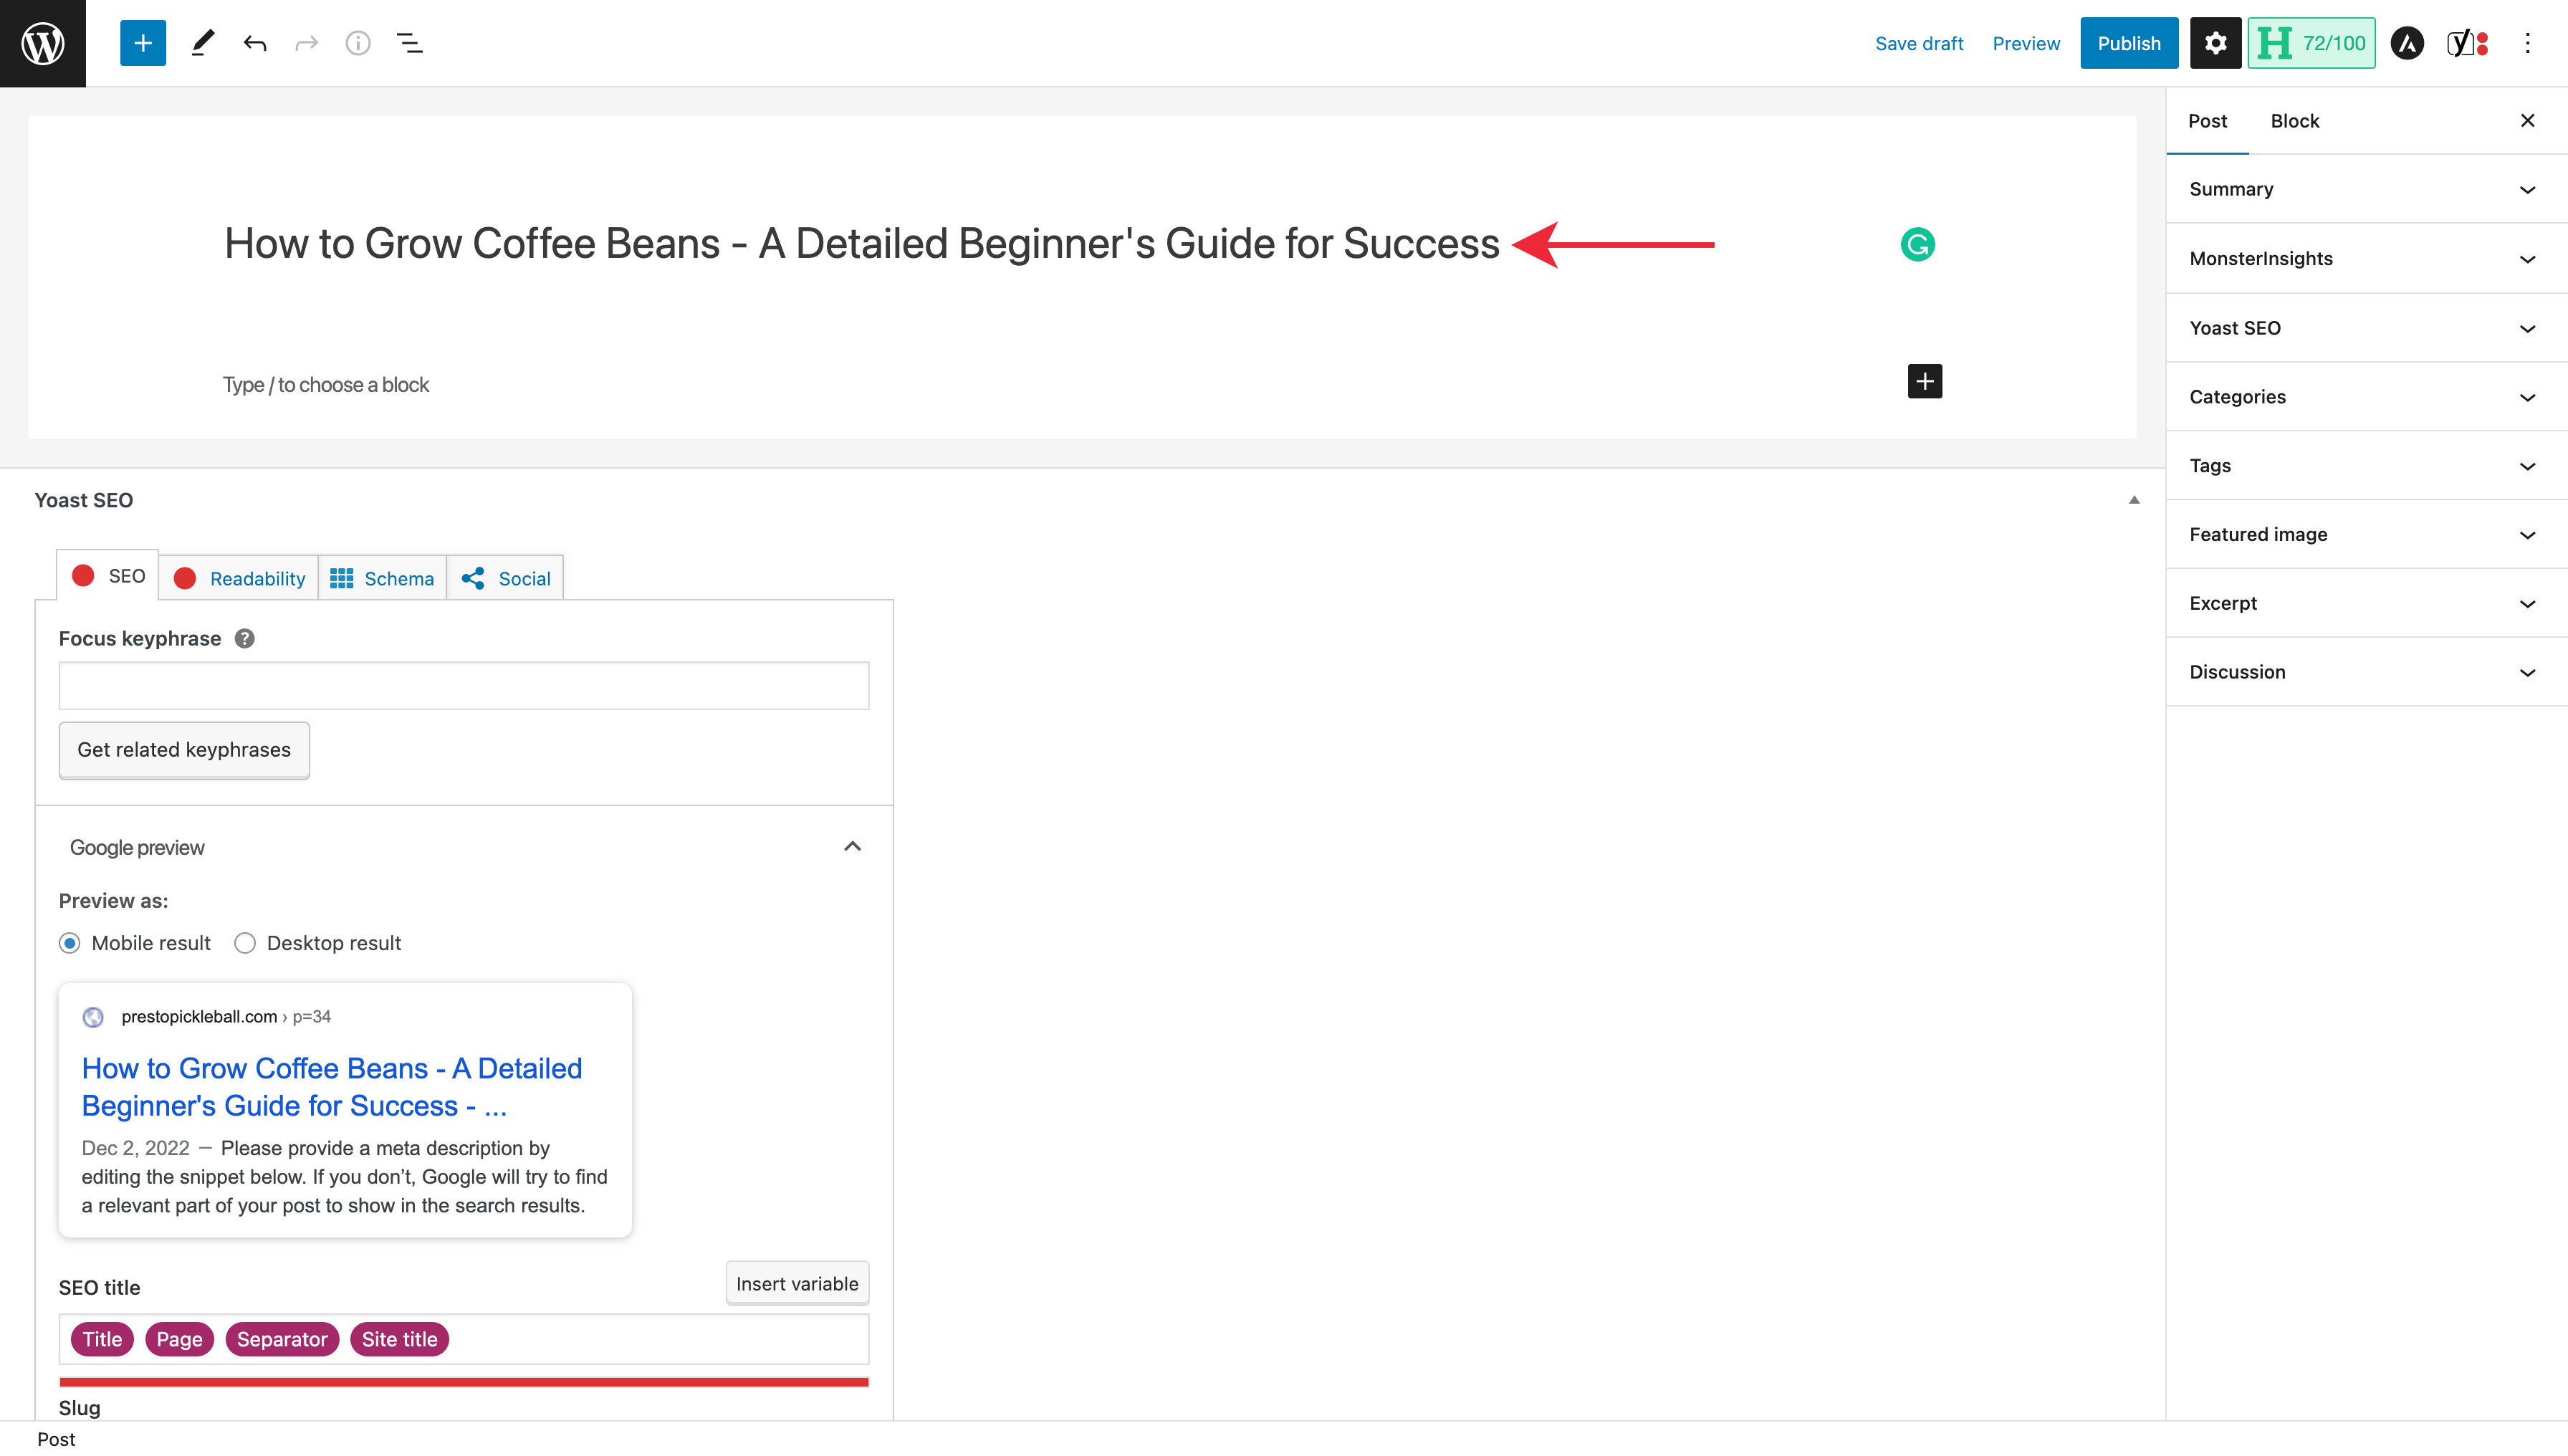
First, we want to add the page title and description that we wrote up in the second part of this guide. Start by scrolling to the bottom of your post in WordPress until you get to the Yoast SEO section.
Yoast is an SEO plugin for WordPress that I recommended in my guide on creating a website. If you don’t have it installed, check it out and consider it to improve your website’s SEO.
Copy and paste your page title from your blog post template into the ‘SEO title’ field and do the same for the description.
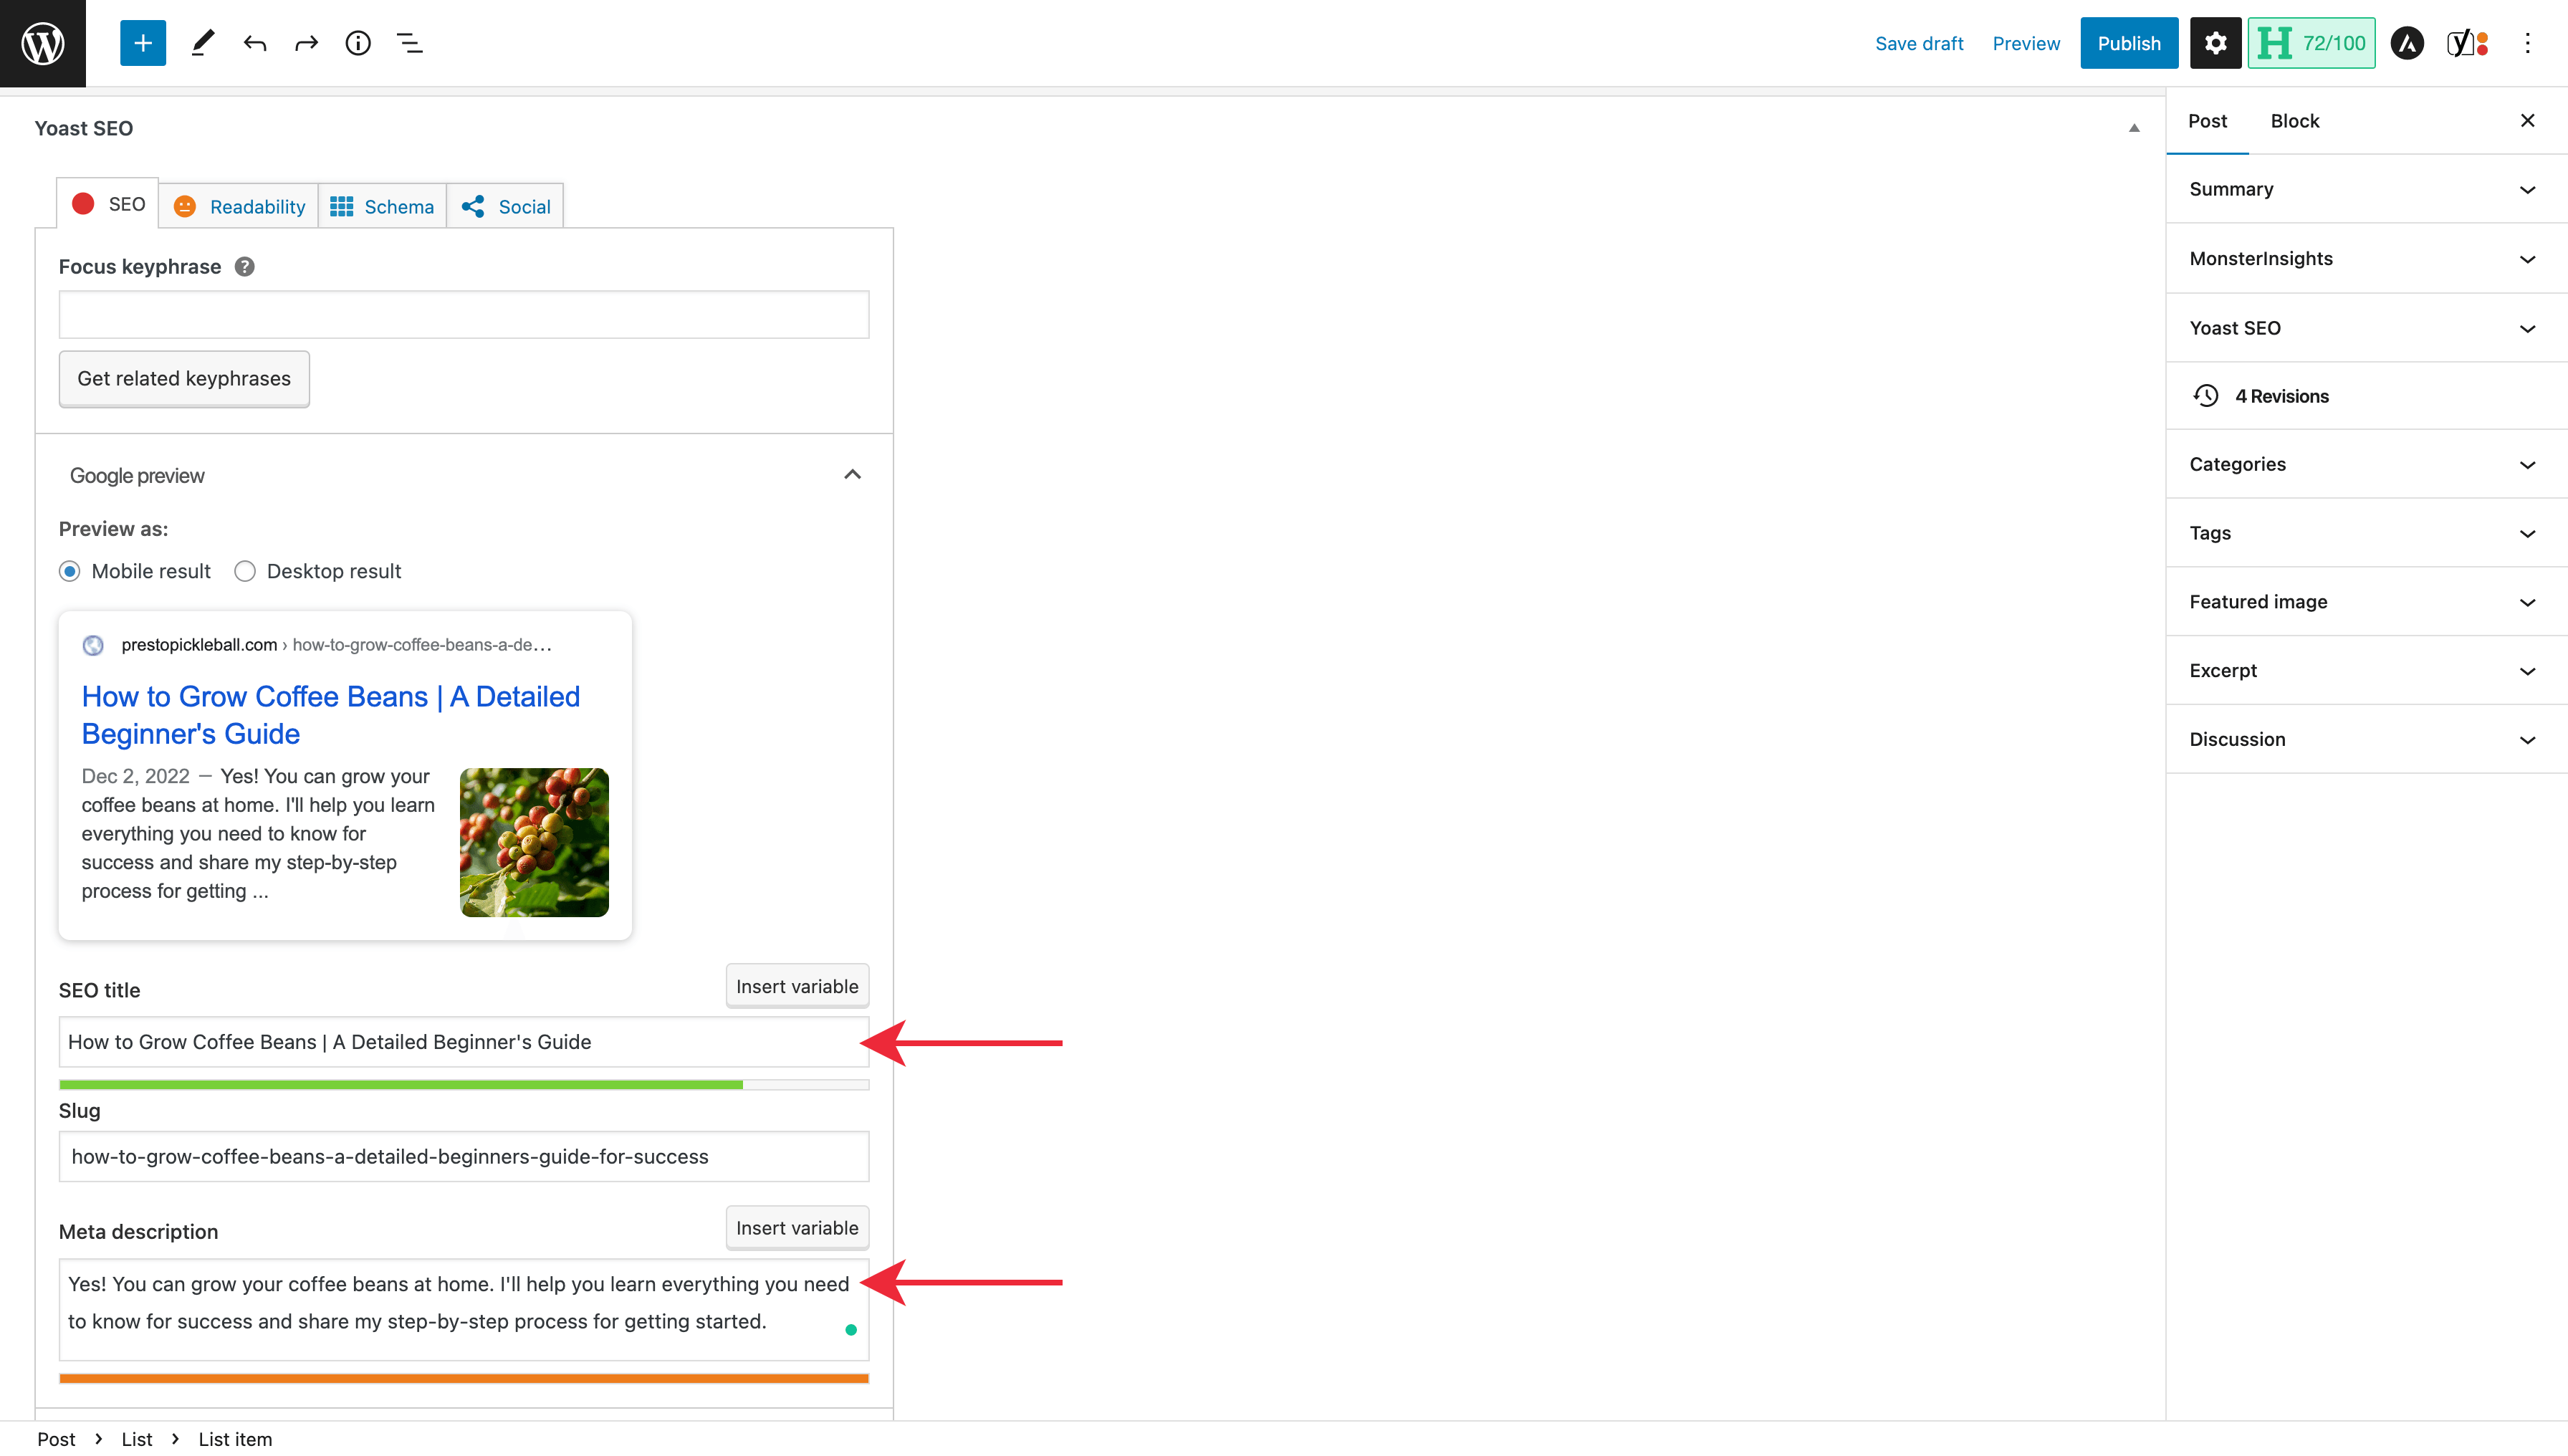
Yoast’s recommended limit on characters for the description is slightly less than 160, so the green bar below the description will show as orange after pasting in yours if it’s a bit longer like mine, but that’s fine.
Update the URL Slug
After adding your page’s title and description, we want to update your blog post’s URL slug, otherwise known as a permalink.
The URL slug is the trailing part of your website’s domain that users would type into their browser to visit this page directly. For this article you’re reading, the URL slug is /how-to-write-a-blog-post/.
You want your URL slug to be short and descriptive. Yoast will default to using the words in the title of your post.
For my example post about how to grow coffee beans, I’d like to shorten it, so I’ll update it in the ‘Slug’ field that Yoast provides.

Do not use special characters or uppercase letters when typing your URL slug – only lowercase letters and numbers, and separate each word with a dash, so the URL is easy to read.
You should avoid changing your URL slug at all costs, so type it carefully to prevent misspellings or mistakes. Although it’s possible to modify, it requires a 301 redirect from the old URL to the new URL to maintain SEO value and prevent traffic loss, which we won’t cover today.
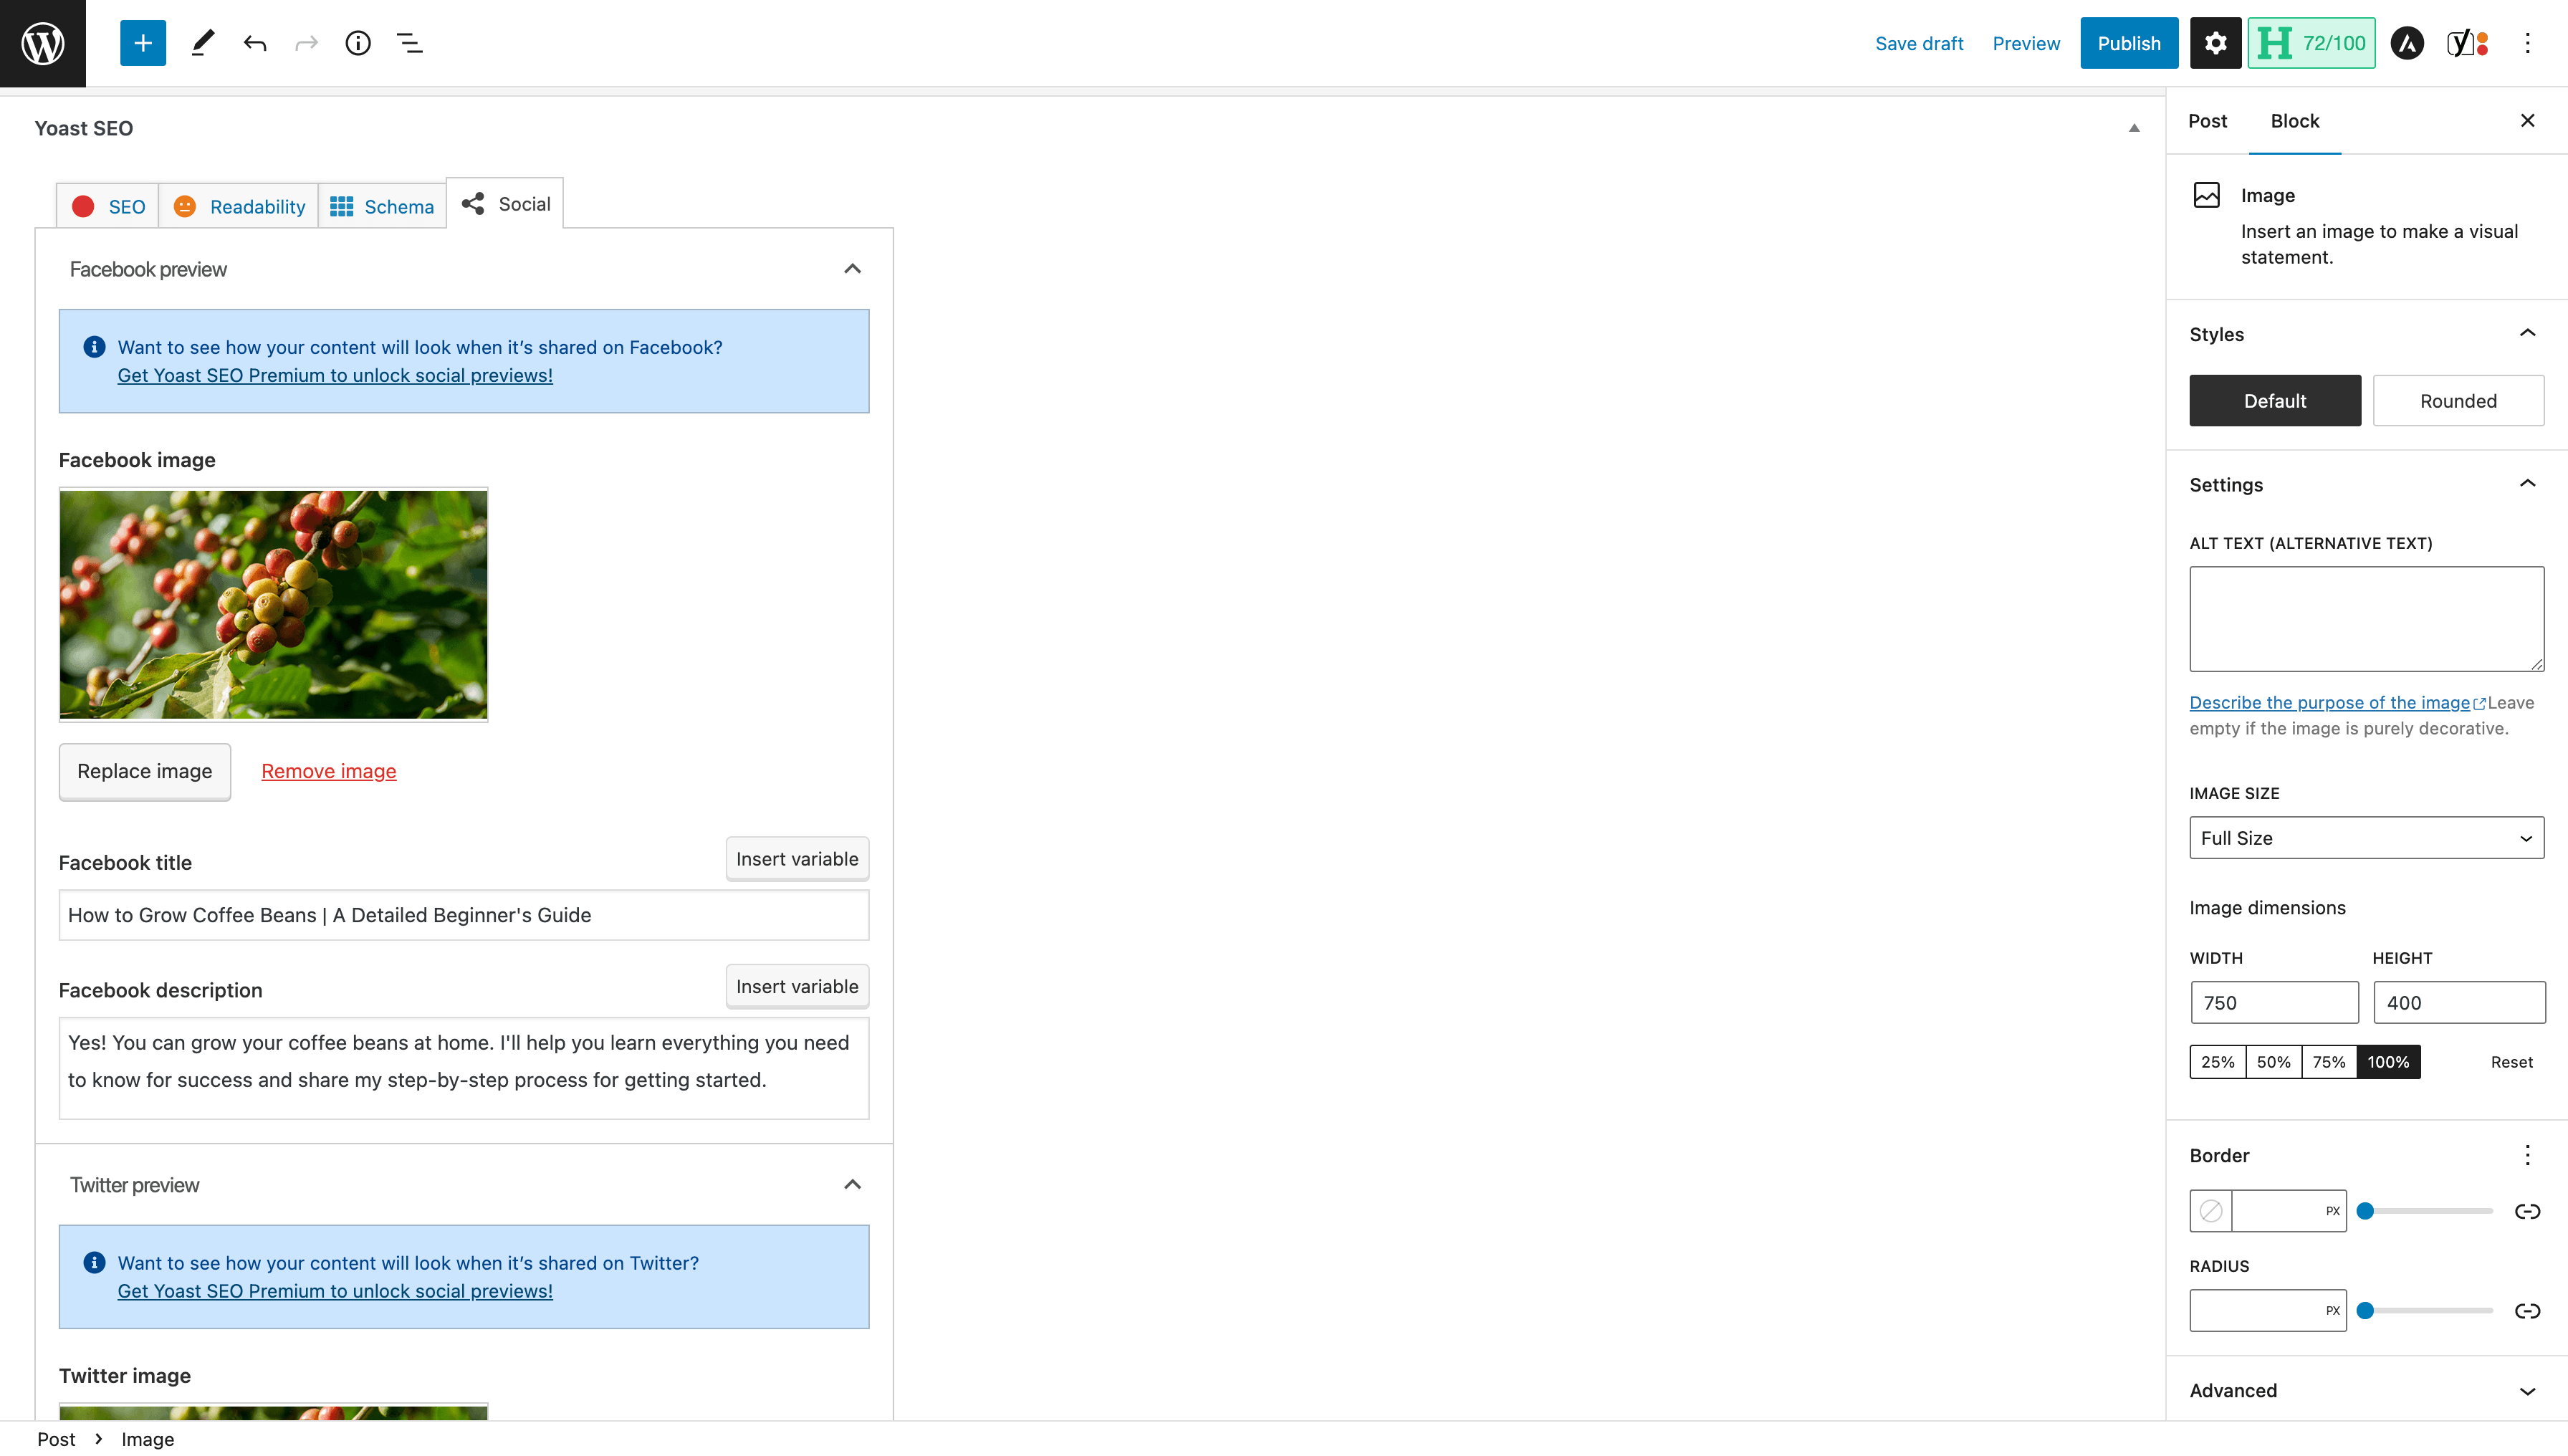
Next, we’ll click on the ‘Social’ tab in the Yoast SEO section.
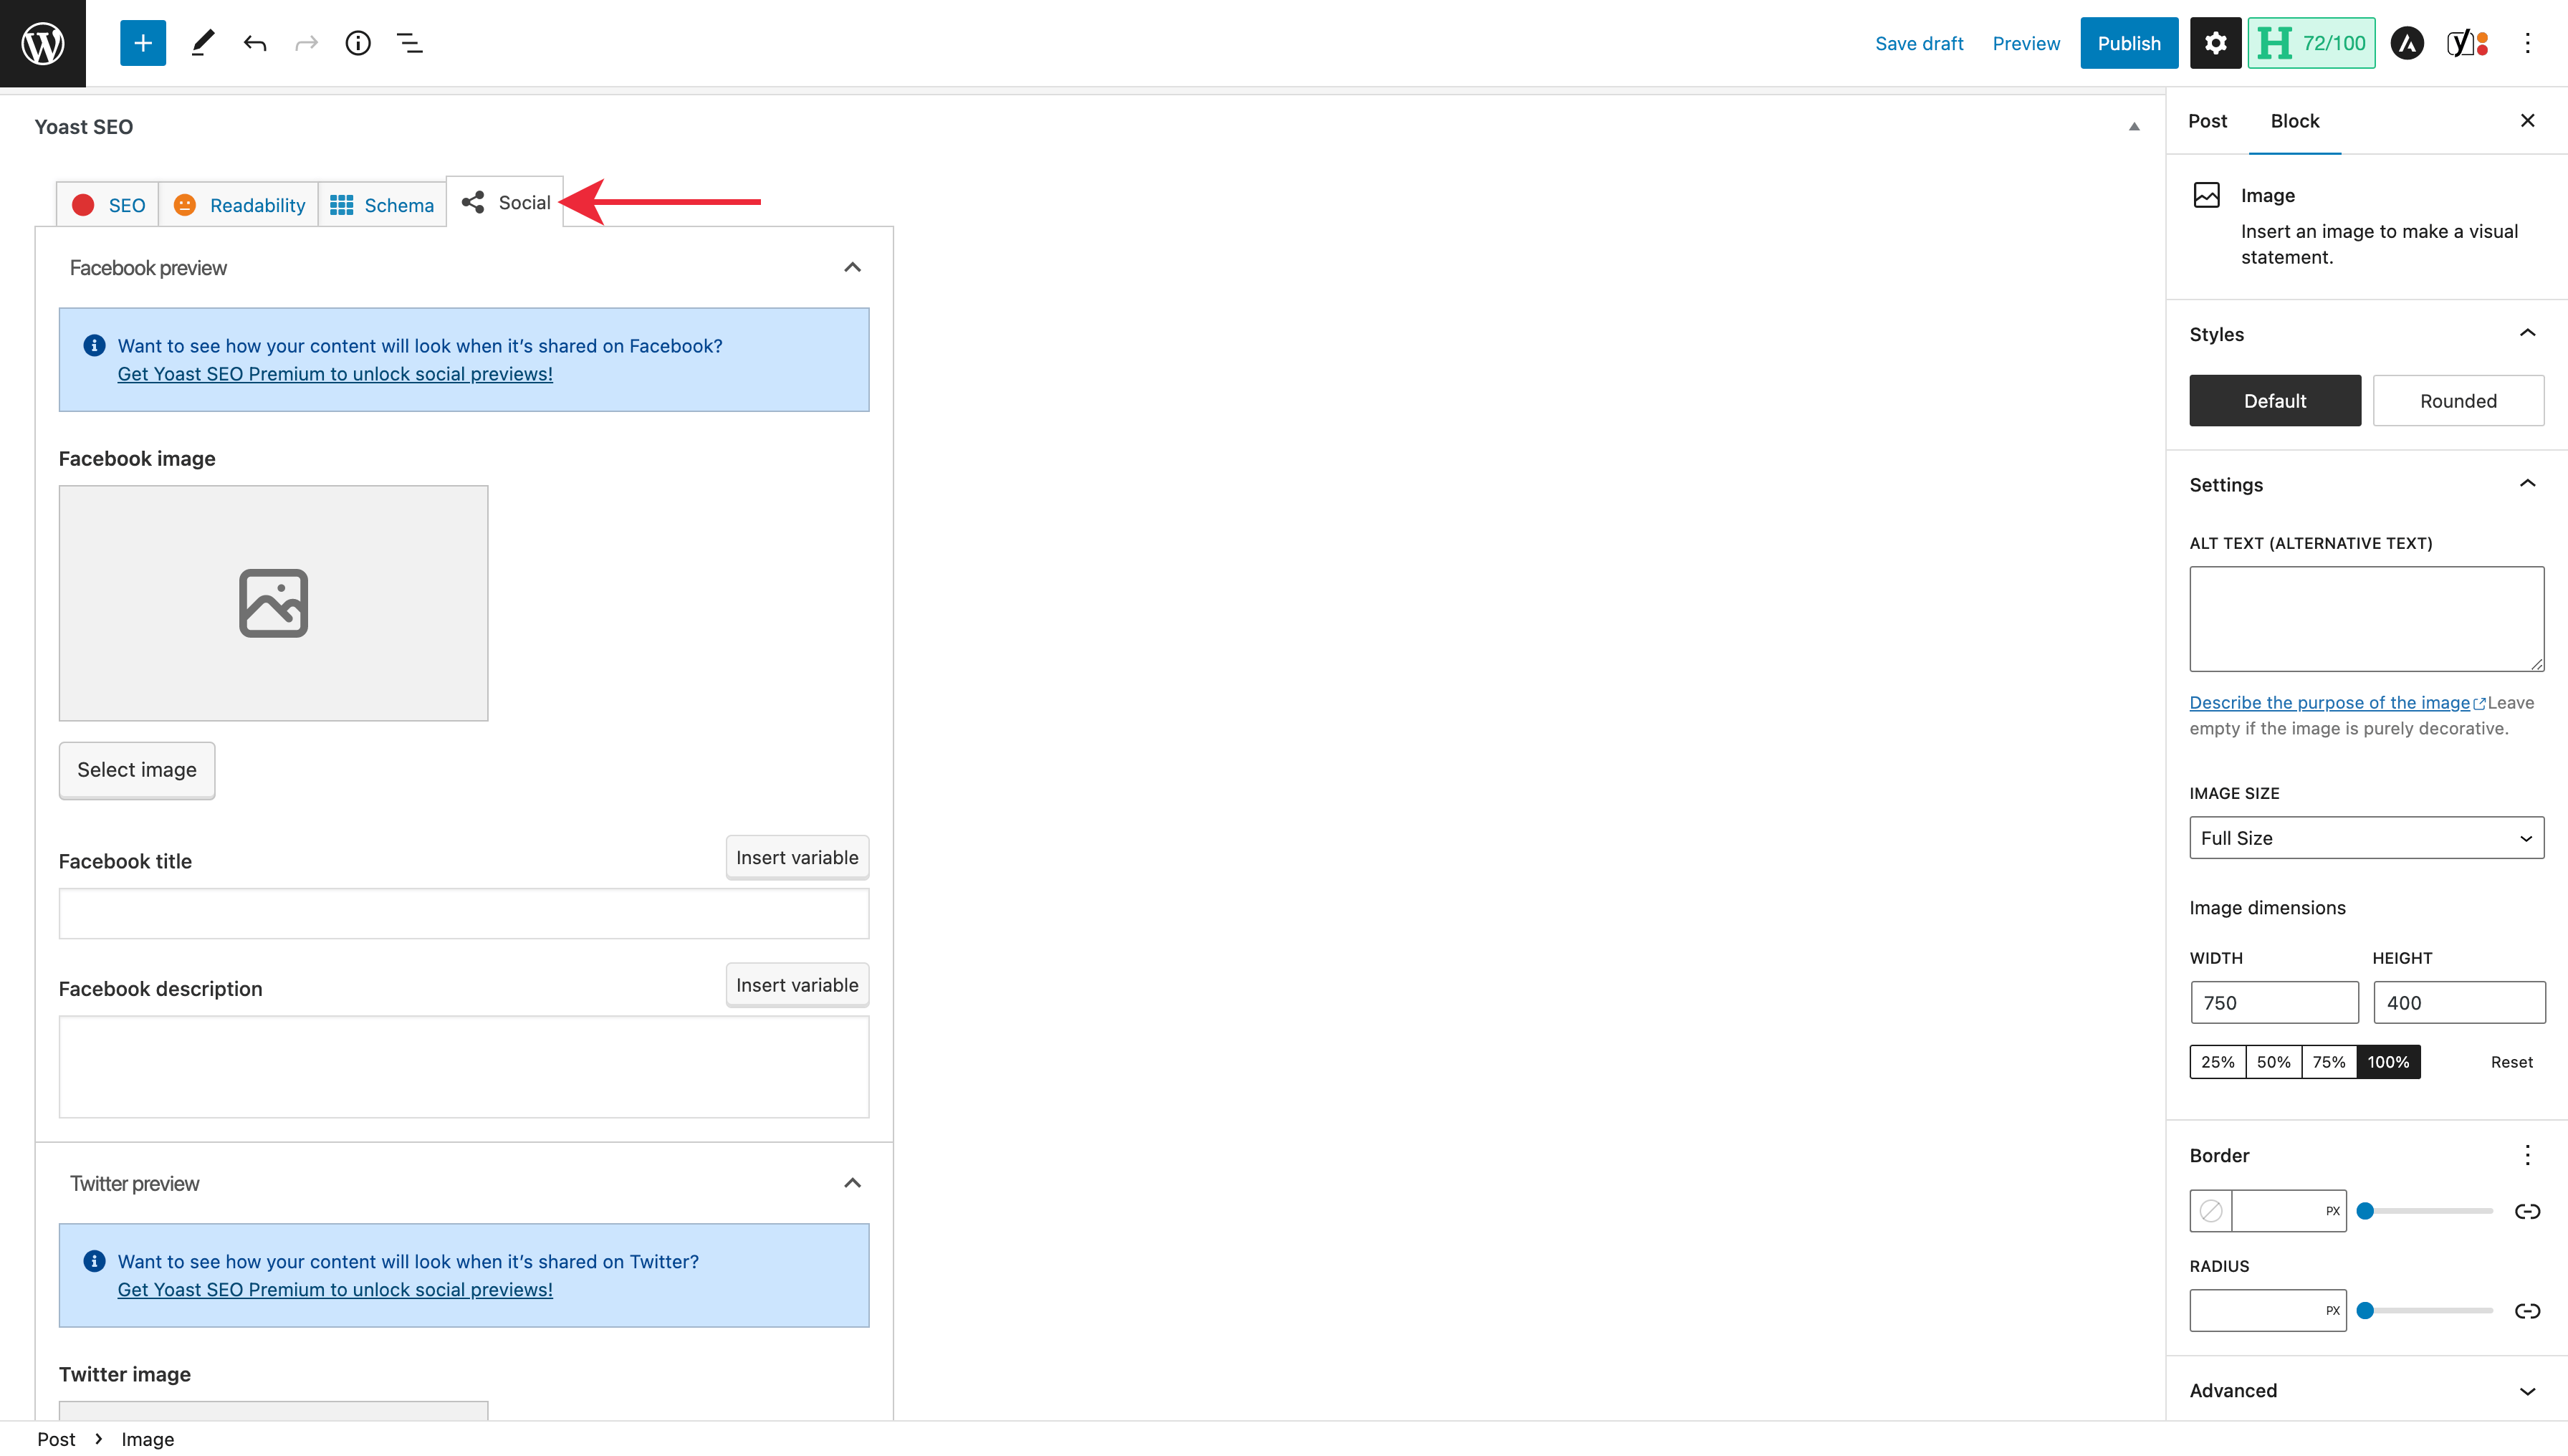
Start by selecting an image for Facebook and Twitter. I’ll use my post’s featured image for these, but you can specify a custom image.
After, you can add a title and description. I’ll use my page title and description for the Facebook and Twitter titles and descriptions to keep things simple, but you can customize these if you’d like.
Publish Your Post
You’re all set. All that’s left to do is publish your blog post.
To publish, click the post ‘Publish’ button and confirm that you are ready by clicking ‘Publish’ once again.
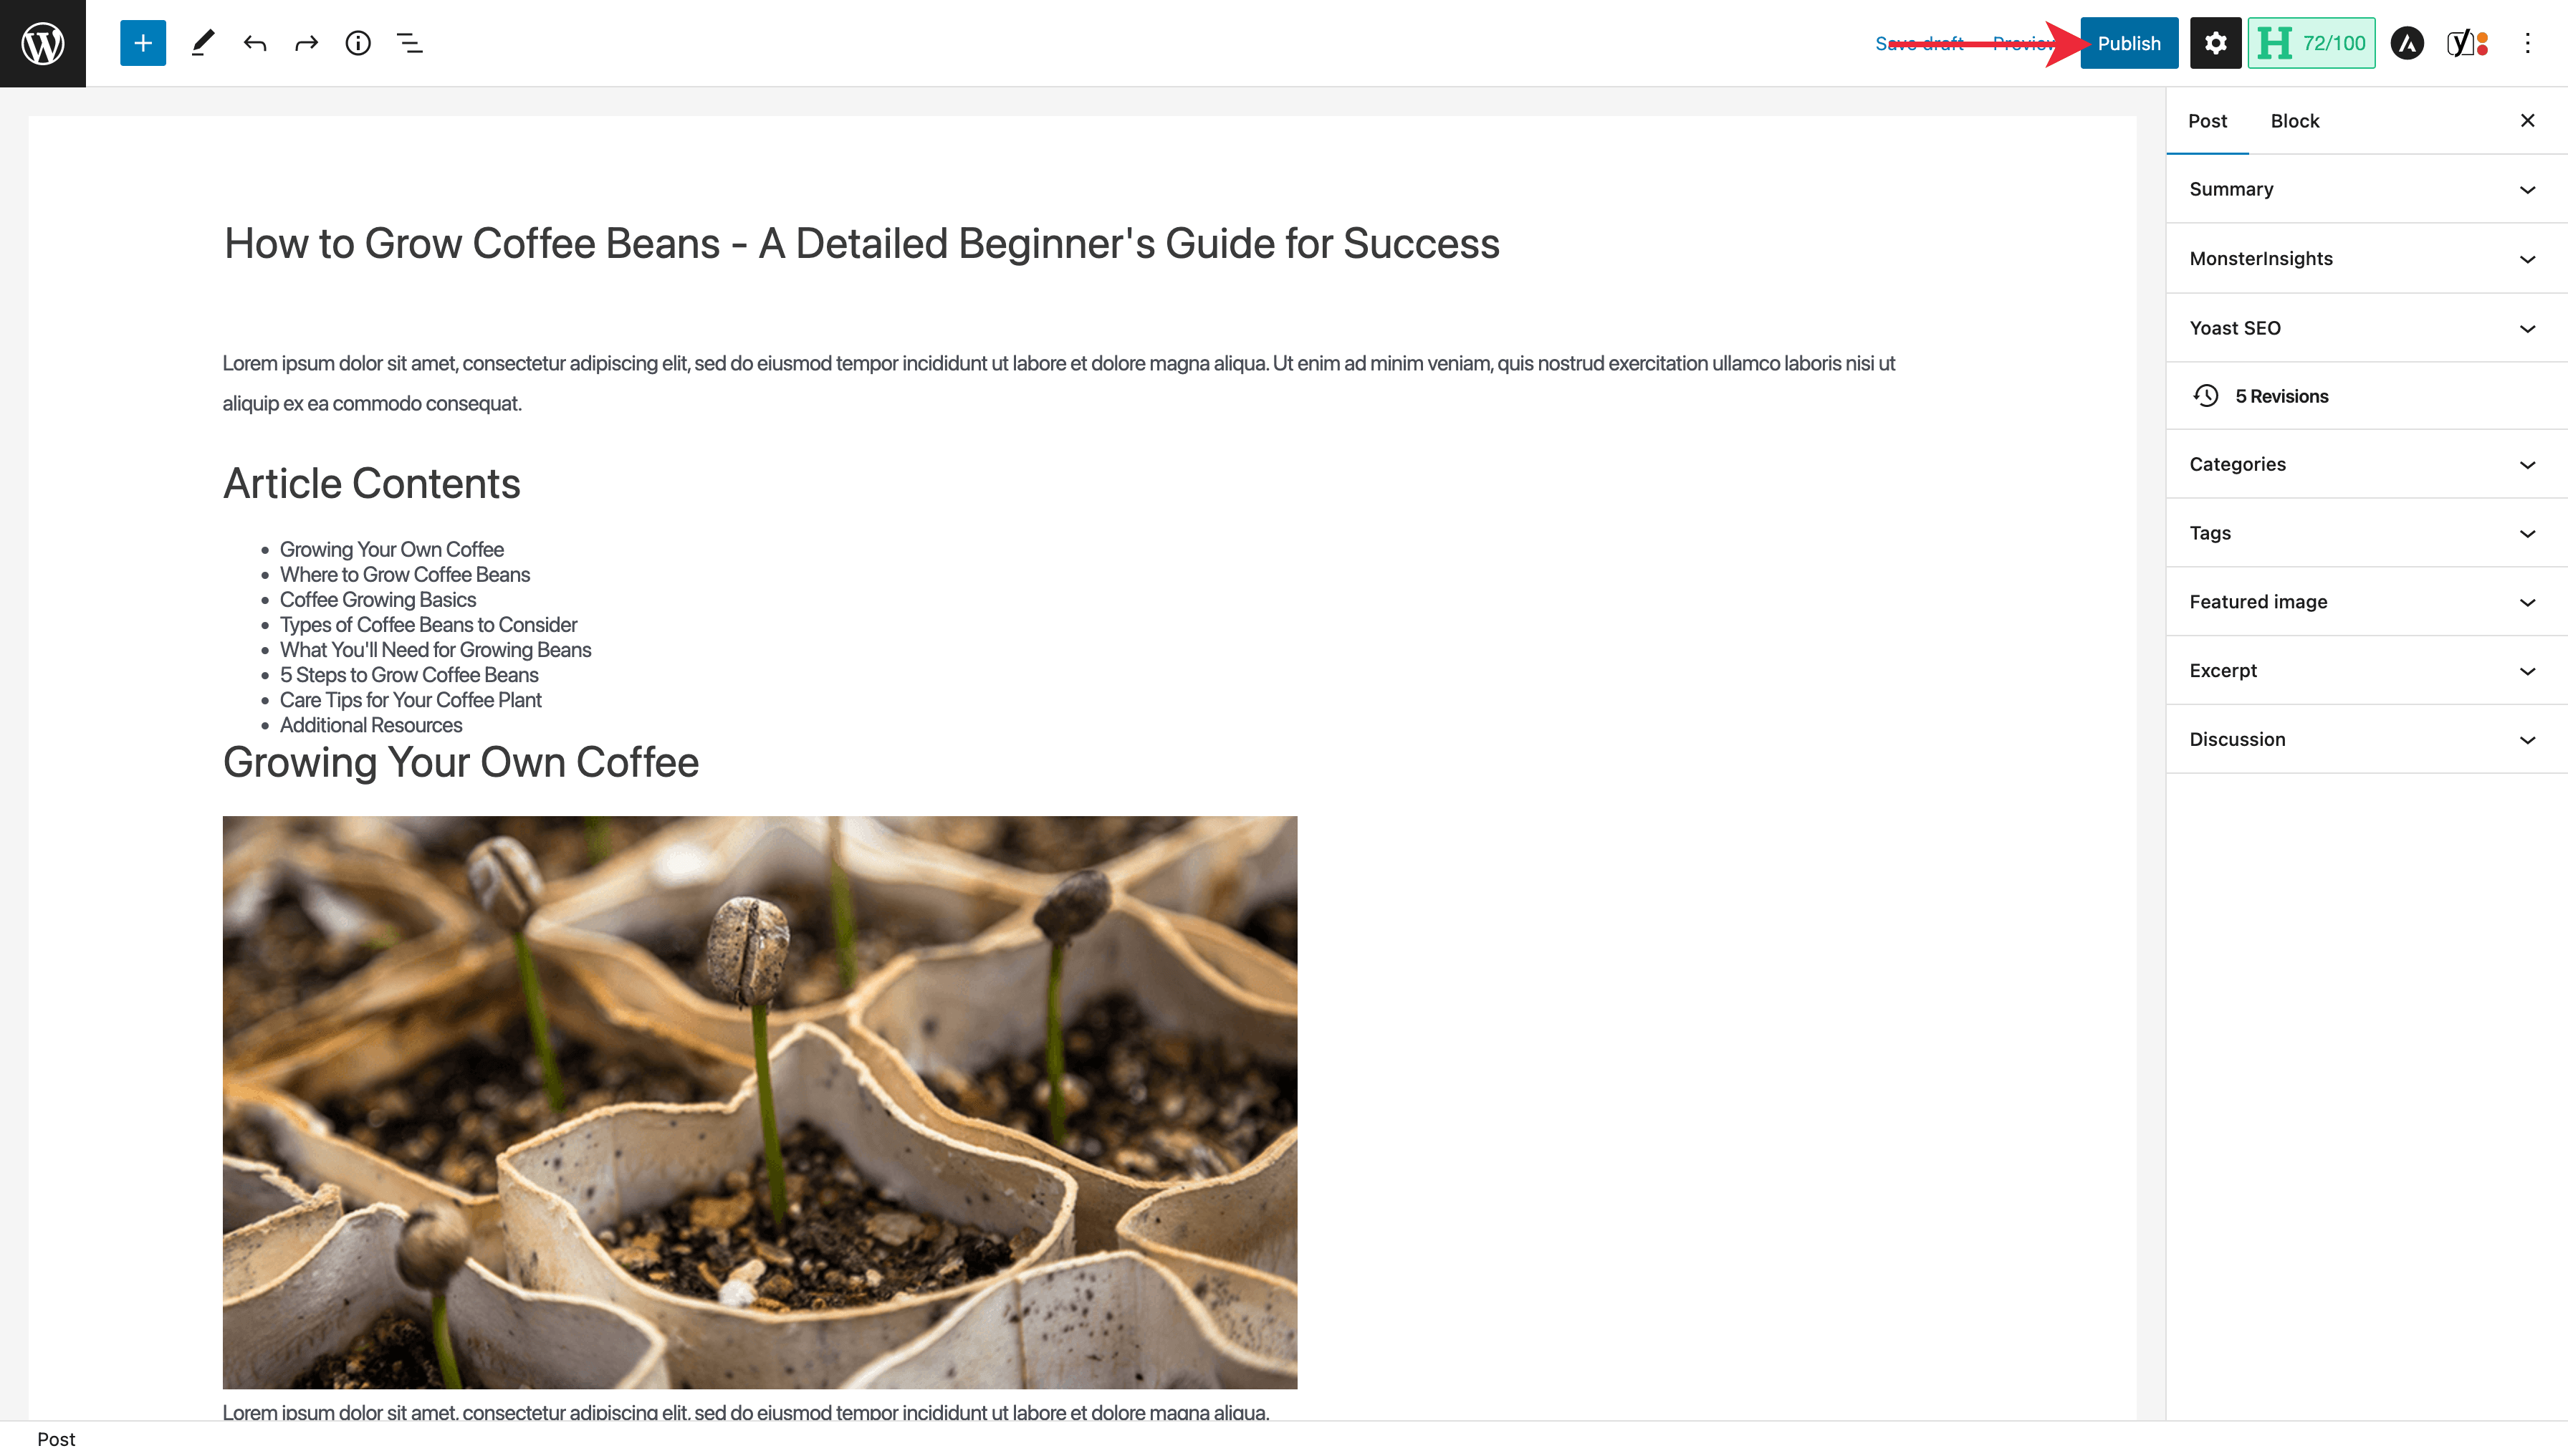
Congrats, your post is now live! You can visit your website’s URL in your browser to see it in action.
What About Keyword Optimization?
If you’ve read about SEO before, you’ve likely stumbled upon the notion of keyword optimization, where people will intentionally seek to include their keywords in the body of their text, headings, image alt text, etc.
There was some validity to these suggestions in the past, but search engines like Google have evolved and are all considerably more intelligent than they used to be, so it’s no longer required. In most cases, doing so is more likely to hurt people with good intentions.
Aside from the page and post title, where I recommend including the primary keyword you’re trying to gain exposure for, keyword optimization is no longer necessary. By thoroughly covering the topic of your blog post within the written text of your article, keywords and phrases about the topic will naturally occur, providing search engines with more than enough data to showcase your content accurately.
These days, the most critical work relating to keywords in SEO remains the upfront research you did to ensure you select a worthwhile topic and the supporting analysis of related keywords, subtopics, and questions, which influence your post’s outline.
Part 4: Tips for Writing Your Blog Post
Writing blog posts is a skill that takes time to develop. Thankfully, the more you do it, the better and more efficient you’ll become. To help you on your blogging journey, here are a few tips to keep in mind.
Tackle a Short Post to Start
When searching for a topic for your first few posts, identify a keyword you can thoroughly cover in 1,000 – 1,500 words.
If you go too big on your first post, you may find yourself quickly discouraged as you spend hours trying to produce it. Blogging is all about momentum, and hitting publish is motivating.
You want to commit to writing your first blog post and be pumped to start up the next one; starting small makes it easier to stay on course.
Be Flexible With Your Outline
Your outline is the backbone of your blog post that helps guide your writing and ensures your post has a logical flow. That said, it’s perfectly acceptable for it to change once you start writing, so go with the flow.
Nearly every article I write usually ends up with a handful of changes to the outline, including how I word and organize sections.
Write Bad to Start
When writing your blog post, allow yourself to write badly to start. Putting pen to paper can be challenging even for the most experienced writers, but I’ve always found it helpful to start typing whatever comes to mind.
First, it’s helpful to gain some momentum with your writing. Second, you can edit to your heart’s content. Typically, I do my best to start writing and rewrite paragraphs once I’ve typed them, if necessary.
I find it much easier to edit and rewrite something I’ve written than trying to write it perfectly the first time around. Plus, it will probably never be perfect, and that’s okay.
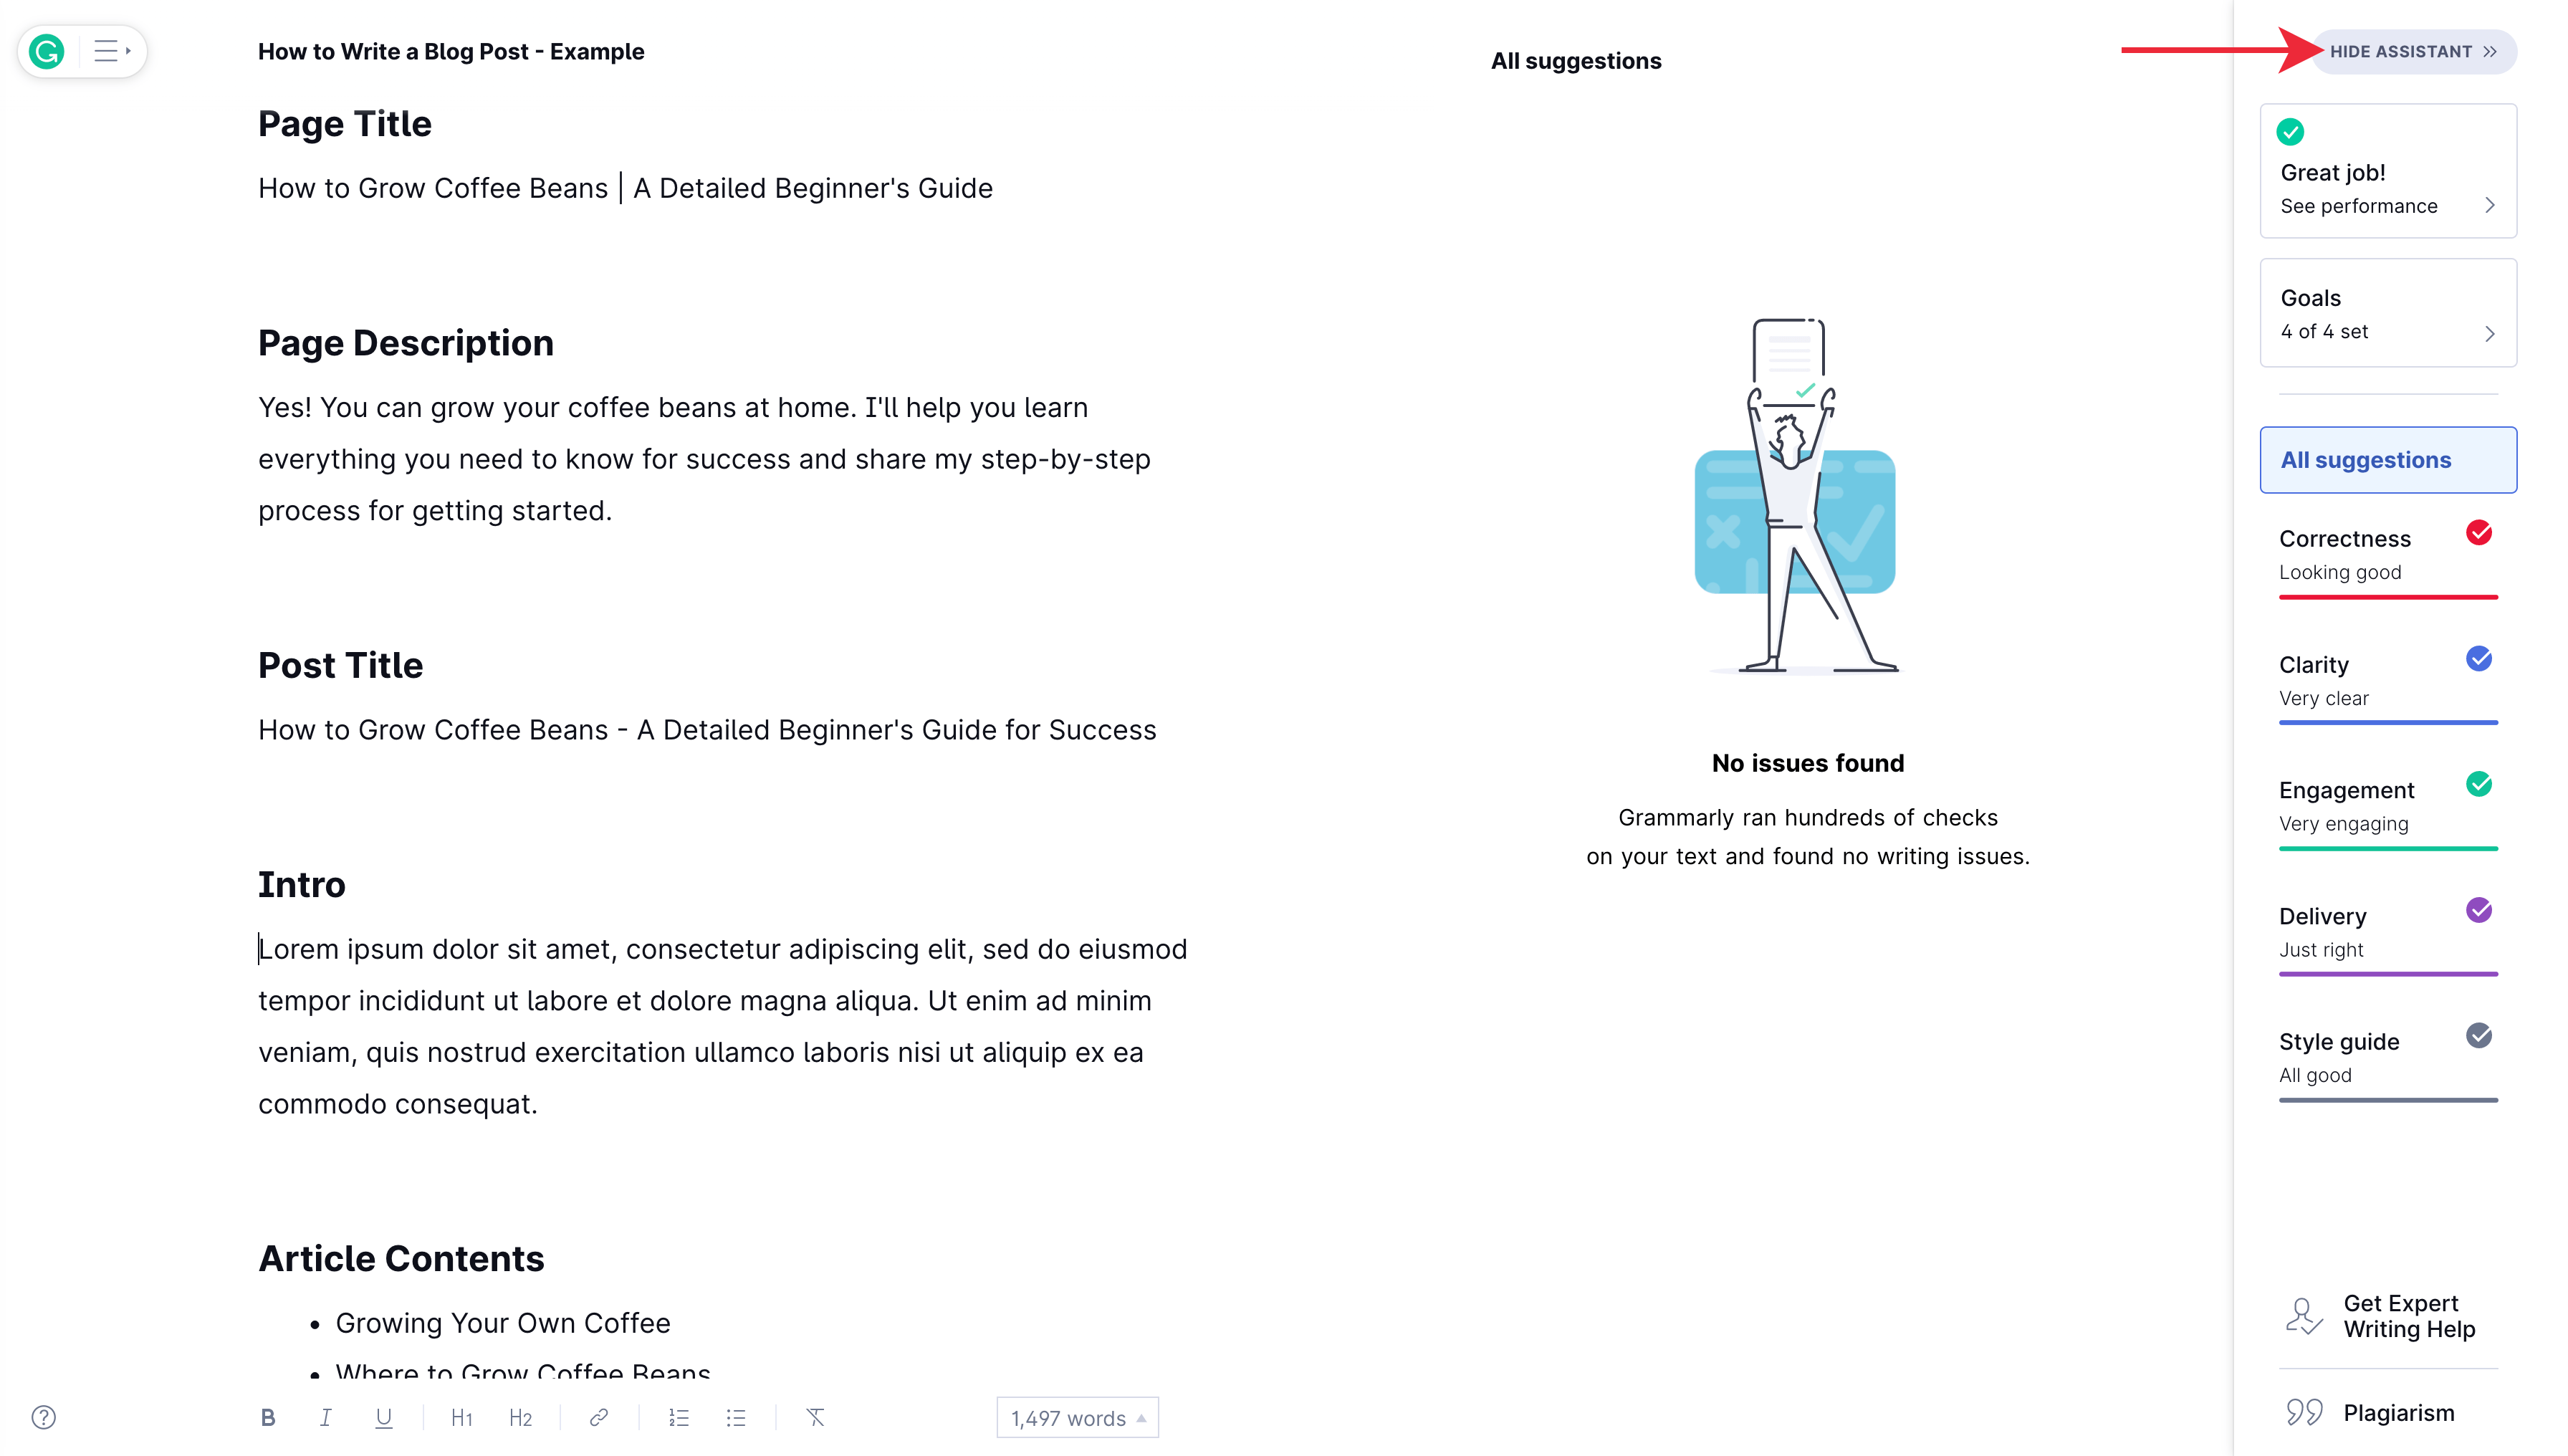
Turn Off Editor Suggestions
To go along with my previous tip, try turning off your text editor’s suggestions when writing your first draft. If you’re stopping to fix a minor grammar or spelling issue every few seconds you type, you’ll likely find it stifles your momentum and slows your progress.
For example, when using Grammarly, I can ‘Hide Assistant’ and type without interruption. When I’m ready for feedback, I can open it, review the suggestions, and edit as I see fit.
Write to an Audience of One
Whenever I write a blog post, I write with one specific individual in mind. For example, while writing this article, I have a close friend in mind who’s starting to build an online business who I know could benefit from the information I’m covering.
Doing so helps keep your message focused, simple, and concise. It also encourages you to write in a friendlier tone and avoid the trap of trying to please everyone who might visit your post.
The goal isn’t to appeal to every reader – that’s a futile effort. Instead, you want to be as helpful as possible to a specific audience that’s well-positioned to benefit from what you have to share.
Read & Research Before Your Write
Whenever I’m writing an article, especially a technical one, I like to spend time reading and researching before I start writing. What we covered in the blog post template I shared with you is a great start.
However, if you spend a bit of extra time reading up on the topic before you start writing, you’ll be more knowledgeable, which primes your writing and makes it easier to put words on paper.
Sleep On It
Often our minds get locked into a single way of thinking about something, making communicating it challenging.
If you’re struggling with a section of a blog post, I’d encourage you to sleep on it. You might skip the part of the article you’re stuck on to keep writing and revisit it the next day.
My brain seems to do some background processing when I rest and return to a portion of a blog post I’m struggling to write. I accidentally discovered this over time. I’d get stuck on a section, run out of the allotted time I gave myself to work on the post for the day, and come back the next day, and things seemed to write themselves.
Similarly, if you finish writing a blog post, hold off a day before publishing it and read it one last time before pushing it live. You’ll likely be surprised at the things you pick up on that can improve the article when you let it sit for a day before sharing it with the world.
Formatting
When you format your blog post, you make it easier to read. Here are some of the most common formatting options available when writing a blog post on WordPress or nearly any CMS.
- Headings
- Bullet lists
- Numbered lists
- Bold text
- Italic text
- Quote text
Beyond these, writing shorter sentences and paragraphs can make it significantly easier to consume your content, especially when users are visiting your blog post on mobile devices.
Be Patient With Yourself
When you first start writing a blog, it can be painstakingly slow, and if you’re not an experienced writer, kind of ugly to start. Try your best to go into it with a recognition that it’s normal for it to be challenging.
Over time, writing will become more natural, you’ll be more efficient, and your output will increase, but it takes time. Keep at it and be patient with yourself; your best work is yet to come.
Done is Better Than Perfect
When you first start blogging, it’s natural to be self-conscious about your writing, causing you to chase perfection. Undoubtedly, you want to put out your best work online, but don’t let that slow you down.
In the blogging and building traffic world, time plays a huge role in generating results, so the sooner you can hit publish, the better. It’s best to get your work out there to see what results you can generate instead of obsessing over every last detail.
You can always come back and edit or update an article, and I’d encourage you to do so for the best long-term results.
Revisit Your Intro
There’s a good chance things will change from when you start your blog post until you finish, and that’s perfectly fine. However, when you go back and read your intro, you may notice that you can improve it for the best possible alignment with what you covered.
Remember, your intro is effectively a sales pitch to encourage readers to continue scrolling, so having finished, take a few moments to polish it up and make it as compelling as possible. If it doesn’t need edits, that’s fine, but it’s worth double-checking to ensure you’re confident in it.
Where to Next
Publishing your first blog post is a massive step in the right direction to building traffic and Step 3 in my online roadmap for starting an online business. However, the secret to success lies in continually publishing quality content over time.
Over the coming weeks and months, set a goal to continue publishing at a set frequency, i.e., one post every week. Don’t overcommit; set a realistic goal that you can stick to and keep at it.
It will take time for your website to earn the trust of search engines, but eventually, you’ll start to gain some traction.
In the meantime, I want to dive into Step 4, building an audience. Although it’s exciting to start growing traffic to your website, you don’t want to miss out on the opportunity to strengthen your relationship with the dedicated readers of your blog who genuinely enjoy your content.
In my next article, I’ll share how to build an email list, ideas for encouraging users to sign up, tactics for engagement, and the tools I use to manage, collect, and send emails. I’ll also show you step-by-step how to get an email signup form on your website.
If you’d like to be one of the first to know when I publish my next article, you can enter your name and email below, and I’ll send you a note when it’s live. Thanks for stopping by!
PS – I hate spam, and I’ll never abuse my privilege to communicate with you. Plus, I take your privacy very seriously and will not share or sell your email to anyone. I promise.
Can I Ask a Quick Favor?
Your feedback is invaluable. How did it go writing your blog post? Did the information I covered in this article help? Is there any section that I can do a better job of clarifying?
Please post a comment below to share your thoughts.
Photo Credit: @andrewtneel