
A website is the backbone of any successful online business that provides digital entrepreneurs with the foundation necessary to gain exposure to the billions of people who use the internet daily.
Thankfully, creating a website is easier than ever. However, countless options exist to accomplish the task, which can be overwhelming to evaluate and compare. Furthermore, selecting an ideal solution can be challenging without being able to foresee your exact needs.
This guide helps by eliminating paralyzing decision points and cutting through the clutter to provide a clear step-by-step path for setting up a business website to start your online business. In it, I recommend the exact time-tested solutions that I rely on to build my own.
Article Contents
- Step 1: Choose a Website Builder
- Step 2: Select the Perfect Domain Name
- Step 3: Sign Up for Hosting (with a Free Domain)
- Step 4: Set Up a Custom Email
- Step 5: Update WordPress Settings
- Step 6: Activate a Theme
- Step 7: Configure Plugins
- Step 8: Install Google Analytics
- Step 9: Create Your First Pages
- Step 10: Build Your Menu Navigation
Preface
I created this guide to provide anyone interested in starting an online business with support for creating a website consistent with the steps I’ve outlined in my roadmap for success.
In it, I provide specific recommendations at every step based on my experience to fast-track building a lean, flexible, and highly performant website that enables you to start growing traffic sooner than later.
However, beyond my roadmap, this guide will also serve anyone looking to create a high-quality business website from scratch, so I’d encourage you to follow along regardless of your ambitions.
It’s worth noting that this guide requires you to spend money to get your website up and running, which averages out to just shy of $24 per month over the first year. Although there are ways to create websites for free, it comes at a substantial cost to performance, flexibility, and features, so it’s not a path I recommend.
Instead, I aim to balance cost with the foundation required for building, managing, and scaling a successful online business.
Step 1: Choose a Website Builder
The first place to start when creating a website from scratch is website builders, which provide the simplest way to set up and launch a website without coding or web development knowledge.
You may hear website builders referred to as content management systems or CMS, which is a fancy name for a software application that allows non-techy people to build websites.
W3Techs, which tracks the usage of website builders across the internet, provides some excellent data that helps shine a light on the most popular options available. Here’s how it breaks down among the top 7 most user-friendly consumer options.
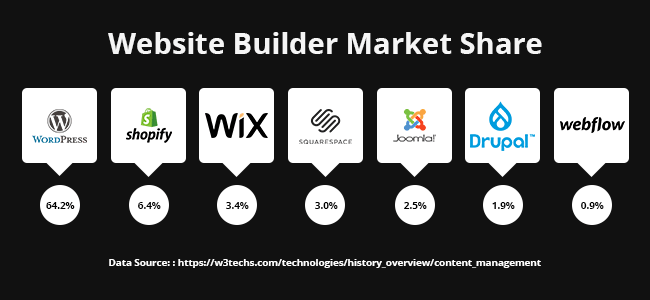
WordPress stands out as a leader in usage, but what’s also noteworthy is how much further they’ve grown, having launched within a few years of some of its top competitors.
While usage alone is compelling, here are several additional reasons WordPress is an ideal solution for running your business.
It’s Free
WordPress software is open source, so it’s freely available for anyone to use, redistribute, and modify, which is a significant benefit for those looking to start a business while keeping their costs low.
To start your WordPress website, you only need a domain name and hosting, which are widely available at a reasonable cost. We’ll cover what these are and the ones I recommend to provide your business with a rock-solid foundation.
It’s User Friendly
It takes some time to get familiar with WordPress, like any new software, but it doesn’t have a steep learning curve, so you’ll be able to pick it up quickly, and extensive support resources are available if you get stuck.
Overall, the team at WordPress has done an excellent job at making it easy to use, and they’re continuously refining it based on the feedback of millions of users to keep up with the latest trends.
In this guide, I’ll walk you through how to set up your website with WordPress, so you’ll start to become familiar with the software by following my step-by-step instructions.
It’s Endlessly Flexible
You can easily shape WordPress to conform to your needs, so there are virtually no limitations when building a website for your business. Best of all, you can start small and expand as needed.
Although flexibility is one of WordPress’ strengths, many individuals quickly get caught up in building an overly complex website that distracts from spending time on the most meaningful activities that drive growth.
To avoid this pitfall, I’ll share how you can get up and running quickly with a lightweight WordPress implementation that facilitates success while leaving room for your website to evolve and meet your future needs.
It’s Highly Extendable
WordPress has attracted a rich community of incredible web developers contributing to its success because it’s an open-source website creator. Some of the most notable contributions from web developers to the platform include WordPress templates and plugins.
Templates change the look and feel of a WordPress website. Plugins, on the other hand, enable additional functionality to help business owners build robust, full-featured websites without having a tech background or needing to hire a web developer.
However, knowing which templates and plugins you can trust is half the battle when setting up your WordPress website, so I’ll detail the handful of highly-rated options I use to power my business.
It’s Cross-Device Compatible
Although you’ll spend most of your time building your website on your laptop or desktop computer, most people visiting your website will be on their mobile devices, so it’s crucial your website looks great on every device, including phones, tablets, and computers.
WordPress has you covered by helping you create a website that looks great on every device by automatically adapting to each screen size, more commonly referred to as responsive web design.
WordPress.com vs. WordPress.org
When you build a WordPress website, you have two options.
You can visit WordPress.com, and they’ll host your website for a fee. Alternatively, you can download their software from WordPress.org and host your website through a third-party hosting provider that you select.
Although WordPress.com offers a quality website hosting solution, I don’t consider them the best web host, so it’s not the path I’d recommend.
Instead, I encourage you to opt for DreamHost. This third-party website hosting provider that I use offers exceptional support and additional tools for managing your website, including a staging site that allows you to test critical changes on your website before publishing them.
Furthermore, when you sign up with them, they’ll pre-install WordPress for you, so you don’t need to download it from WordPress.org. In my experience, this is the best path forward.
Step 2: Select the Perfect Domain Name
A domain name is the memorable part of your website’s address, which users will use to find you online. For example, the domain name for this website is digiblend.com.
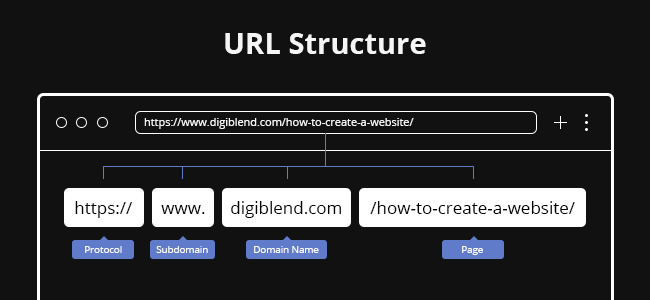
When someone types your domain name into a browser such as Chrome, Firefox, or Safari, it takes them to your website.
Although there are no rules for selecting a domain name, there are a handful of helpful criteria to keep in mind.
Domain Extensions
You can purchase website domains with various domain extensions. According to GoDaddy, the three most popular are:
- .com / commercial
- .net / network
- .org / organization
If you live outside the United States, you’re likely also familiar with your country’s domain extension. Here are a few examples:
- .us / United States
- .uk / United Kingdom
- .ca / Canada
- .au / Australia
- .co / Columbia
Generally, I recommend purchasing a .com domain because it’s the most prevalent and recognizable, which translates to trust.
However, since it’s the most popular, finding an available domain name with the .com extension can often be challenging, so it’s good to be aware of the other available options.
Elements of a Perfect Domain Name
To help you narrow down a domain name, here are a few criteria I’d encourage you to keep in mind.
- Be Descriptive: One way to increase the likelihood that you can find an available .com domain is by being descriptive. The simplest way to accomplish this is by including the topic of your business in the name. I did this for my primary business, “TennisCompanion.” Descriptive domains are also powerful because they help people and search engines quickly identify your website’s topic.
- Make it Easy to Say and Spell: If you build a successful online business, people will eventually talk about it, so you want to make sure it’s easy to say. You’ll also want to make sure it’s easy to spell so that users can find you when searching online.
- Go for Memorable: When someone stumbles upon your website, you want its name to stick with them so they can easily find you again in the future and share your website with family and friends.
- Try for Brandable: Long-term, it’s ideal if your domain name is unique enough to stand on its own. If you have a creative idea that’s less descriptive but still relevant, then go for it. For example, dailygrind.com is a more compelling website domain than newyorkcoffeeroaster.com, although both can work.
- Keep it Short: Shorter domains tend to be easier to remember and more brand-worthy, which are ideal qualities.
Once you have an idea for your domain, you can use DreamHost’s domain checker to see if it’s available for purchase.
The first few ideas you have will likely be unavailable, but don’t let that discourage you. Keep an open mind and brainstorm as many ideas as possible. I’d also encourage you to talk it over with a friend or family member who can help give you ideas and narrow things down.
A few tools I recommend for help selecting a domain include DomainWheel and Business Name Generator. Using both, you can enter a keyword, which will serve up tons of ideas to consider.
Once you find an available domain, we’ll register it in the next step, but before we do that, let’s talk about some tips to keep in mind.
Tips for Selecting a Domain Name
Selecting a domain name can be frustrating, especially when all your best ideas are unavailable. Here are a few tips to help you along the way.
Don’t Pay a Premium
If someone already owns the domain name you want and a website doesn’t exist for it, you’ll likely be able to buy it for a premium.
However, more often than not, the prices are unreasonable, and it’s not a worthwhile investment. Although a domain name is essential, it will have a relatively limited impact on your success, and we want to keep our costs low. Unused domains are dirt cheap, and that’s the way we want it.
Non .com Domain Extensions
If you opt for a domain extension other than .com, only do so if someone doesn’t currently have a live website on the .com version of the domain.
It’s common for .com domains to be unavailable with no website built on them, which is ideal when purchasing an alternate domain extension, such as .org. Doing so will help you avoid confusion with the existing website and ensure people can easily find you when searching online.
Yes, it’s true someone could come along and buy the unused .com version in the future, but that’s unlikely in most cases. If it does happen, you’ll have already spent time building up your business beforehand, so you’ll usually be the first website that shows up when people search online.
It’s also worth noting that once you build a presence on a different domain extension, the .com will become less appealing to buyers, so you may have the opportunity to purchase it for a reduced cost in the future.
Don’t Overthink It
As hard as it can be, don’t overthink the domain name you select too much. The last thing you want is to get stuck on this step, preventing you from taking action to start building your business.
If you fall in love with a .com domain but it’s not available, then opting for another popular domain extension is perfectly fine.
Sleep On It
Once you settle on a domain name, you might find it helpful to sleep on it to make sure you feel good about it the following day.
I’ve brainstormed endlessly on ideas for domain names in the past, and after a while, you might think you have a good one, only to wake up the next day and wonder why you thought it was worthwhile.
Consider Buying Multiple Extensions
If you narrow down a .com domain that you’d like to use for your business and the .net and .org domain extensions are also available, it’s worth considering buying those. Doing so decreases the likelihood of a bad actor starting a new business with the same name and trying to compete with you, which can confuse users and lead to headaches down the road.
Likewise, if the .com extension isn’t available, but the .org and .net are, you might purchase the .org and .net domains to reduce the likelihood that someone will pick up the .com domain.
In both cases, you’ll only use one for your website, so consider buying the additional domains an insurance policy. We can set the unused domains to redirect to your website, so if someone does type them into a browser, they’ll still get where they need to go.
Don’t go crazy here, though. There are over 1,500 domain extensions, most of which people rarely use. If warranted, you can always buy more down the road, so I’d focus on the .com, .net, and .org extensions if you want to protect your domain name.
Step 3: Sign Up for Hosting (with a Free Domain)
In Step 1, I touched on hosting, one of the requirements of setting up a WordPress website for your business.
As a quick refresher, you’ll rely on your hosting provider to get your website online and, just as important, keep it up and running. If you have questions or your website goes down, you’ll rely on their support team for help, and the good ones provide extra tools for success.
To be fair, there are plenty of good web hosts. Here are a few top web hosts that I’ve used over the years:
However, having experience with each of these, the one that stands out from the crowd offering excellent hosting, support, and tools for running and managing a WordPress website for businesses, is DreamHost.
I’m running Digiblend on DreamHost, and it’s what I use to run my main business website, TennisCompanion.
Having been with them for more than ten years, I can confidently say that they’re incredibly reliable and genuinely helpful when needed. I’m also a big fan of their user account, which is easy to navigate and use.
Overall, I can wholeheartedly recommend their service and will use them to walk you through building your business website in this step. Of course, if you prefer one of the others, that’s perfectly fine, but I’ll only cover how to set up a website with DreamHost in this guide.
DreamPress by DreamHost
Like all hosting providers, DreamHost offers a variety of options to get you up and running, but we’re going to focus on DreamPress, their managed WordPress hosting solution.
Managed hosting is ideal for individuals that need an excellent hosting solution but don’t want to worry about the technical details required to ensure their website loads quickly, reliably, and smoothly. It’s also perfect for individuals that need expert support from IT professionals who understand WordPress and can help you troubleshoot when issues arise.
In the case of DreamPress, DreamHost has optimized its backend systems to cater specifically to WordPress, so you’ll get exceptional performance dialed in for your business, which will seamlessly grow with you as you find success and increase traffic to your website.
Here are a few additional perks offered by DreamPress:
- Automatic WordPress Installation: When you sign up for DreamPress hosting, DreamHost automatically installs WordPress for you, so you can start using it right away.
- Pre-installed SSL Certificate: This protects your visitors and is a positive signal for search engines like Google, which will send you traffic. You don’t want to run a website without one.
- Nightly Backups: It’s critical that you back up your website regularly so that if something goes wrong, you can quickly and easily restore a prior version if needed. DreamHost handles this for you with automatic nightly backups, so your content is always safe. Plus, restoring backups is a breeze.
- Built-in Caching: Caching is one of the most effective ways of speeding up your website, so it loads fast for your visitors. DreamHost includes this because they know how important speed is for your business and the users who visit your website.
- 1-Click Staging: WordPress lets you quickly and easily change your website without a developer, which is a massive bonus. However, as your traffic grows, these changes become riskier because people will be actively browsing your website. If something goes wrong, things can break, making your website inaccessible. To protect against this, DreamHost offers a staging website, which is an exact copy of your website that you can use to test things like new plugins before updating your live website. This feature is a huge benefit and can save you massive headaches.
- Email Accounts: Once you set up your website, you’ll want to create a custom email address – for example, [email protected]. DreamHost includes this in your plan at no extra cost.
- Money-back Guarantee: Right now, you might be super excited about starting an online business only to find out that life gets in the way a few weeks later or it’s not what you expected. DreamHost gets it and offers a money-back guarantee allowing you to cancel your account and get your money back long as you do so within 30 days of opening your account.
The bottom line, DreamPress by DreamHost takes the complexity out of running a website so you can focus on the activities that will grow your businesses and earn you money.
Signing Up for DreamPress
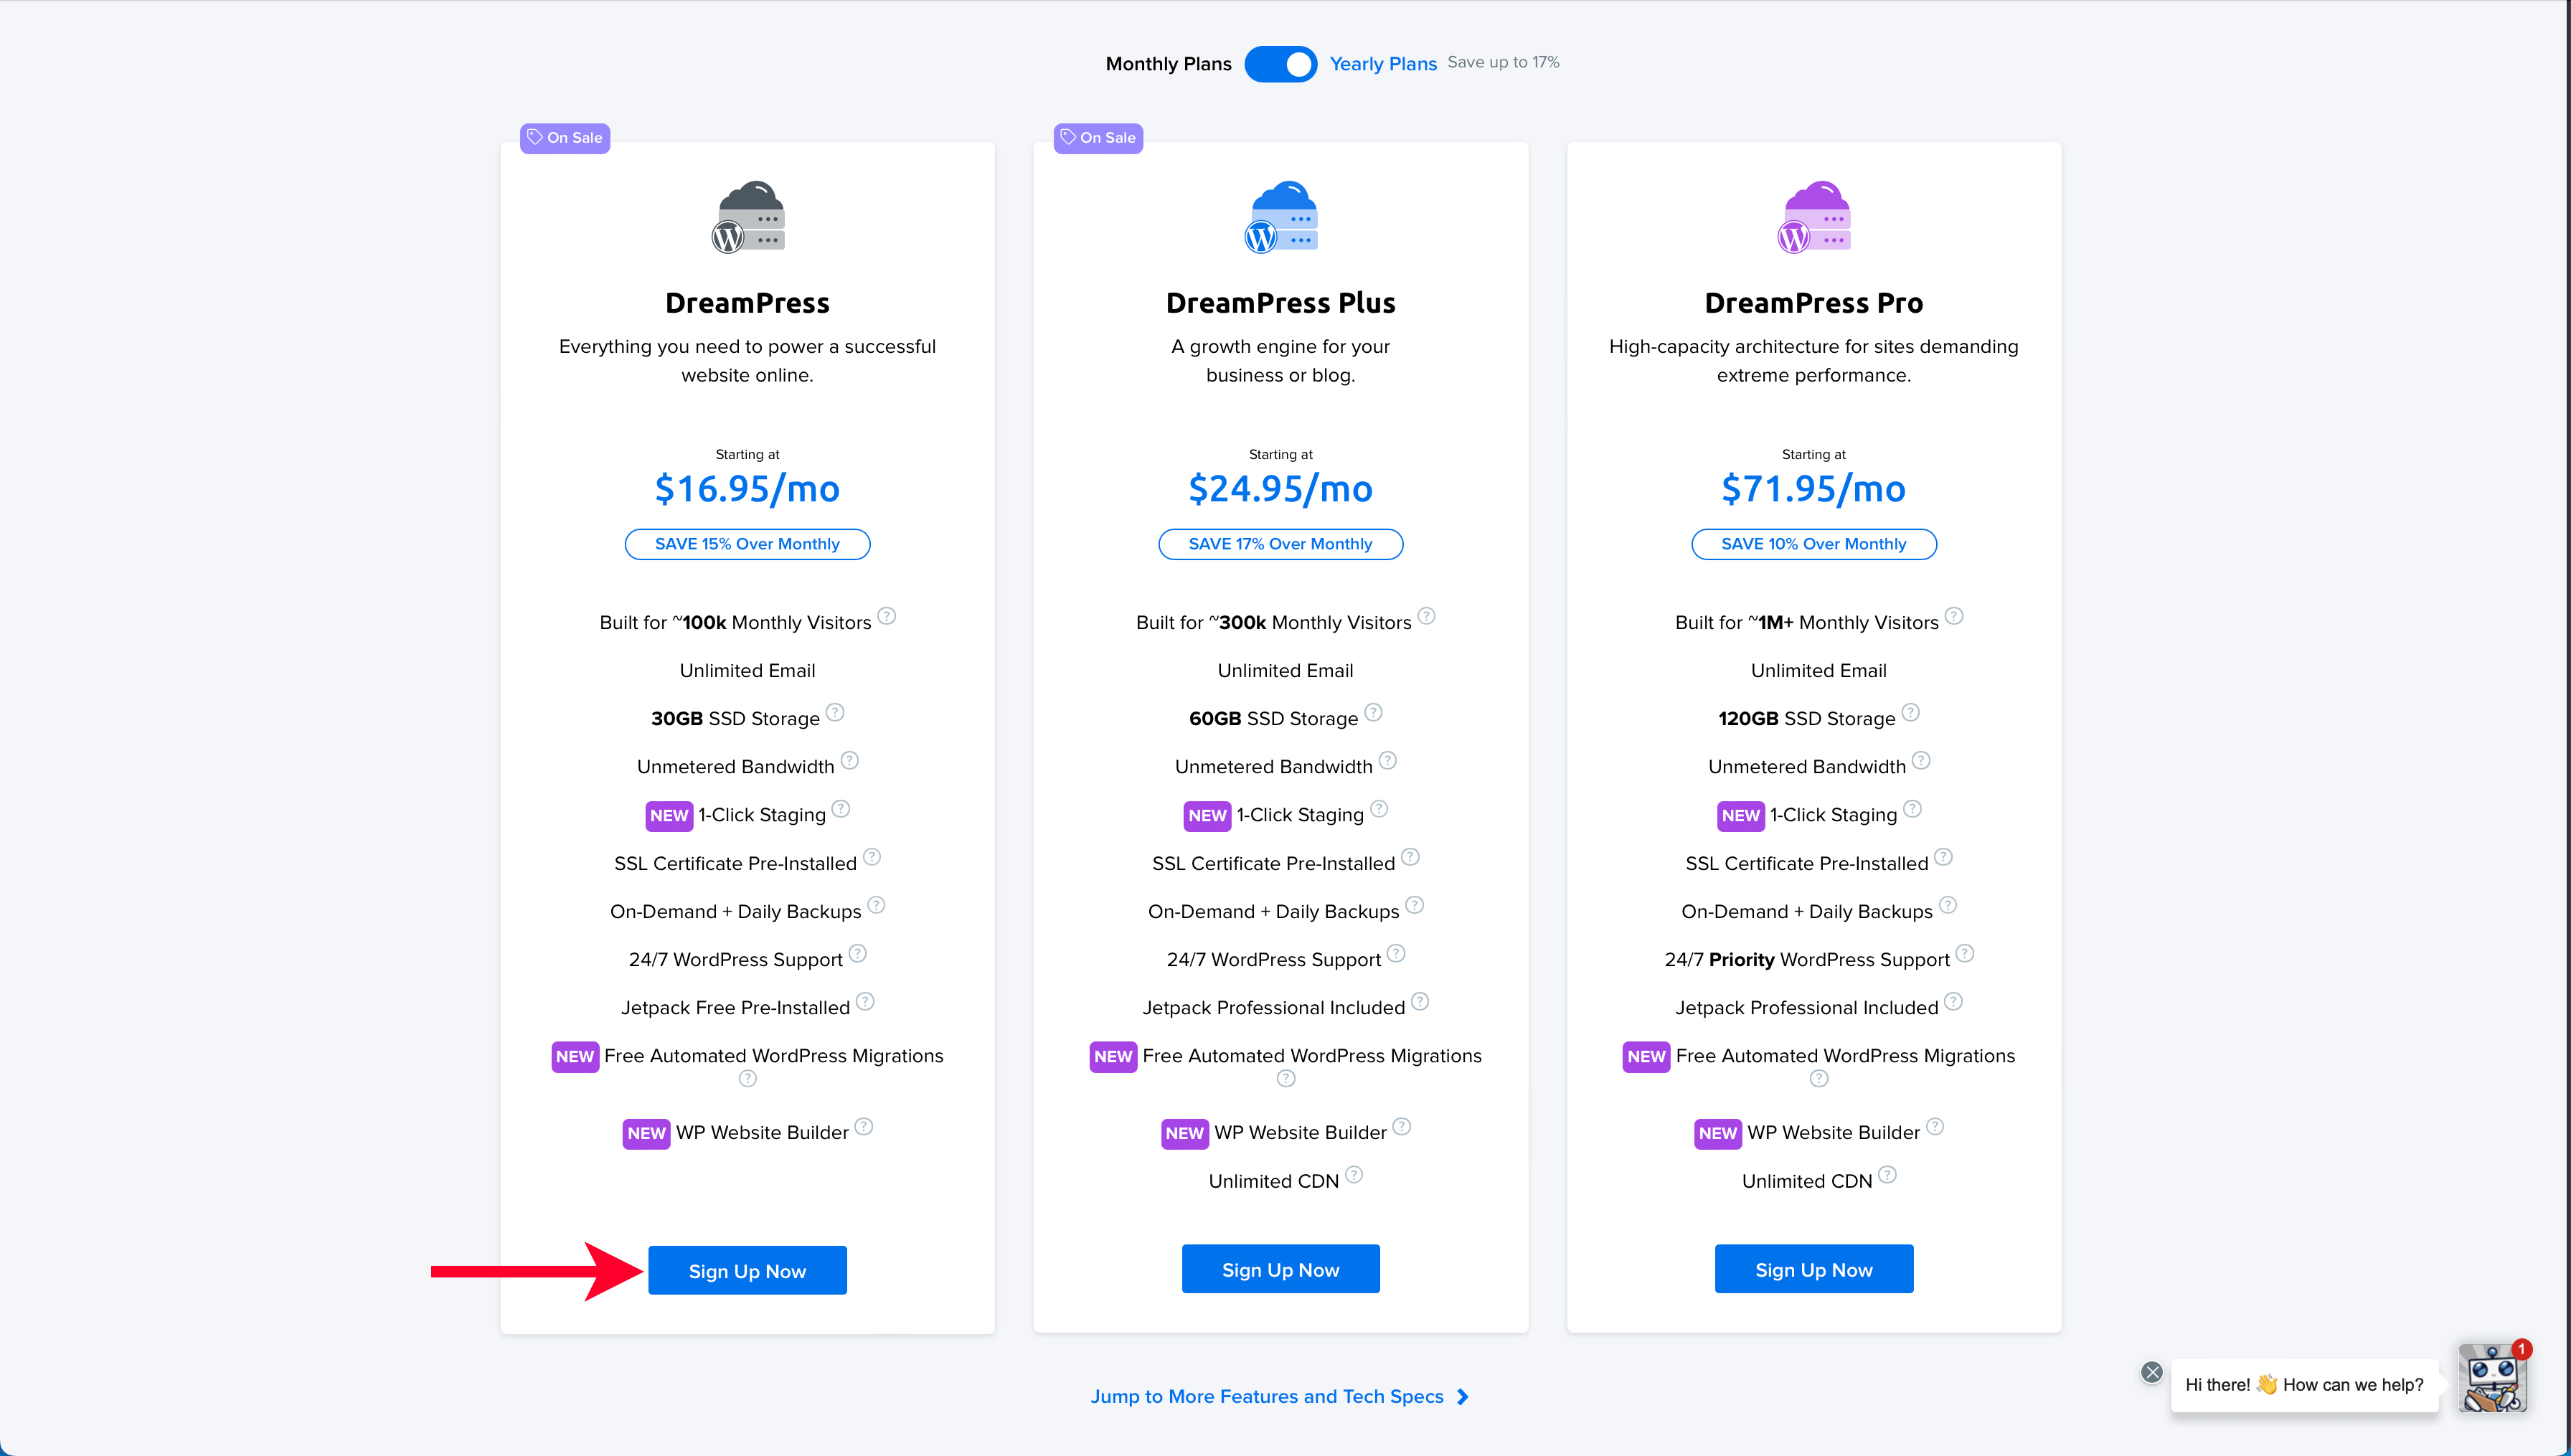
Head on over to DreamPress by DreamHost to get started. When you get there, you’ll notice that they offer three tiers:
- DreamPress
- DreamPress Plus
- DreamPress Pro

Since your website is brand new, DreamPress, the least expensive option, is sufficient for your needs. As your business grows, you can easily upgrade to the Plus or Pro plan when needed.
You’ll also notice that you can sign up for a monthly or yearly plan. I recommend the yearly option for two reasons.
- You’ll save the most money: Once you start building your website, you’ll always need hosting, so you should get the best deal for the longest period.
- You’ll get a free domain: DreamHost offers free one-year domain registration for their yearly plan. This cost is annual, so you’ll pay for it in subsequent years, but the up-front savings is a bonus.
Helpful Tip
Often, DreamHost will discount their monthly plans for the first three months, so it looks cheaper, but after those three months, the cost jumps up, so you’ll be paying more at the end of the year. Any discount is better than none, but you’ll save the most with their yearly option.
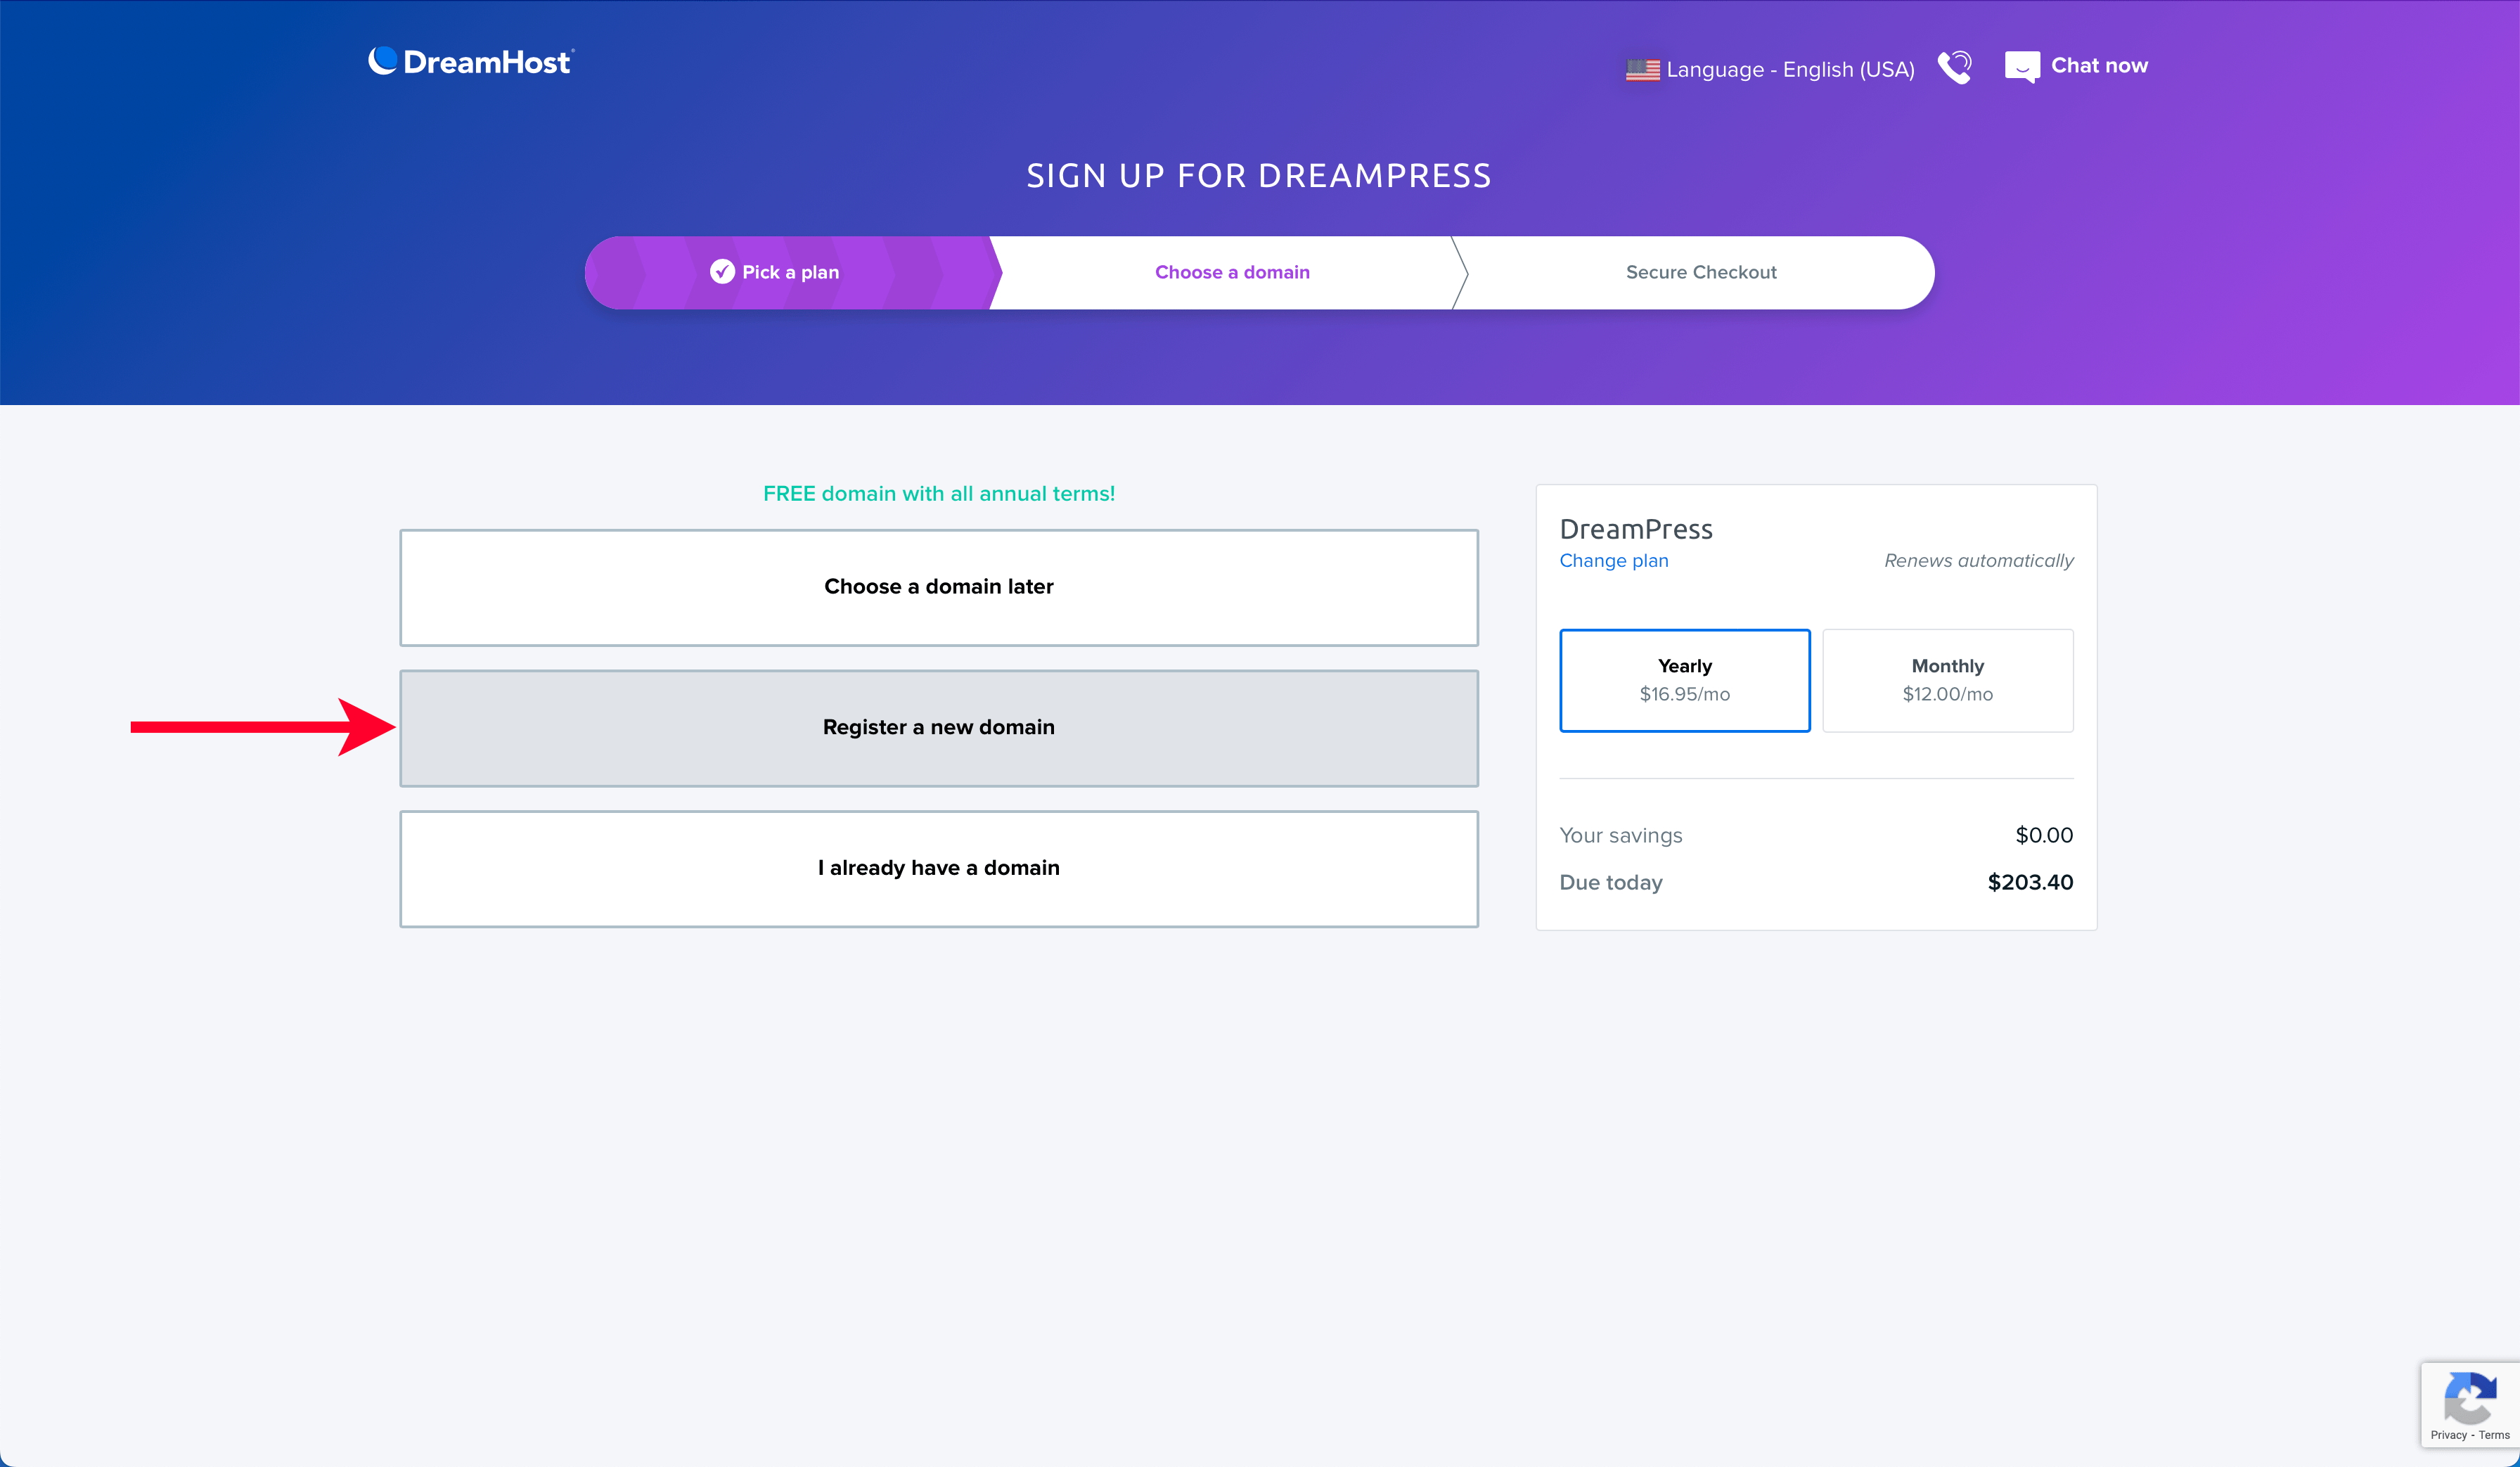
From the DreamPress landing page, click the “Sign Up Now” button for DreamPress to get started.
On the next page, select “Register a New Domain.”
Carefully enter the domain name you’d like to register in the search box and then hit “Enter” or “Return” on your keyboard. I’ll be registering a new website of my own so you can easily follow along.
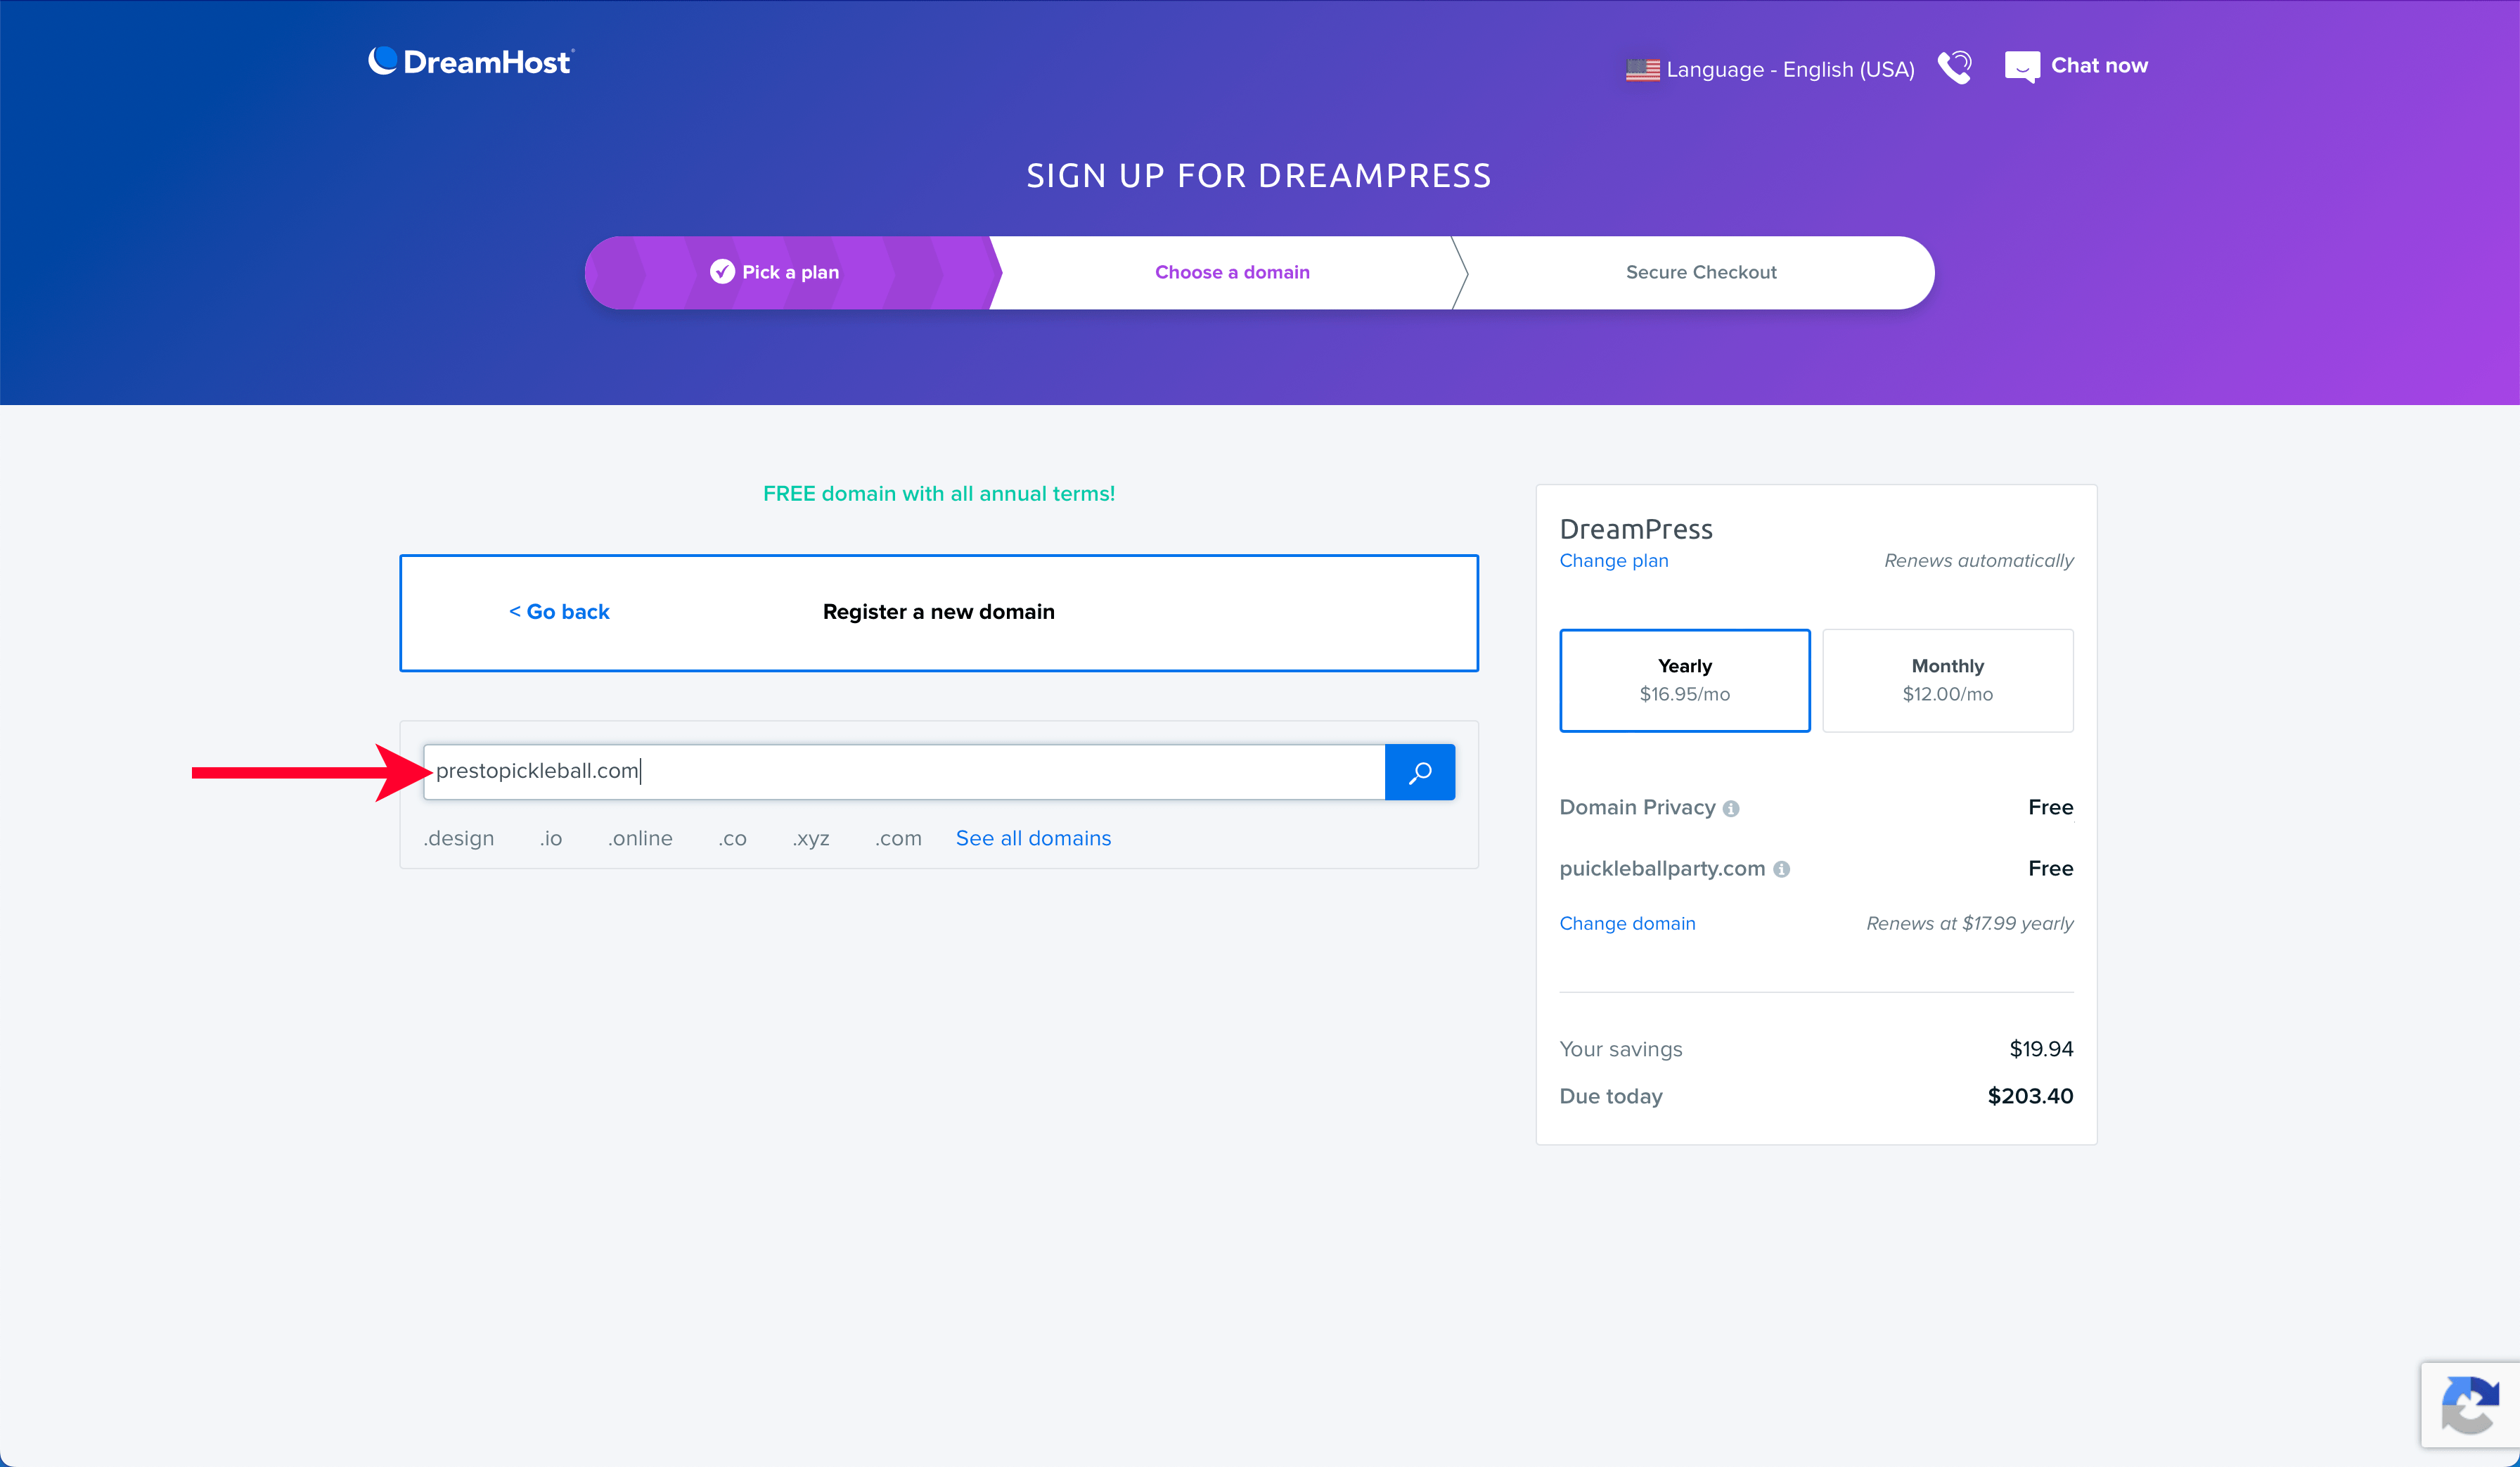
You should have already checked the availability of your domain in Step 3 of this guide, but DreamHost will confirm its availability here.

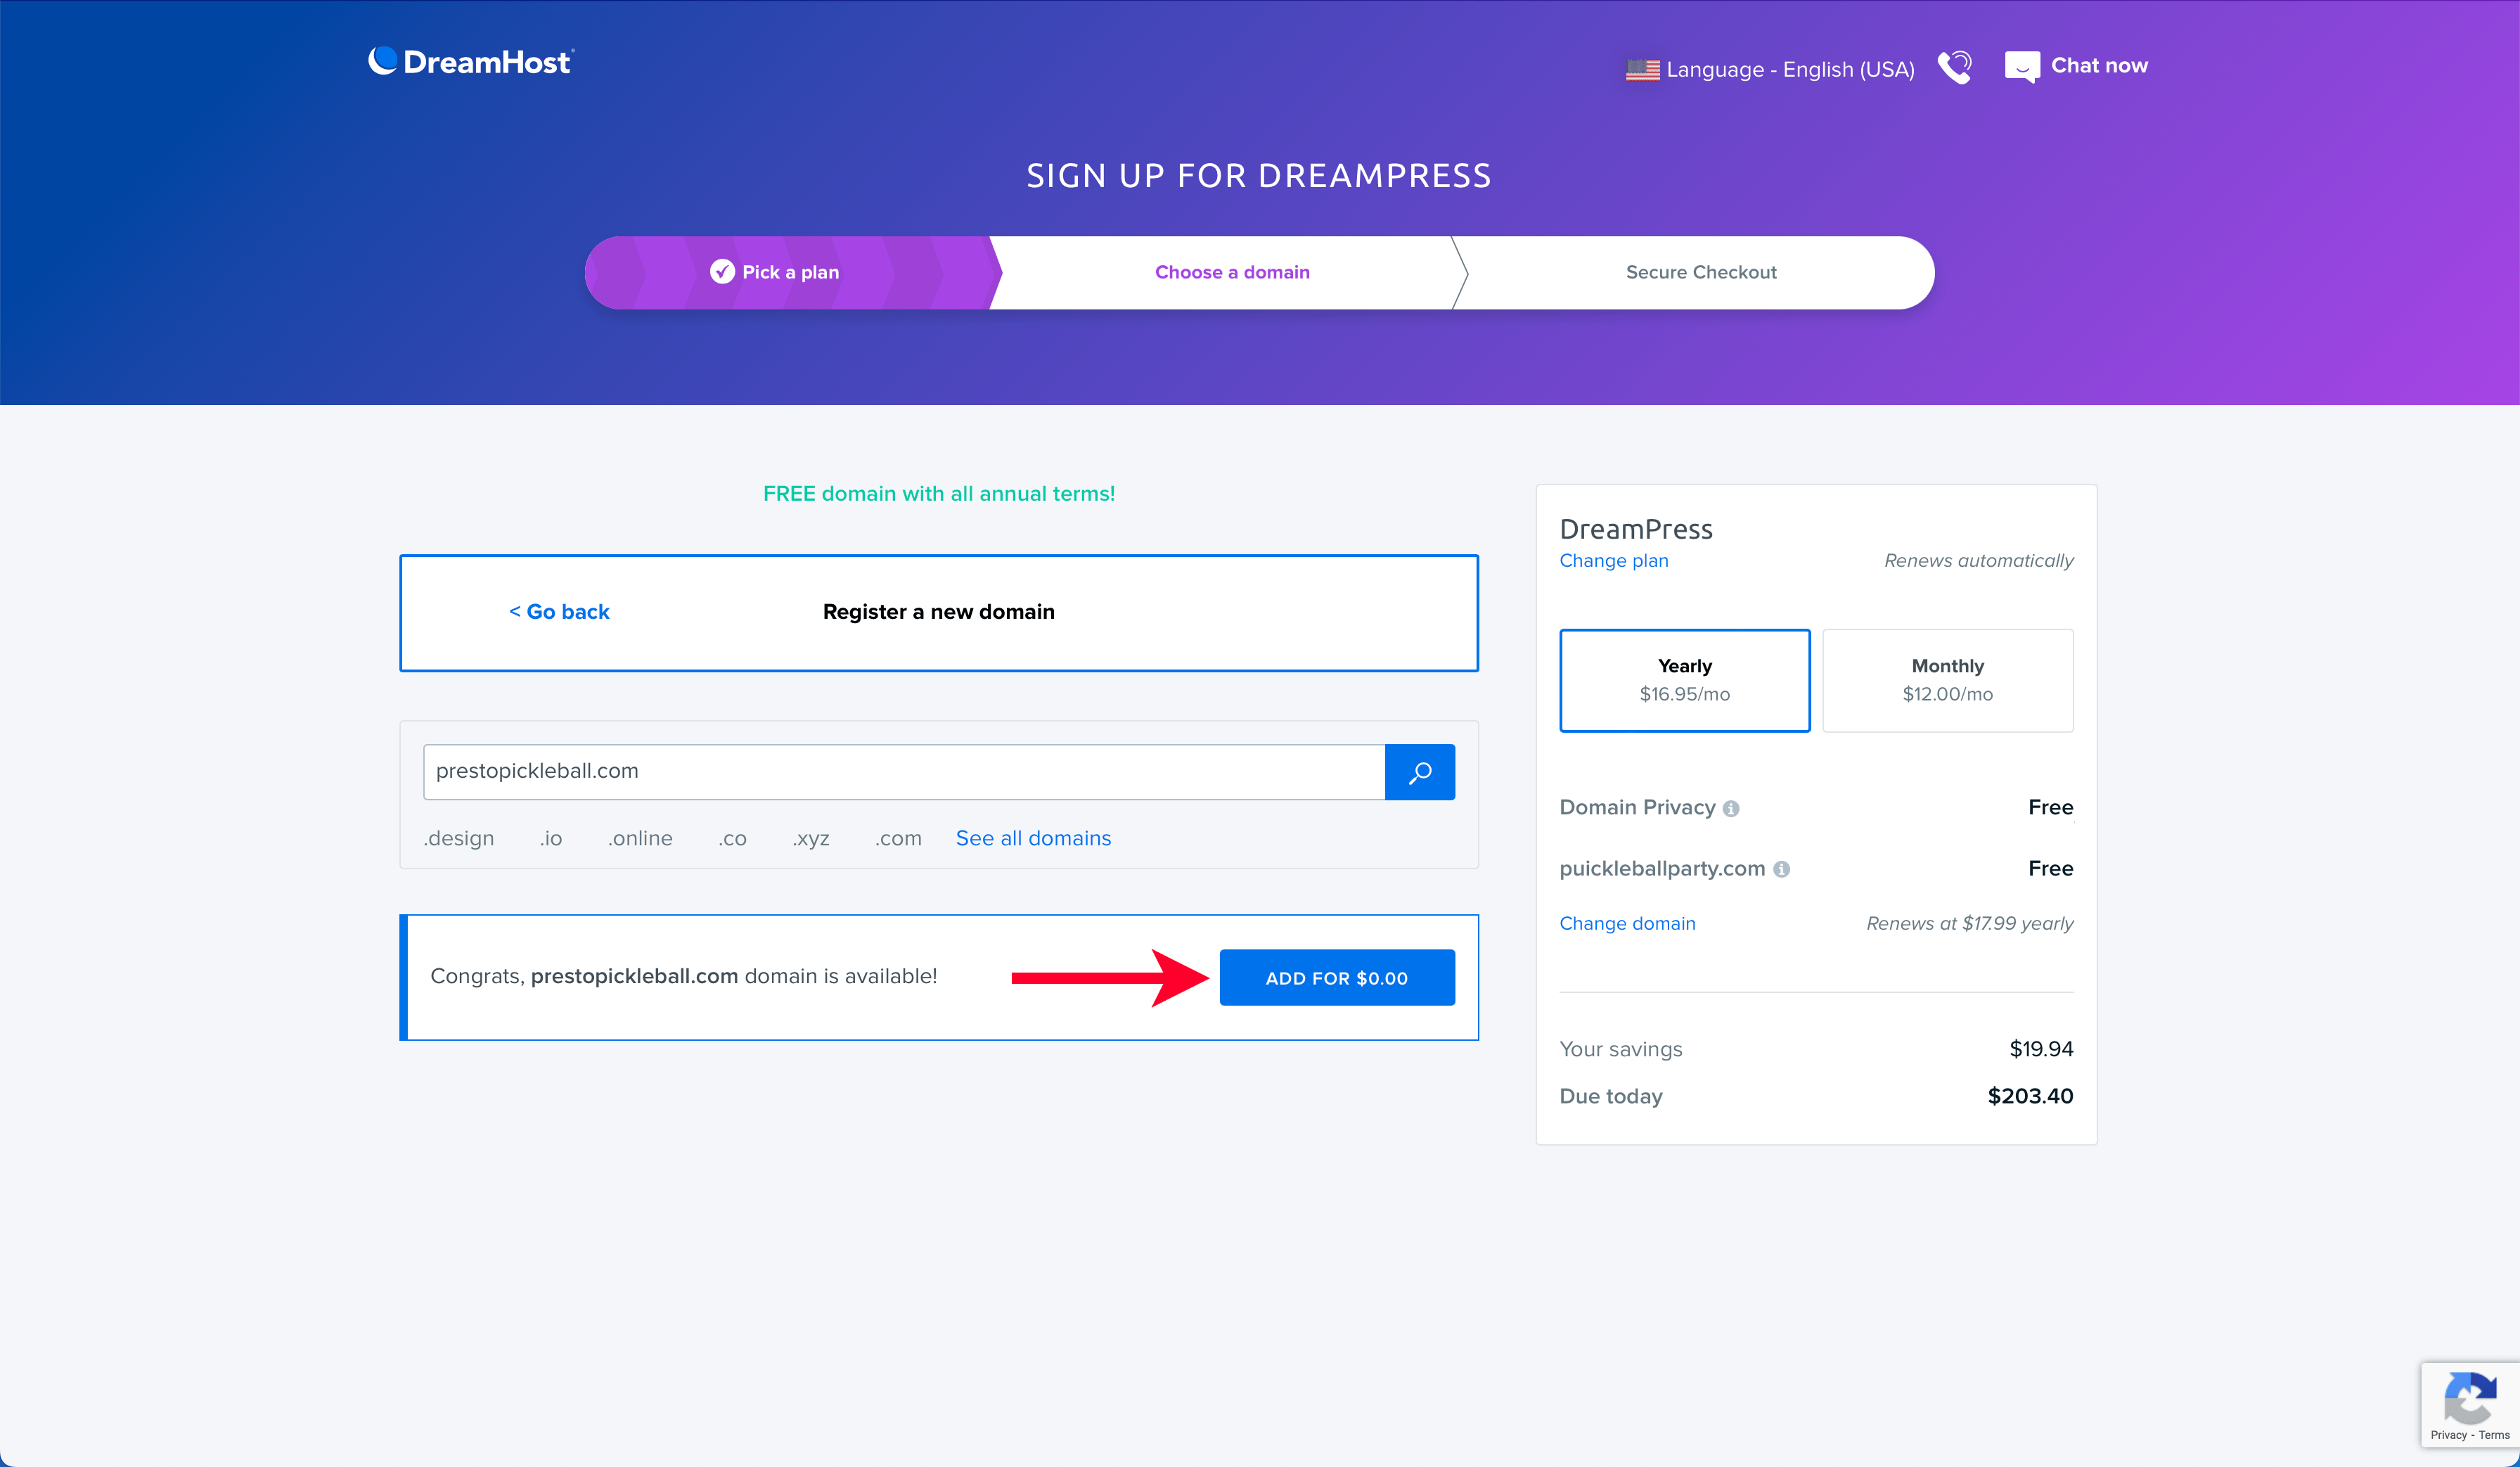
Click the button to “Add” the domain to your plan.
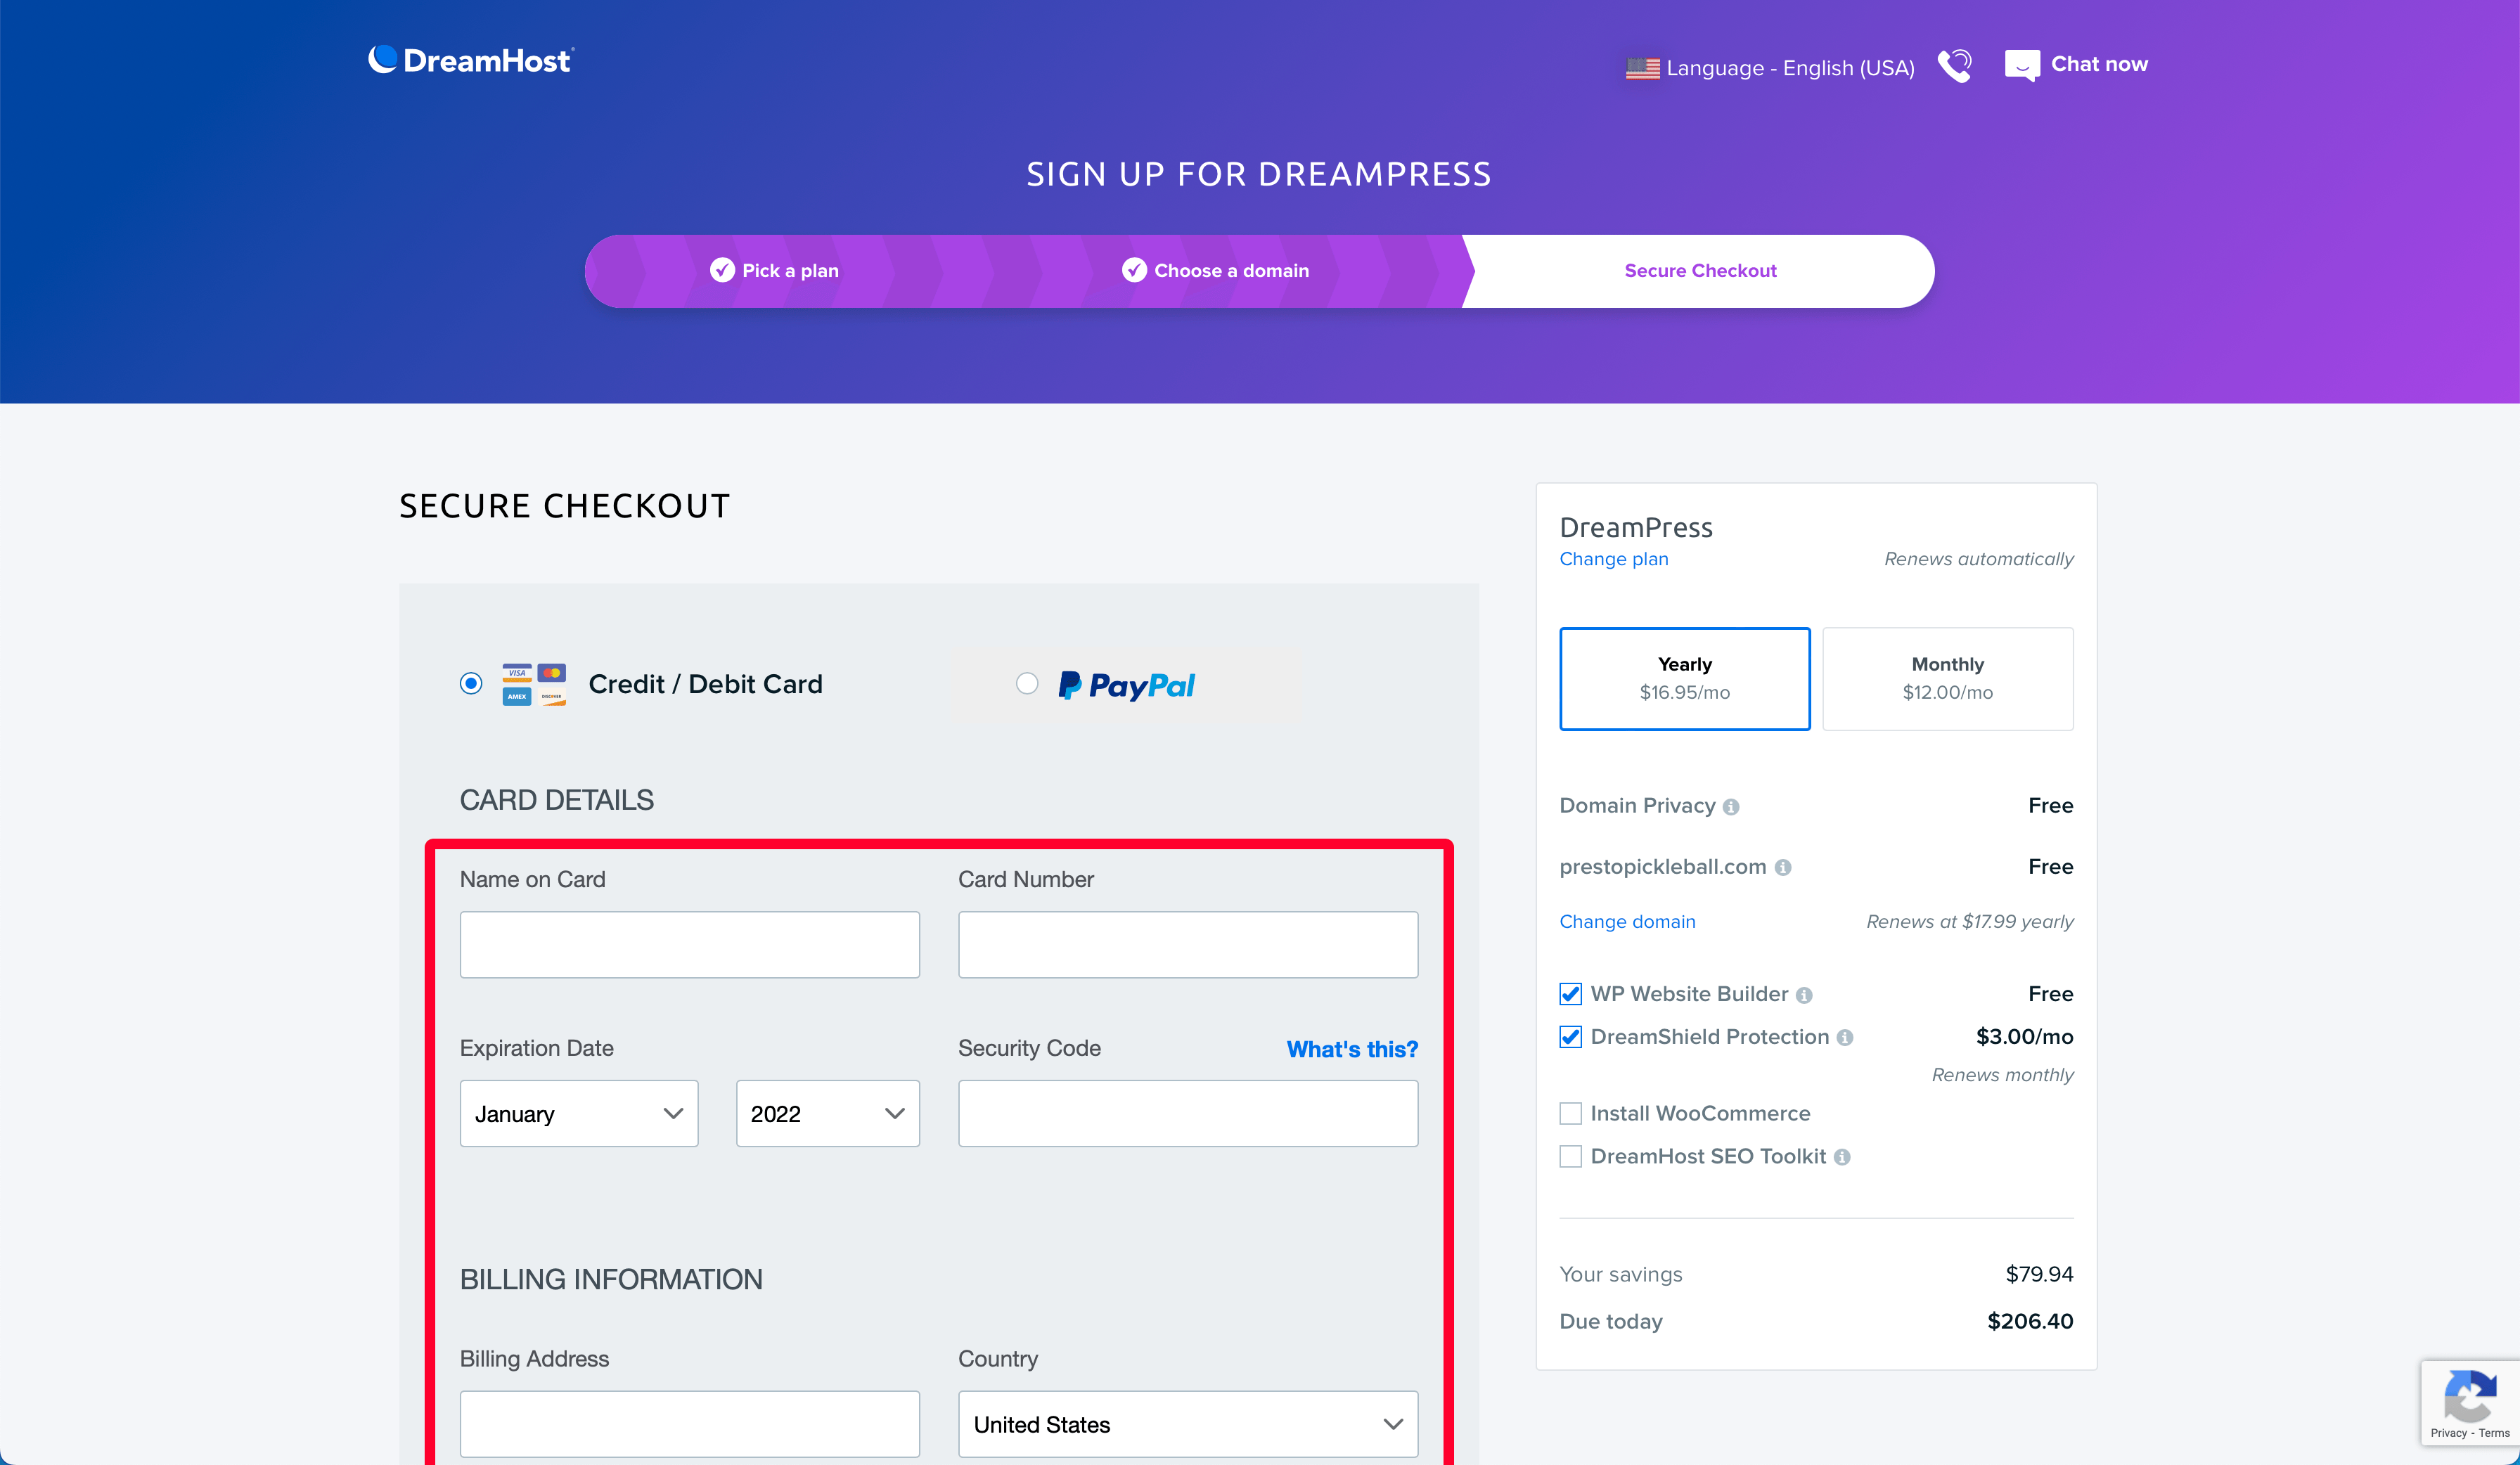
Next, enter your credit card details and billing information. Then click the “Add Credit Card” button.
Fill out your “Account Setup” information.
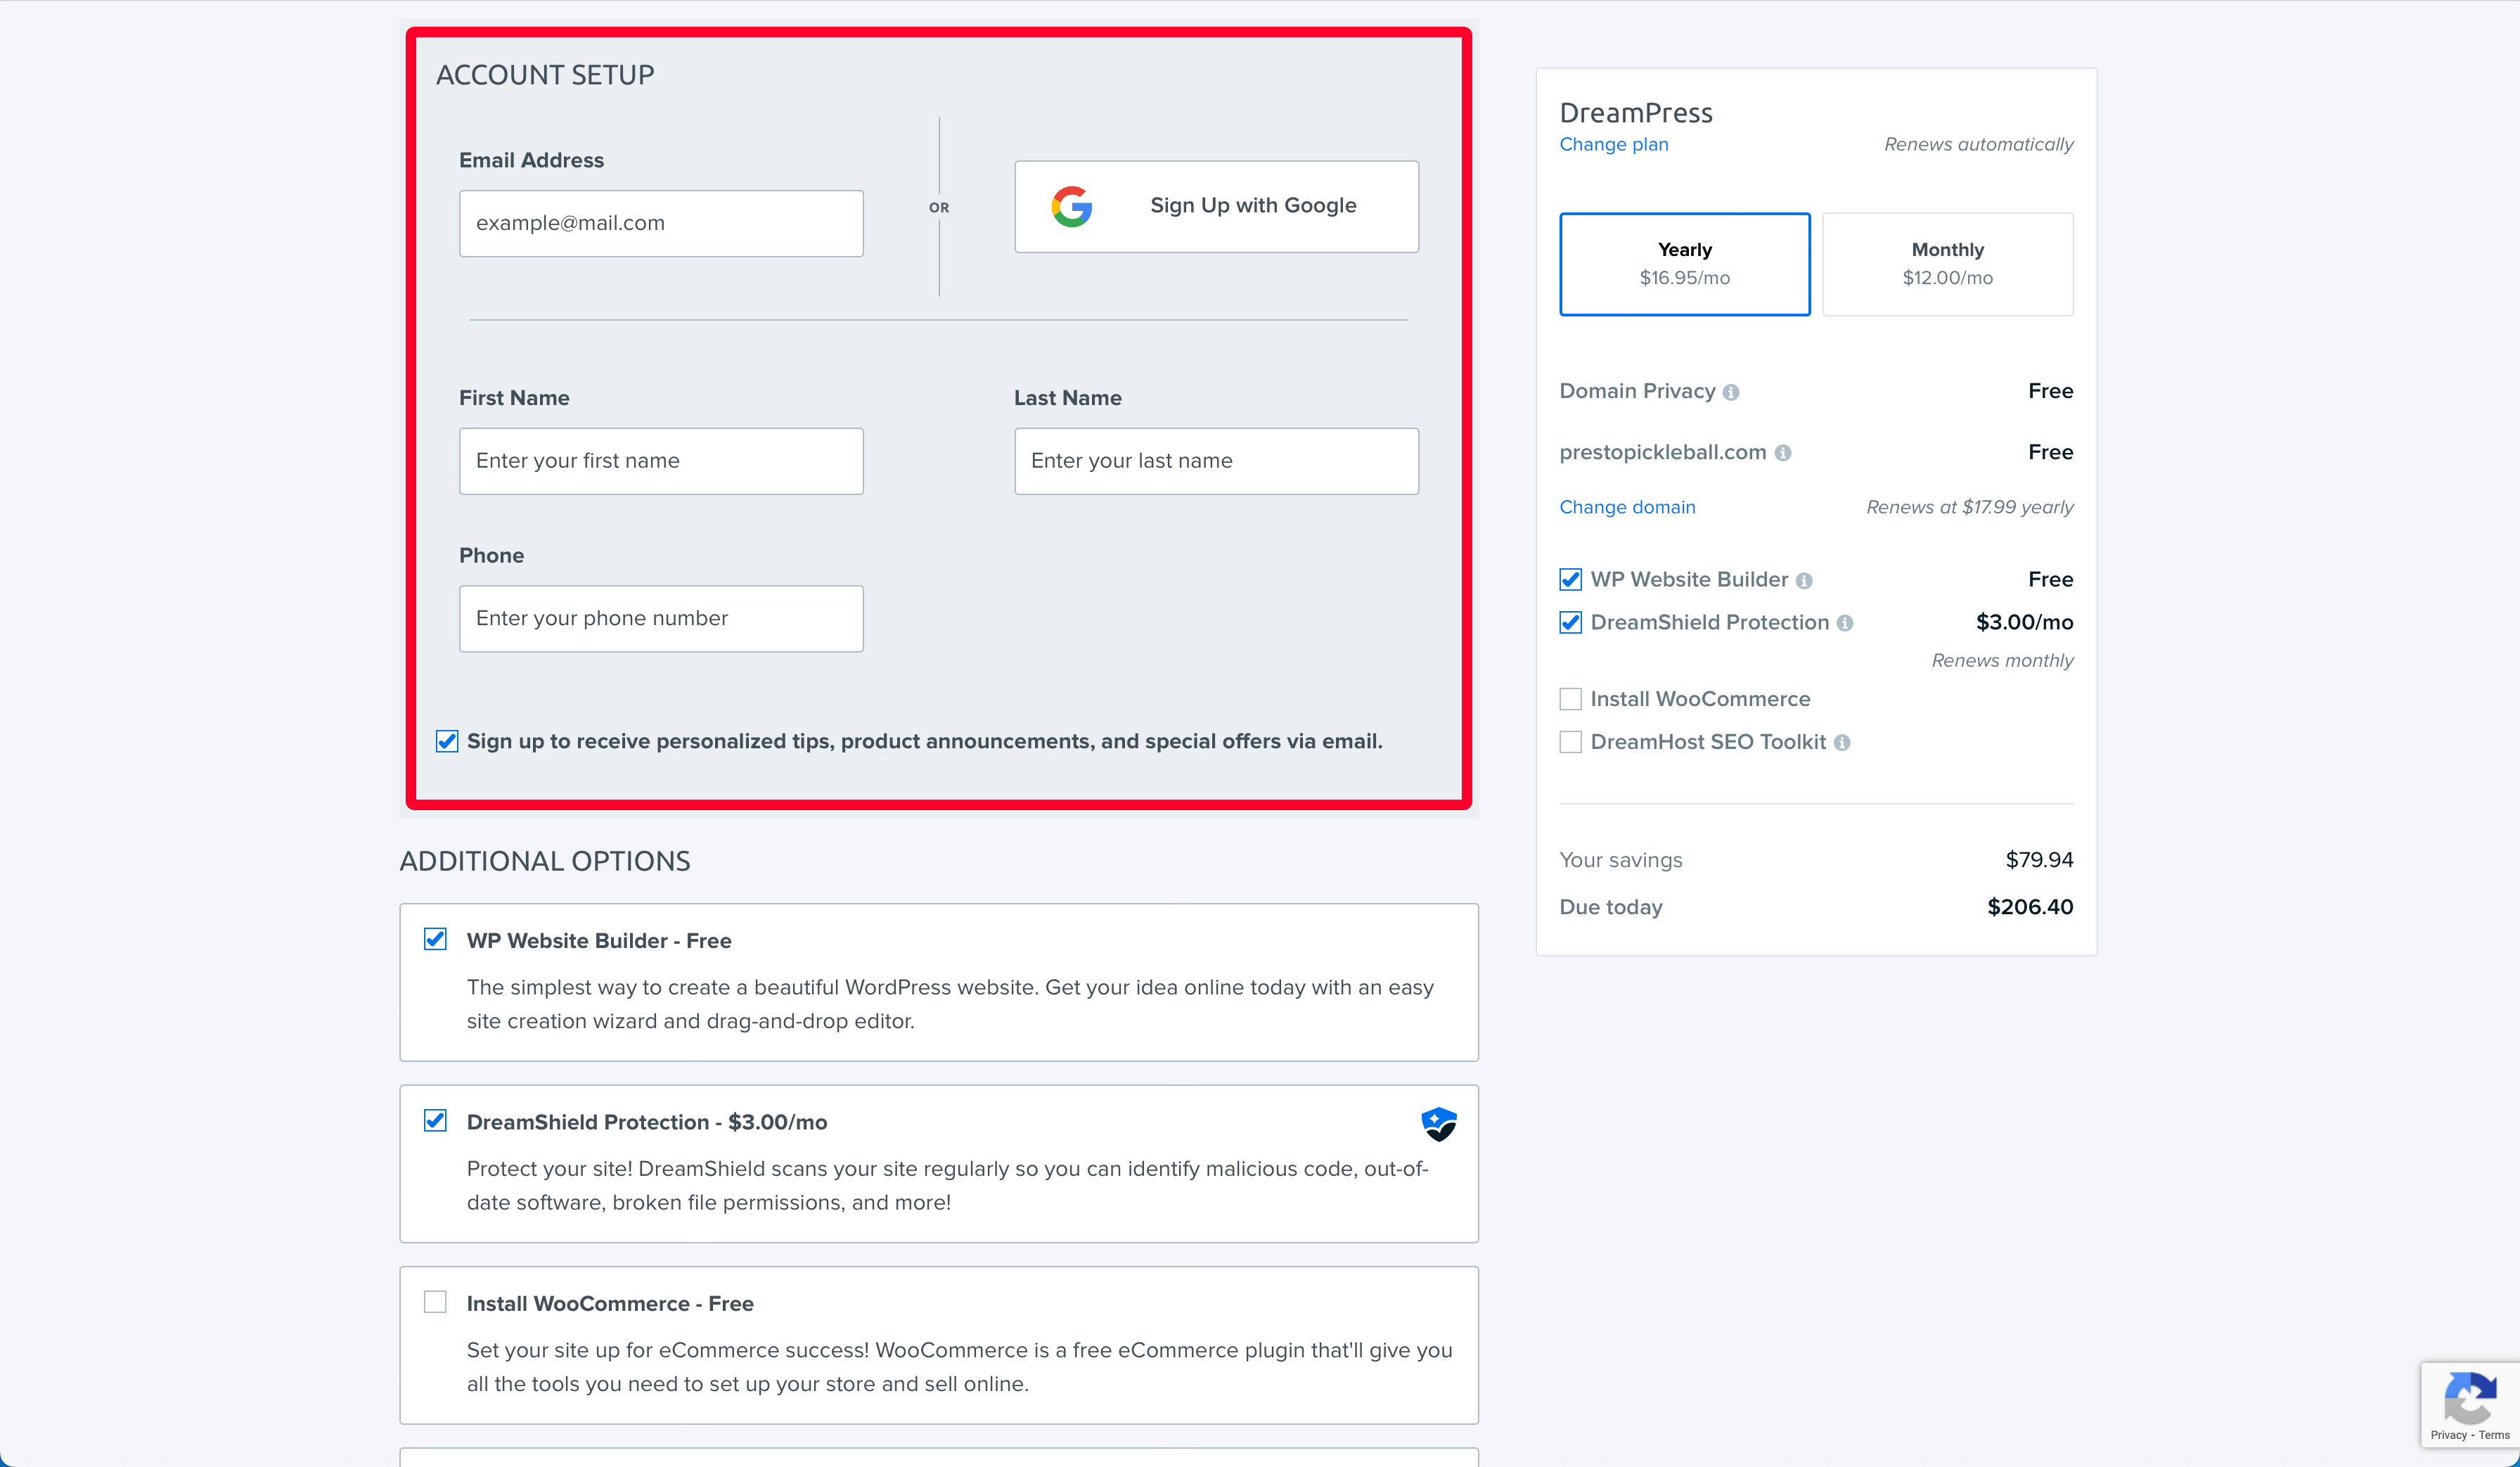
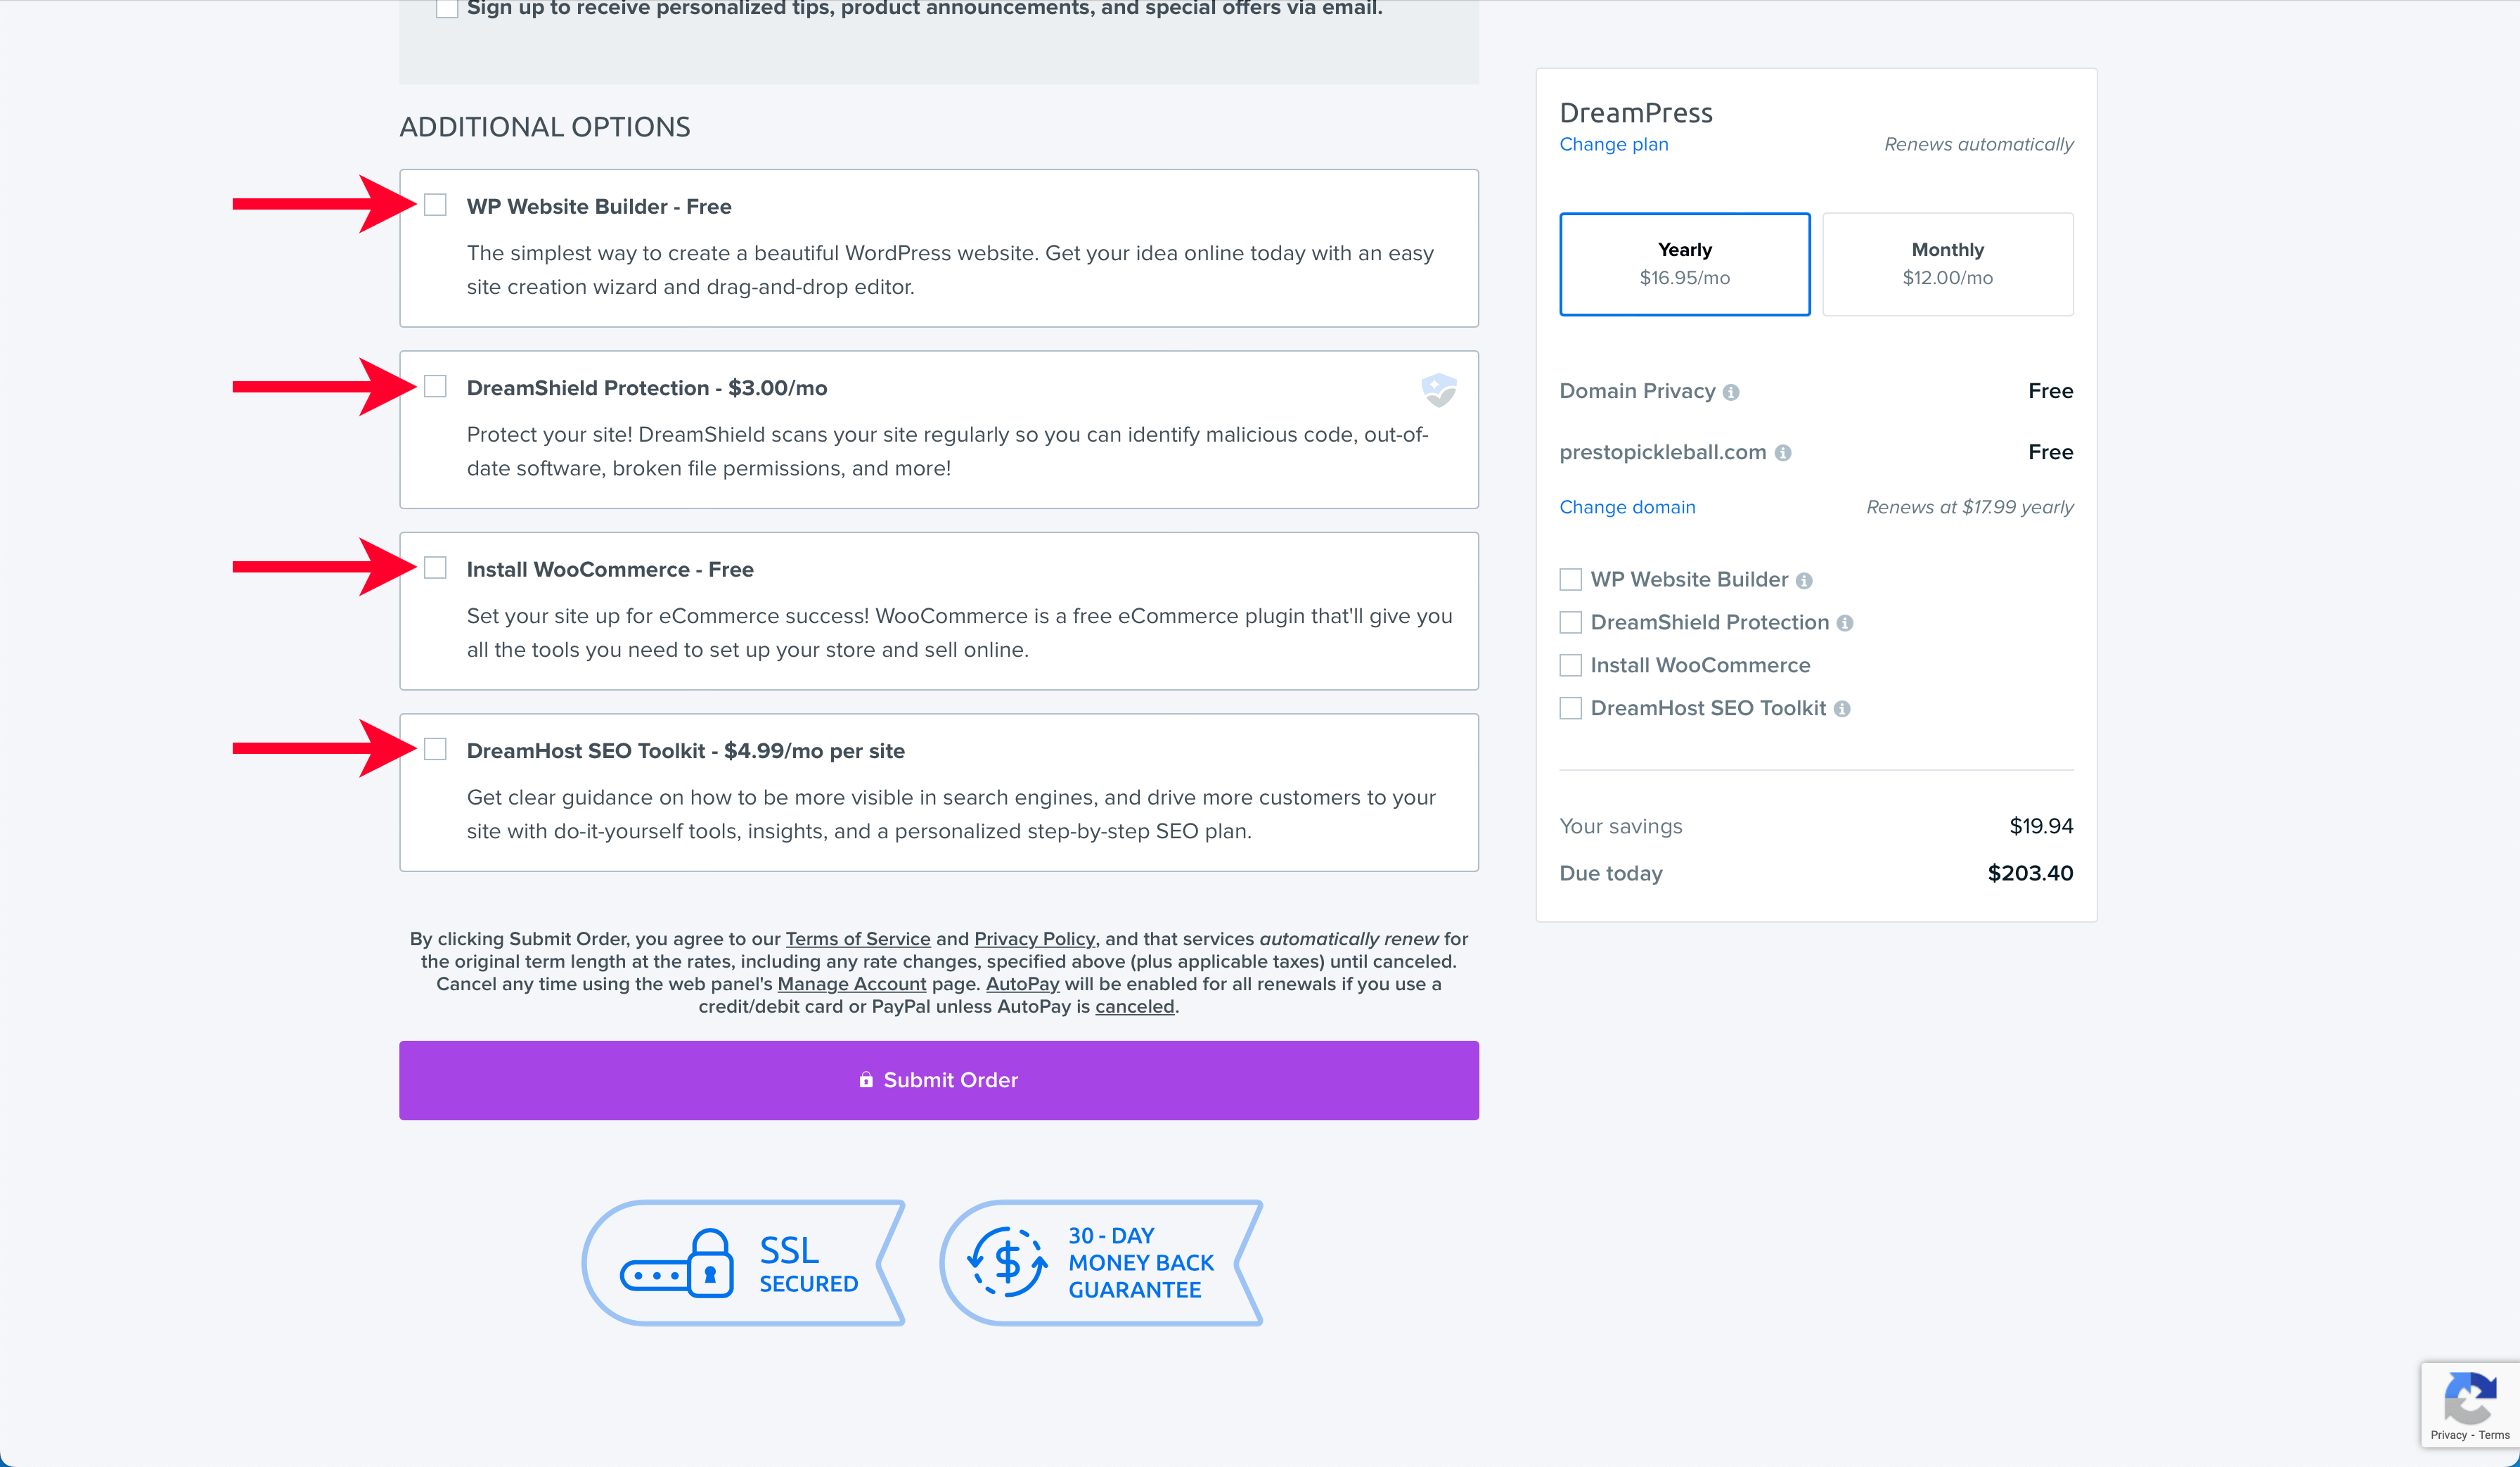
DreamHost offers several “Additional Options” you can add to your plan. You won’t need any of these extras, so I’d recommend you can uncheck all of them – even the free ones.
Finally, click “Submit Order.” After successfully submitting your order, DreamHost will ask you to set a password.

Make sure you set a strong password. You’ll be investing a lot of time and energy into your new online business, and if someone gains access to your account, they can take control of it and wreak havoc.
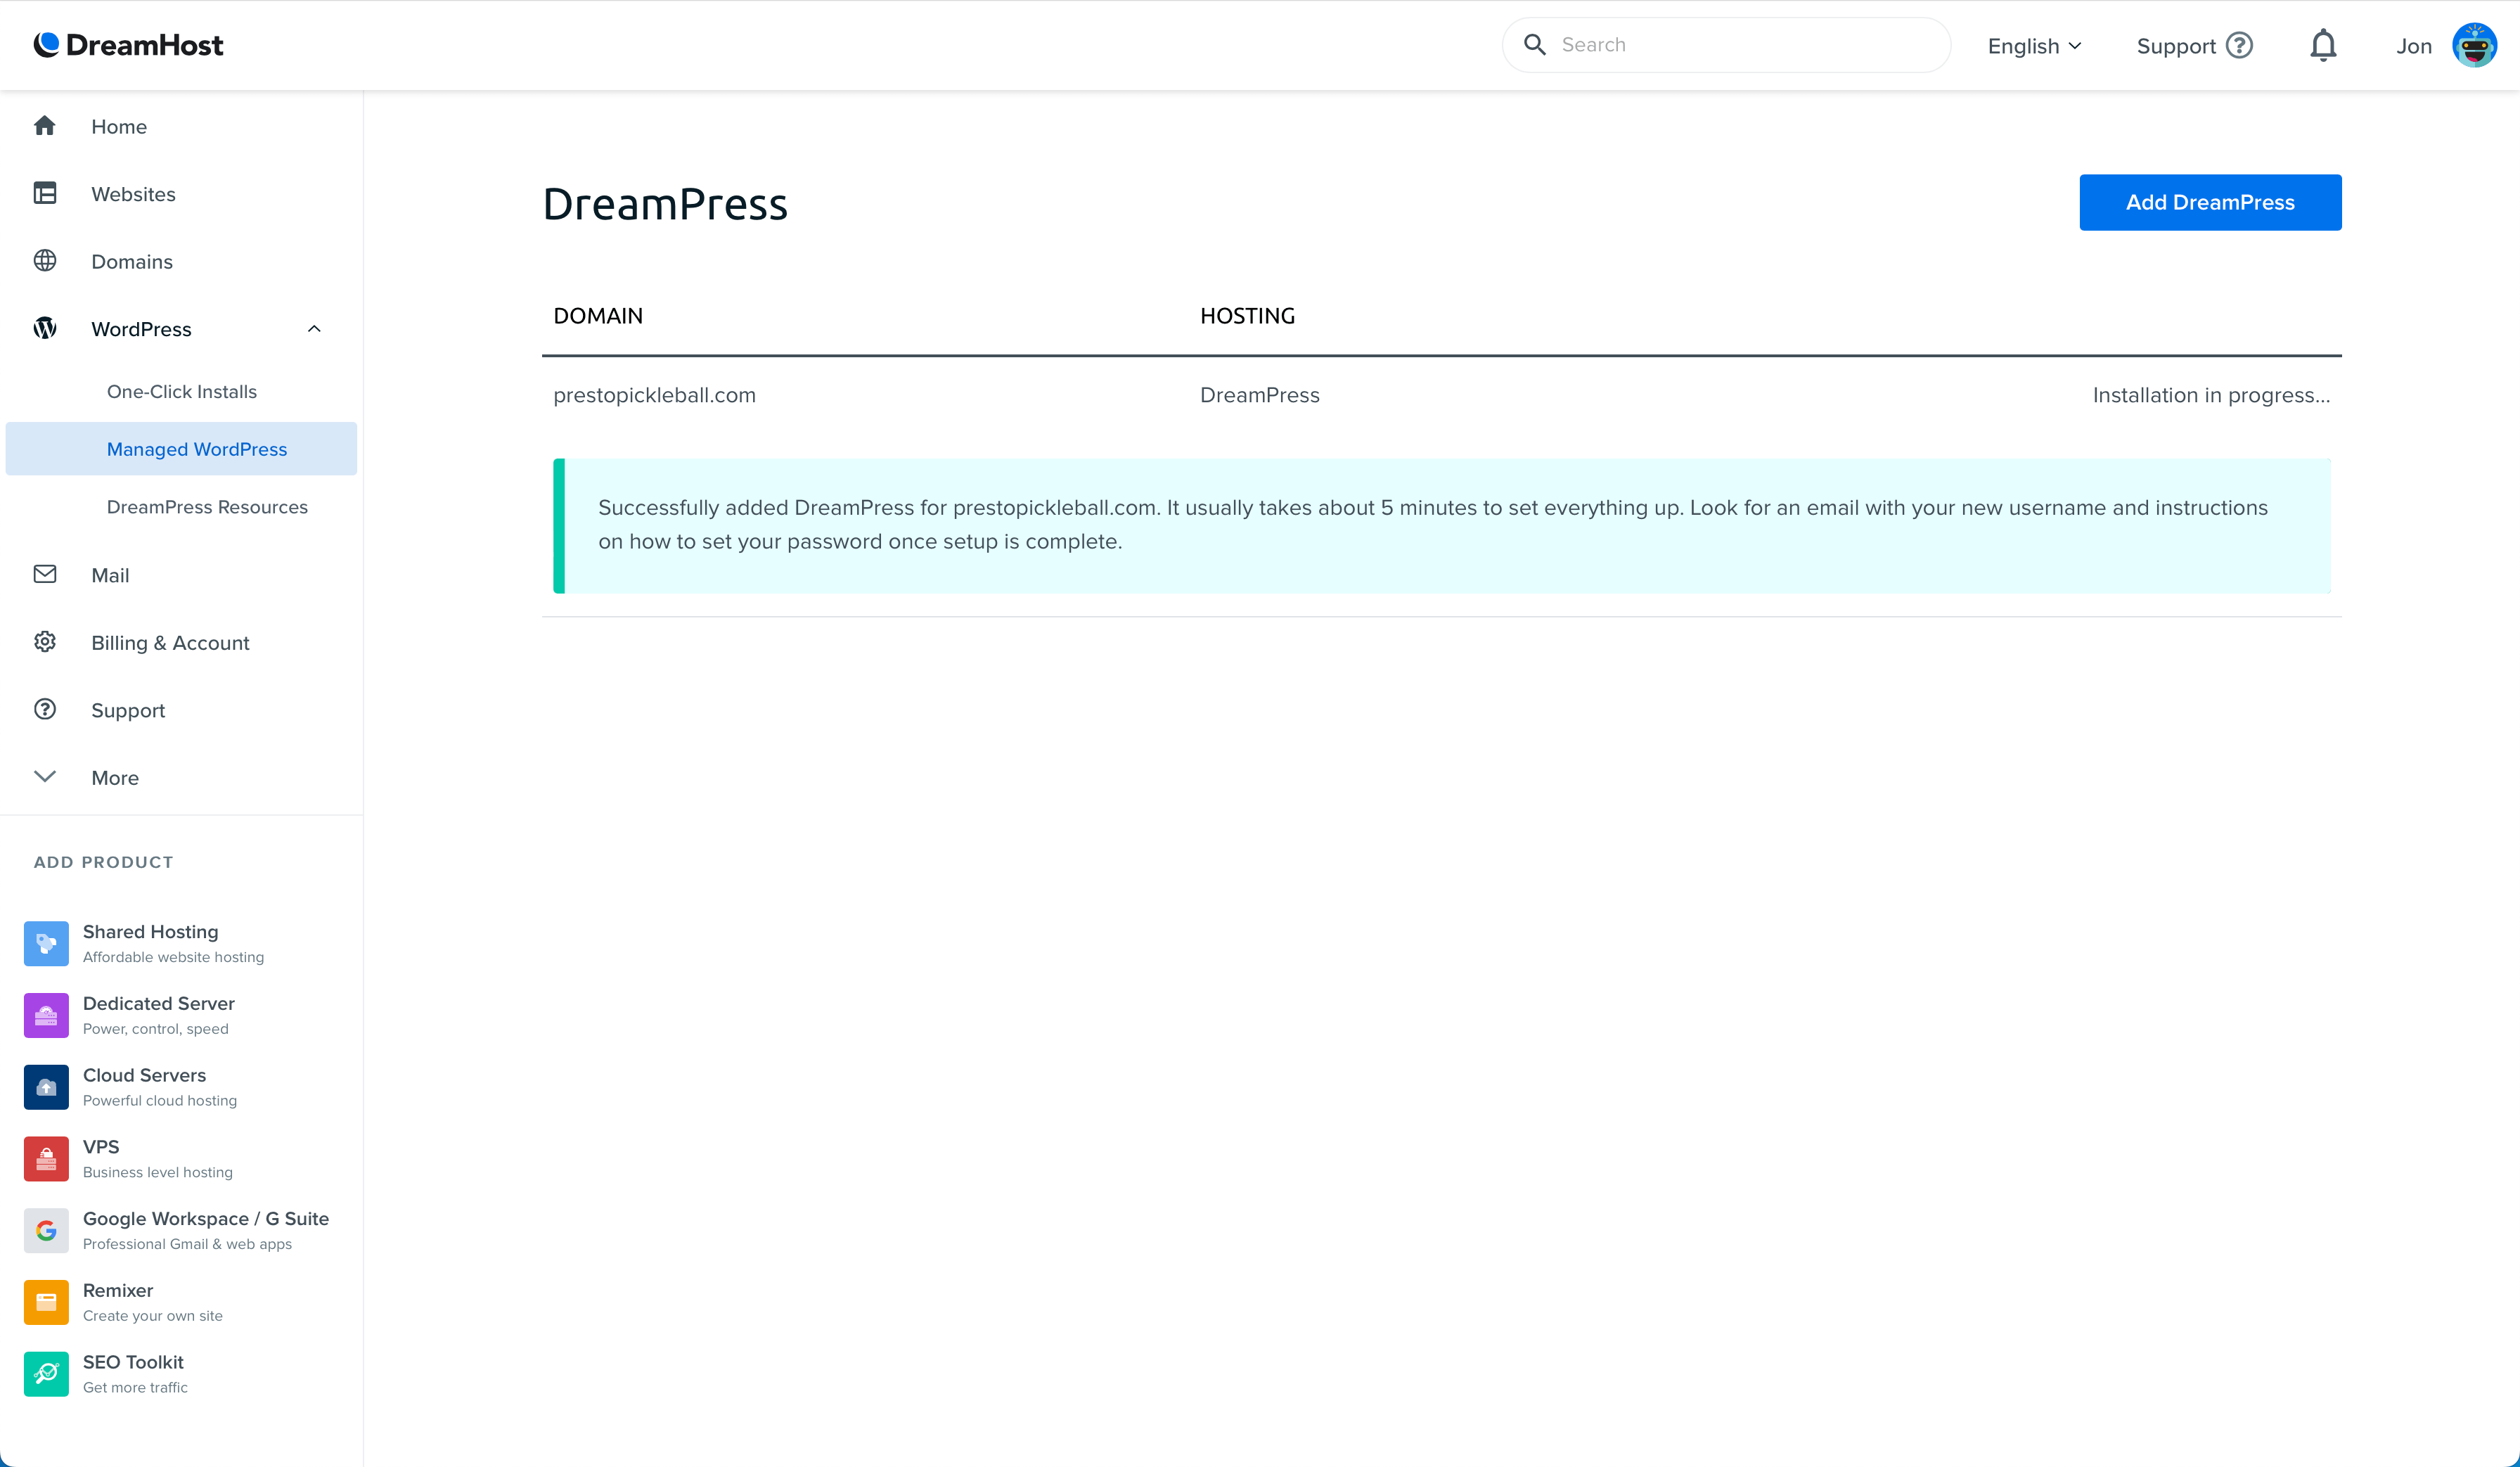
After setting your password, DreamHost will drop you into your account and let you know that they’re working on provisioning your website.
During this time, you’ll receive a few emails from DreamHost. One of them requires immediate action, so let’s review those.
- Email Verification: Shortly after signing up, you’ll receive an email asking you to verify your contact information and email address. It’s super important you click the link in this email to confirm. If you haven’t already, do that now before proceeding.
- Data Sharing: You’ll receive another email encouraging you to set your data sharing preferences for DreamHost. By default, DreamHost does not share your data, so unless you want to opt-in, there’s no action required.
DreamHost takes roughly 30 minutes to register your domain, so you may need to hold tight before proceeding.
Check Your SSL Certificate for Security
As we covered earlier, an SSL certificate protects your visitors as they interact with your website, and it’s also a positive signal for search engines, which will be the primary way users find your website.
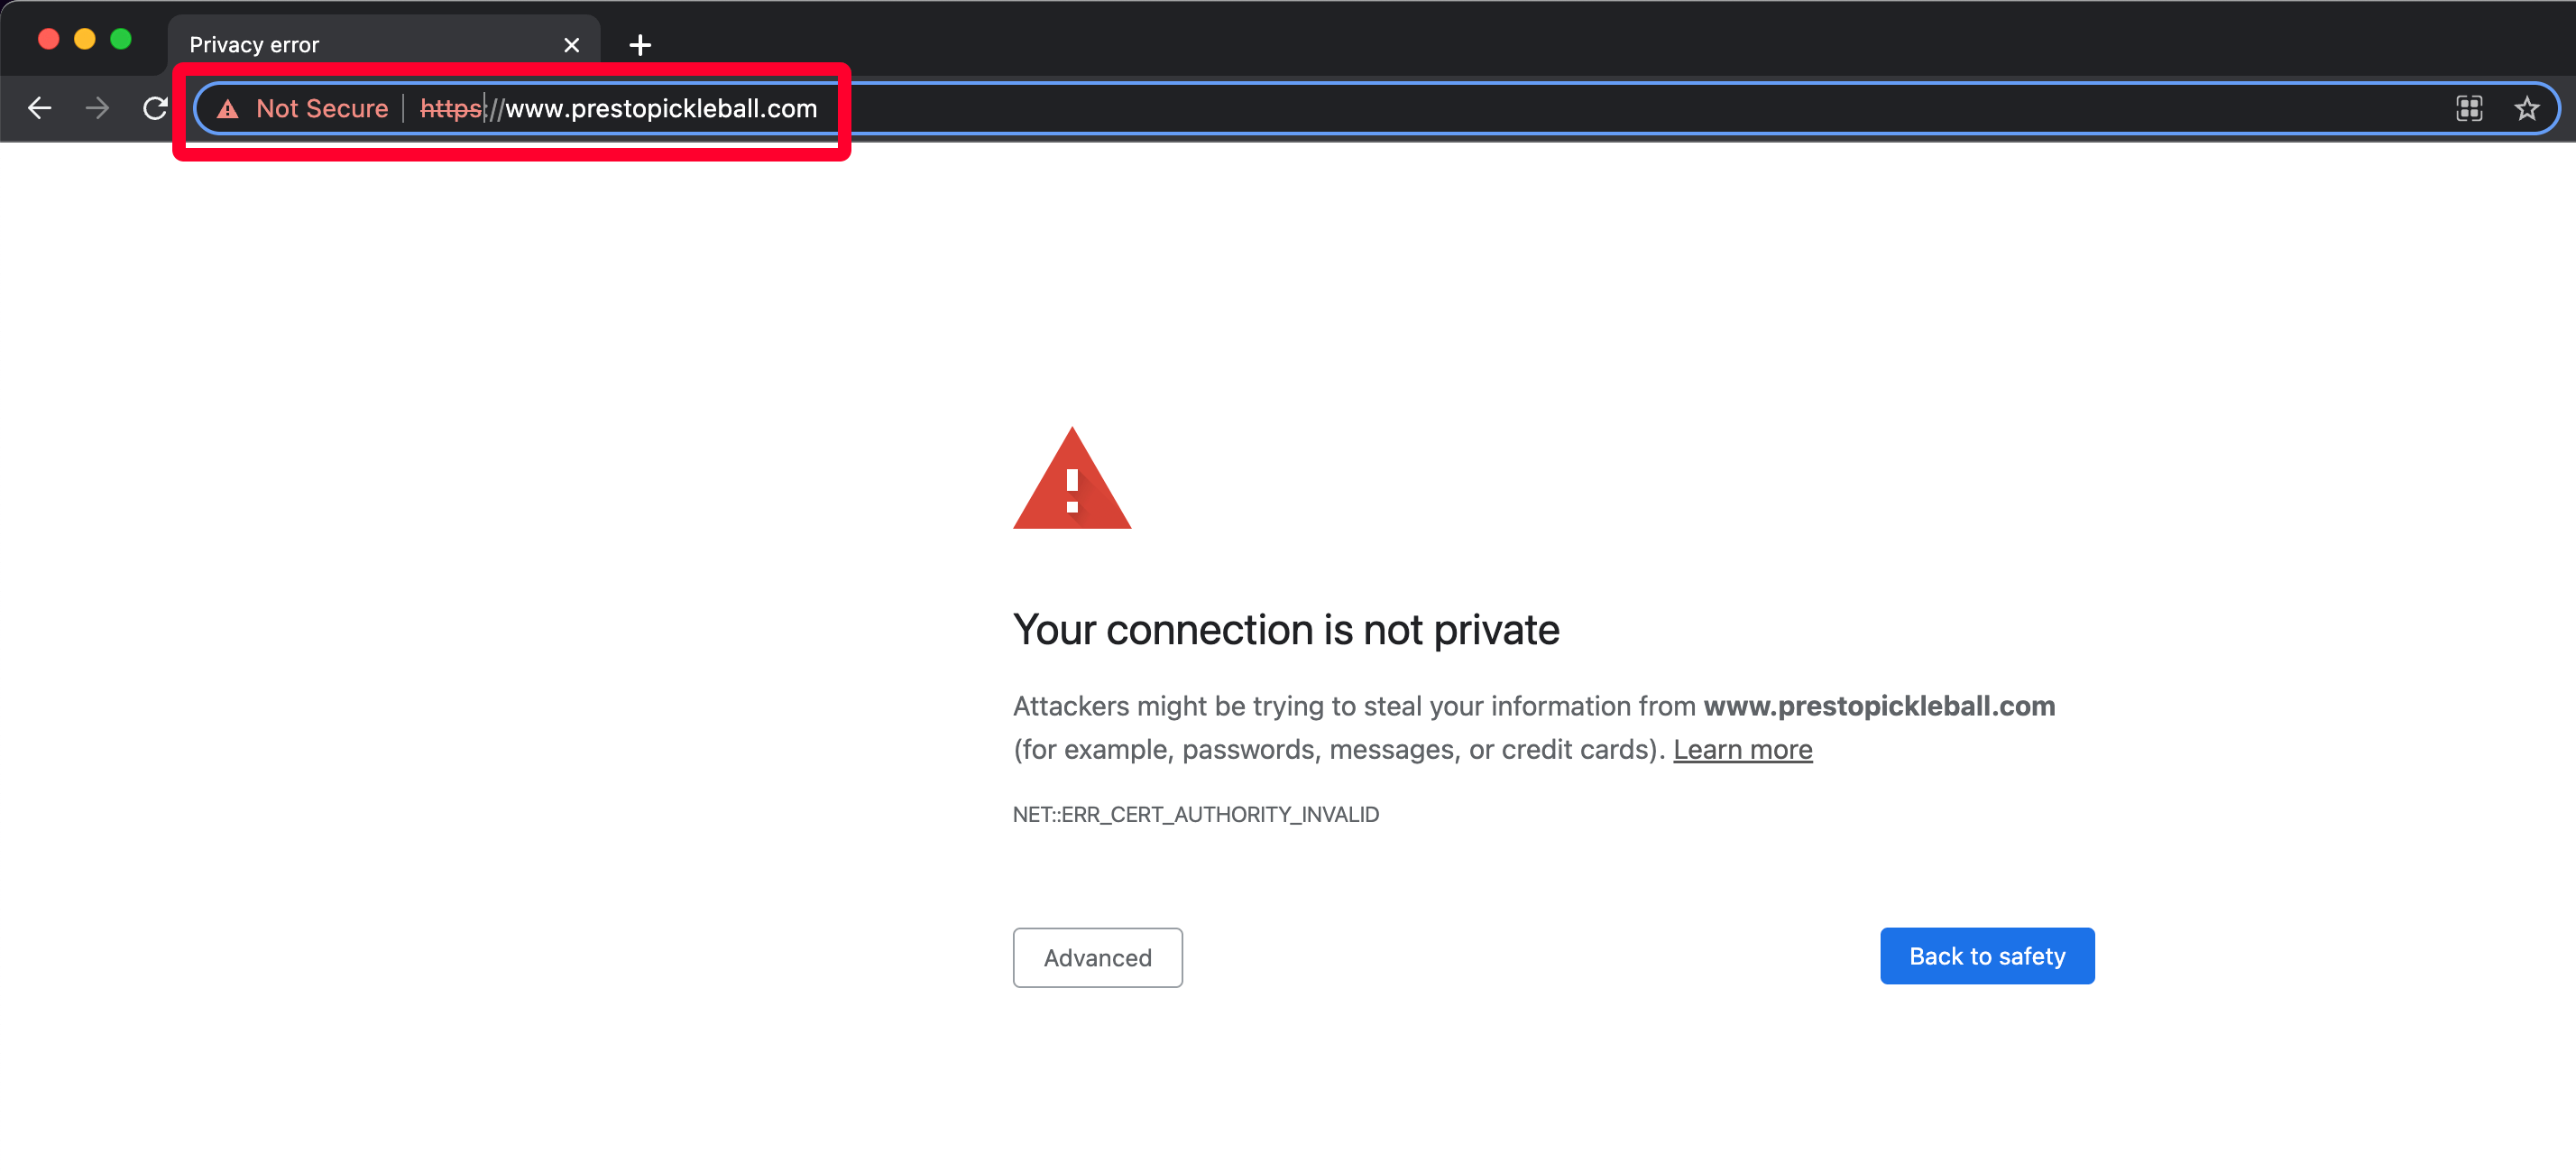
Once your website is set up, roughly 30 minutes after signing up, you can visit your new website’s URL. It should load correctly, and you should see a lock symbol to the left of the URL in your browser.

If your website doesn’t load properly and you see a “Not Secure” message from your browser, then we have to install your free SSL certificate. Don’t worry. It only takes a few minutes.
Head to your DreamHost account, select “Websites” from the left-hand navigation, then click “Secure Certificates.”
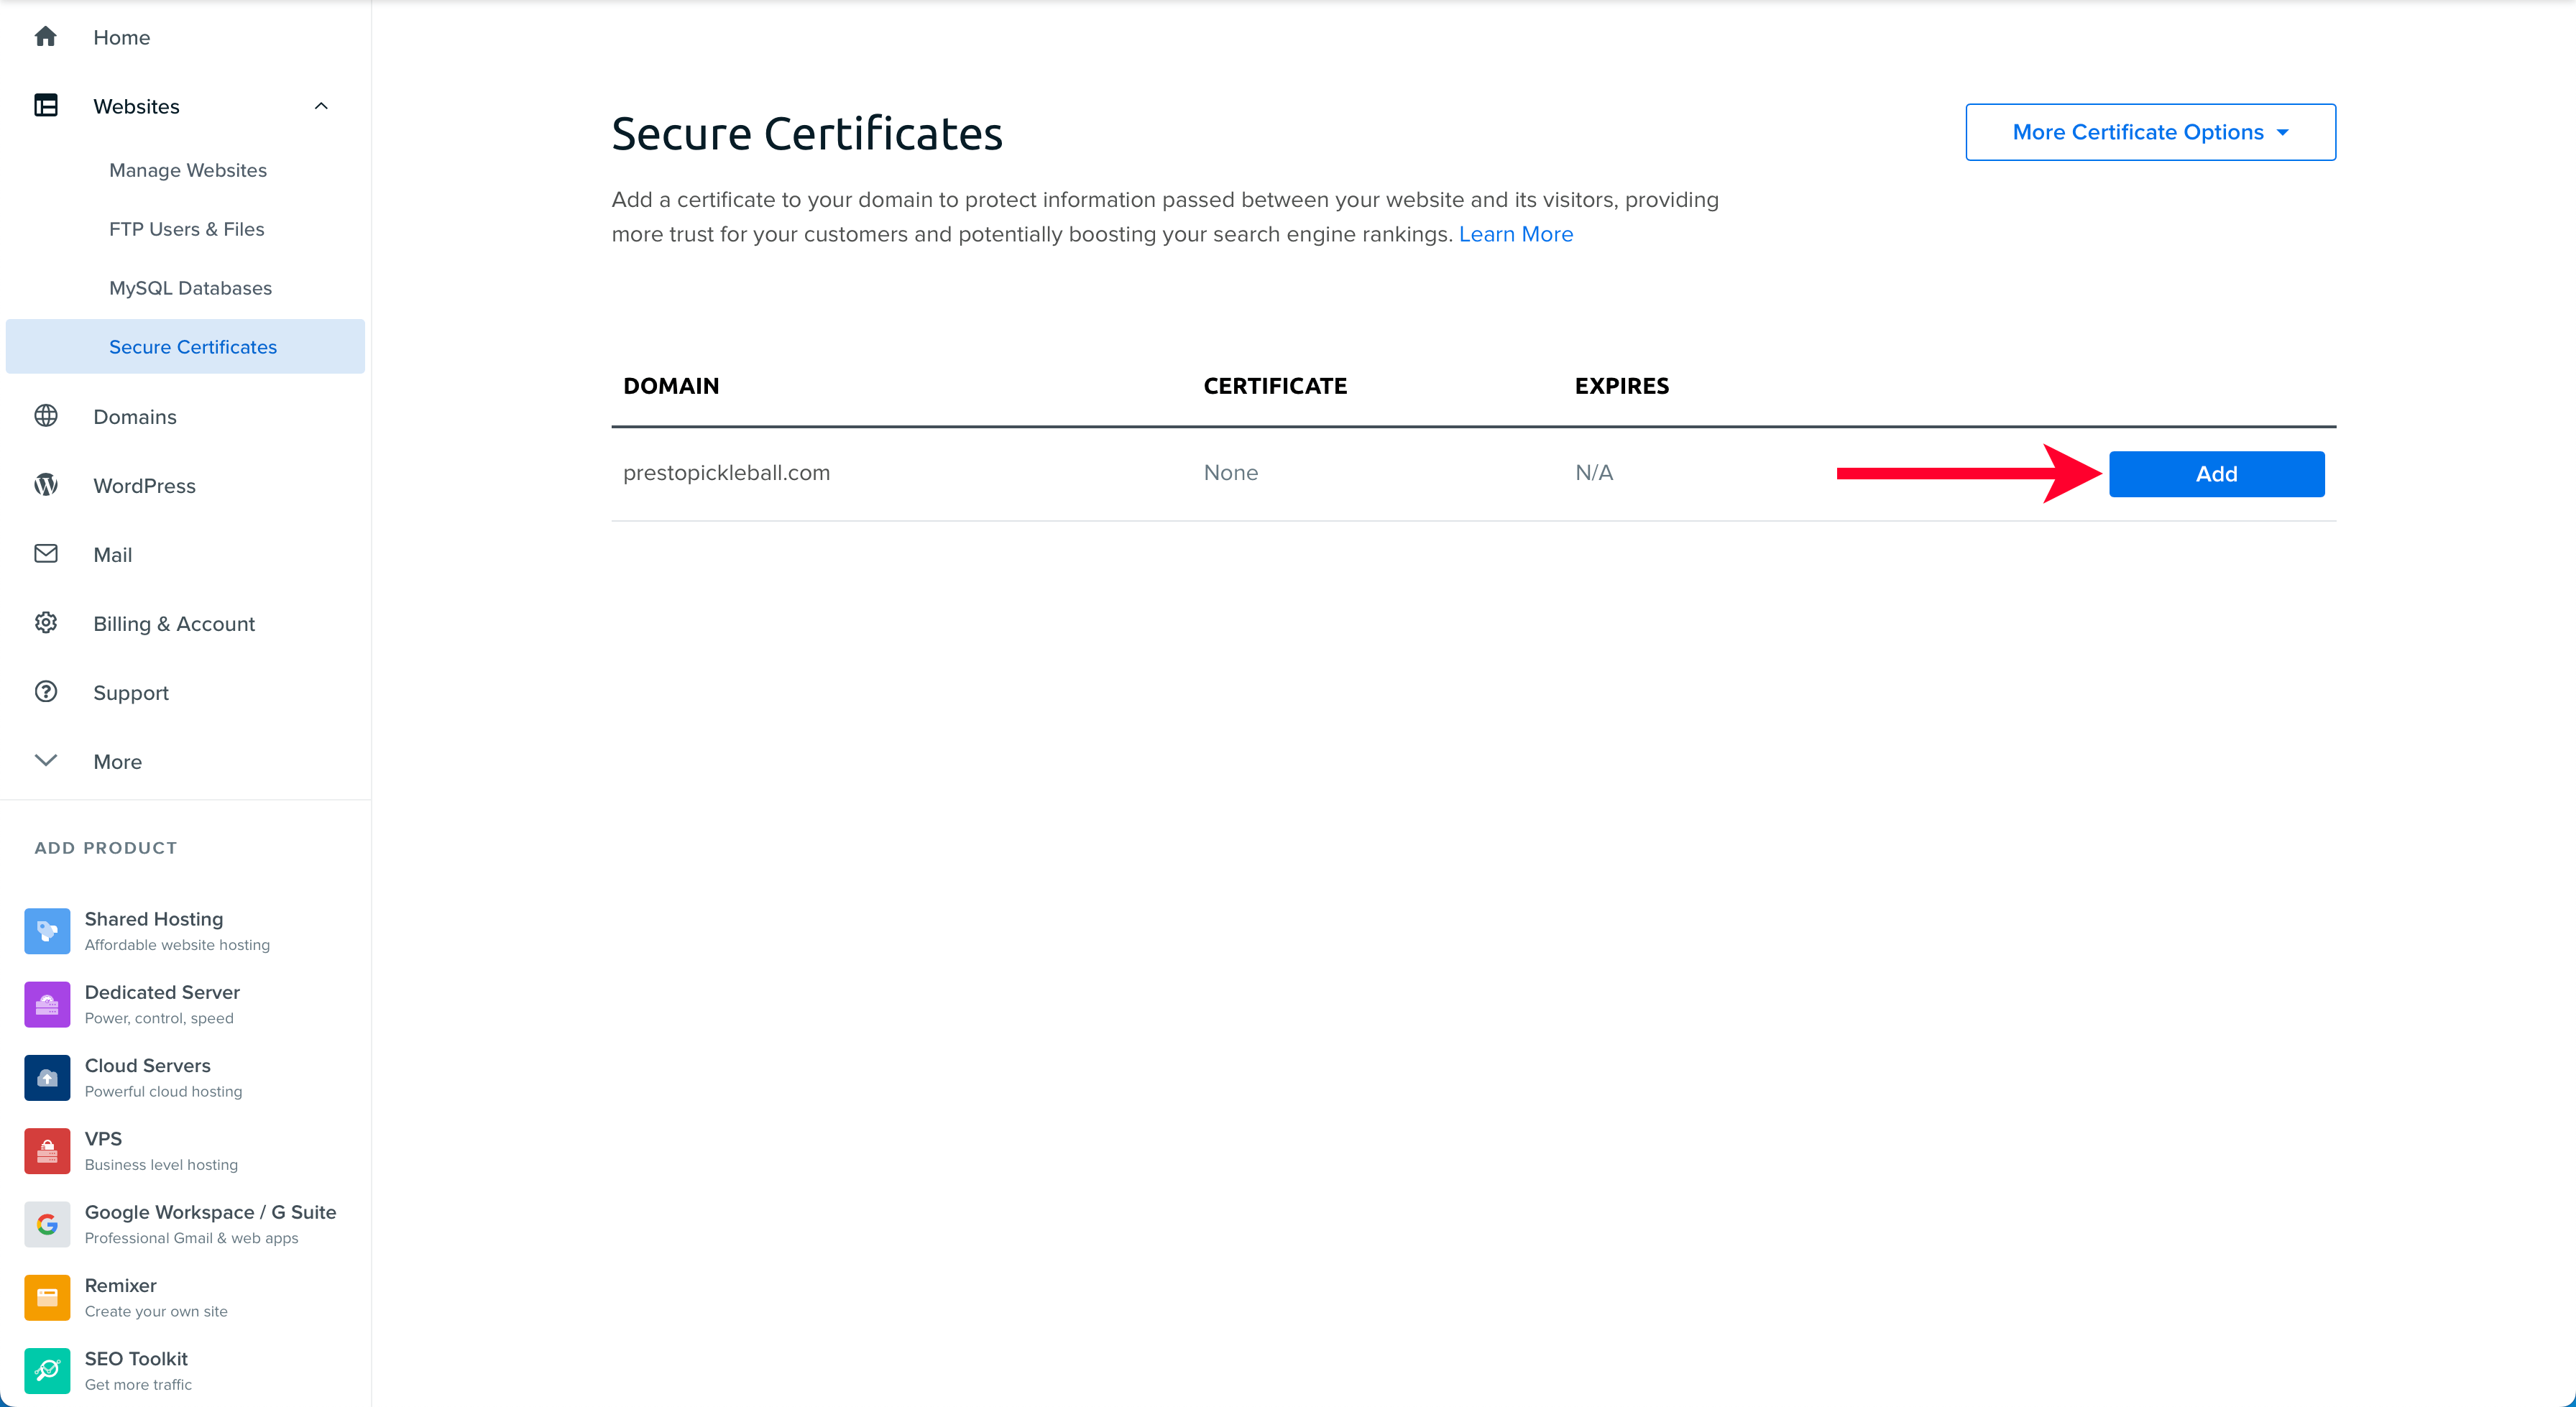
Next to your domain, click the “Add” button and follow the prompts to install a free Let’s Encrypt certificate.
Once finished, head back to your website, and it should load properly with the lock next to your URL in your browser’s address bar.
Need Help?
Don’t hesitate to contact their support team if you have issues during your WordPress installation with DreamHost.
You can contact them from the “Support” menu in the left-hand navigation of your account by clicking on “Contact Support.”
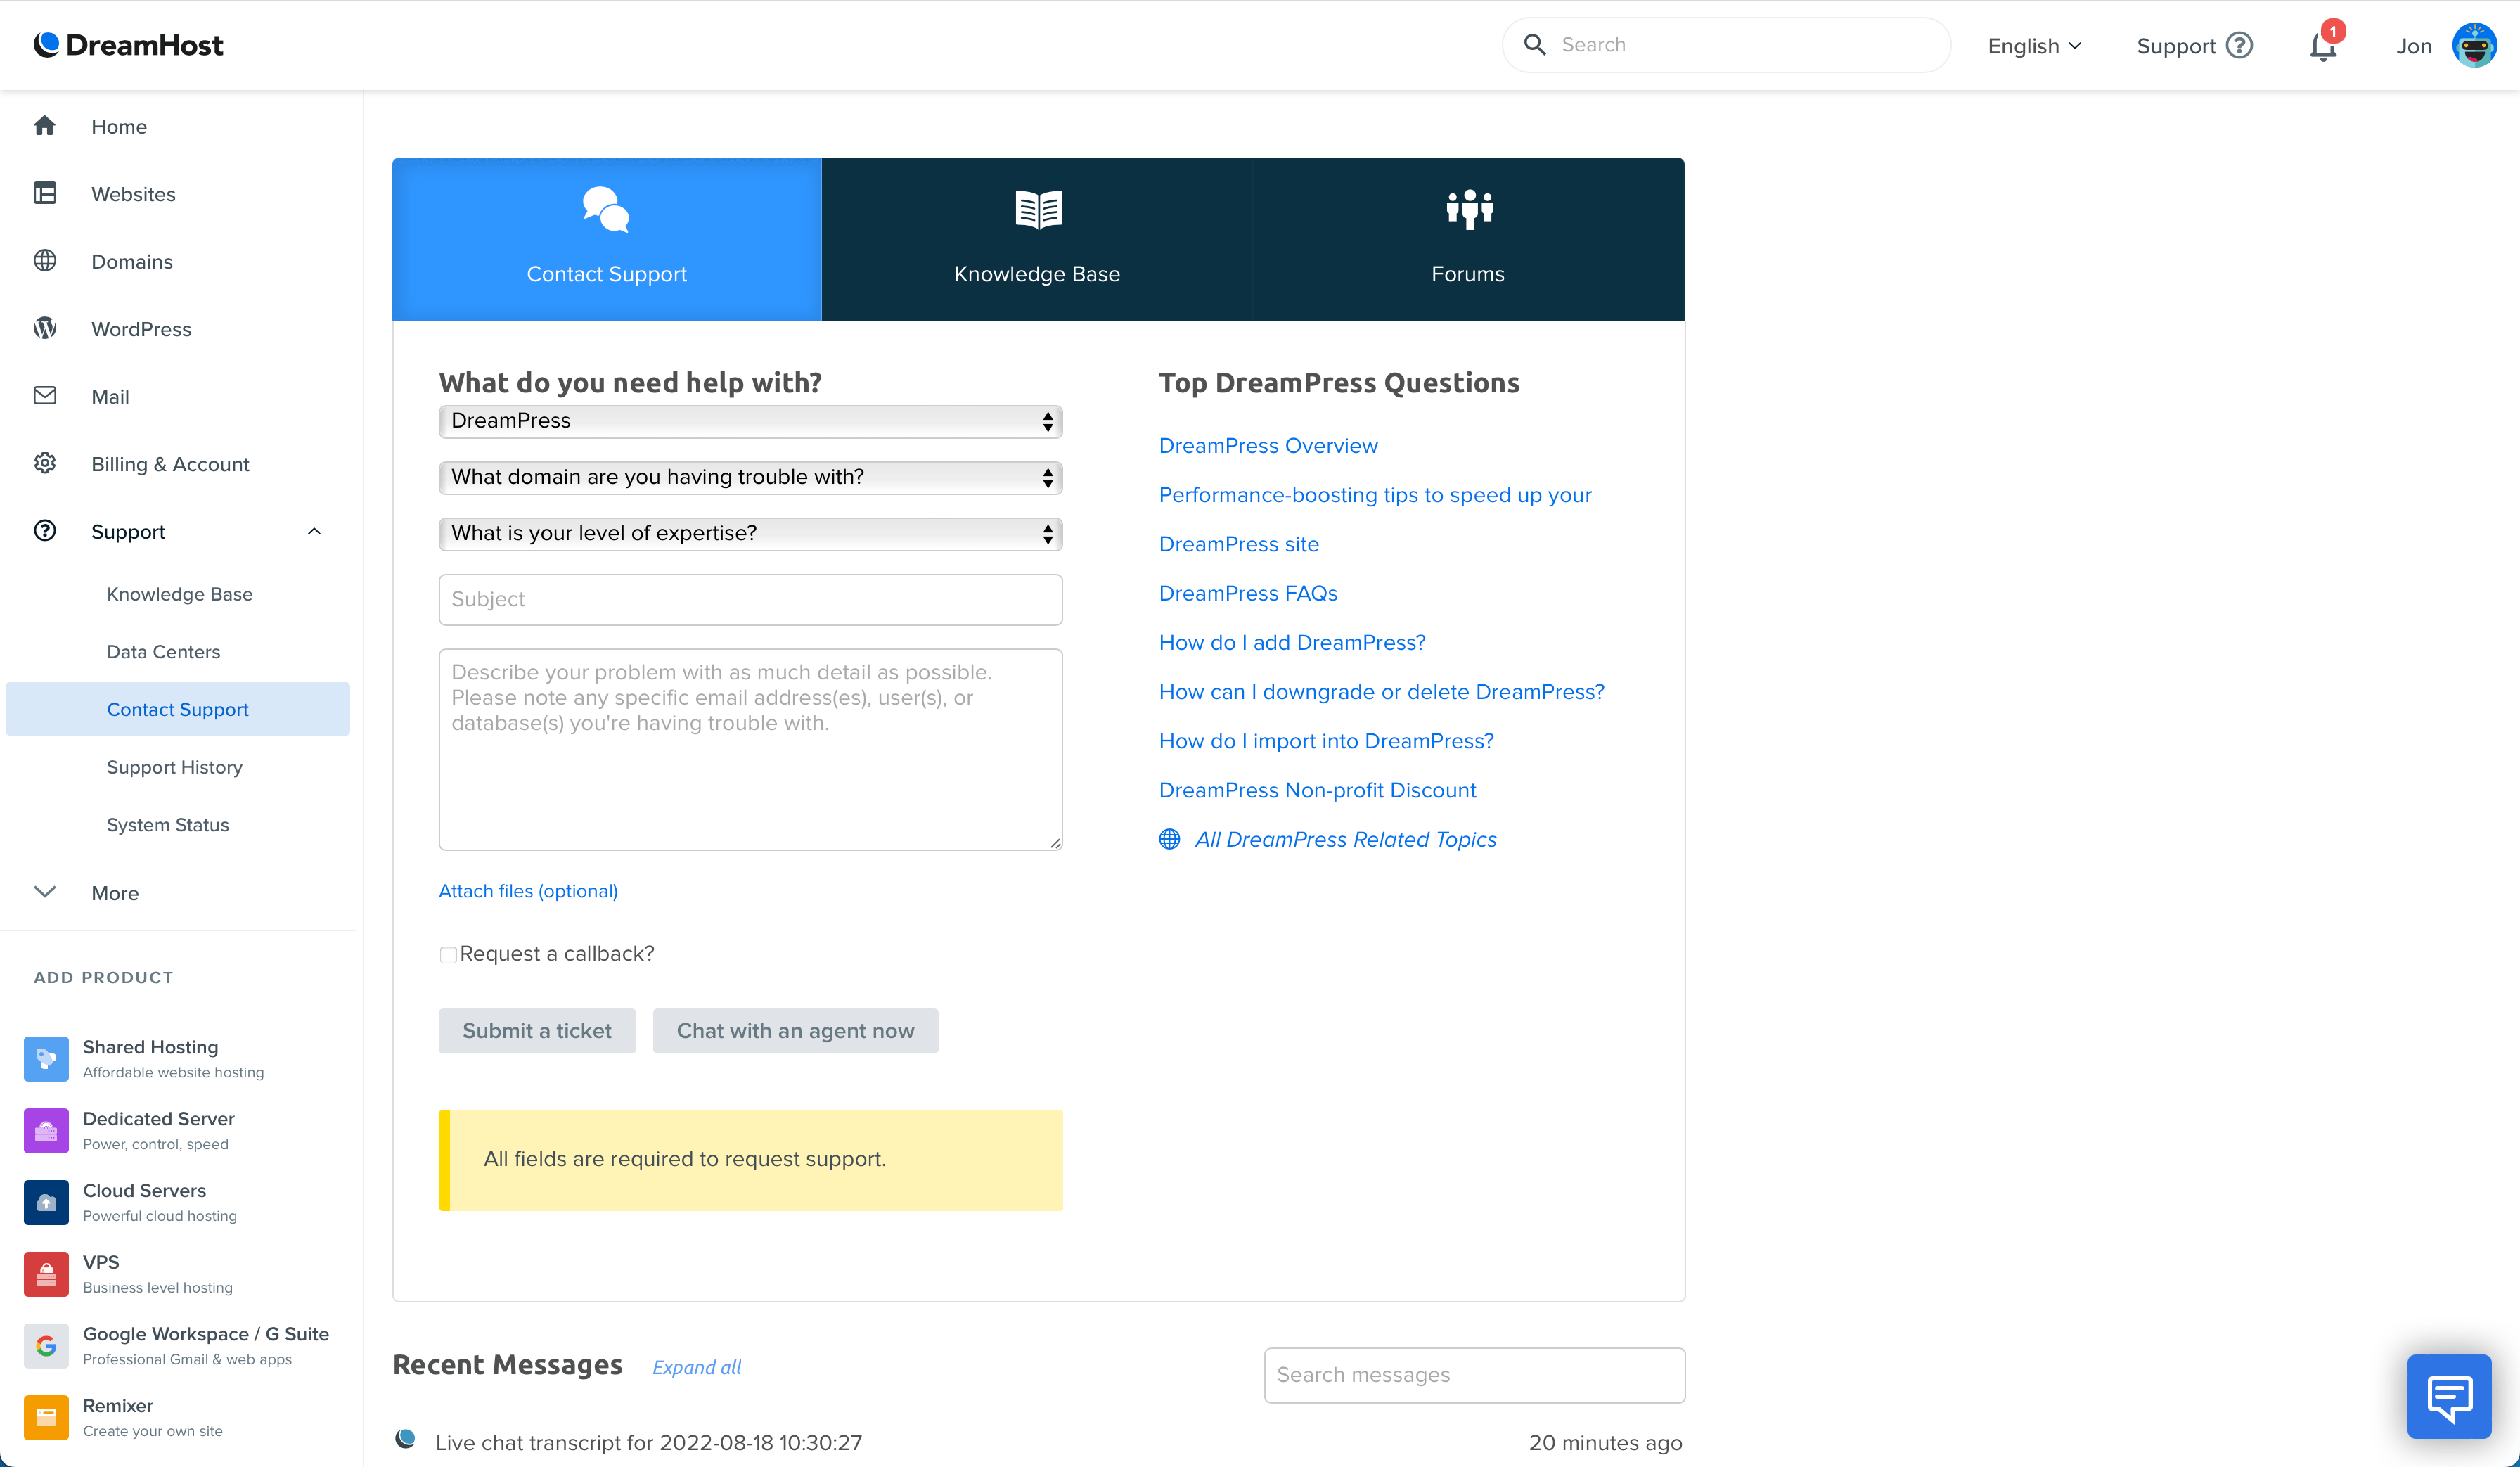
Fill out all the required fields to describe your issue, then submit a ticket or select “Chat with an agent now,” which is how I like to get in touch.
Step 4: Set Up a Custom Email
A custom email address adds a professional touch to any outreach you do for your business, so let’s get that set up. We’ll also create a “support” email for your website, which we’ll use later in this guide.
Create a Custom Personal Email
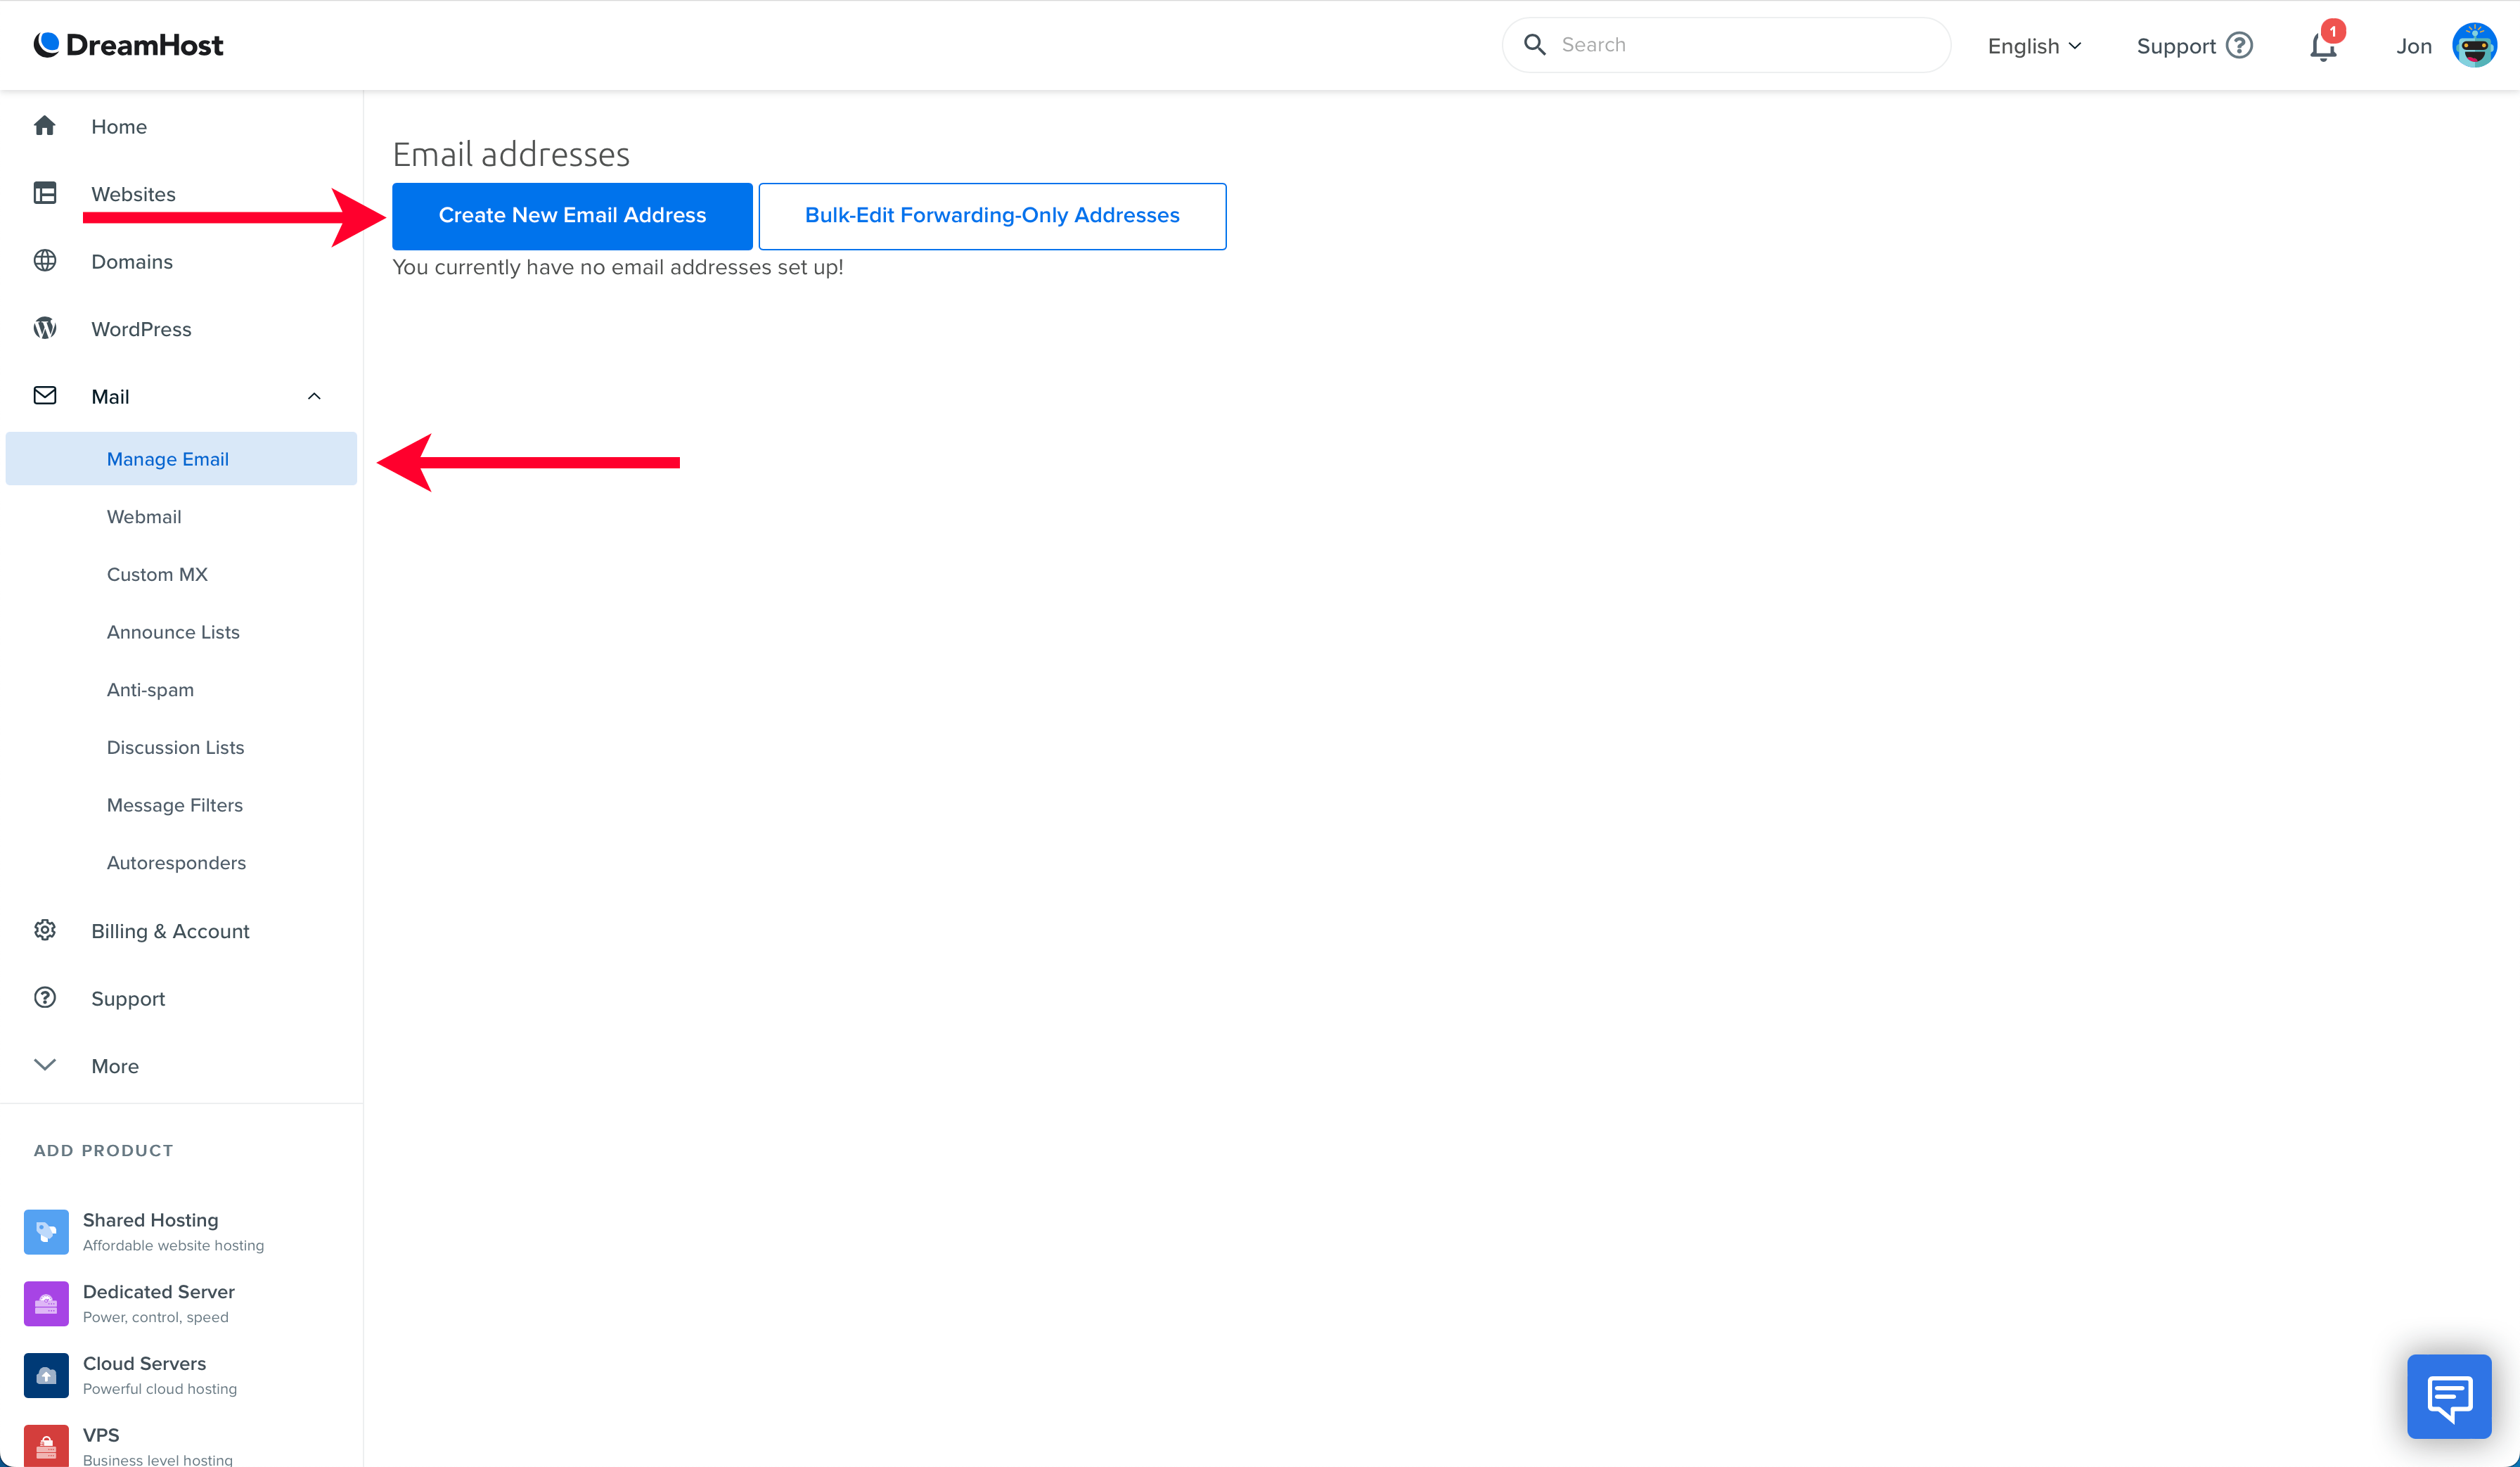
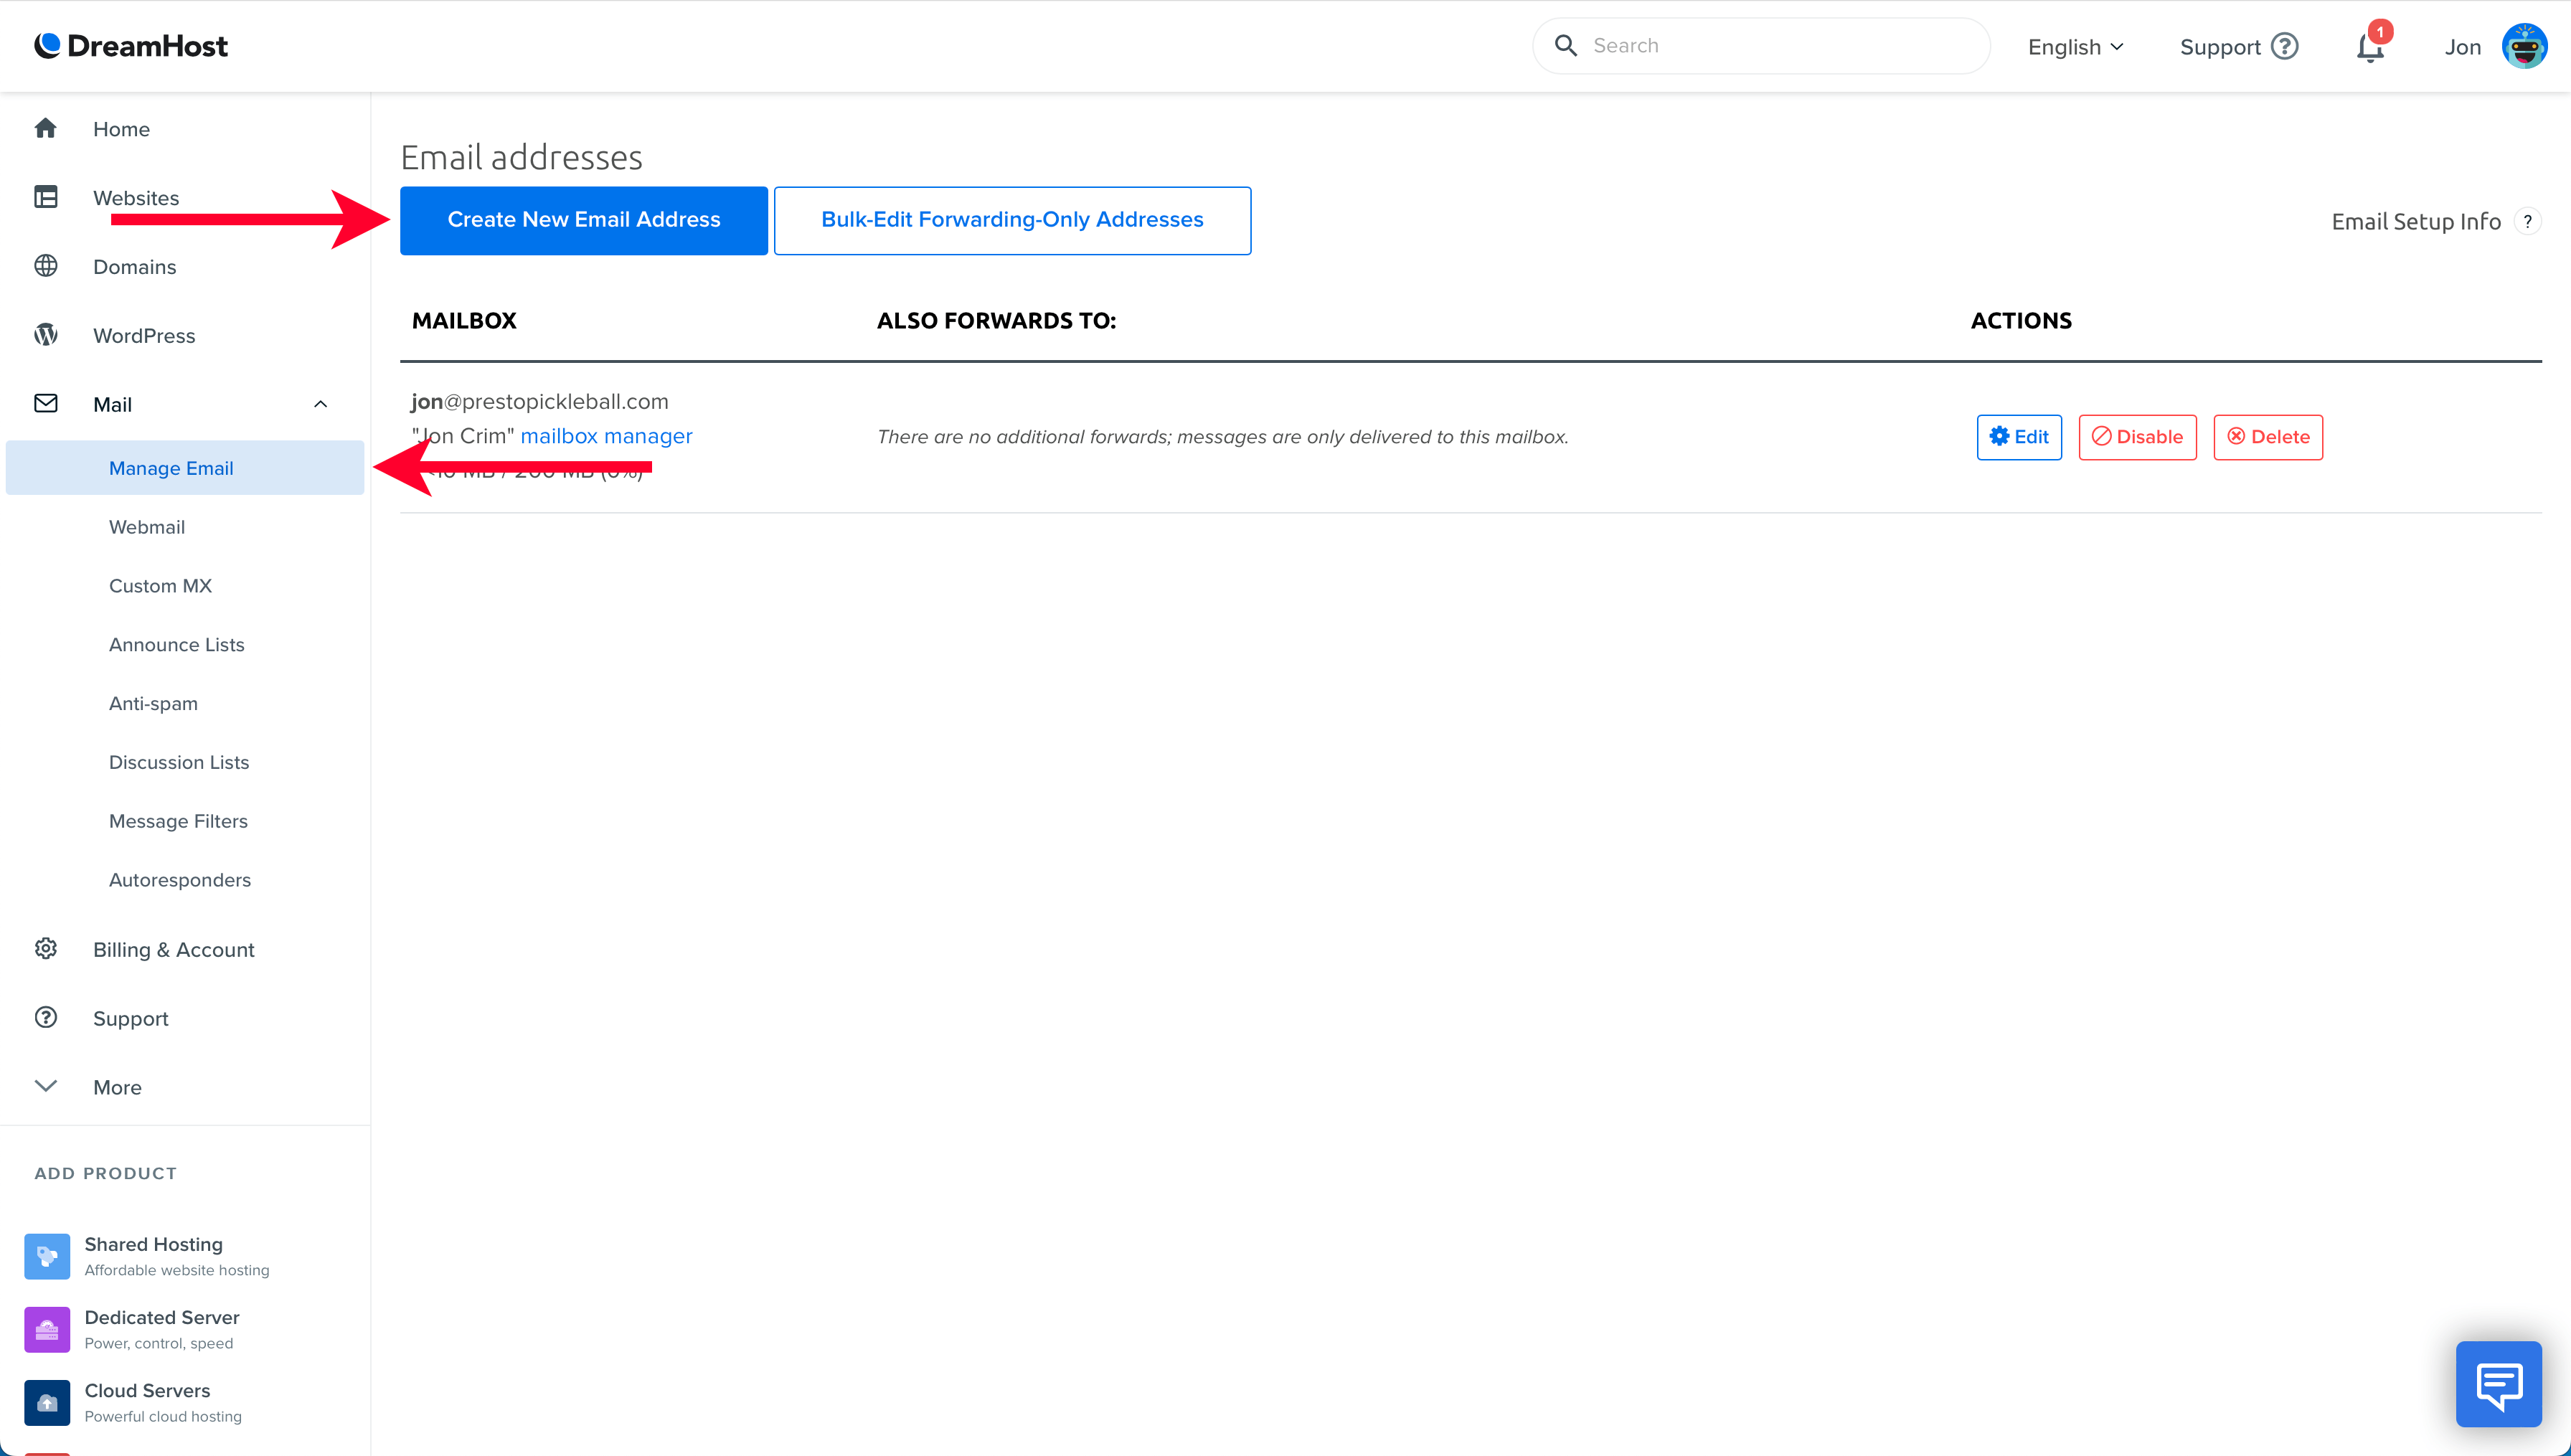
Head to your DreamHost account, select “Mail” in the left-hand navigation, and then the sub-menu “Manage Email.” Next, click the “Create New Email Address” button.
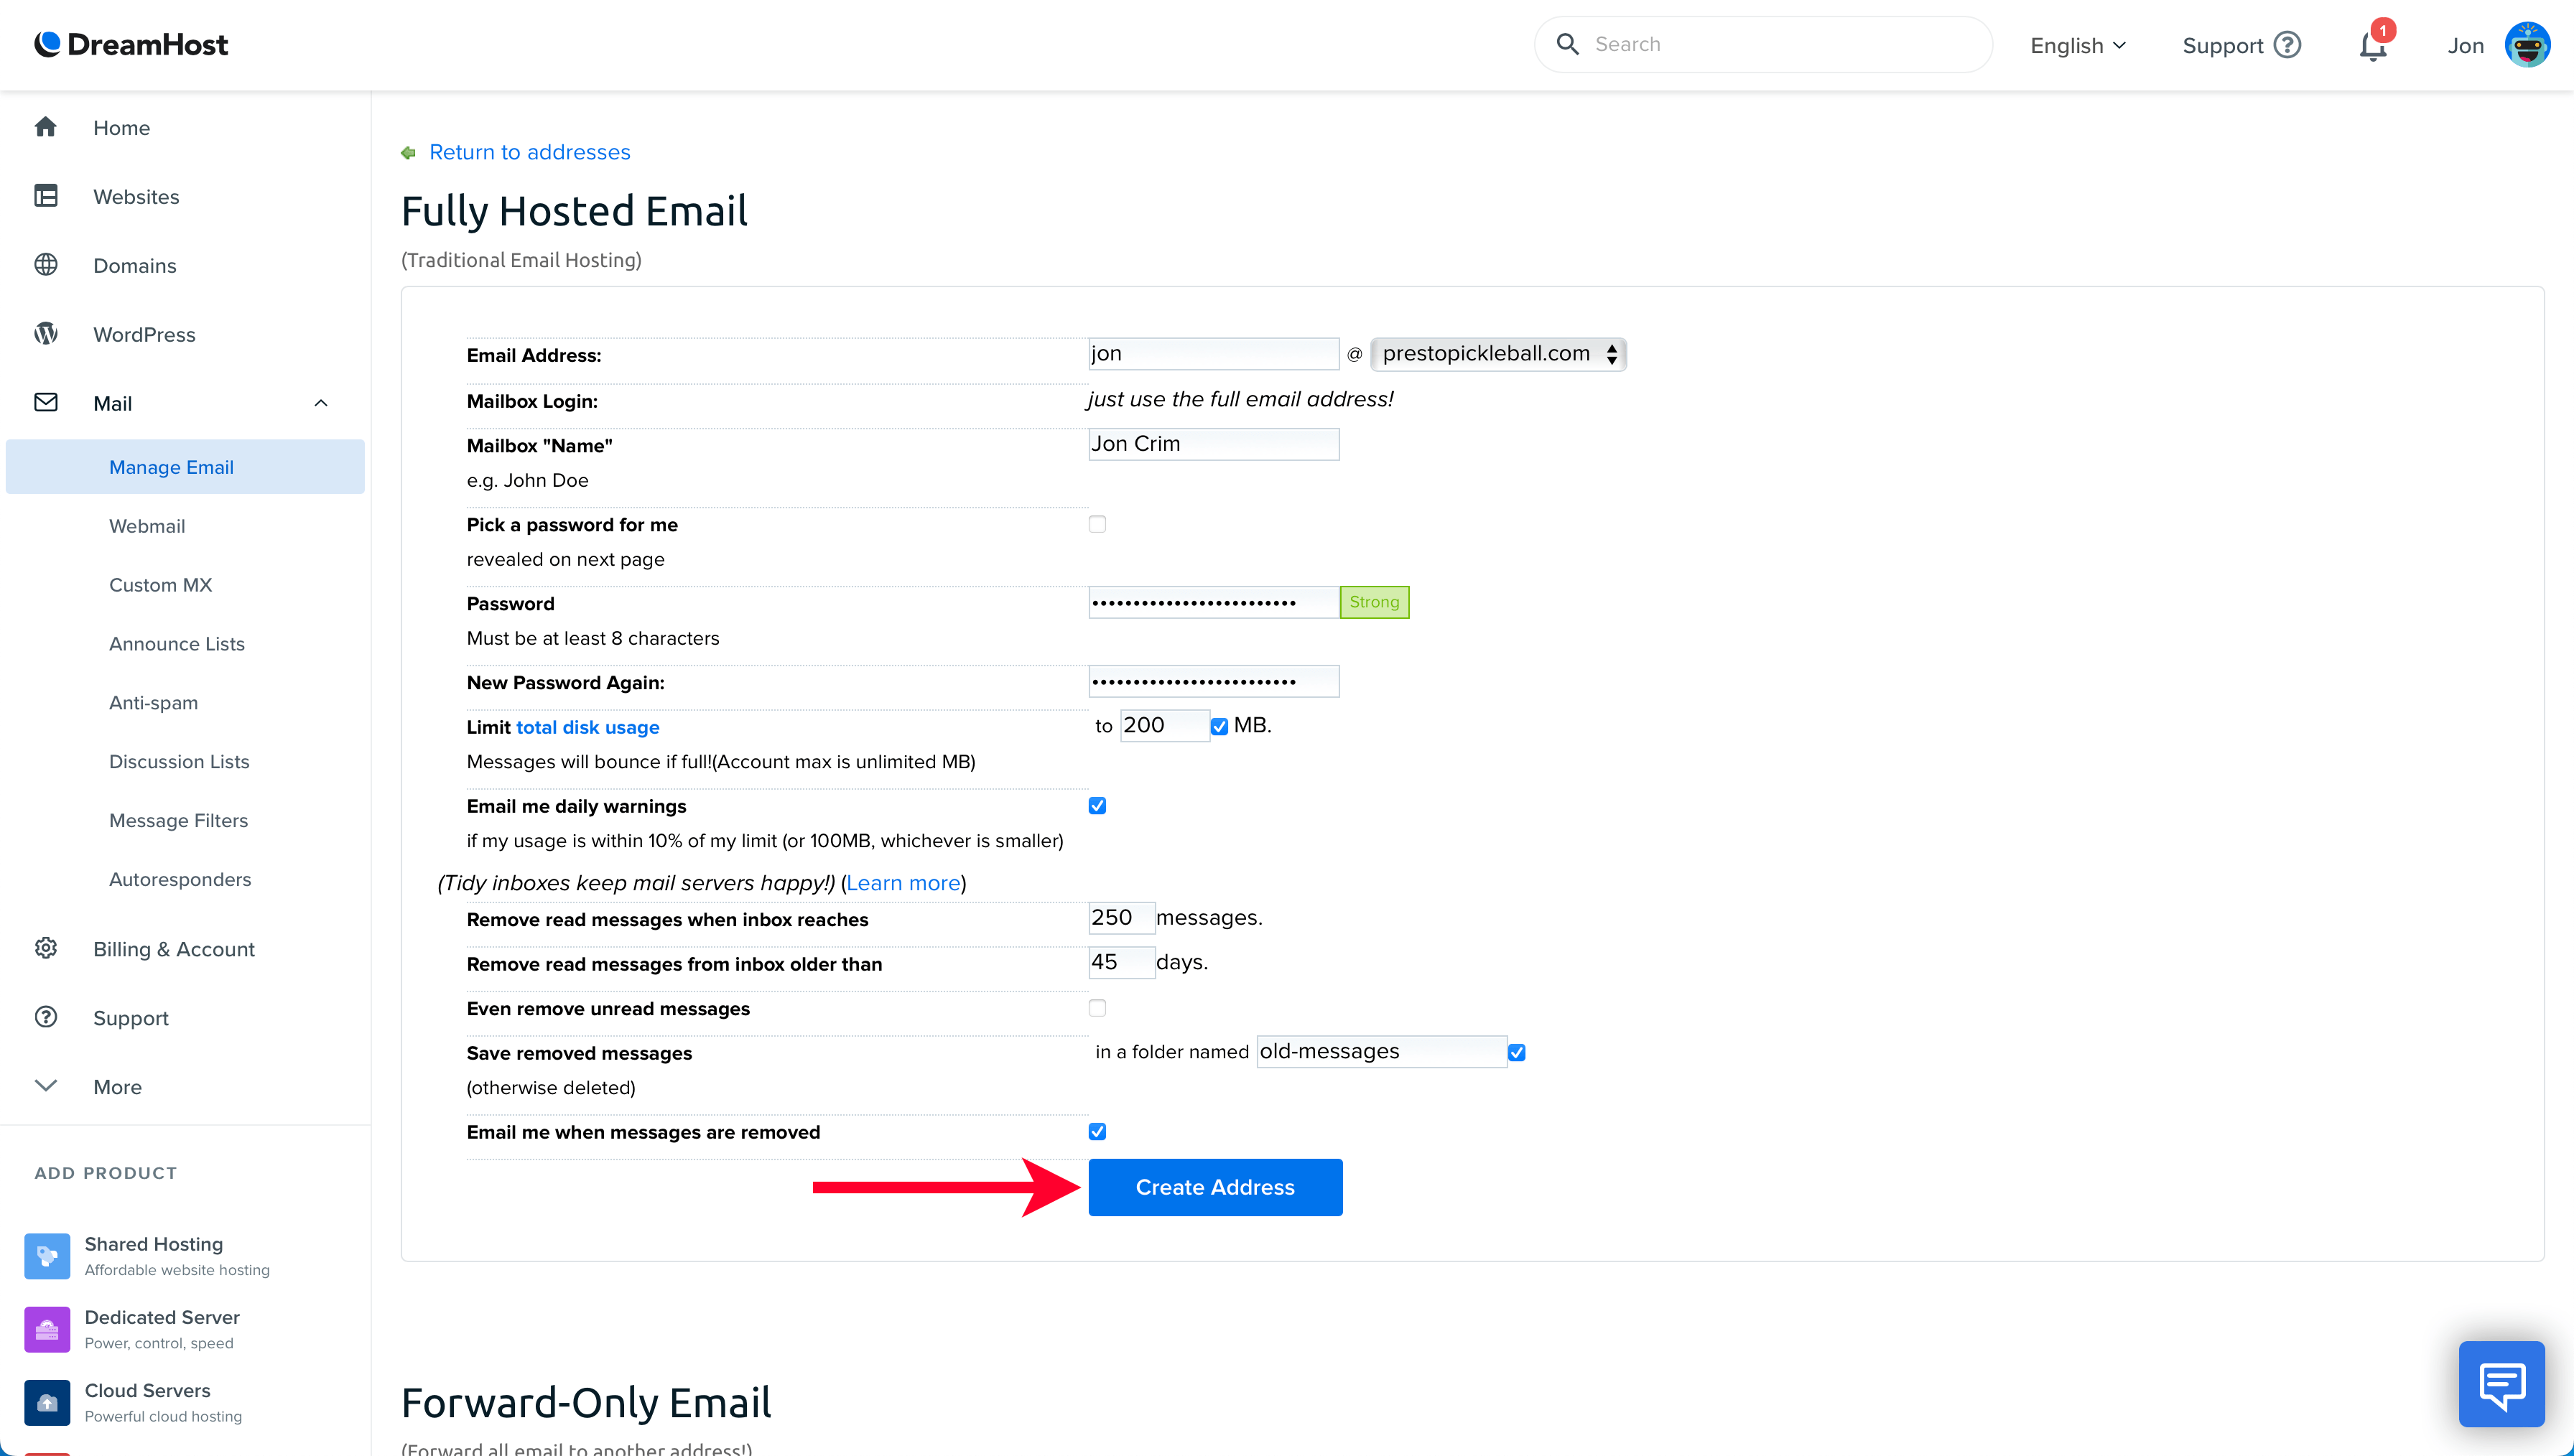
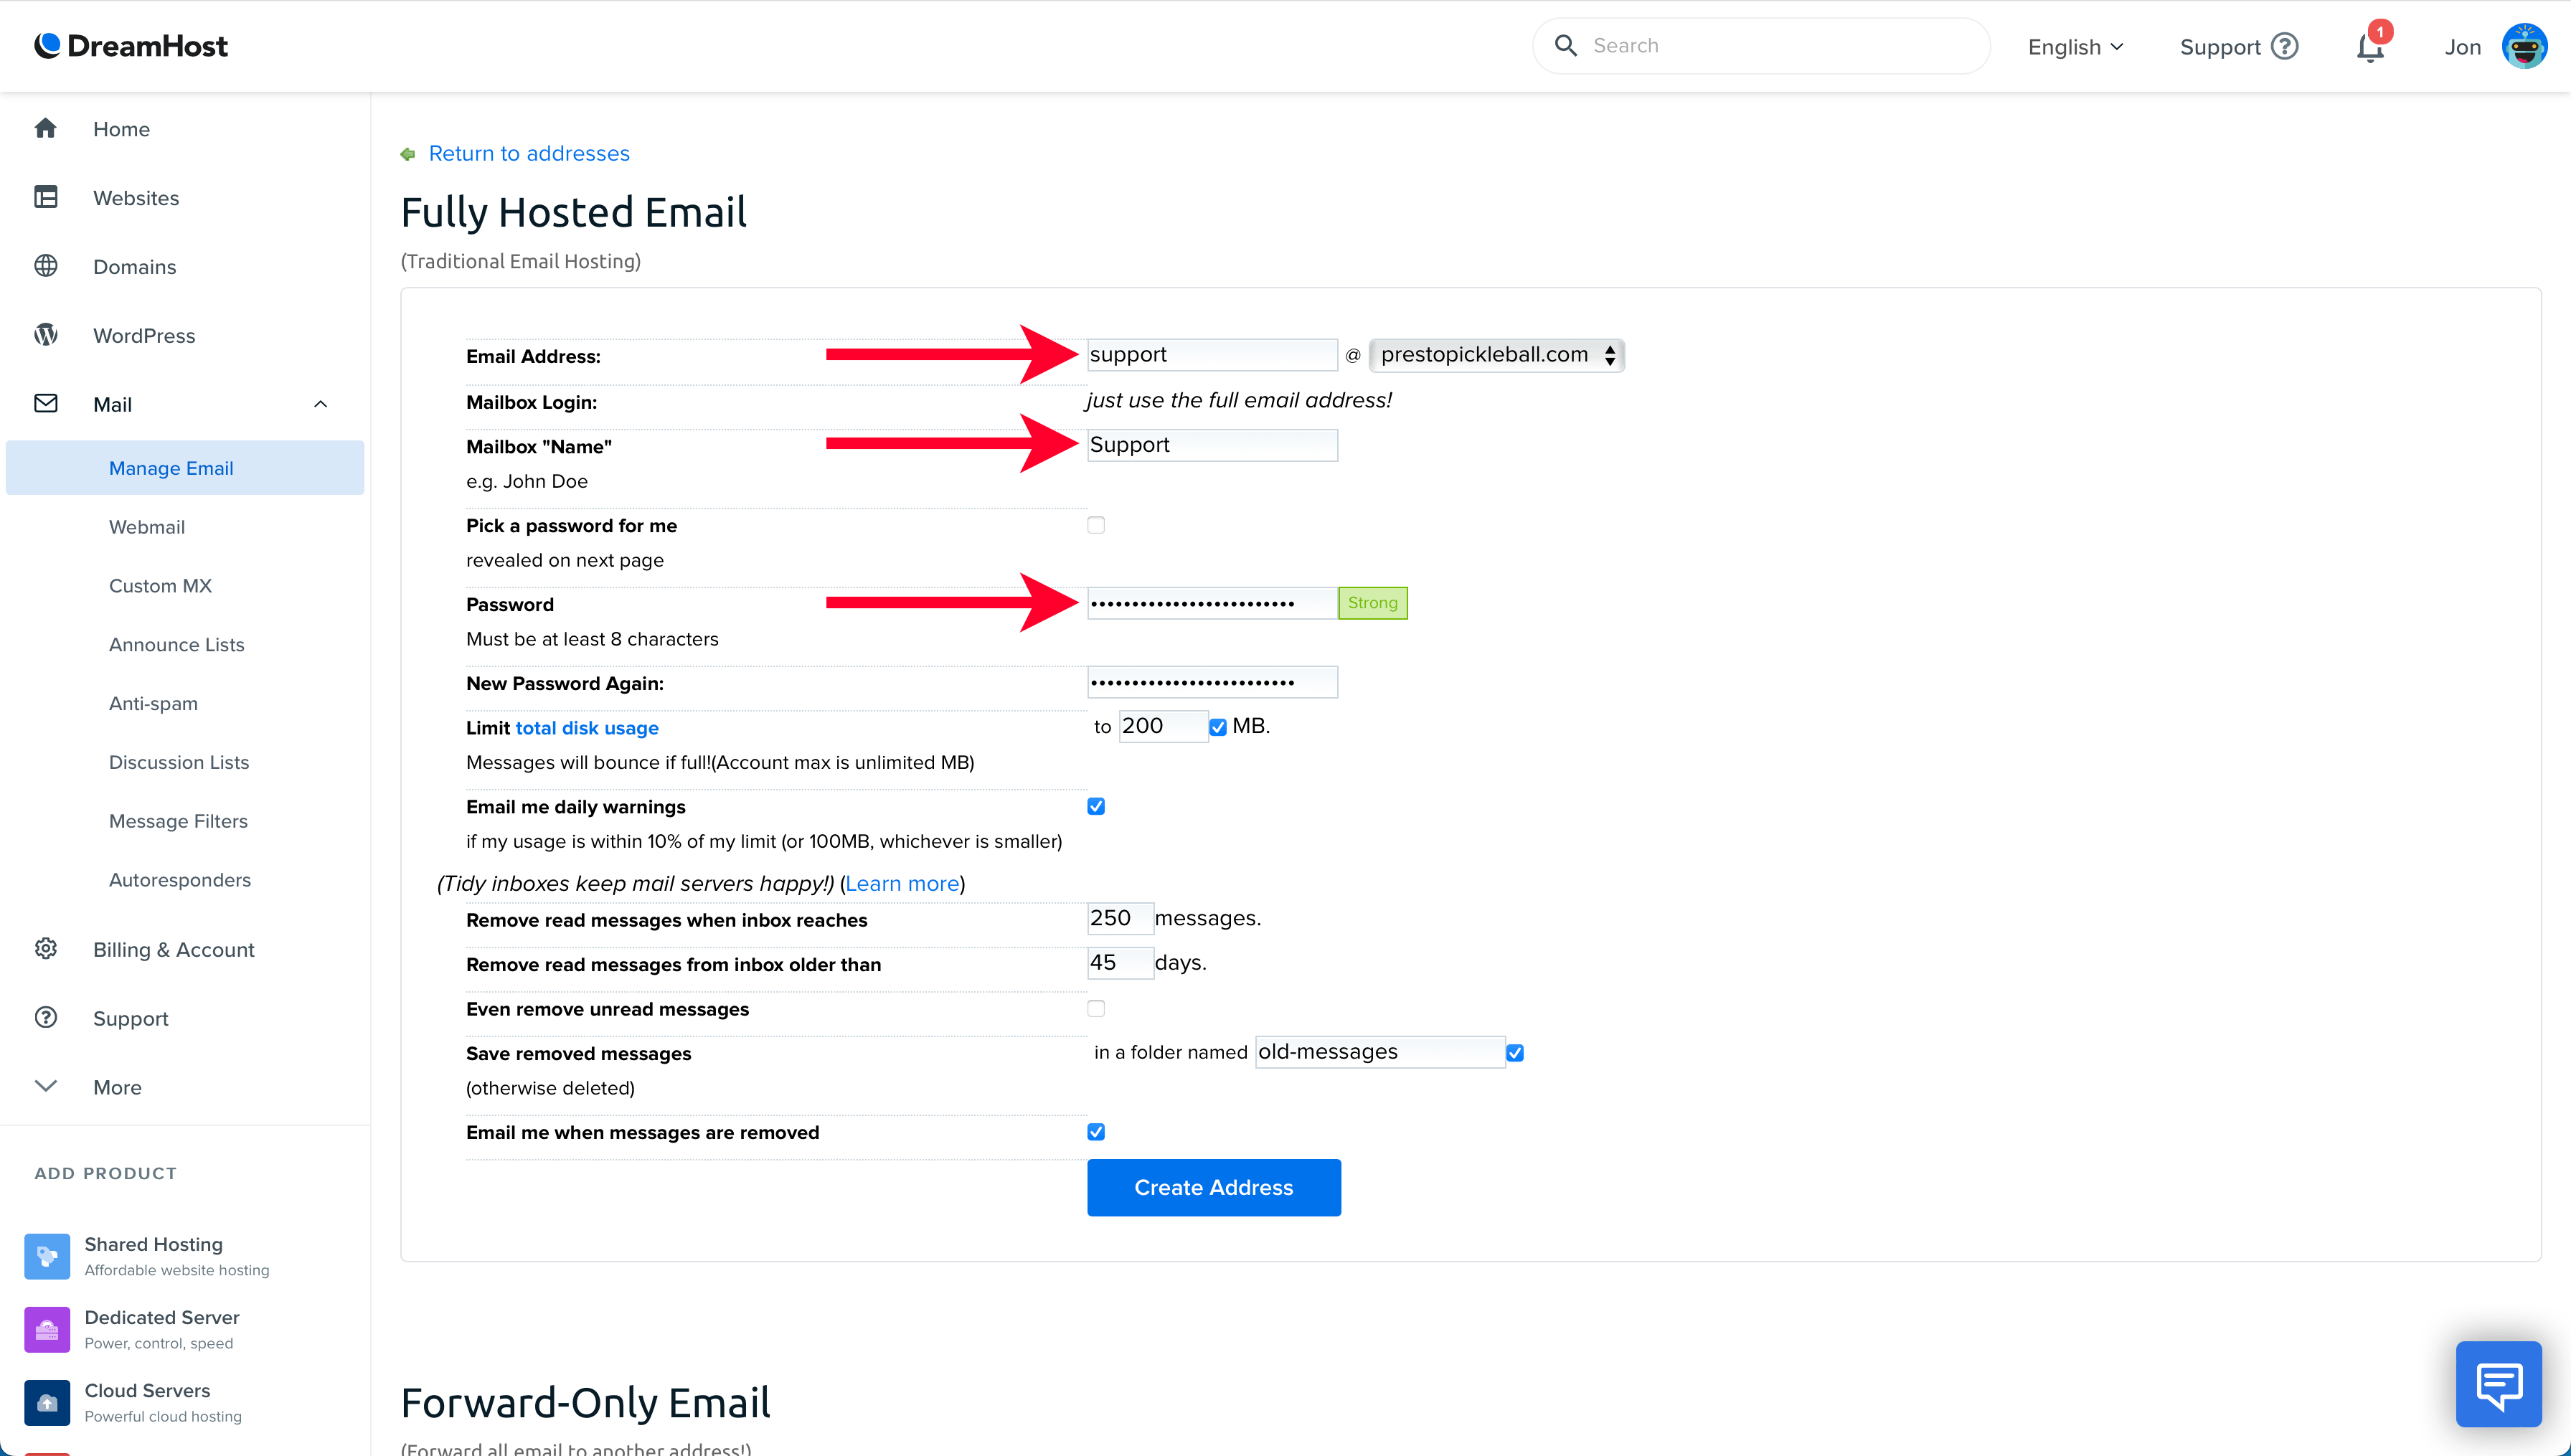
On the next screen, under the heading “Fully Hosted Email,” take the following actions:
- Enter the email address you’d like to use: I’m using my first name.
- Enter a mailbox name: I’m using my full name.
- Enter a password: Jot this down; you’ll need it to access your email messages in the future. Of course, you can always return to this page if you need to reset it.

Then, click “Create Address.”
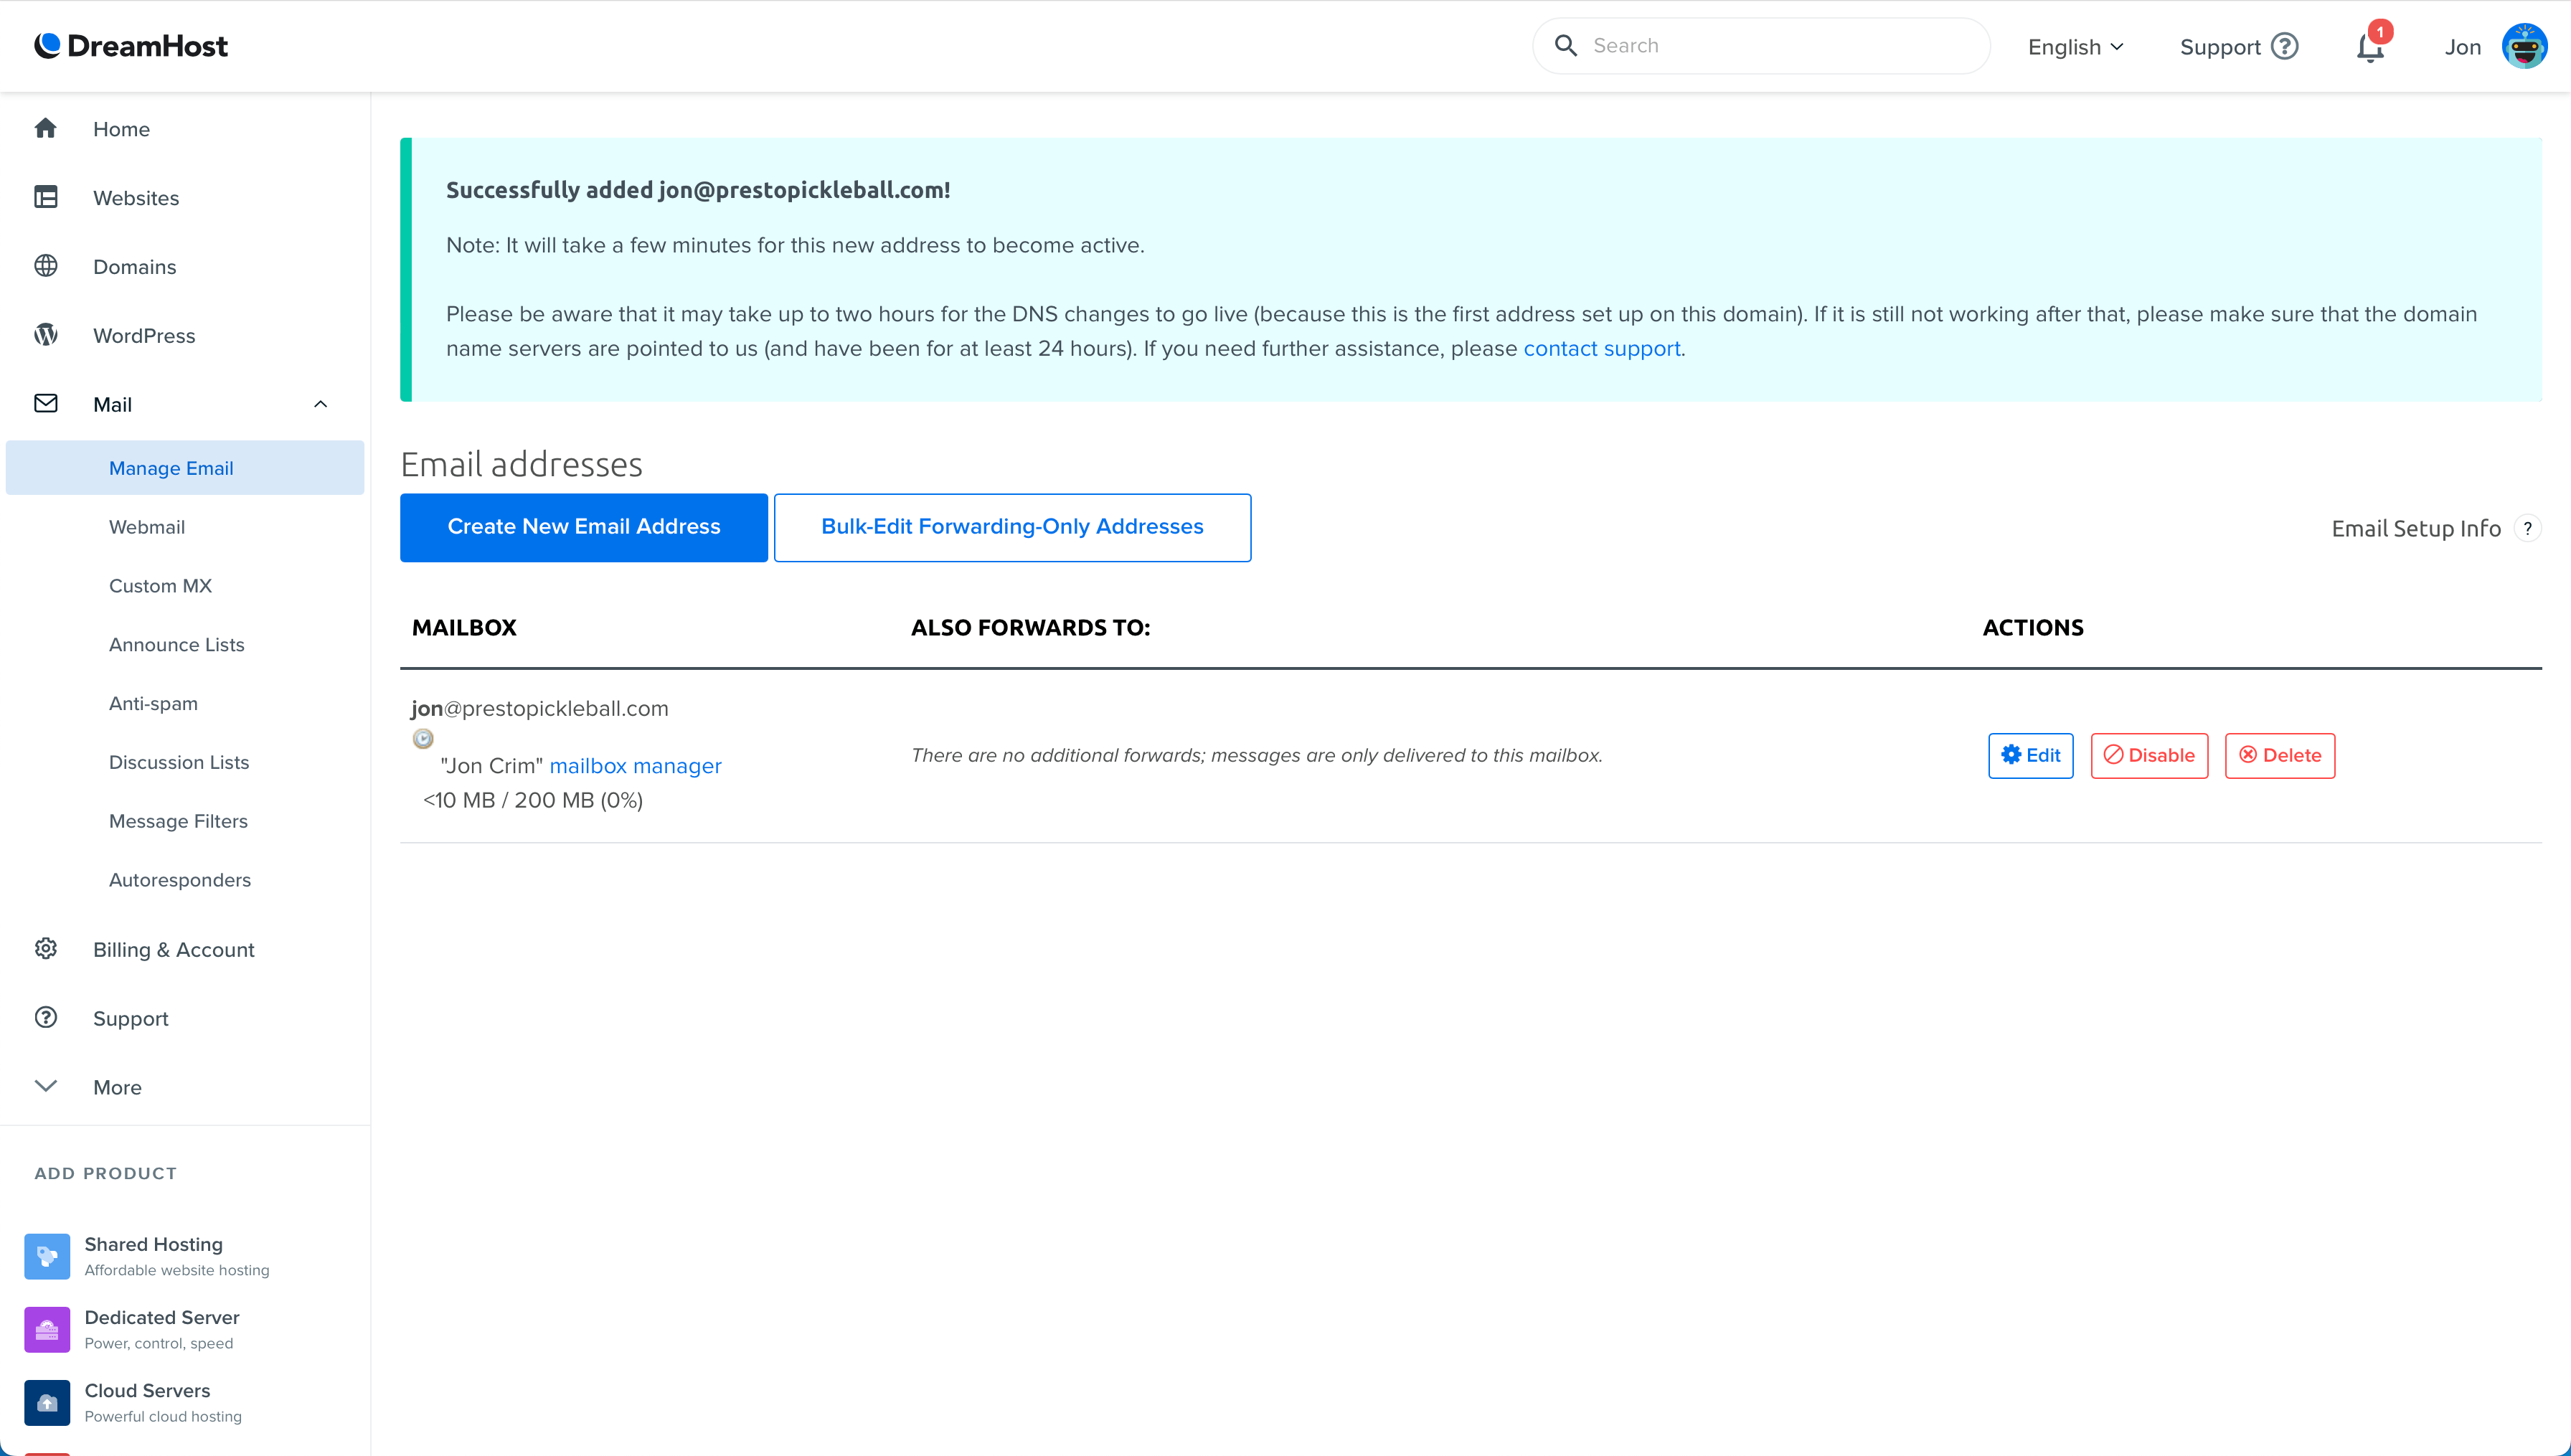
Once finished, you’ll see a new email address appear in your account’s “Manage Email” section.
Create a Custom Support Email
We’re now going to create another email address you can use in Step 9 of this guide. Start by clicking the “Create New Email Address” button on your DreamHost account’s “Manage Email” page.
On the next screen, under the heading “Fully Hosted Email,” take the following actions:
- Enter the email address of “support”
- Enter a mailbox name of “Support”
- Enter a password (jot this down, you’ll need it in the future)
Then, click “Create Address.”
The support email will now display in your DreamHost account.

Accessing Your Email Account
Moving forward, you can access any email sent to the new email addresses you set up by clicking the “Webmail” menu in your DreamHost account’s left-hand navigation.

From the “Webmail” section of your account, you can click the “Secure URL” to bring up the login page, where you’ll enter your custom email address and password to check any email you receive.

That’s it! You’re all set with your new custom email address. If you’d like to connect your new custom email address to your phone or a desktop email client, check out this resource from Dreamhost.
Step 5: Update WordPress Settings
Now that you’re website is up and running and you’ve created a new custom email for yourself, it’s time to jump into WordPress and update a few settings to optimize your website for the best results.
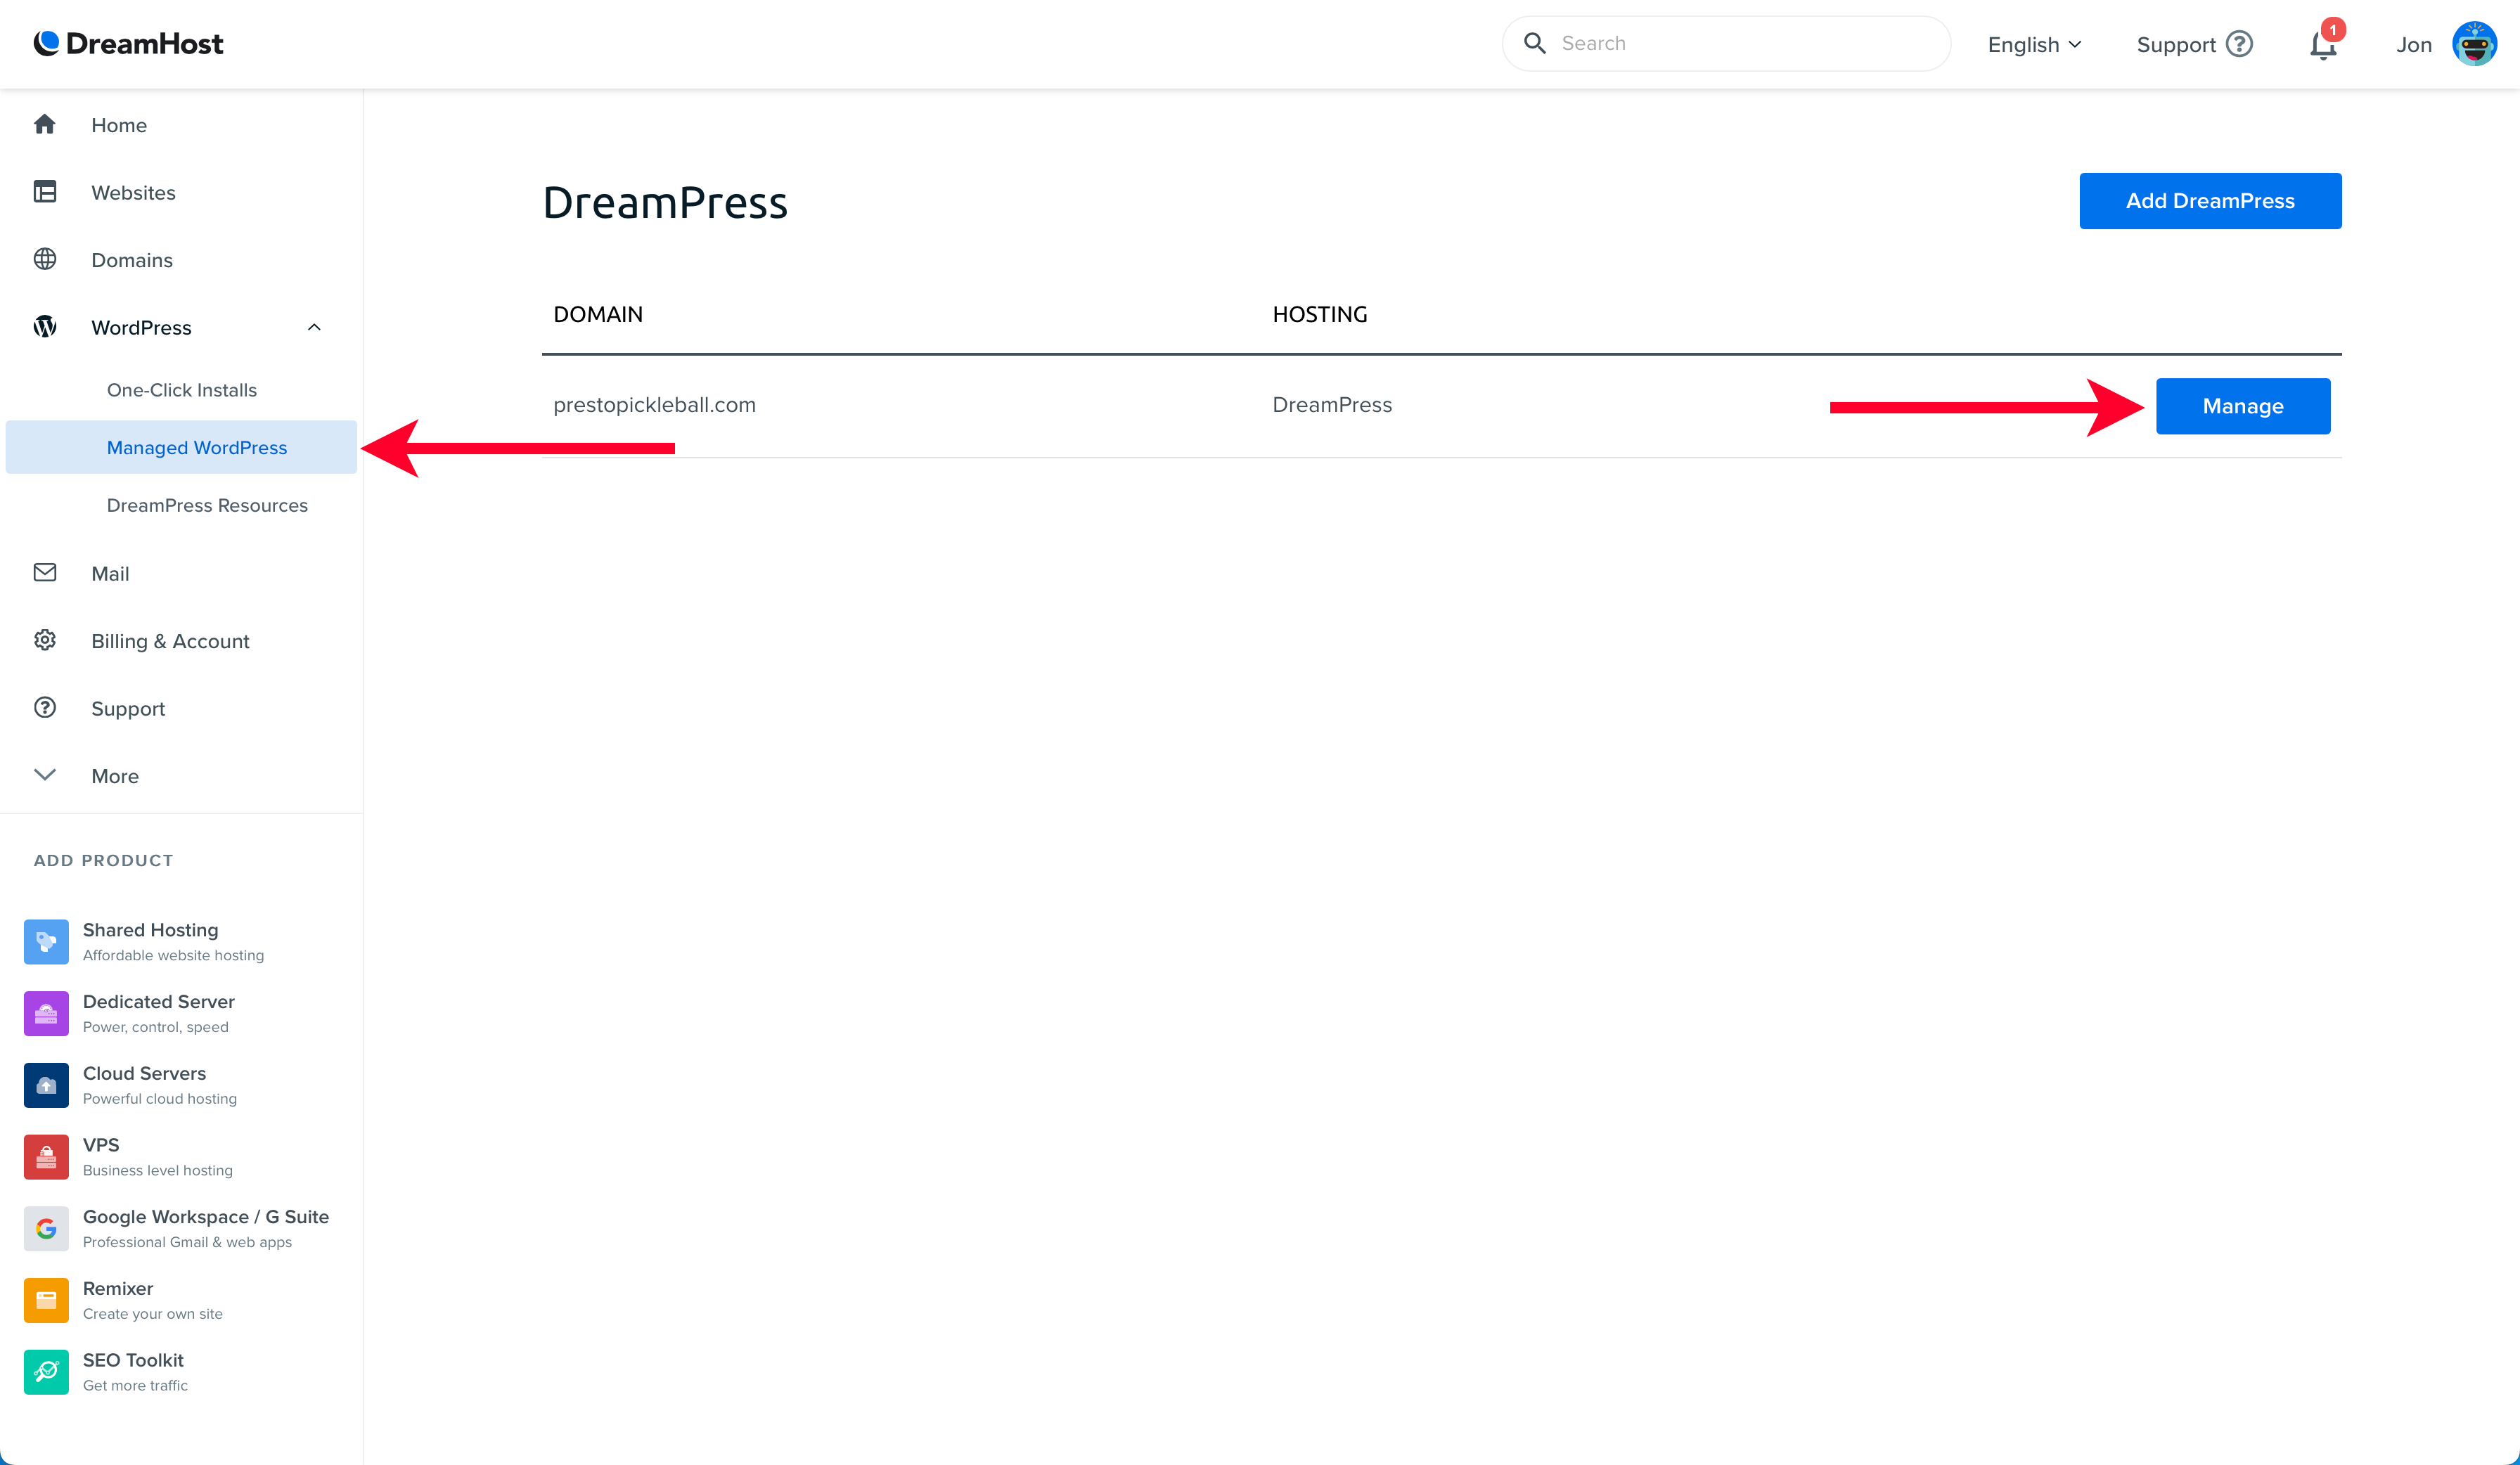
To access your WordPress for the first time, you’ll need to log in to your Dreamhost account. Once logged in, navigate to the “WordPress” section of your account’s left-hand navigation, then click “Managed WordPress.”
From there, click the “Manage” button next to your domain.
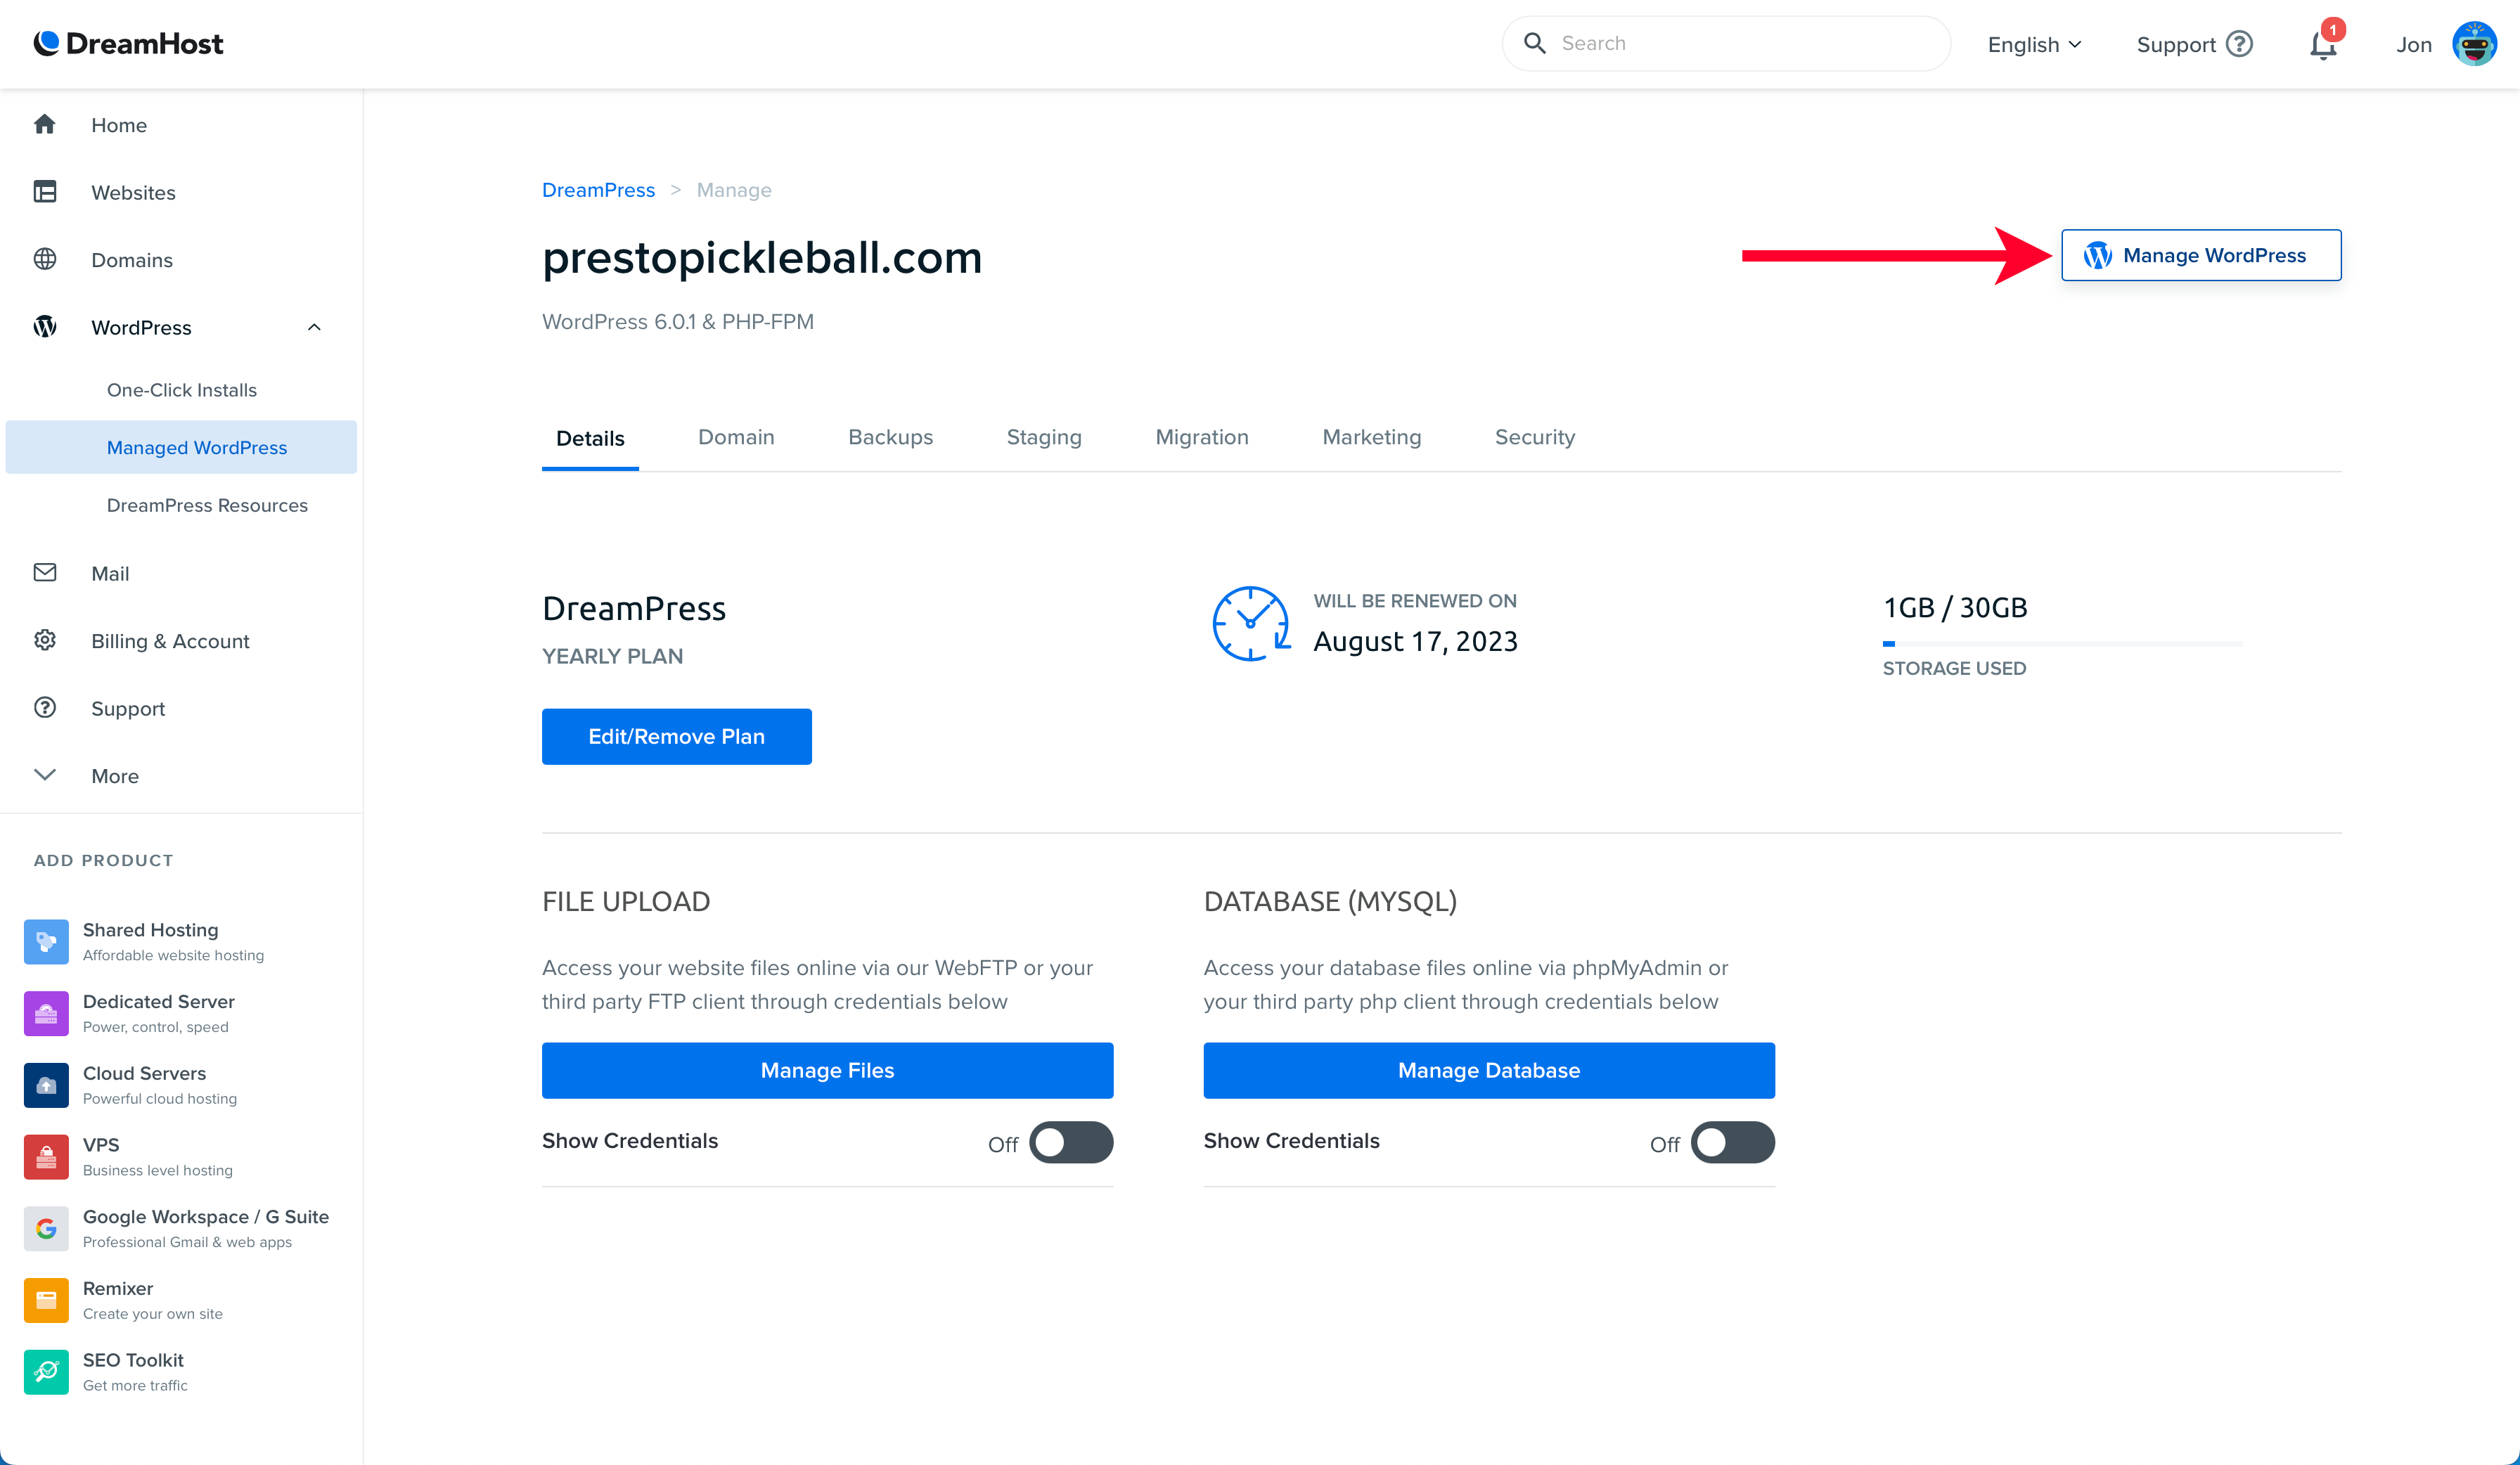
On the following screen, click the “Manage WordPress” button, which will log you into your WordPress account as an admin.
Remember: You can follow those steps to log in to your WordPress account anytime. Of course, don’t hesitate to contact DreamHost’s support team if you have any issues. They can quickly resolve login issues over a quick support chat.
Update Your Admin Name
Let’s start by updating the name associated with your admin user. In the left-hand navigation, select “Users.” Then click the username link for the existing admin user.

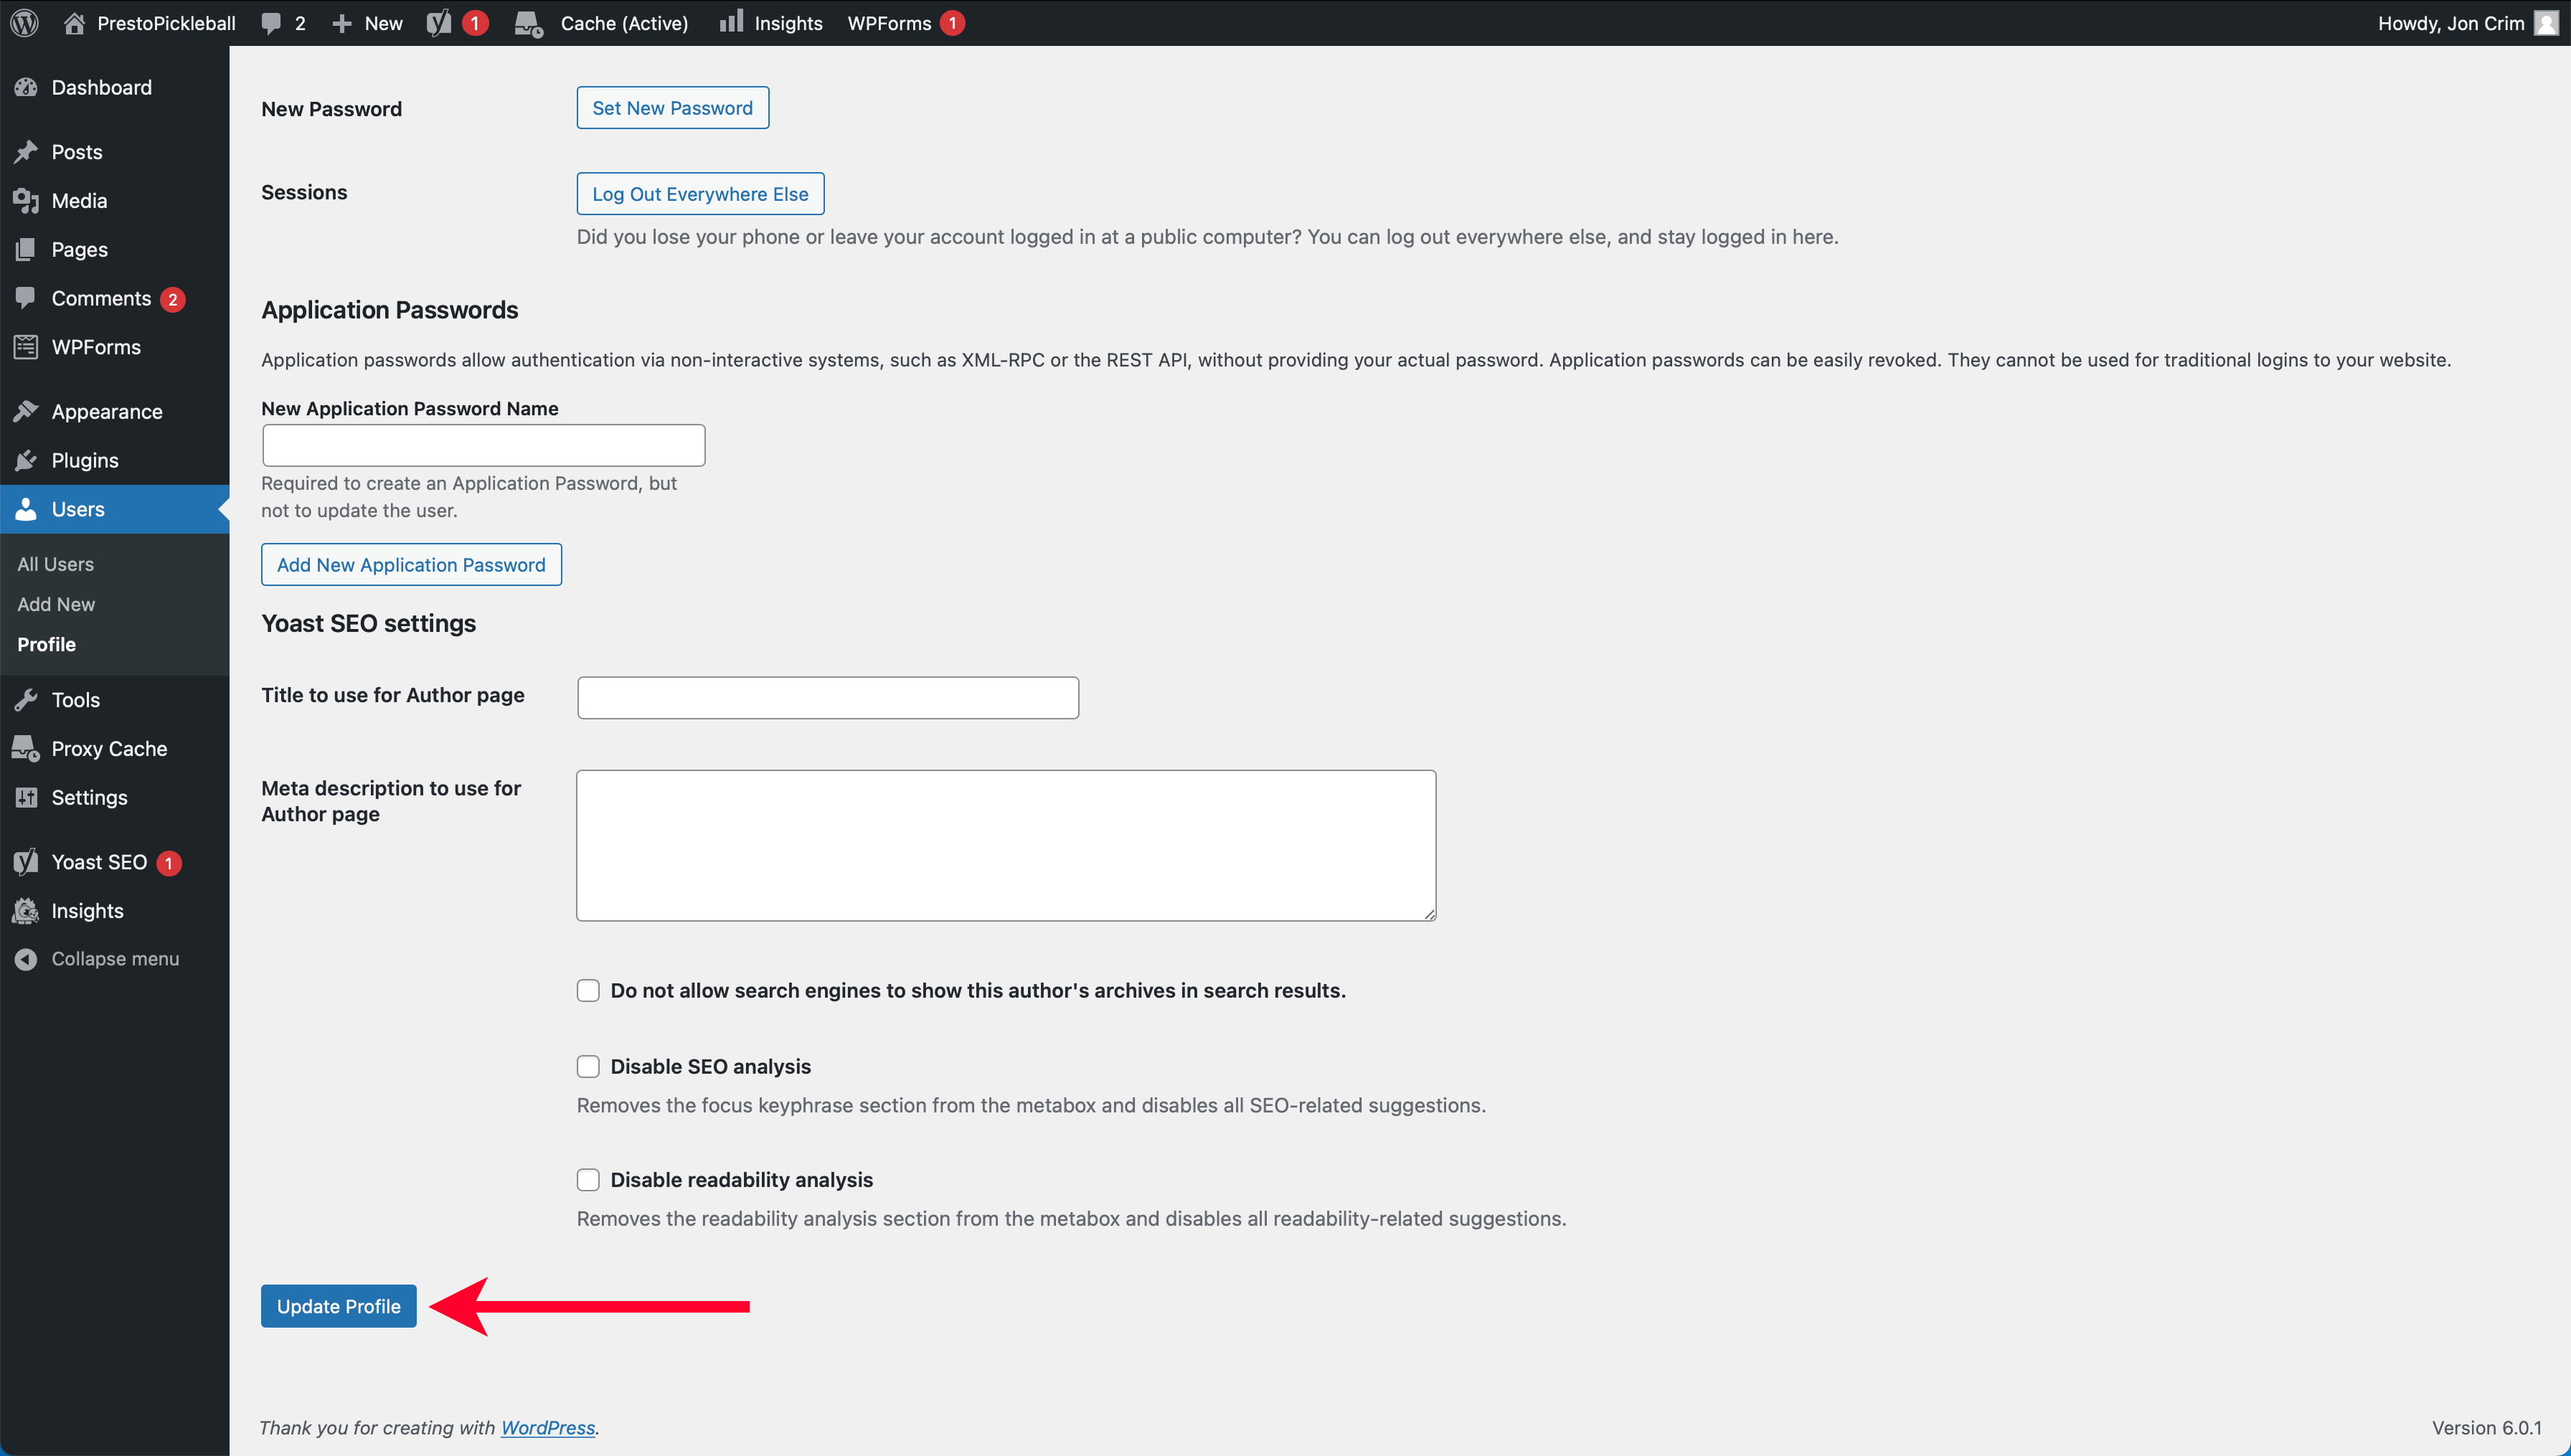
On the “Profile” page for the admin user, enter your first and last name, then scroll to the bottom of the page and click “Update Profile.”
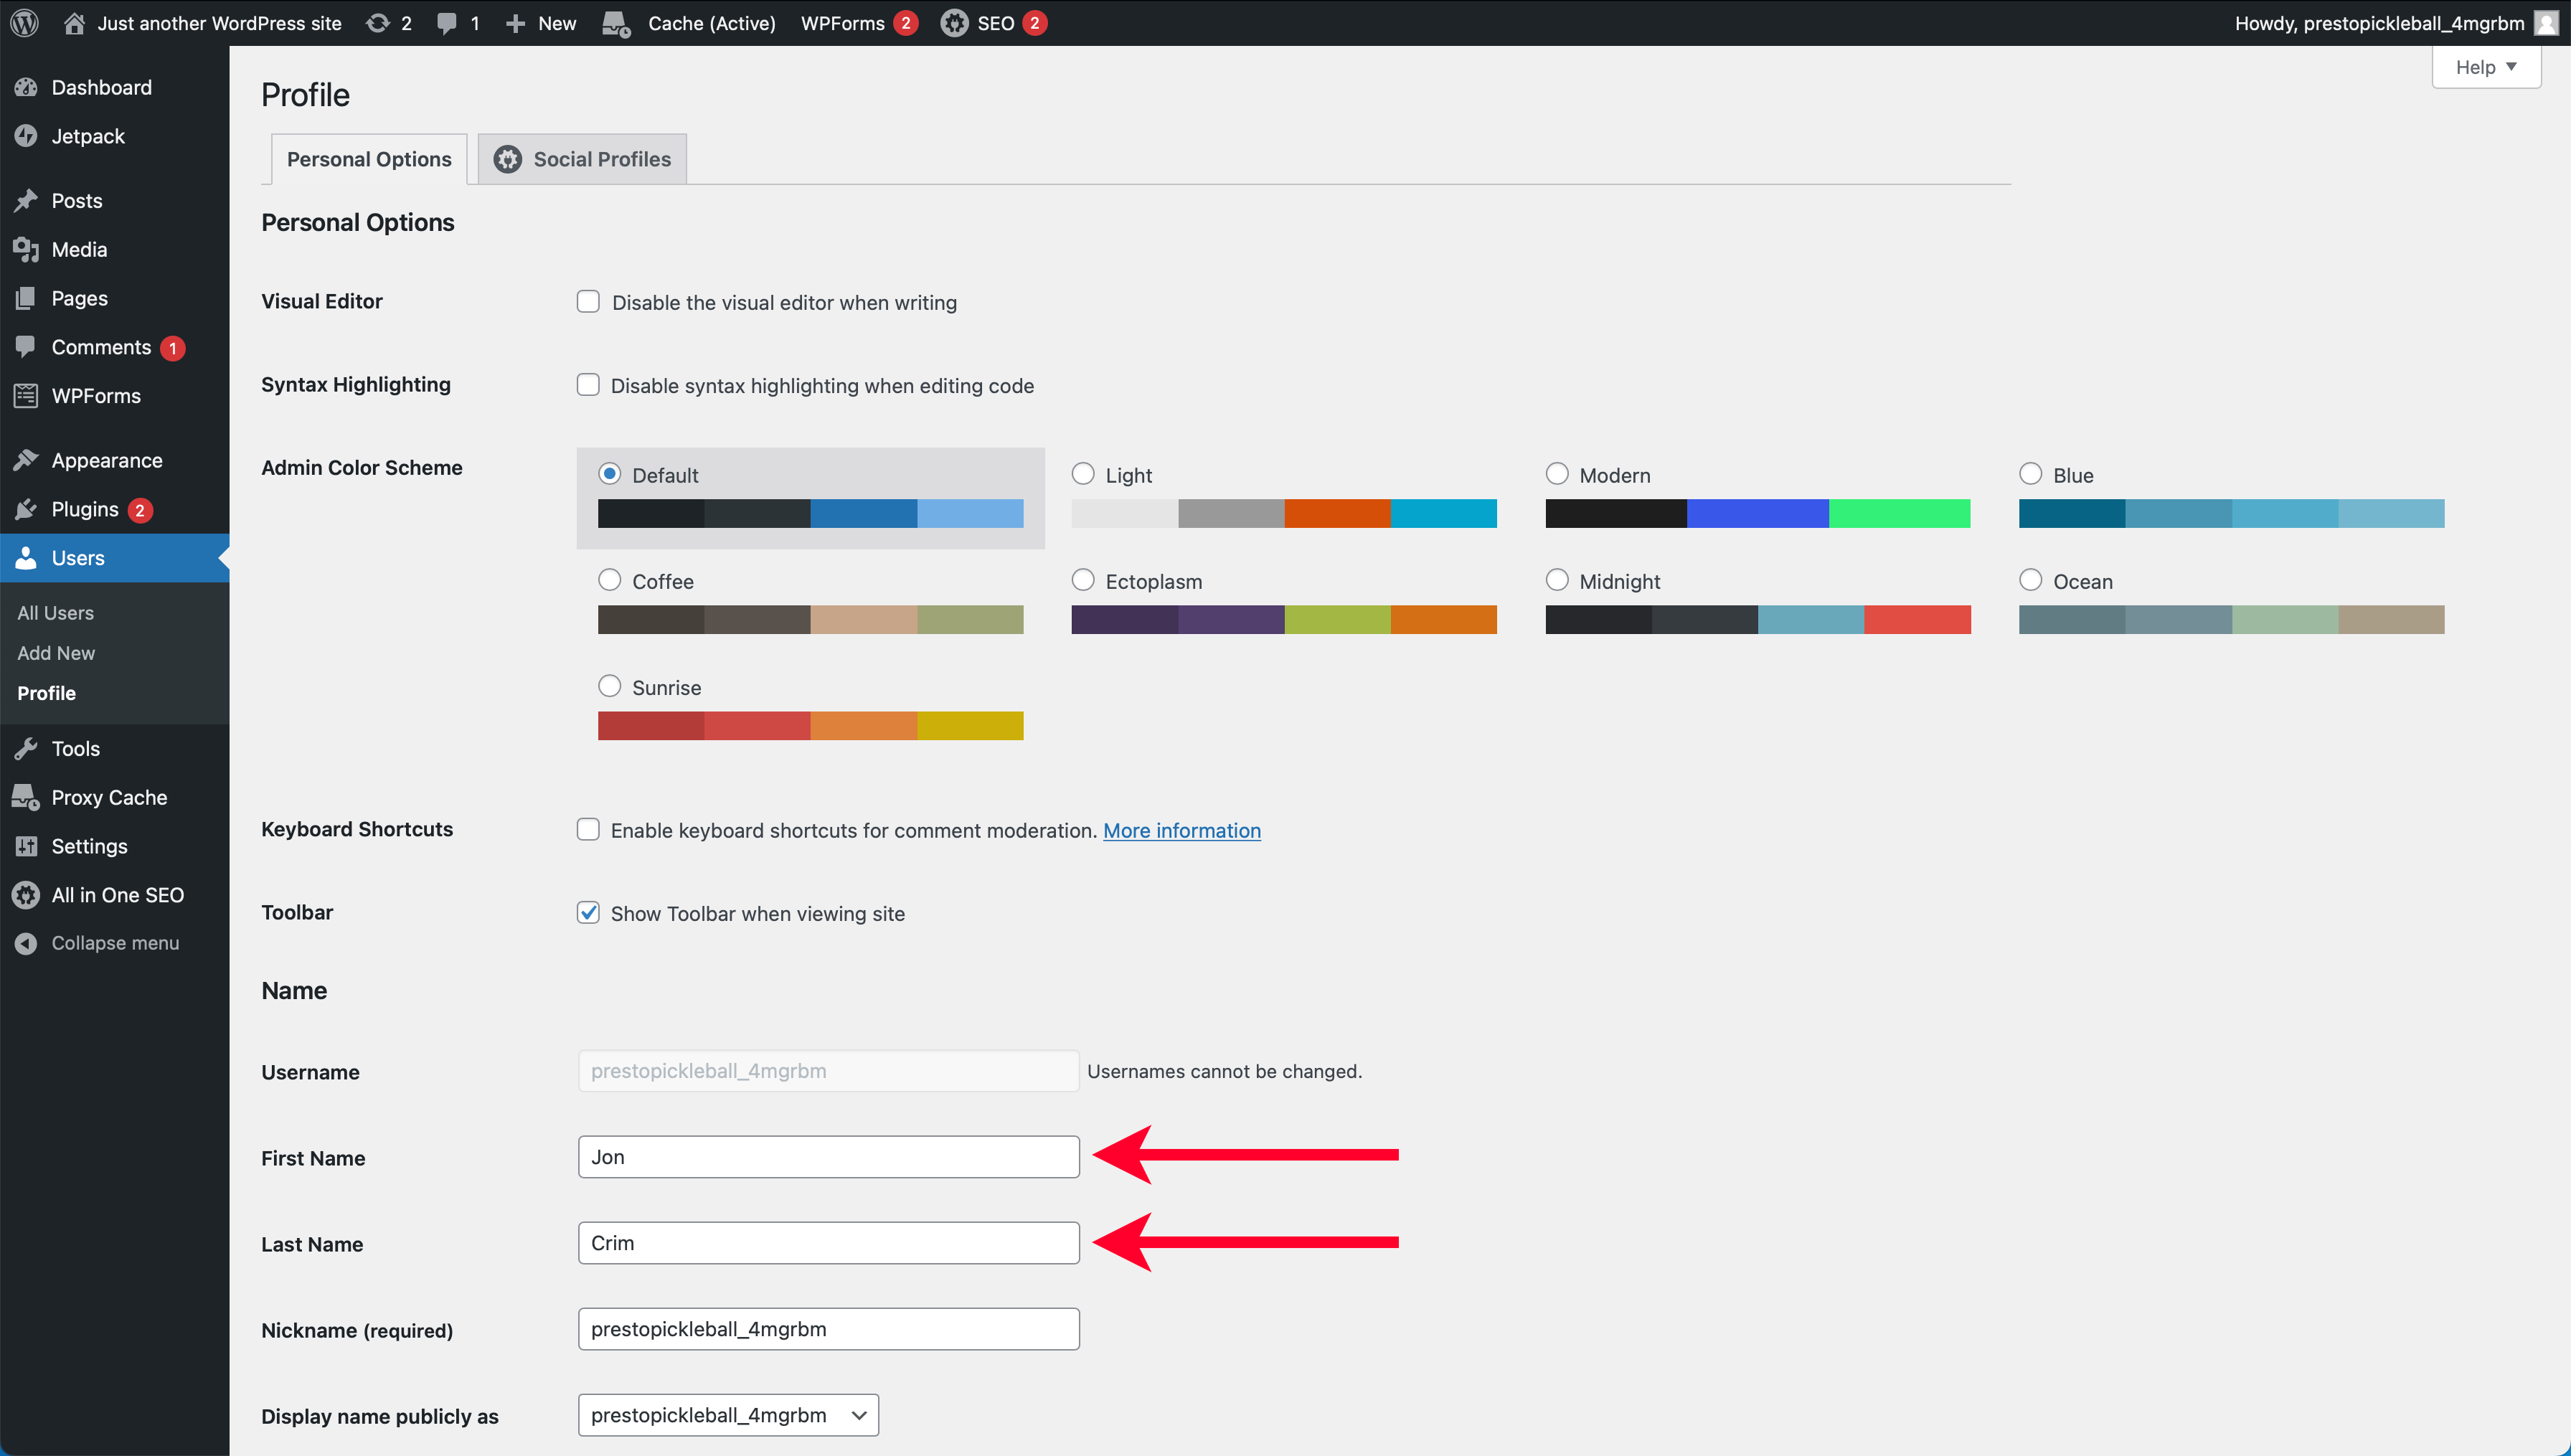
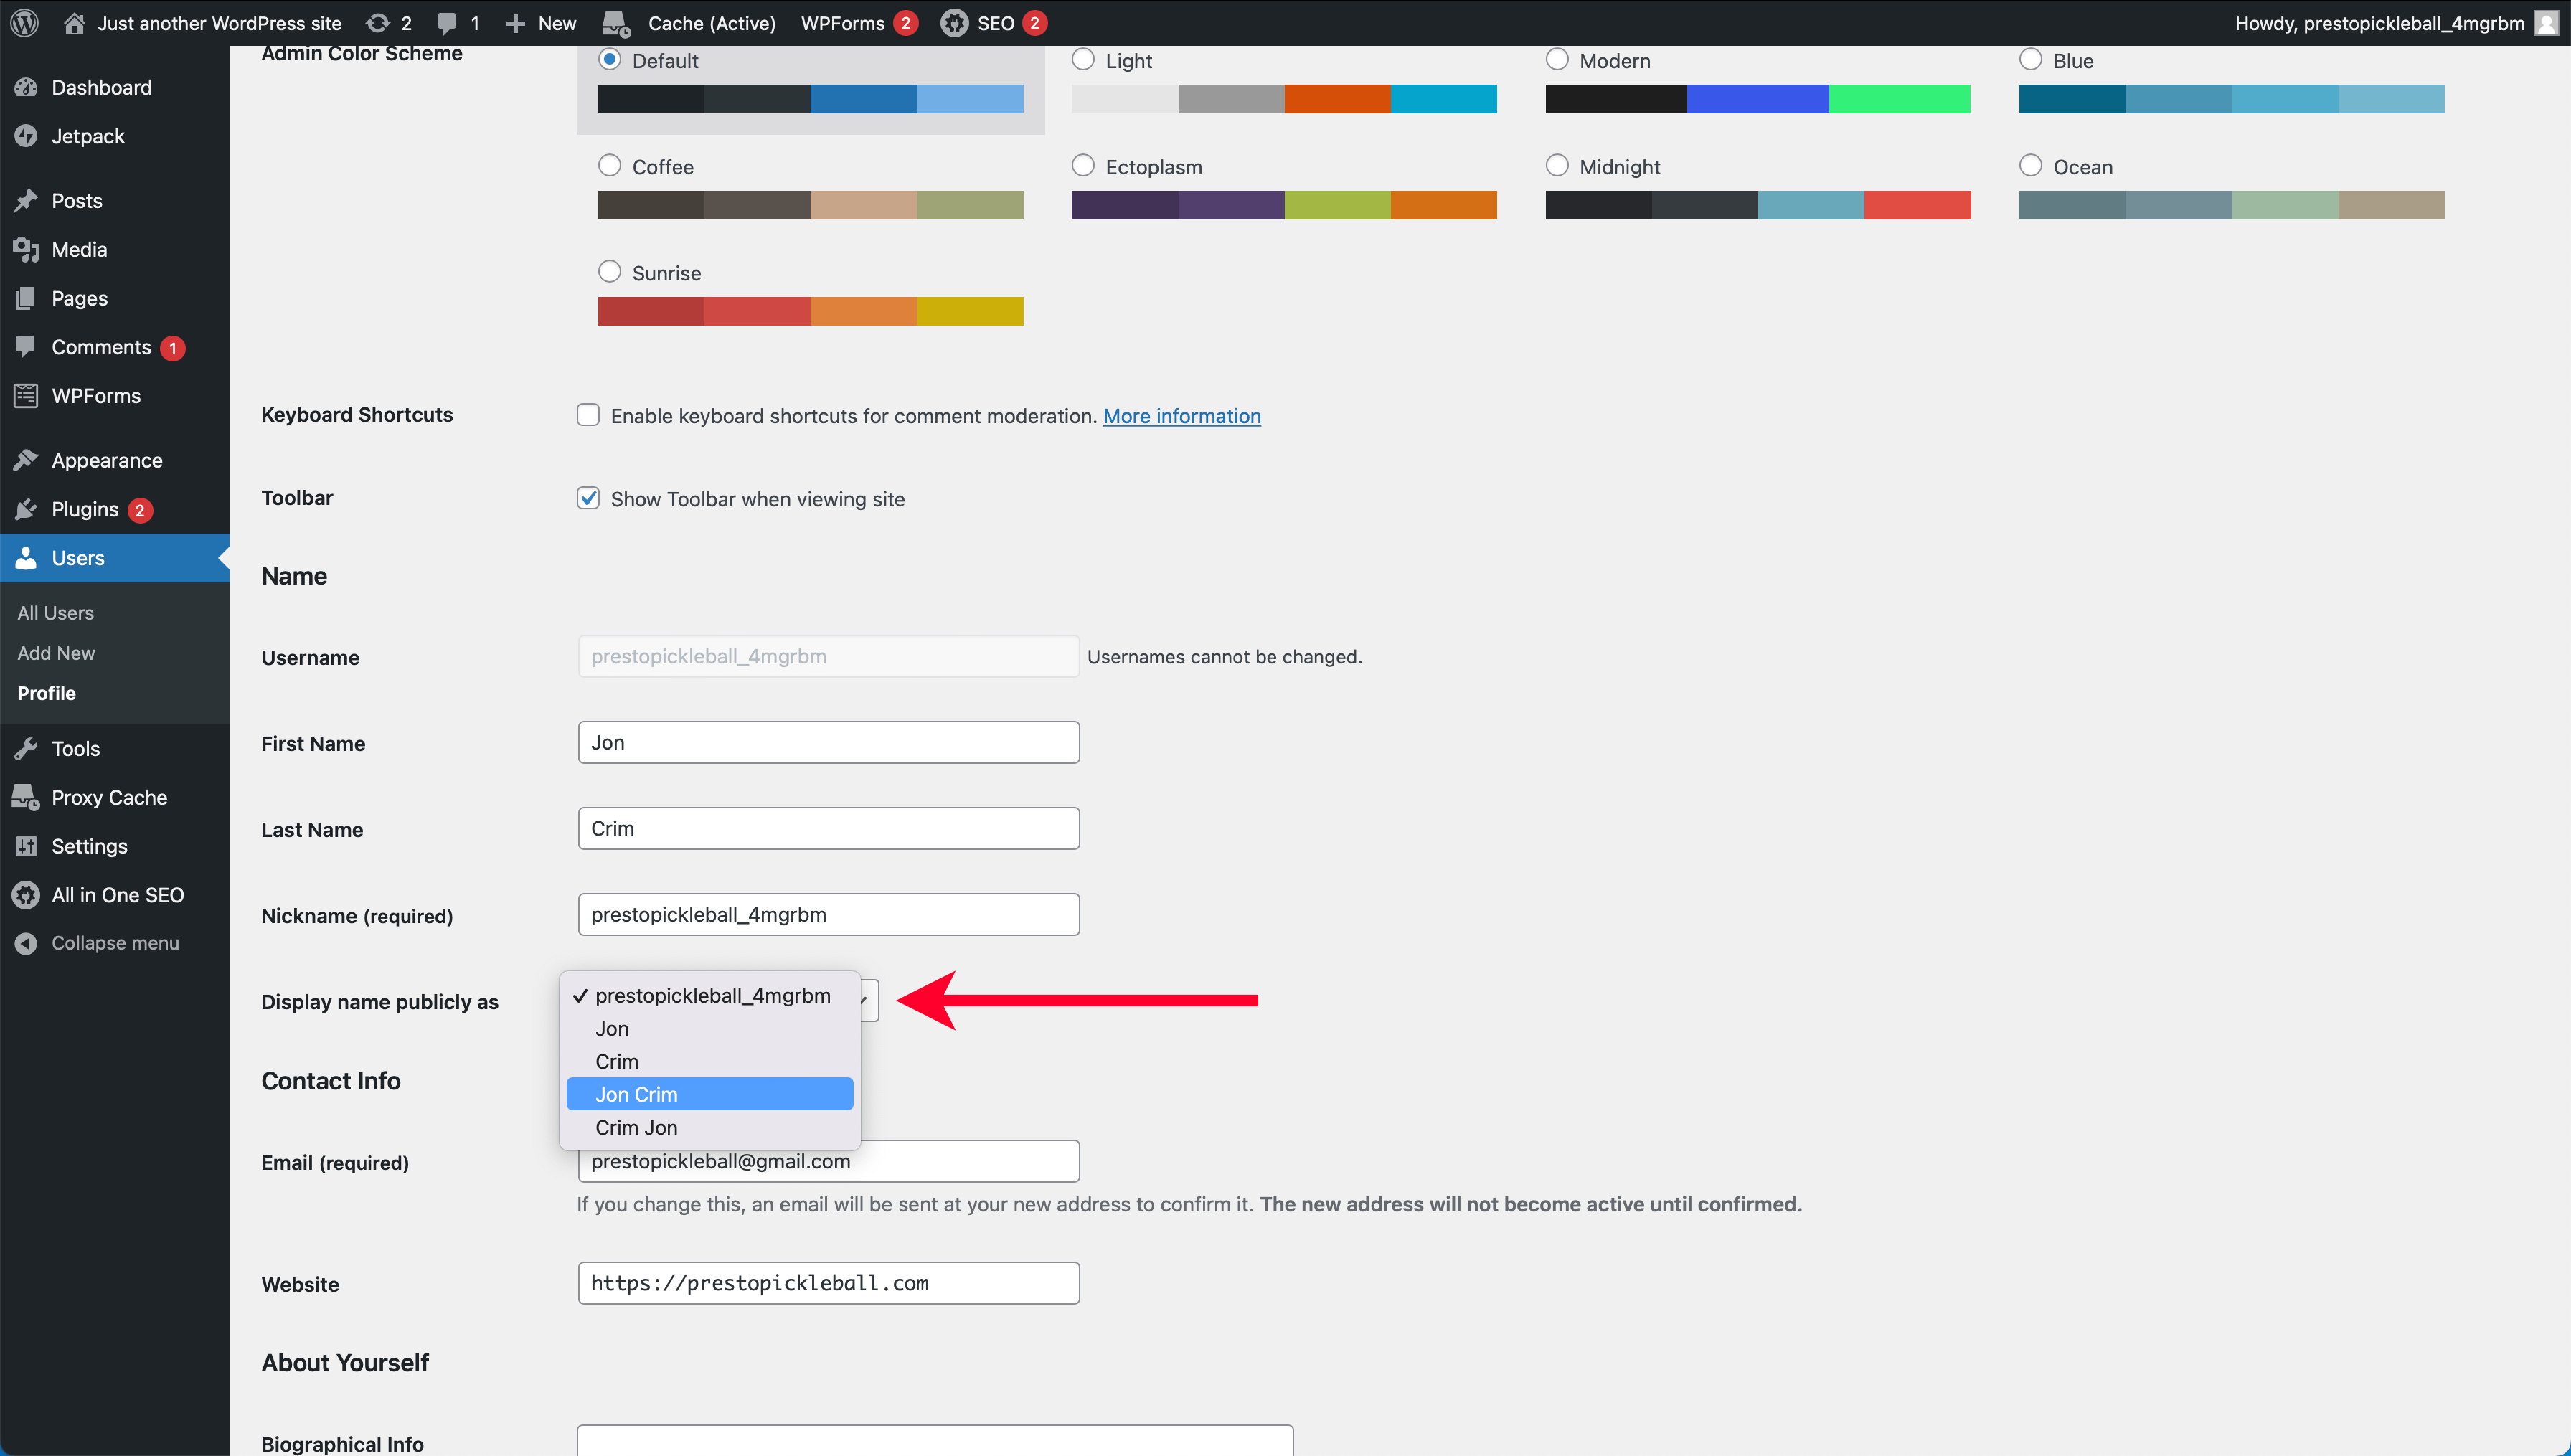
Next, scroll back up the page and change the “Display name publicly as” dropdown to whatever name you want to display on your website. When you post content, this will be the name associated with published articles.
Scroll down to the bottom of the page again and click “Update Profile” to save your change. Your profile is all set for now!
Update General Settings
From your WordPress account, click “Settings” in the left-hand navigation.
We’ll start by updating the “Site Title.” In this field, remove “Just another WordPress site” and type the name of your website. Then, delete the tagline of “Just another WordPress site” and leave it empty.
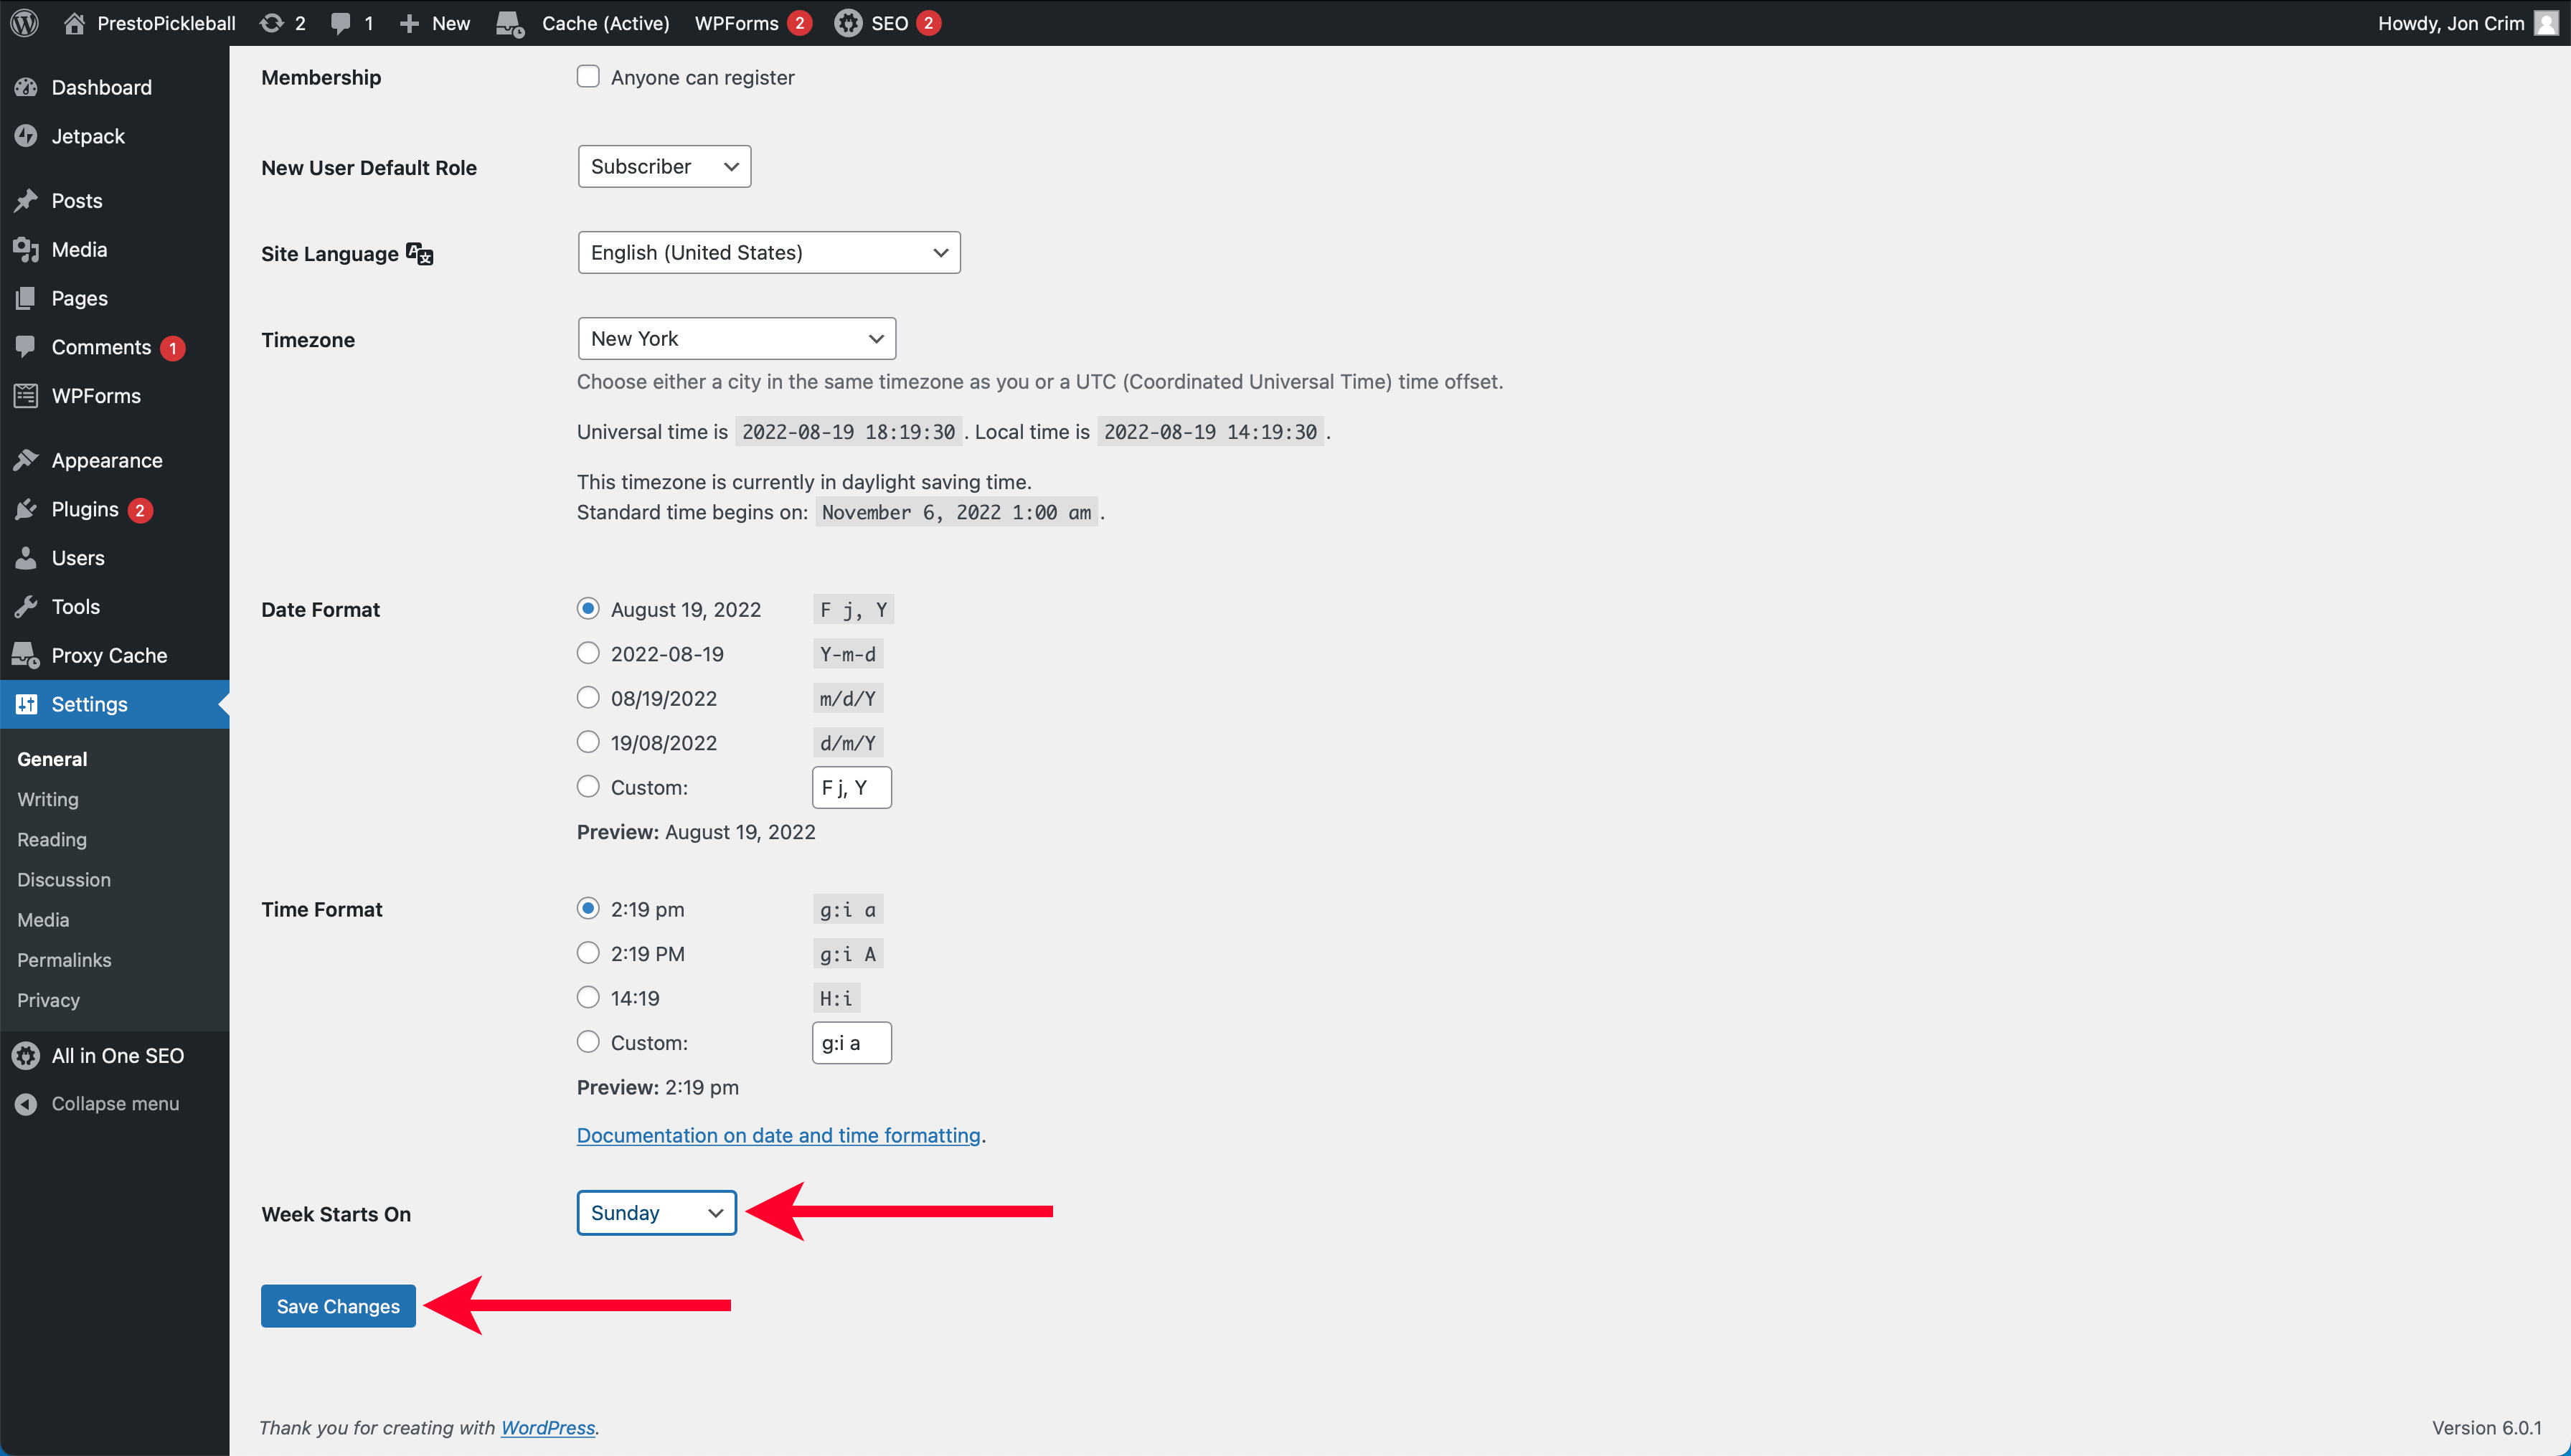
Now we’ll update your “Timezone.” You can scroll to select a UTC offset or a nearby city; I’ve chosen a city.
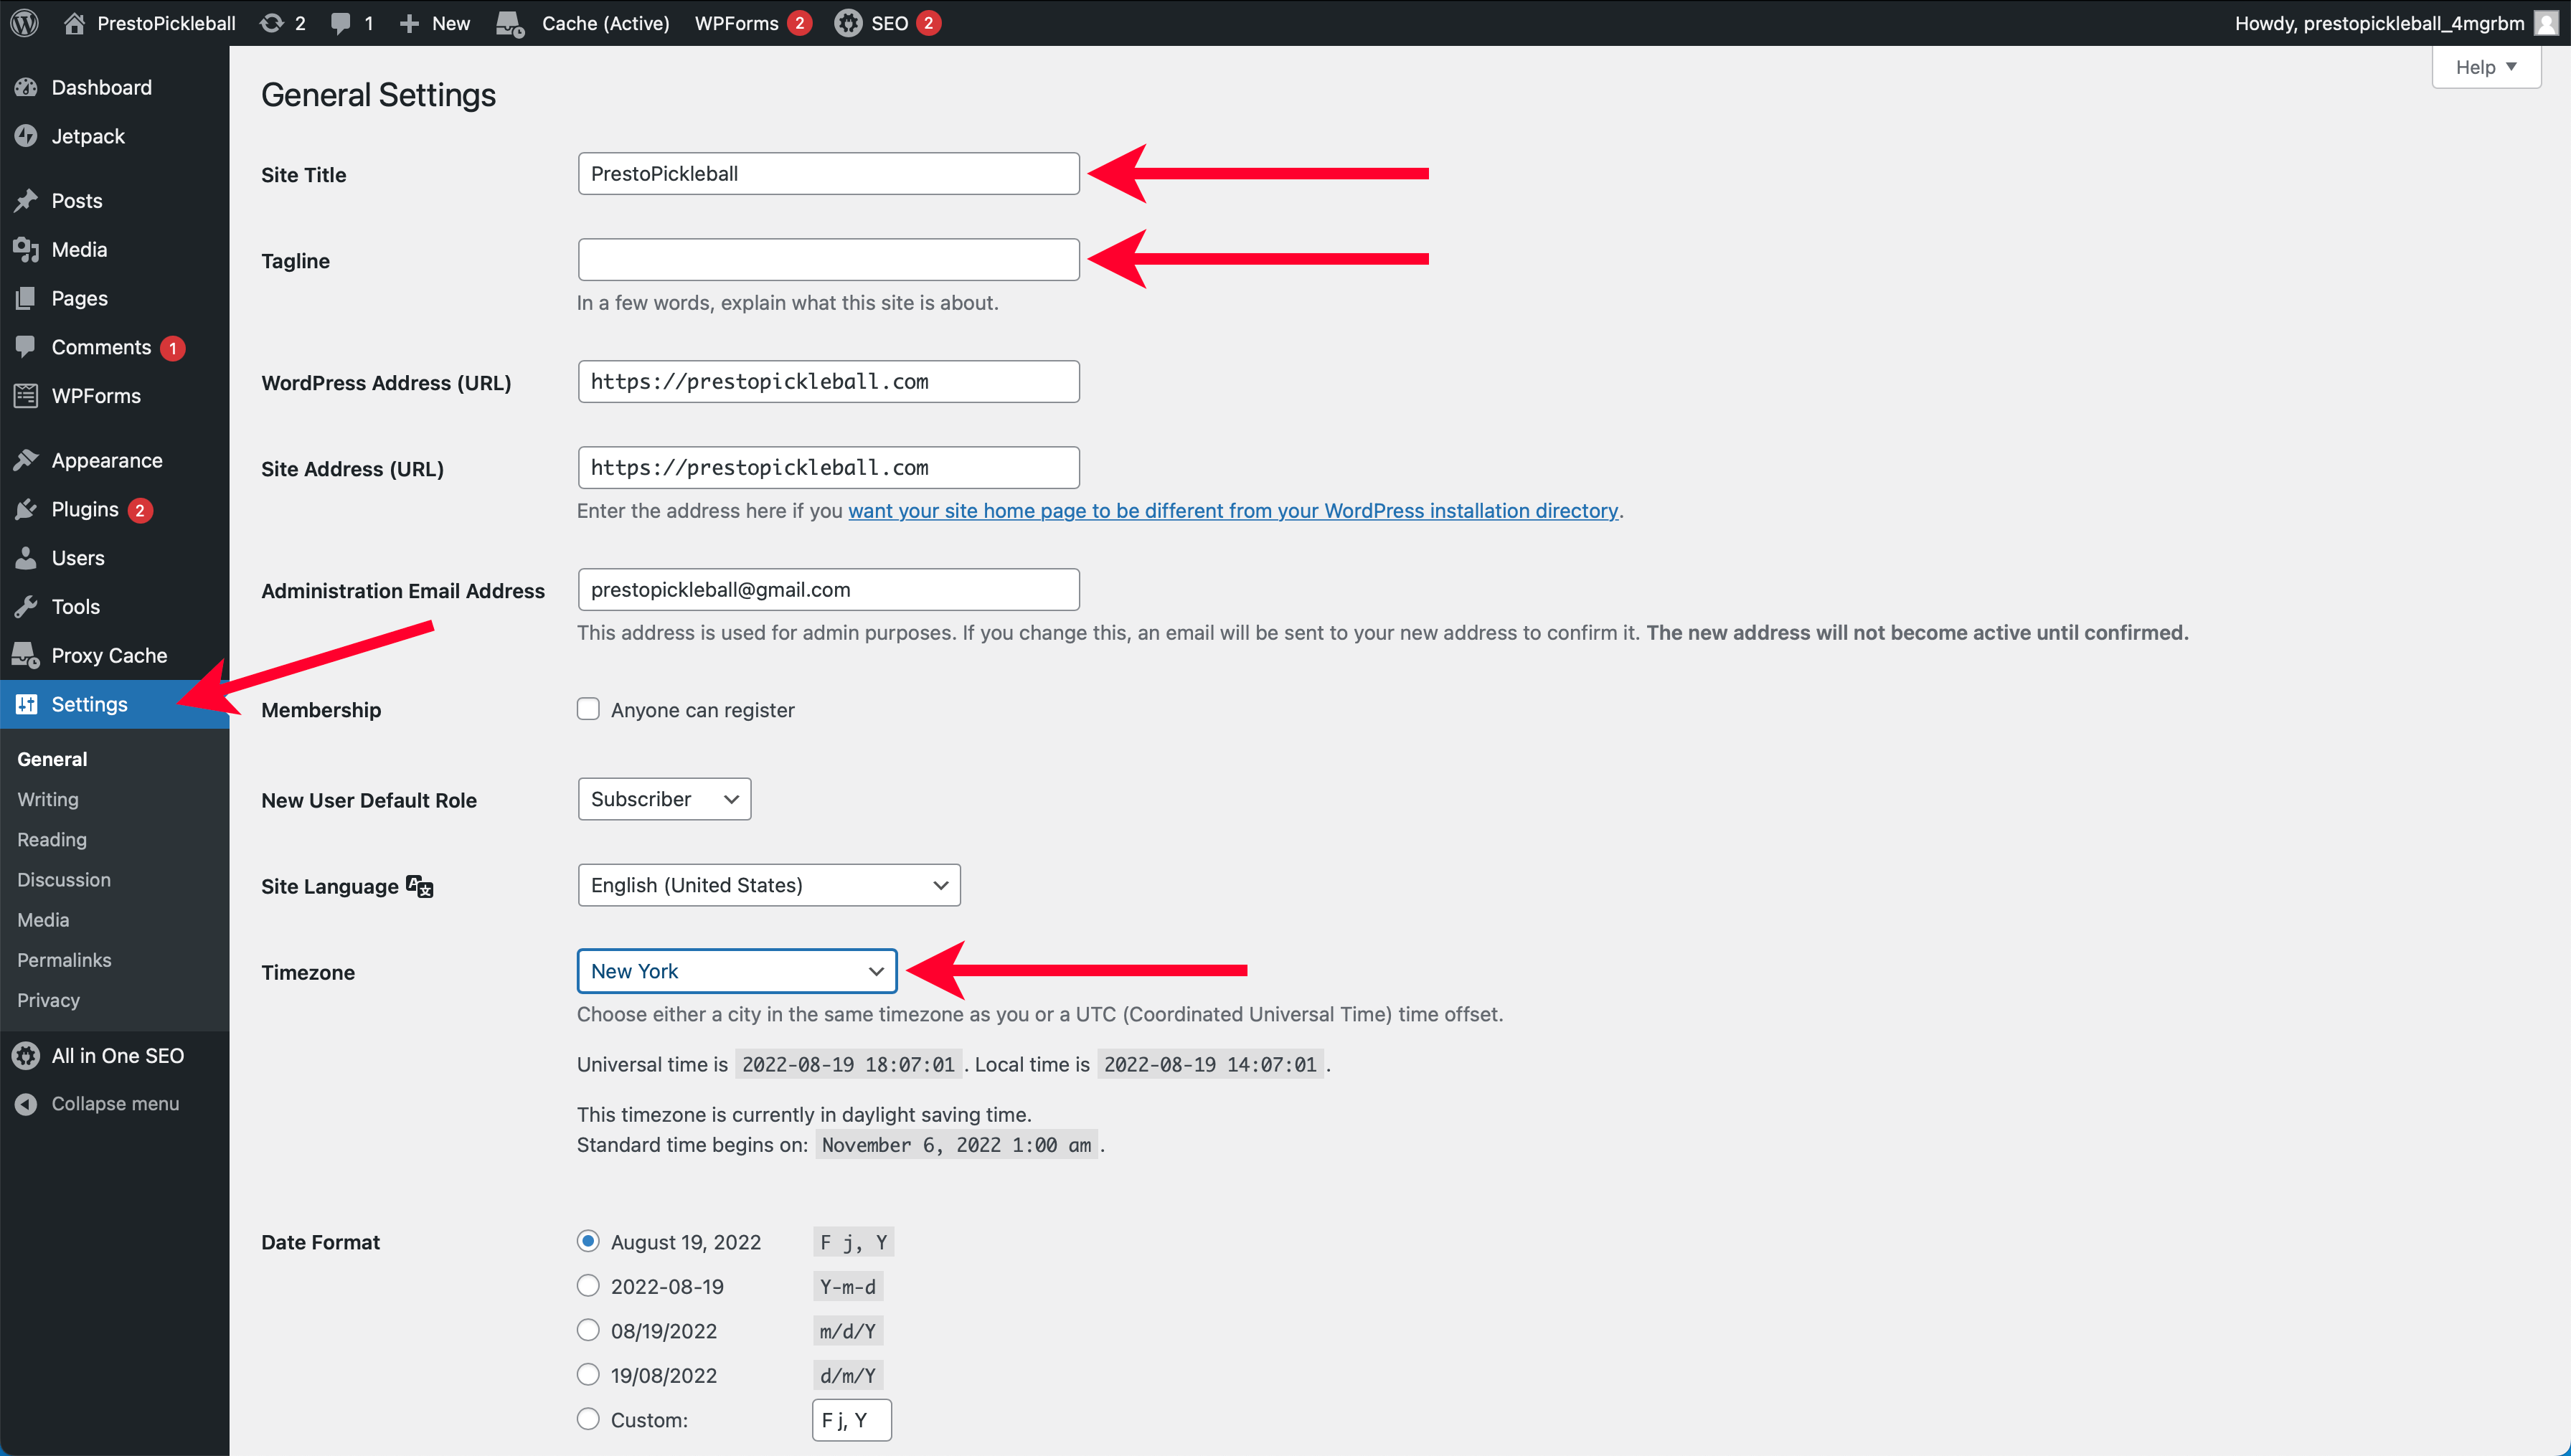
Update the “Week Starts On” dropdown to “Sunday,” then scroll to the bottom of the page and click “Save Changes.”
Update Reading Settings
Next, under the “Settings” menu, click “Reading.” Change the “For each post in a feed, include” radial to “Excerpt.” Once selected, scroll to the bottom of the page and click “Save Changes.”

Update Discussion Settings
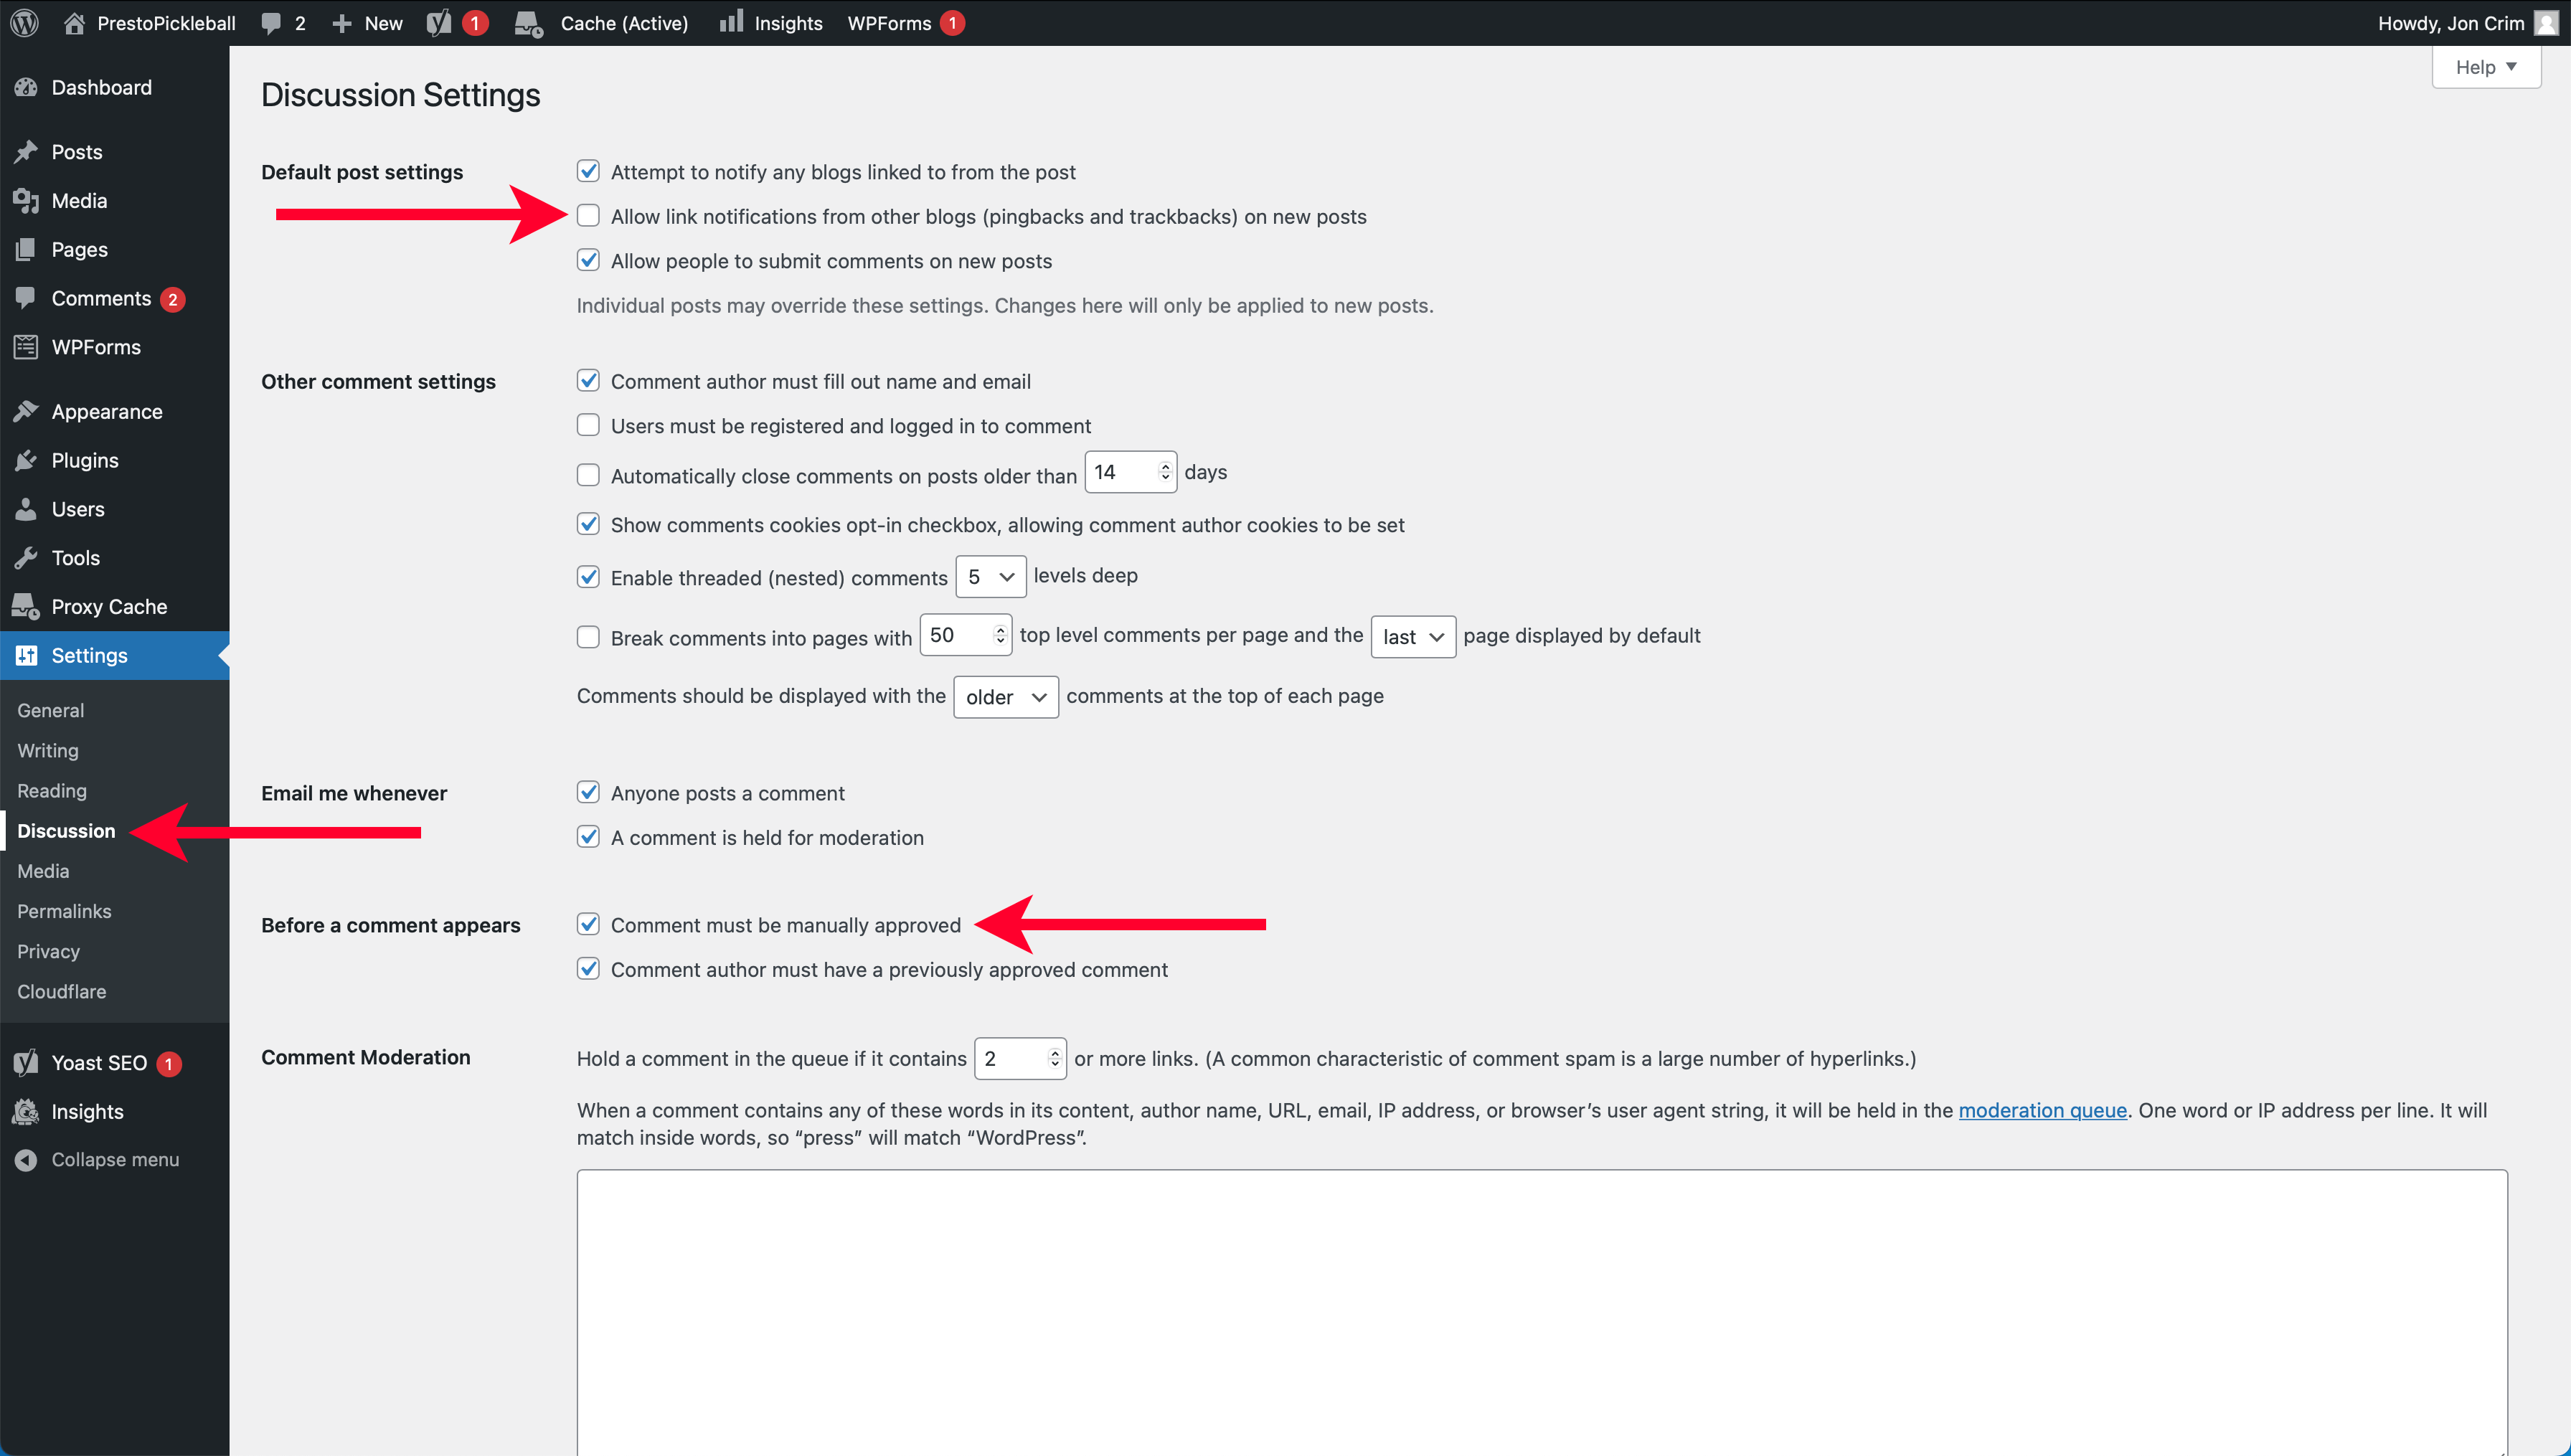
Now under the “Settings” menu, select “Discussion.”
Uncheck the box for “Allow link notifications from other blogs (pingbacks and trackbacks) on new posts” and check the box for “Comment must be manually approved.” Once finished, scroll to the bottom of the page and click “Save Changes.”
Update Media Settings
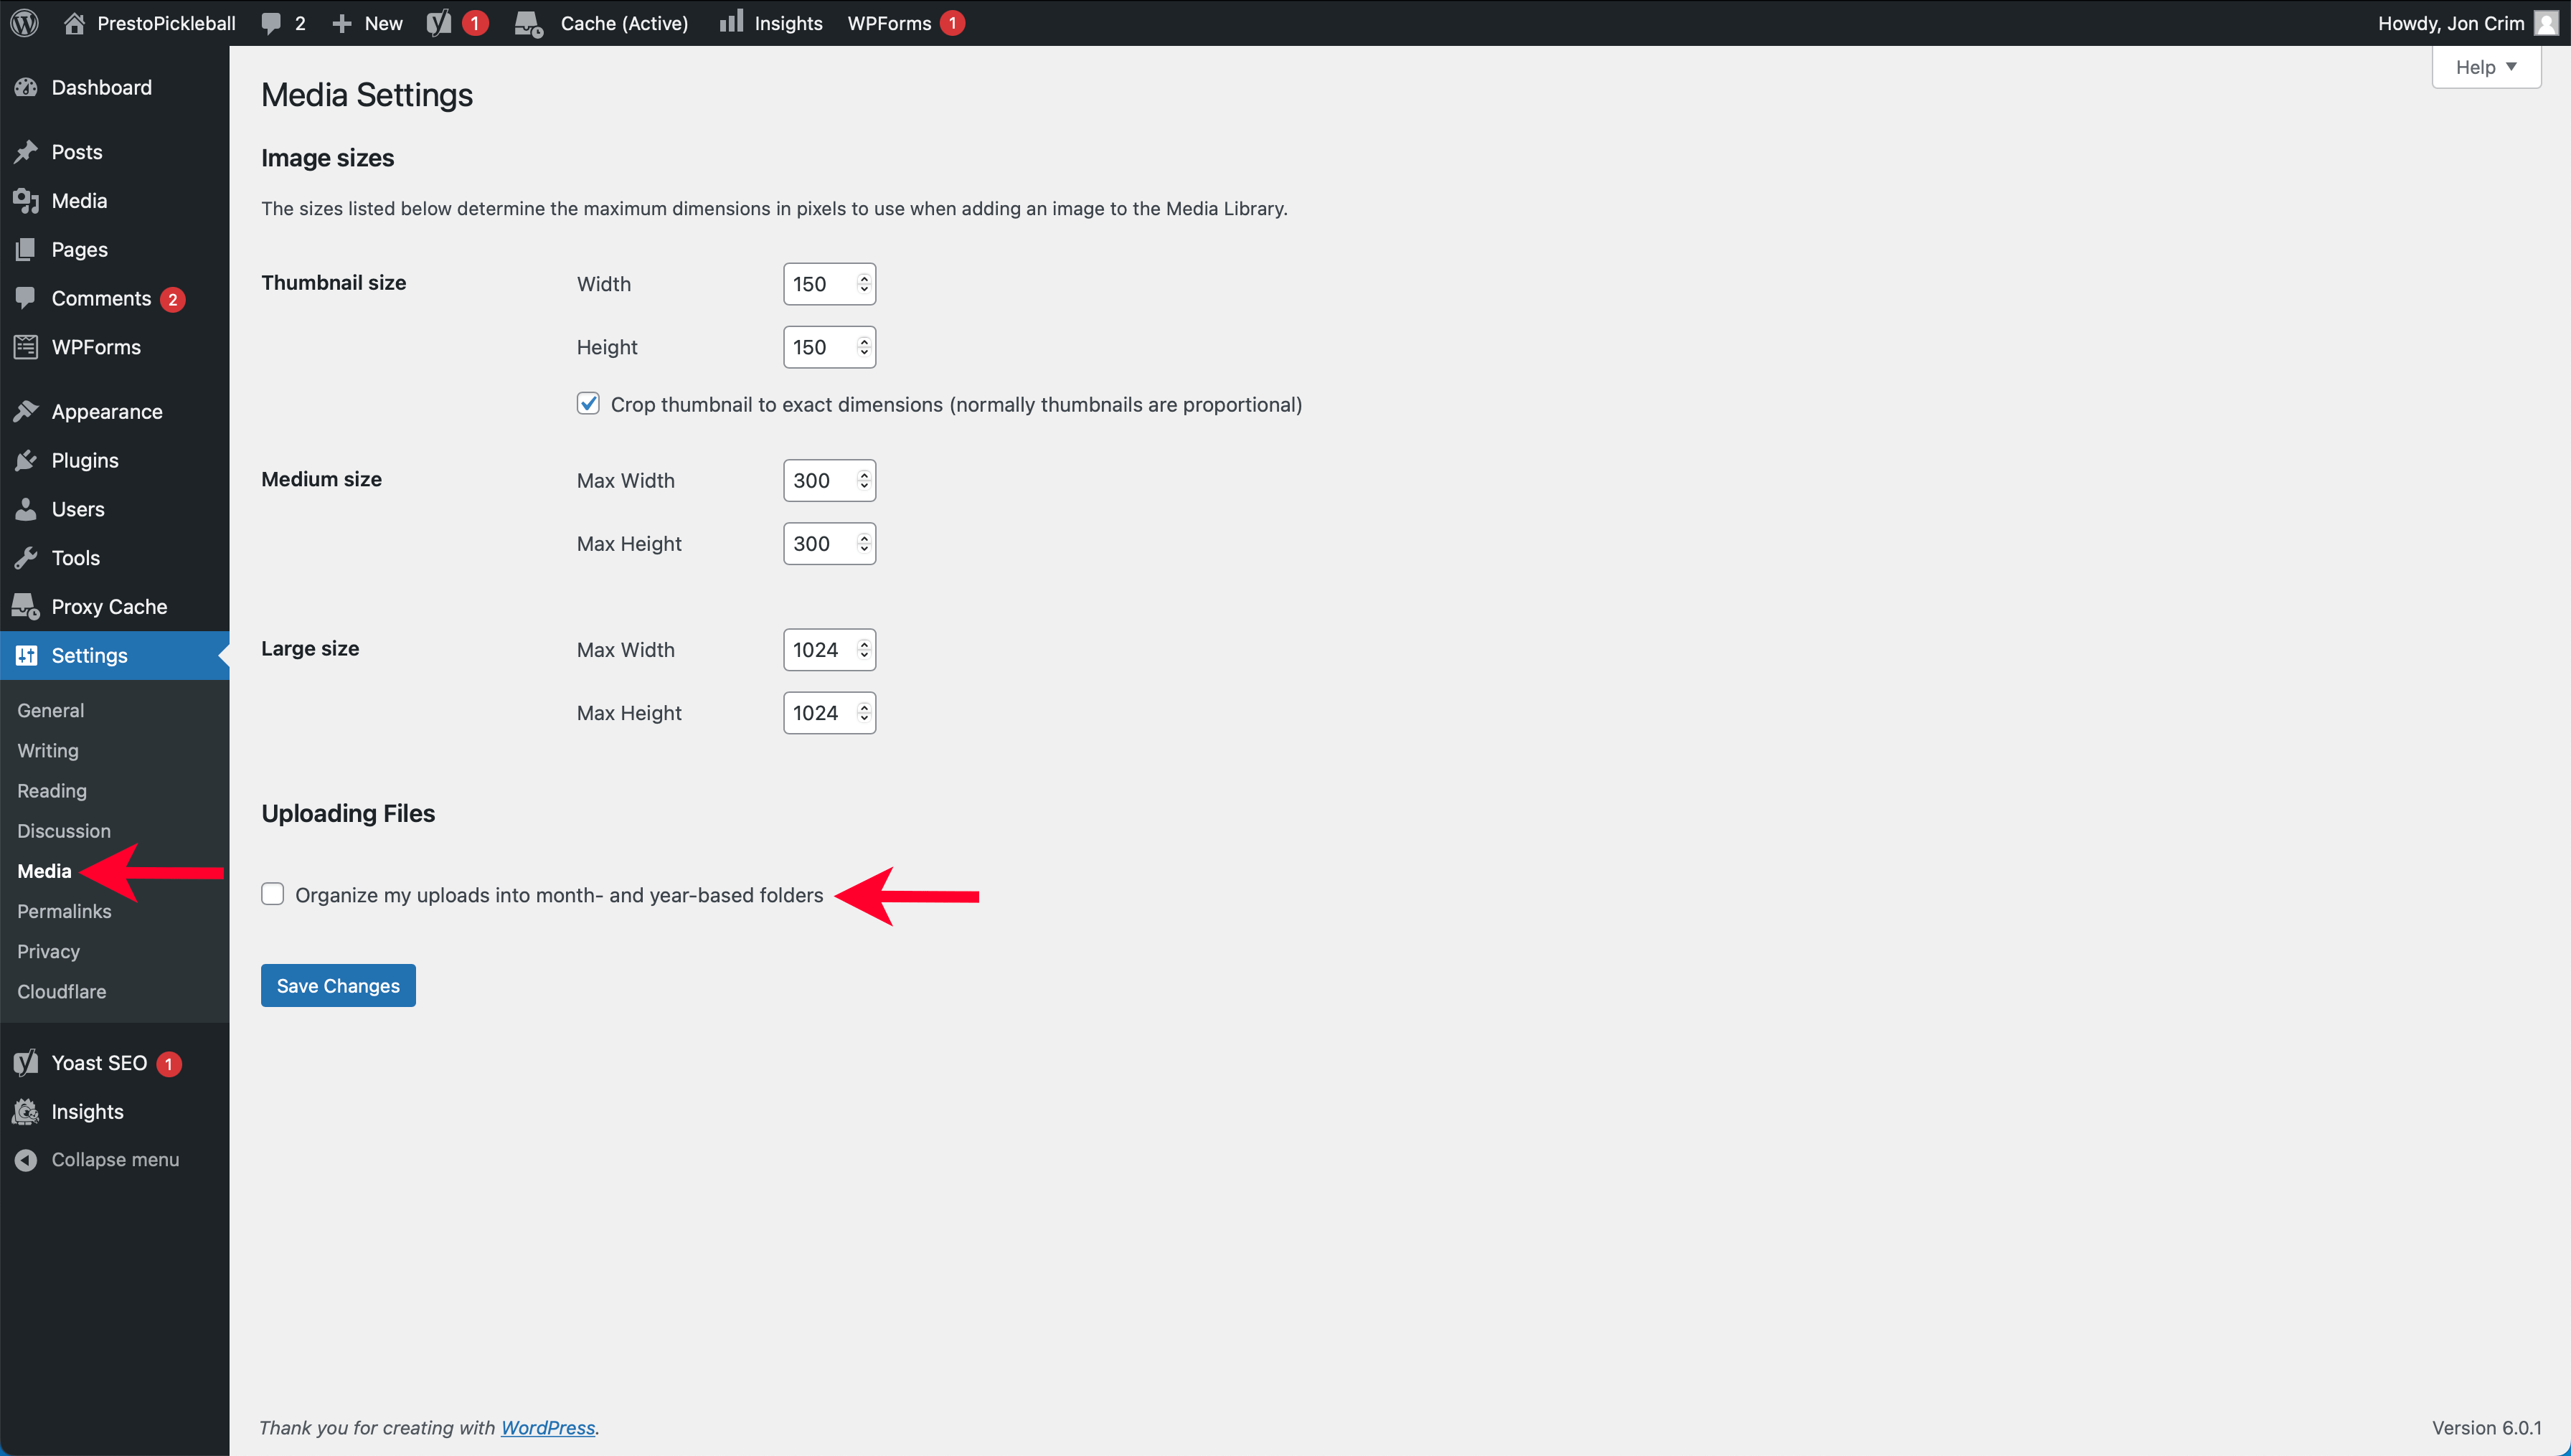
Next, under the “Settings” menu, select “Media.” Uncheck the “Organize my uploads into month- and year-based folders” box and click “Save Changes.”
Update Media Permalinks
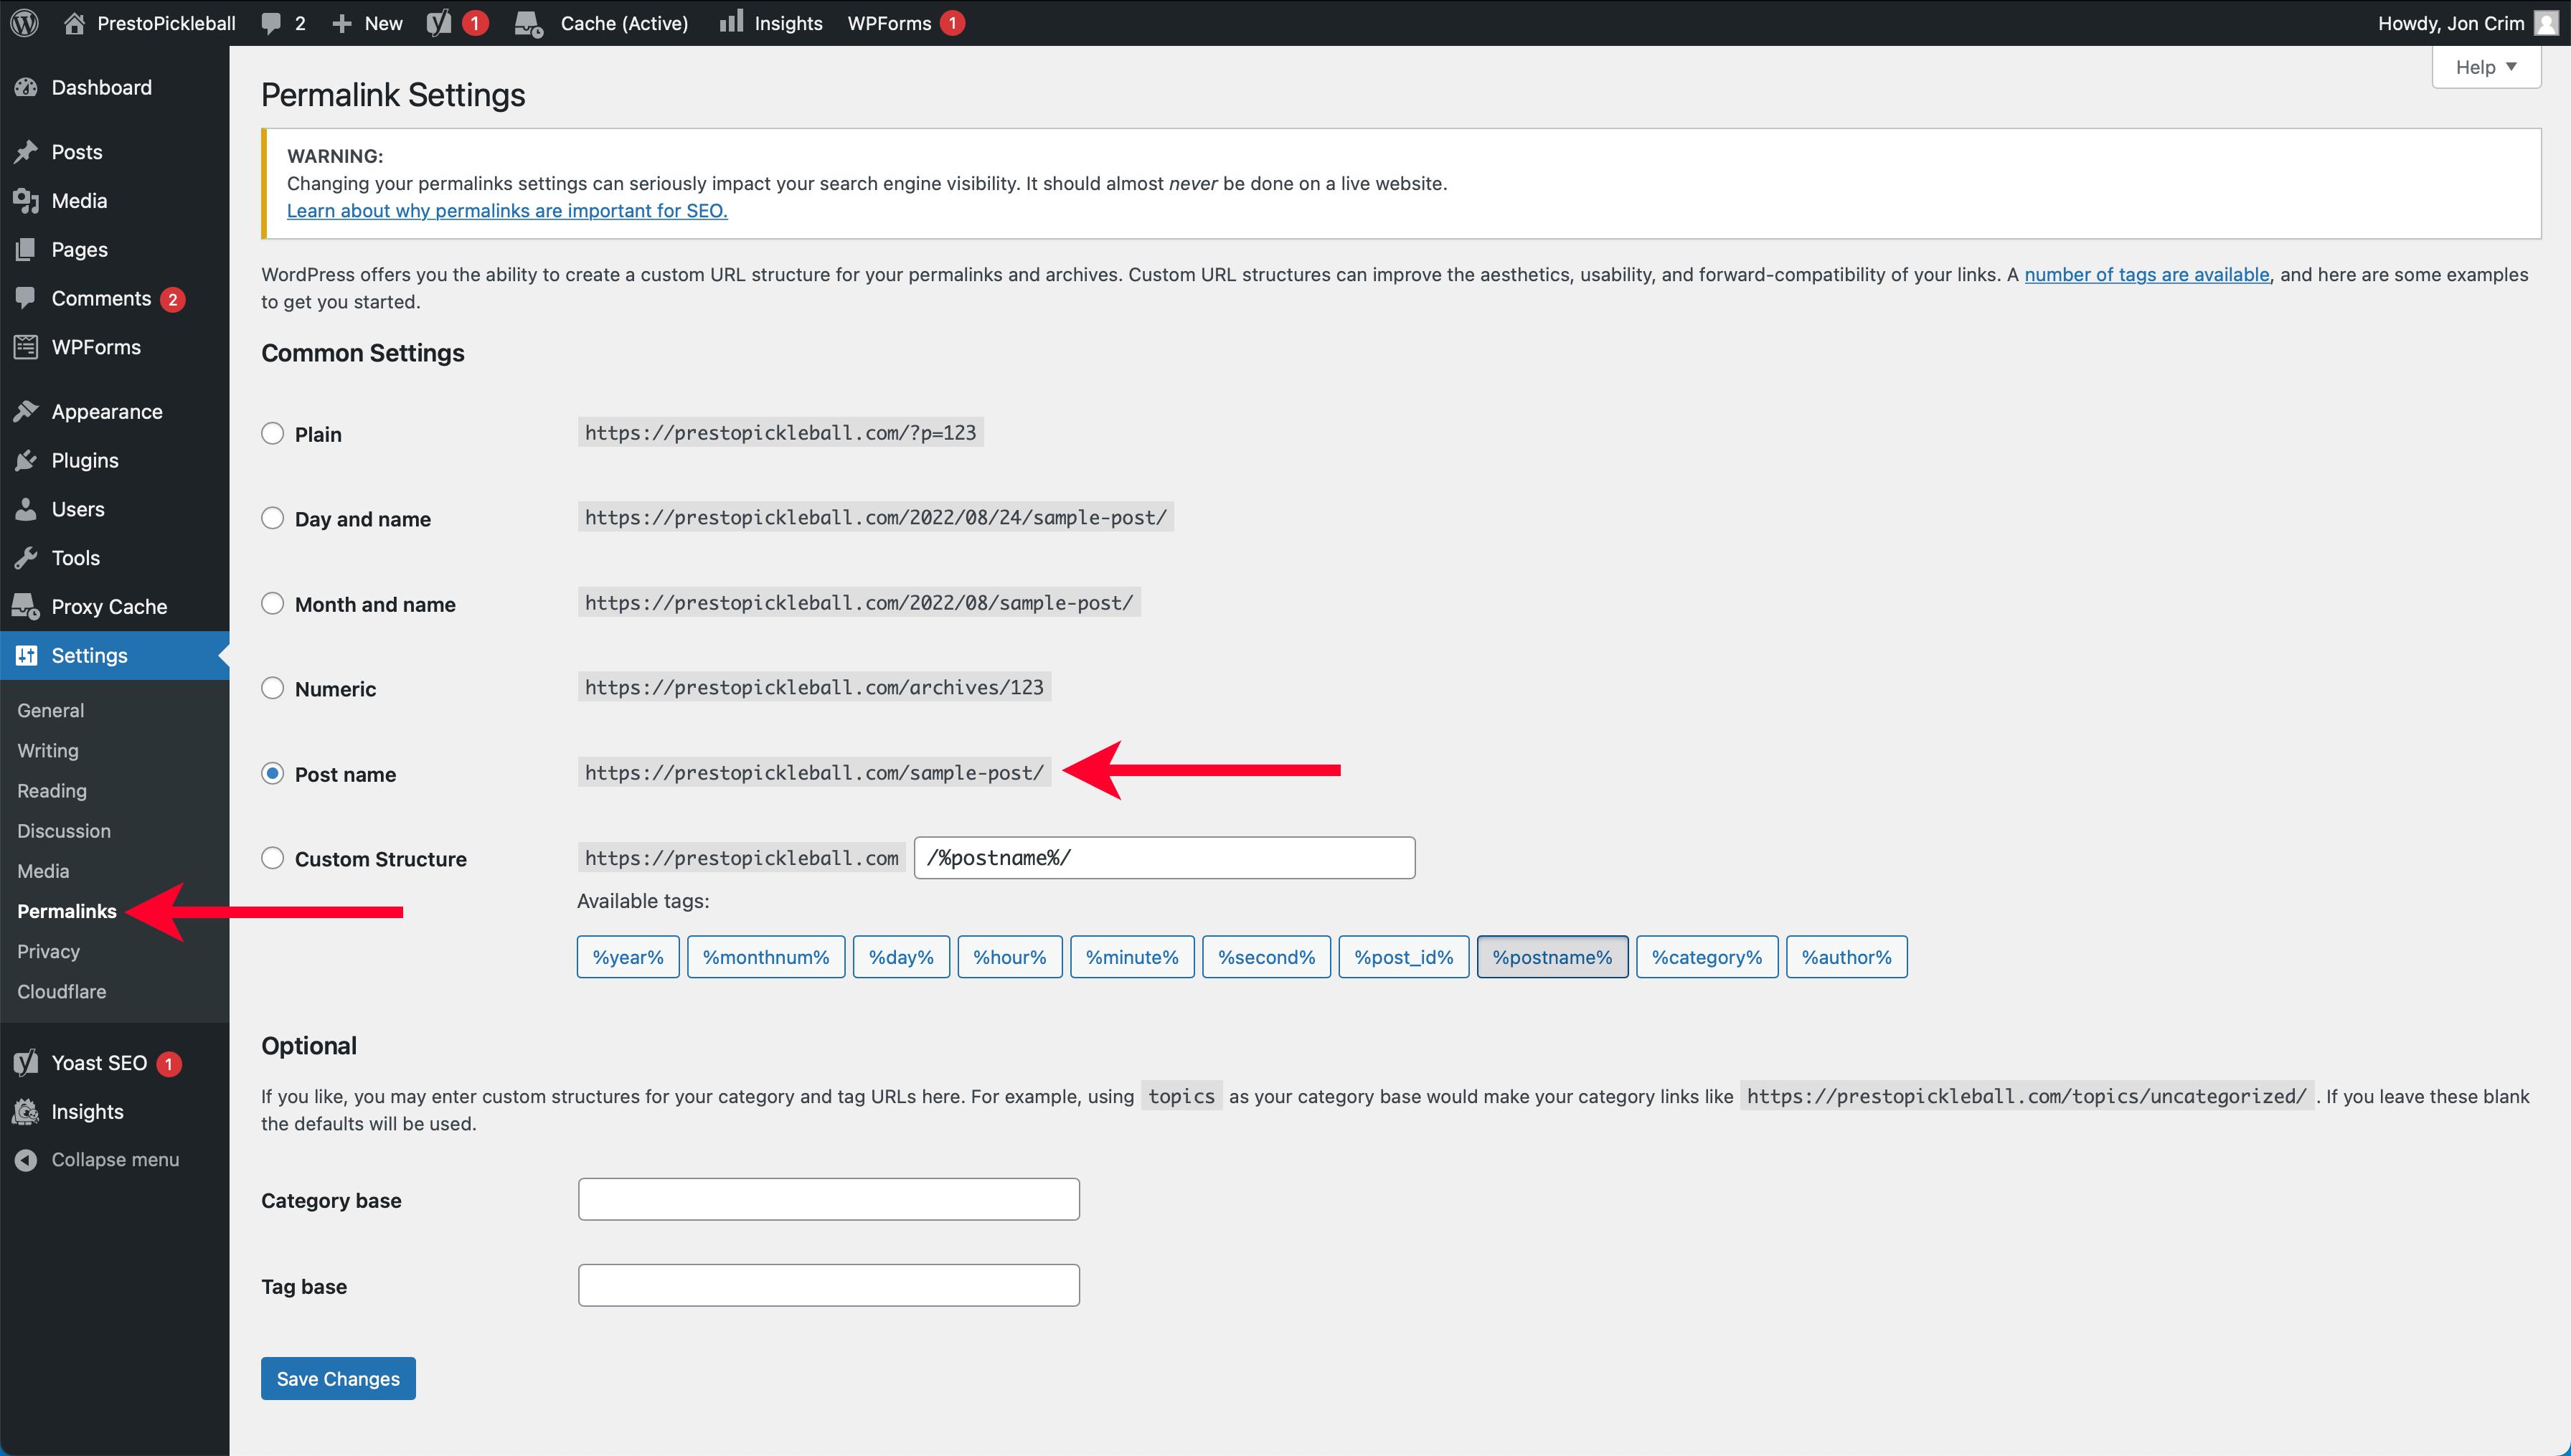
Under the “Settings” menu, click “Permalinks.” Look for the “Common Settings” section and select the radial for “Post Name,” then scroll to the bottom of the page and click “Save Changes.”
Nice work! That’s it for your WordPress settings.
Step 6: Activate a Theme
WordPress themes change the look and feel of your website and can provide you with extra functionality for efficiently designing pages.
For now, we want to install a lightweight theme called Astra, which is free, highly rated, and an excellent starting point. Early on, when building your online business, we don’t want to get bogged down with too much designing, which is unnecessary to run a successful online business.
It’s also worth noting that you can change your theme in the future. My goal is to set you up with a reliable, fast, and no-fuss theme that doesn’t bog you down with unnecessary details and you can trust to begin building your business.
Installing Astra
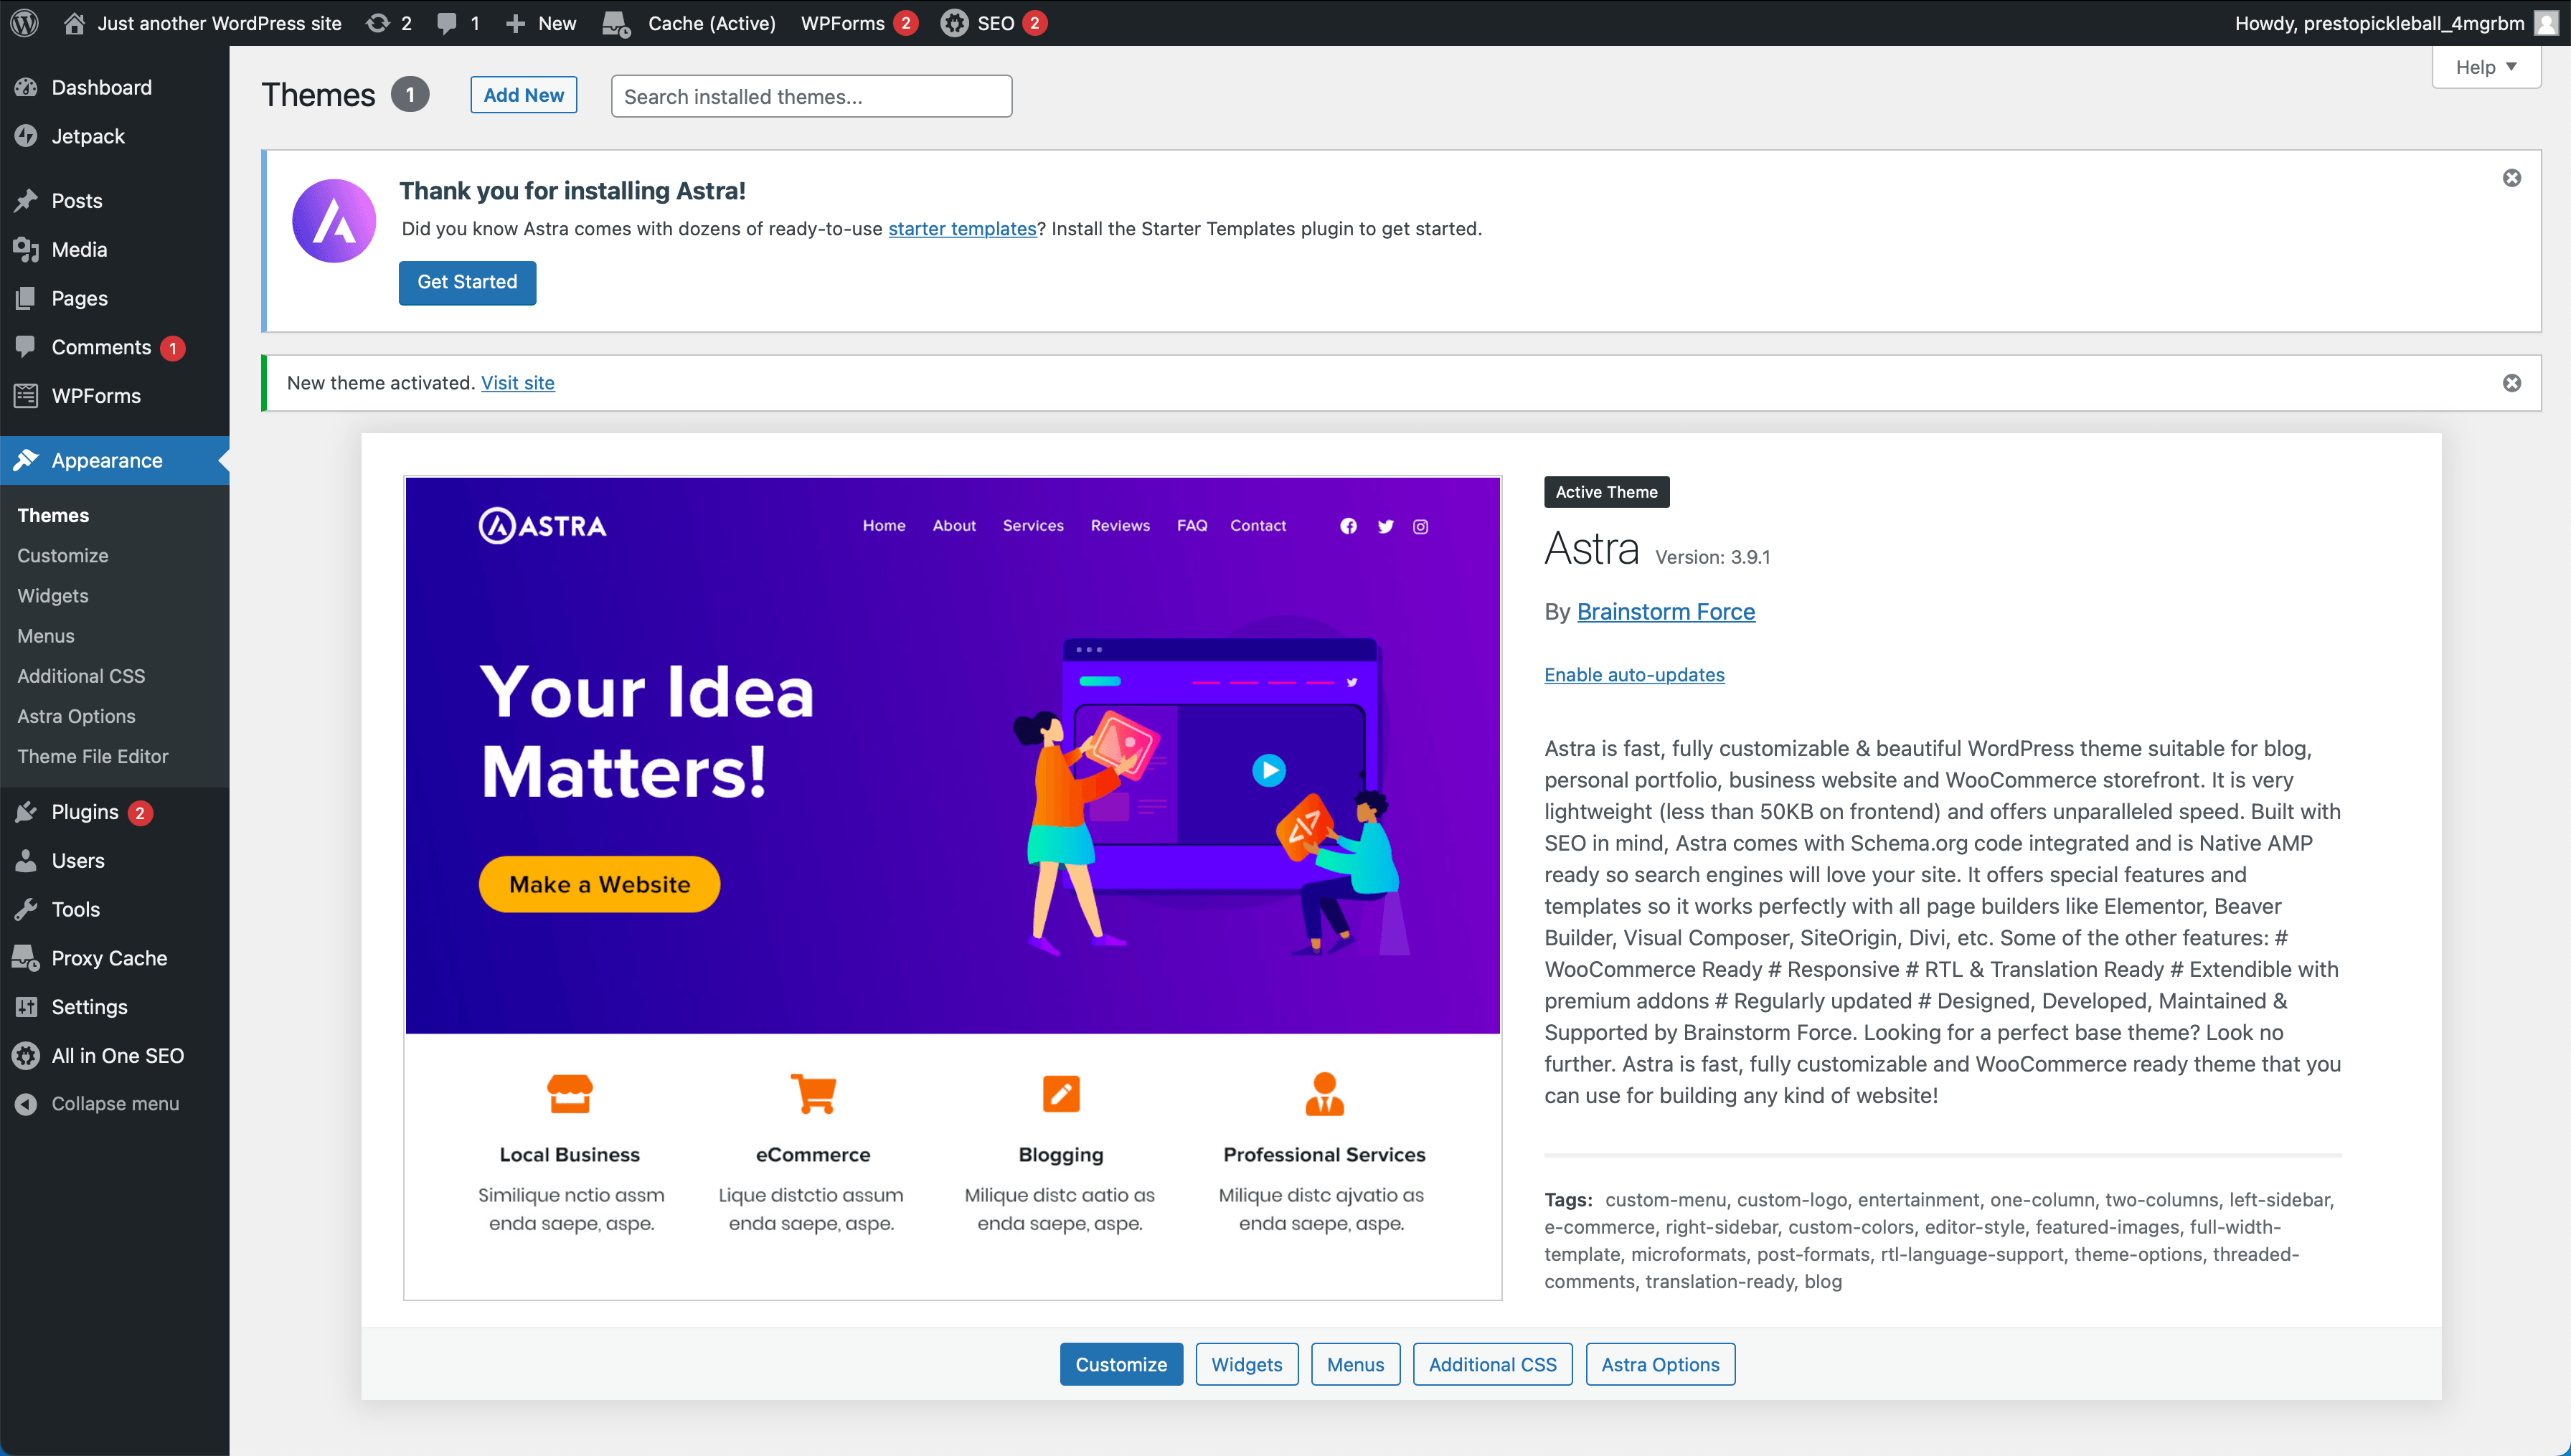
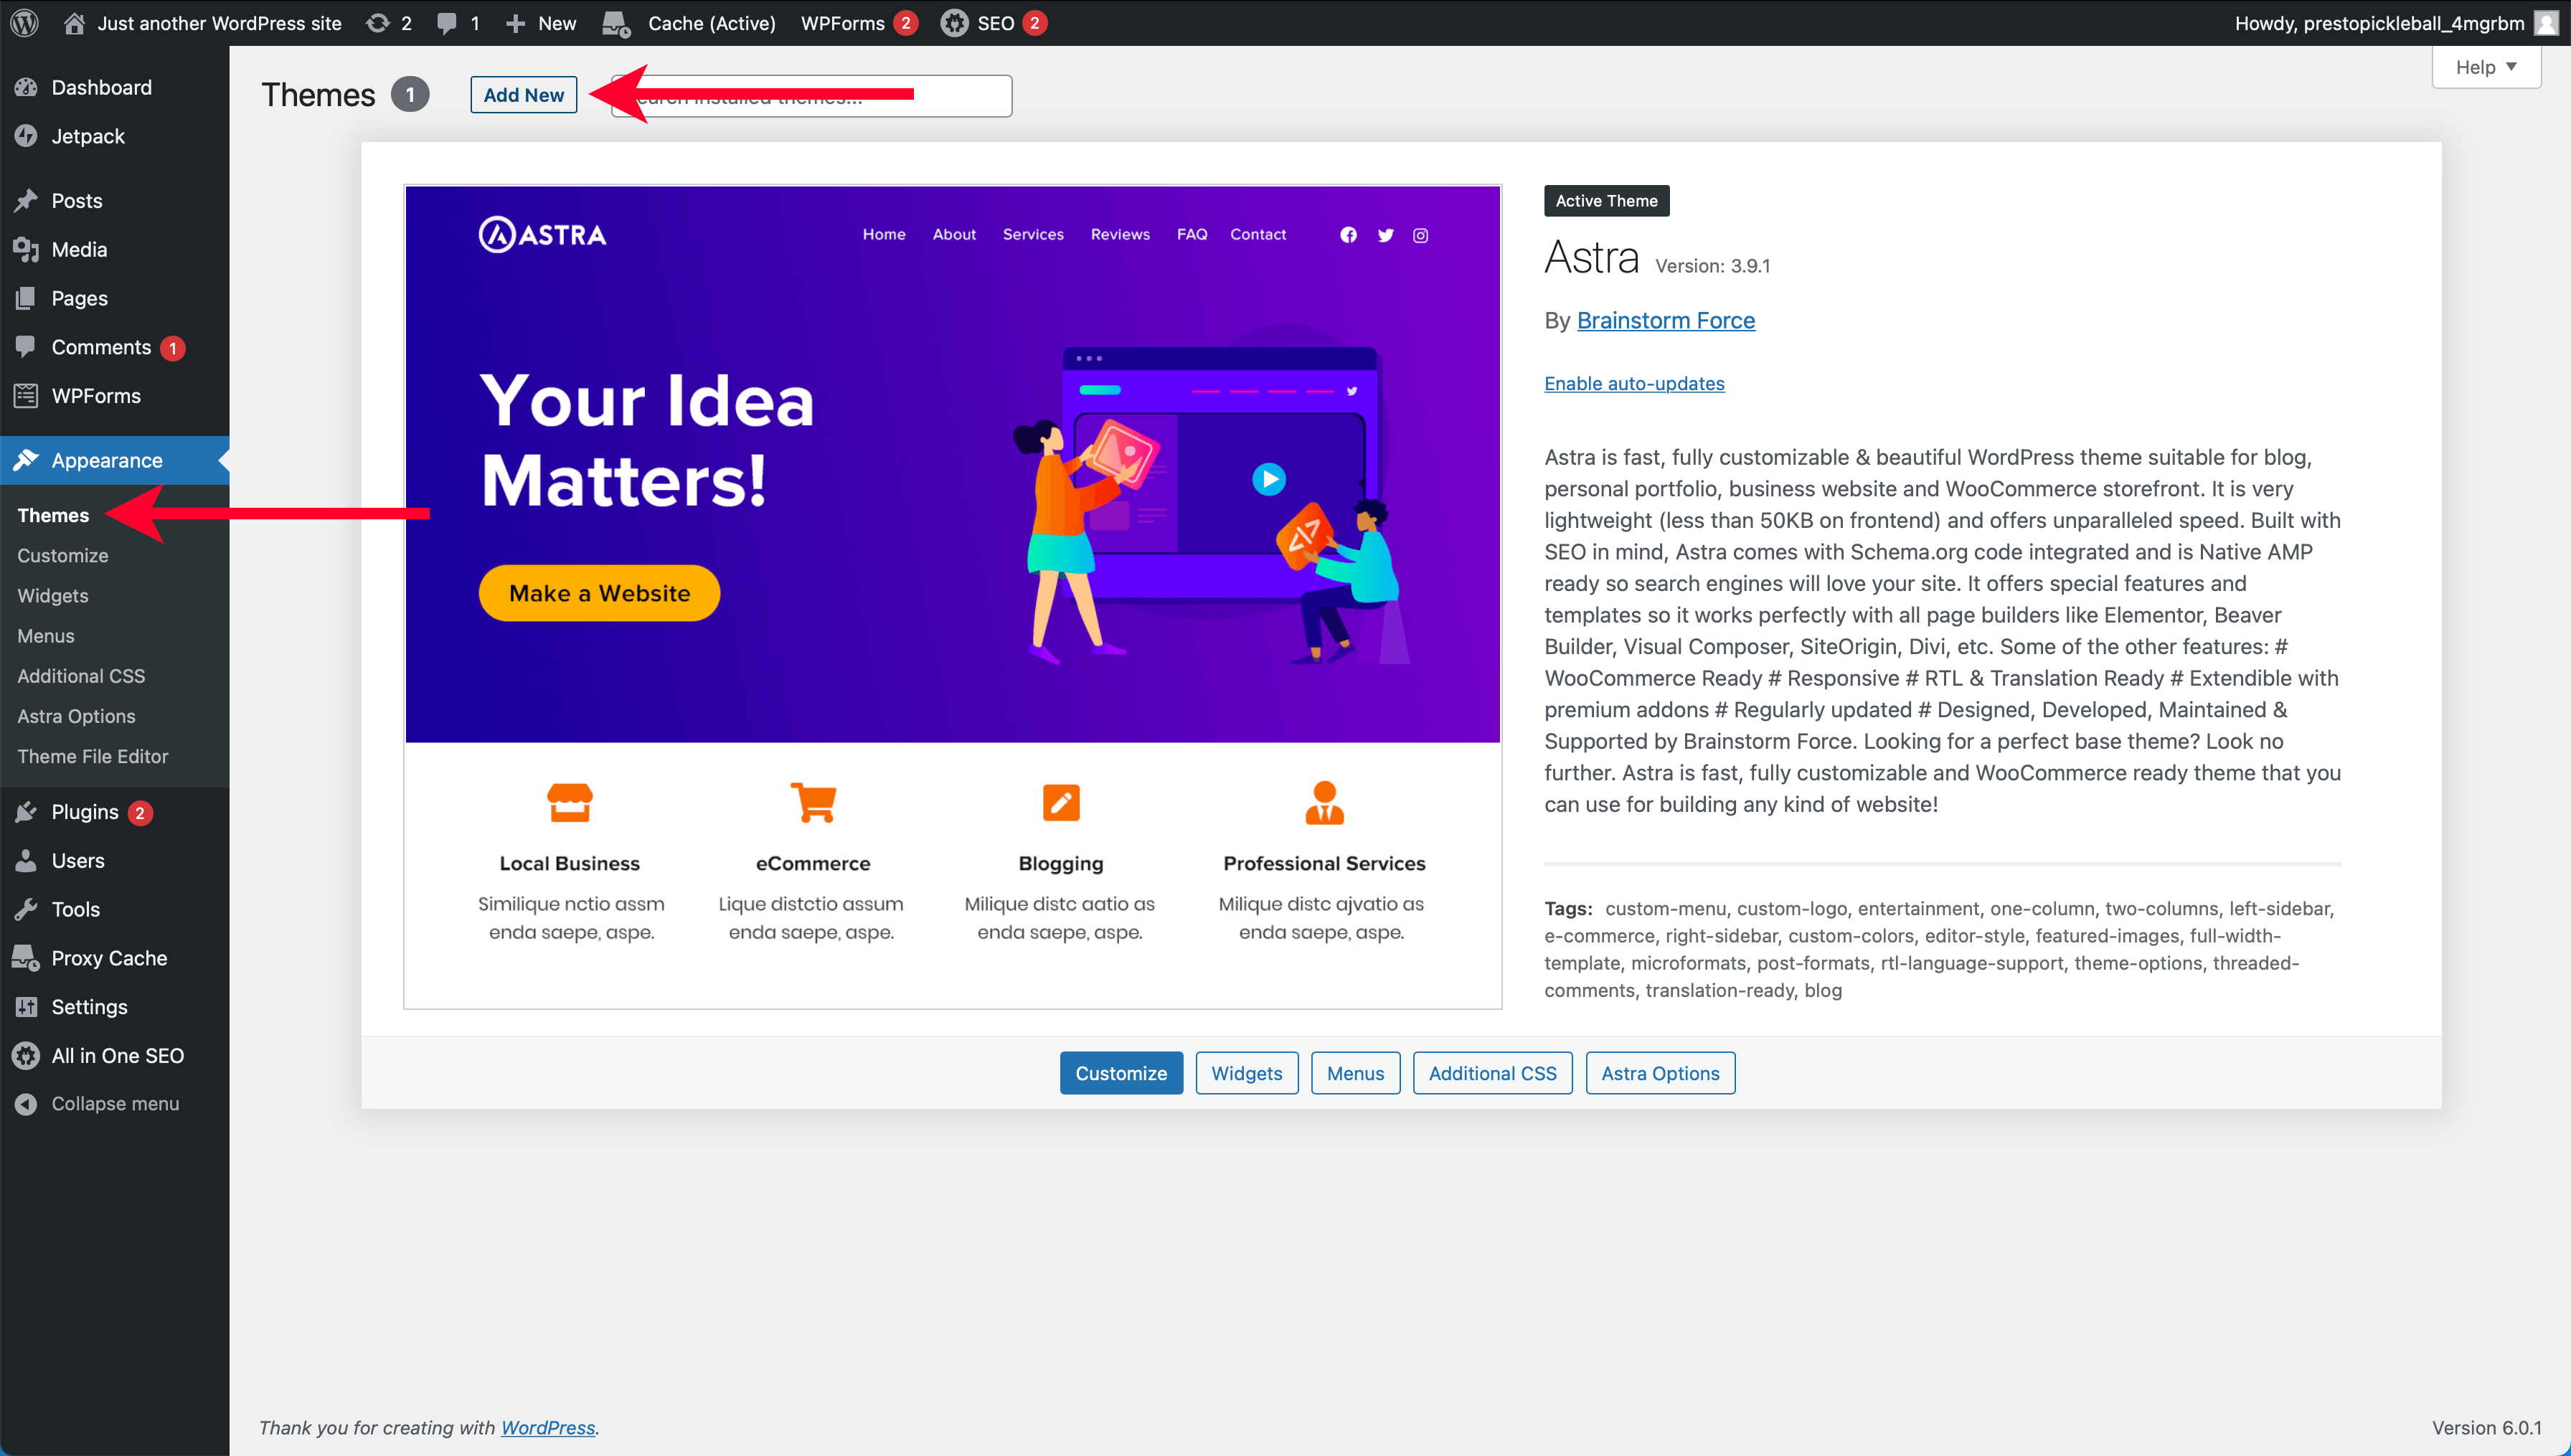
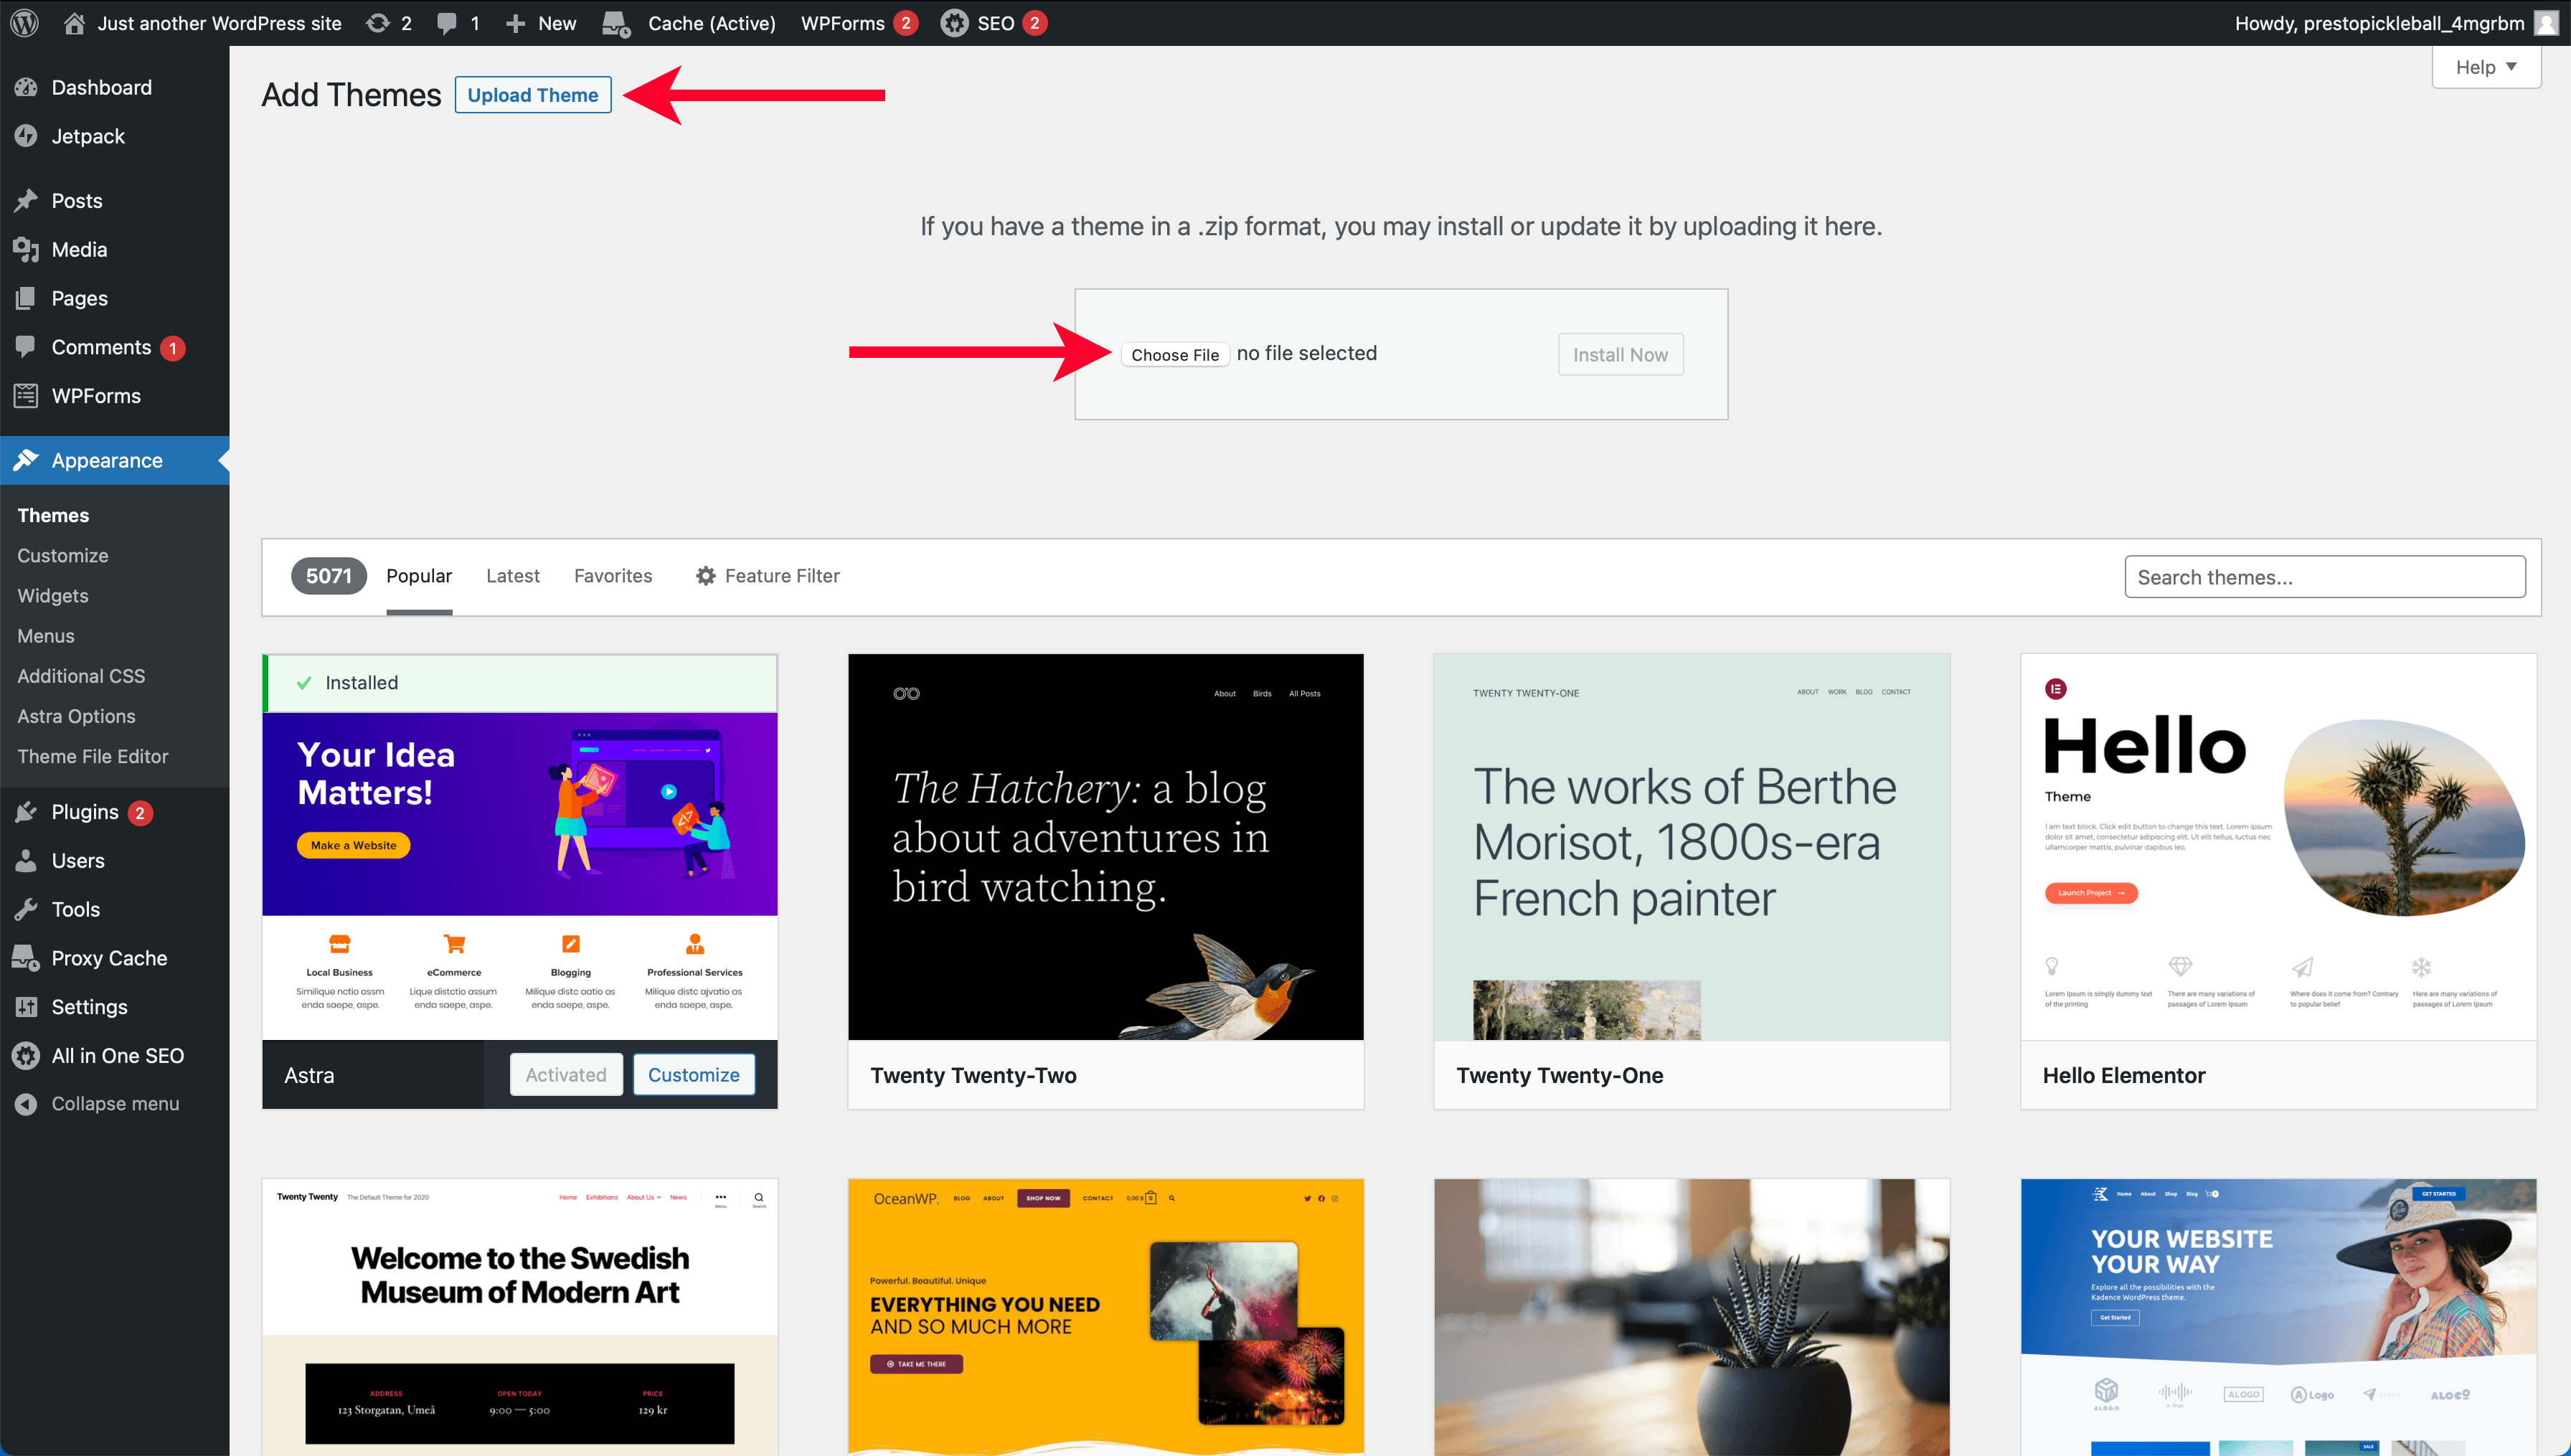
To install Astra, navigate to the “Appearance” menu, then click “Themes.” From the “Themes” page, click on “Add New Theme.”
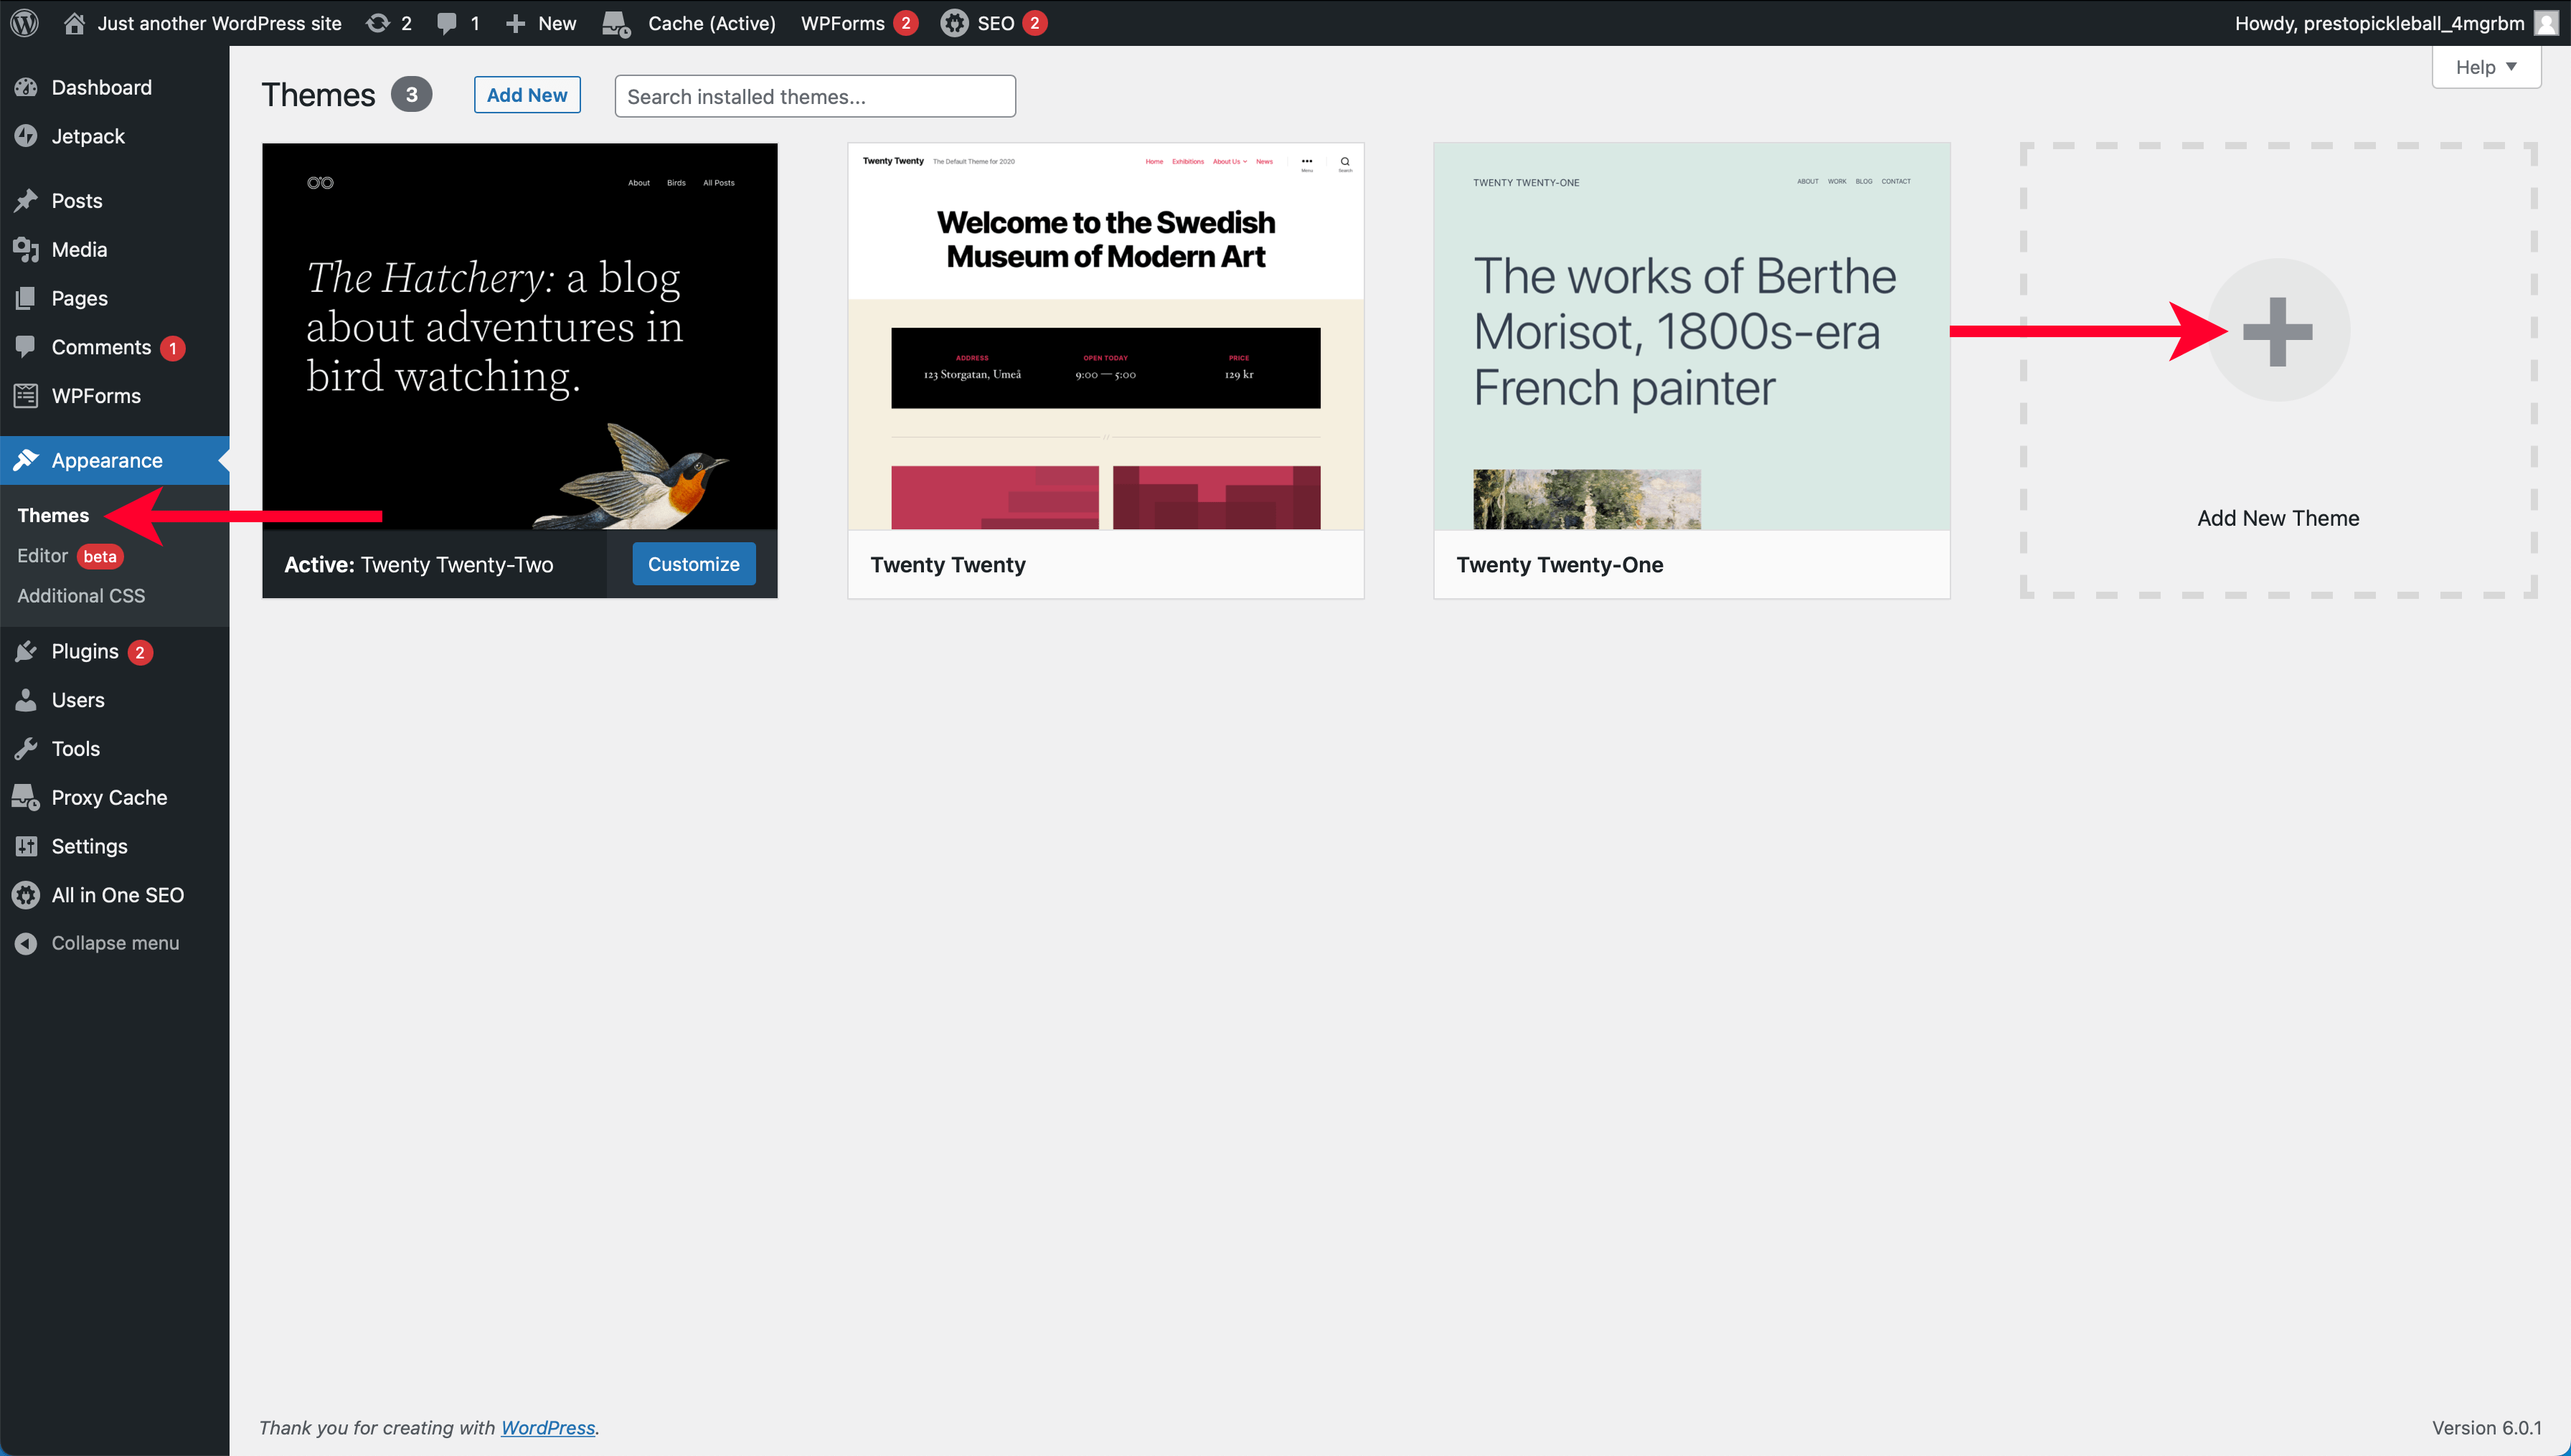
From the “Add Themes” page, you can enter the search term “Astra.” Next, hover over the “Astra” theme and click the “Install” button.

It will take a few moments for the new theme to install. Once installed, a confirmation message will display over the theme’s tile. Now click the “Activate” button.

WordPress will redirect you to the “Themes” page with a message confirming that “Astra” is now active.
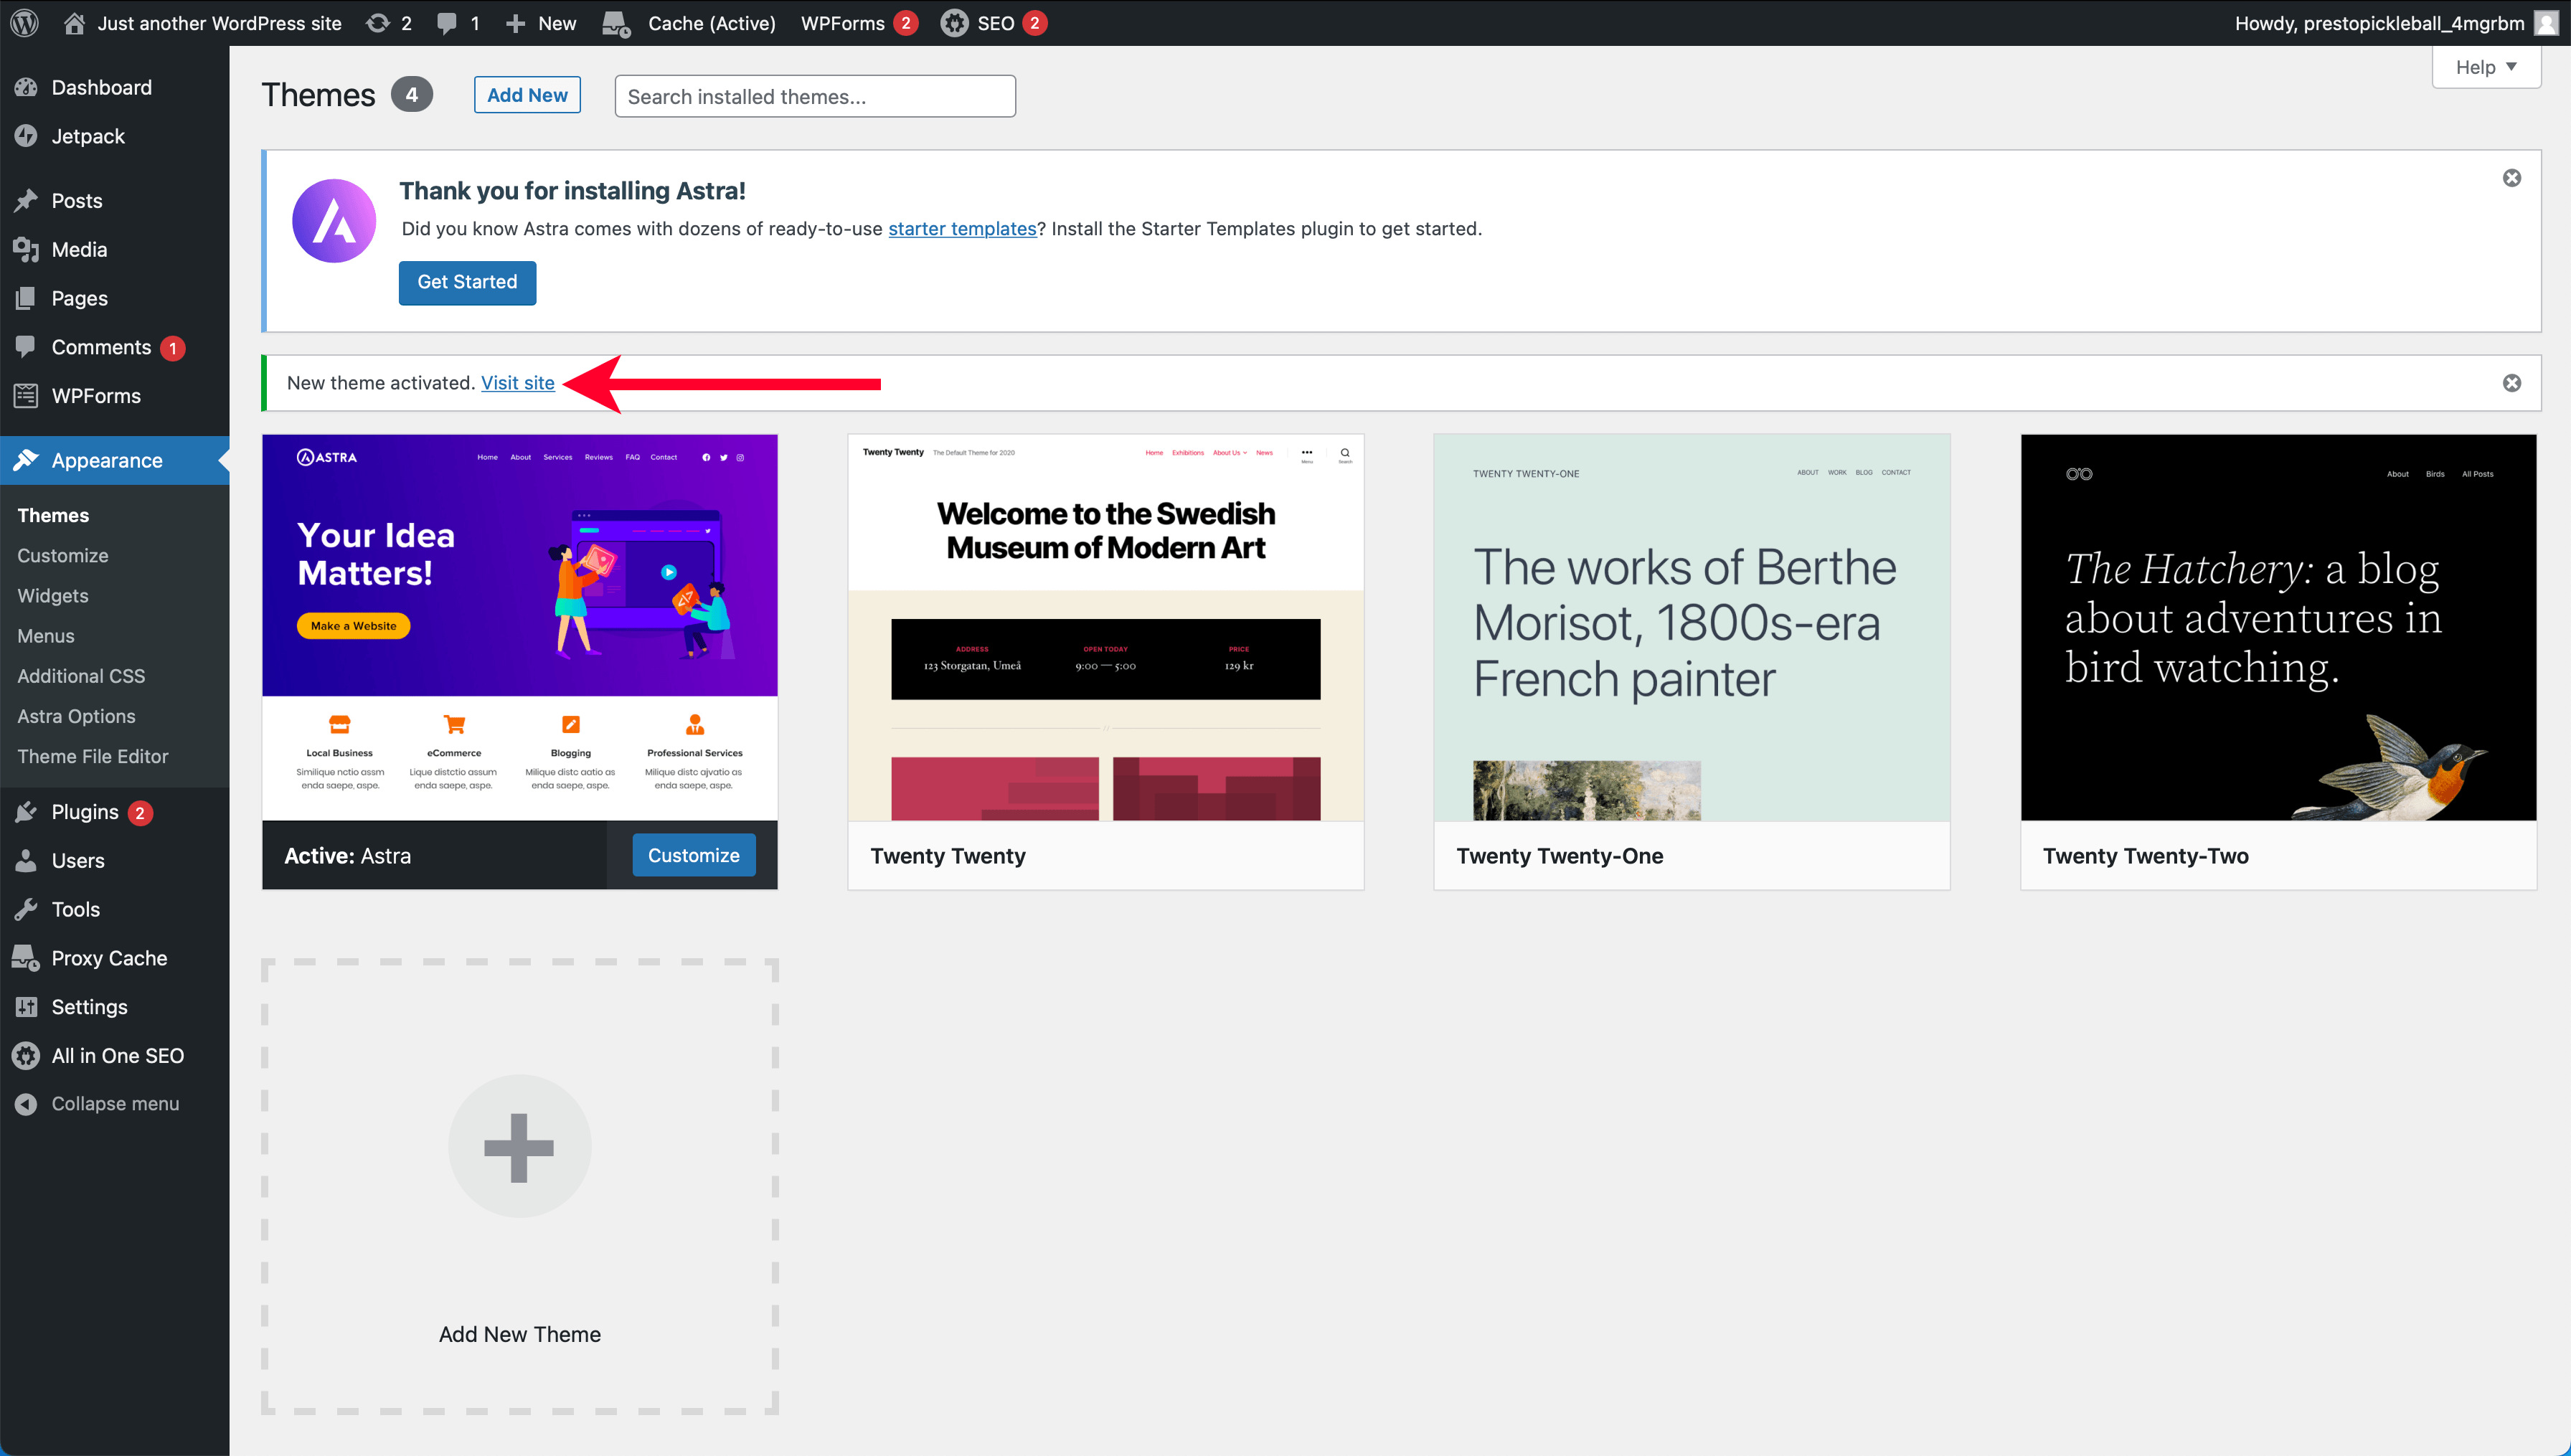
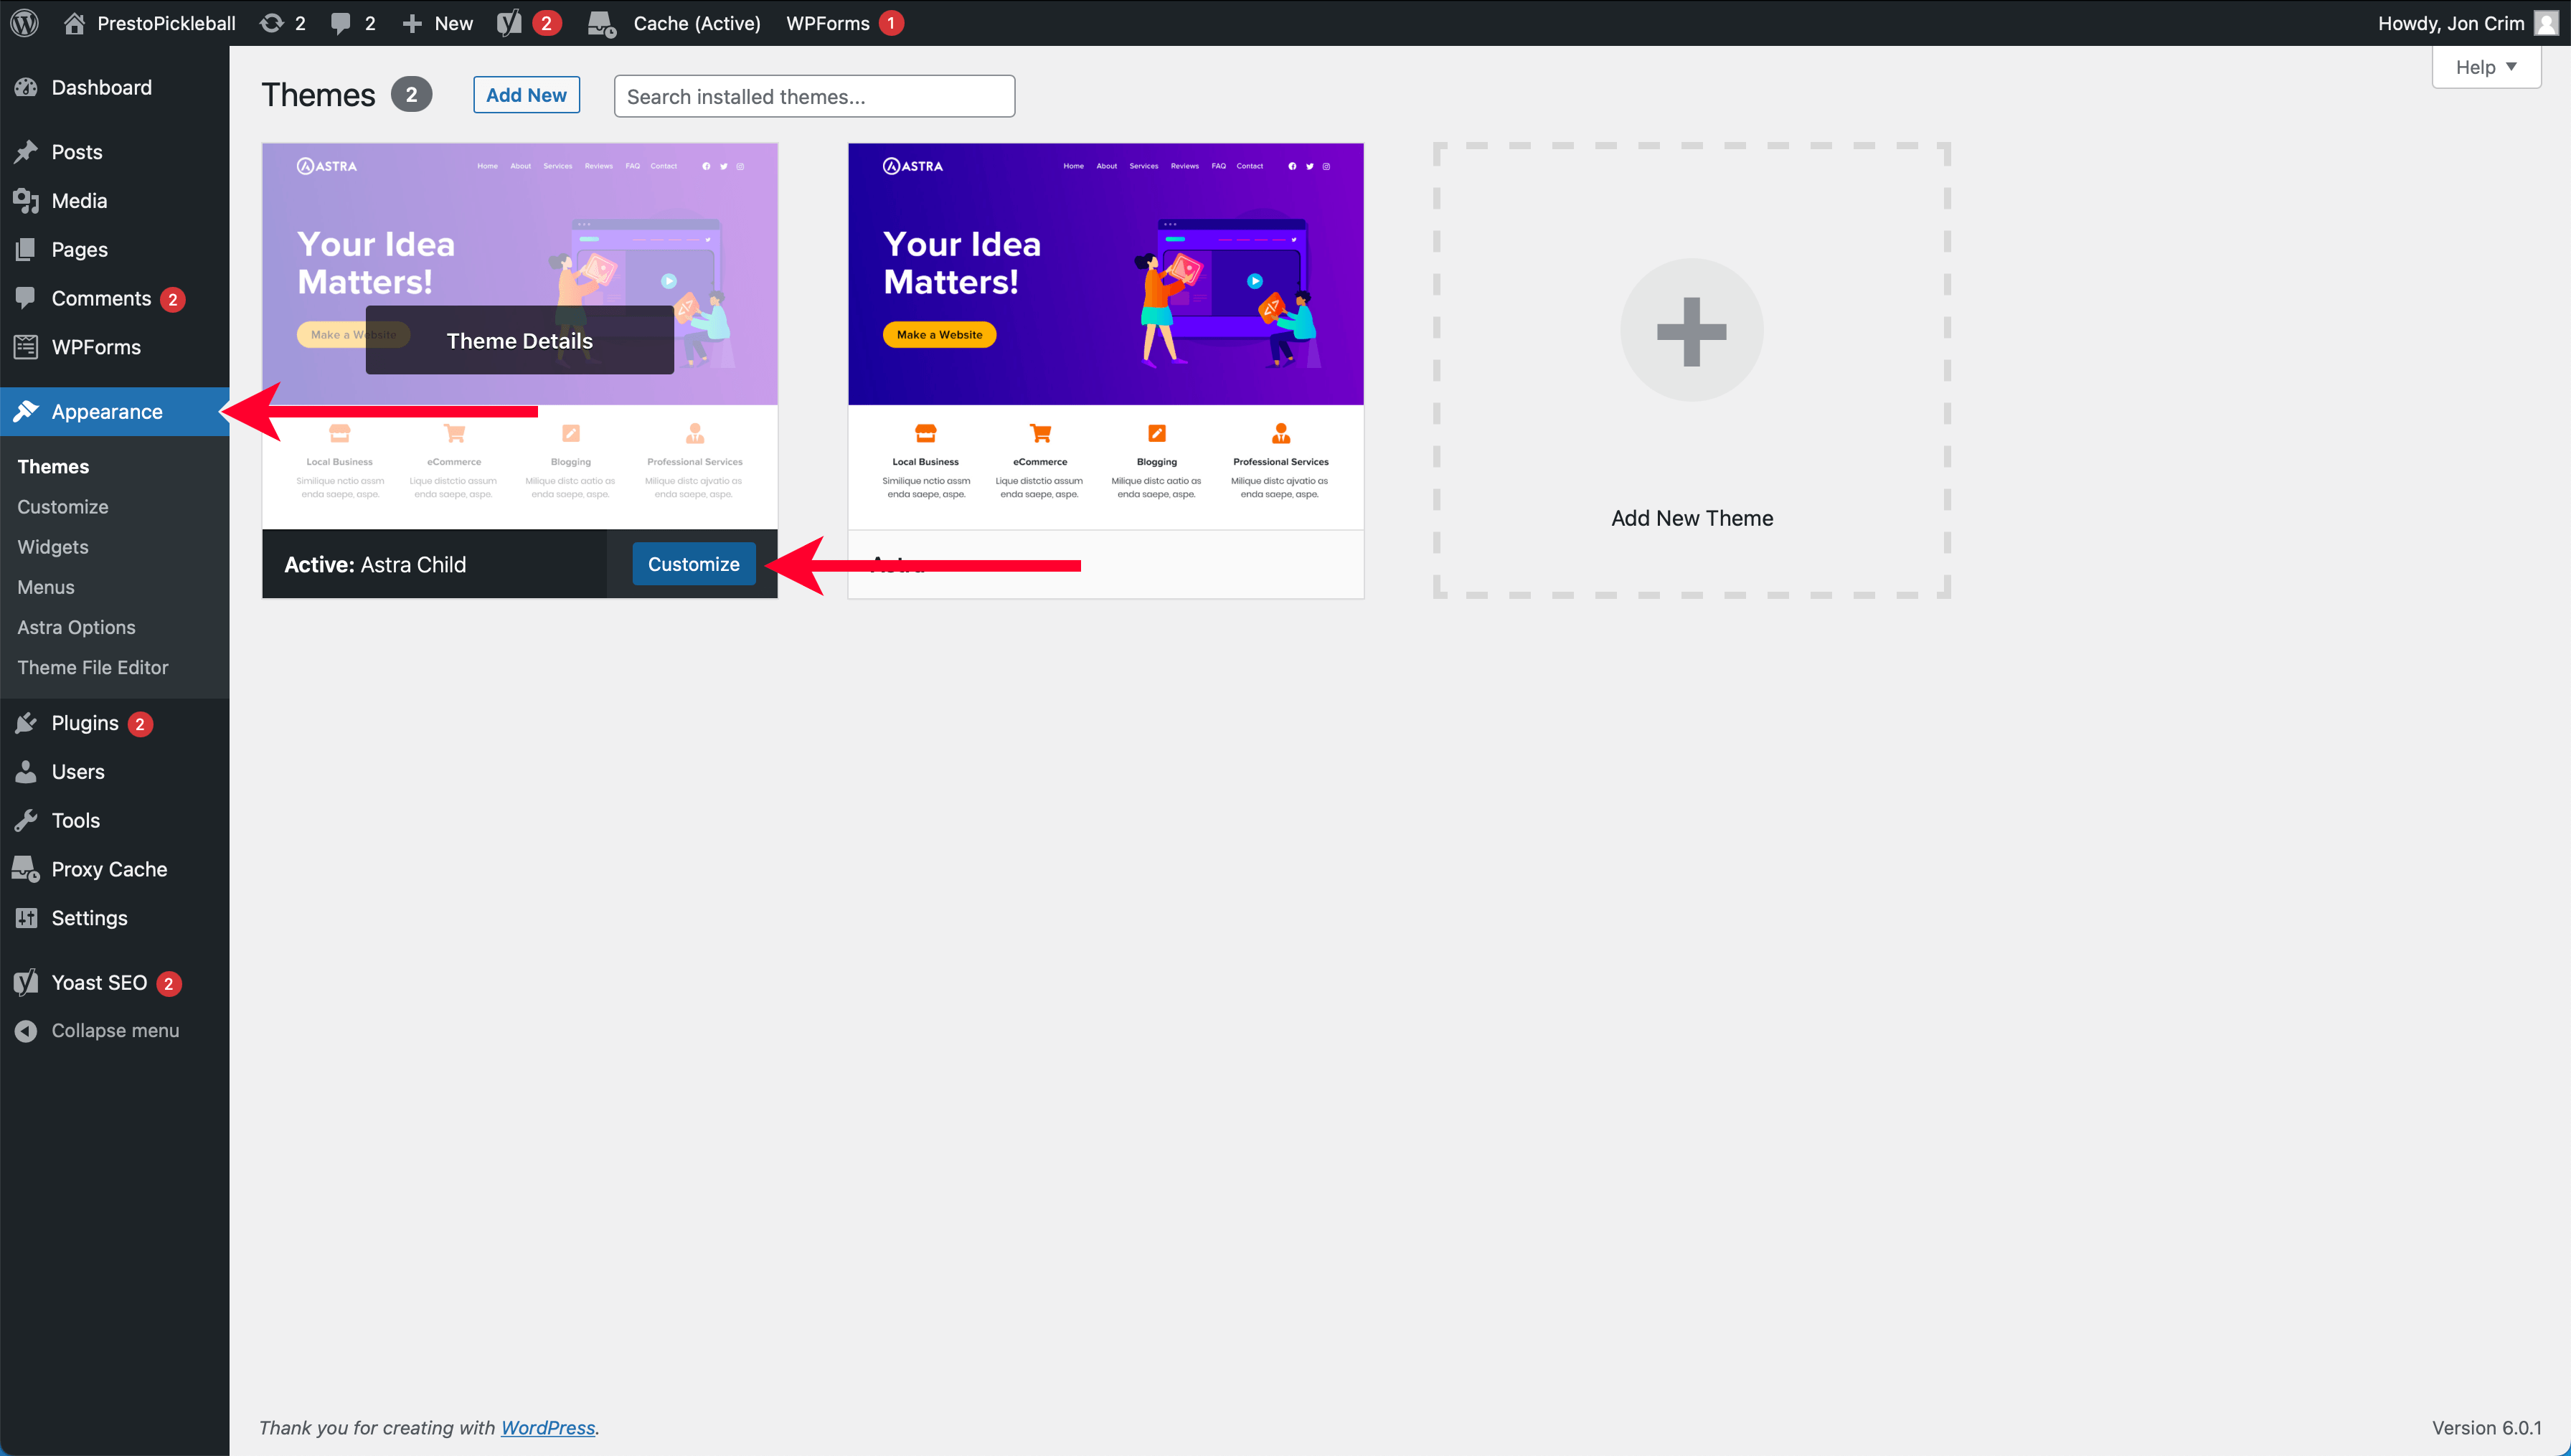
It’s a best practice to limit the number of themes you have installed, so let’s go ahead and delete any of the other themes. To do so, hover over one of the other themes and click the “Theme Details” button.
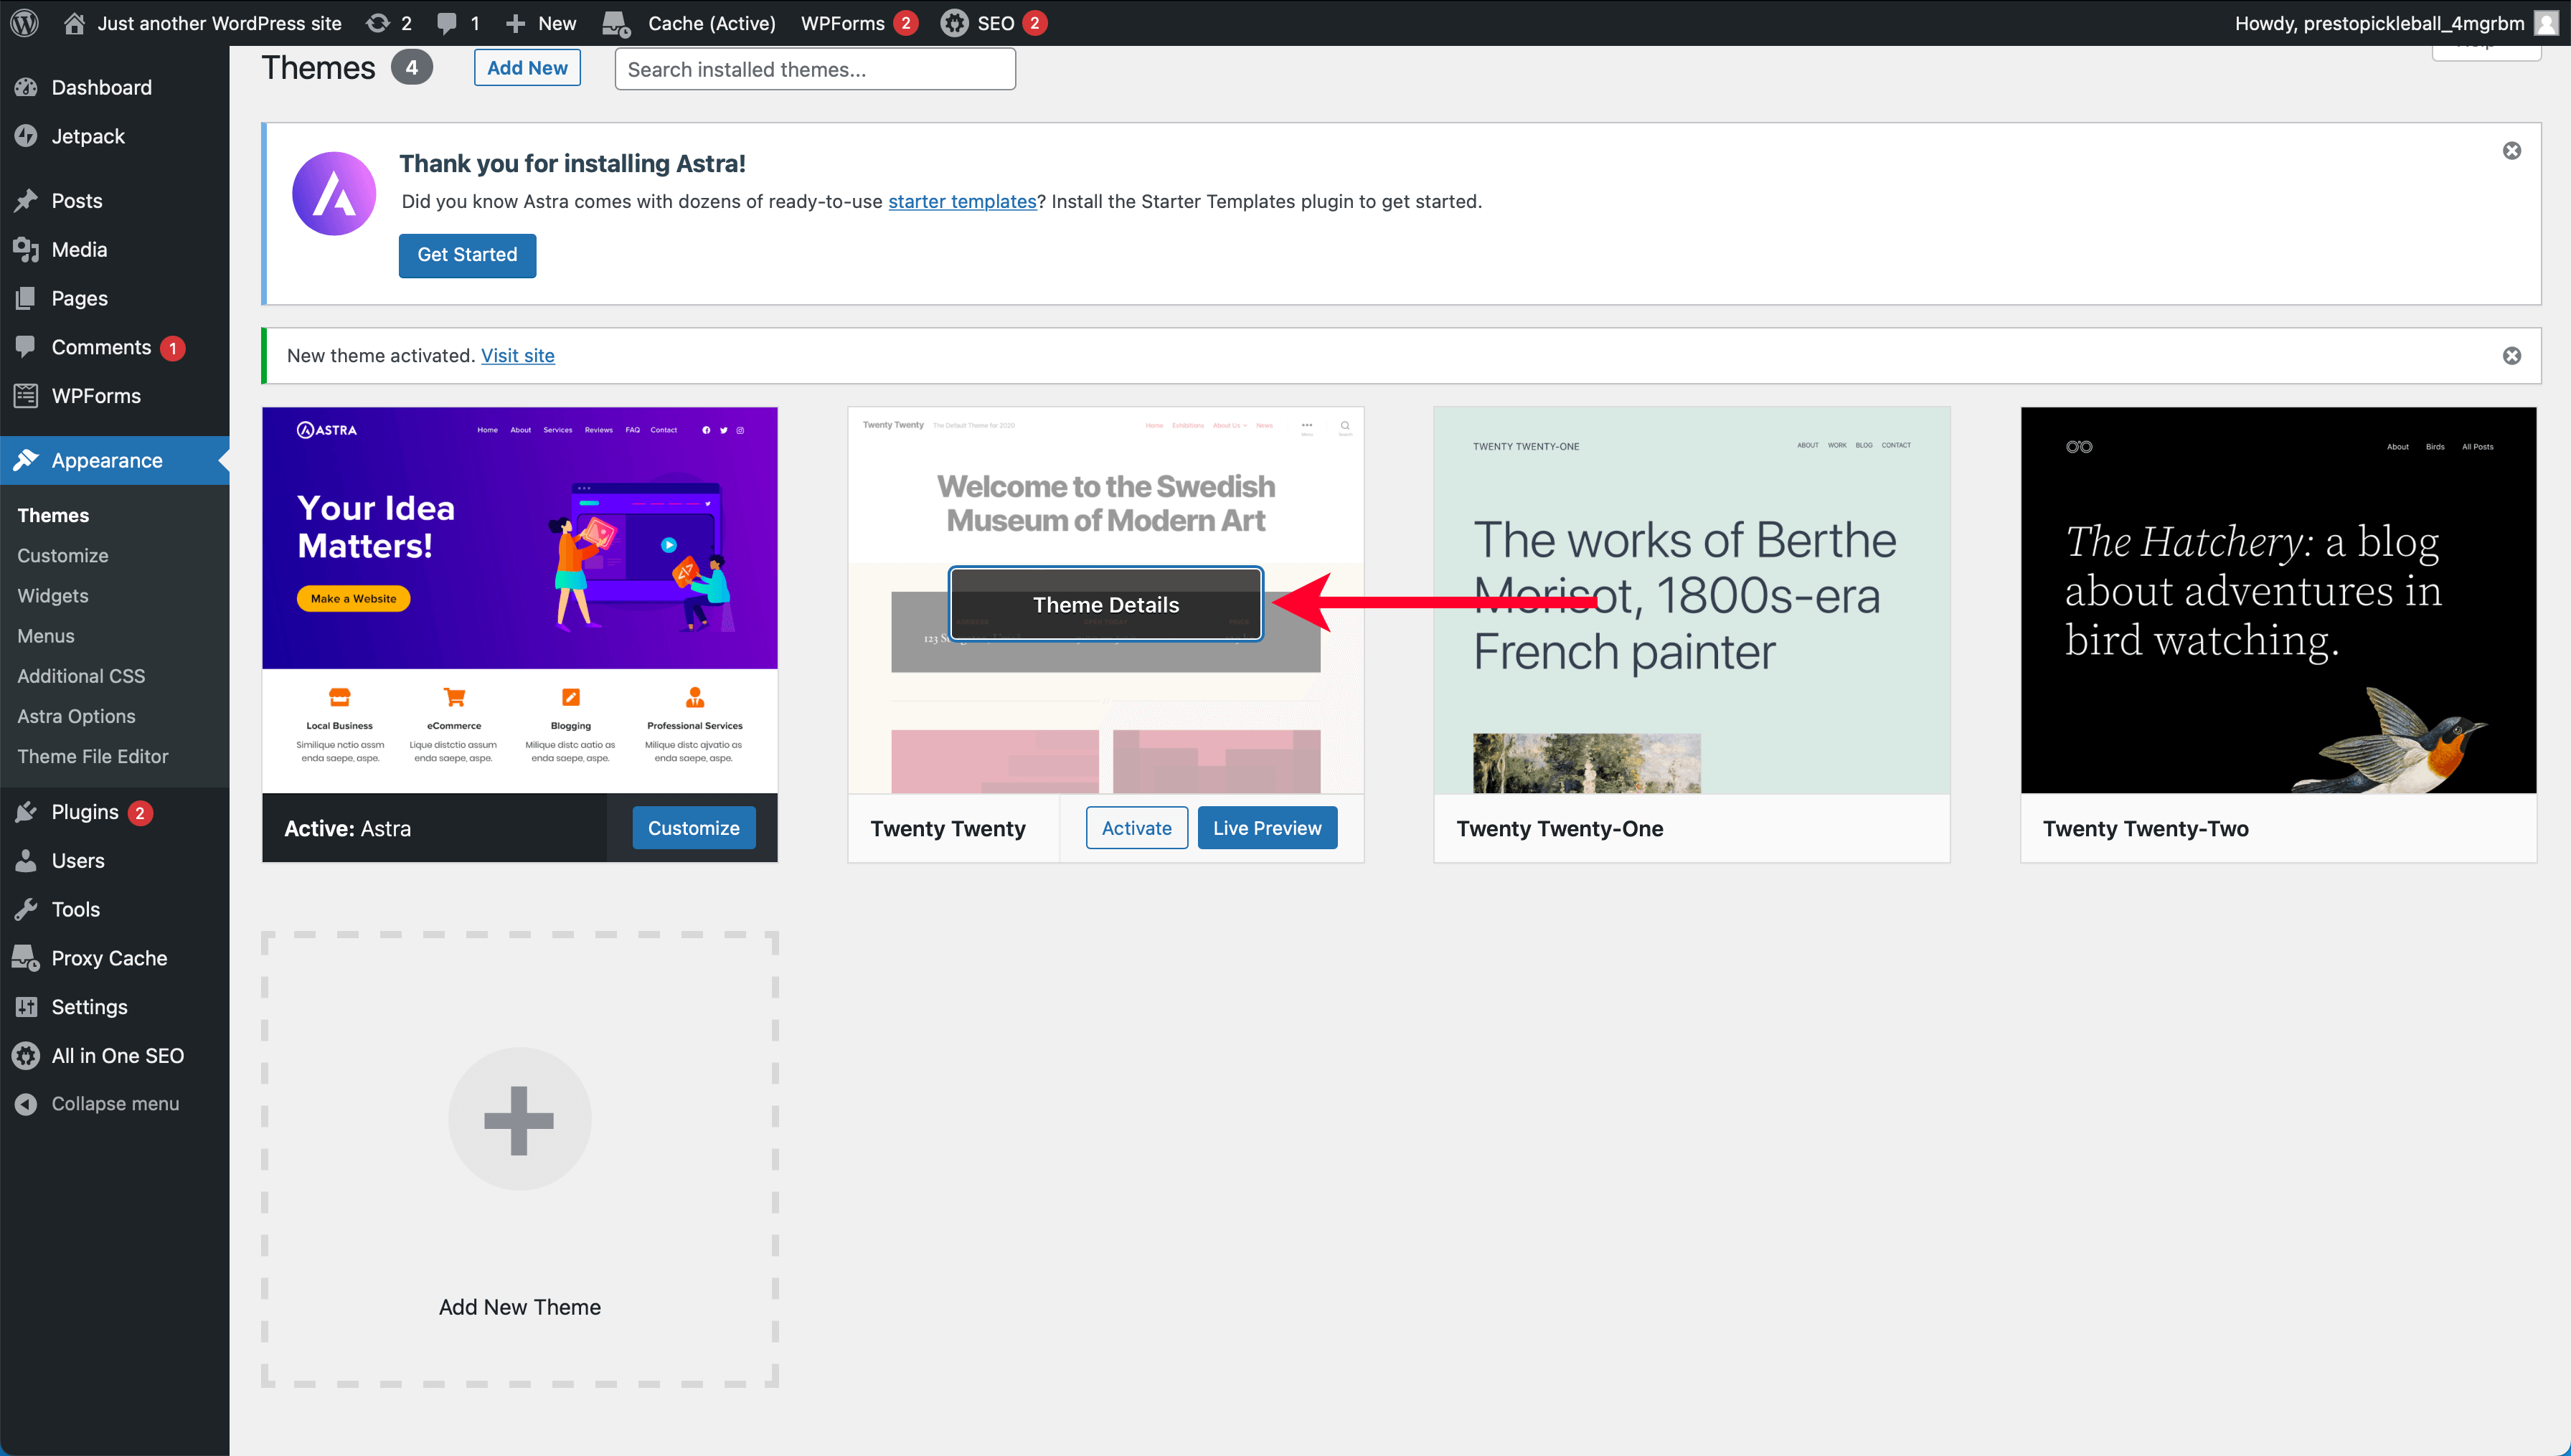
A new screen will pop up. You should see a red “Delete” link in the bottom right-hand corner. Click “Delete.”
Next, confirm it’s “Ok” to delete the theme.
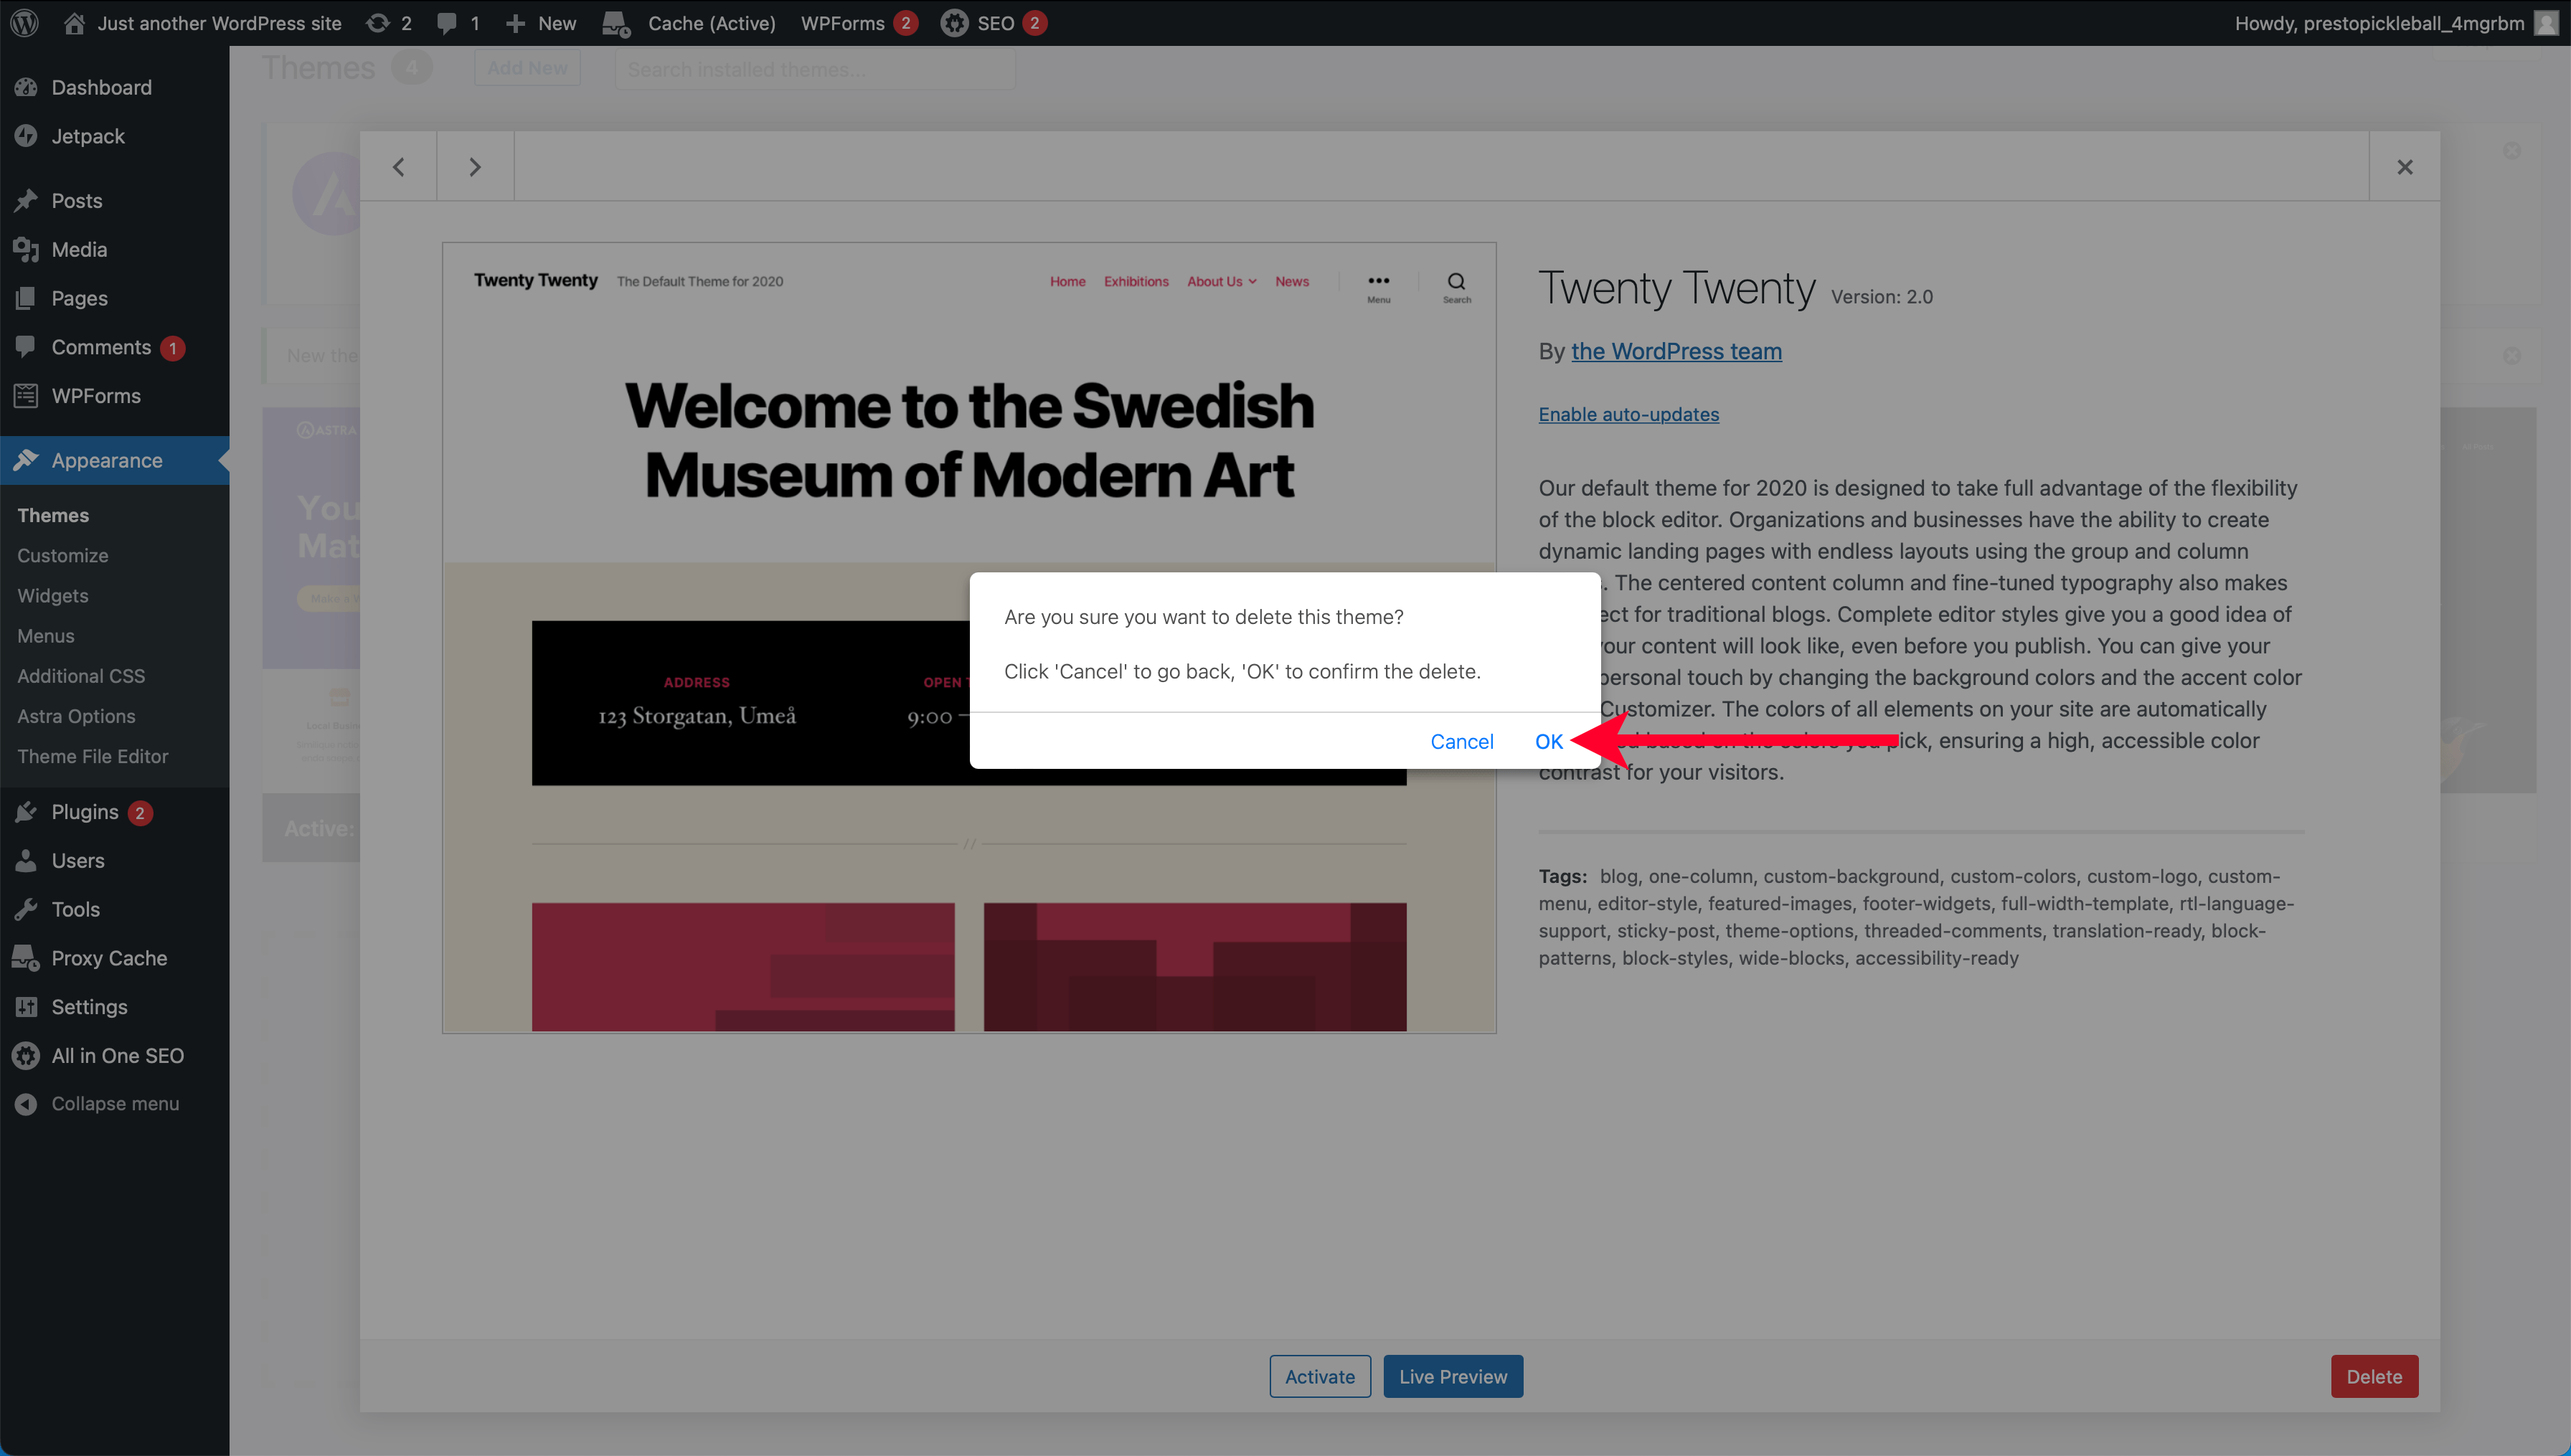
Repeat until the active Astra is the only theme left.
Installing Astra’s Child Theme
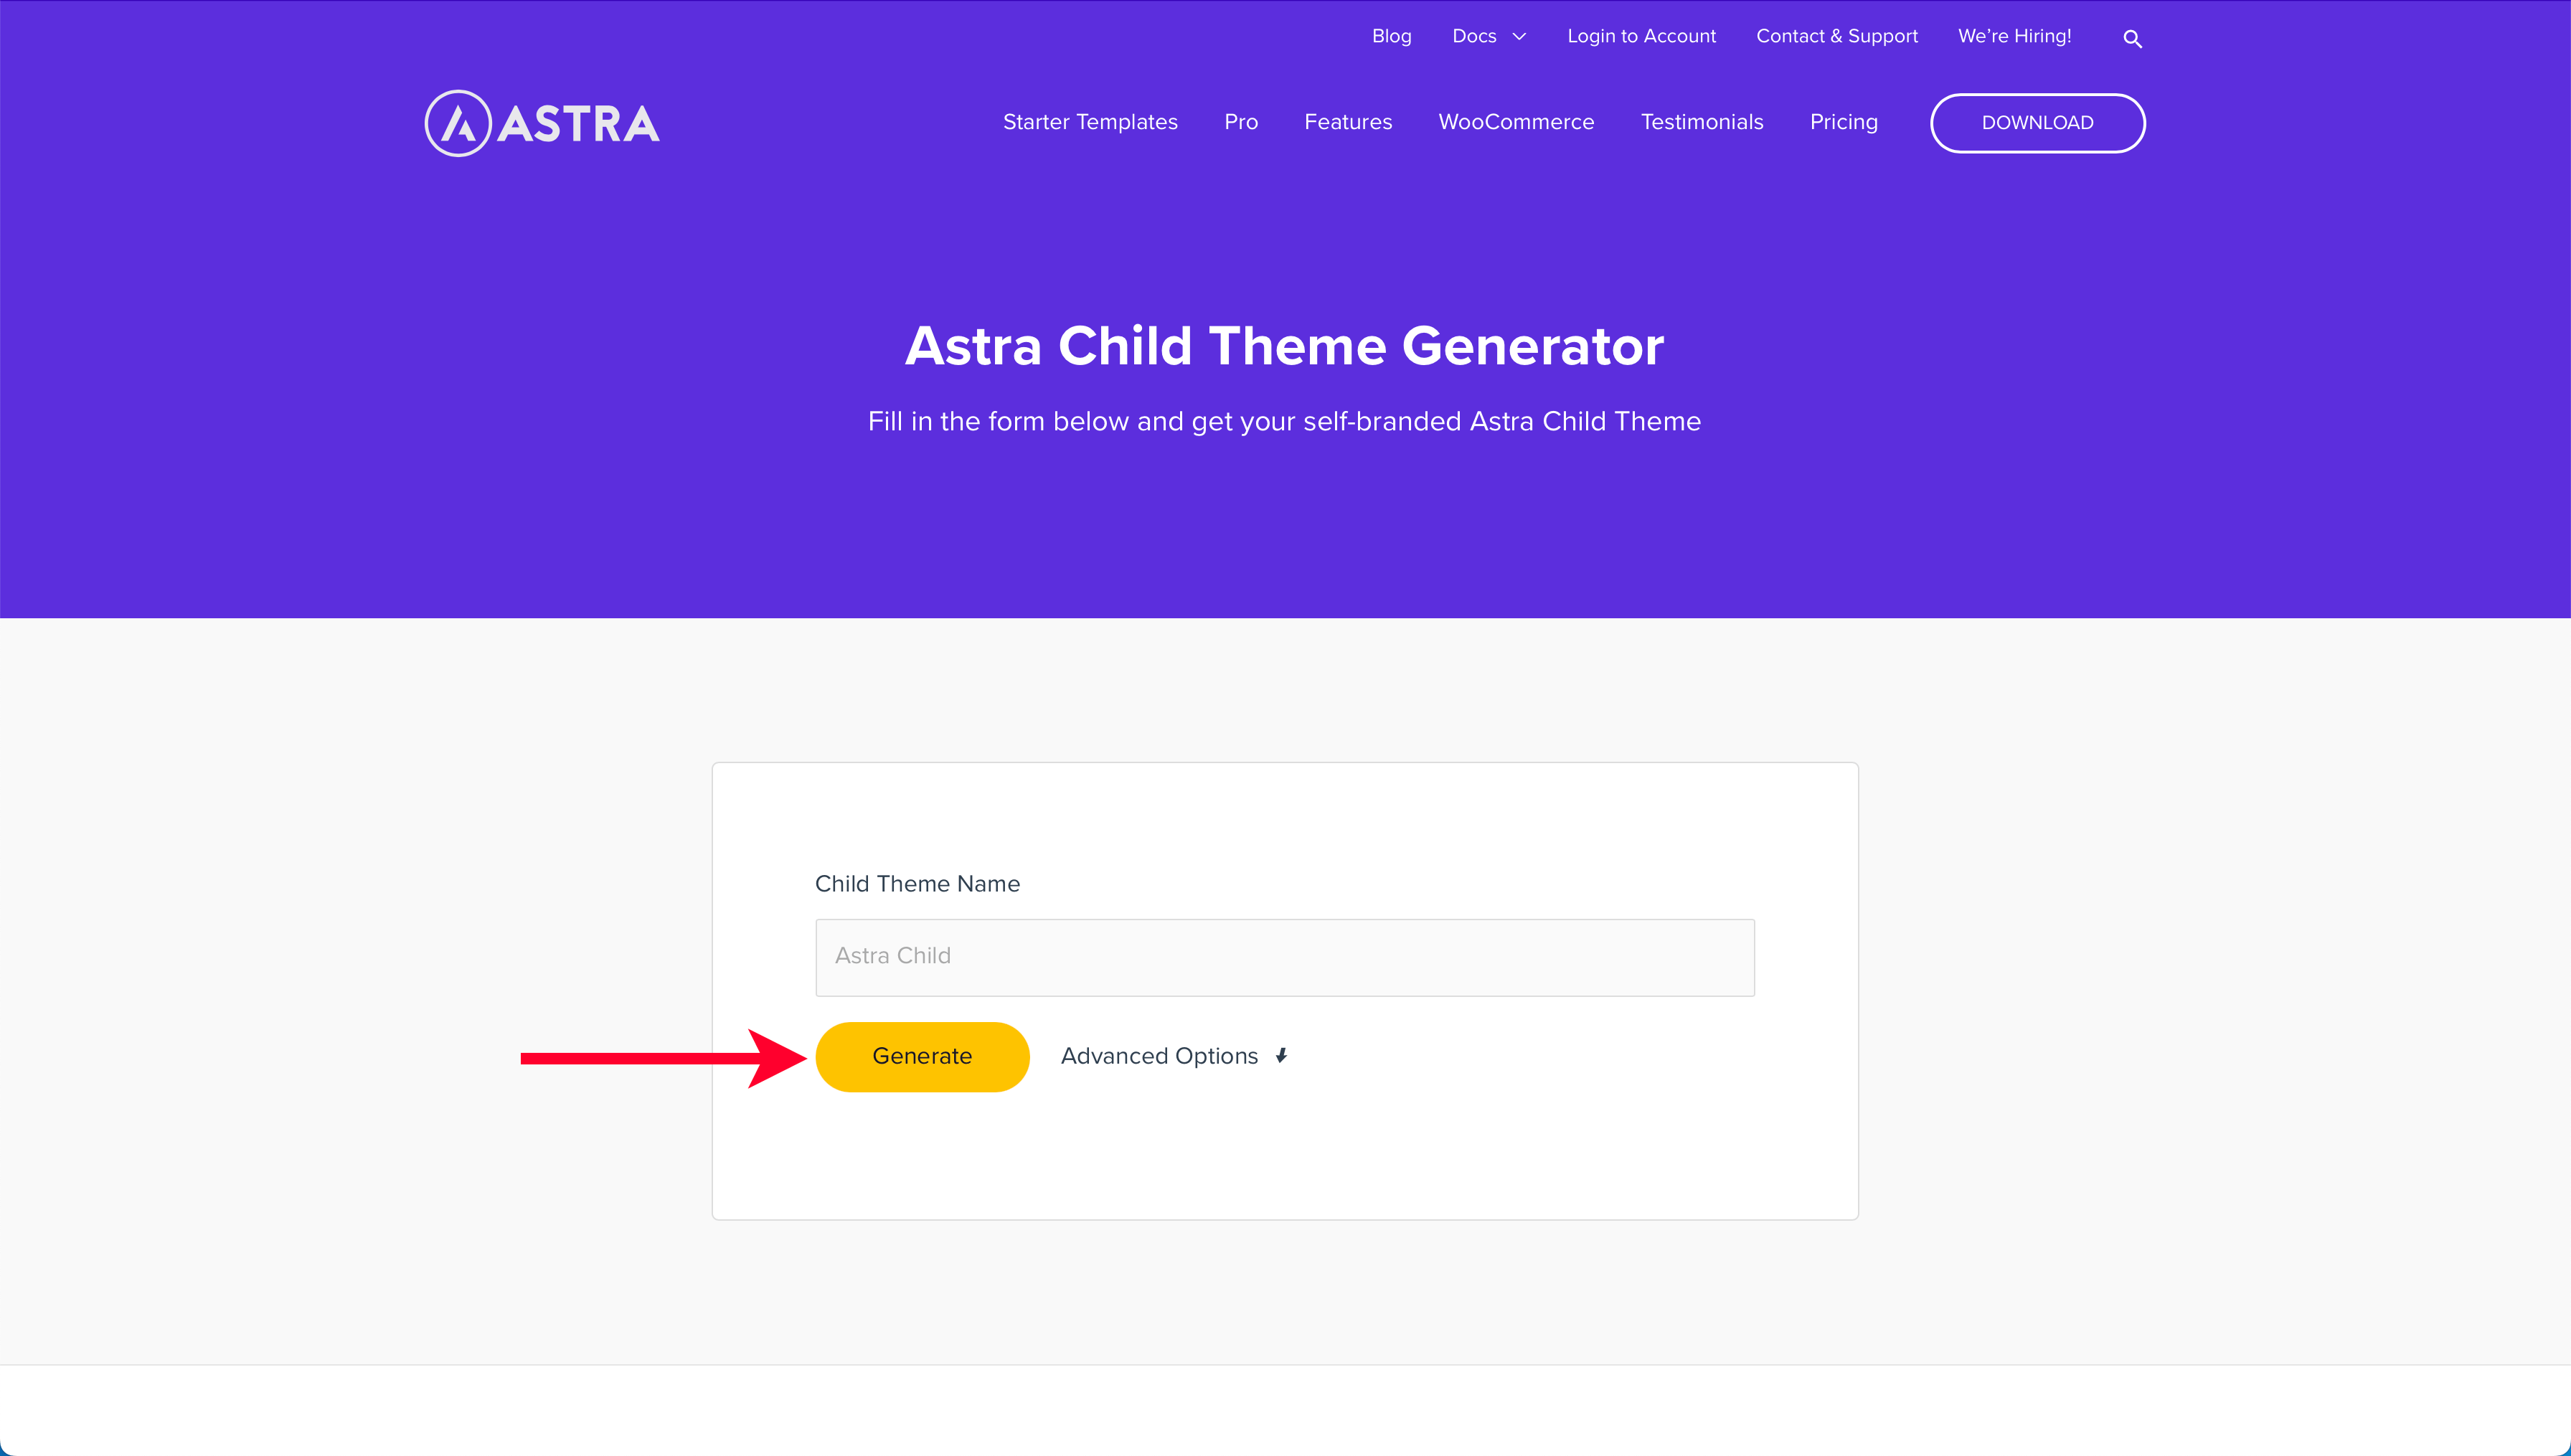
Before we finish, we want to install Astra’s child theme, which is a sub-theme that inherits the parent theme and provides a safe way to modify Astra in the future without changing the main parent theme.
Child themes are downloaded and then installed separately. To do so, visit the Astra child theme generator. Once there, you’ll click the “Generate” button to create a child theme.
Head back to your WordPress account and visit the “Themes” menu under “Appearance.” At the top of the page, you’ll see a button to “Add New,” which you can click.
Click the “Upload Theme” button on the following page and then select the “Choose File” button.
Navigate to the Astra child theme you downloaded moments ago and ensure it’s in a .zip format. If it’s not a .zip file, you’ll need to find the folder and compress it into a zip format before uploading it, which you can do on a Mac by right-clicking the folder and selecting “Compress.”
On Windows, you can right-click the folder, hover “Send To,” then select “Compress” if the folder is not already in a .zip format.

Once the Astra child theme is uploaded, click “Install Now.”

After uploading, you can click the “Activate” link on the next screen.
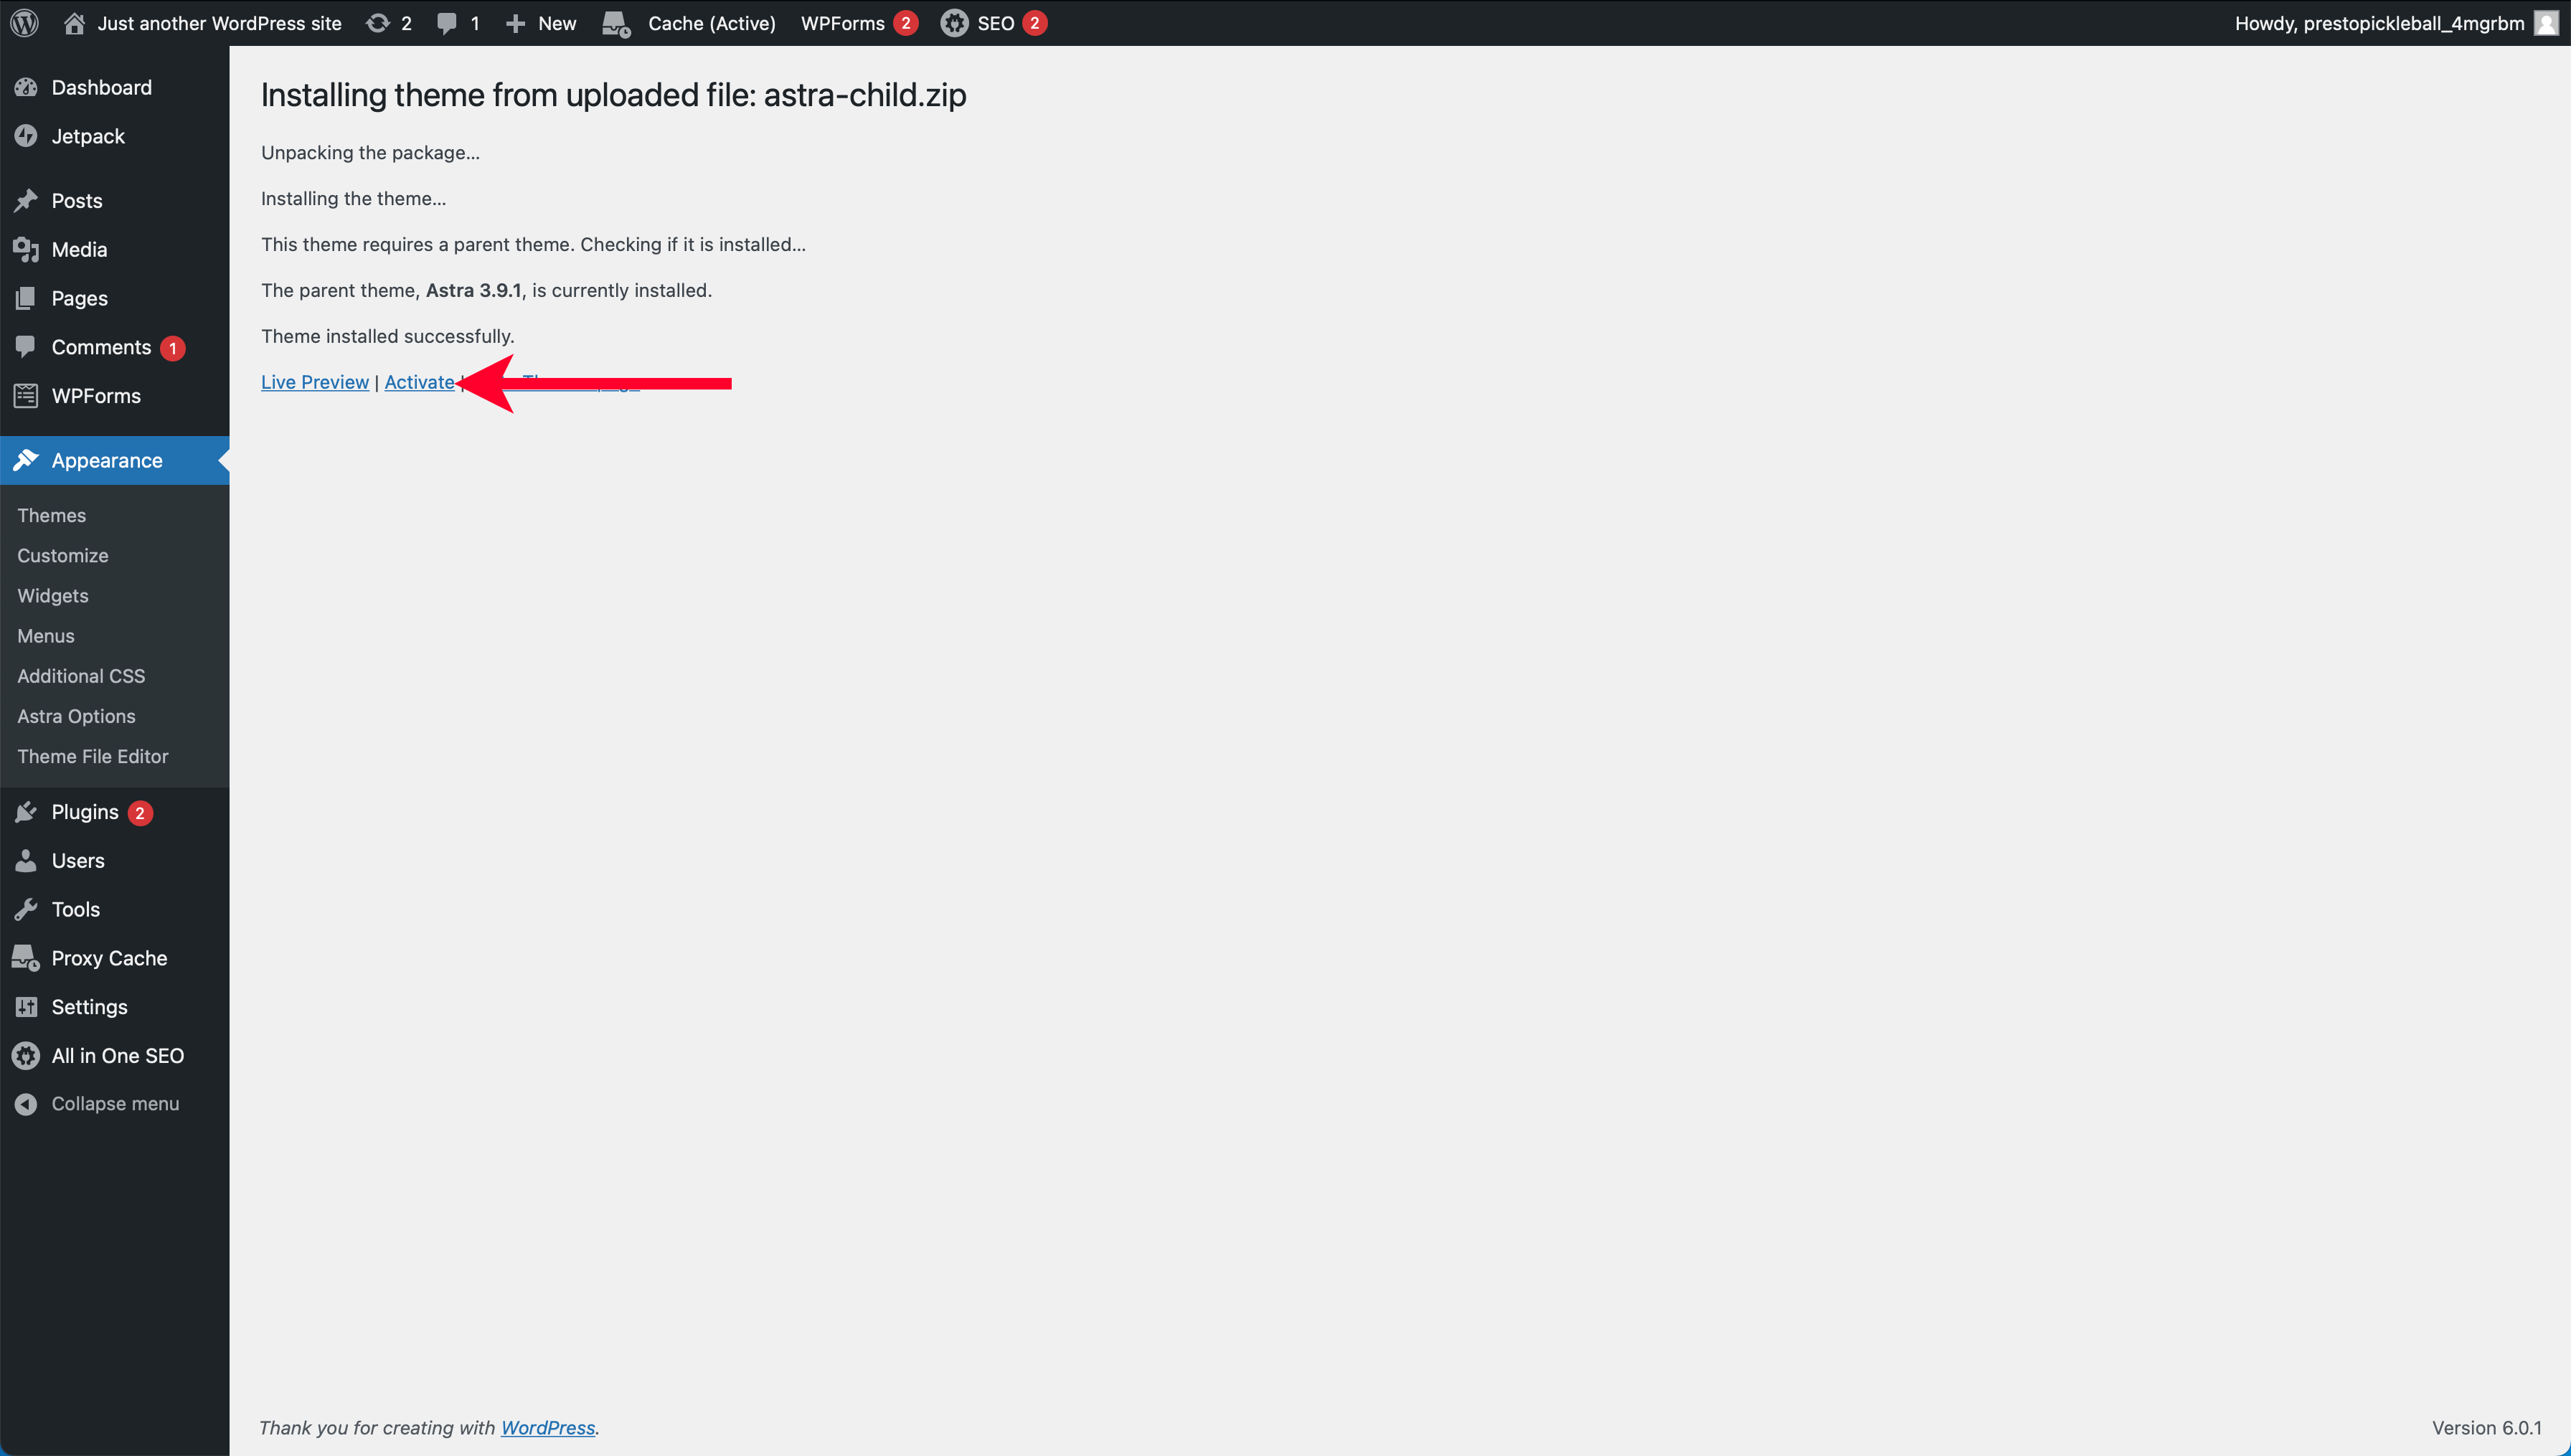
WordPress will redirect you back to the “Themes” page with the “Astra Child” theme showing as “Active.”
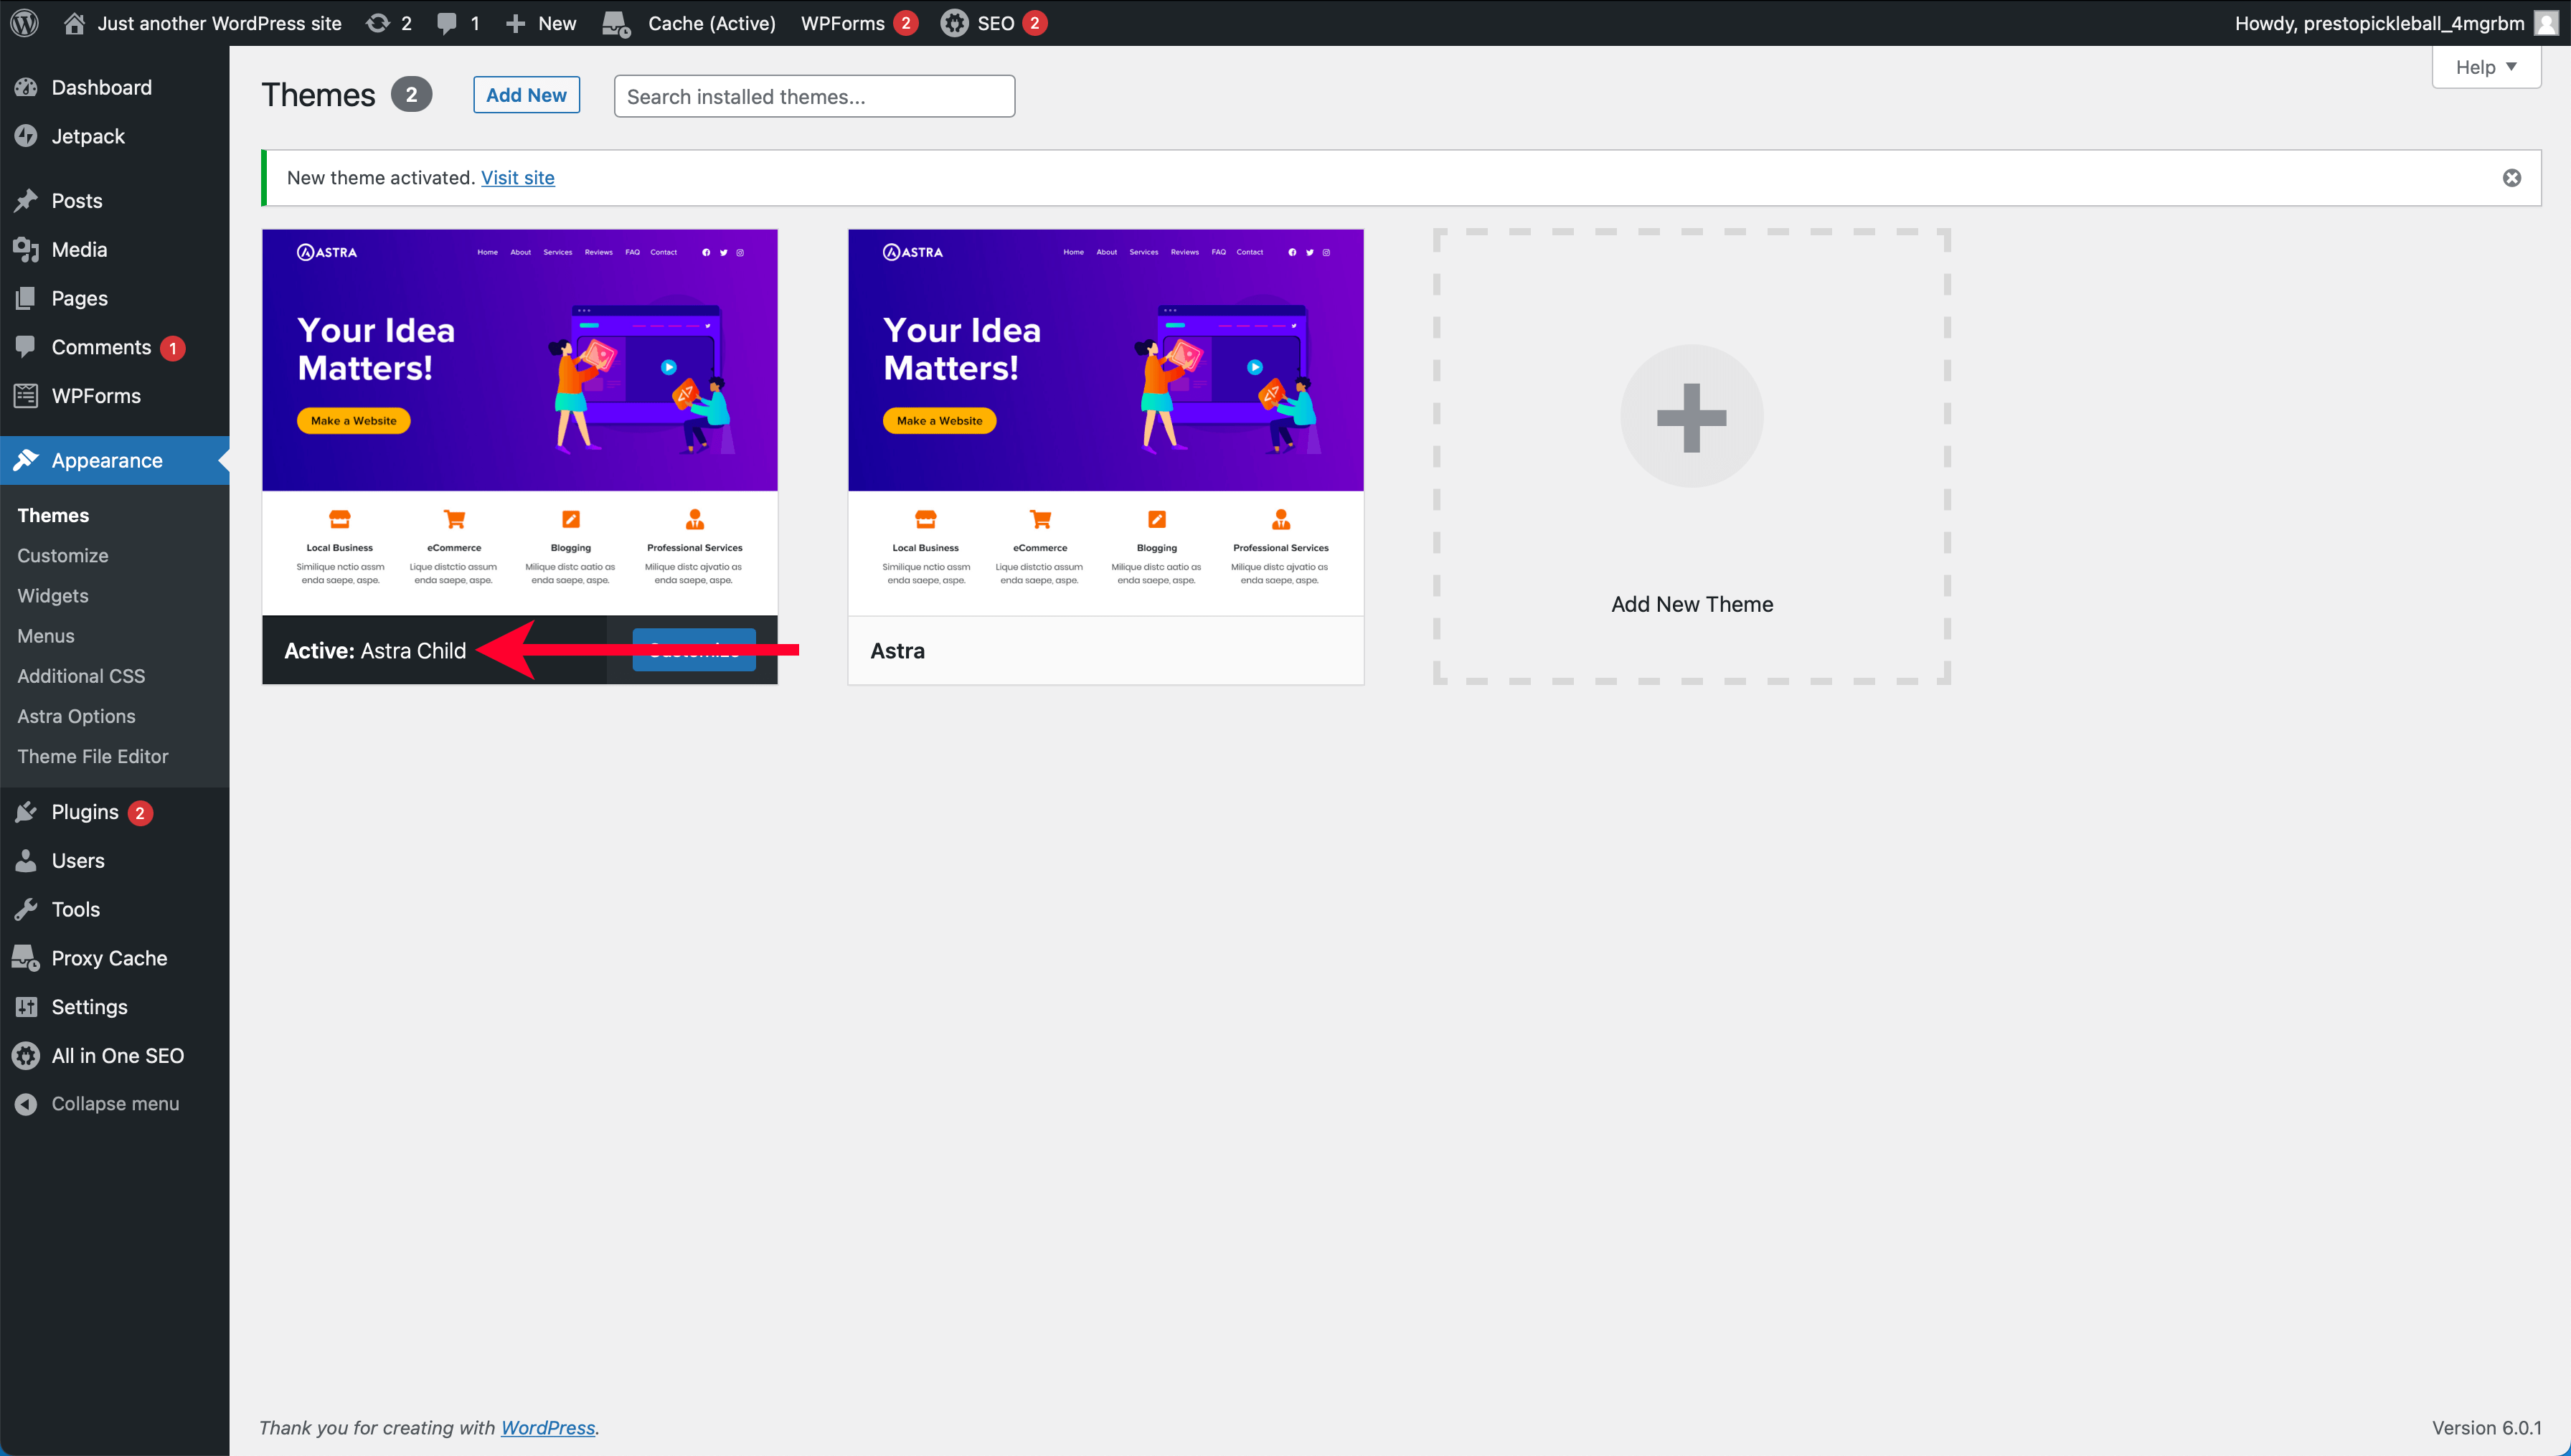
Your child theme is now installed and ready to go!
Customizing Astra
For the best performance, there are a handful of Astra settings that we’ll want to update to make sure your new website is in tip-top shape.
To start, navigate to the “Appearance” menu in the left-hand navigation of your WordPress account, then click the “Customize” button for the active “Astra Child” theme.
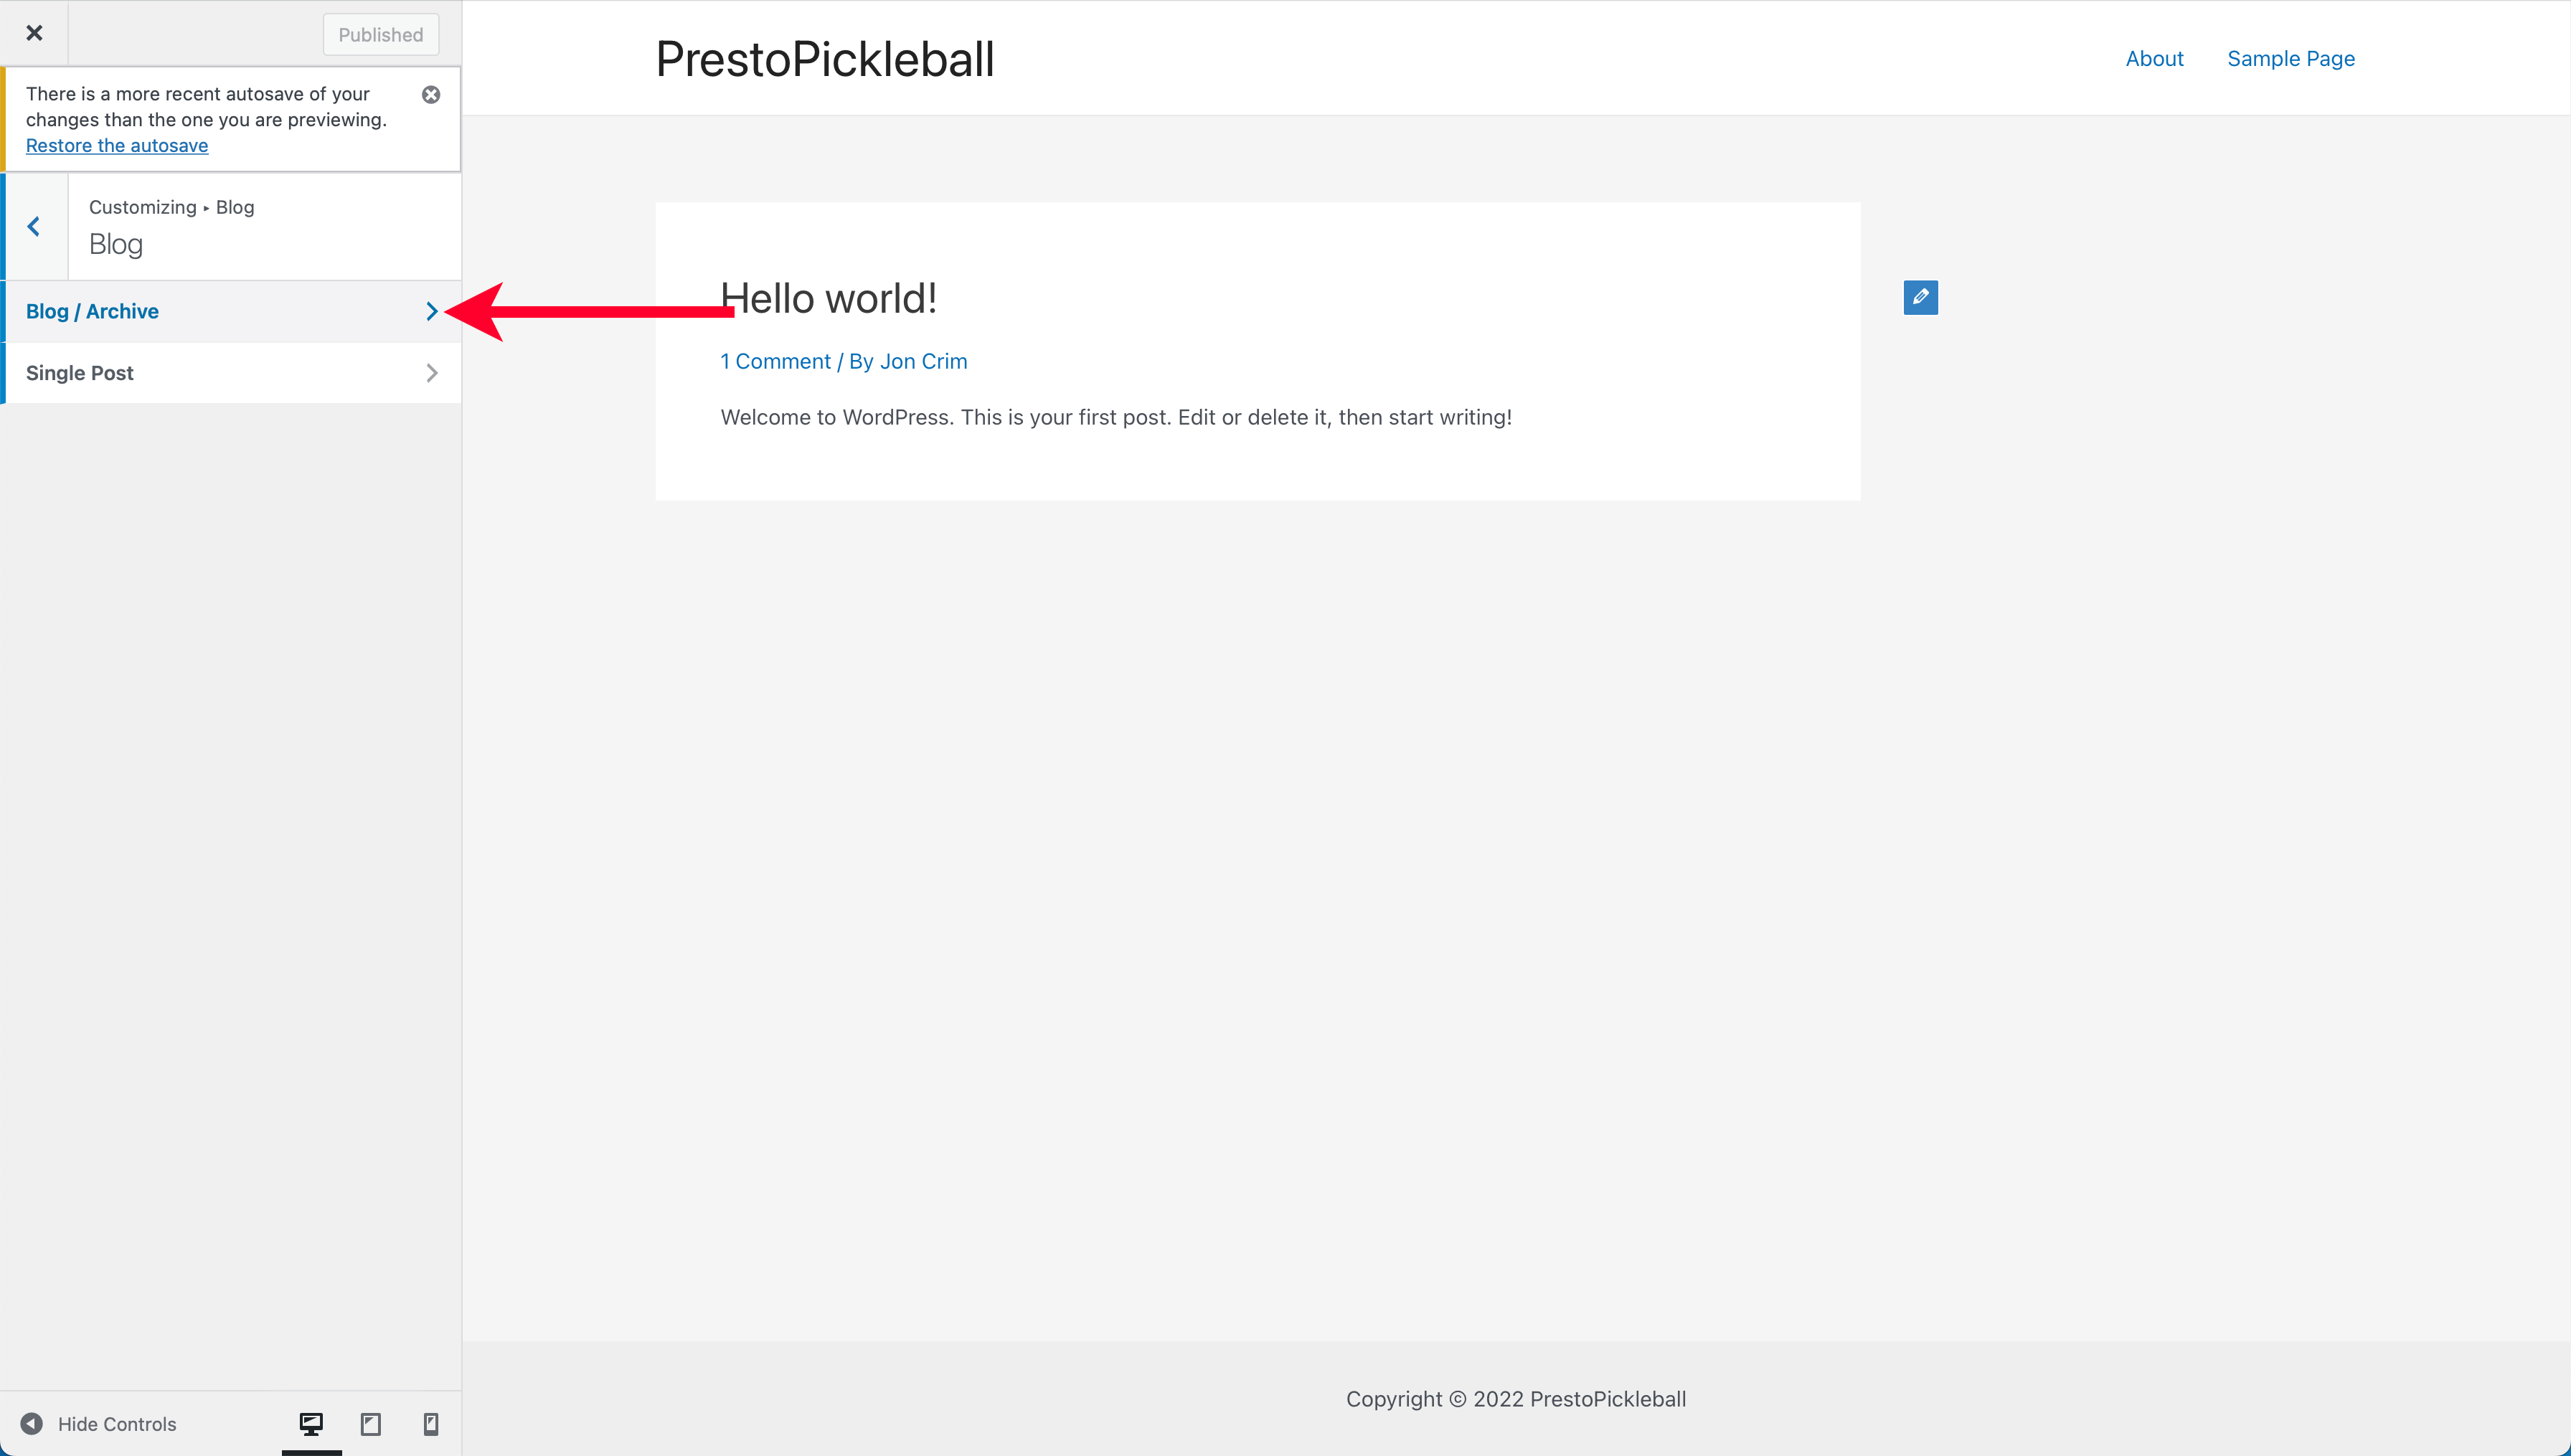
From the left-hand theme editor sidebar, select “Blog.”

Followed by “Blog / Archive.”
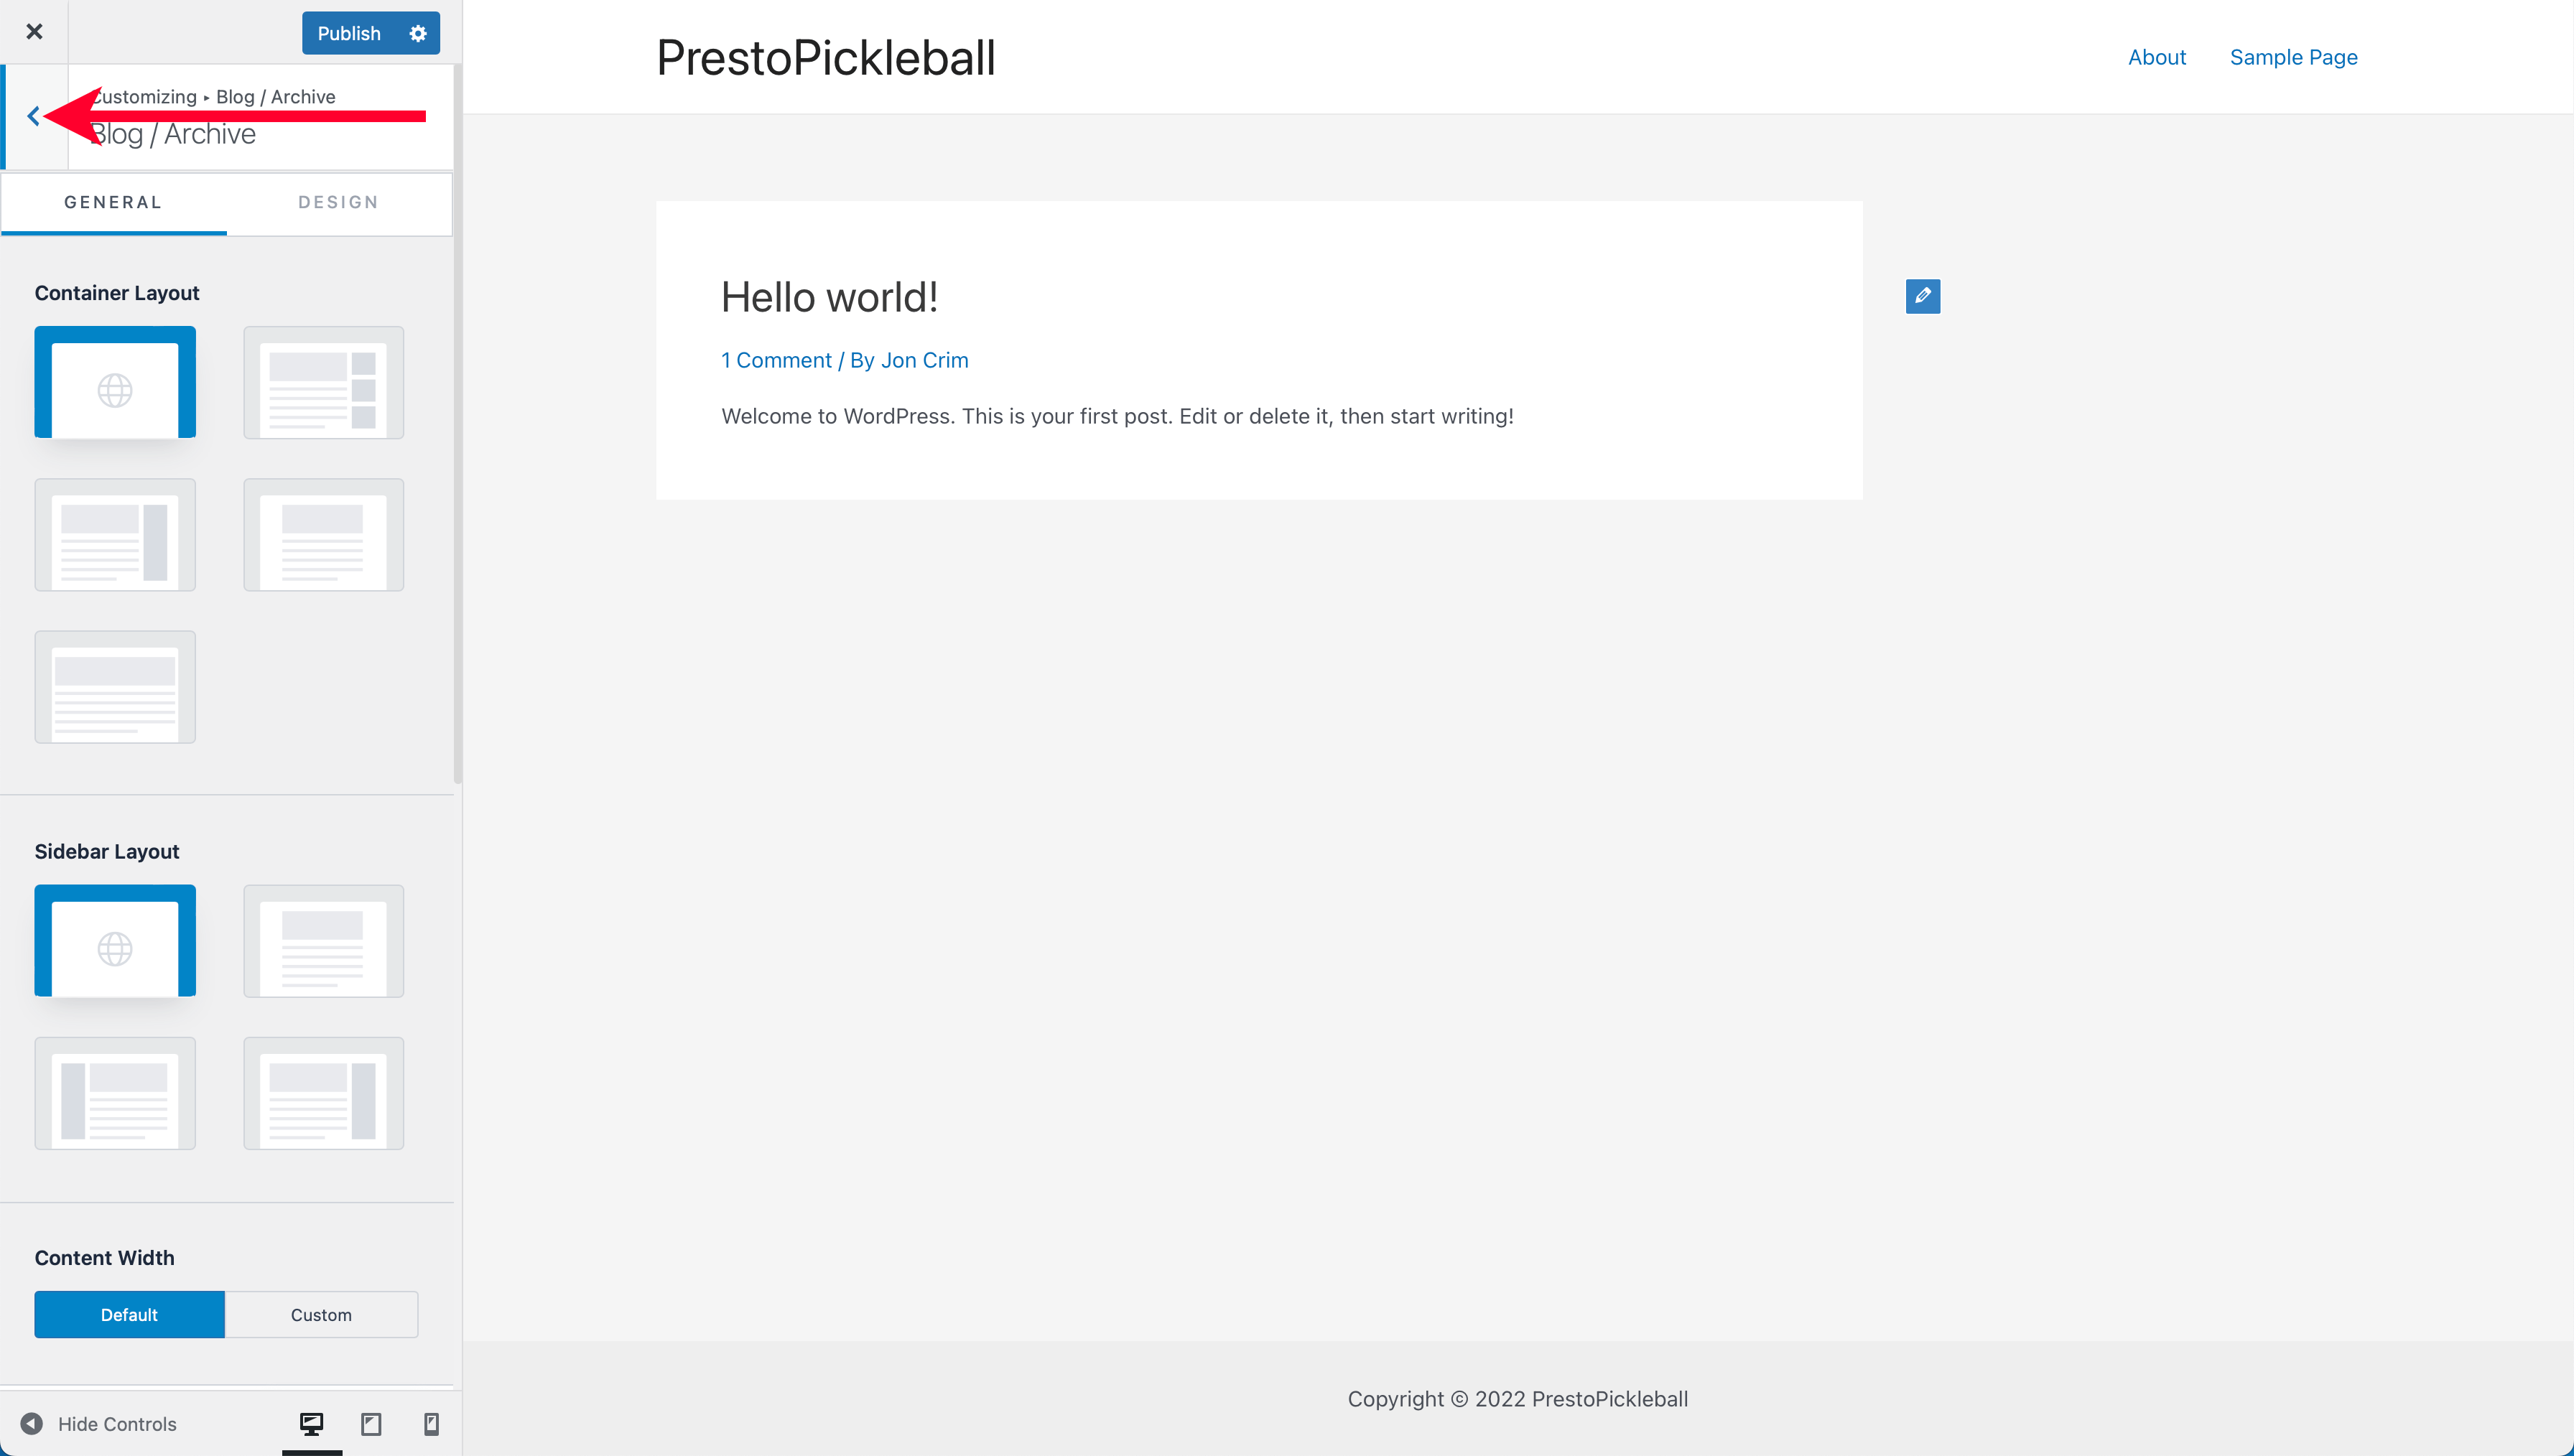
Under the “Sidebar Layout” section, select the “Right Sidebar.”

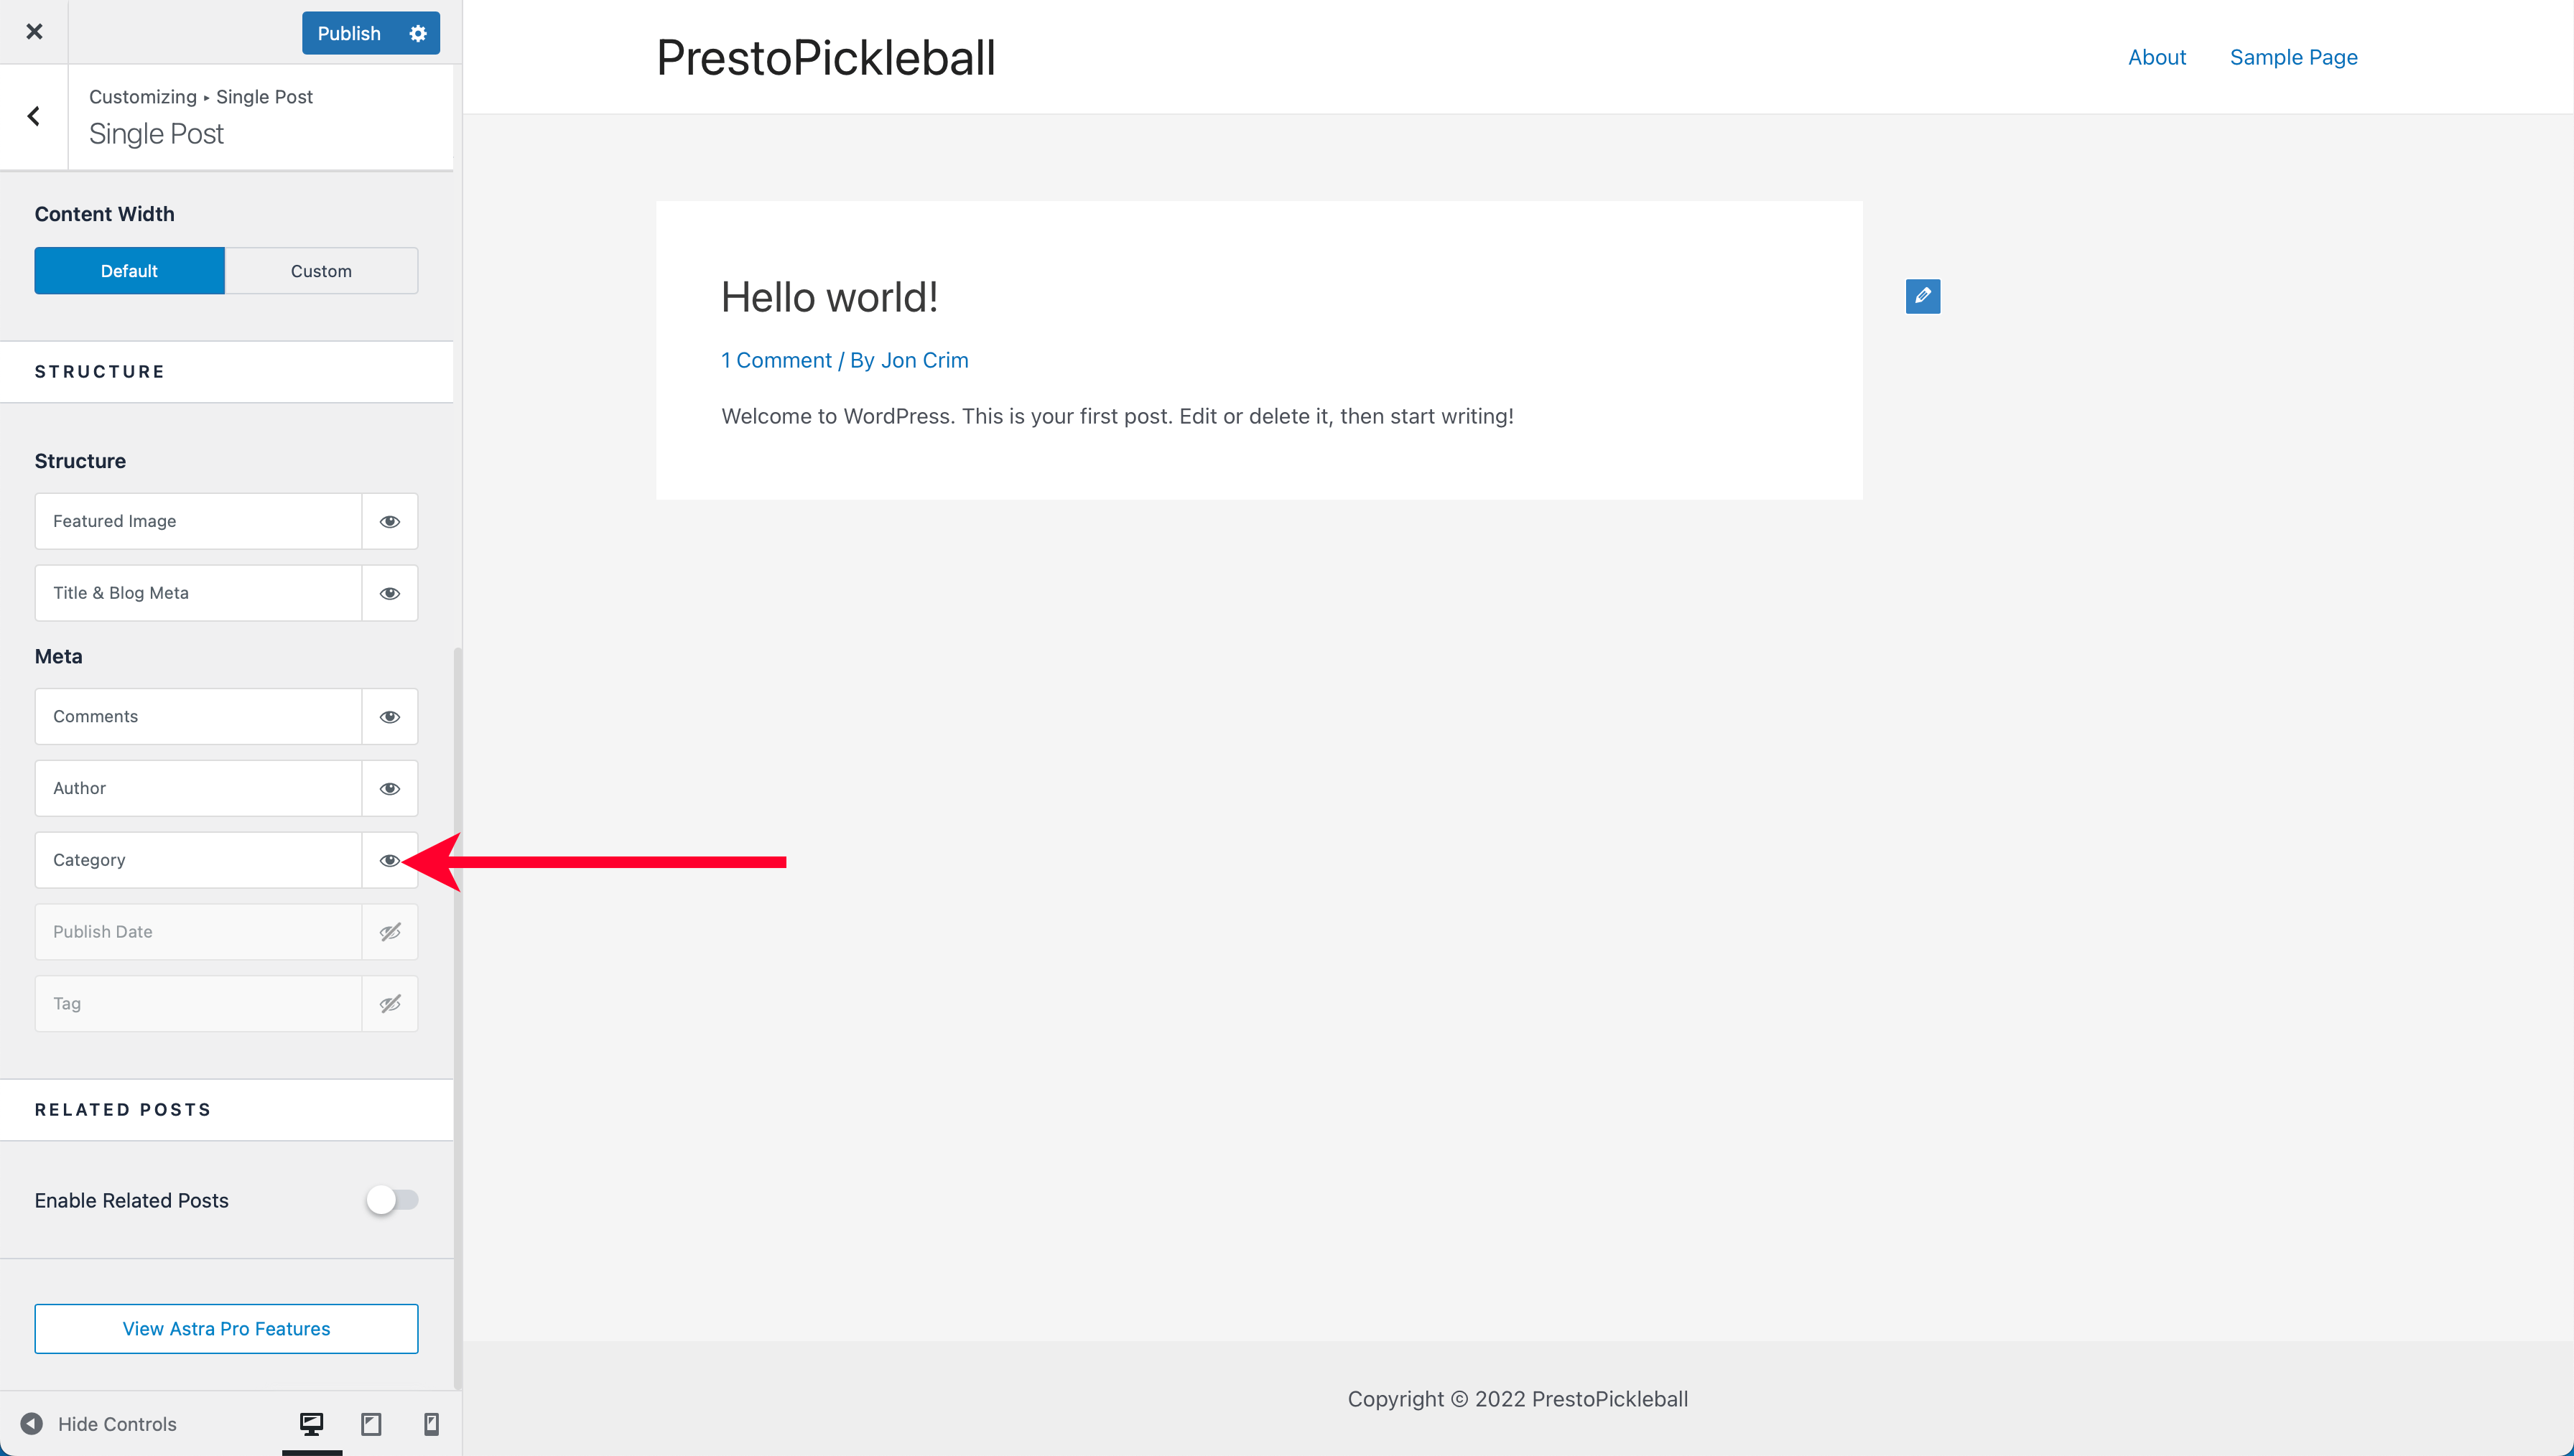
Next, scroll down to the bottom of the theme editor’s sidebar. Under the “Meta” heading, click the eye icon next to “Category” to toggle this feature off.

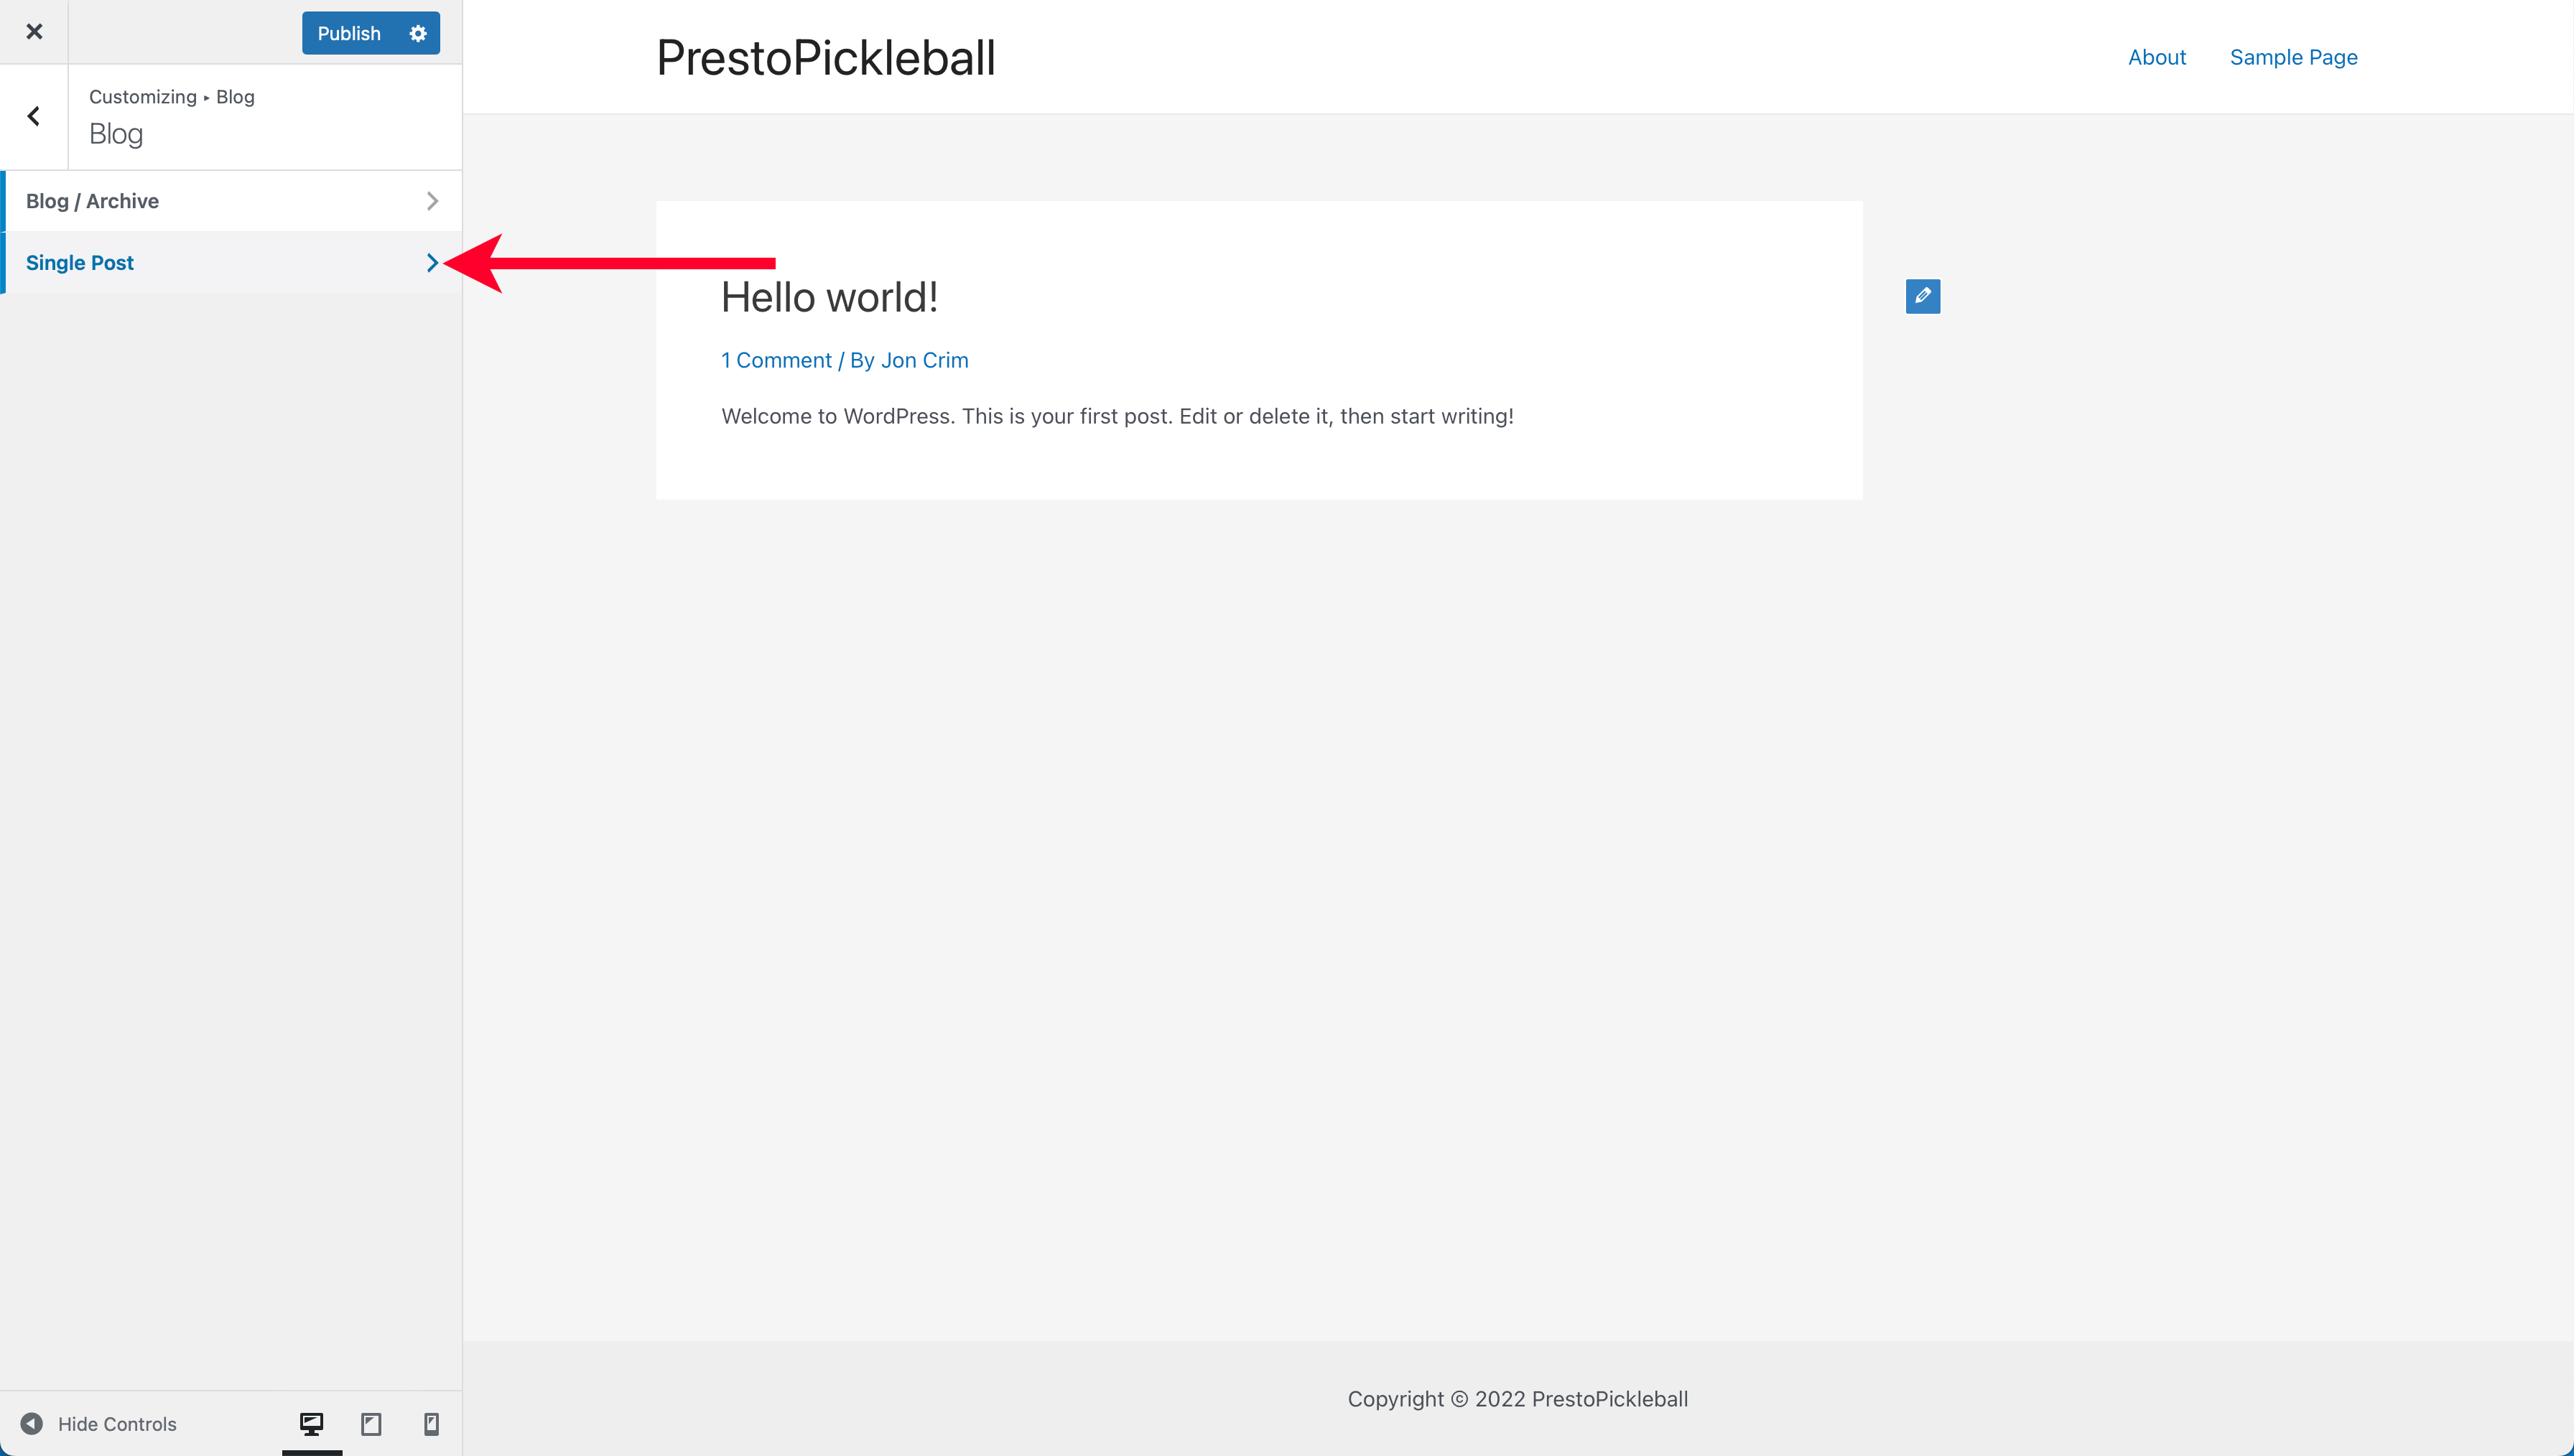
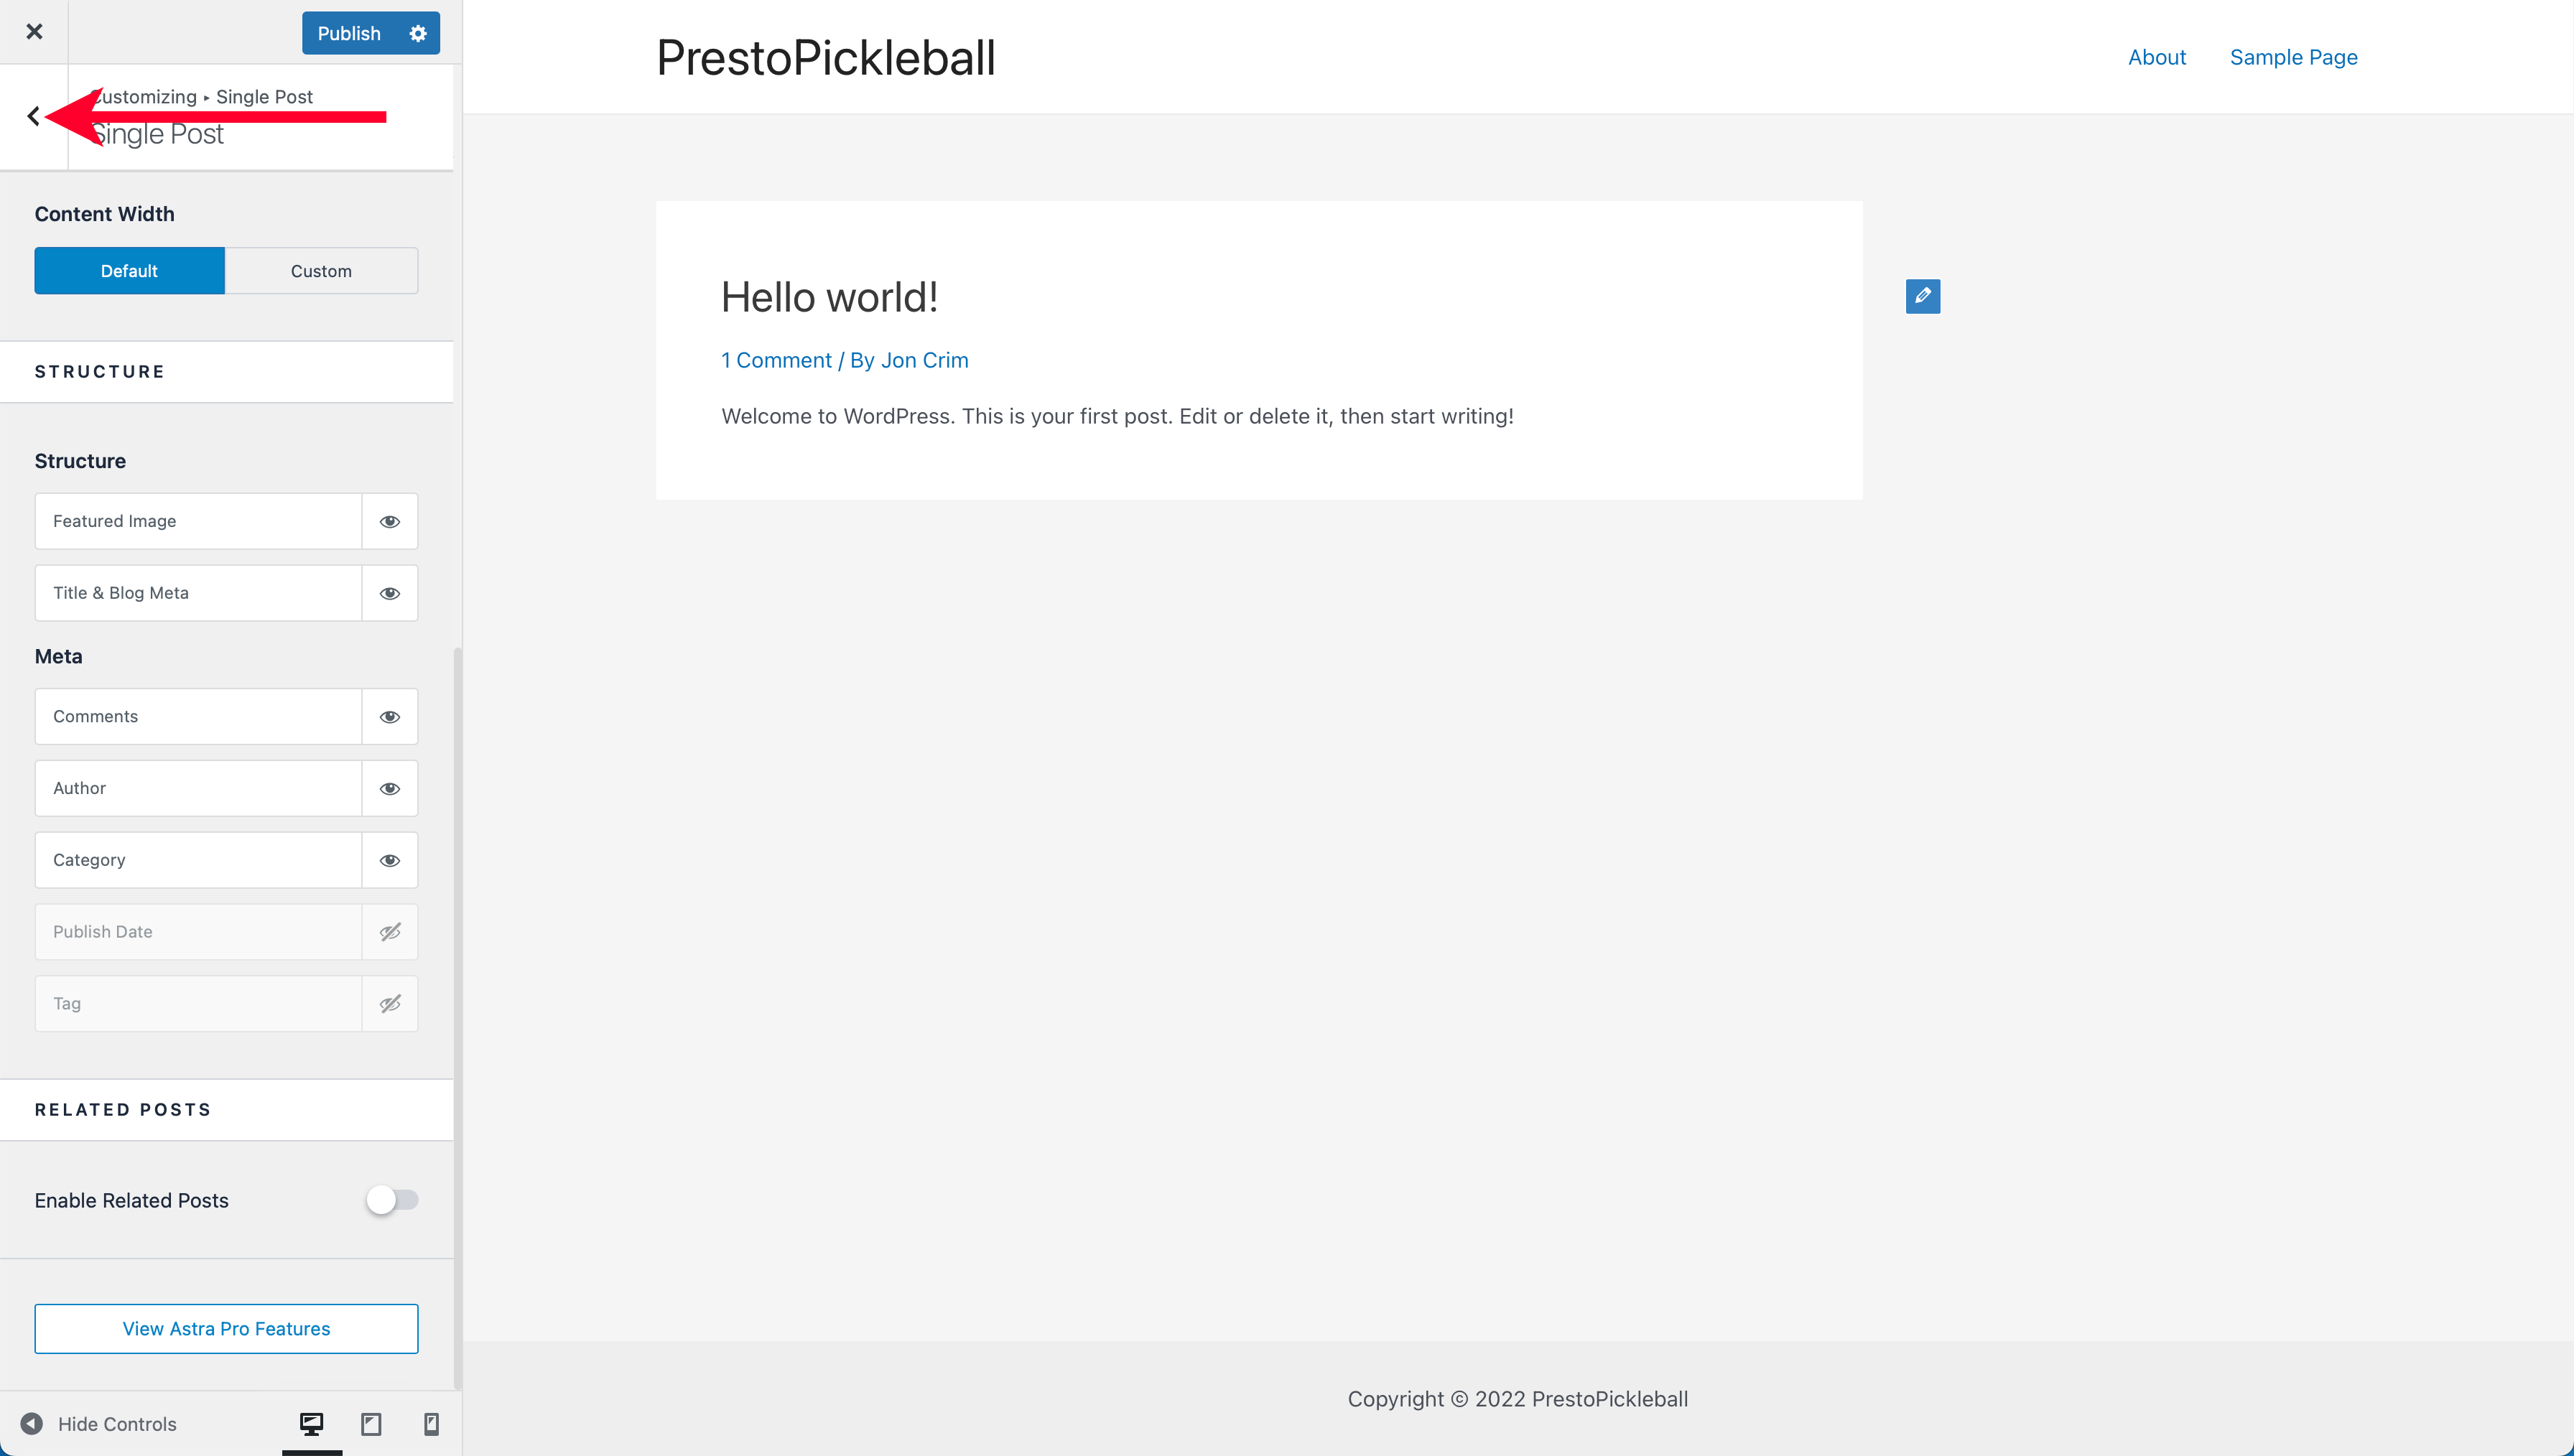
Now, scroll up in the theme editor’s sidebar and click the back arrow.
Then click “Single Post.”
Under the “Sidebar Layout” section, select the “Right Sidebar.”
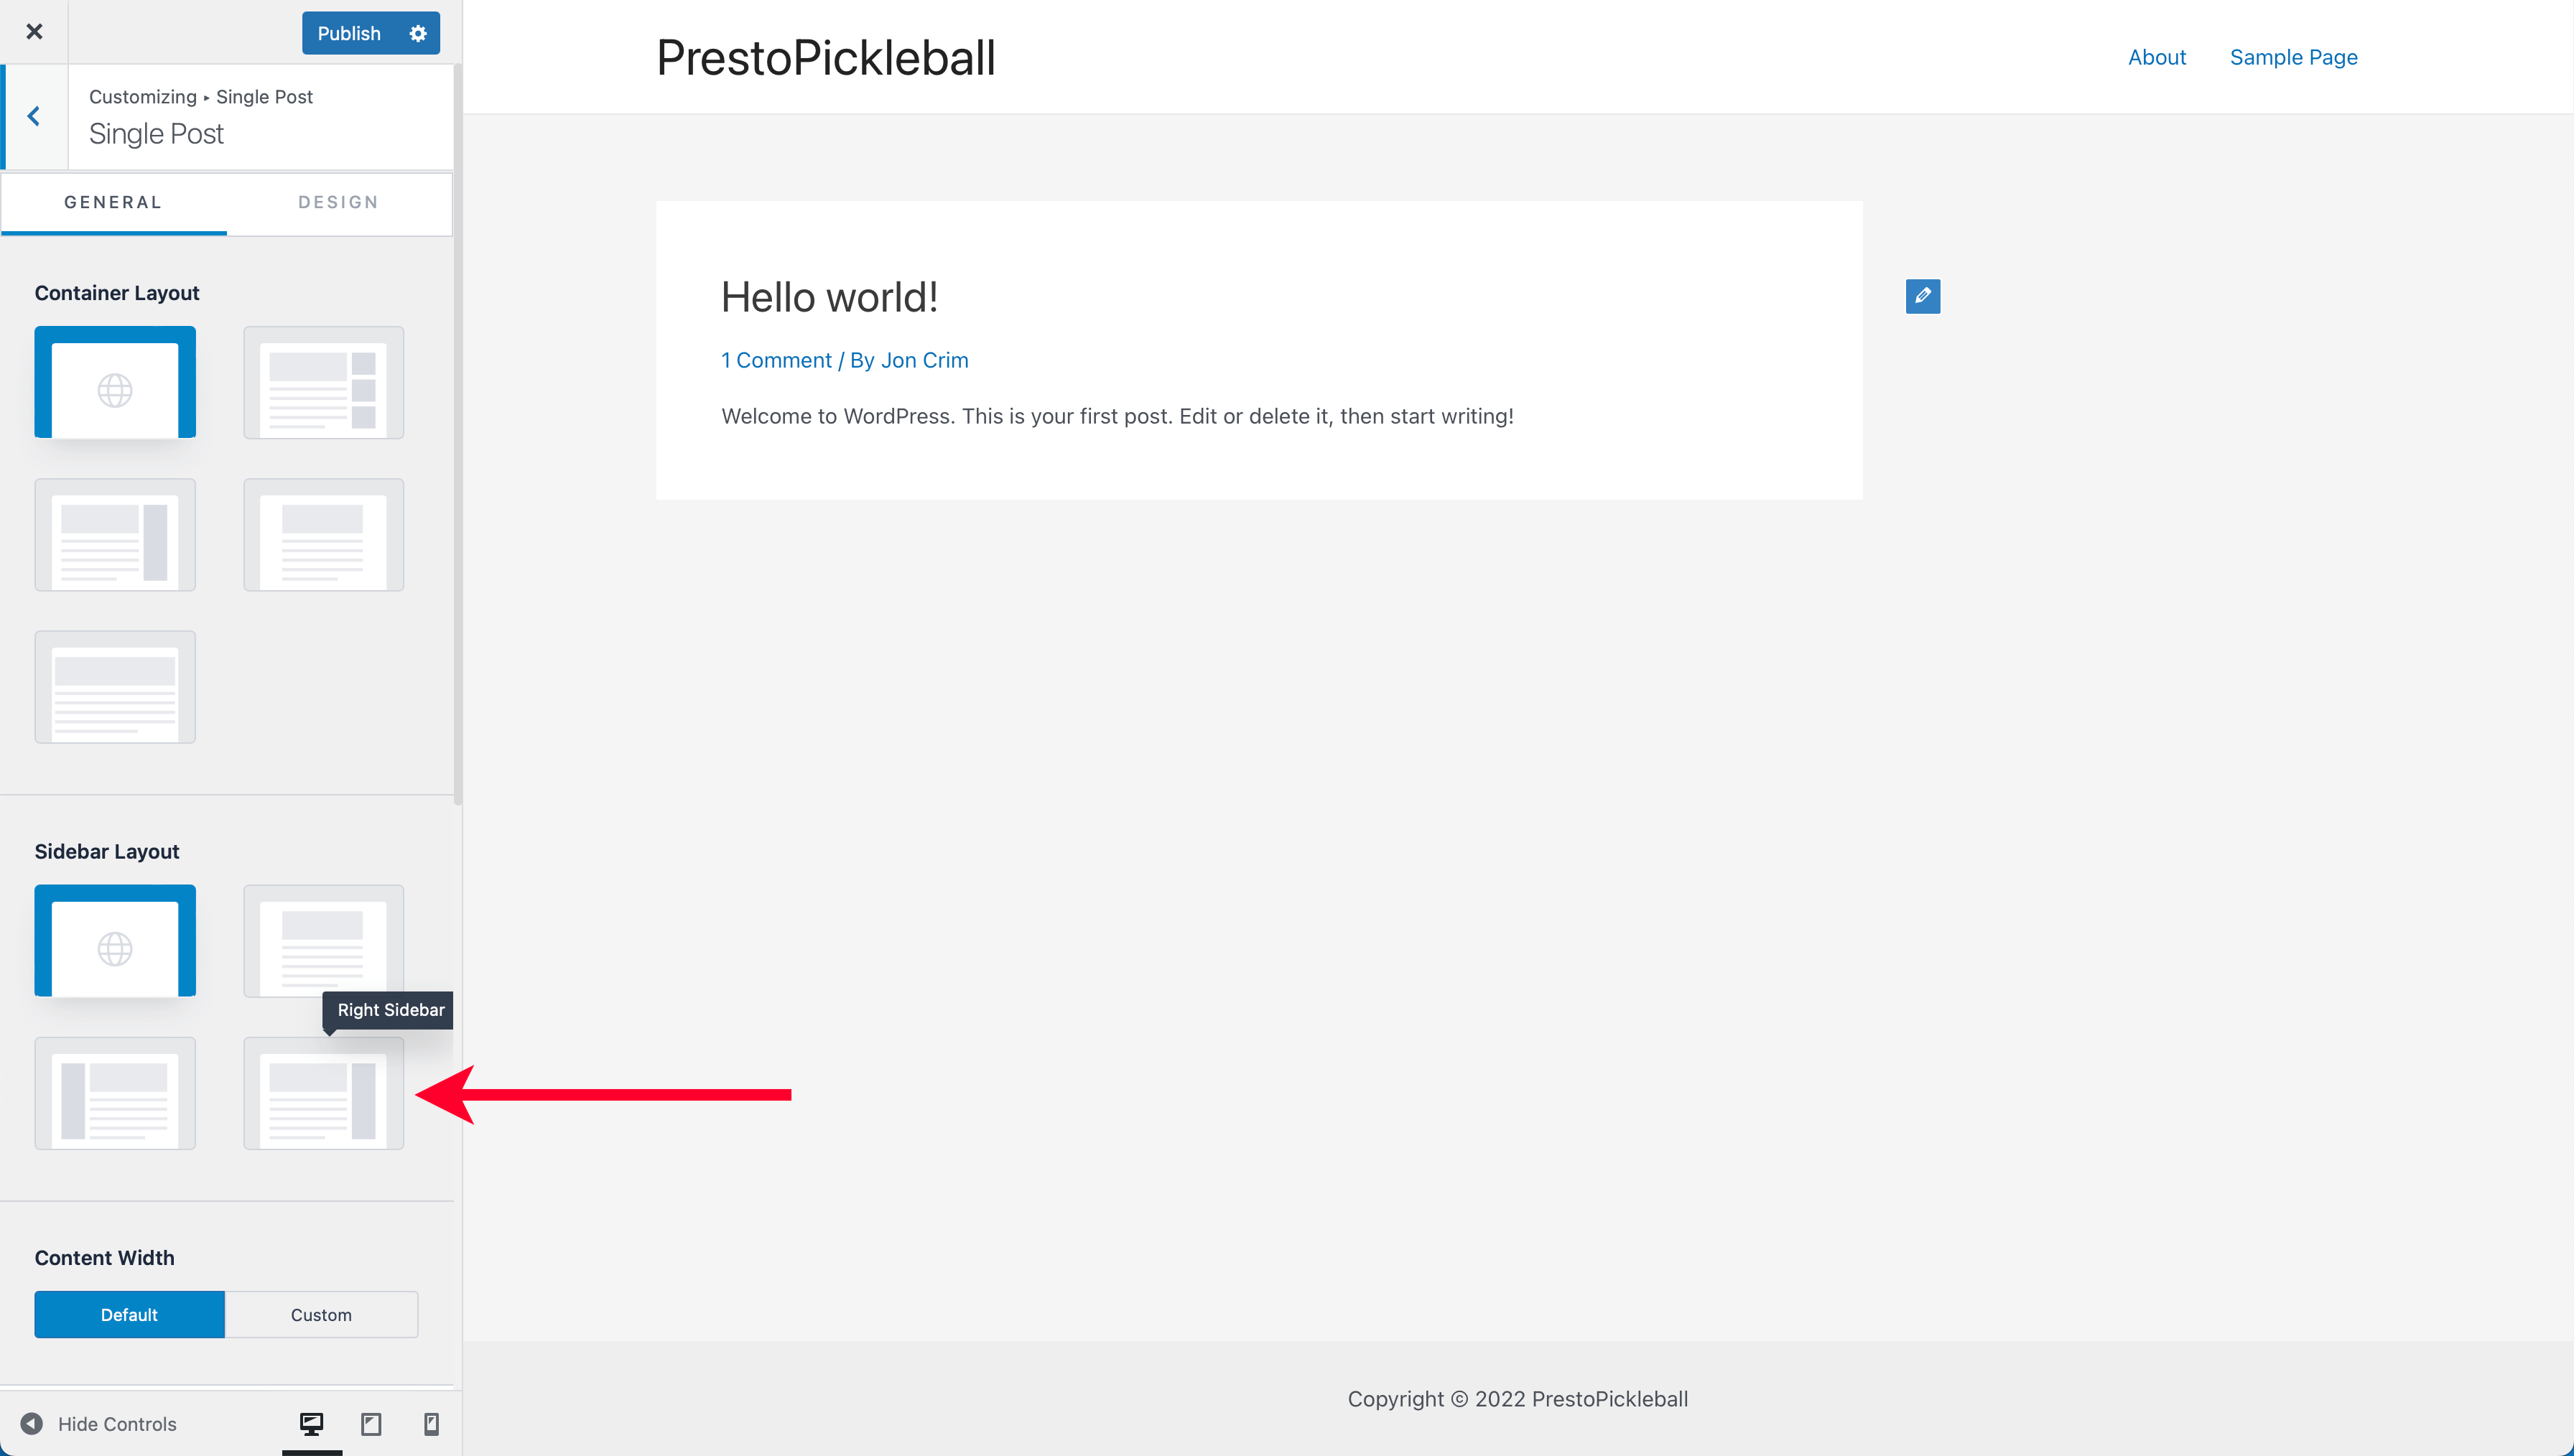
Next, scroll down to the bottom of the sidebar. Under the “Meta” heading, click the eye icon next to “Category” to toggle this feature off.
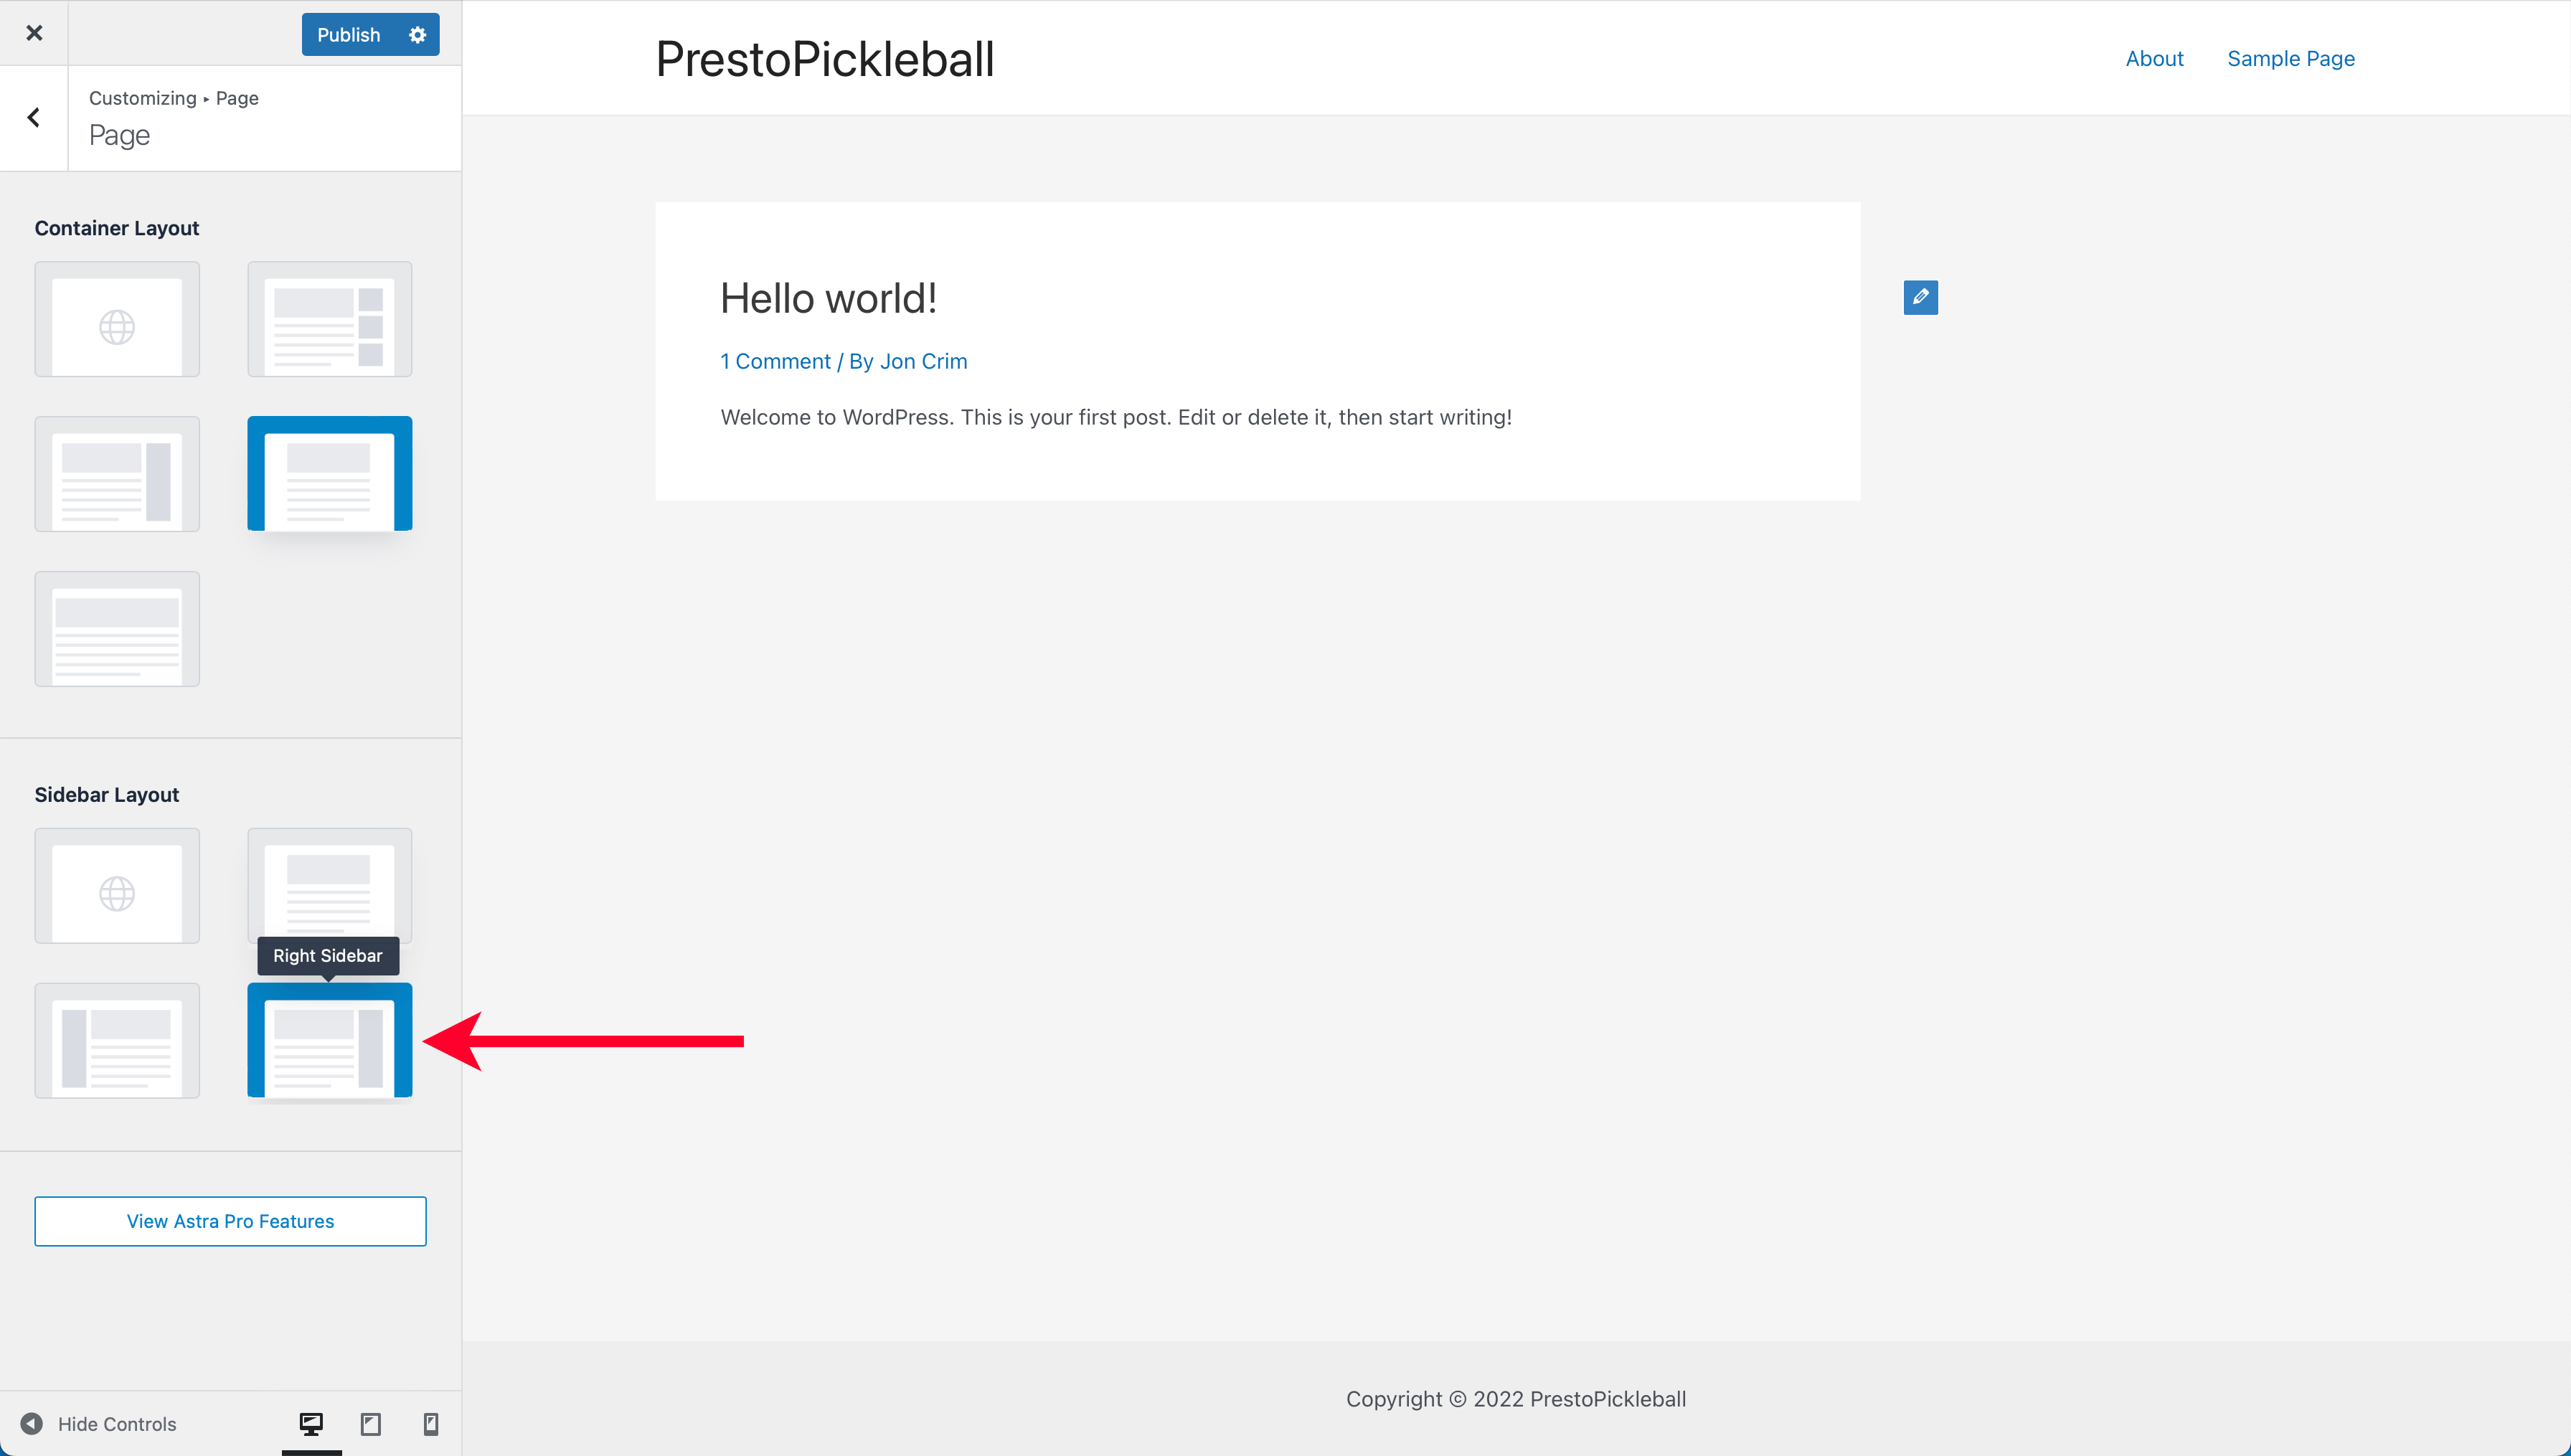
Now, click the back arrow twice in the theme editor’s sidebar and select the “Page” menu.
Under the “Sidebar Layout” section, select the “Right Sidebar.”
Click the back arrow in the theme editor’s sidebar and select “Footer Builder.”
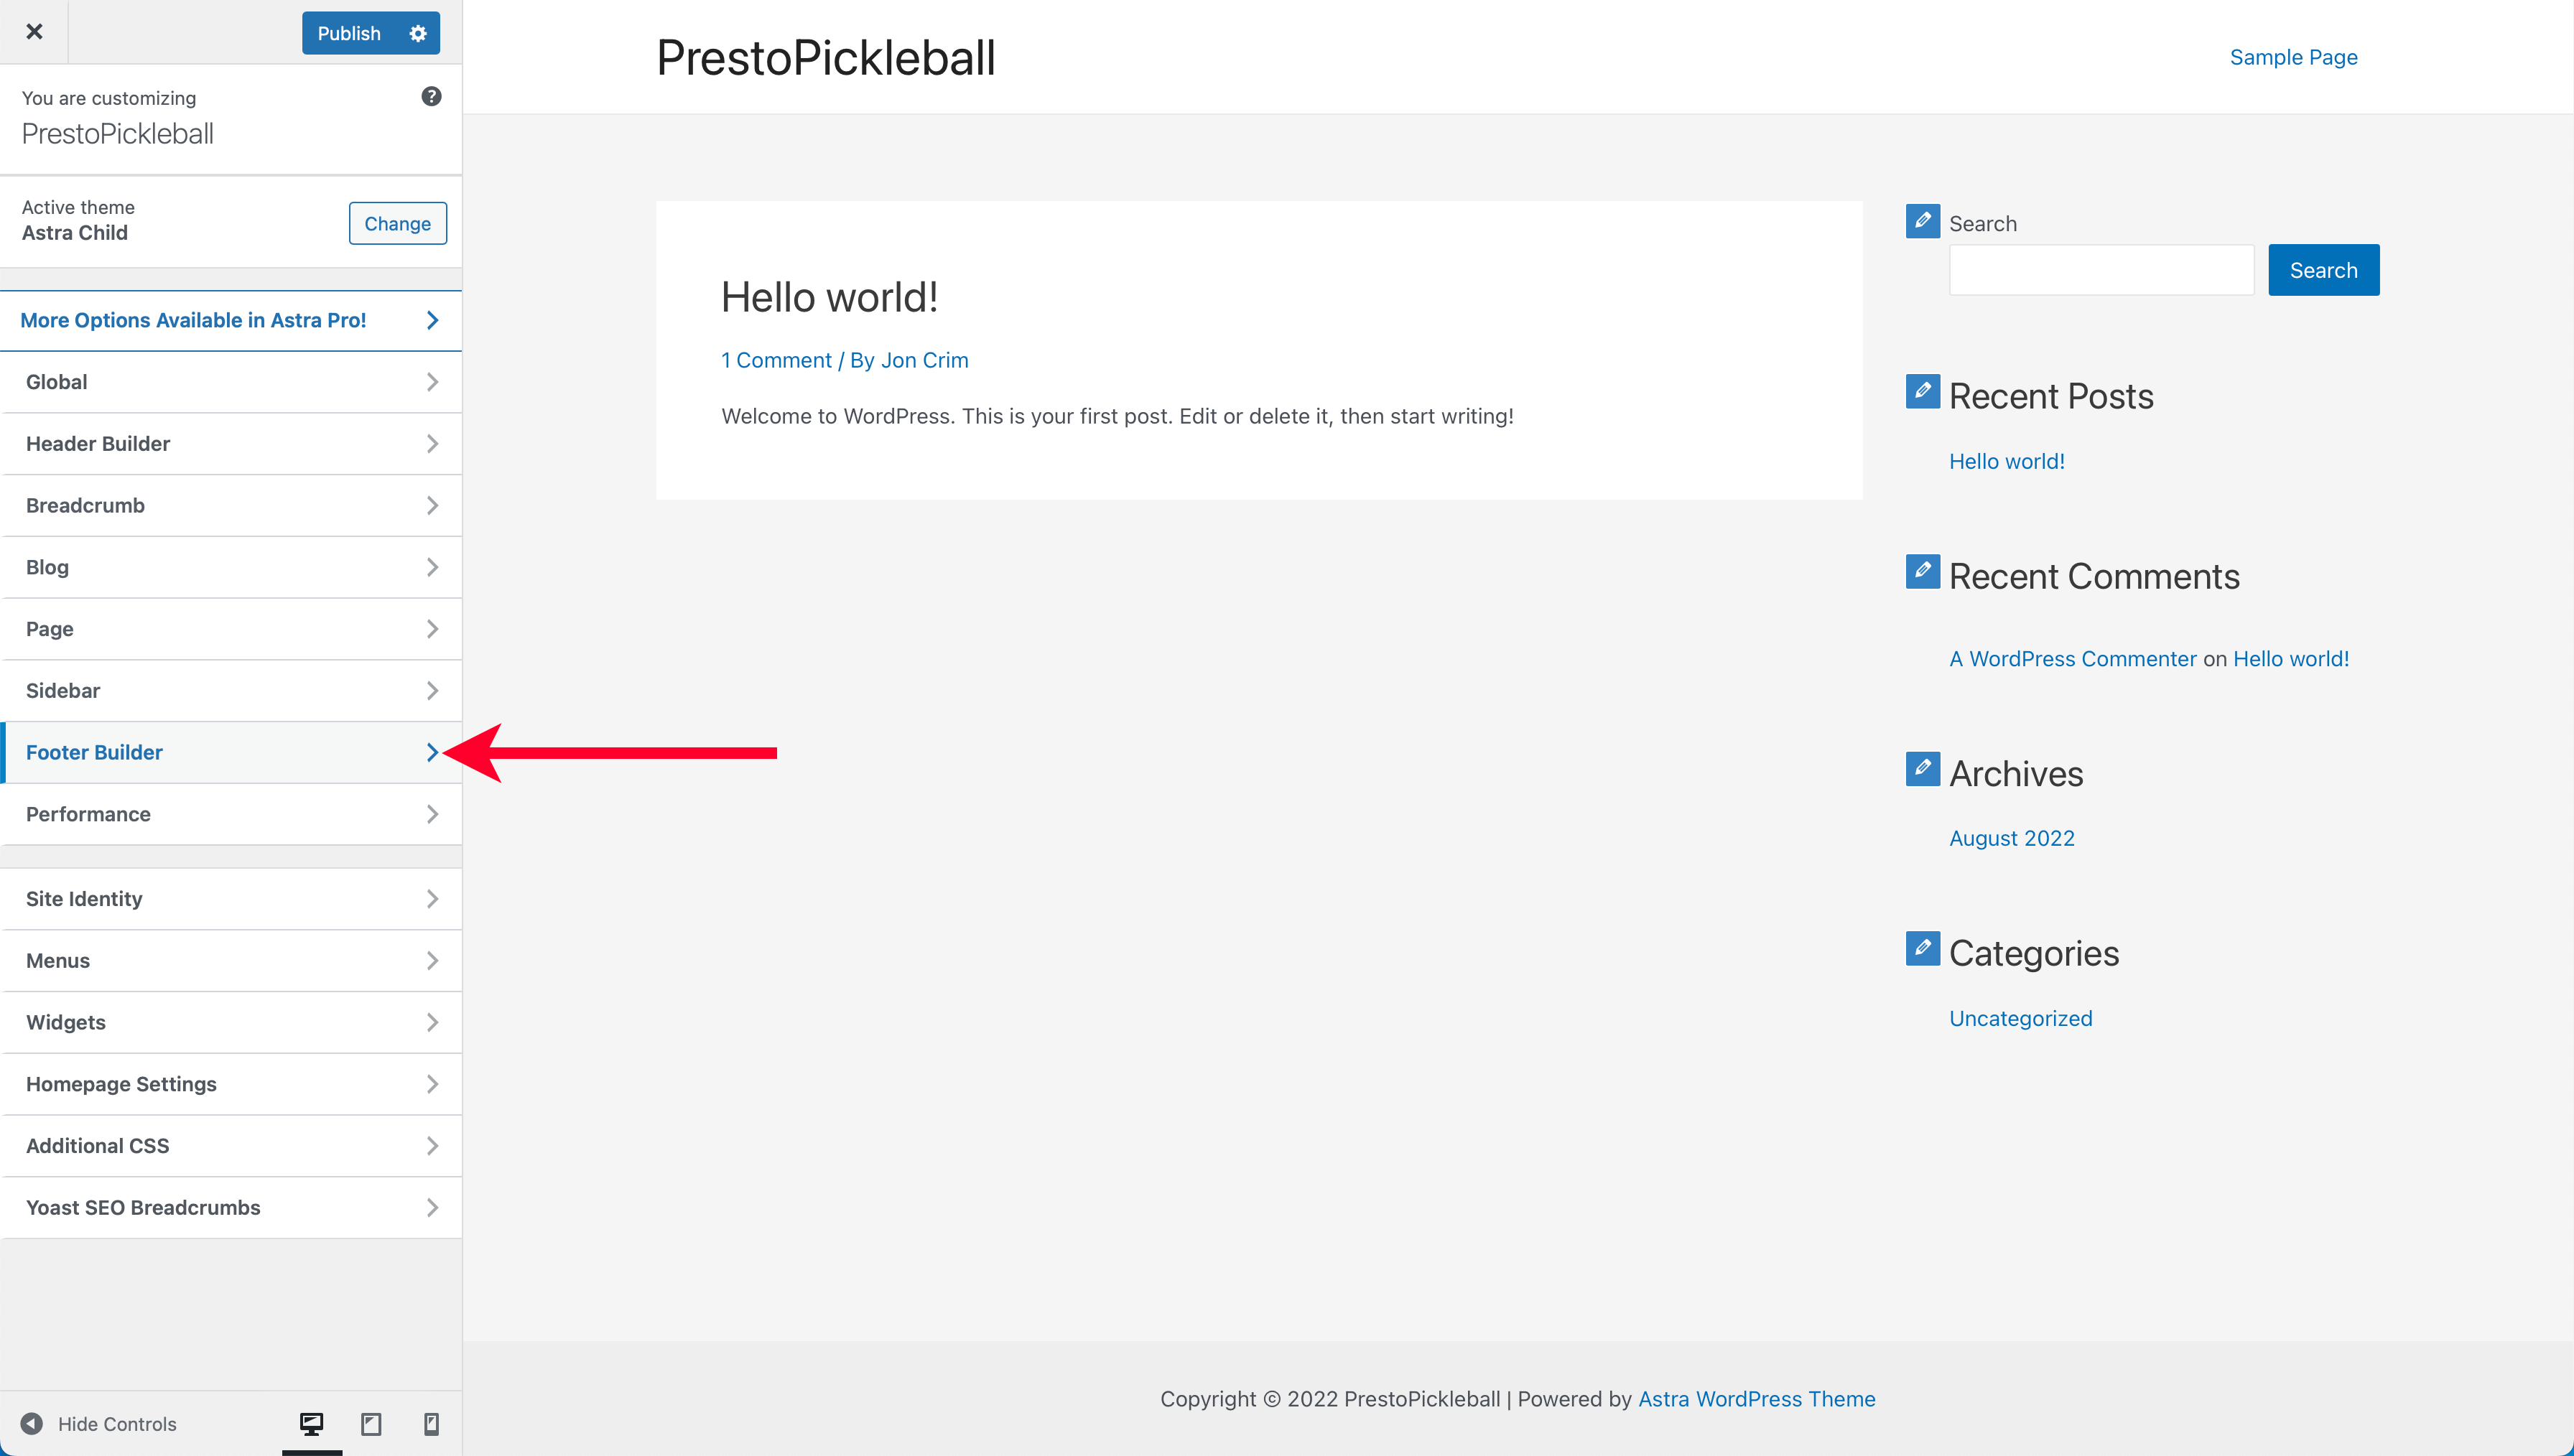
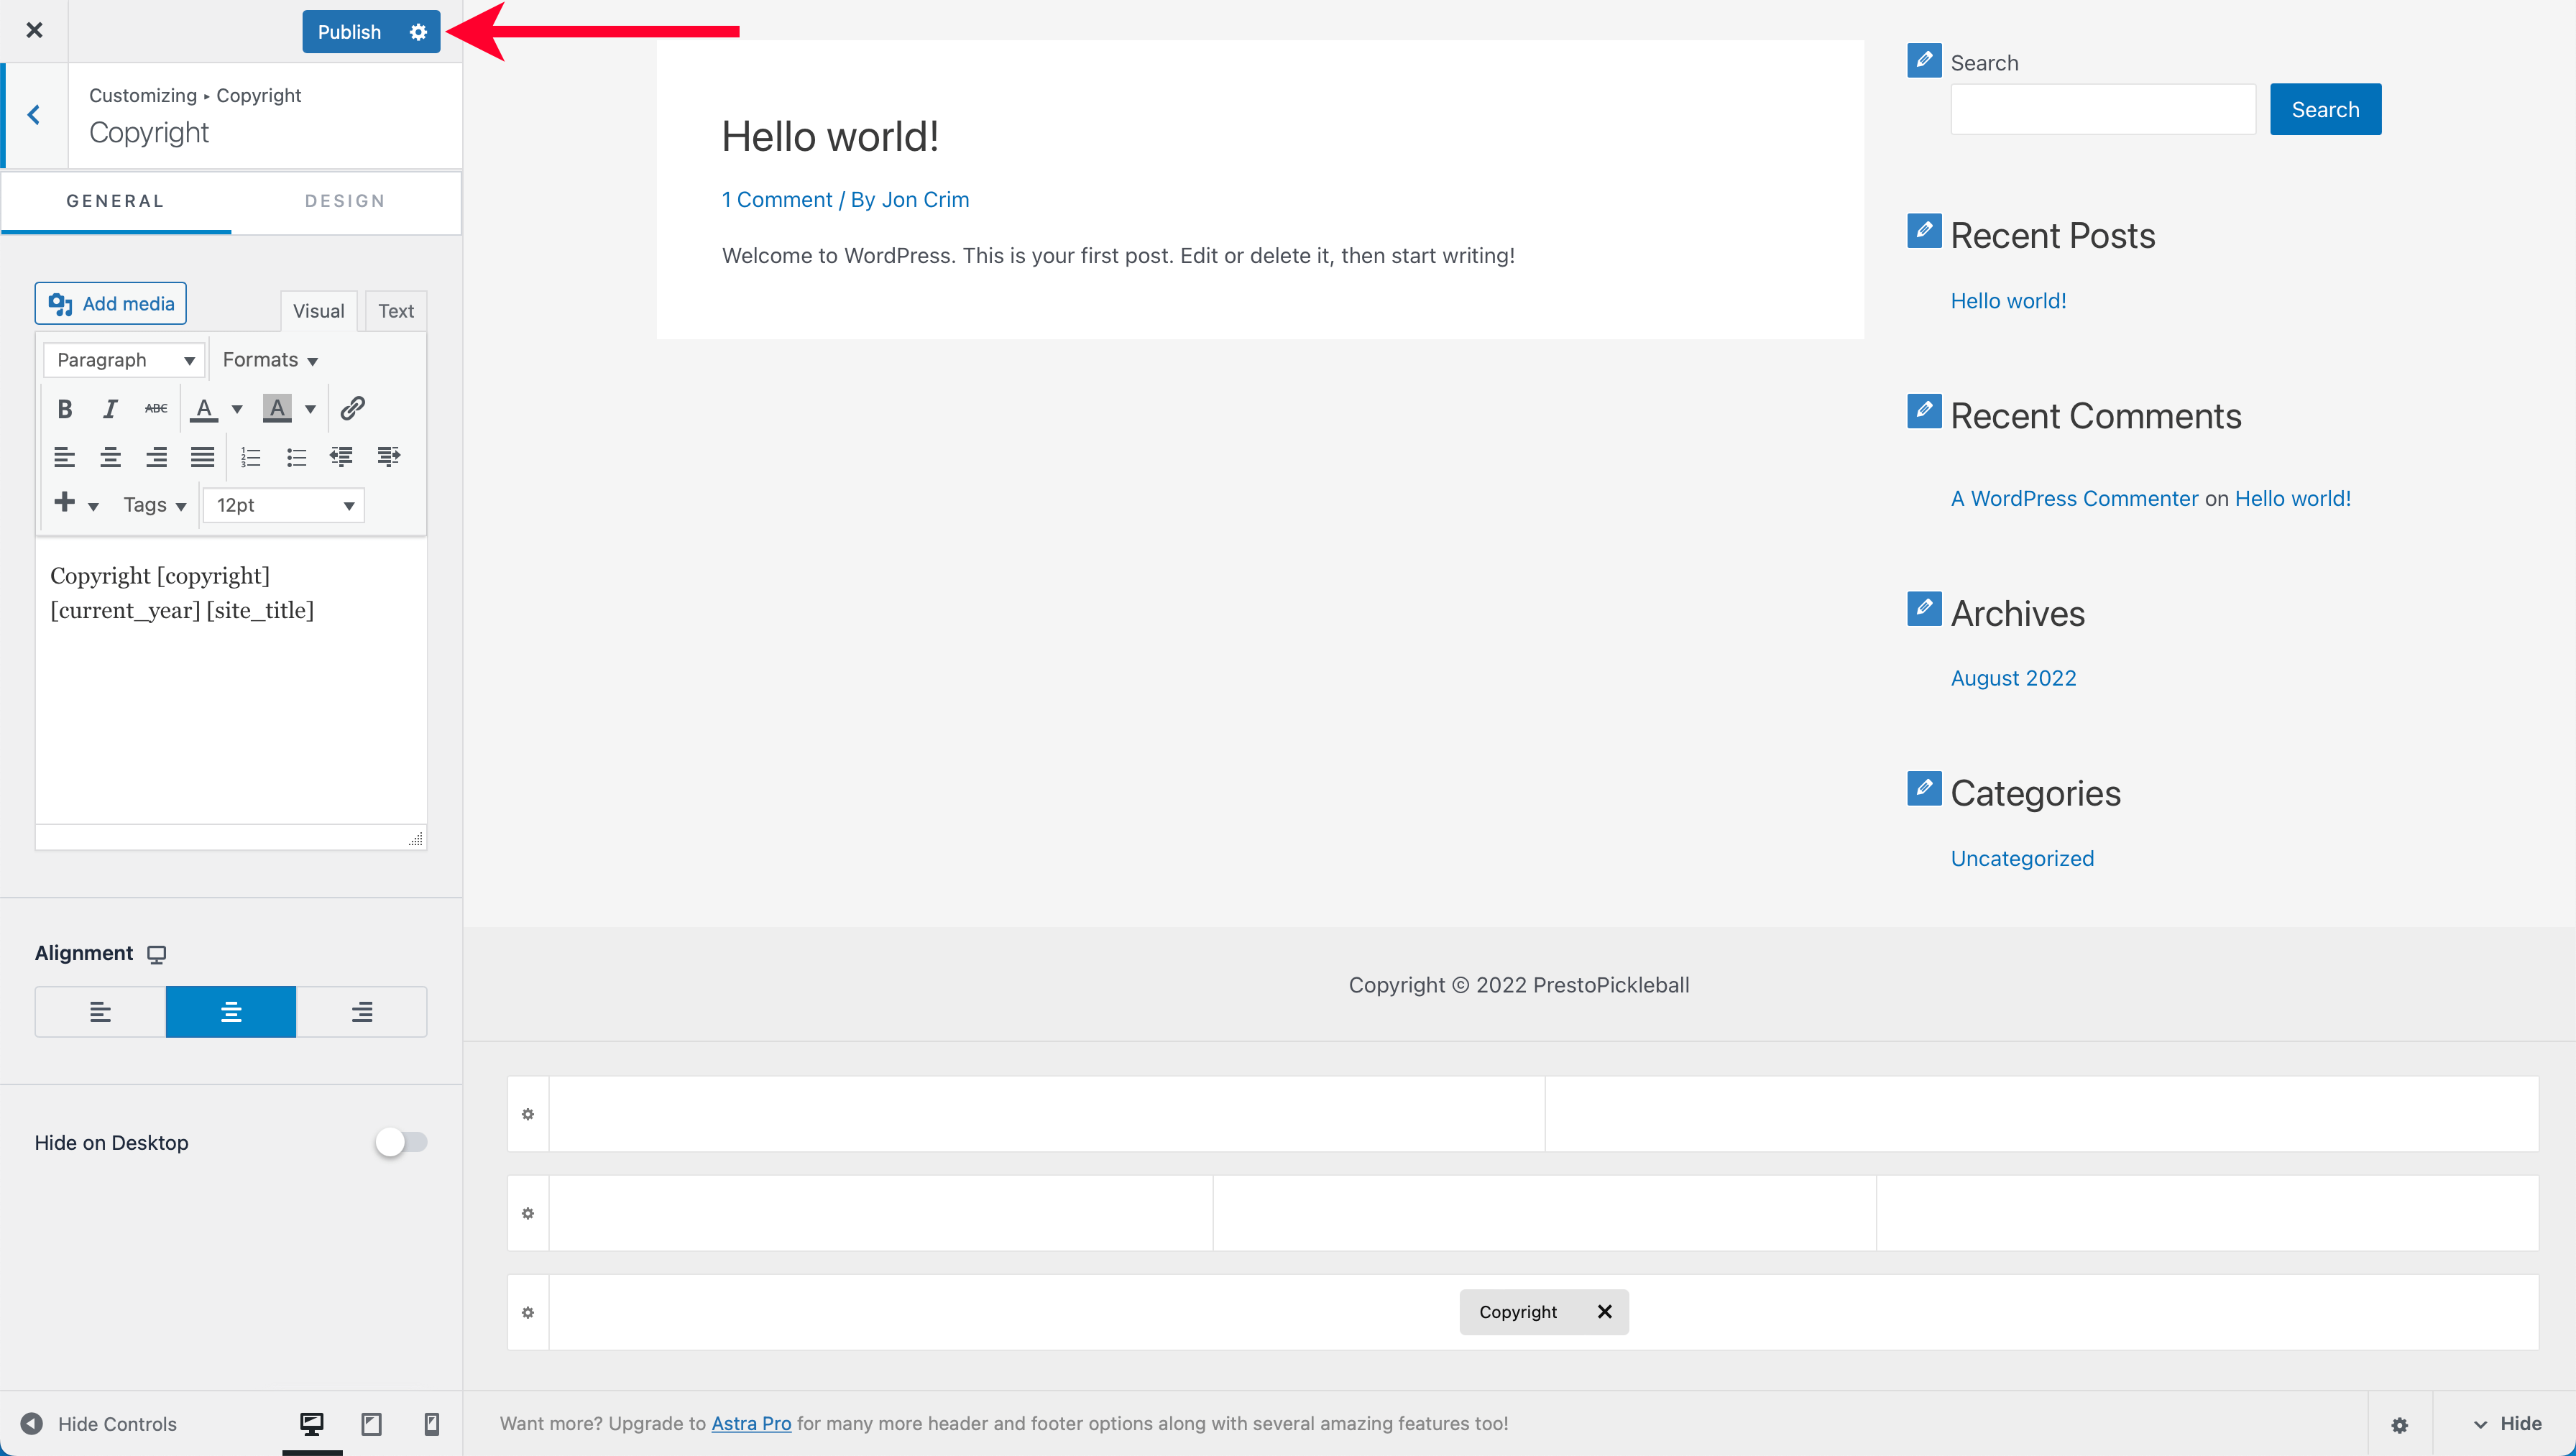
Now, select “Copyright” from the sidebar. In the sidebar textbox, highlight and delete ” | Powered by [theme_autor].”

Finally, click the “Publish” button in the sidebar.
Nice work! Let’s move on.
Creating a Site Icon
A site icon appears in a browser’s tab when viewing your website, which helps users easily recognize a website when jumping back and forth. Here are a few examples.
As you can see, there is no default site icon for the website I’m setting up with you, so we’ll add one to give it a polished look when people visit.
Start by visiting this site icon generator. Once there, you’ll see you can change various elements for your site icon.
I recommend using the first letter of your website’s name for simplicity. Then you can edit the rest of the design for your site icon as you’d like. As you make changes, the preview updates to reflect those changes.
Once you’re happy, click the “Download” button on the page.
Once downloaded, open your website’s WordPress account, click “Appearance” in the left-hand navigation, and select the “Customize” sub-menu.
Next, click the “Site Identity” menu from the theme editor’s sidebar.
Then click “Select Site Icon.”
Click the “Select Files” button and navigate to the “favicon_io” folder you downloaded from the site icon generator’s website, open it, and select the file named “android-chrome-512×512.png.” Finally, click the “Upload” button.
Once uploaded, add the “Alt Text” and “Title” for the image with the name of your website plus the words “Site Icon,” then click the “Select” button.
To save your new site icon, click “Publish” at the top of the theme editor’s sidebar.
Now you can navigate to your website’s homepage, and you should see your site icon showing in your browser’s tab. Keep in mind that it can sometimes take some time to show up, so don’t stress out if the change doesn’t take effect immediately.
To return to your WordPress account, click the “X” at the top left of the theme editor.
Remove Unnecessary Sidebar Widgets
Before we move on, let’s remove the widgets currently displayed in your website’s right-hand sidebar, which are unnecessary and don’t add value.
To start, select the “Widgets” menu under the “Appearance” section of your WordPress account’s left-hand navigation.
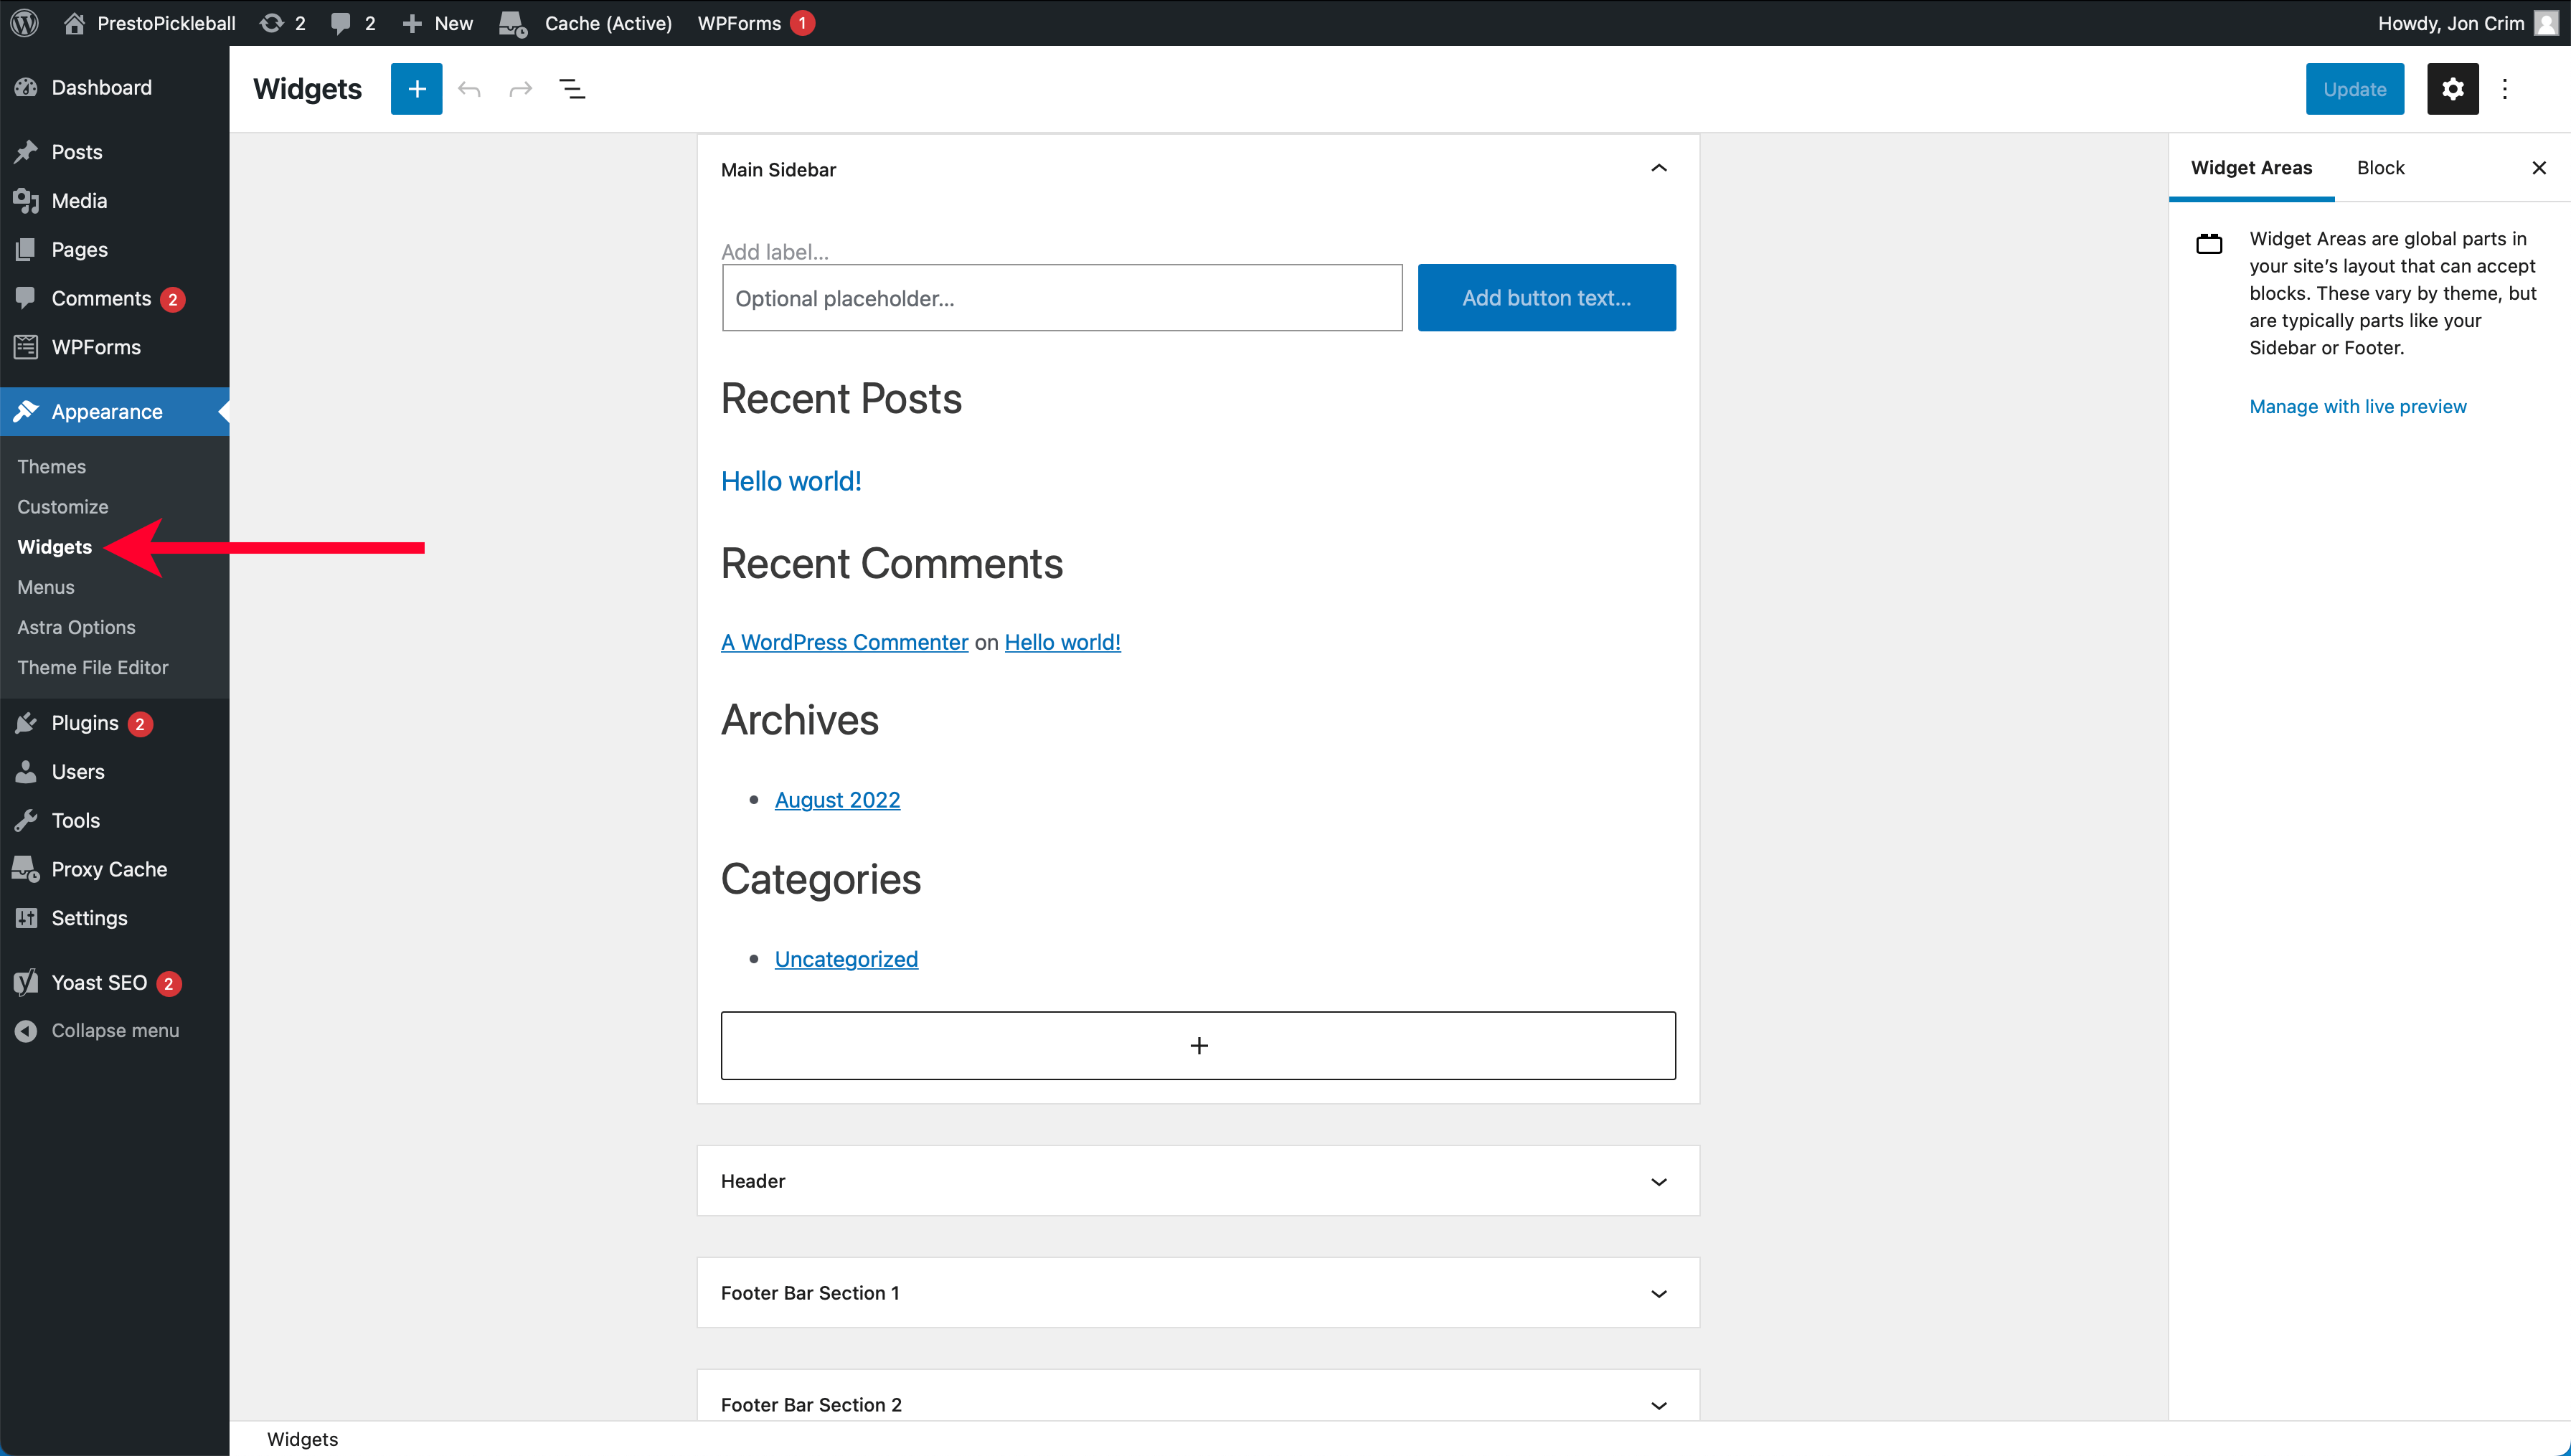
In the middle of the page, under “Main Sidebar,” you’ll see the following widgets:
- Search Bar
- Recent Posts
- Recent Comments
- Archives
- Categories
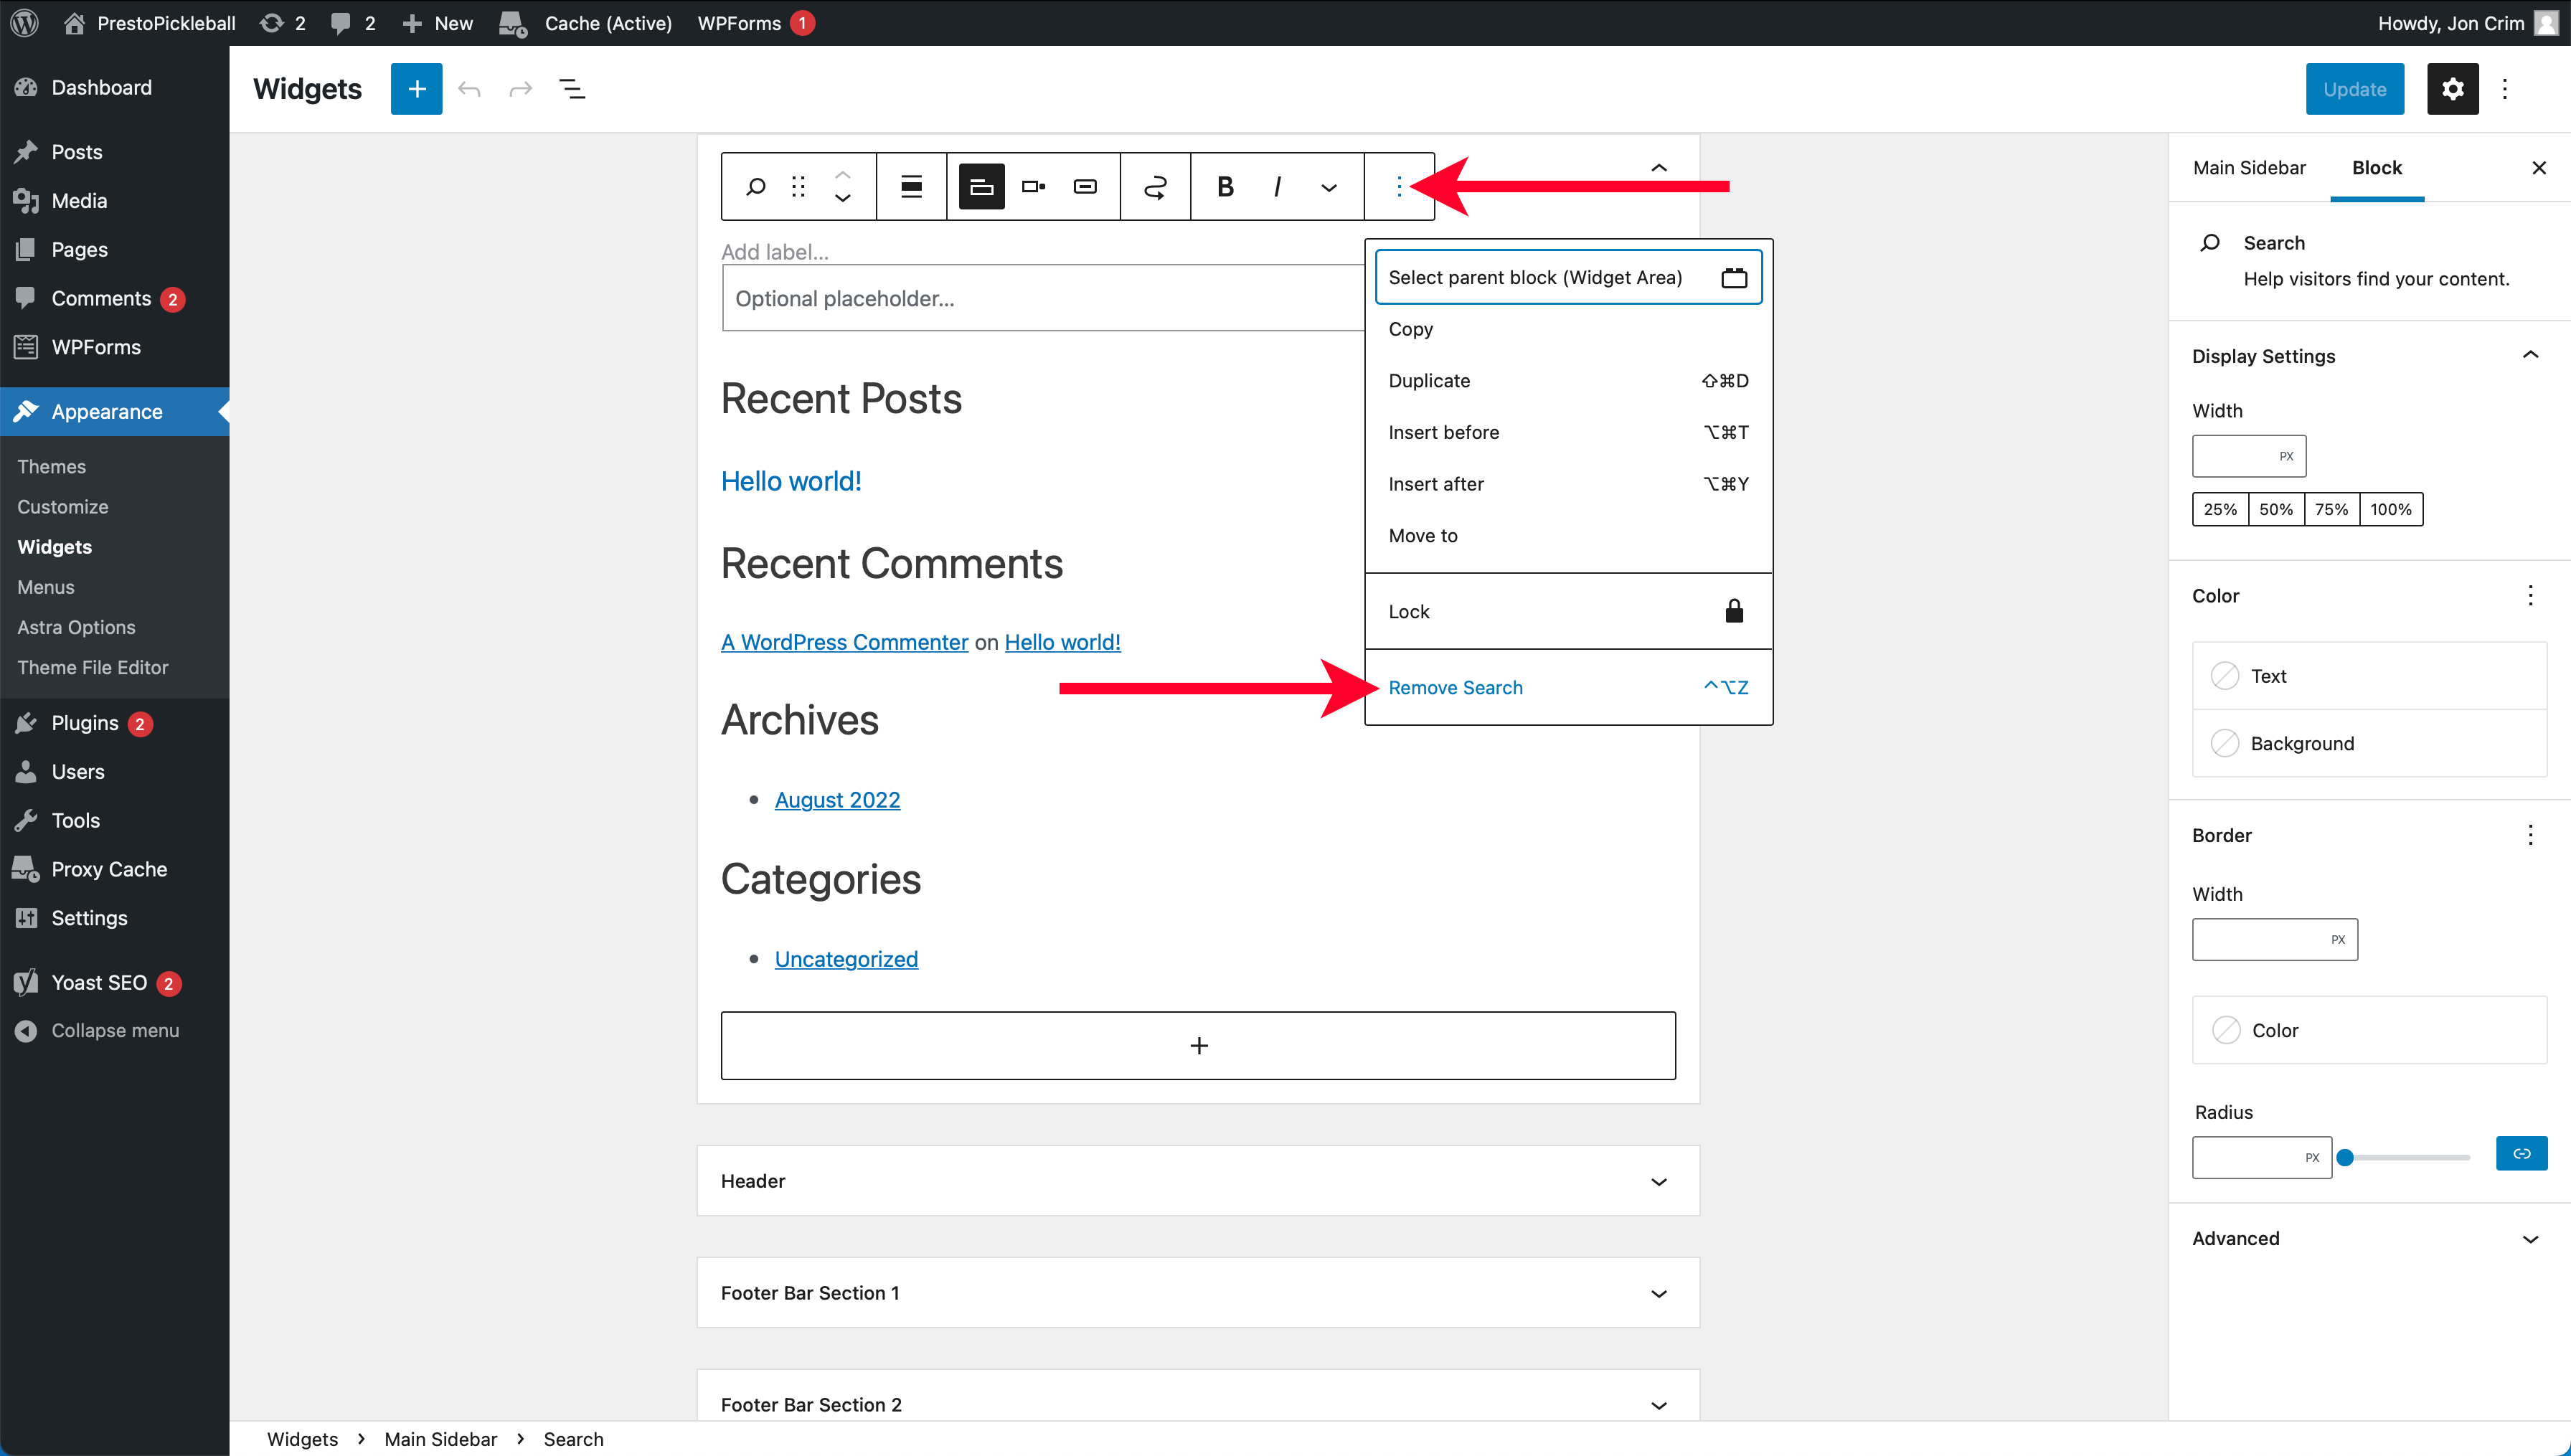
We’re going to delete all of them. To do so, start by clicking on the search widget, which will bring up an options bar for the widget.
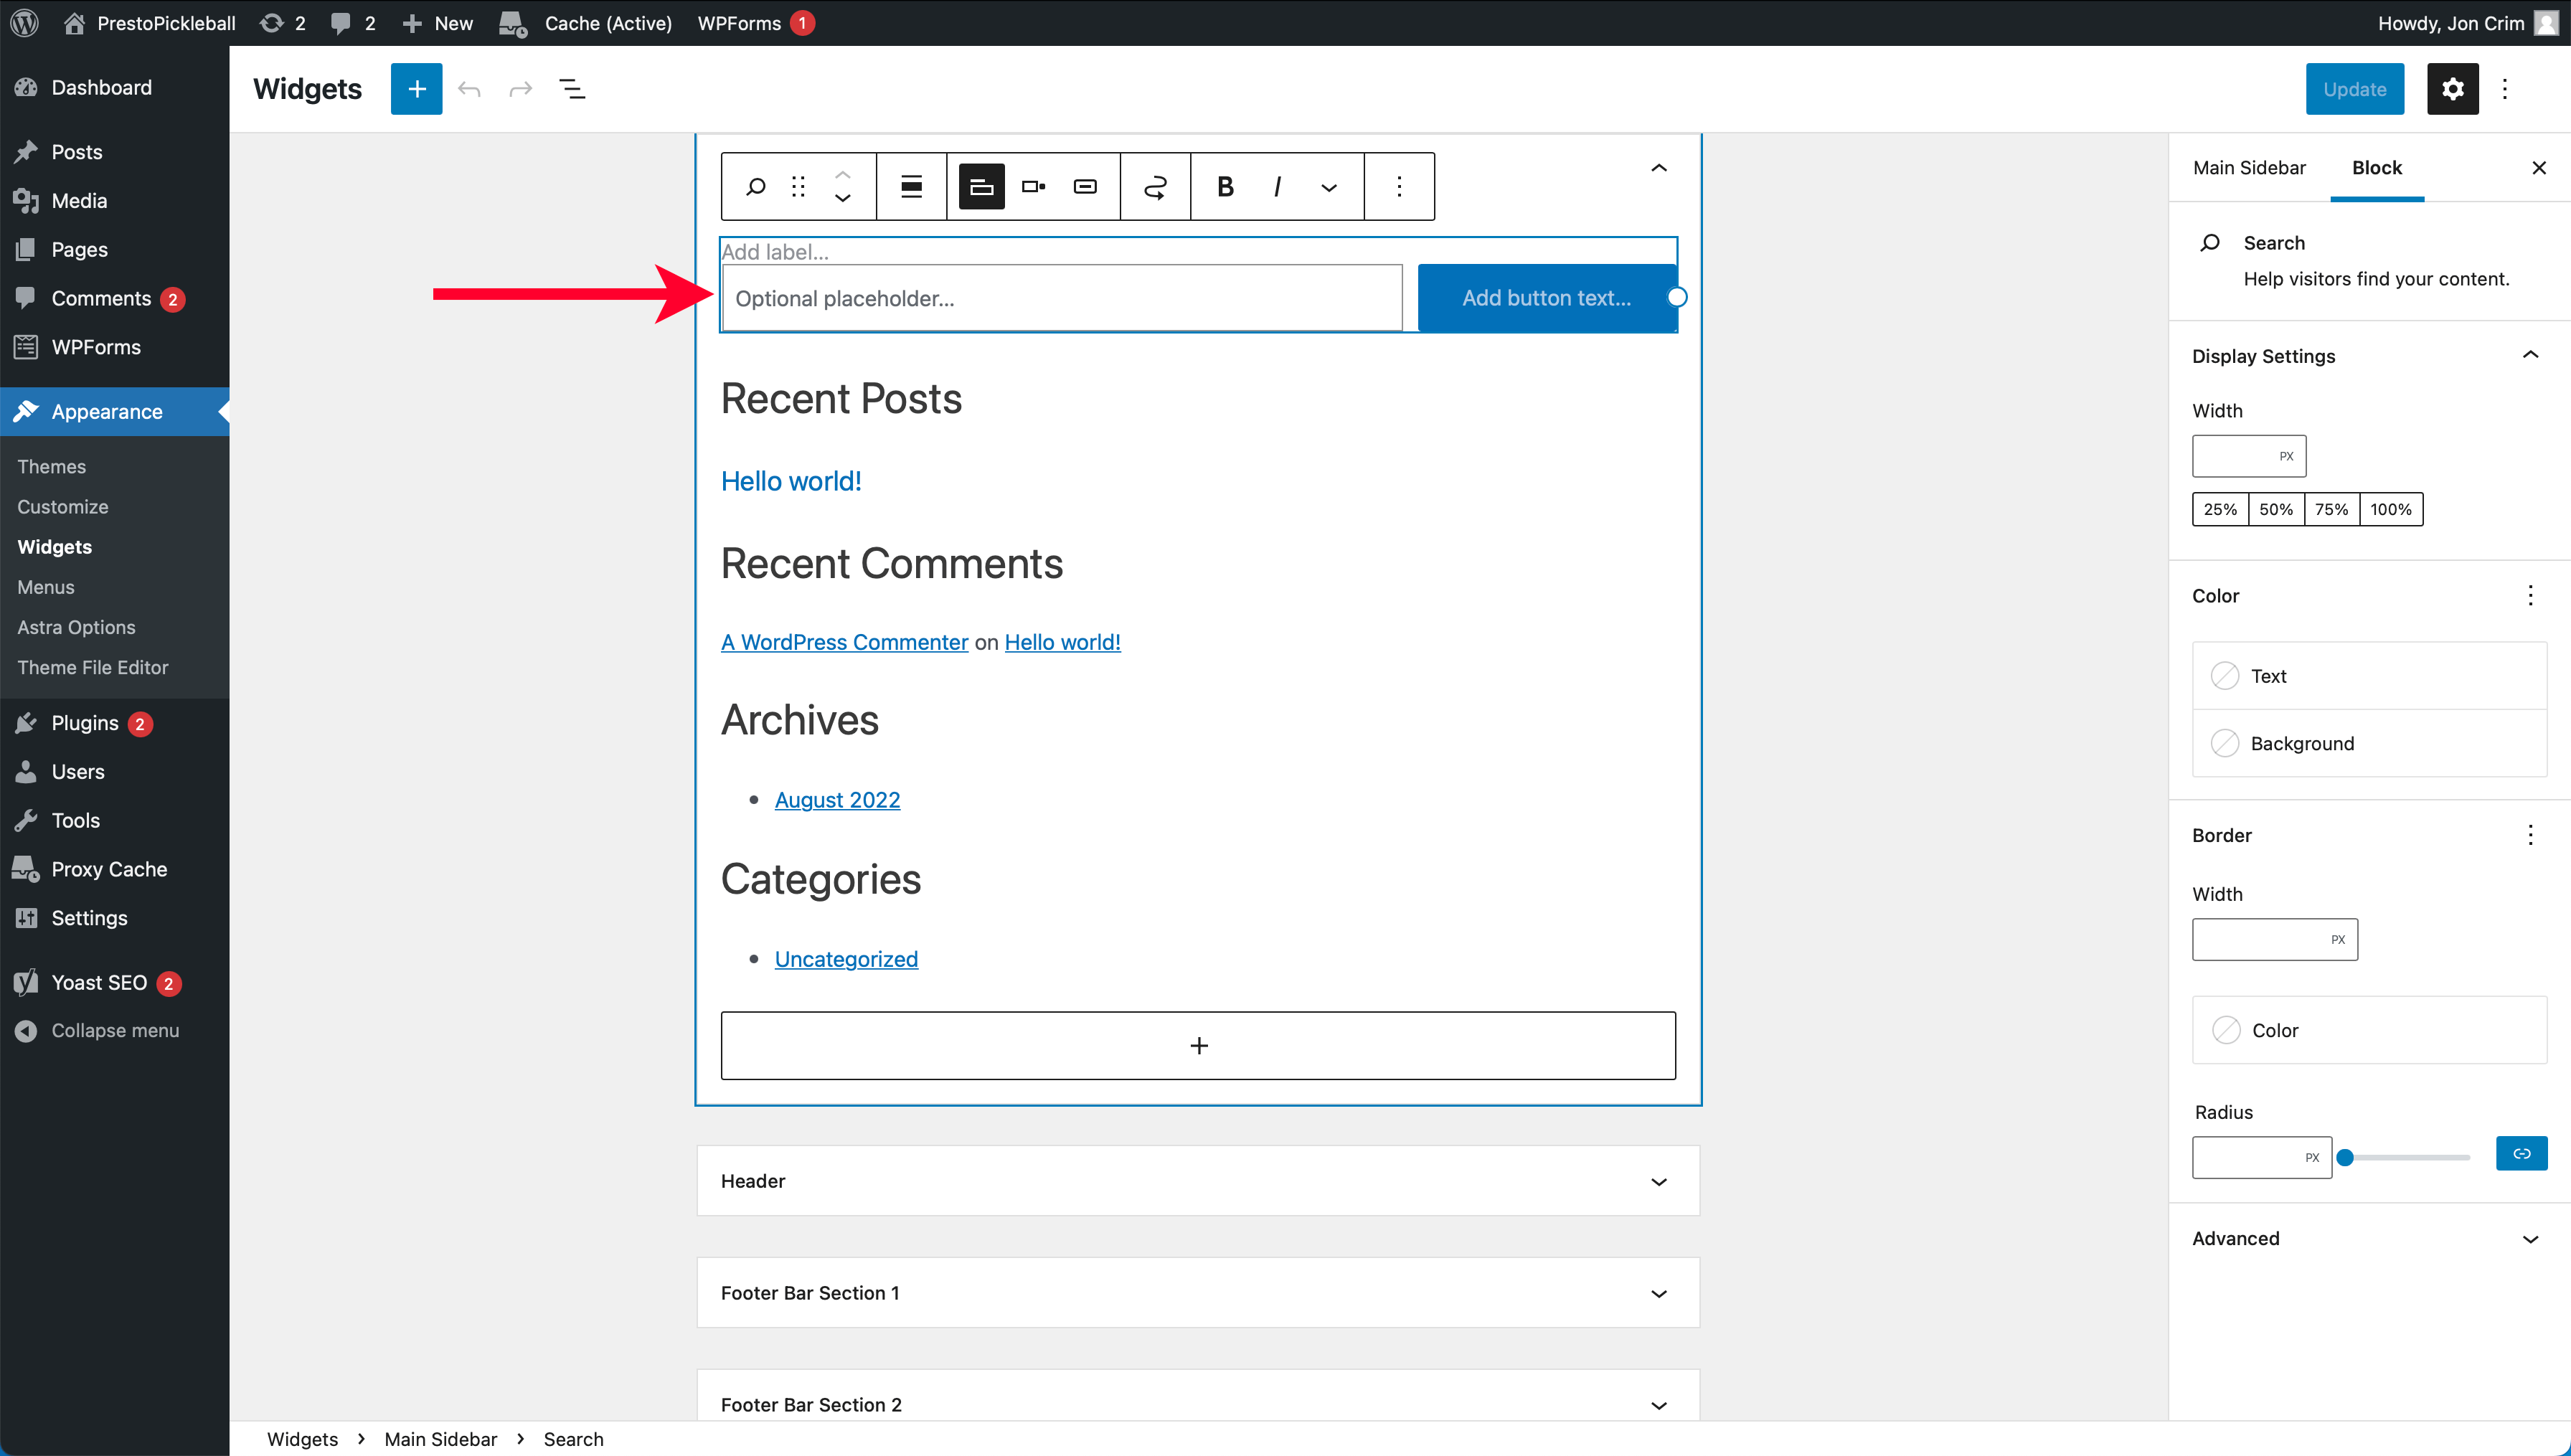
Click the button with three stacked dots to display additional options for the widget, then select “Remove Search” to remove the widget.
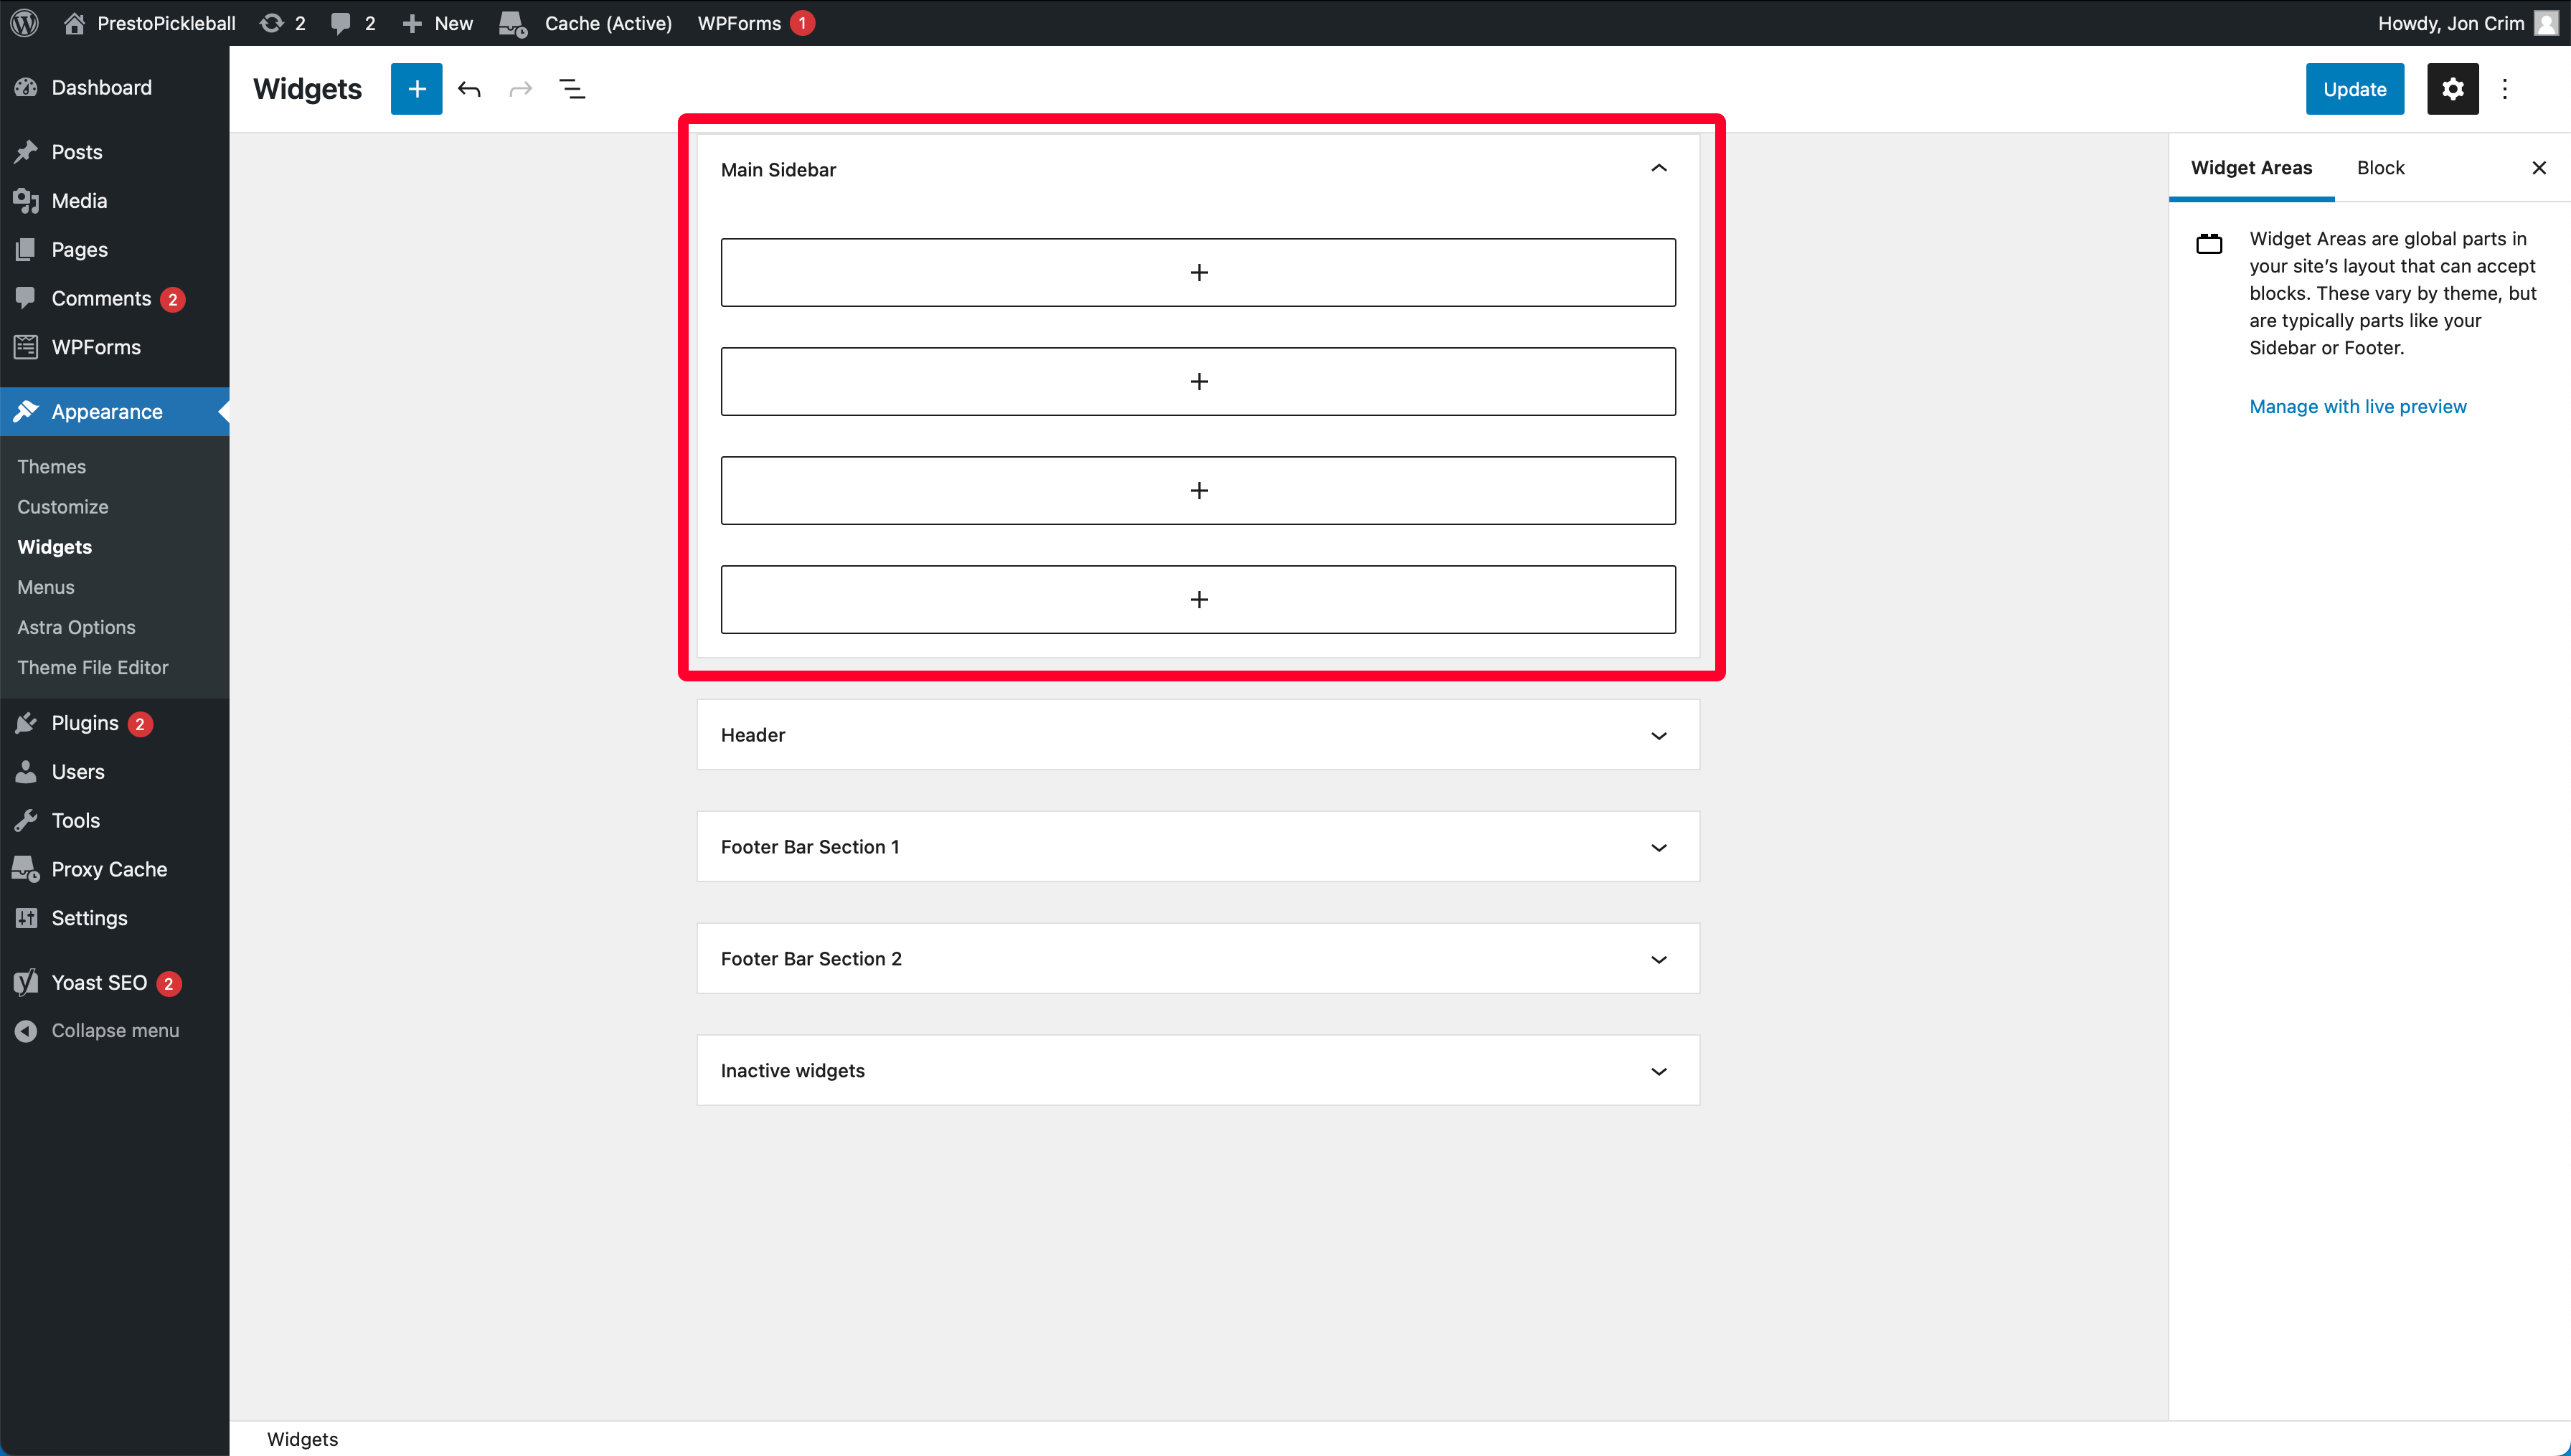
Select each additional widget and repeat the above steps until there are no more widgets. Your “Widgets” page should look as follows. If so, select the “Update” button to publish your changes.
To make sure all your changes take effect on your website, hover “Cache (Active)” at the top of your WordPress account and click “Purge Cache (All Pages).”

You’re all set! Your theme is now ready to go.
Step 7: Configure Plugins
WordPress plugins extend the functionality of your website, so we want to ensure you have the plugins you need and delete the ones that aren’t necessary for building your business.
Before we add a few plugins, let’s delete the ones we don’t need. We always want to use as few plugins as possible because too many can slow down your website and cause conflicts that break your site.
Delete Unnecessary Plugins
If you’re not already, log into your WordPress account. Remember, you can do so from your DreamHost account as we did at the beginning of Step 5 if you need a refresher.
Once logged into your WordPress account, navigate to the “Plugins” menu in the left-hand navigation of your WordPress account. You’ll see a list of installed plugins.
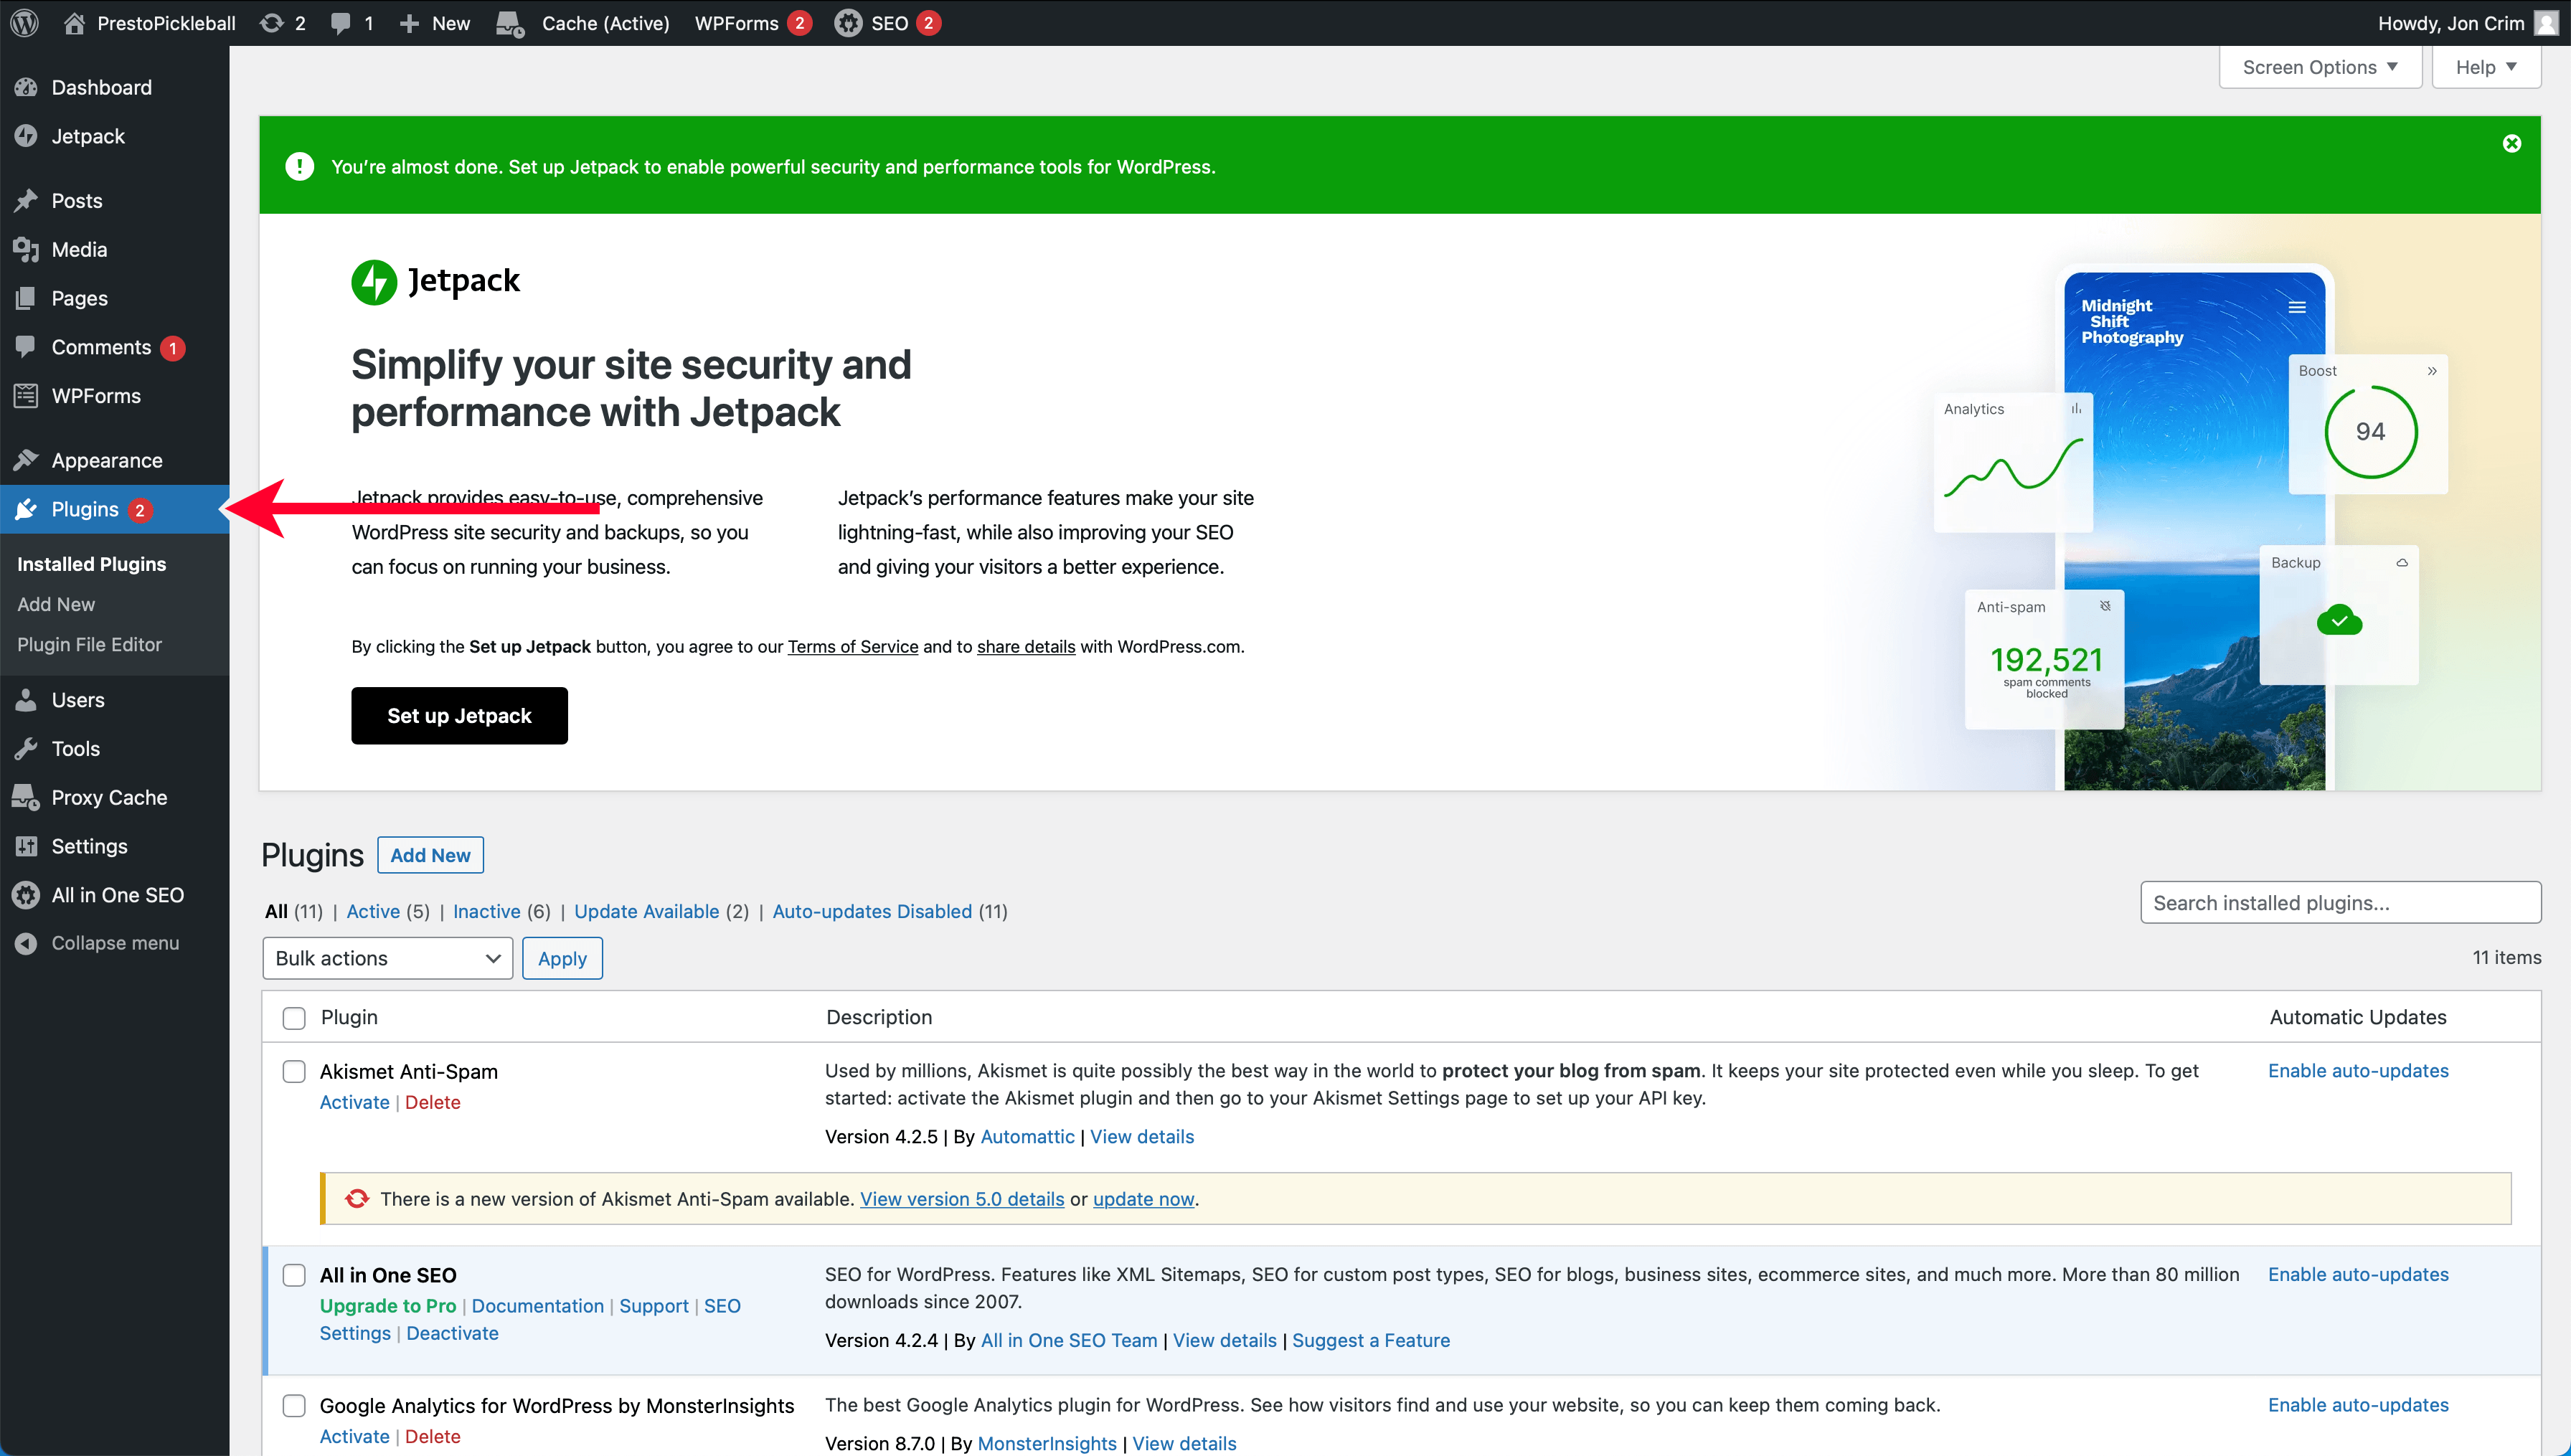
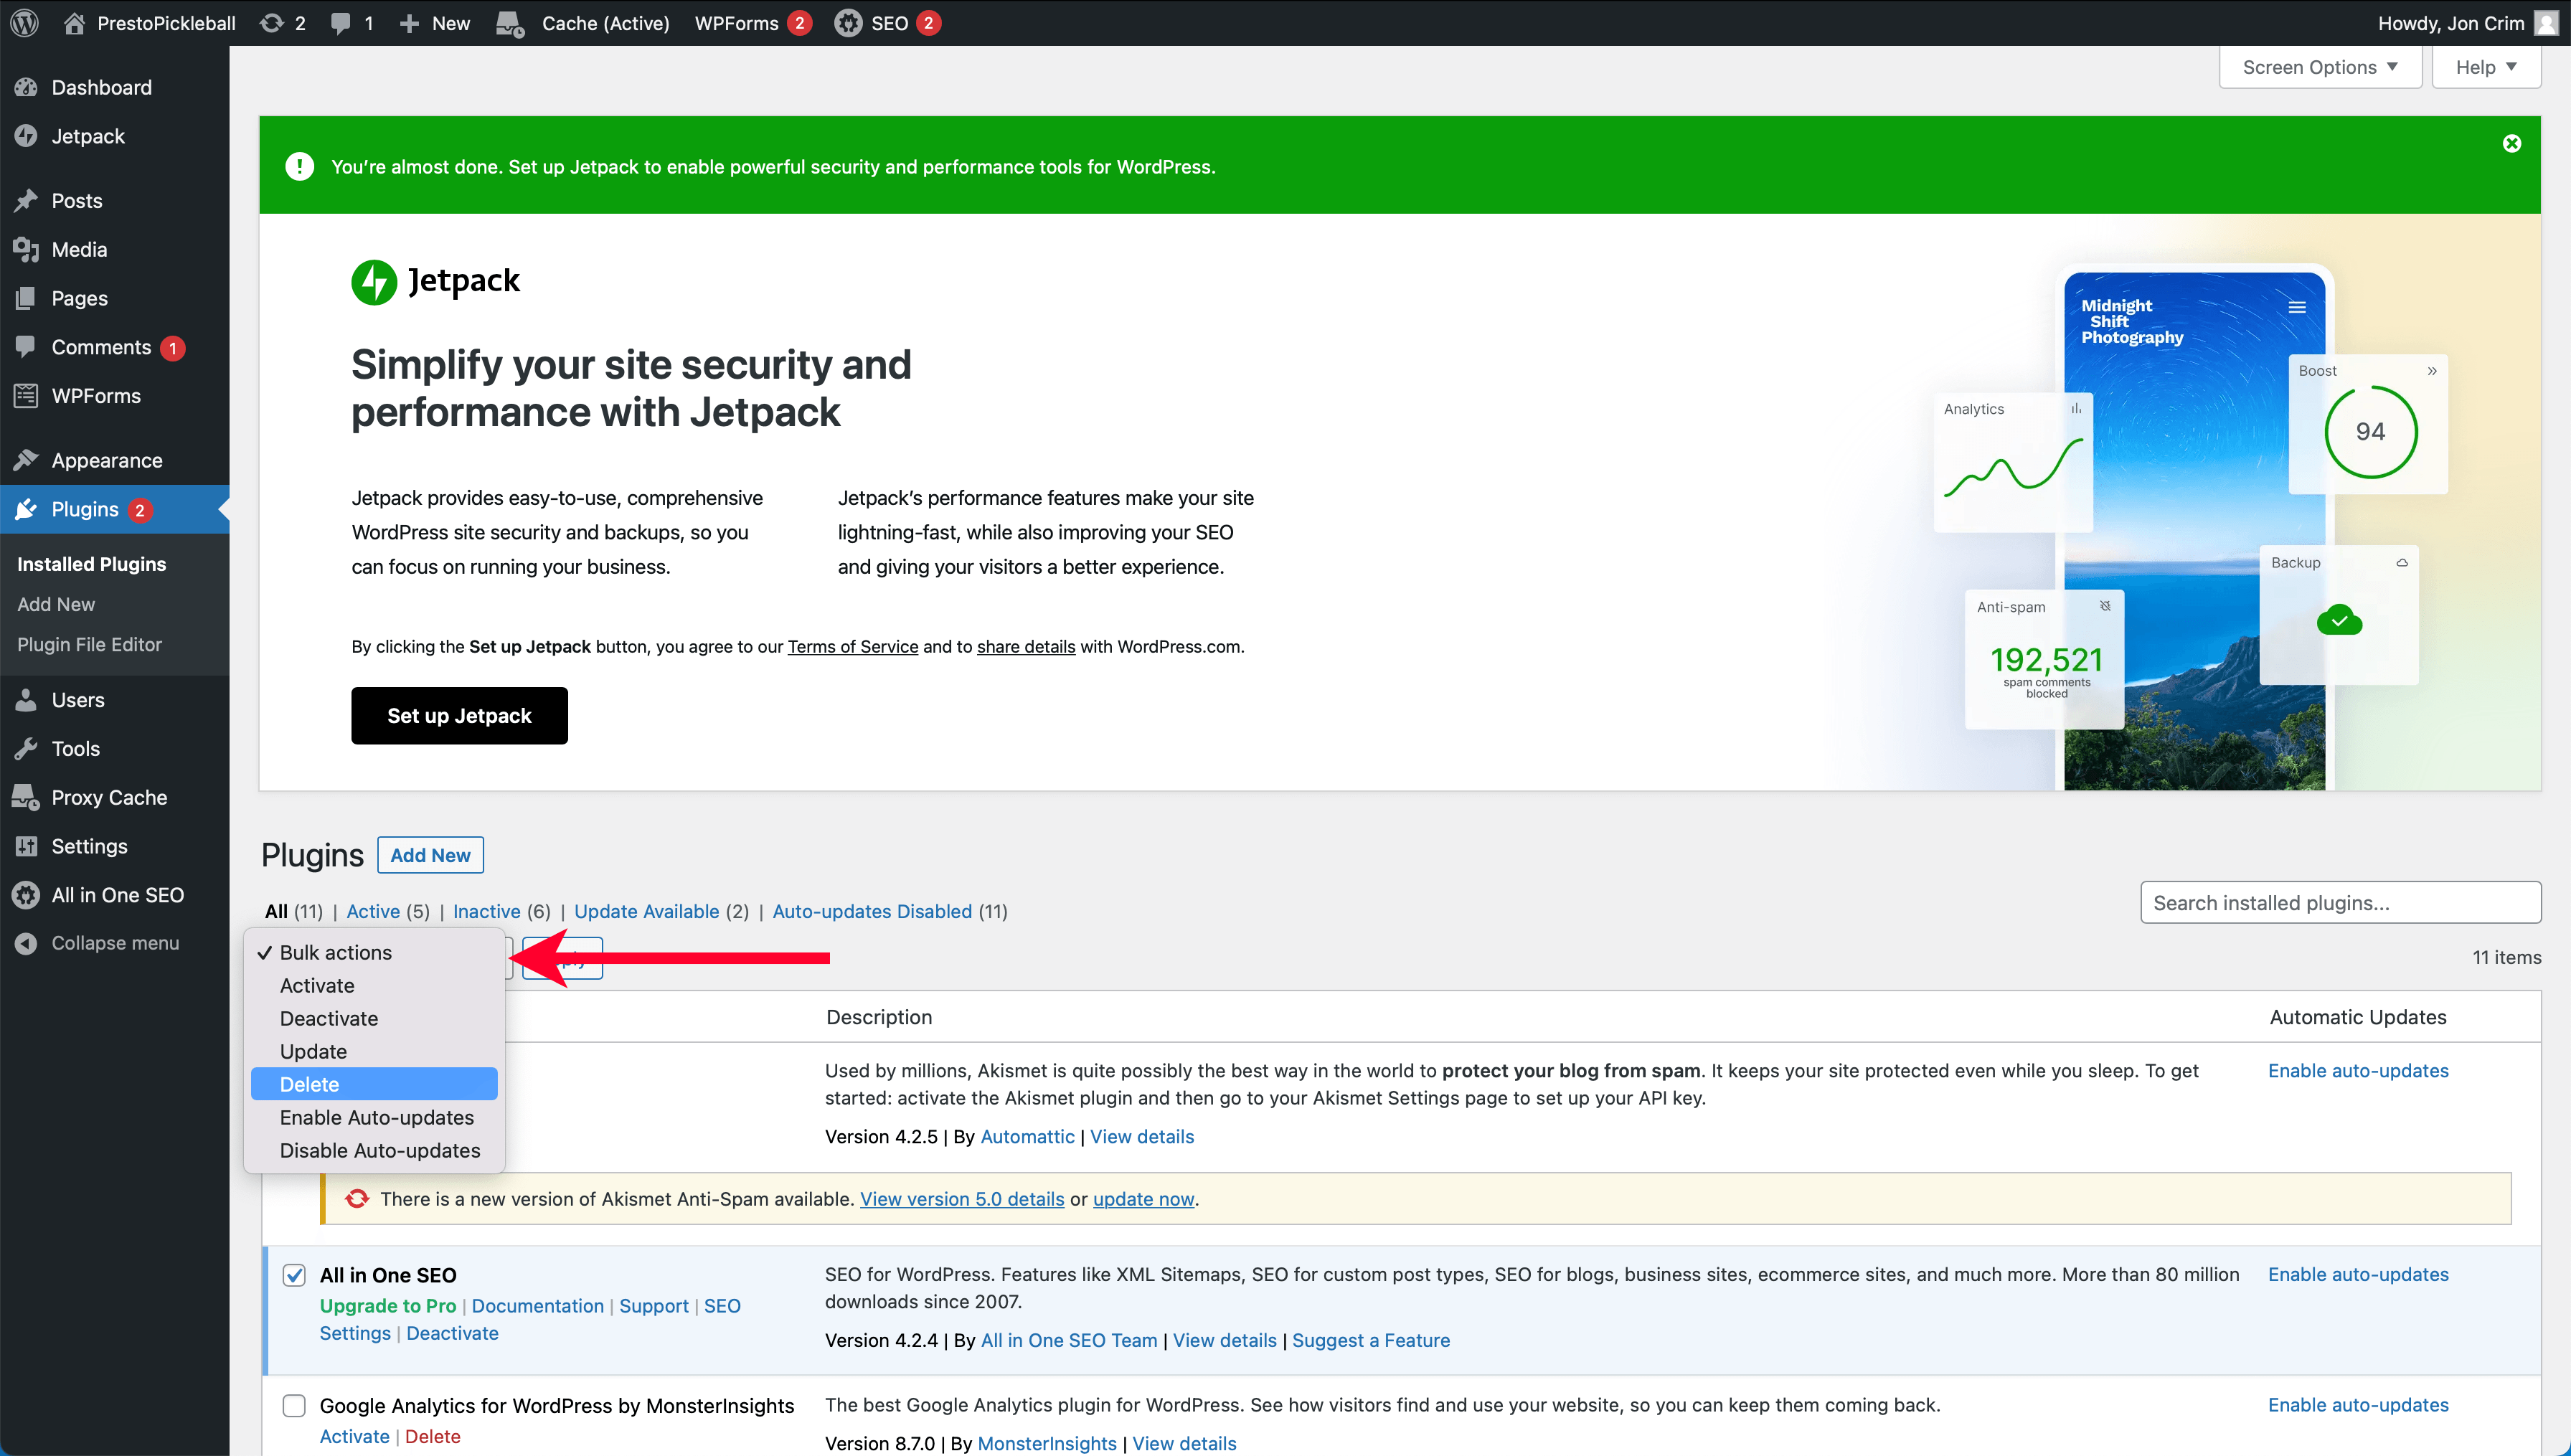
First, we need to deactivate unnecessary plugins. Start by clicking the “Deactivate” links for the following plugins:
- All in one SEO
- Jetpack

You’ll get a confirmation that WordPress deactivated each plugin, and the plugins will no longer be highlighted in blue. Now, select the check boxes next to the following plugins:
- All in one SEO
- Hello Dolly
- Jetpack
- ValutPress
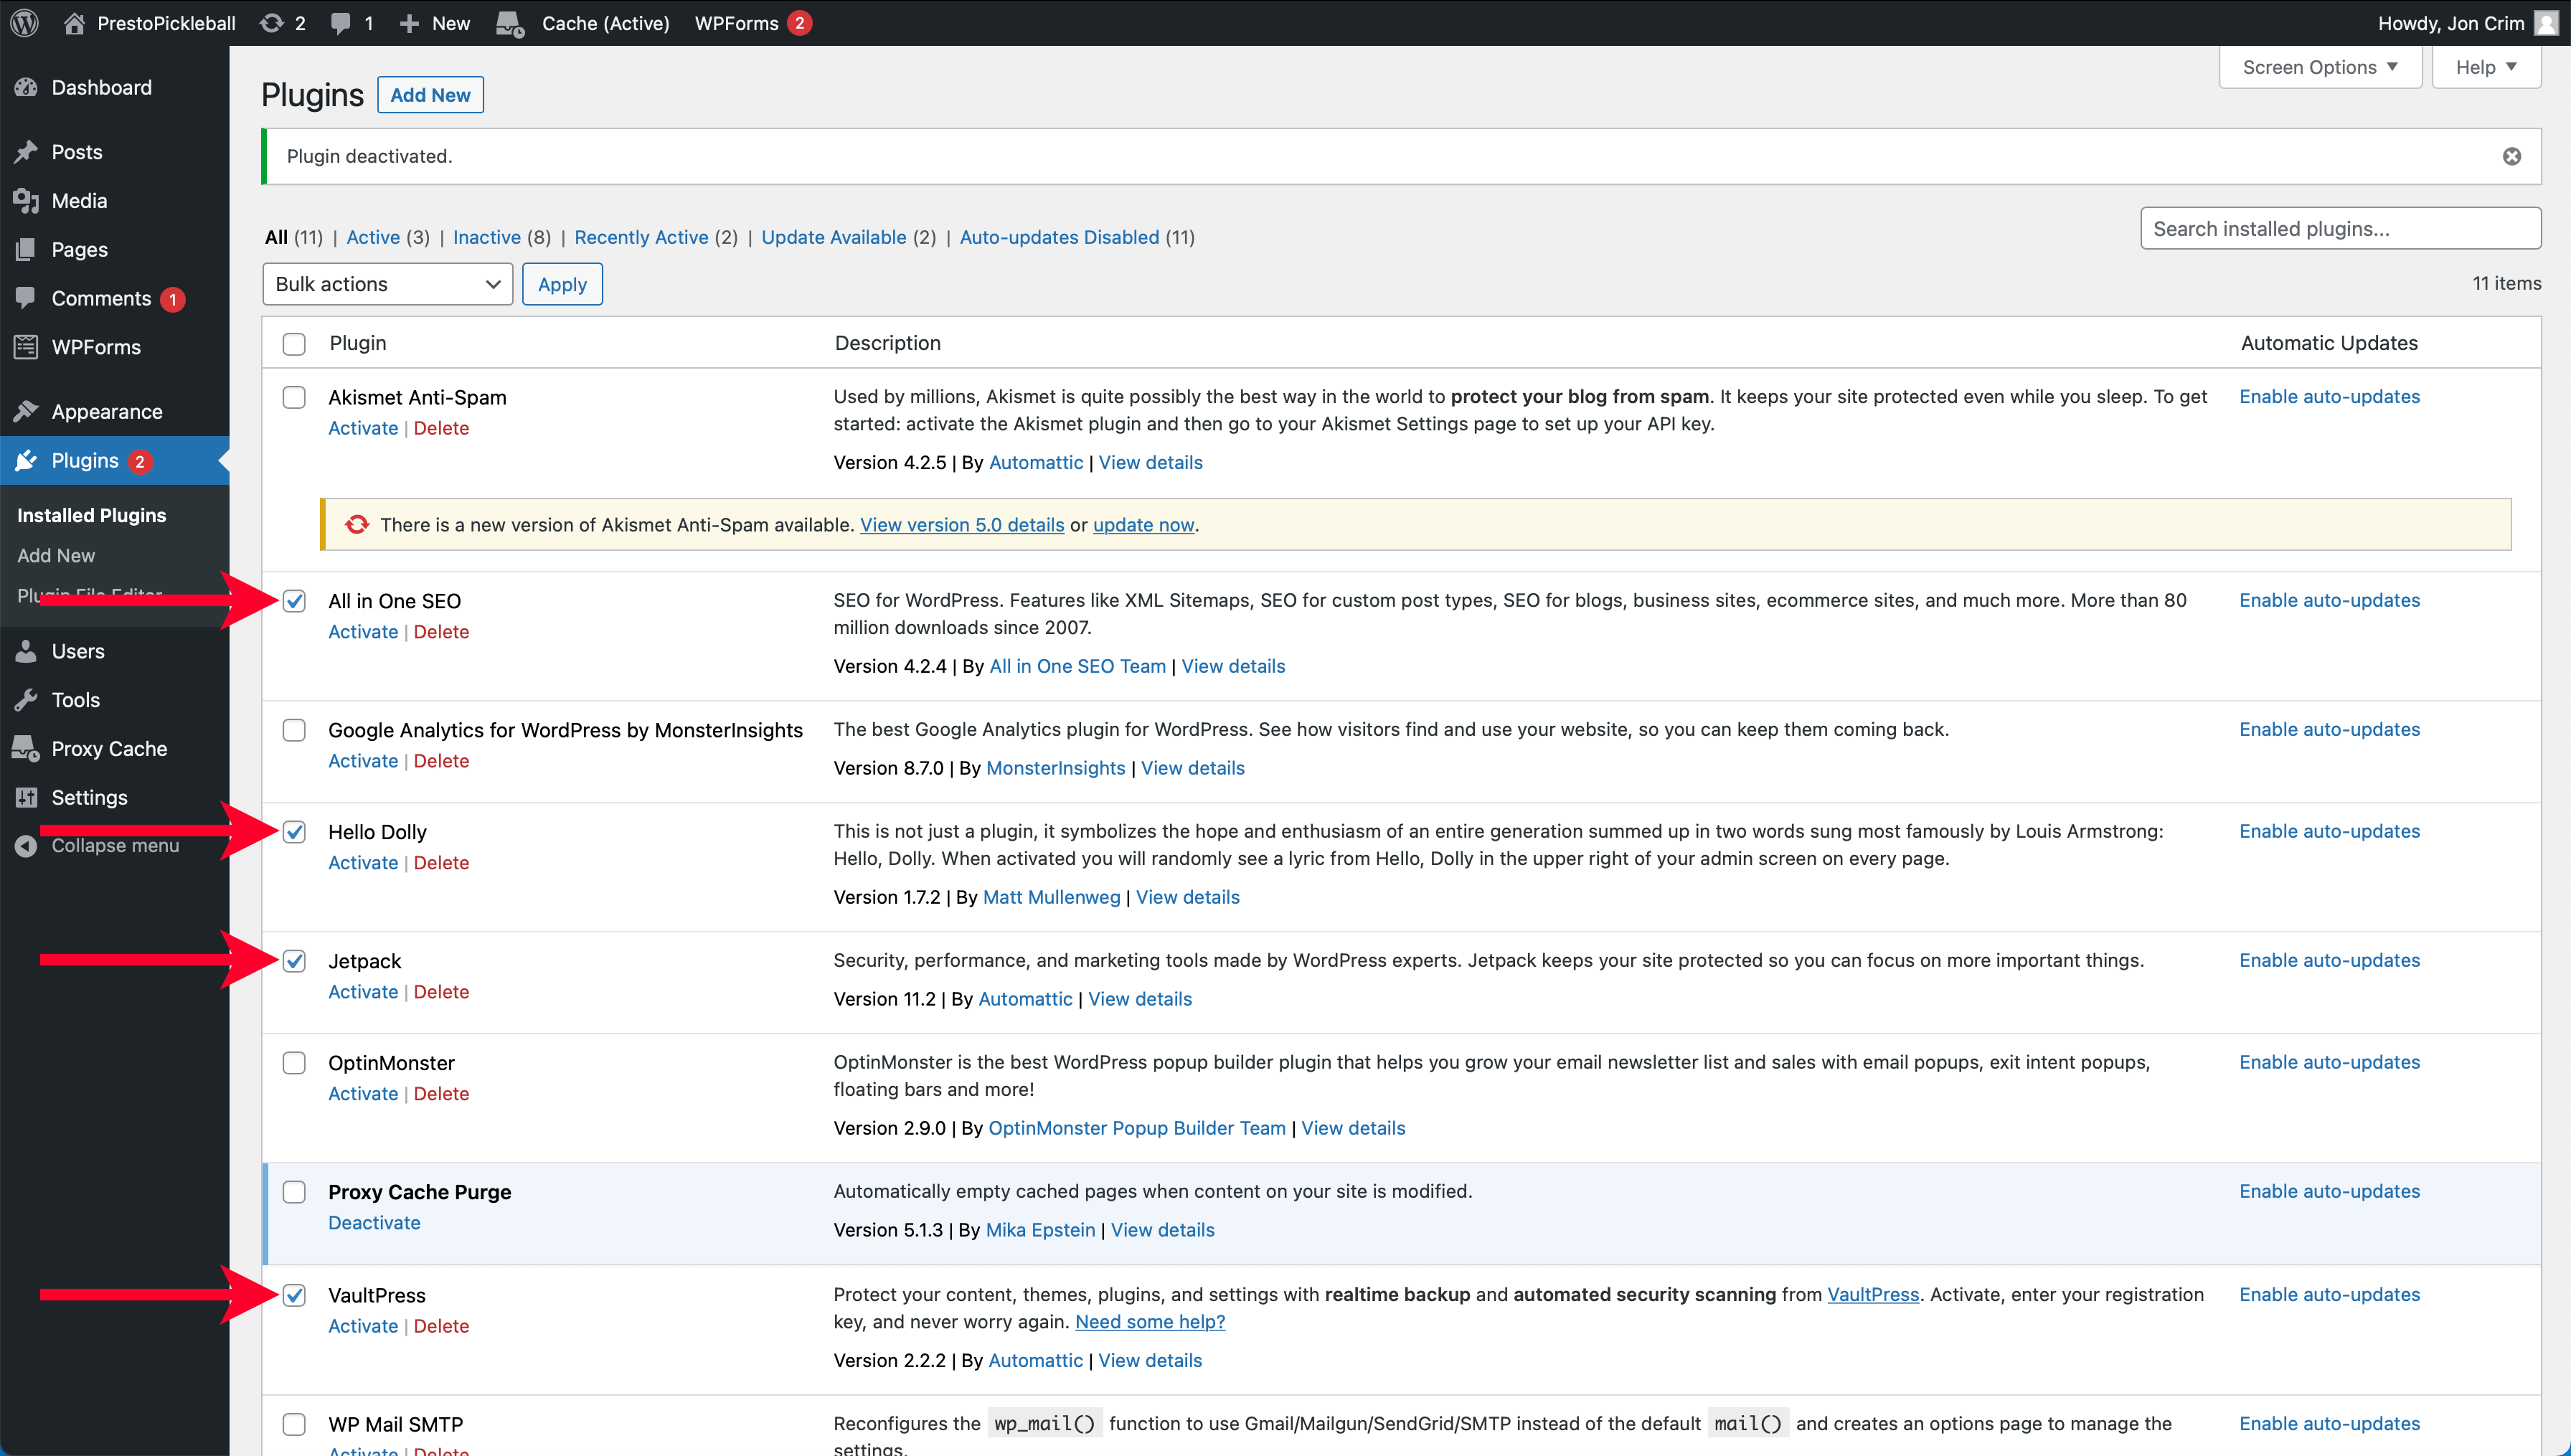
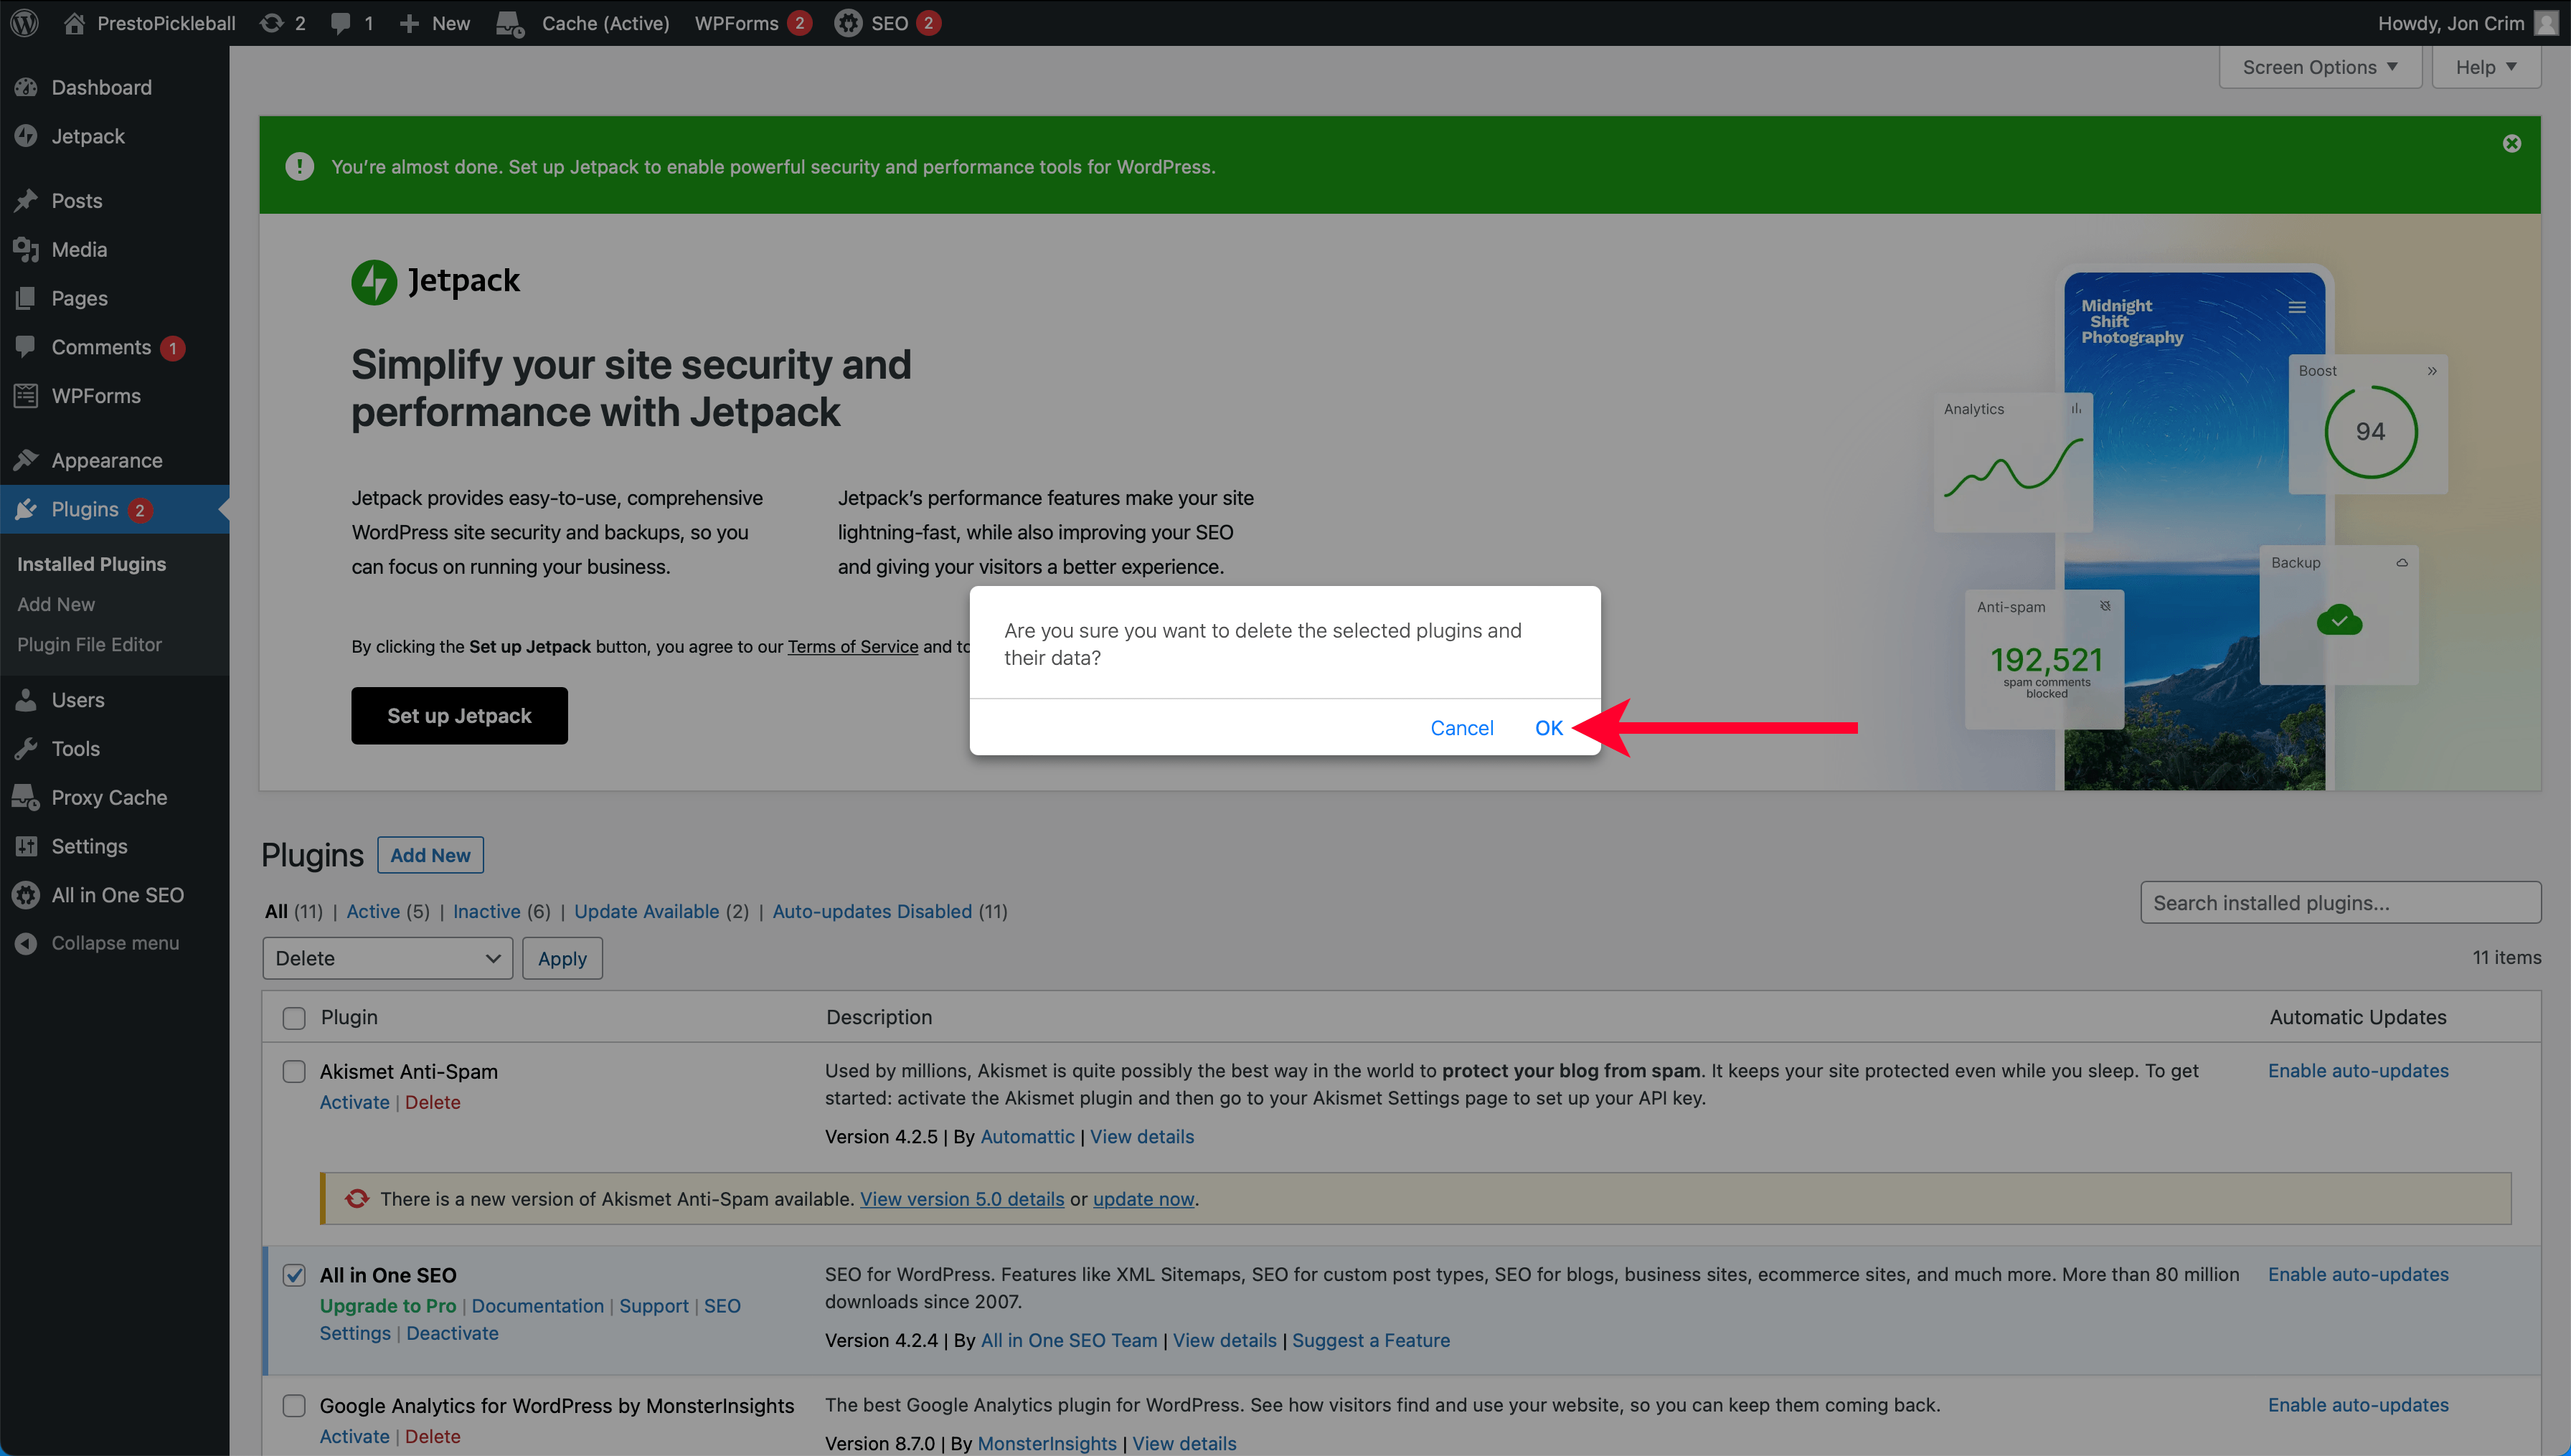
Then scroll up to the dropdown that says “Bulk Actions” and select “Delete,” then click the “Apply” button.
Confirm the deletion by clicking “OK” in the popup.
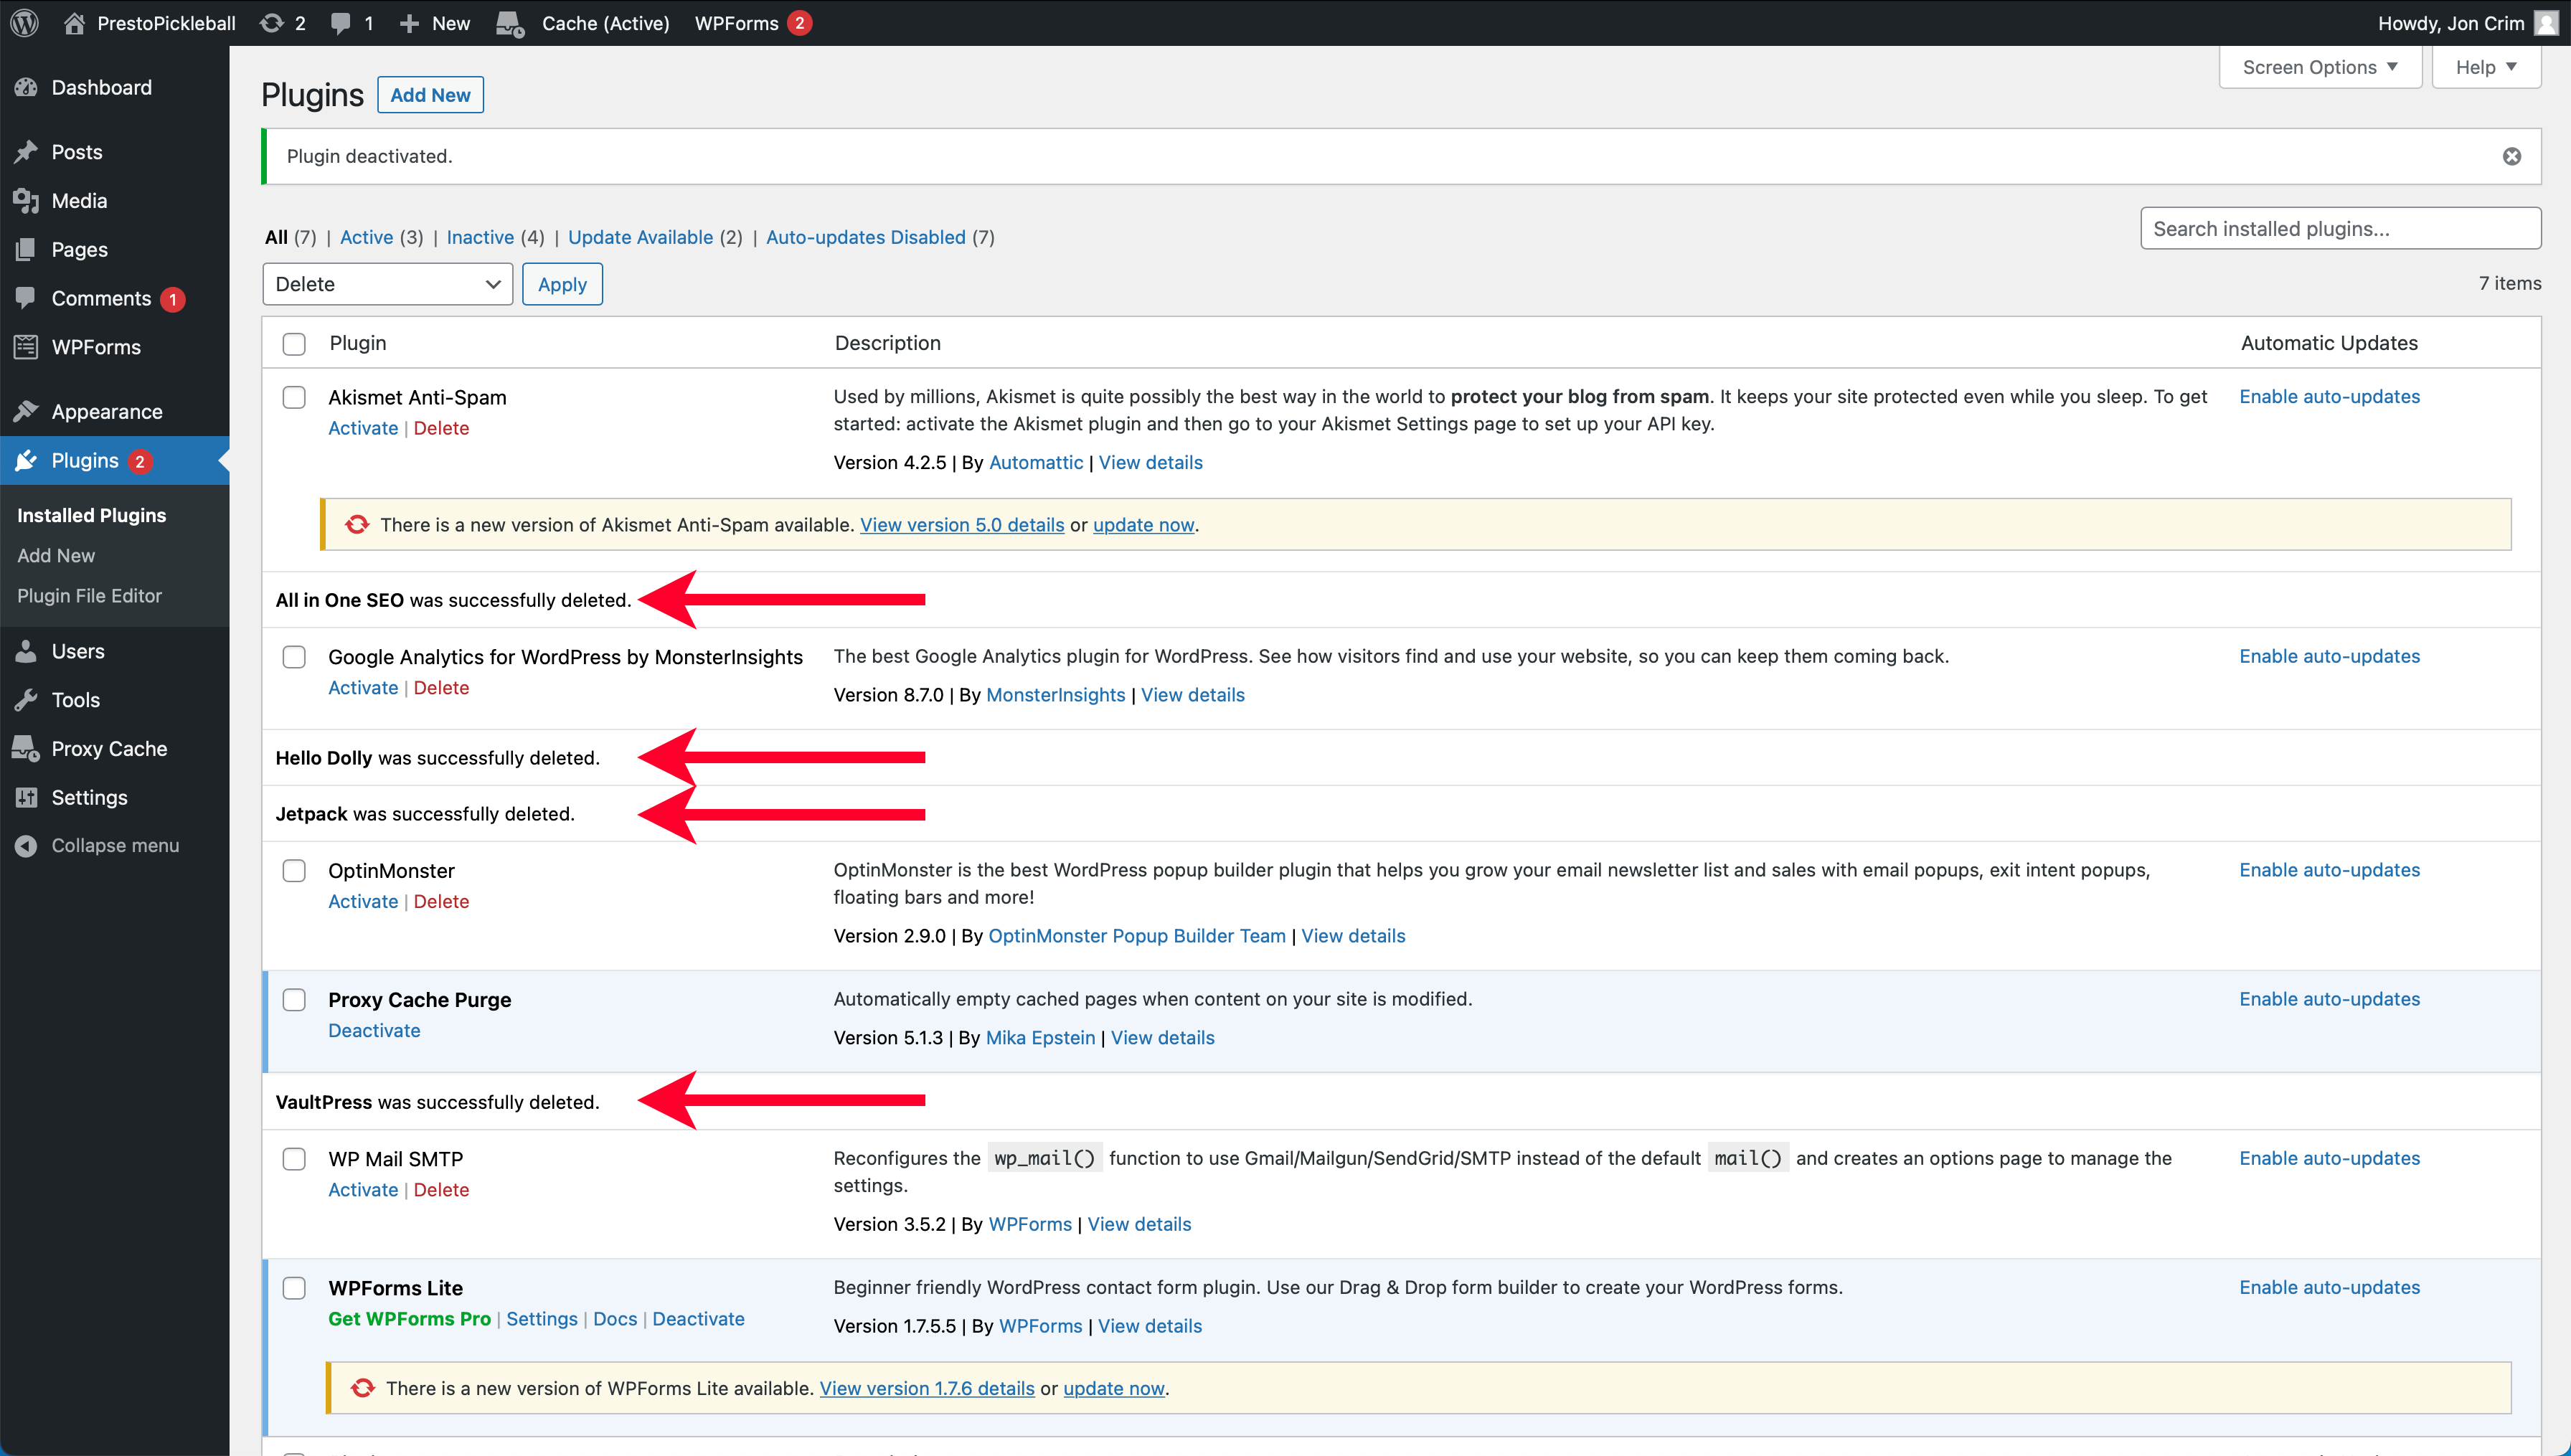
A success message will display for each of the deleted plugins.
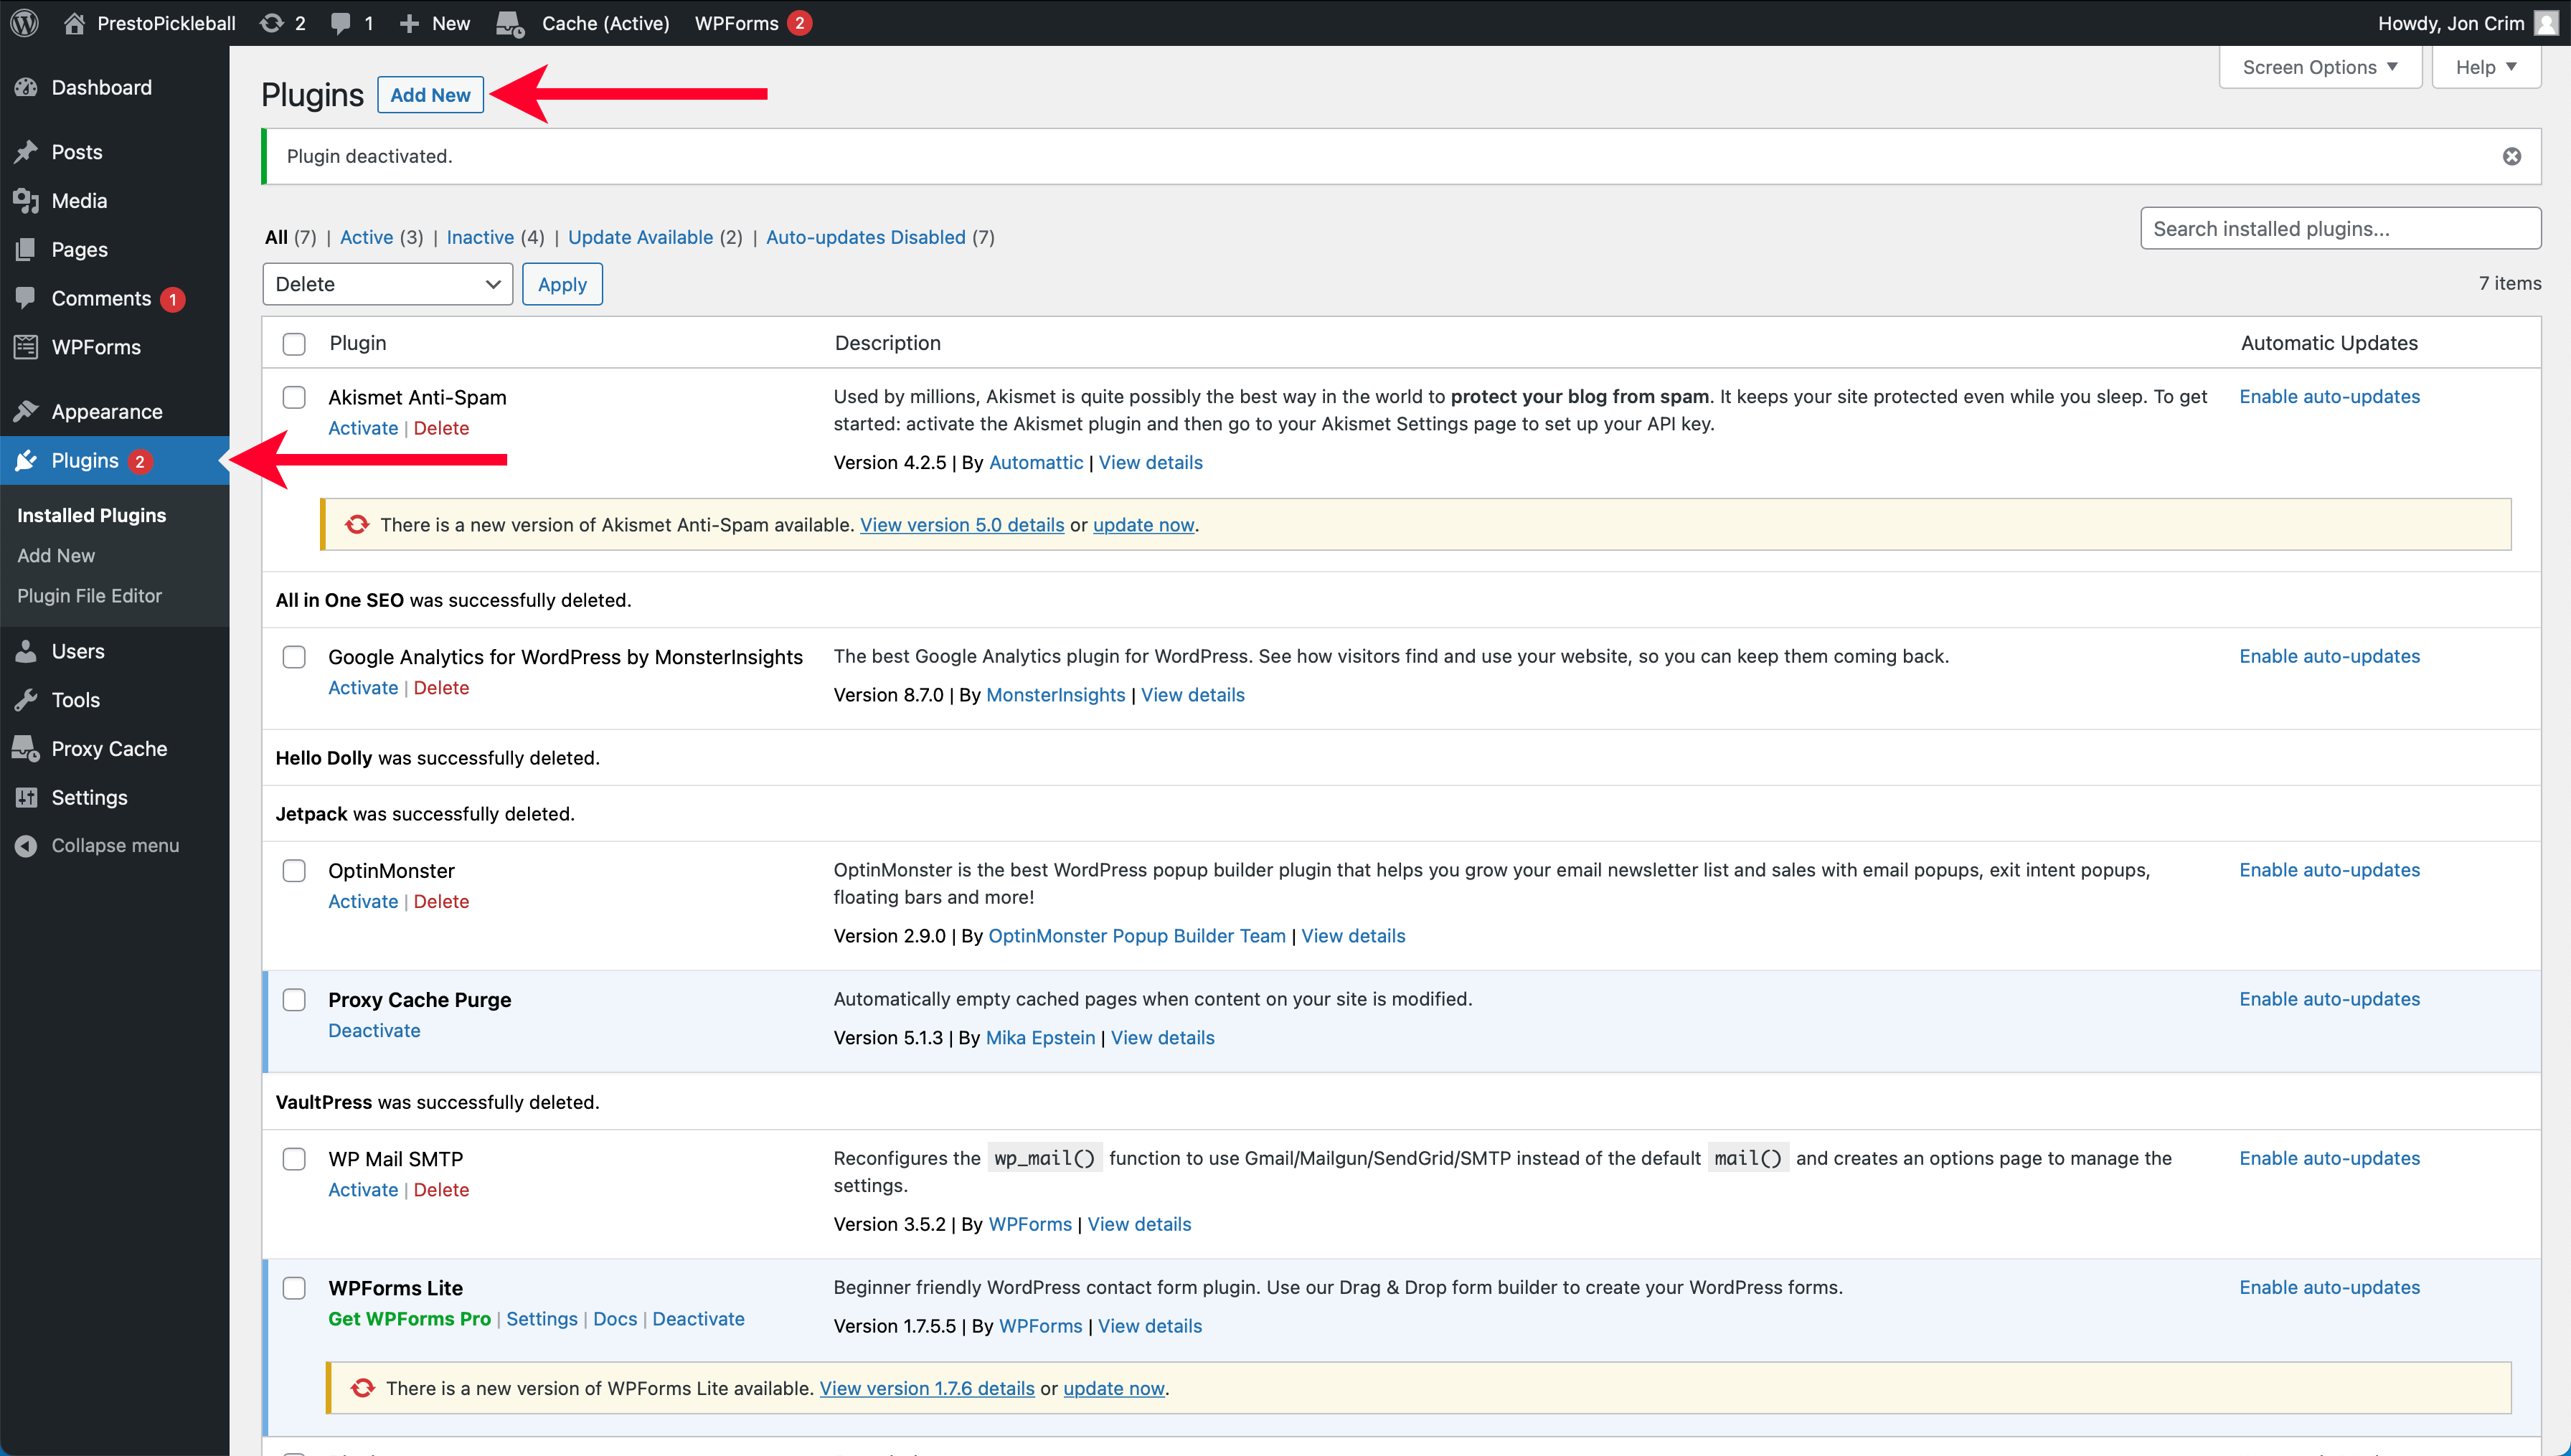
Add New Plugins
Now that we’ve removed unnecessary plugins, let’s go ahead and add a few plugins that we’ll need to get the most out of your WordPress site.
If you aren’t there already, navigate to the “Plugins” menu in the left-hand navigation of your WordPress account.
Installing Yoast SEO
Yoast SEO is a plugin that allows us to update key elements of our site so that search engines like Google can easily find it. It’s essential for getting the best performance, a.k.a, traffic, out of the content you create.
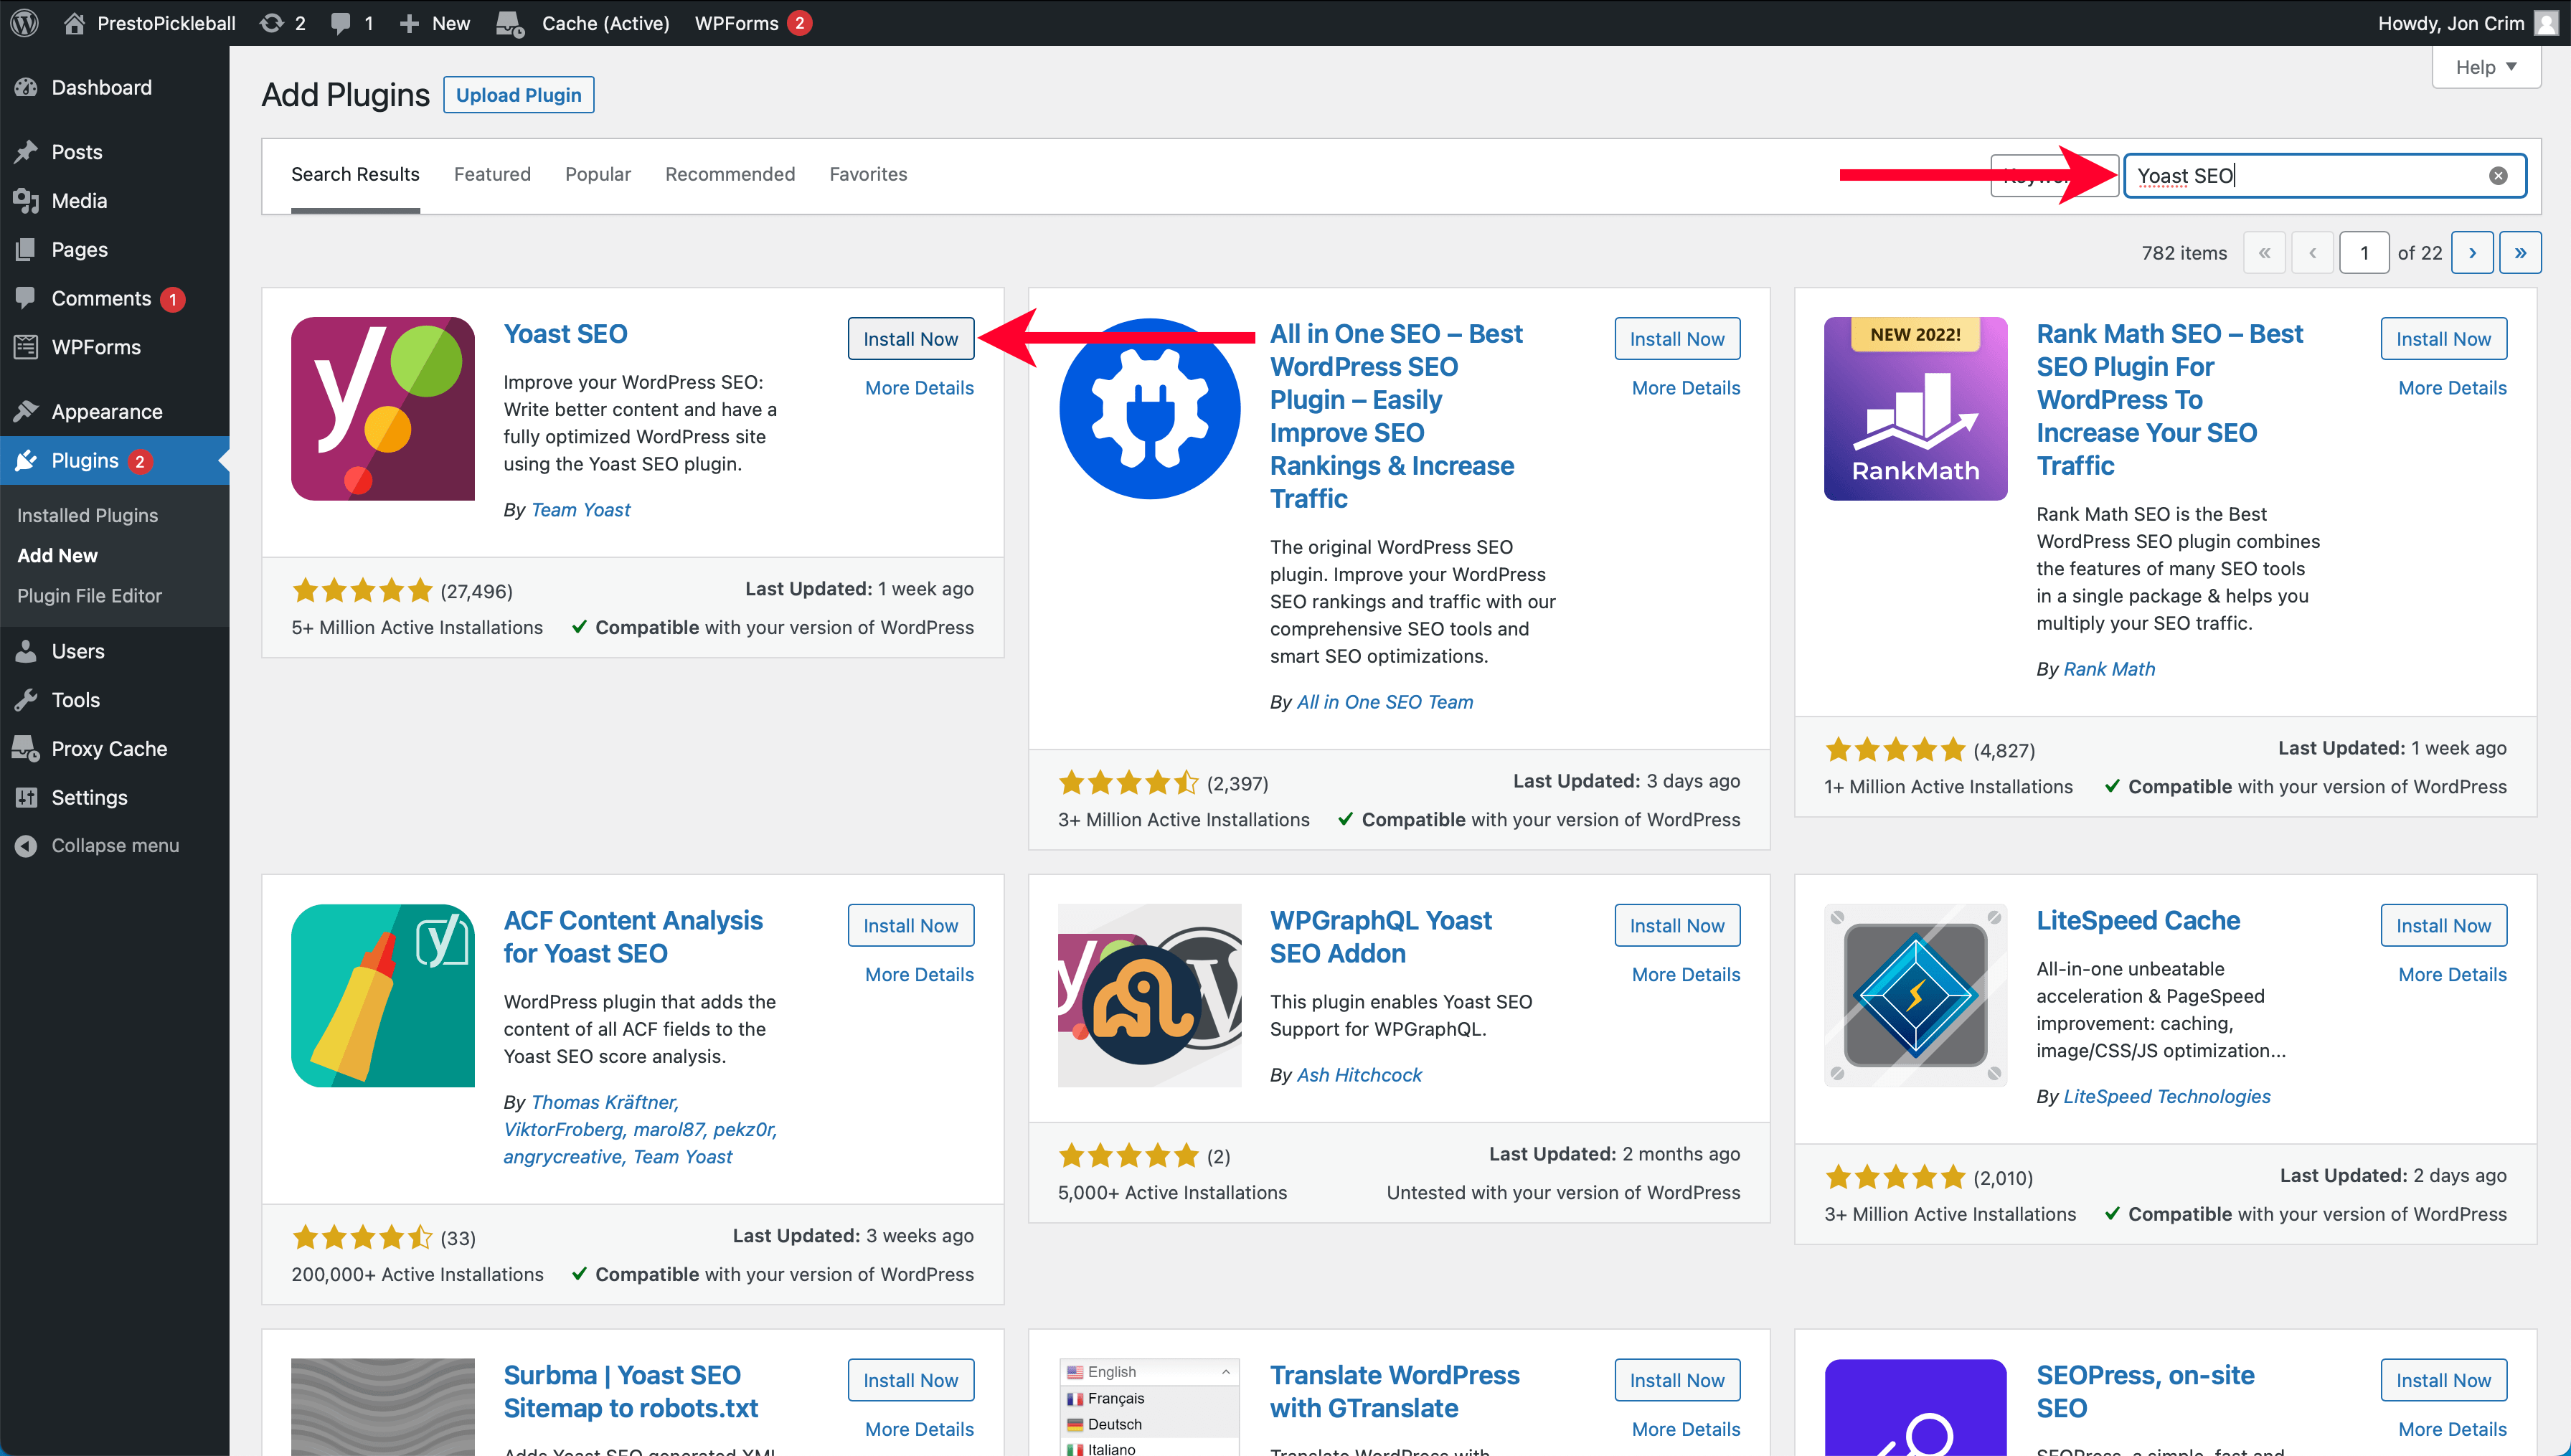
At the top of the “Plugins” page, click the “Add New” button.
In the search field, enter “Yoast SEO,” then click the “Install Now” button for the “Yoast SEO” plugin.
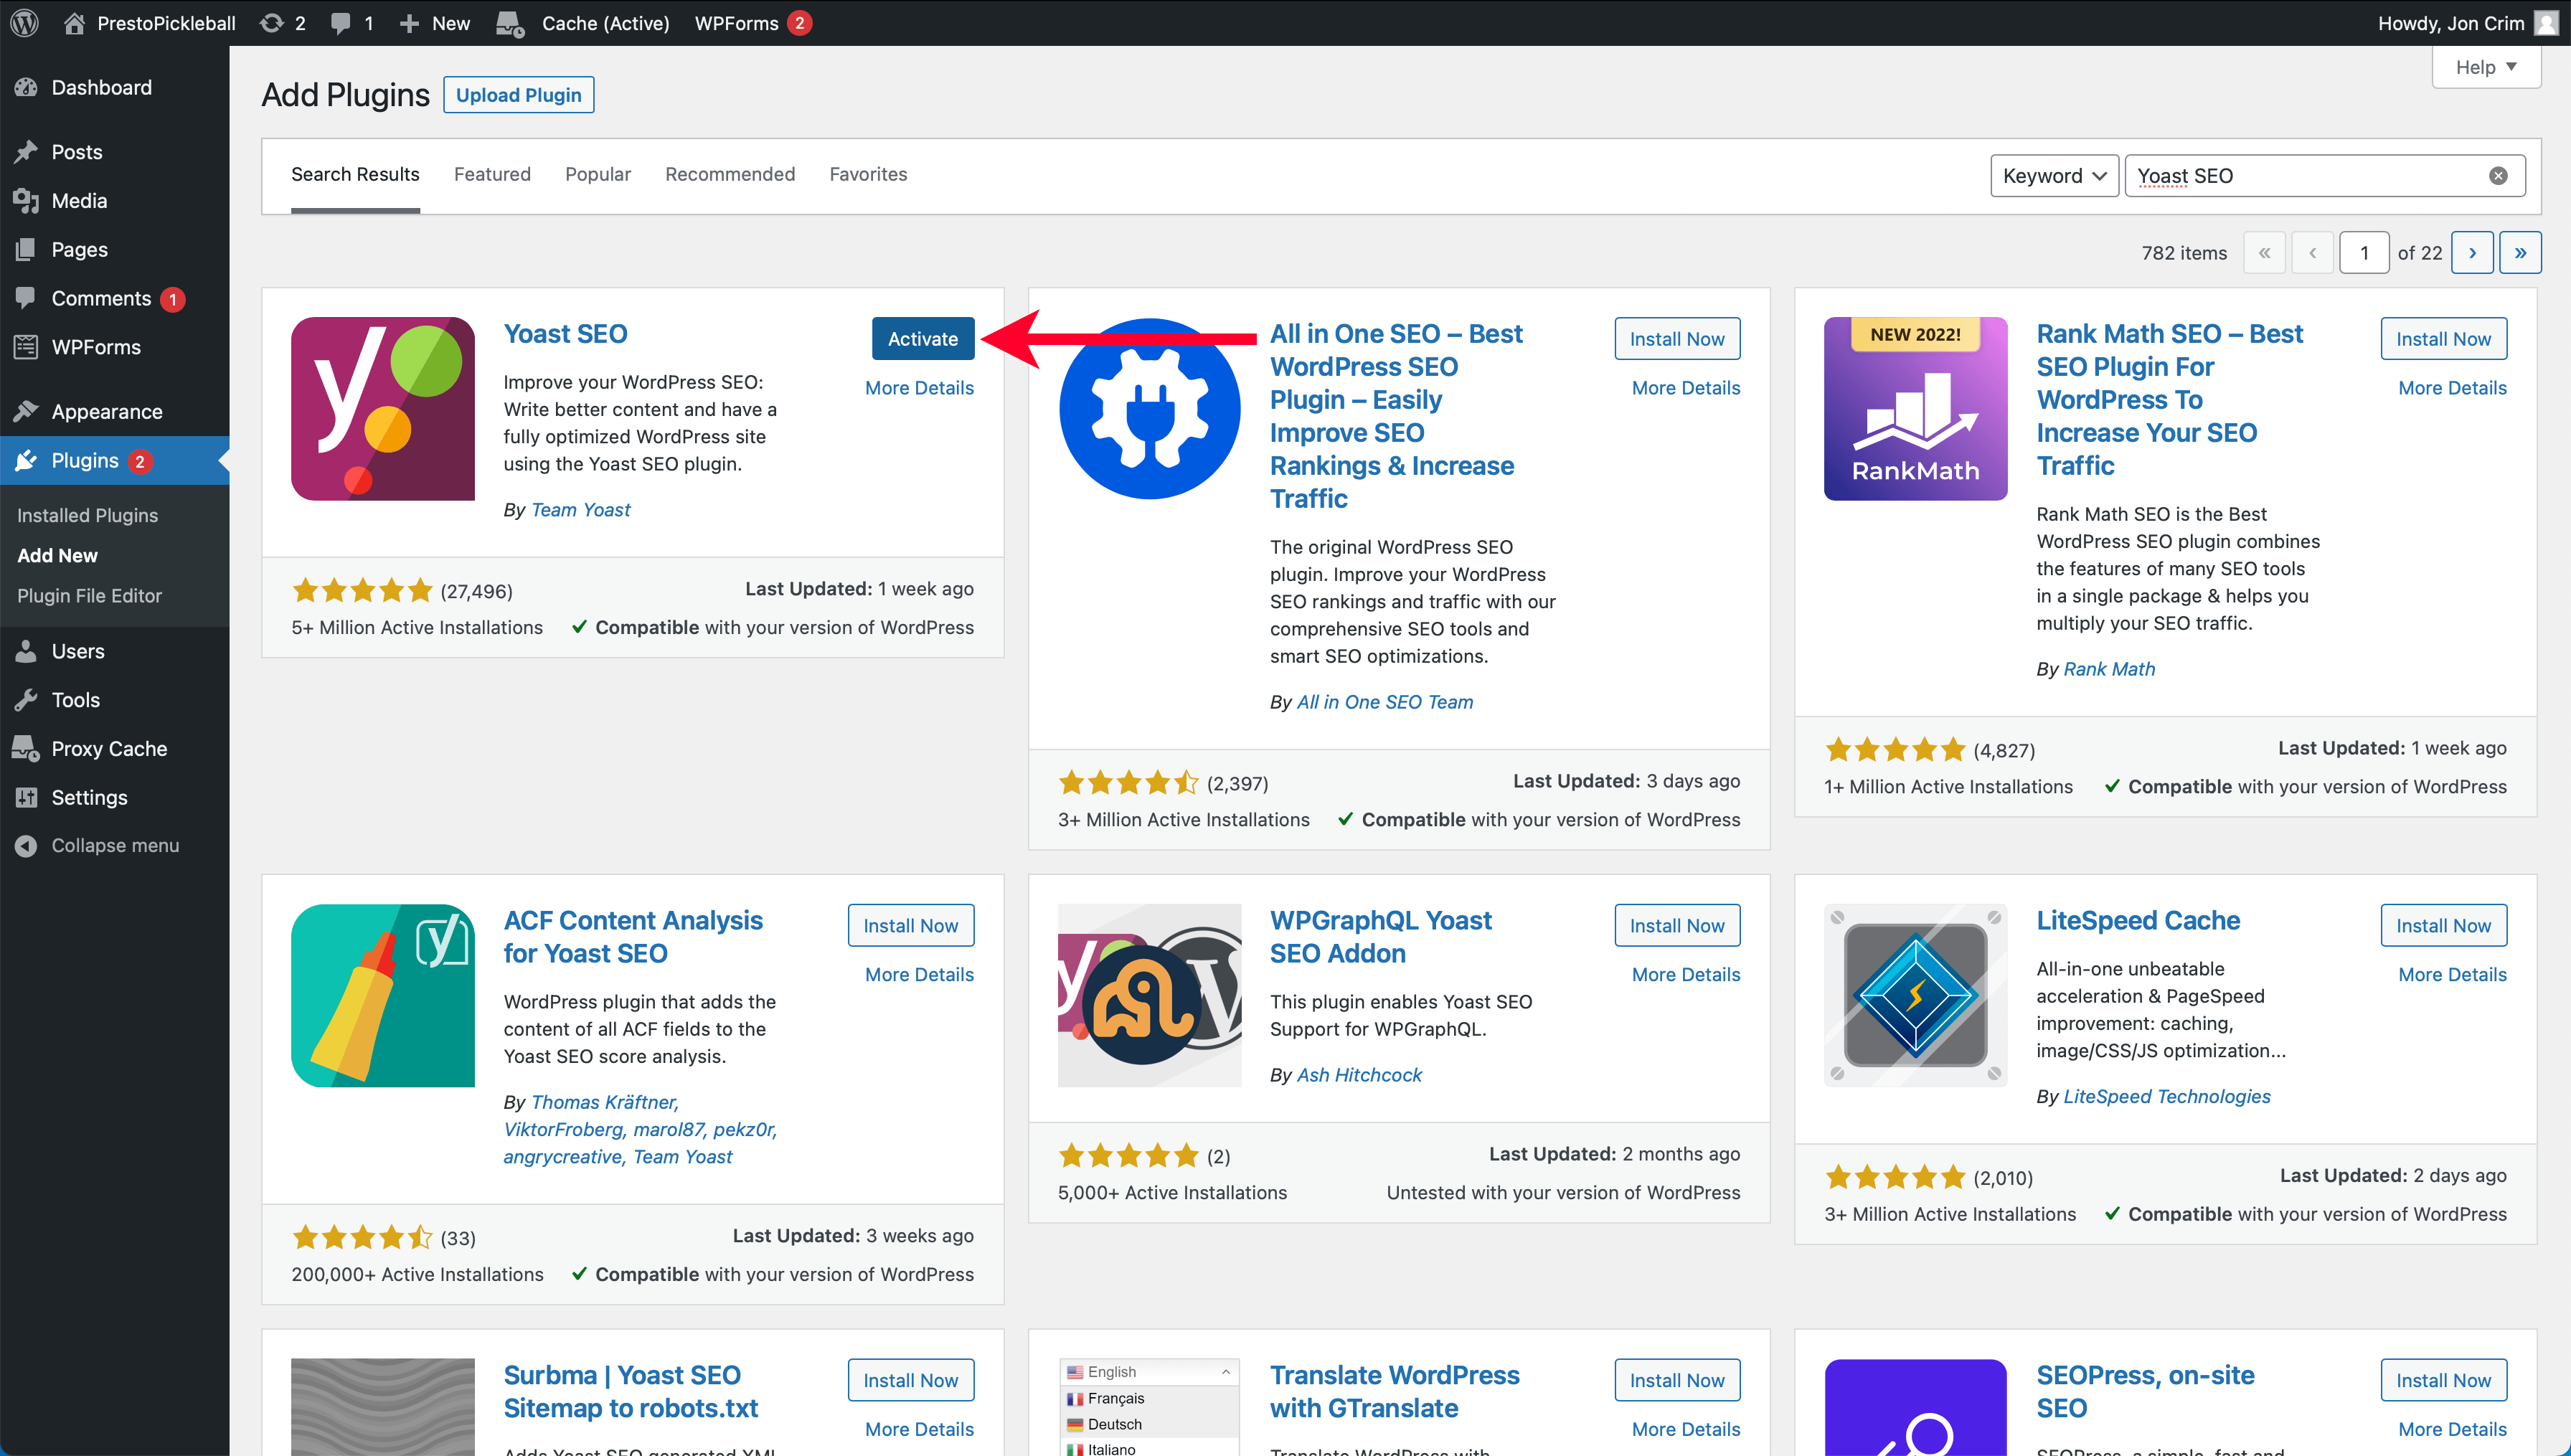
After installing Yoast, click the “Activate” button.
Once active, a page to set up Yoast SEO will display. We’ll handle this later, so for now, you can click the “Skip” link.
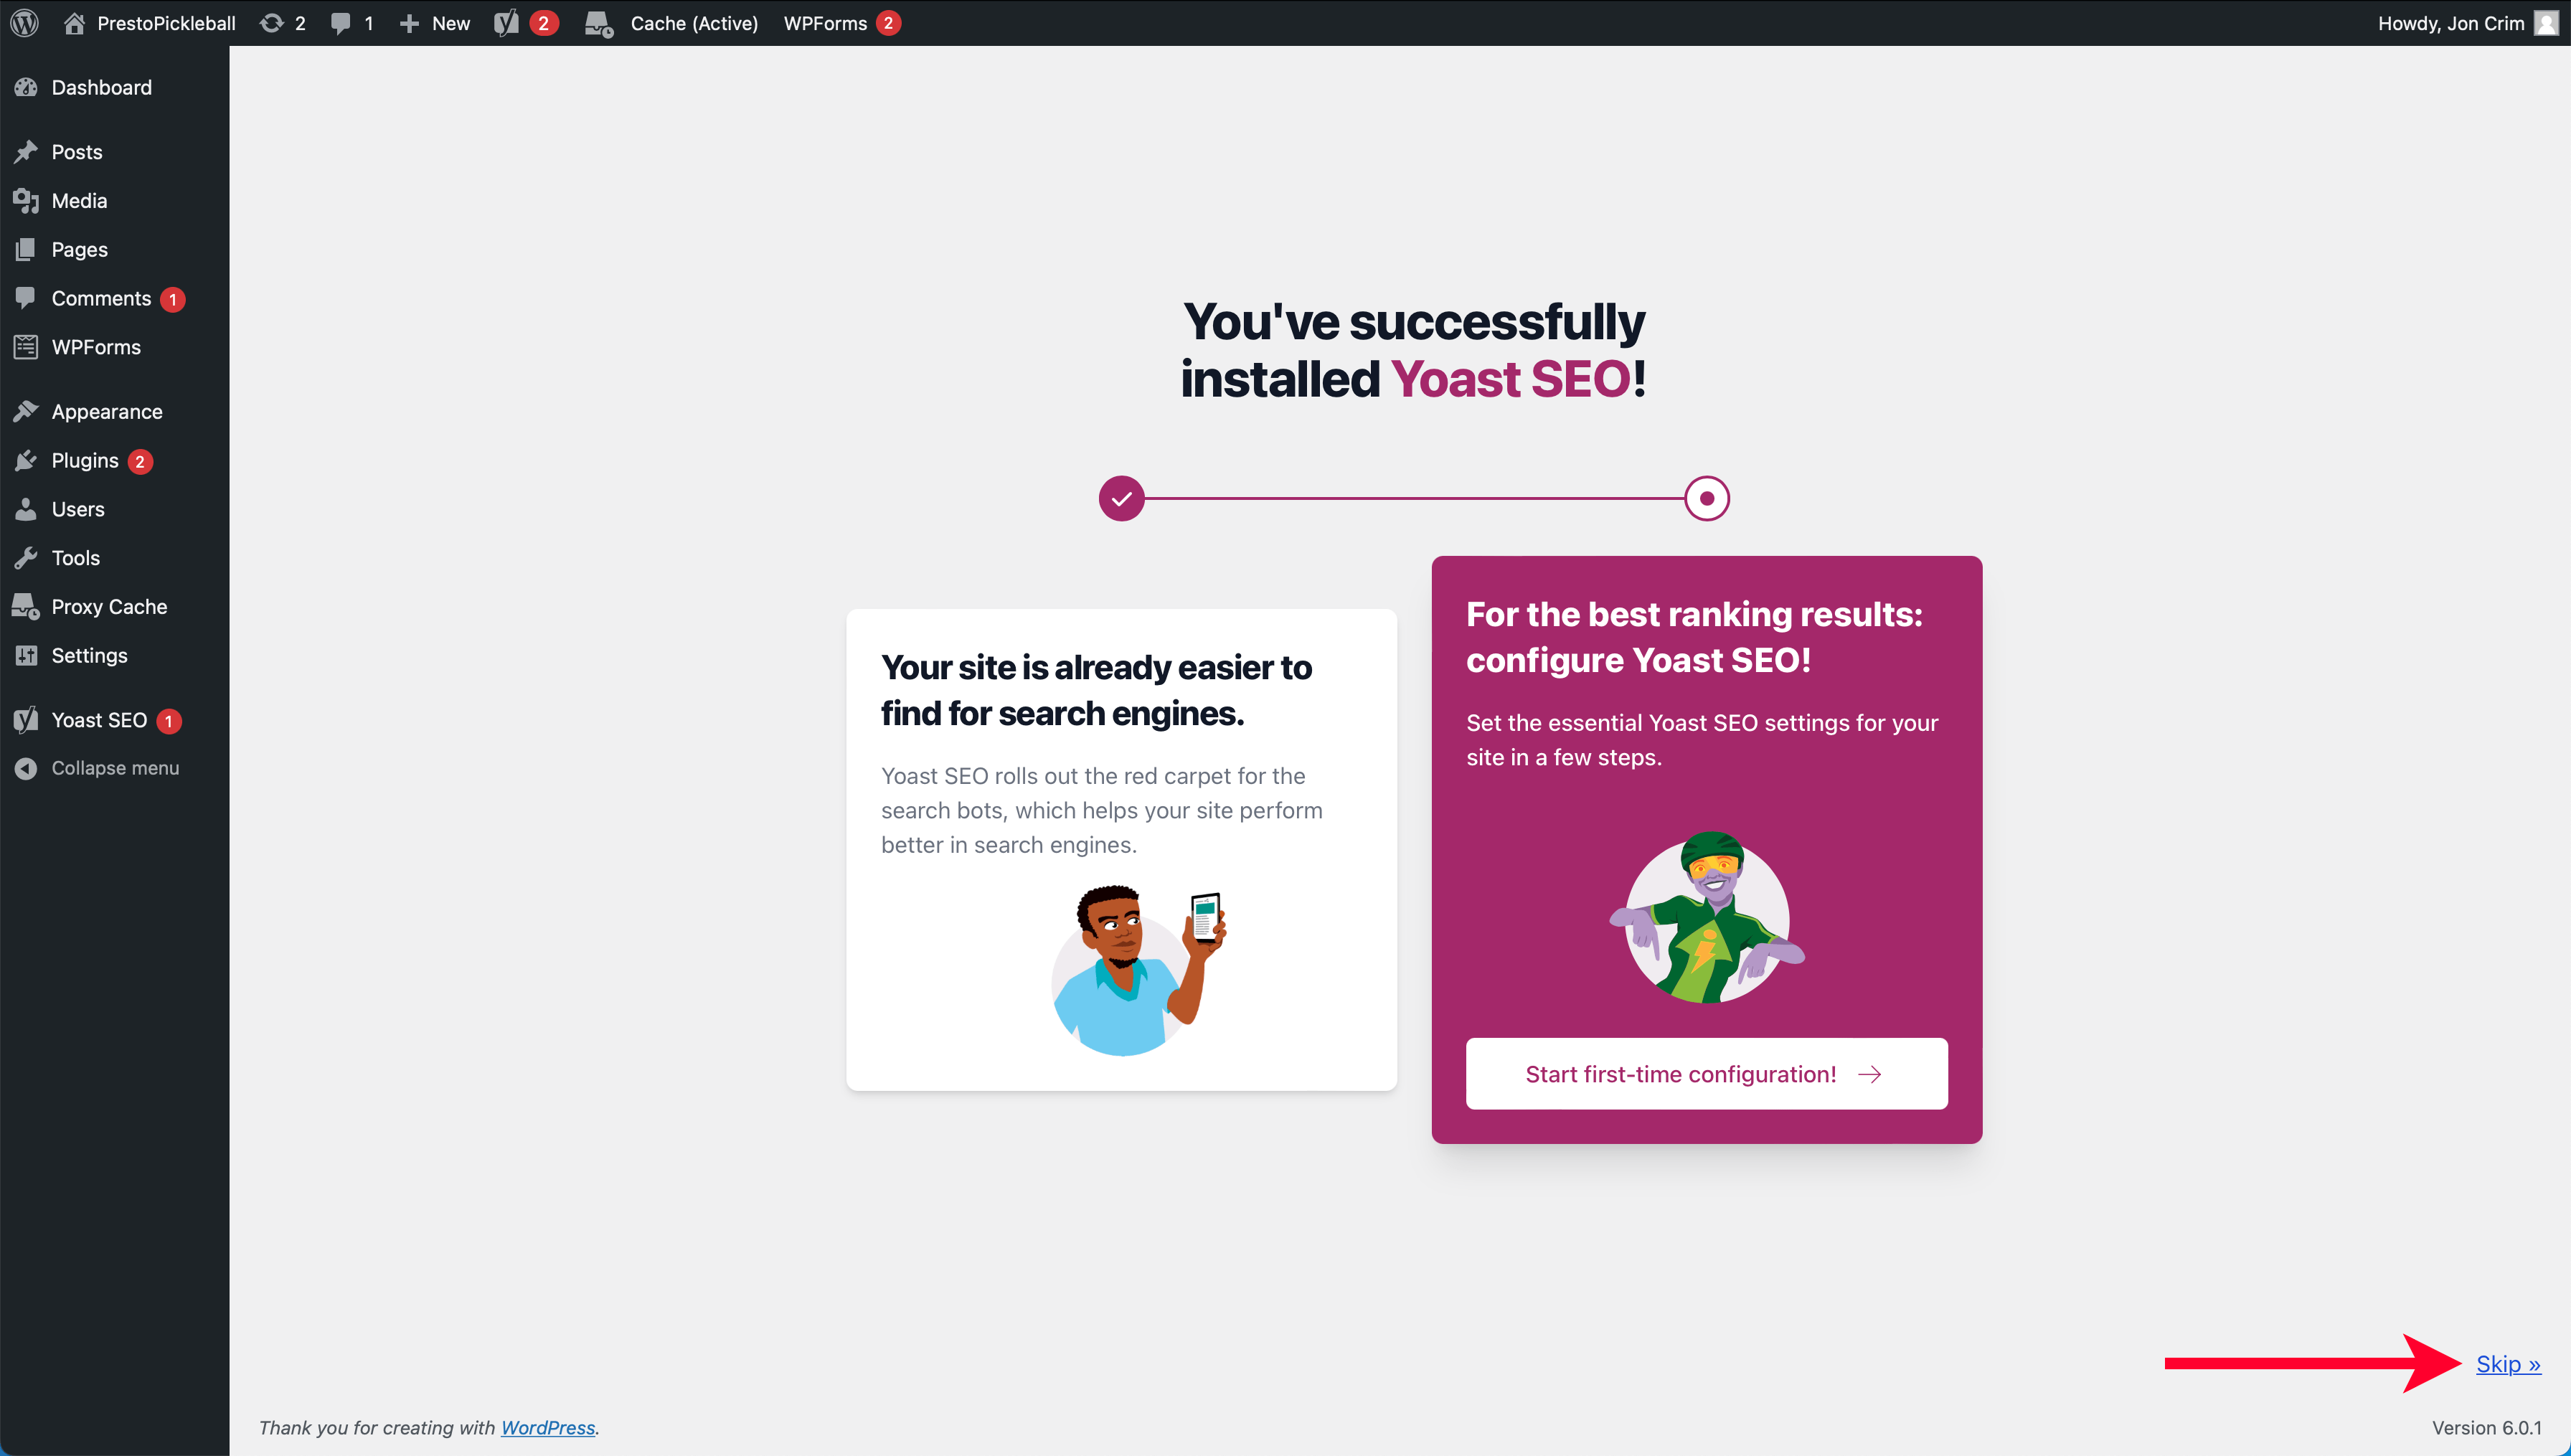
You’ll return to the “Plugins” page in your WordPress account.
Installing Cloudflare
Next up, we’ll install Cloudflare to help ensure your website runs as fast as possible while providing some added security.
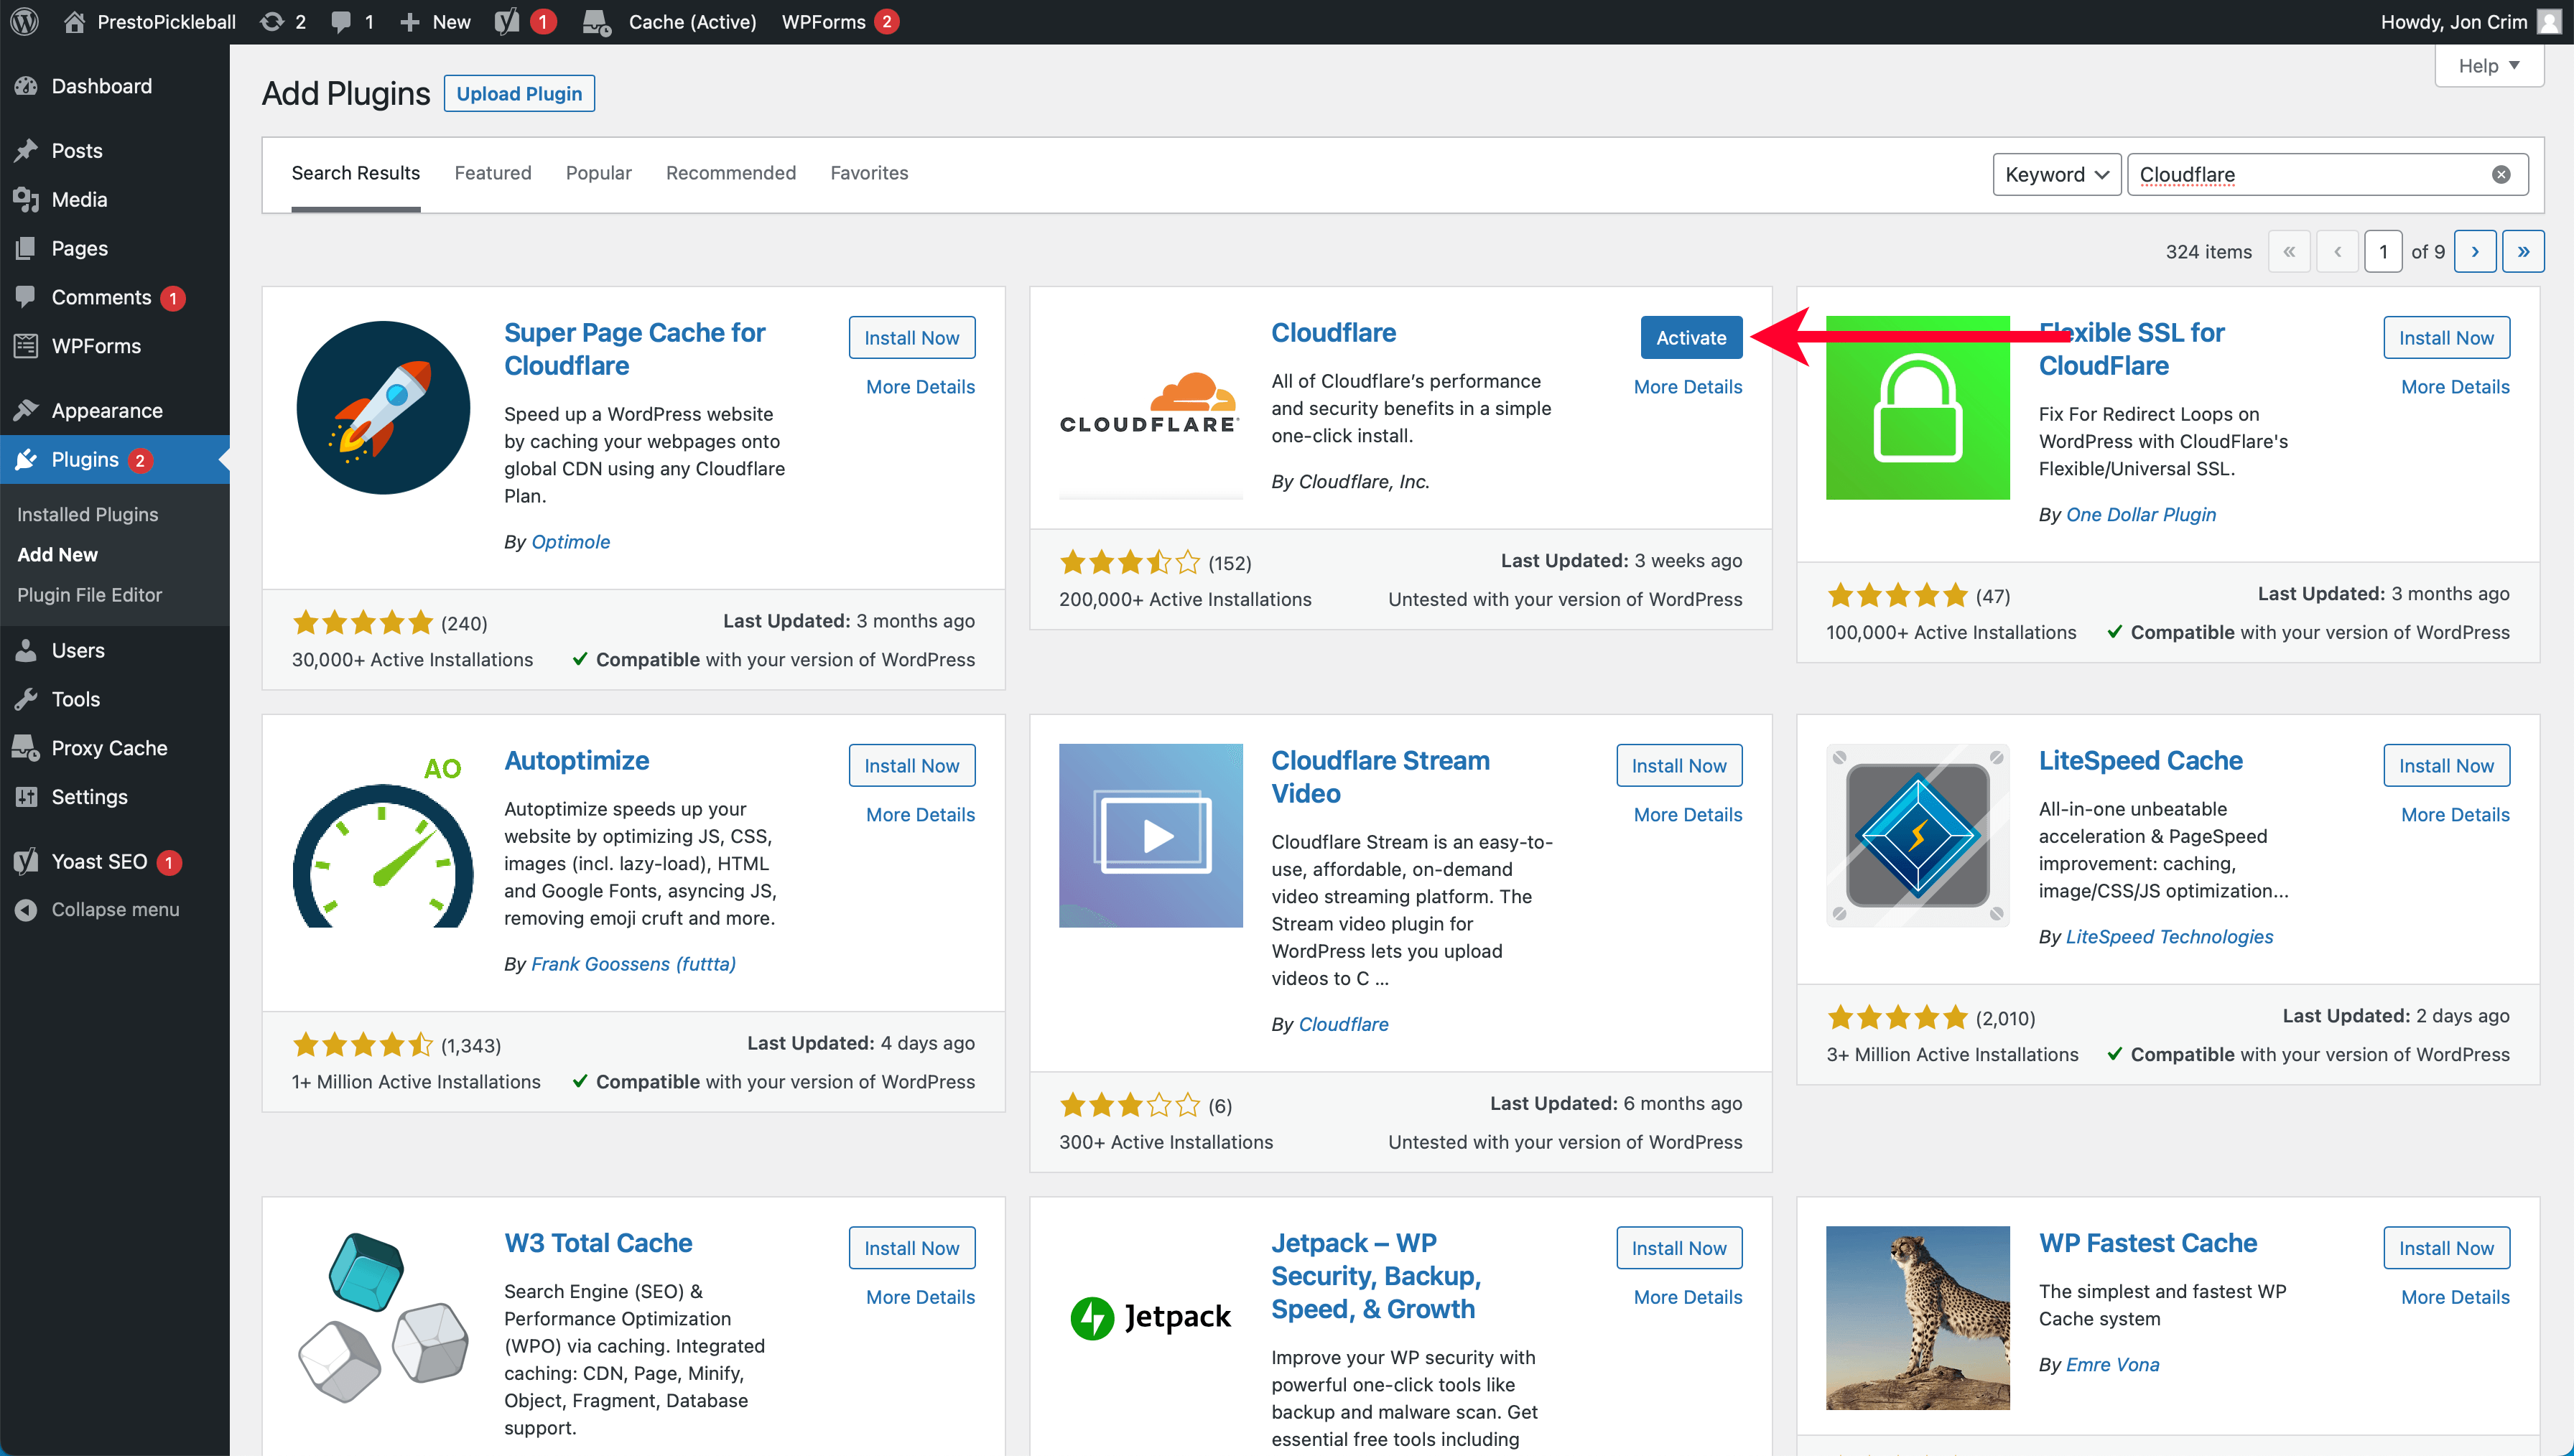
At the top of the “Plugins” page, click the “Add New” button.

In the search field, enter “Cloudflare.” Click the “Install Now” button for the “Cloudflare” plugin.

Then click the “Activate” button for “Cloudflare.”
WordPress will redirect you to the “Plugins” page with Cloudflare active. Once there, click the “Settings” link for “Cloudflare.”
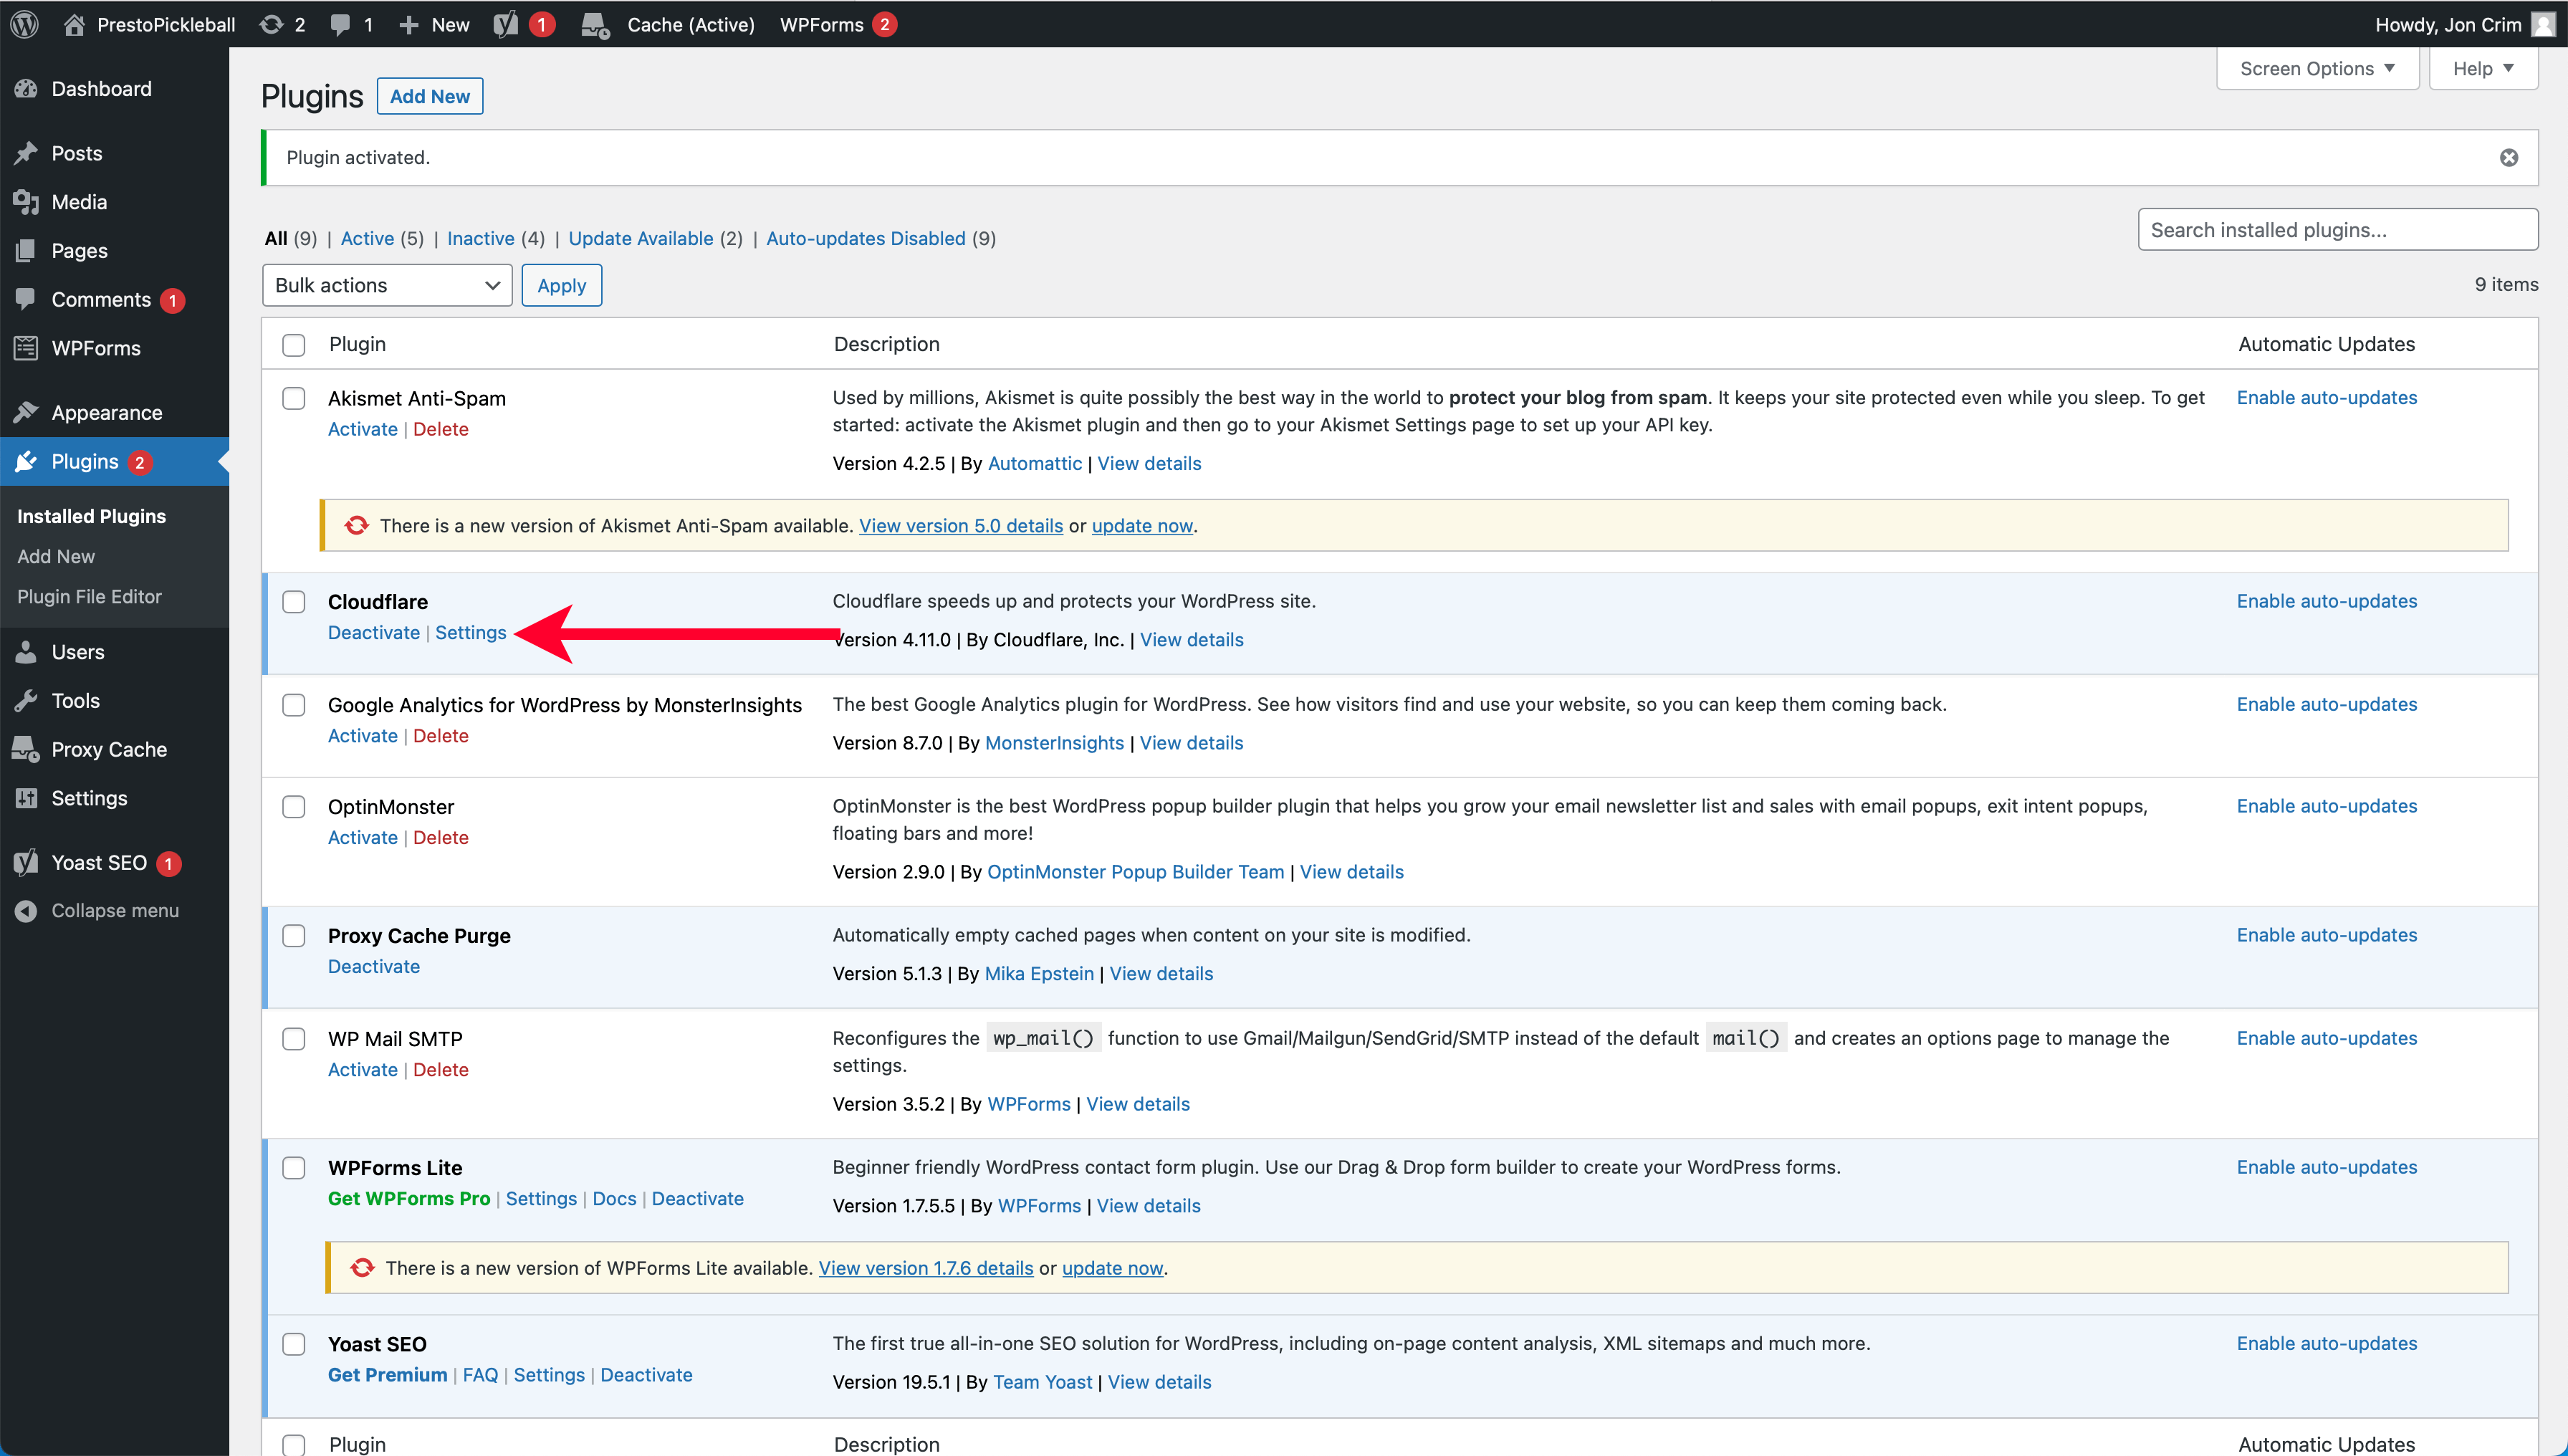
At this stage, the Cloudflare plugin is active, but we still need to set up an account with them so their plugin can speed up and protect your website.
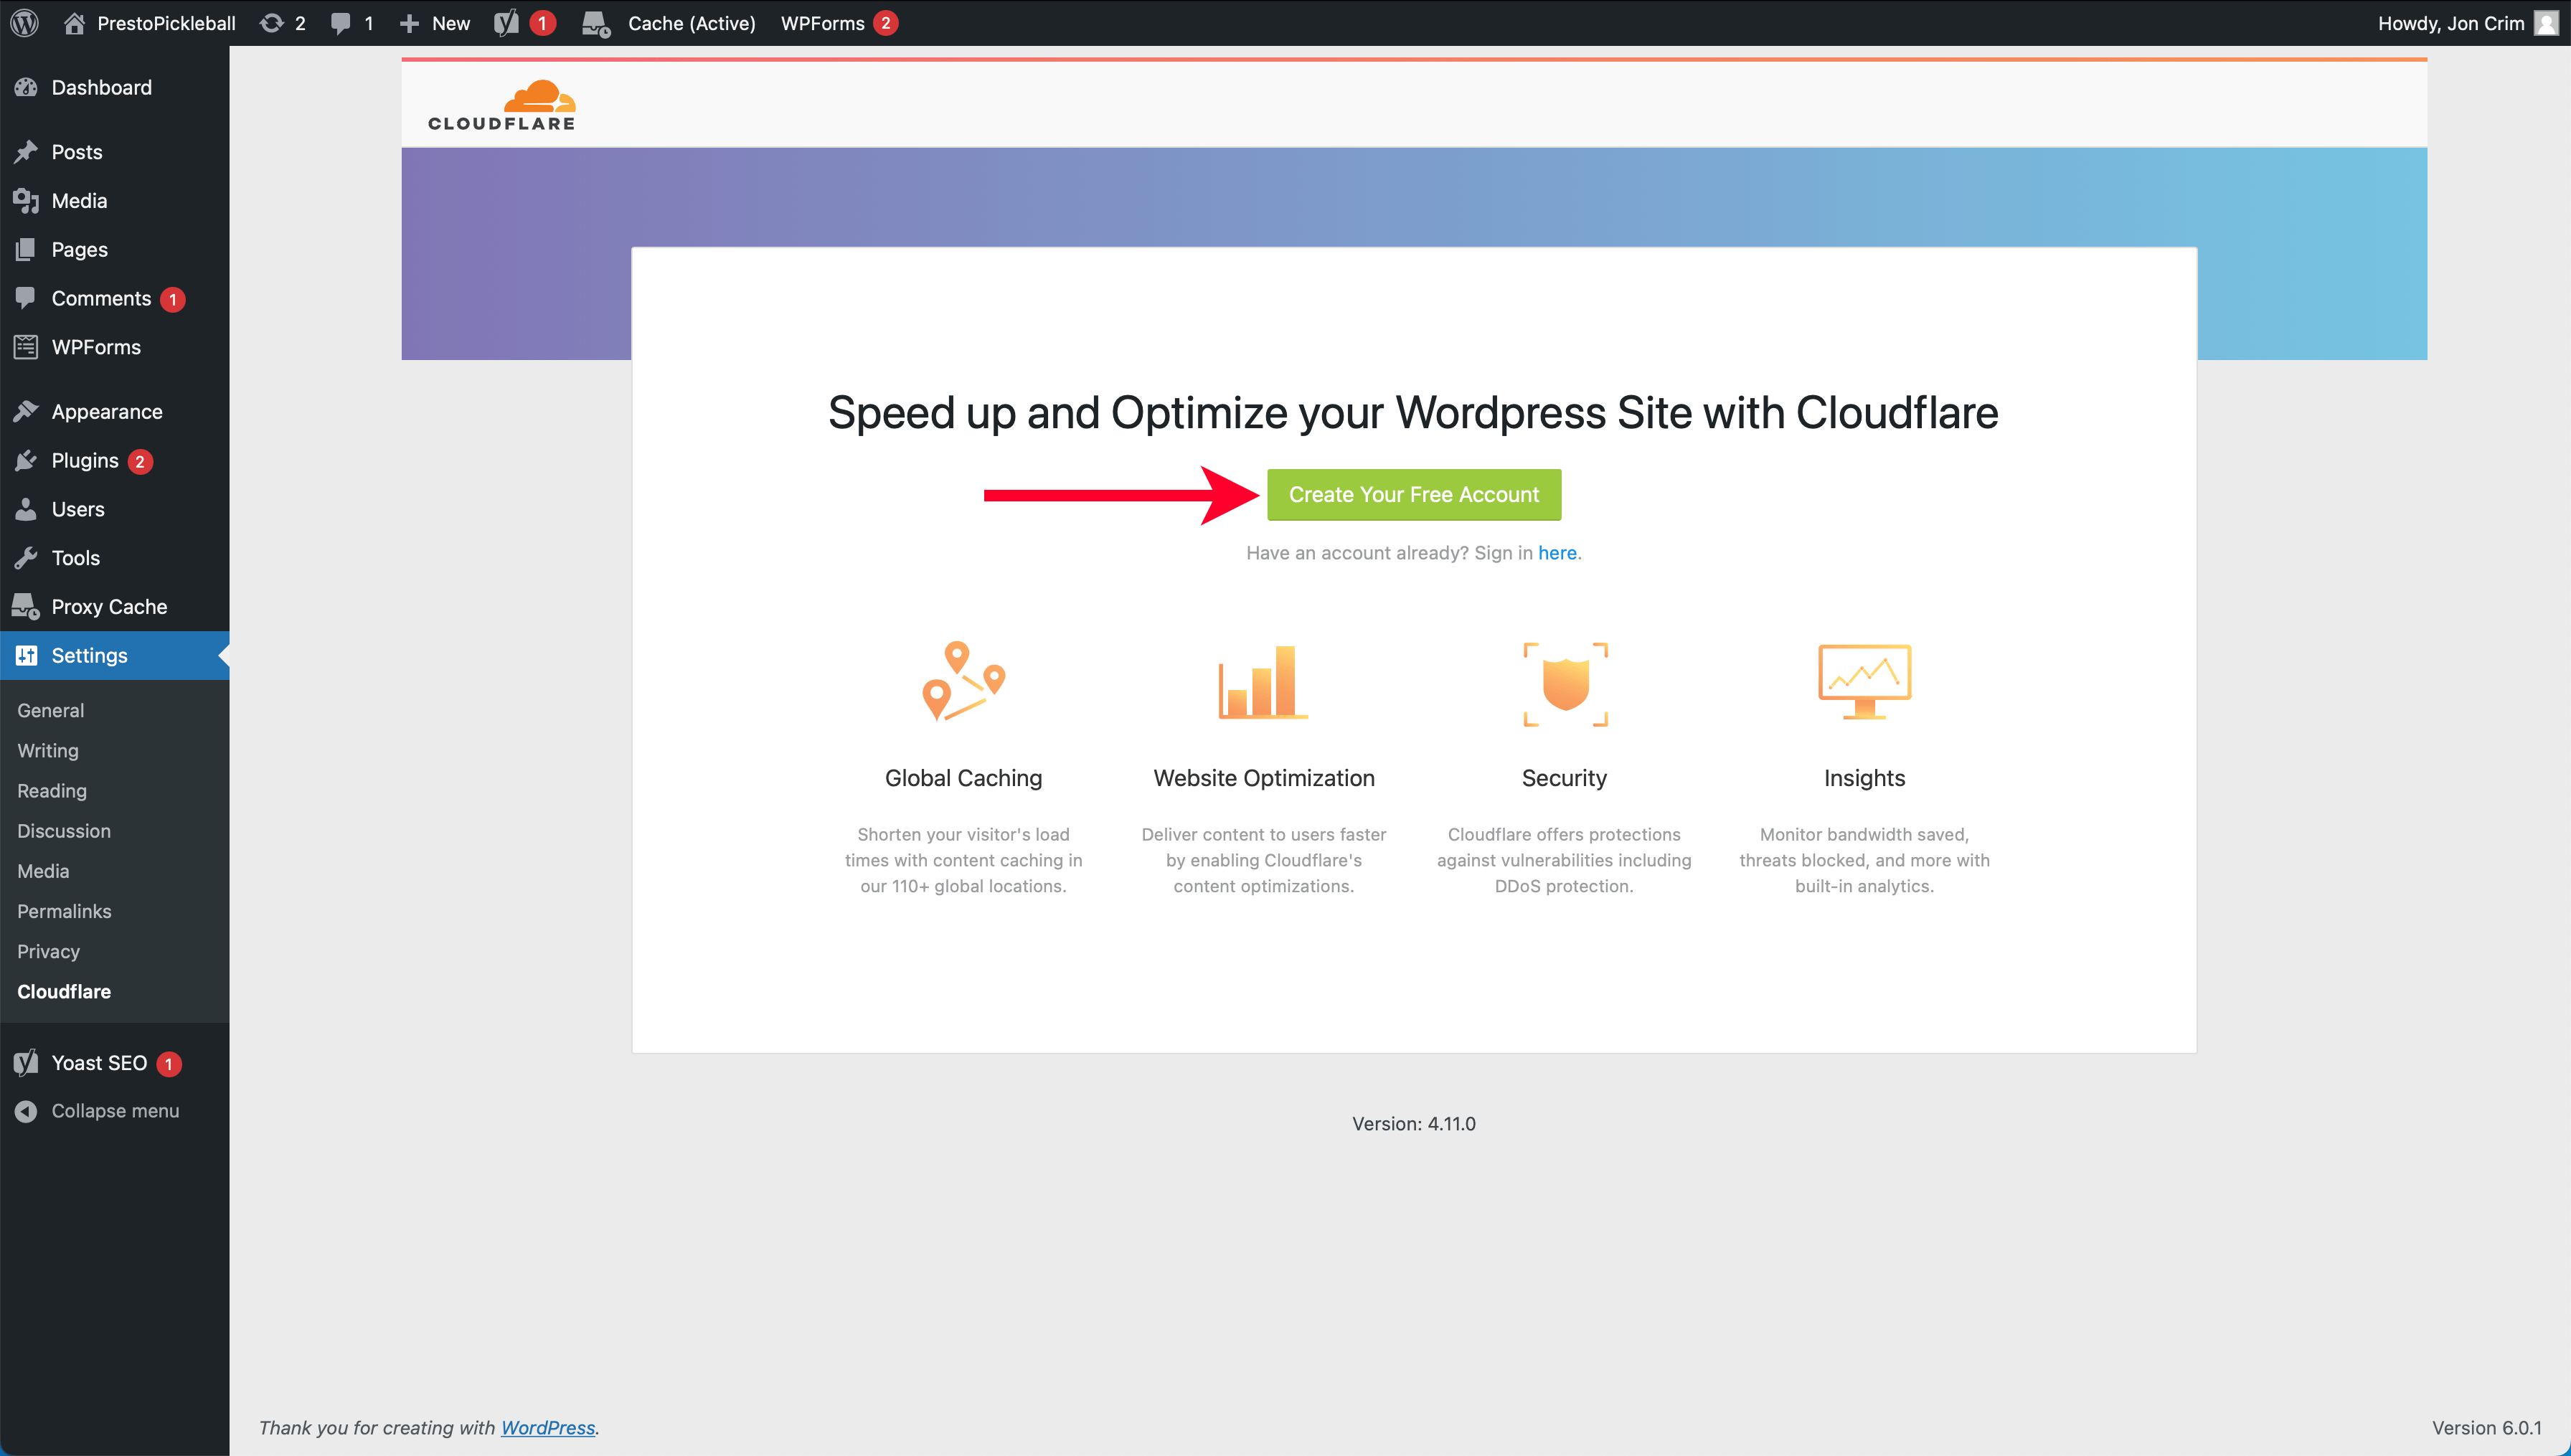
Creating a Cloudflare Account
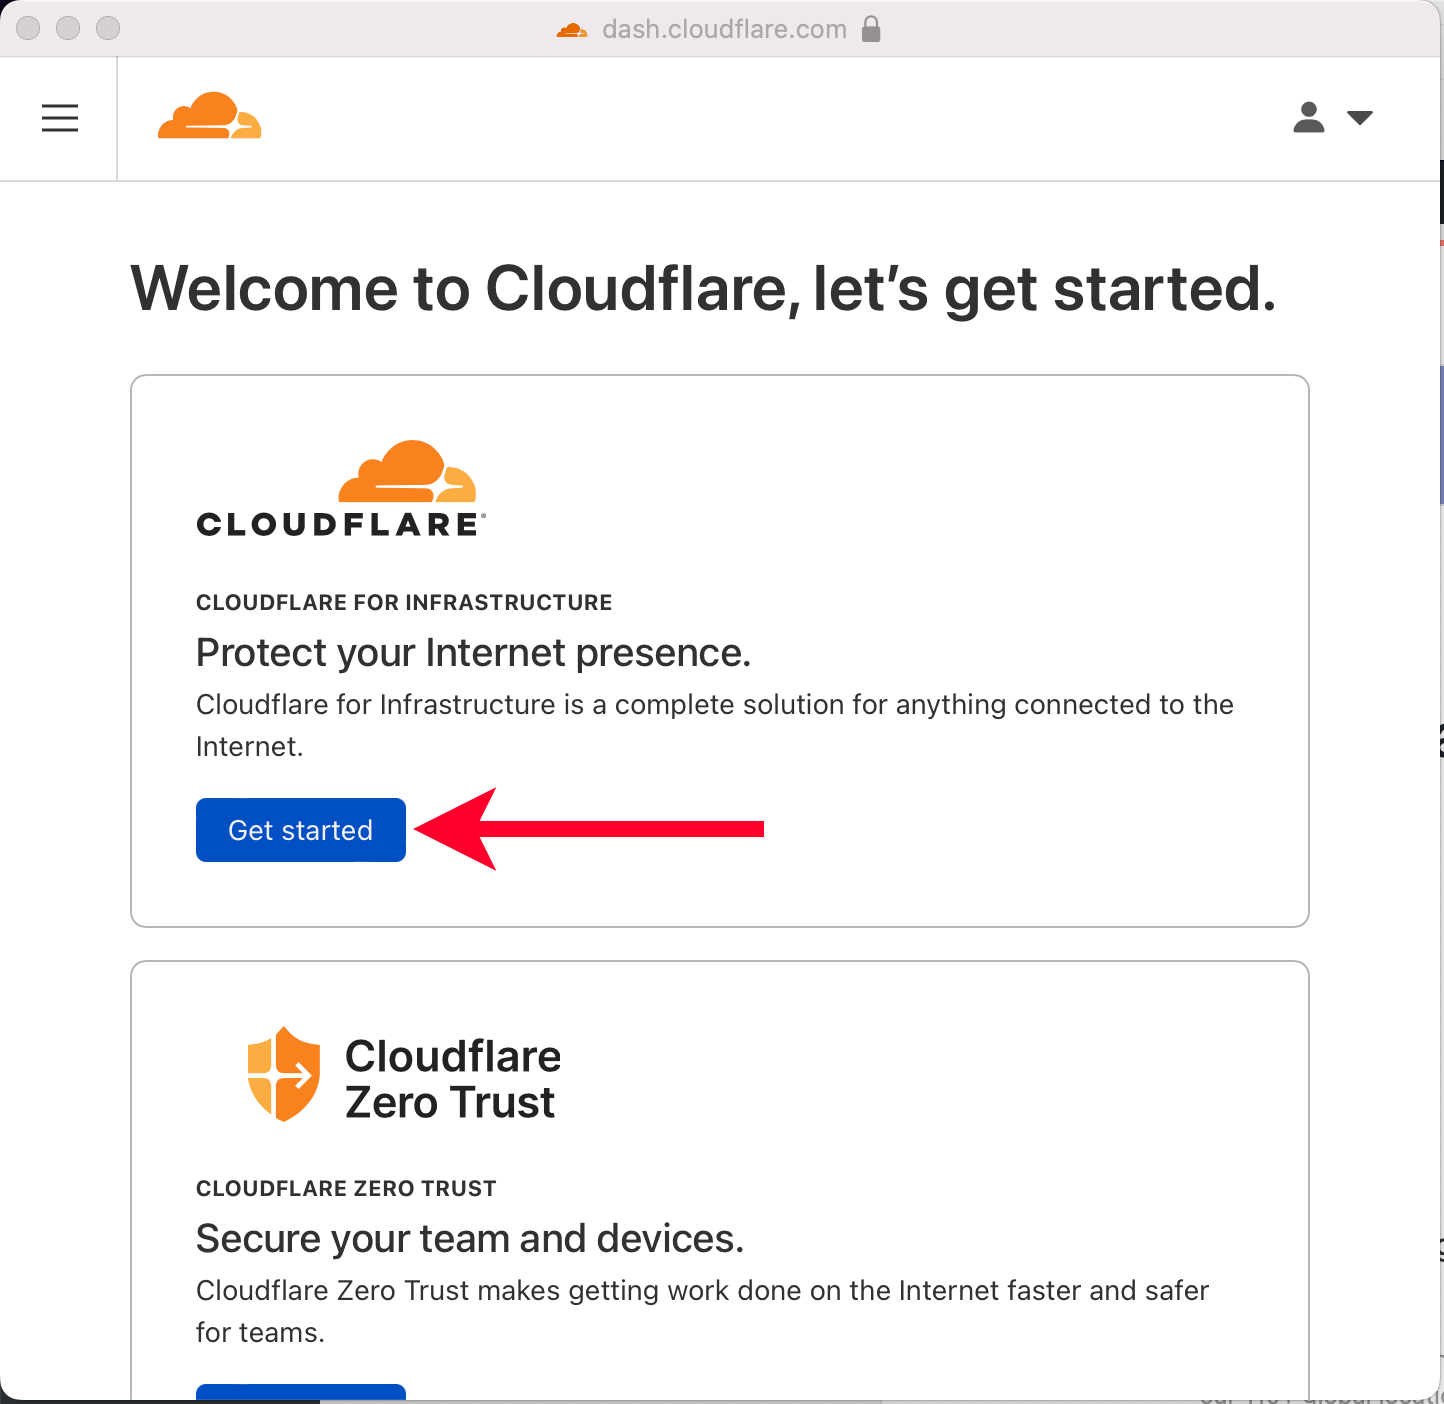
To fully activate Cloudflare, we’ll click the “Create Your Free Account” button from its settings page.
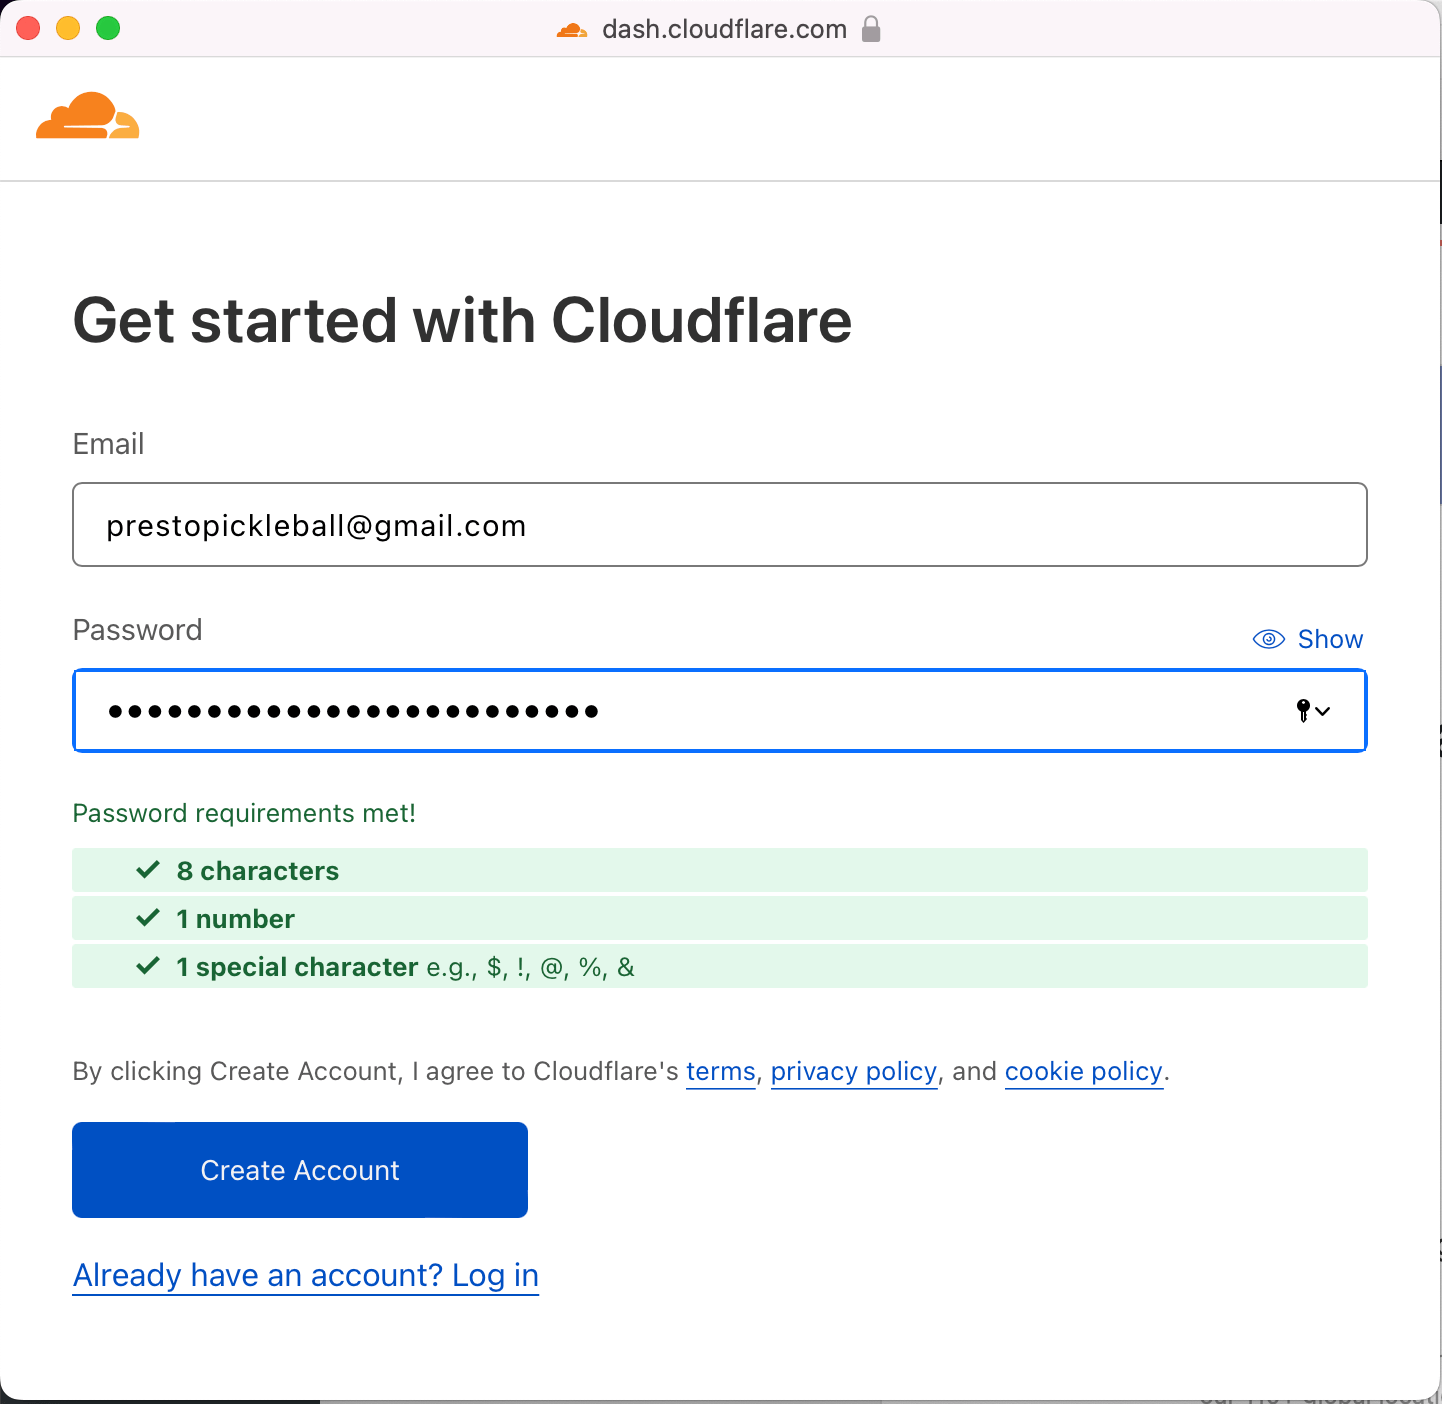
A new Cloudflare window will display to create a free account. Enter the email and password you’d like to use for your Cloudflare account. Make sure you document this so you can easily access Cloudflare in the future.
Next, click “Get Started” in the box for “Protecting your Internet presence.”
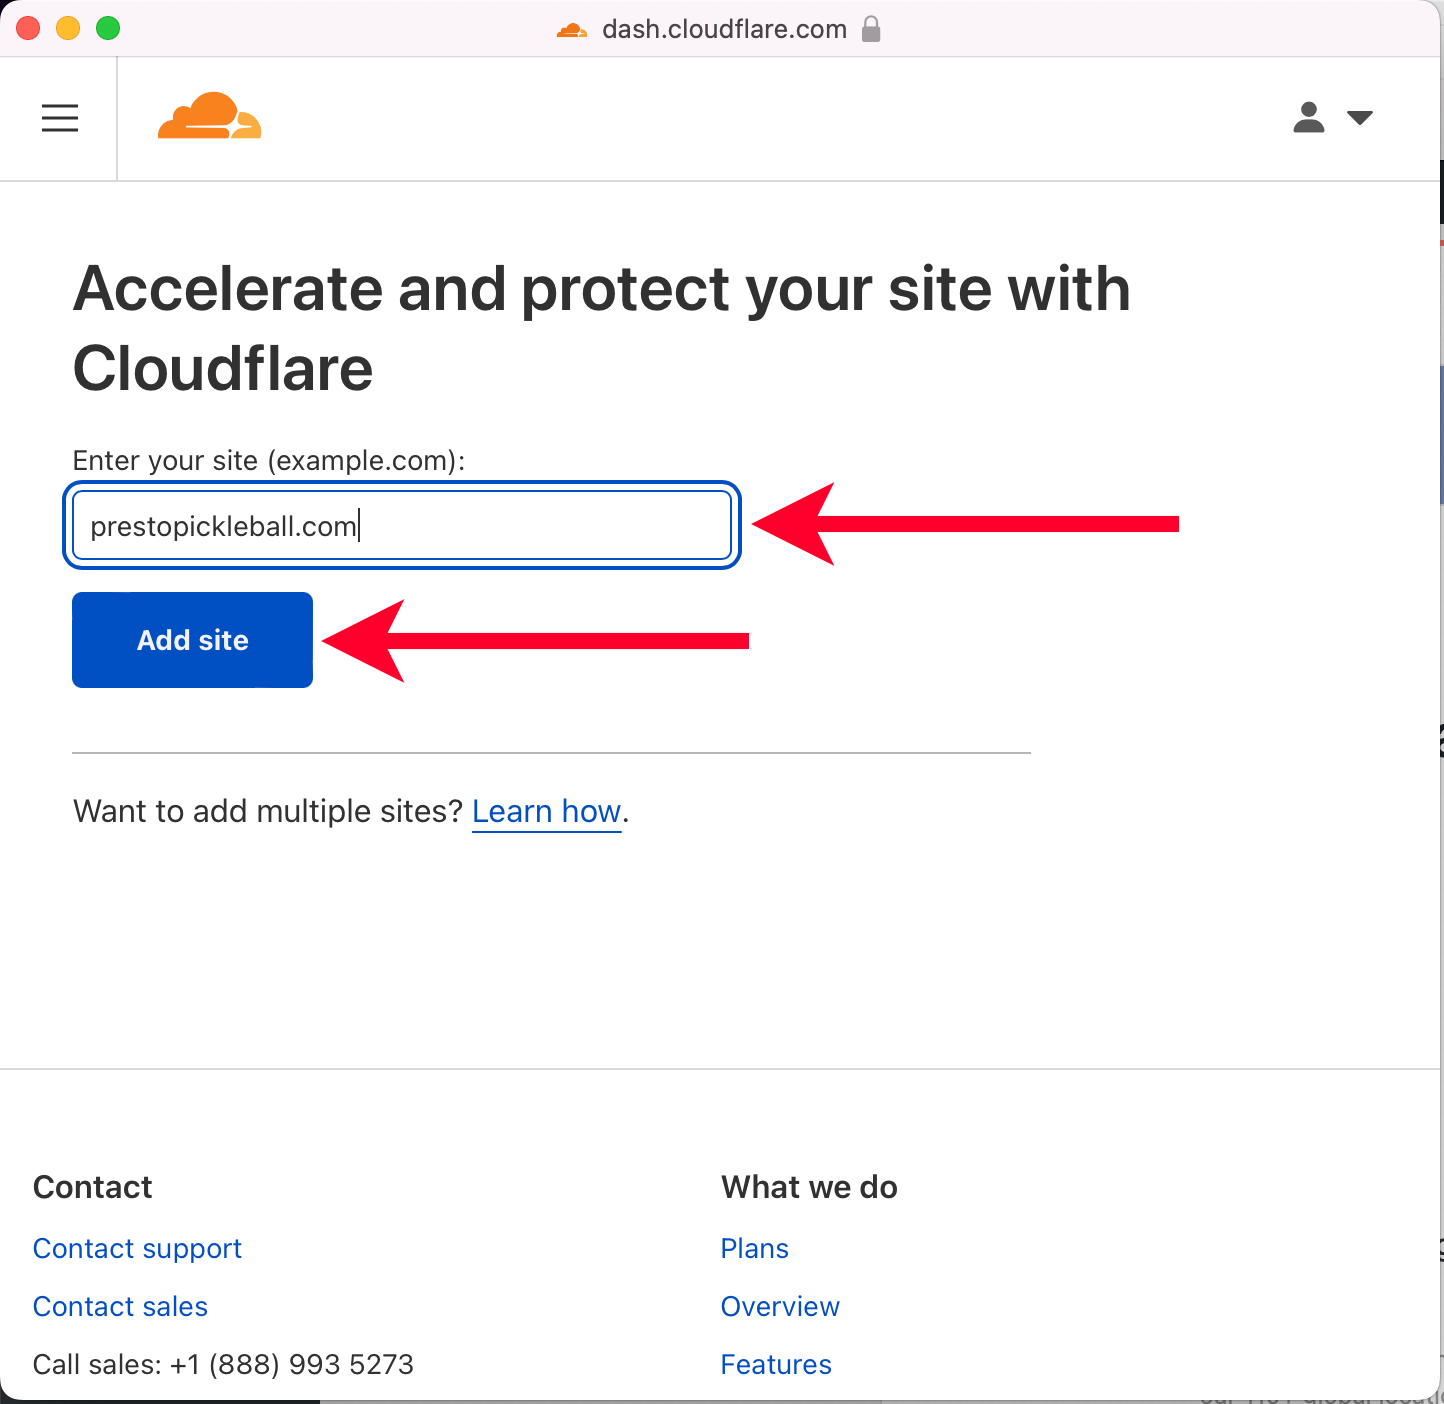
Enter your site’s URL in the next step, then click “Add Site.”
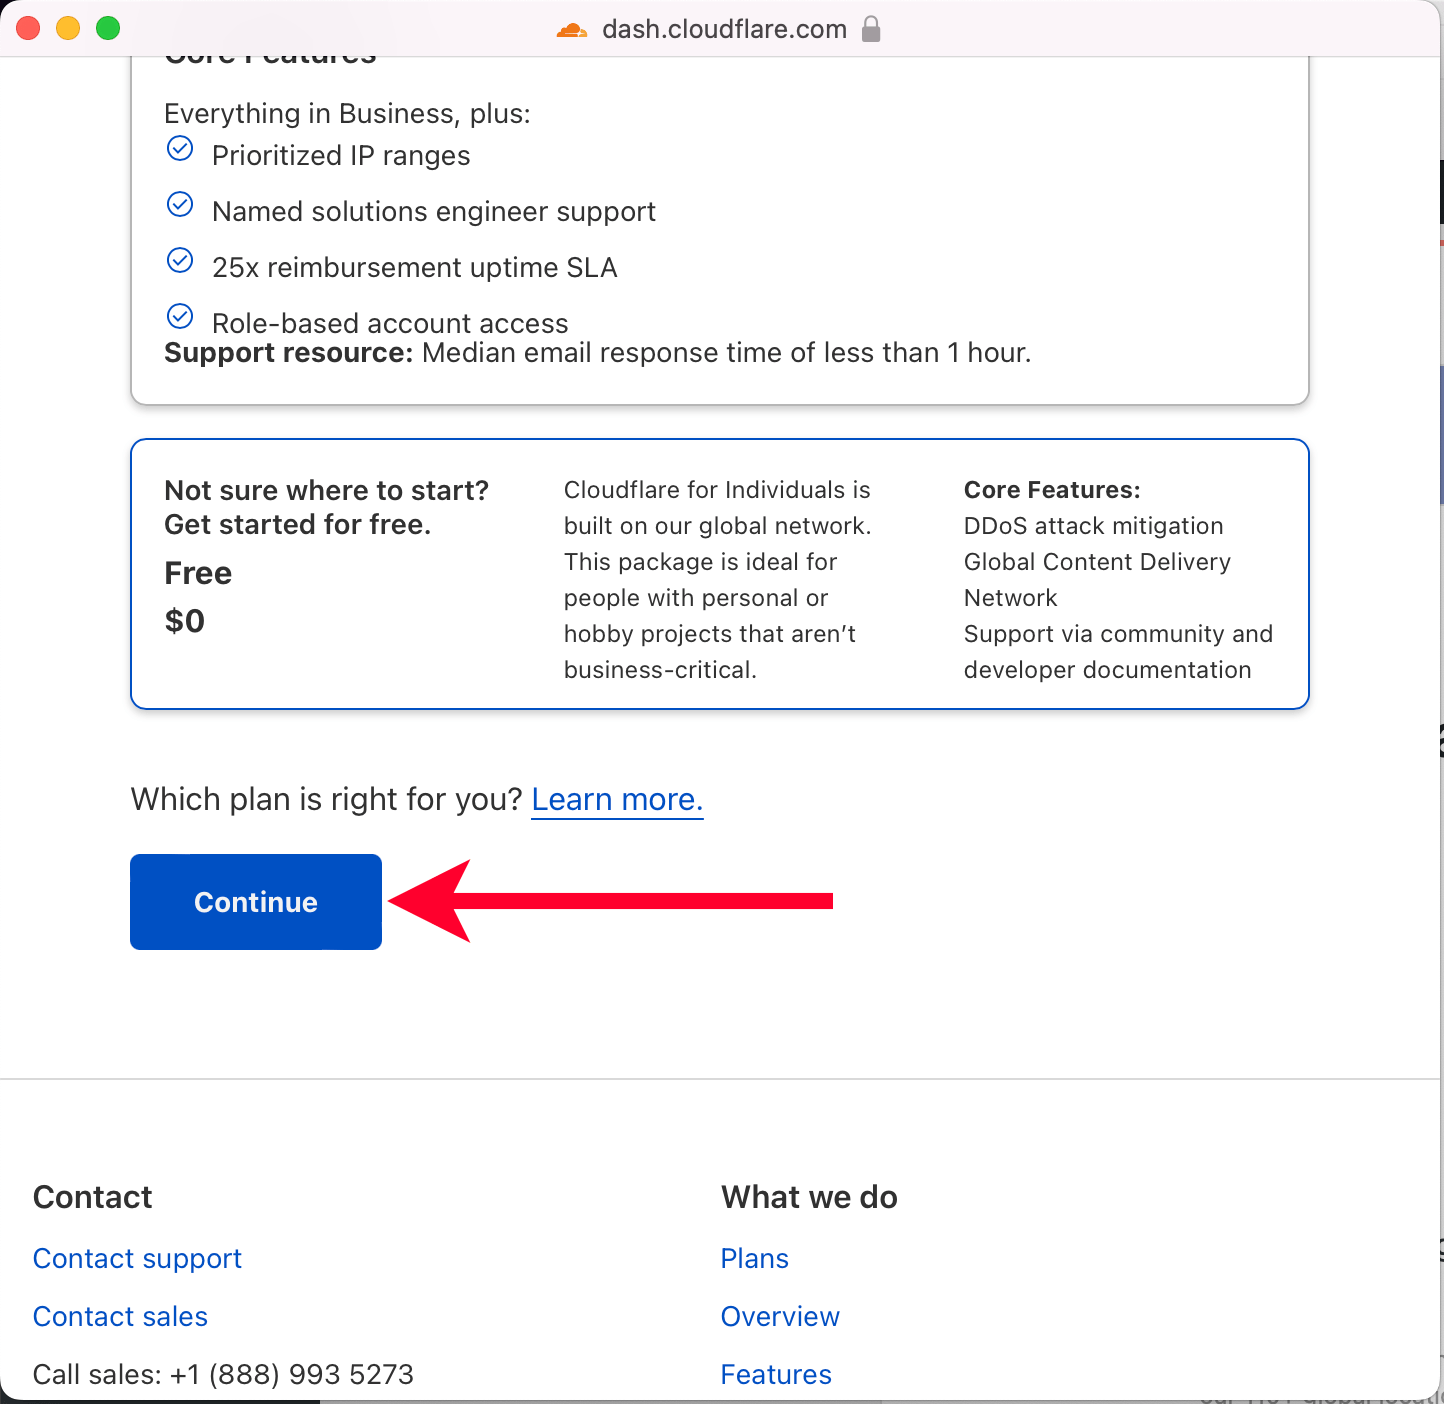
On the next step, scroll to the bottom and select the “Free” option, then click “Continue.”
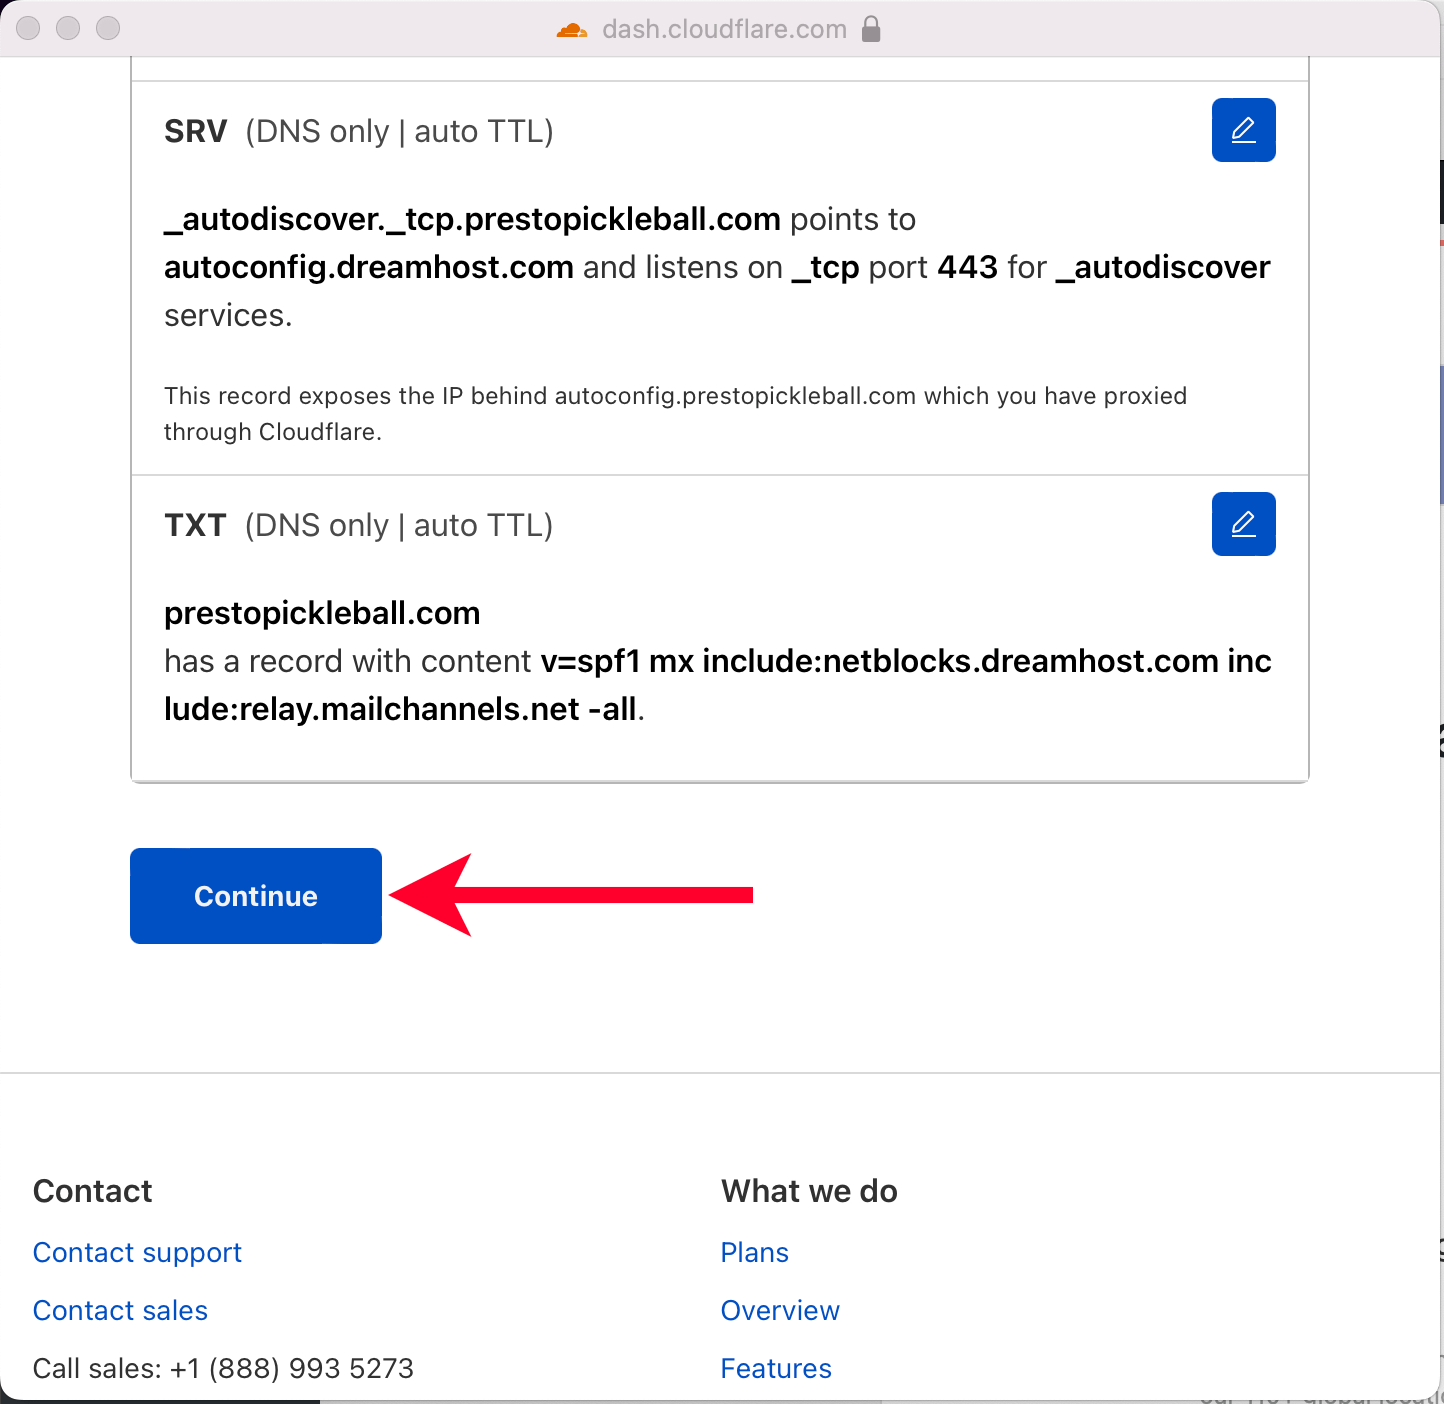
In the next step, there’s no need to make any changes. Scroll to the bottom and click “Continue.”
The final step is critical, so don’t close this popup yet. We’ll change the nameservers for your new WordPress website within your DreamHost account.

If you’re not already, log in to your DreamHost account in a new browser tab or window.
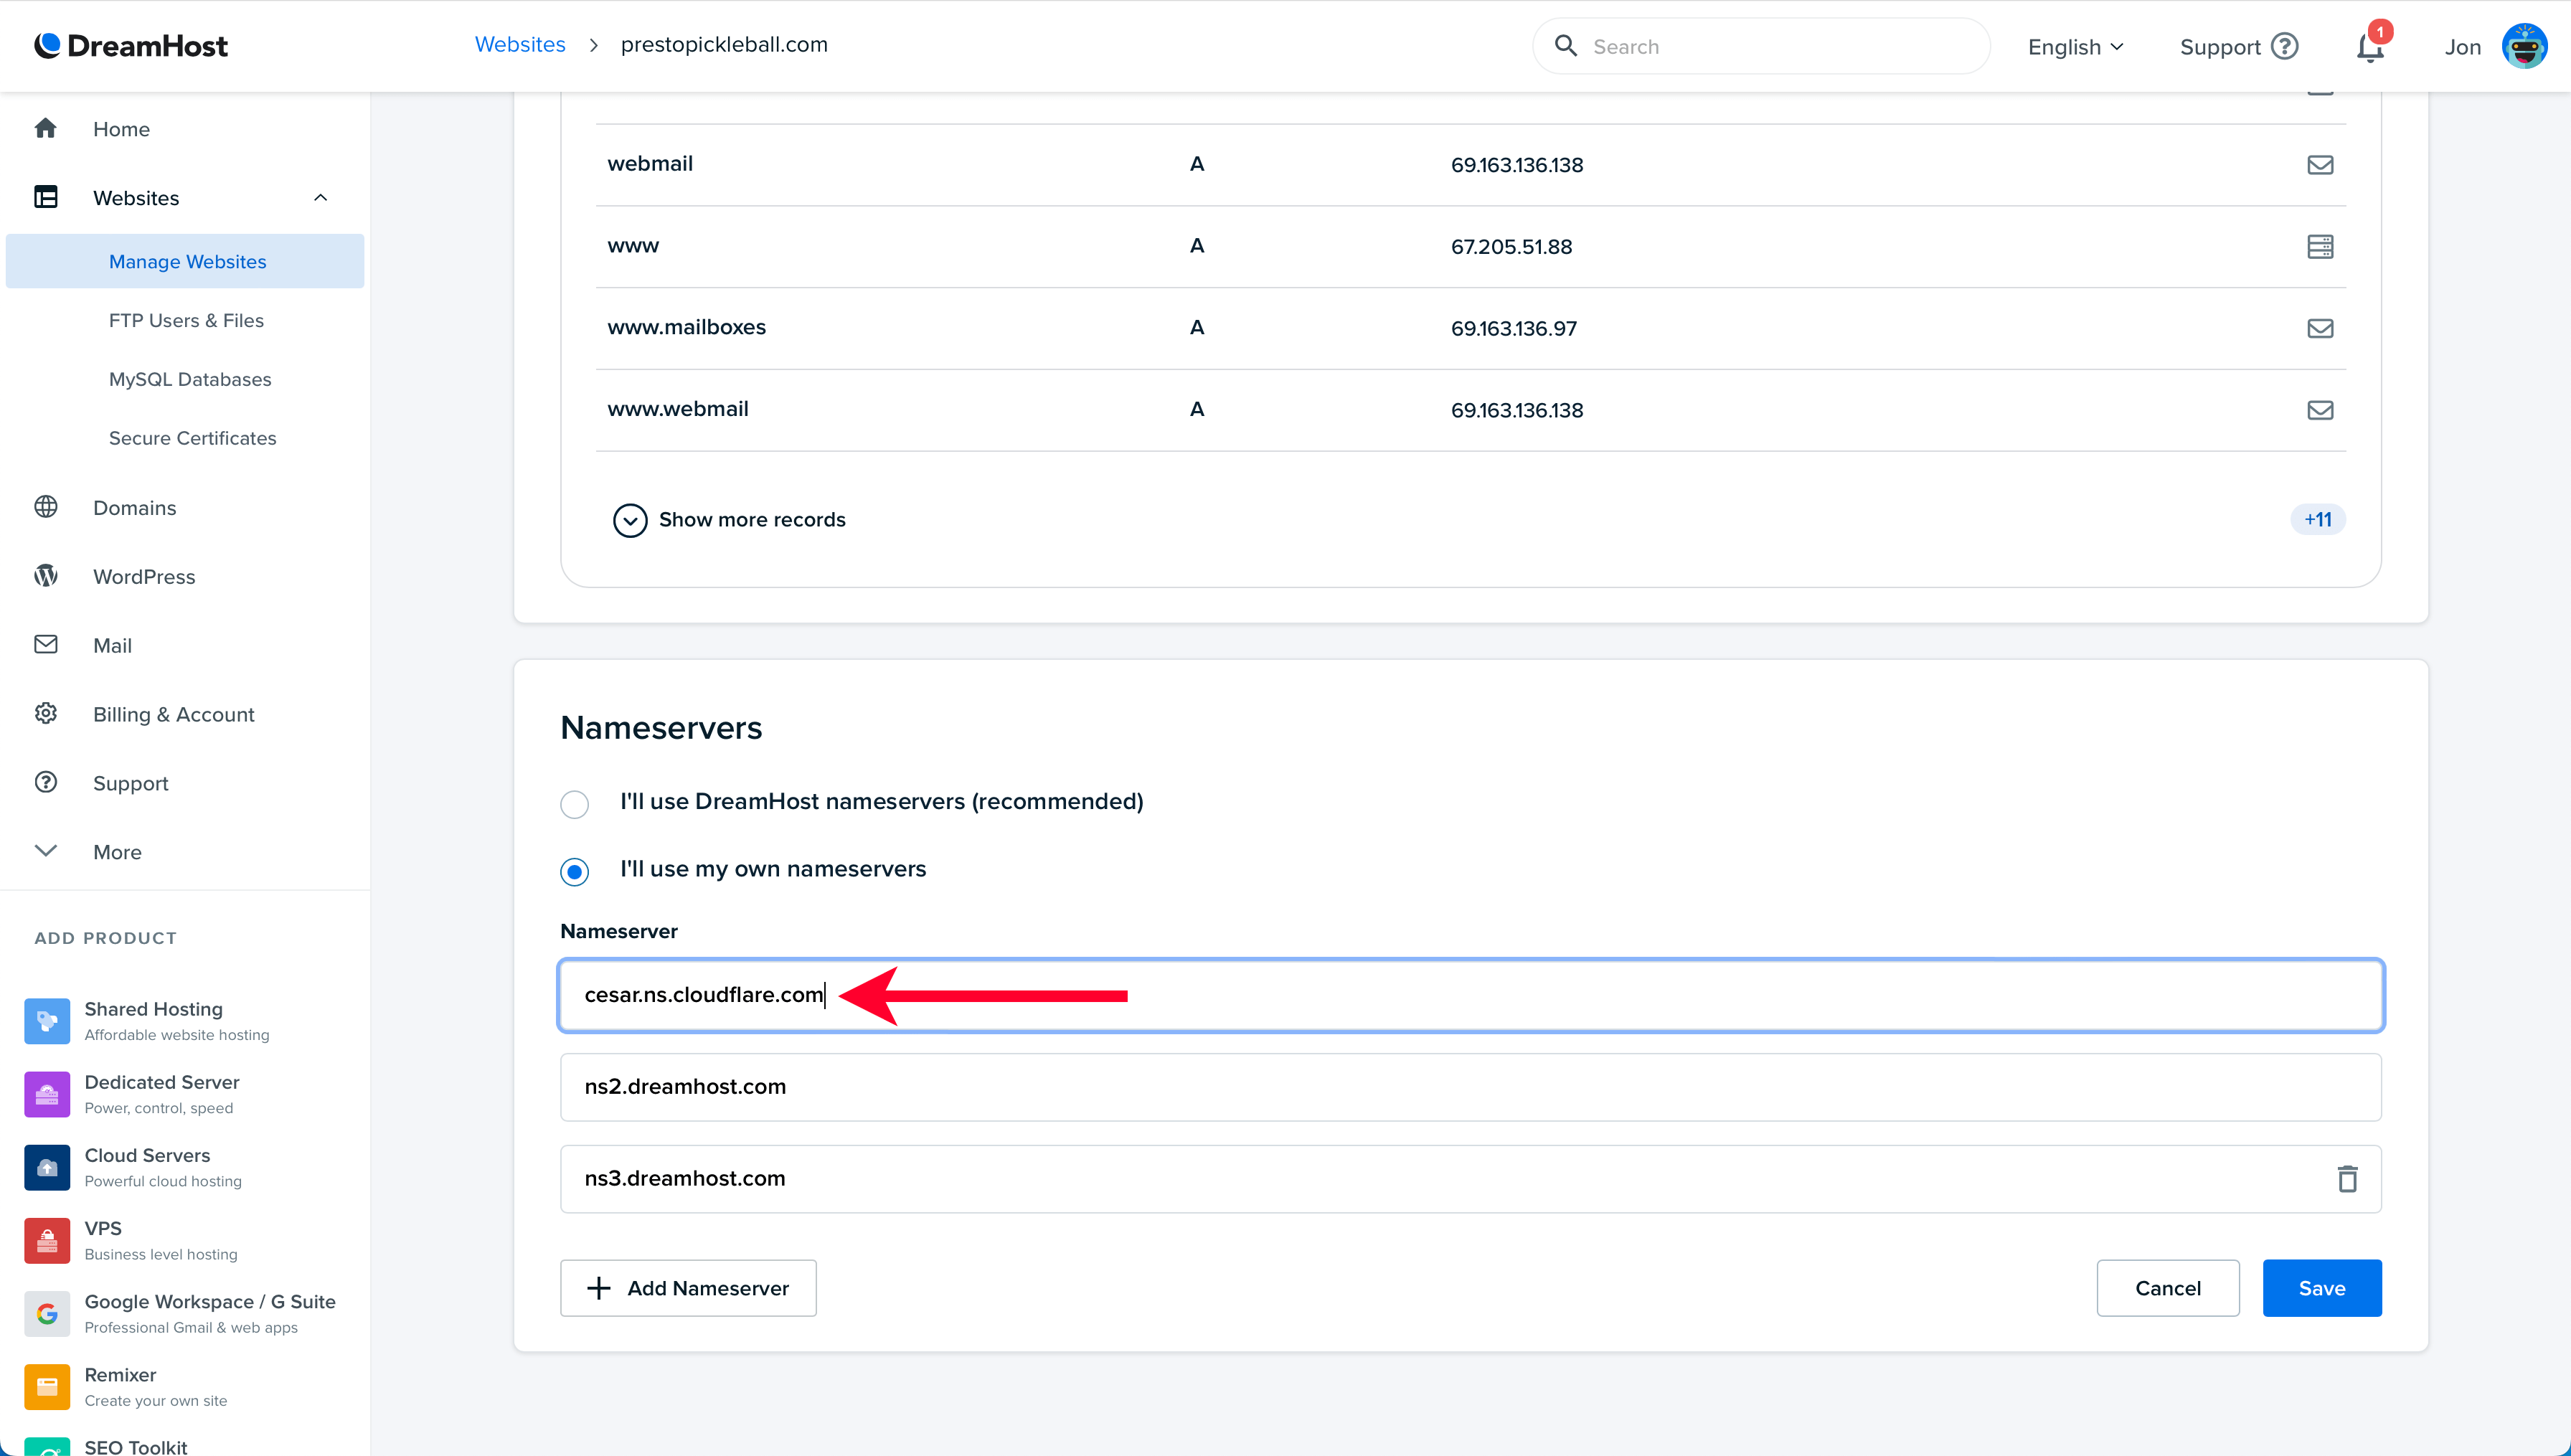
In the left-hand menu of your DreamHost account, click “Domains,” then select “Manage Domains.” Under your domain name on the “Manage Domains” page, click the “DNS” link.
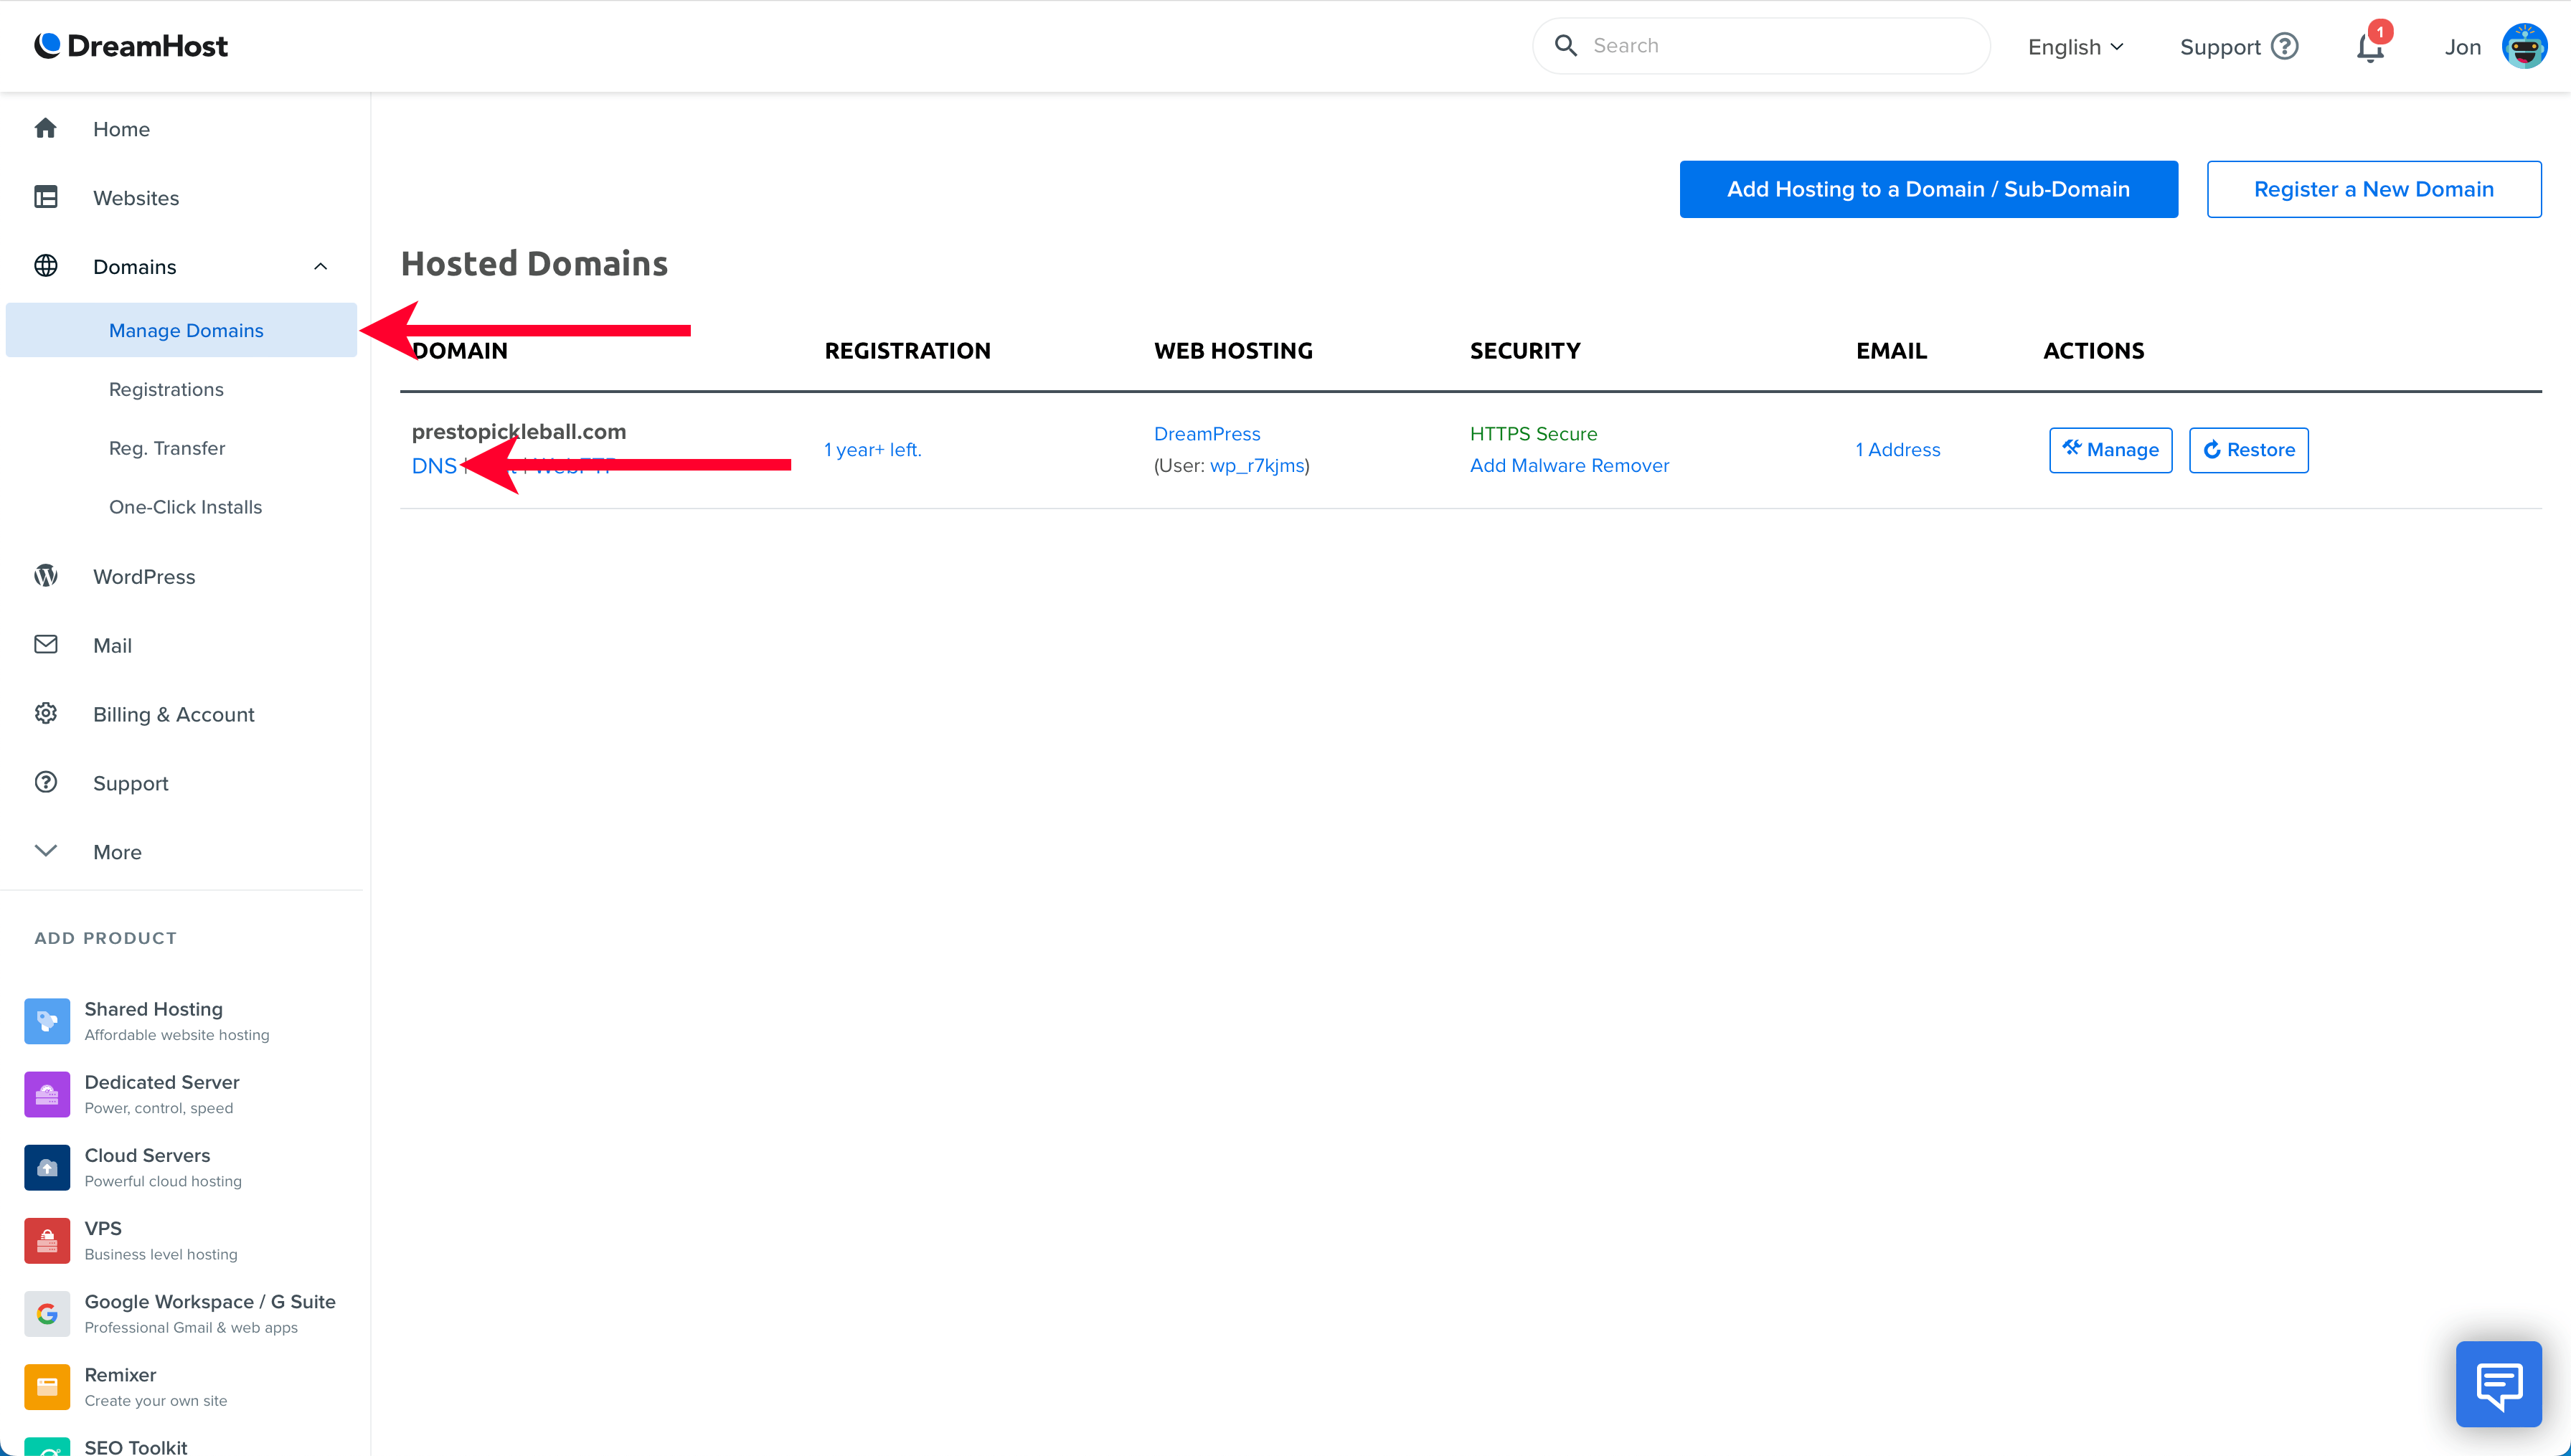
On the “DNS” page, scroll down until you get to the section titled “Nameservers,” then click the “Change” button.
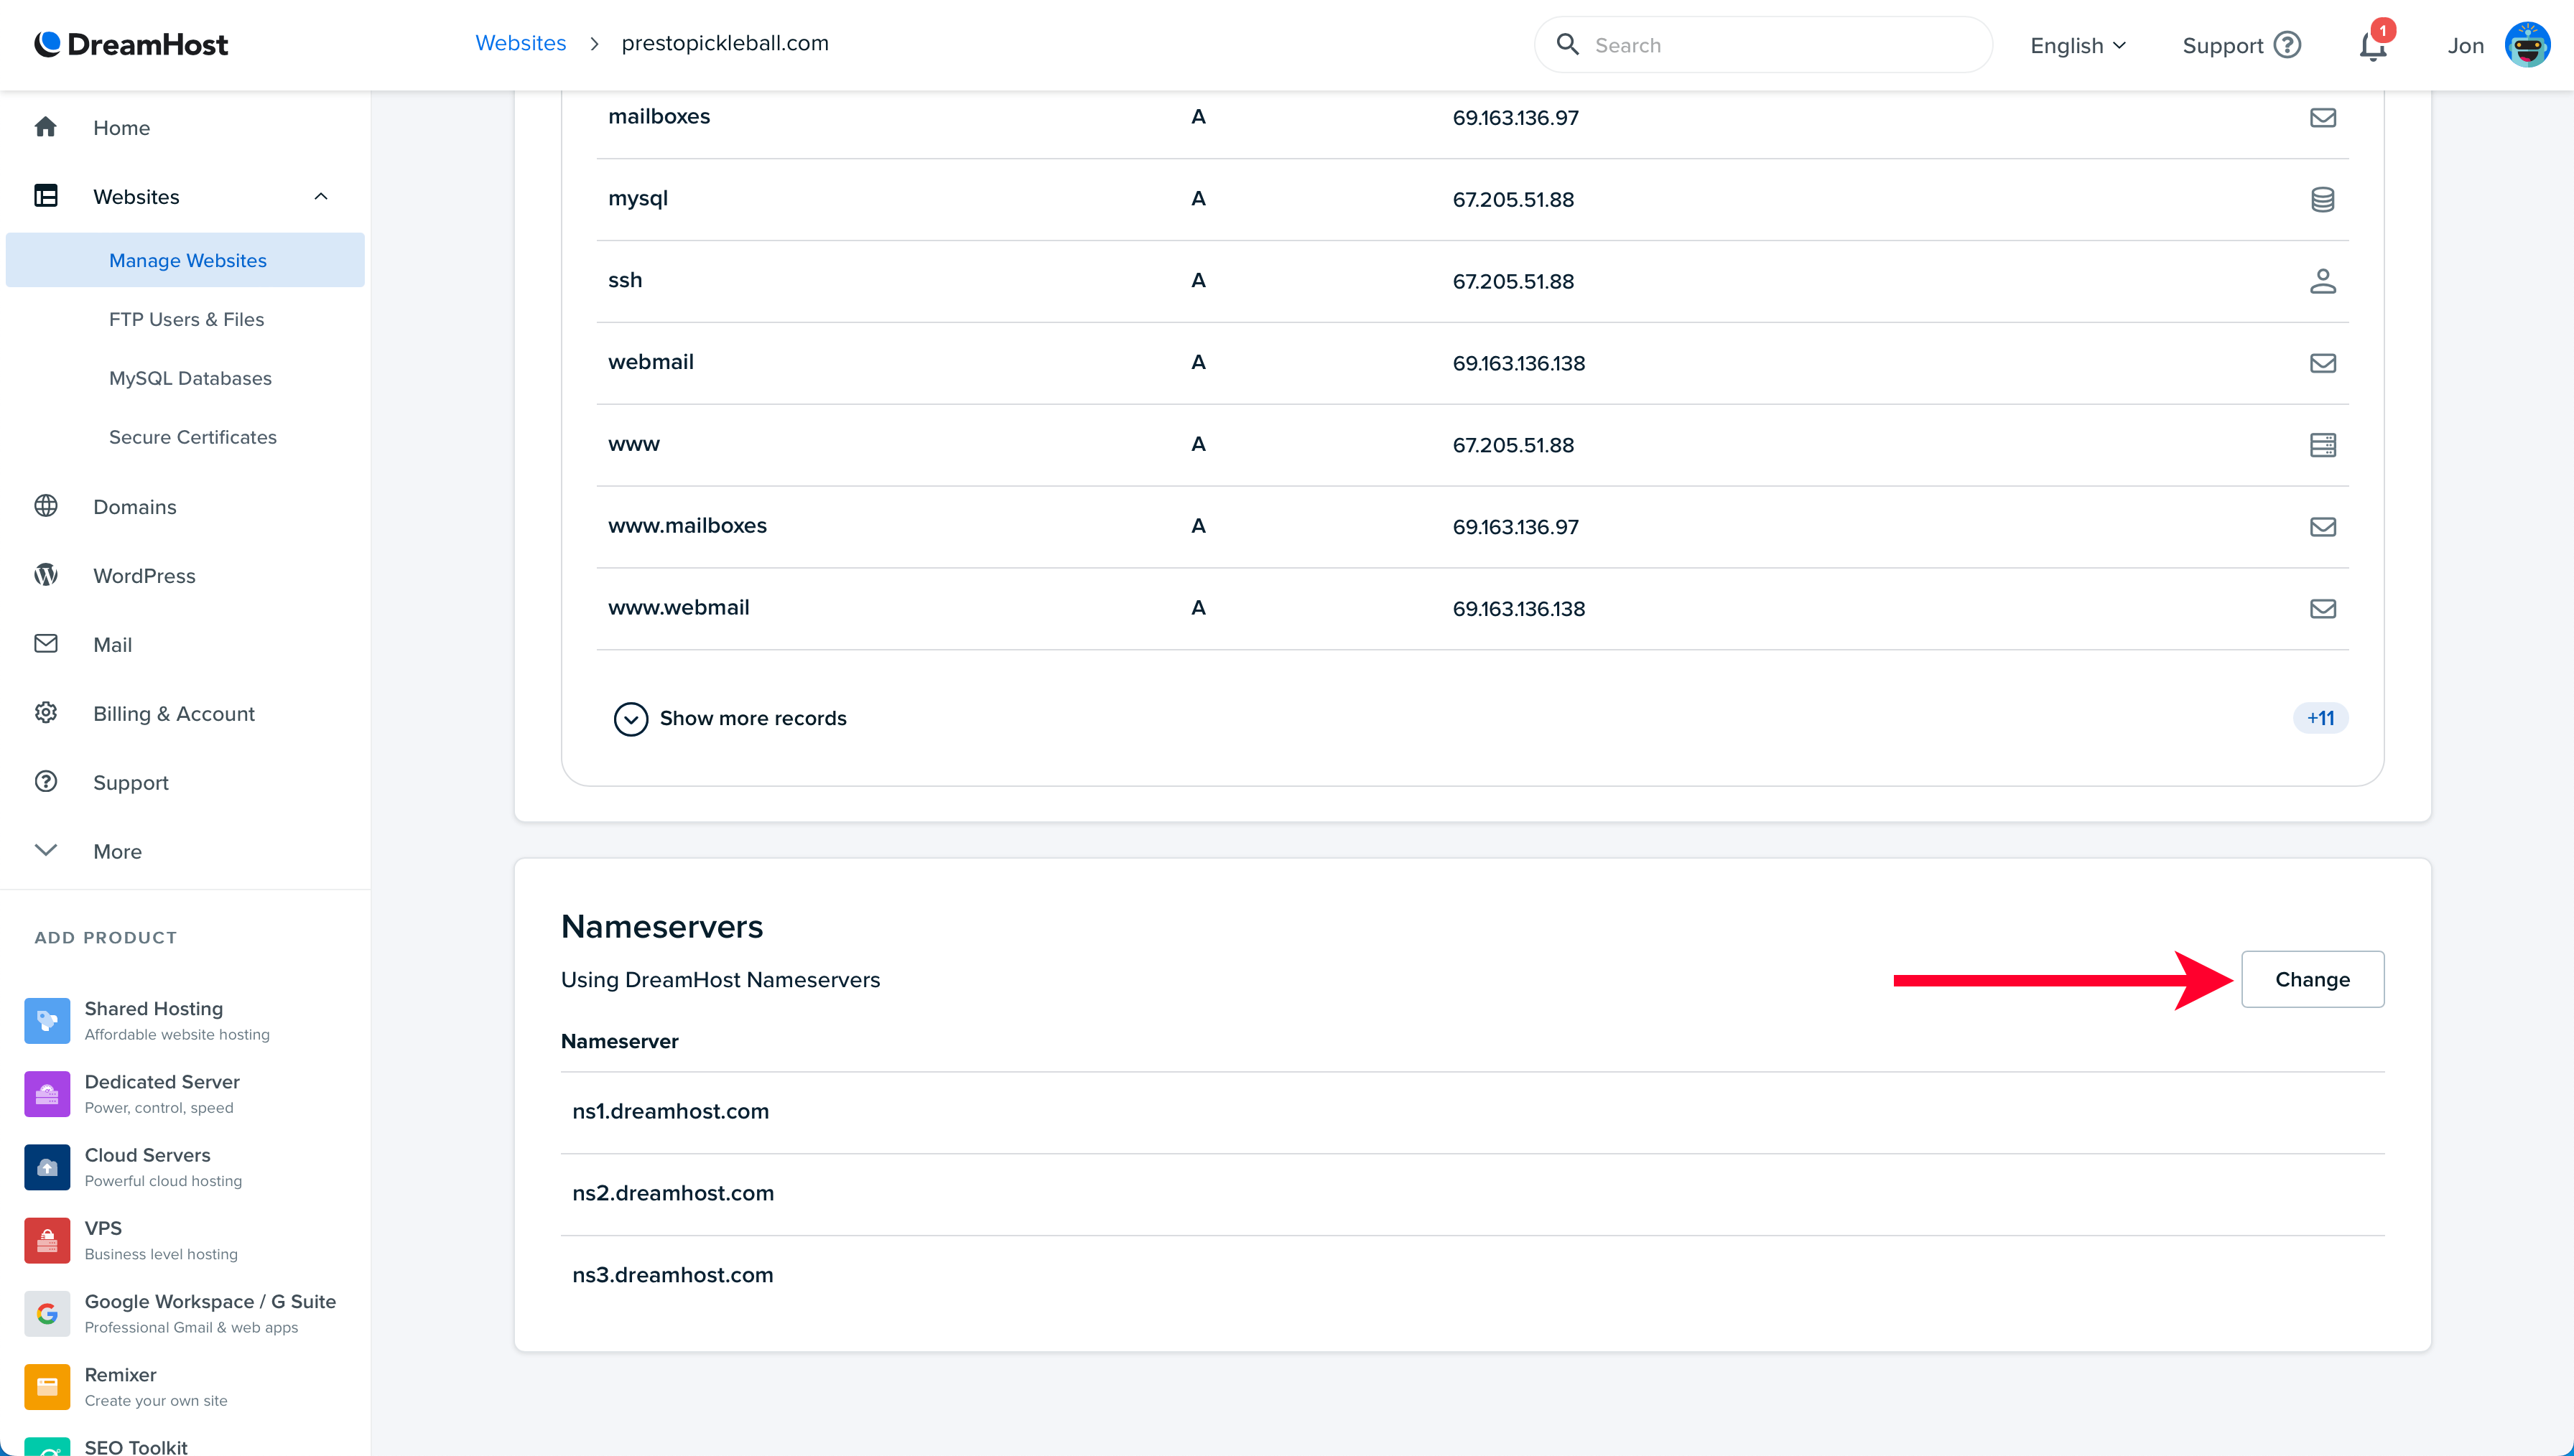
After clicking “Change,” you’ll see two options:
- I’ll use DreamHost nameservers (recommended)
- I’ll use my own nameservers
Select “I’ll use my own nameservers.”
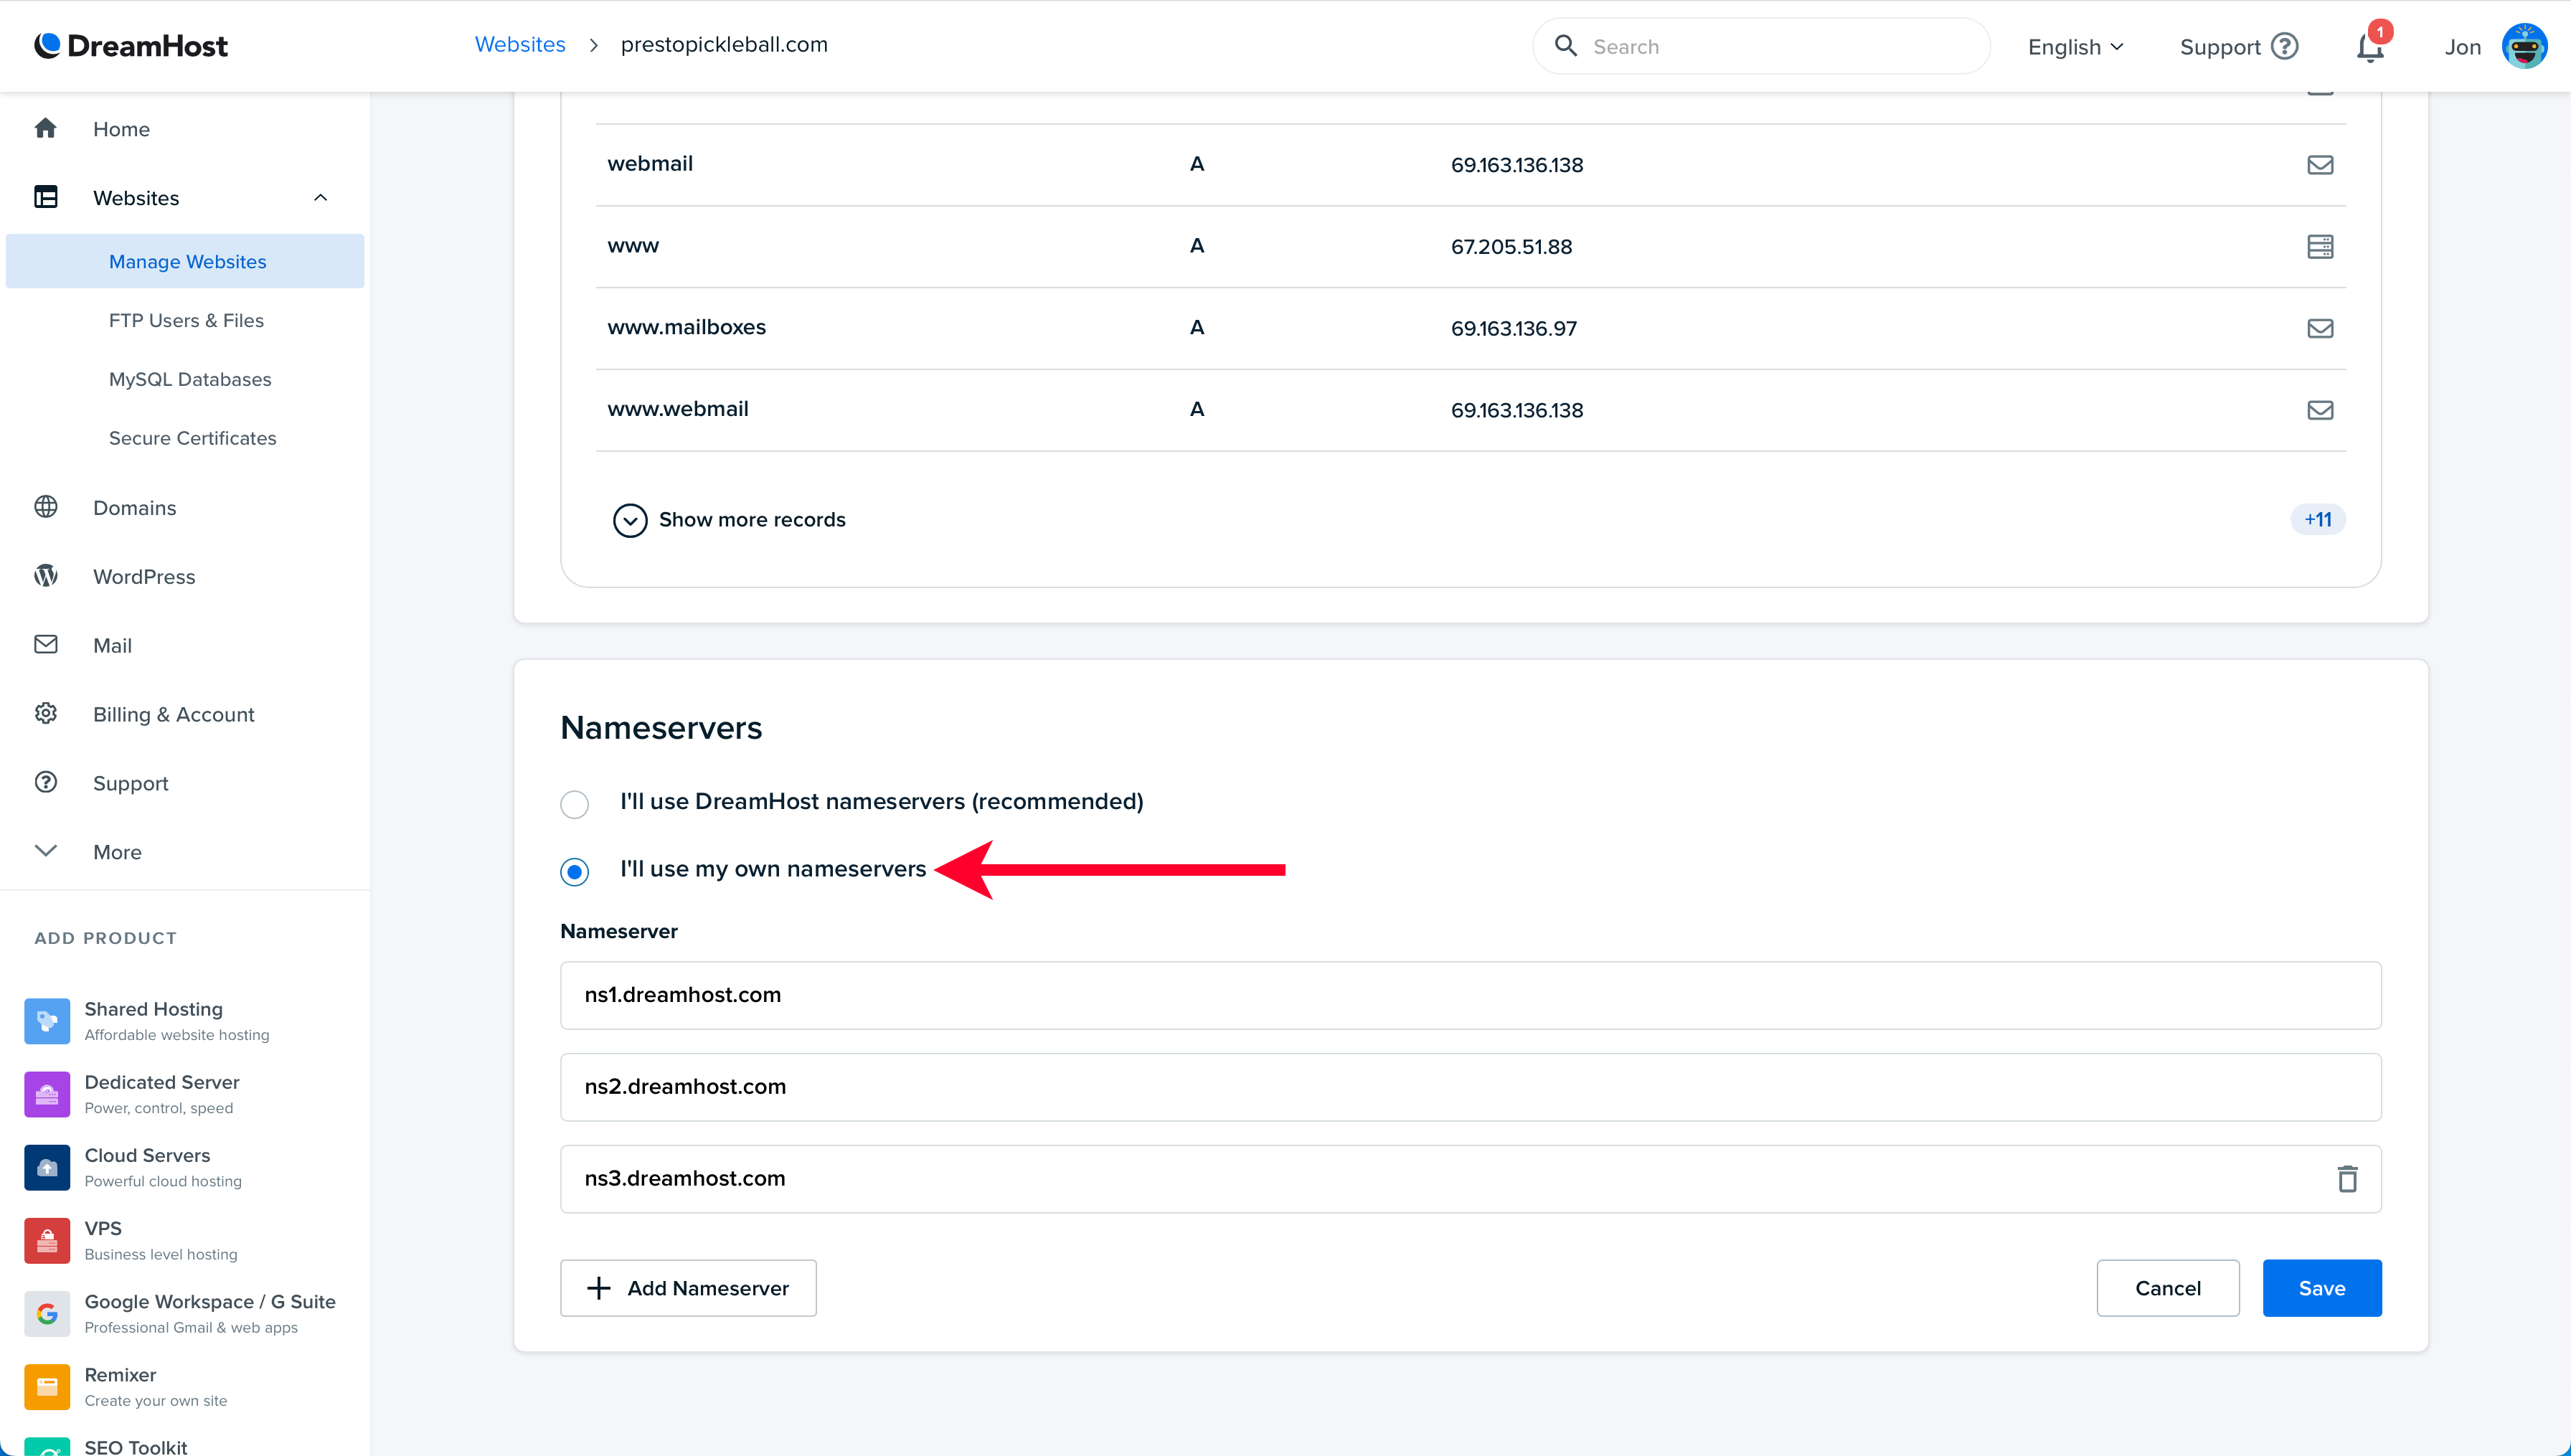
Go back to the window where you set up your Cloudflare account and “Click to Copy” the first of two Cloudflare nameservers.

In the browser window with your DreamHost account, highlight the text for the first nameserver, then “Paste” the Cloudflare nameserver in its place.
Go back to the Cloudflare popup and “Click to Copy” the second Cloudflare nameserver.
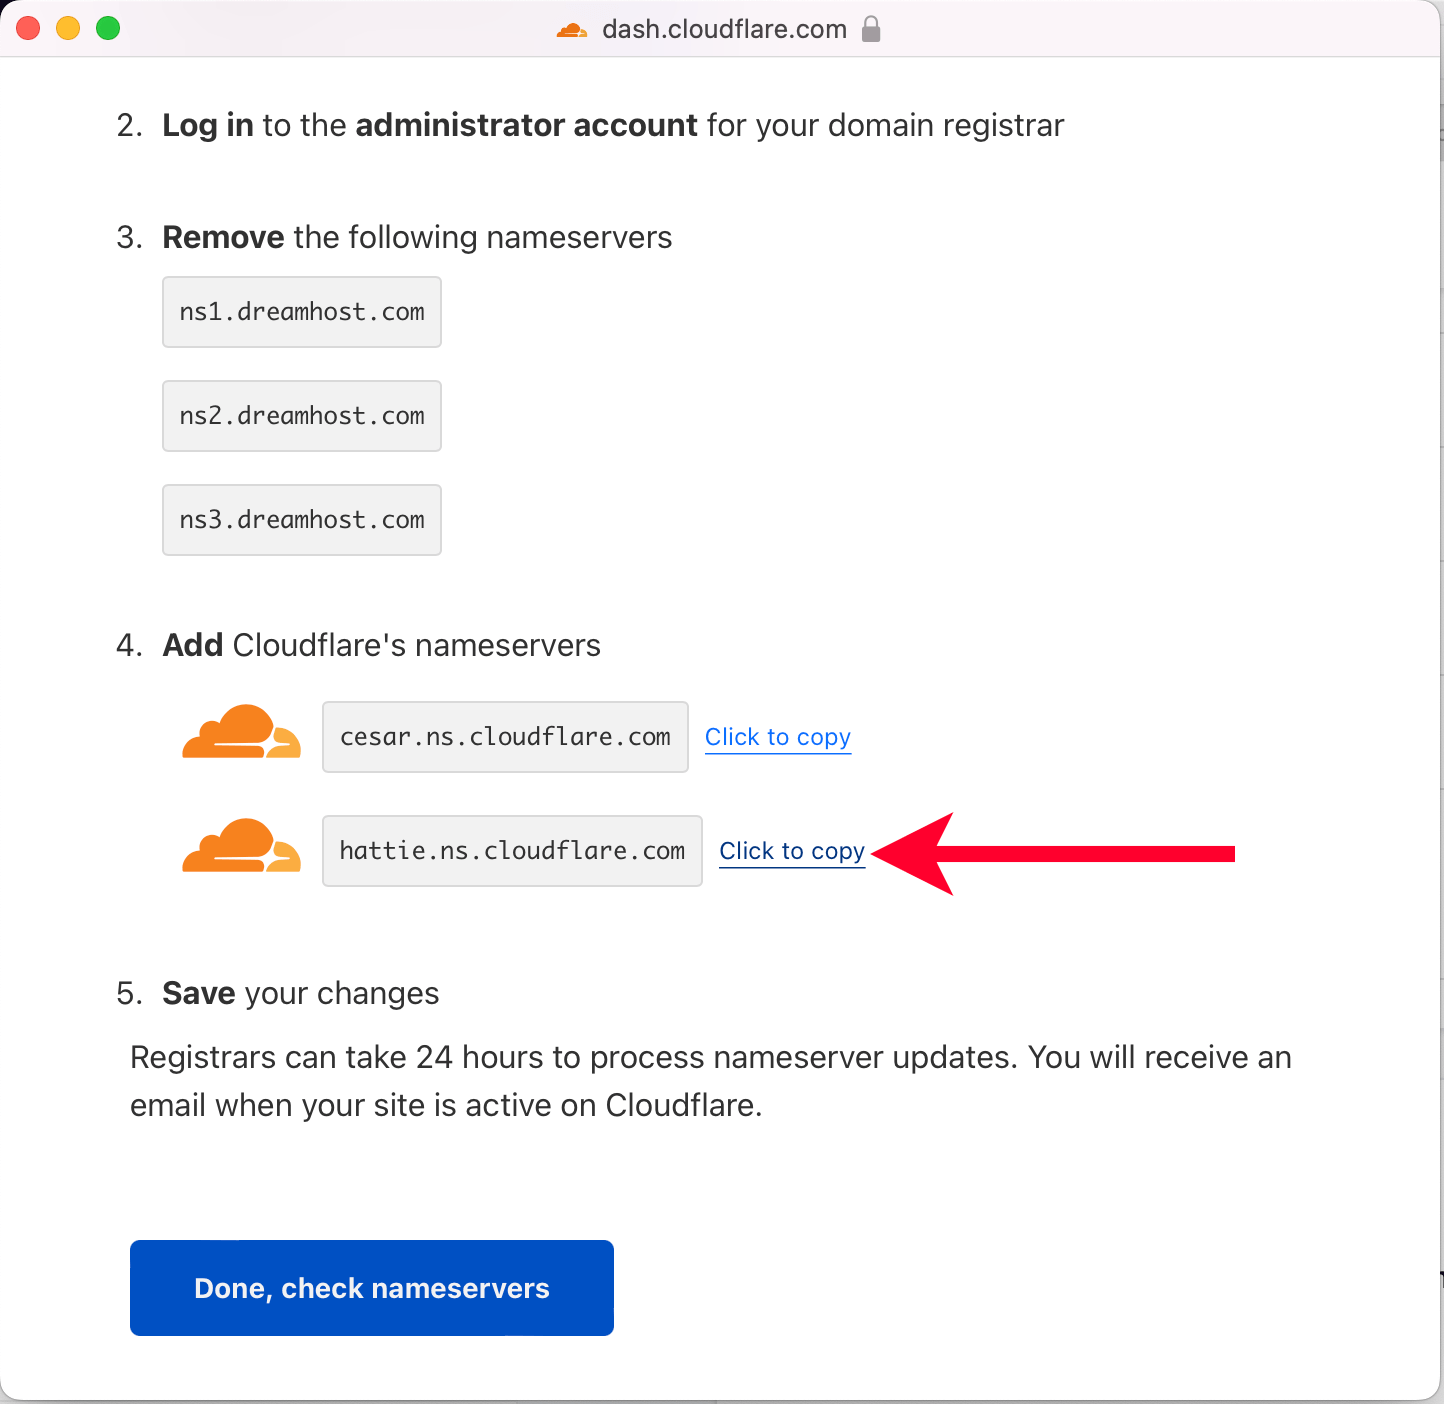
In the browser window with your DreamHost account, highlight the text for the second nameserver, then “Paste” the Cloudflare nameserver in its place.

Now, delete the third “DreamHost” nameserver by clicking the trash can icon. Once deleted, click “Save.”

Head back to the Cloudflare popup and click the “Done, Check Nameservers” button.

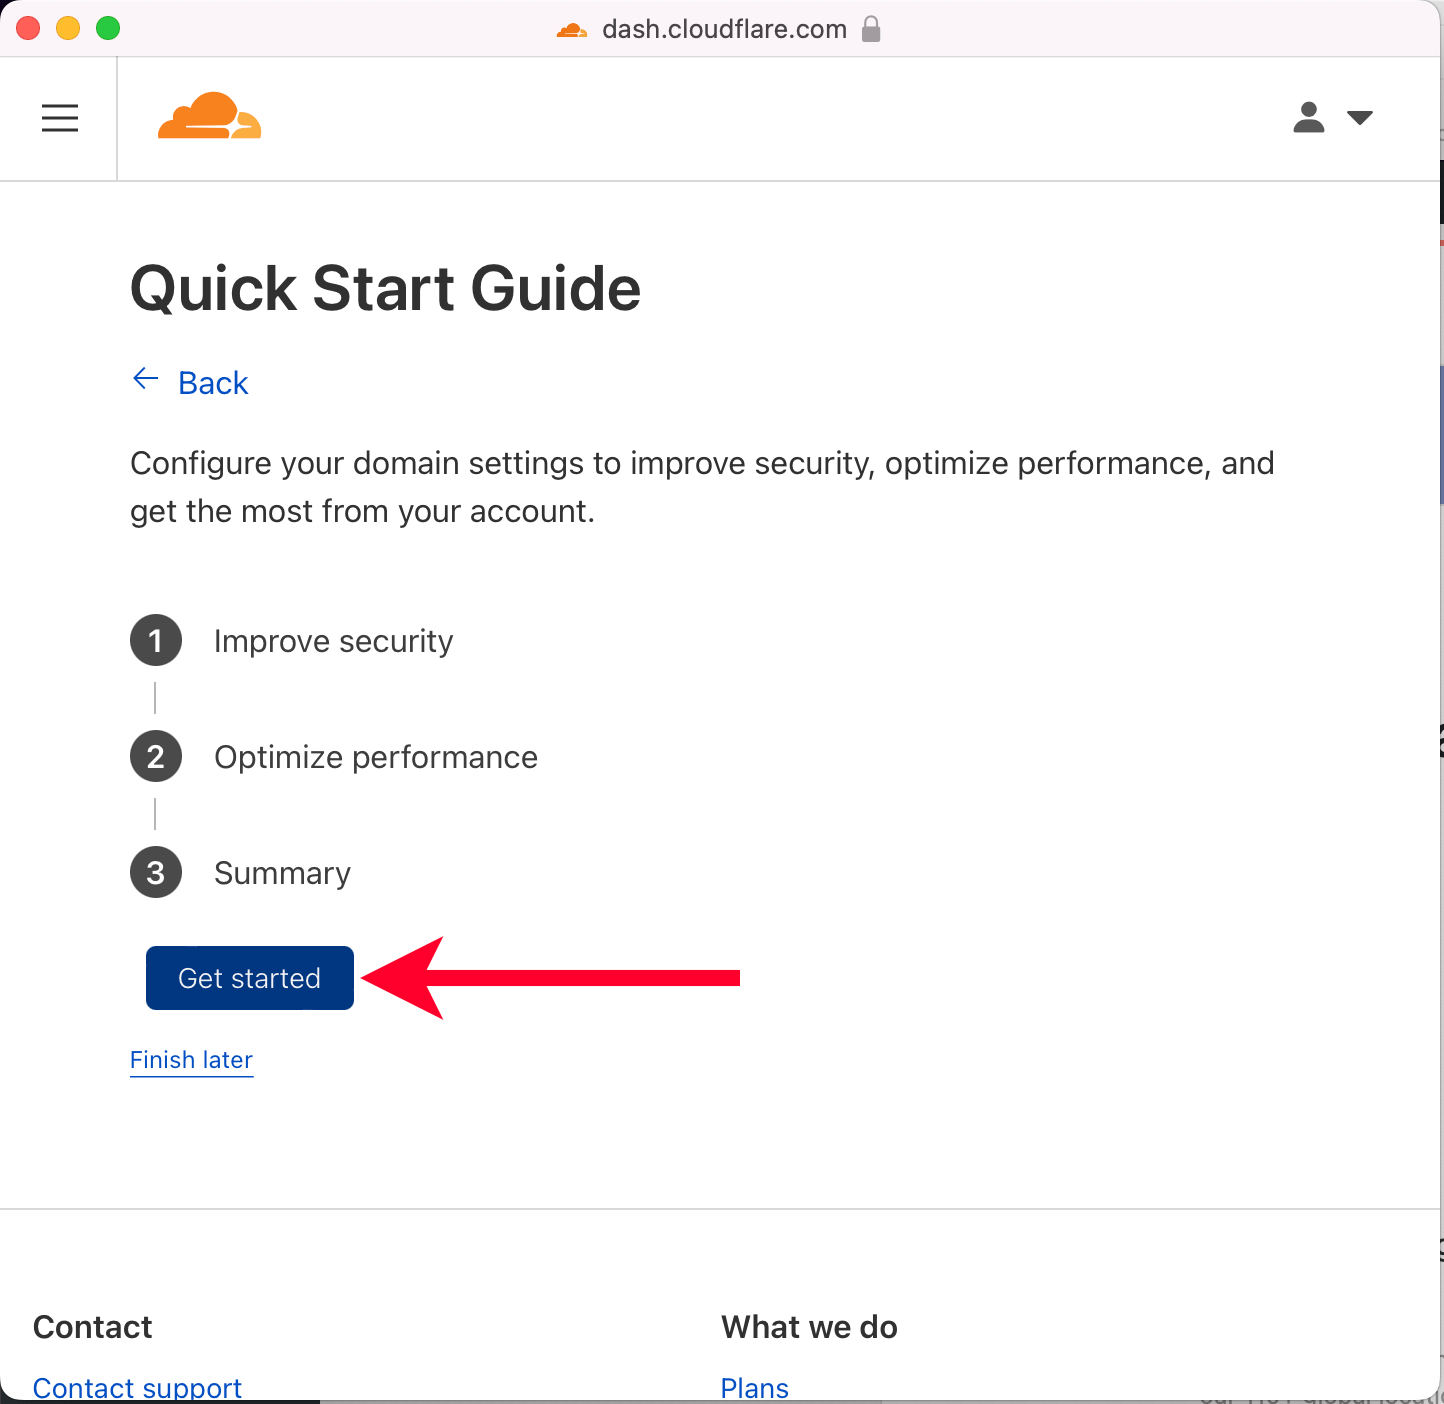
On the following screen, click “Get Started.”
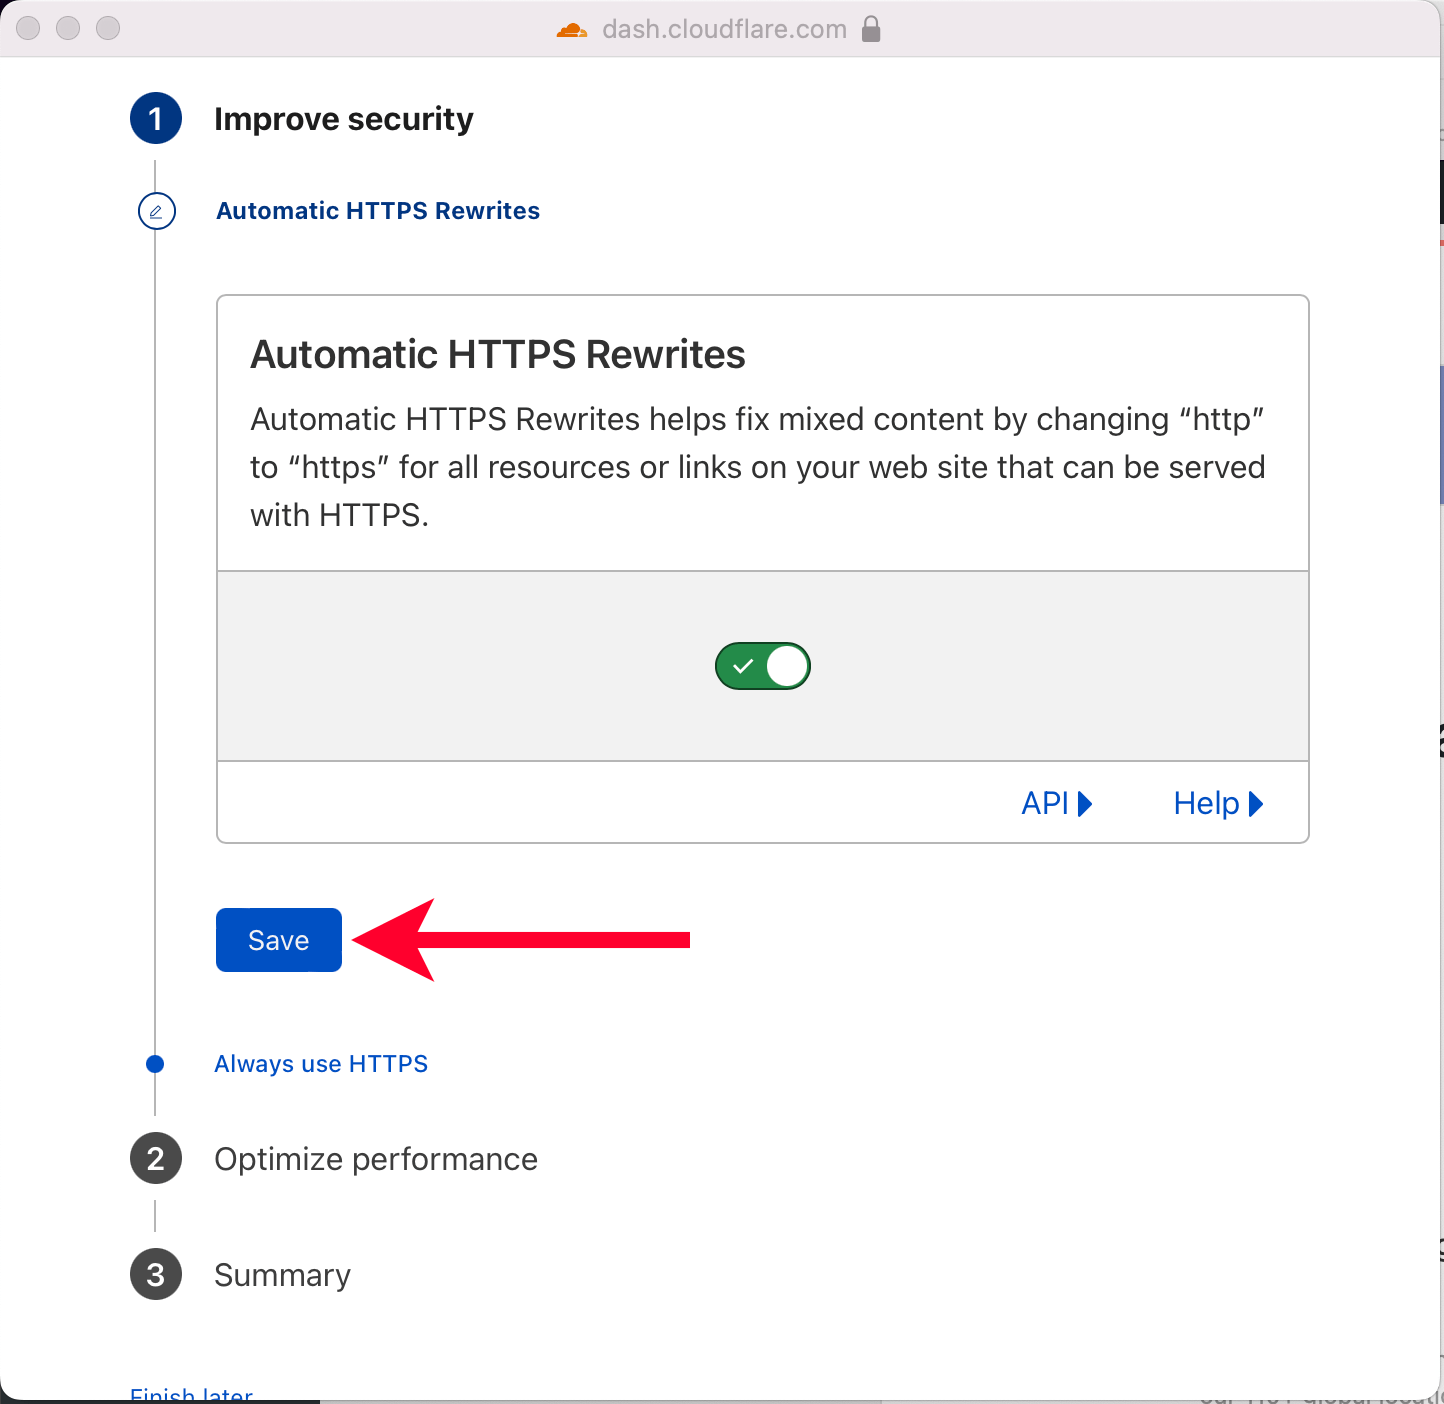
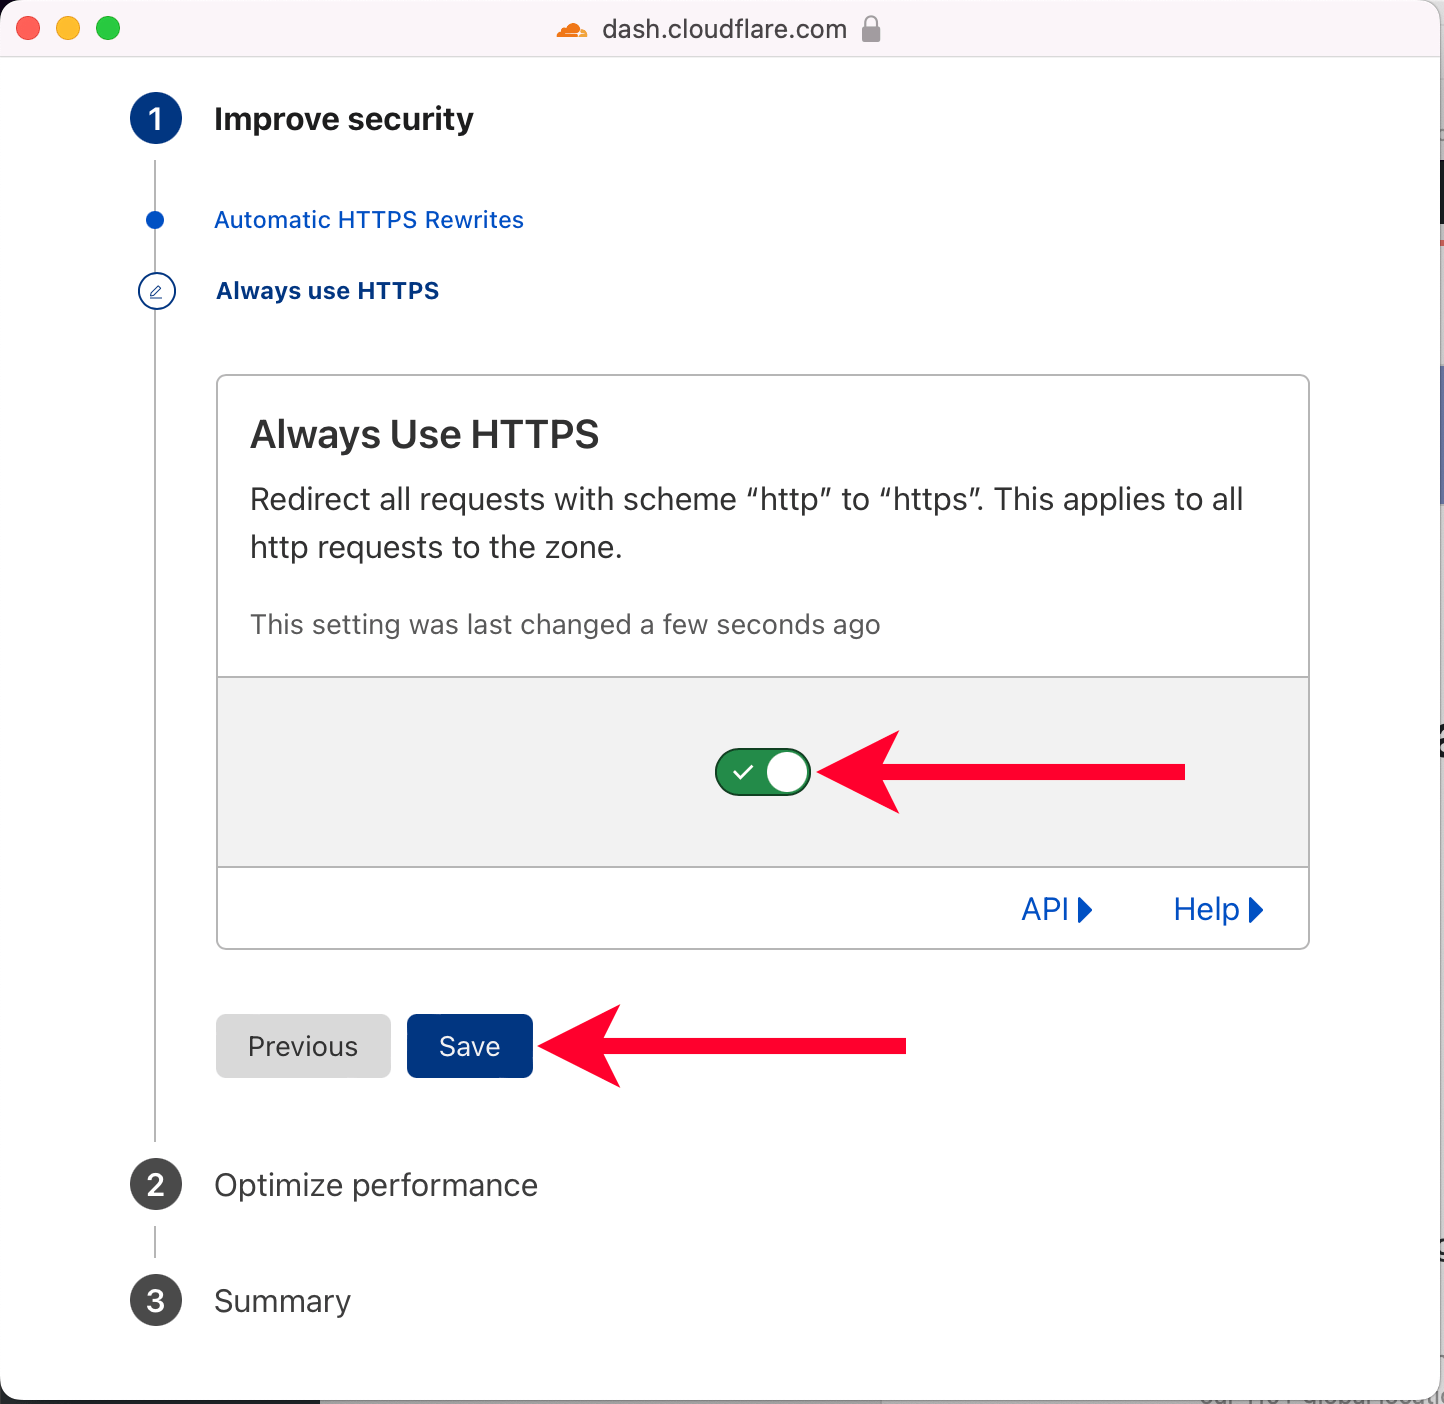
On the first step for “Automatic HTTPS Rewrites,” click “Save.”
On the second step for “Always Use HTTPS,” activate this feature by clicking the toggle so it’s green and “Save.”
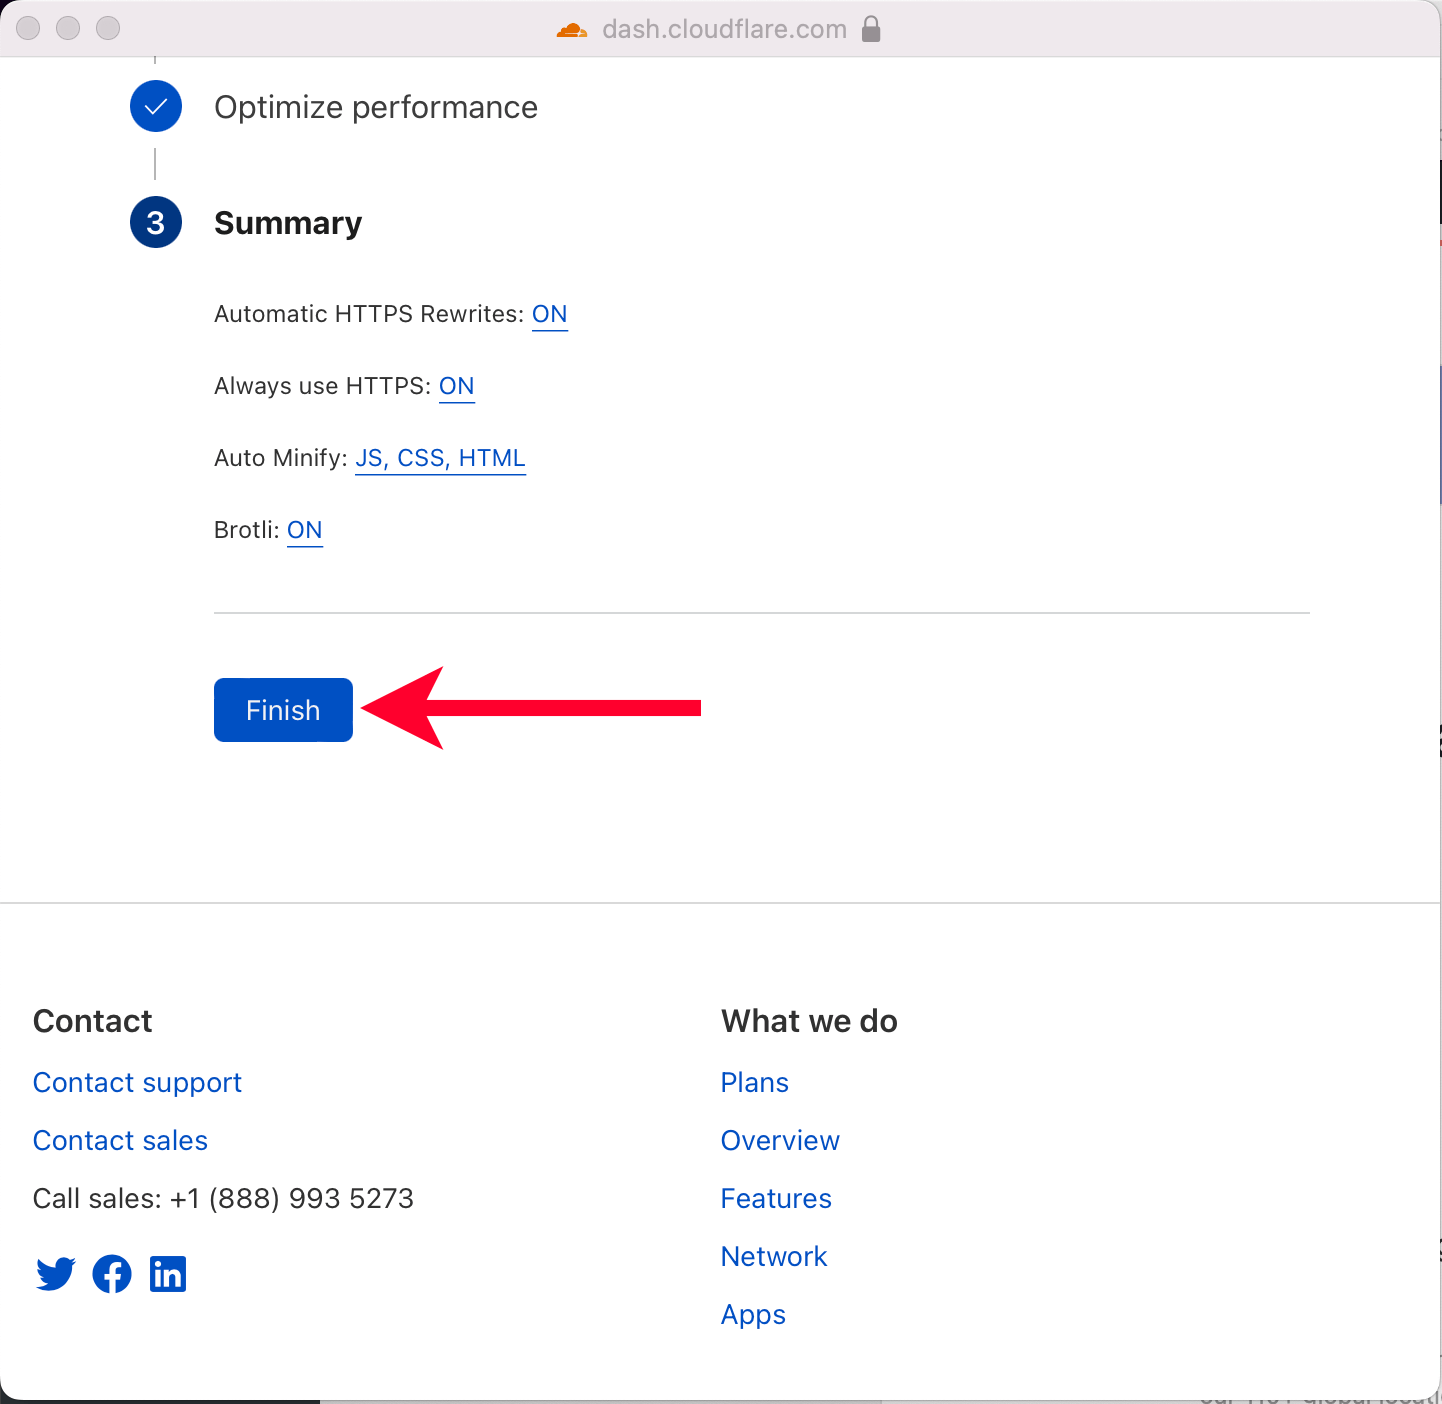
For “Auto Minify,” check all the boxes for JavaScript, CSS, and HTML, then click save.
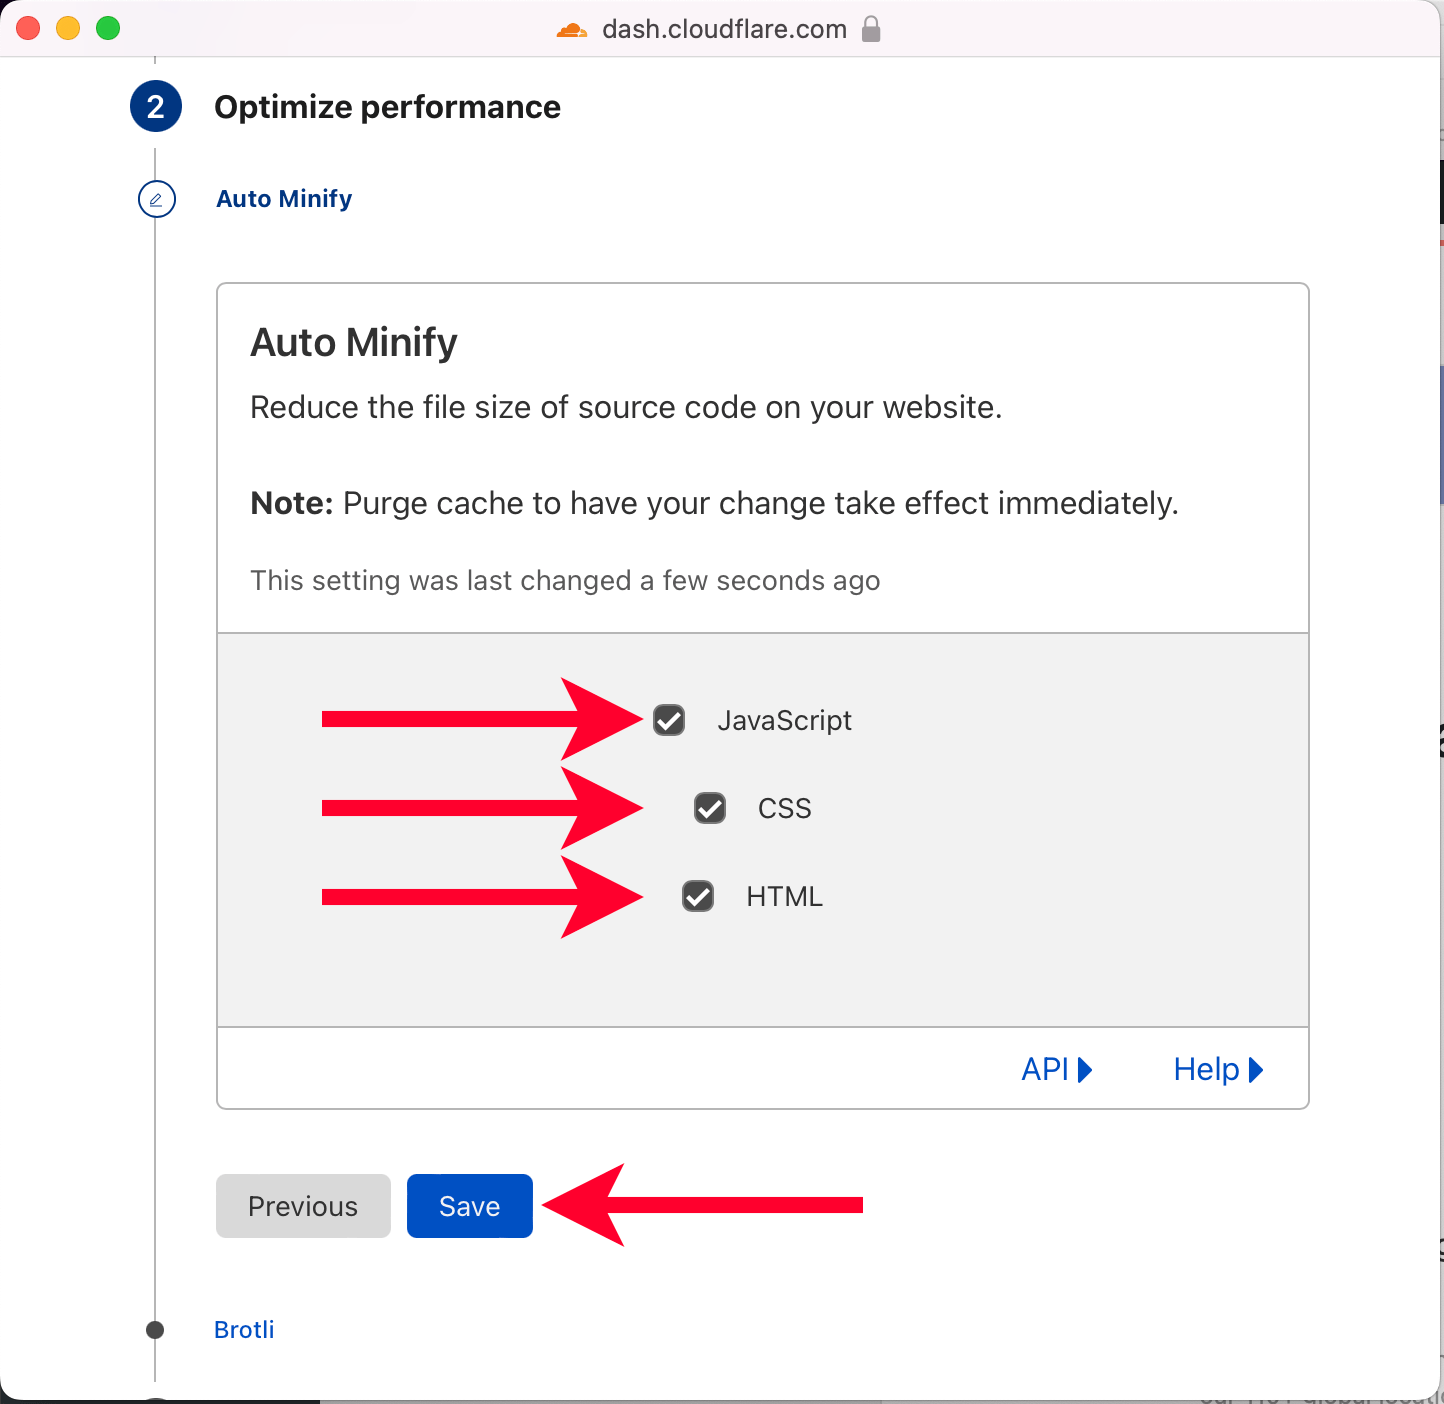
For “Brotli,” click “Save.”

Finally, click the “Finish” button.
Now you can close the popup.
Setting Up Cloudflare
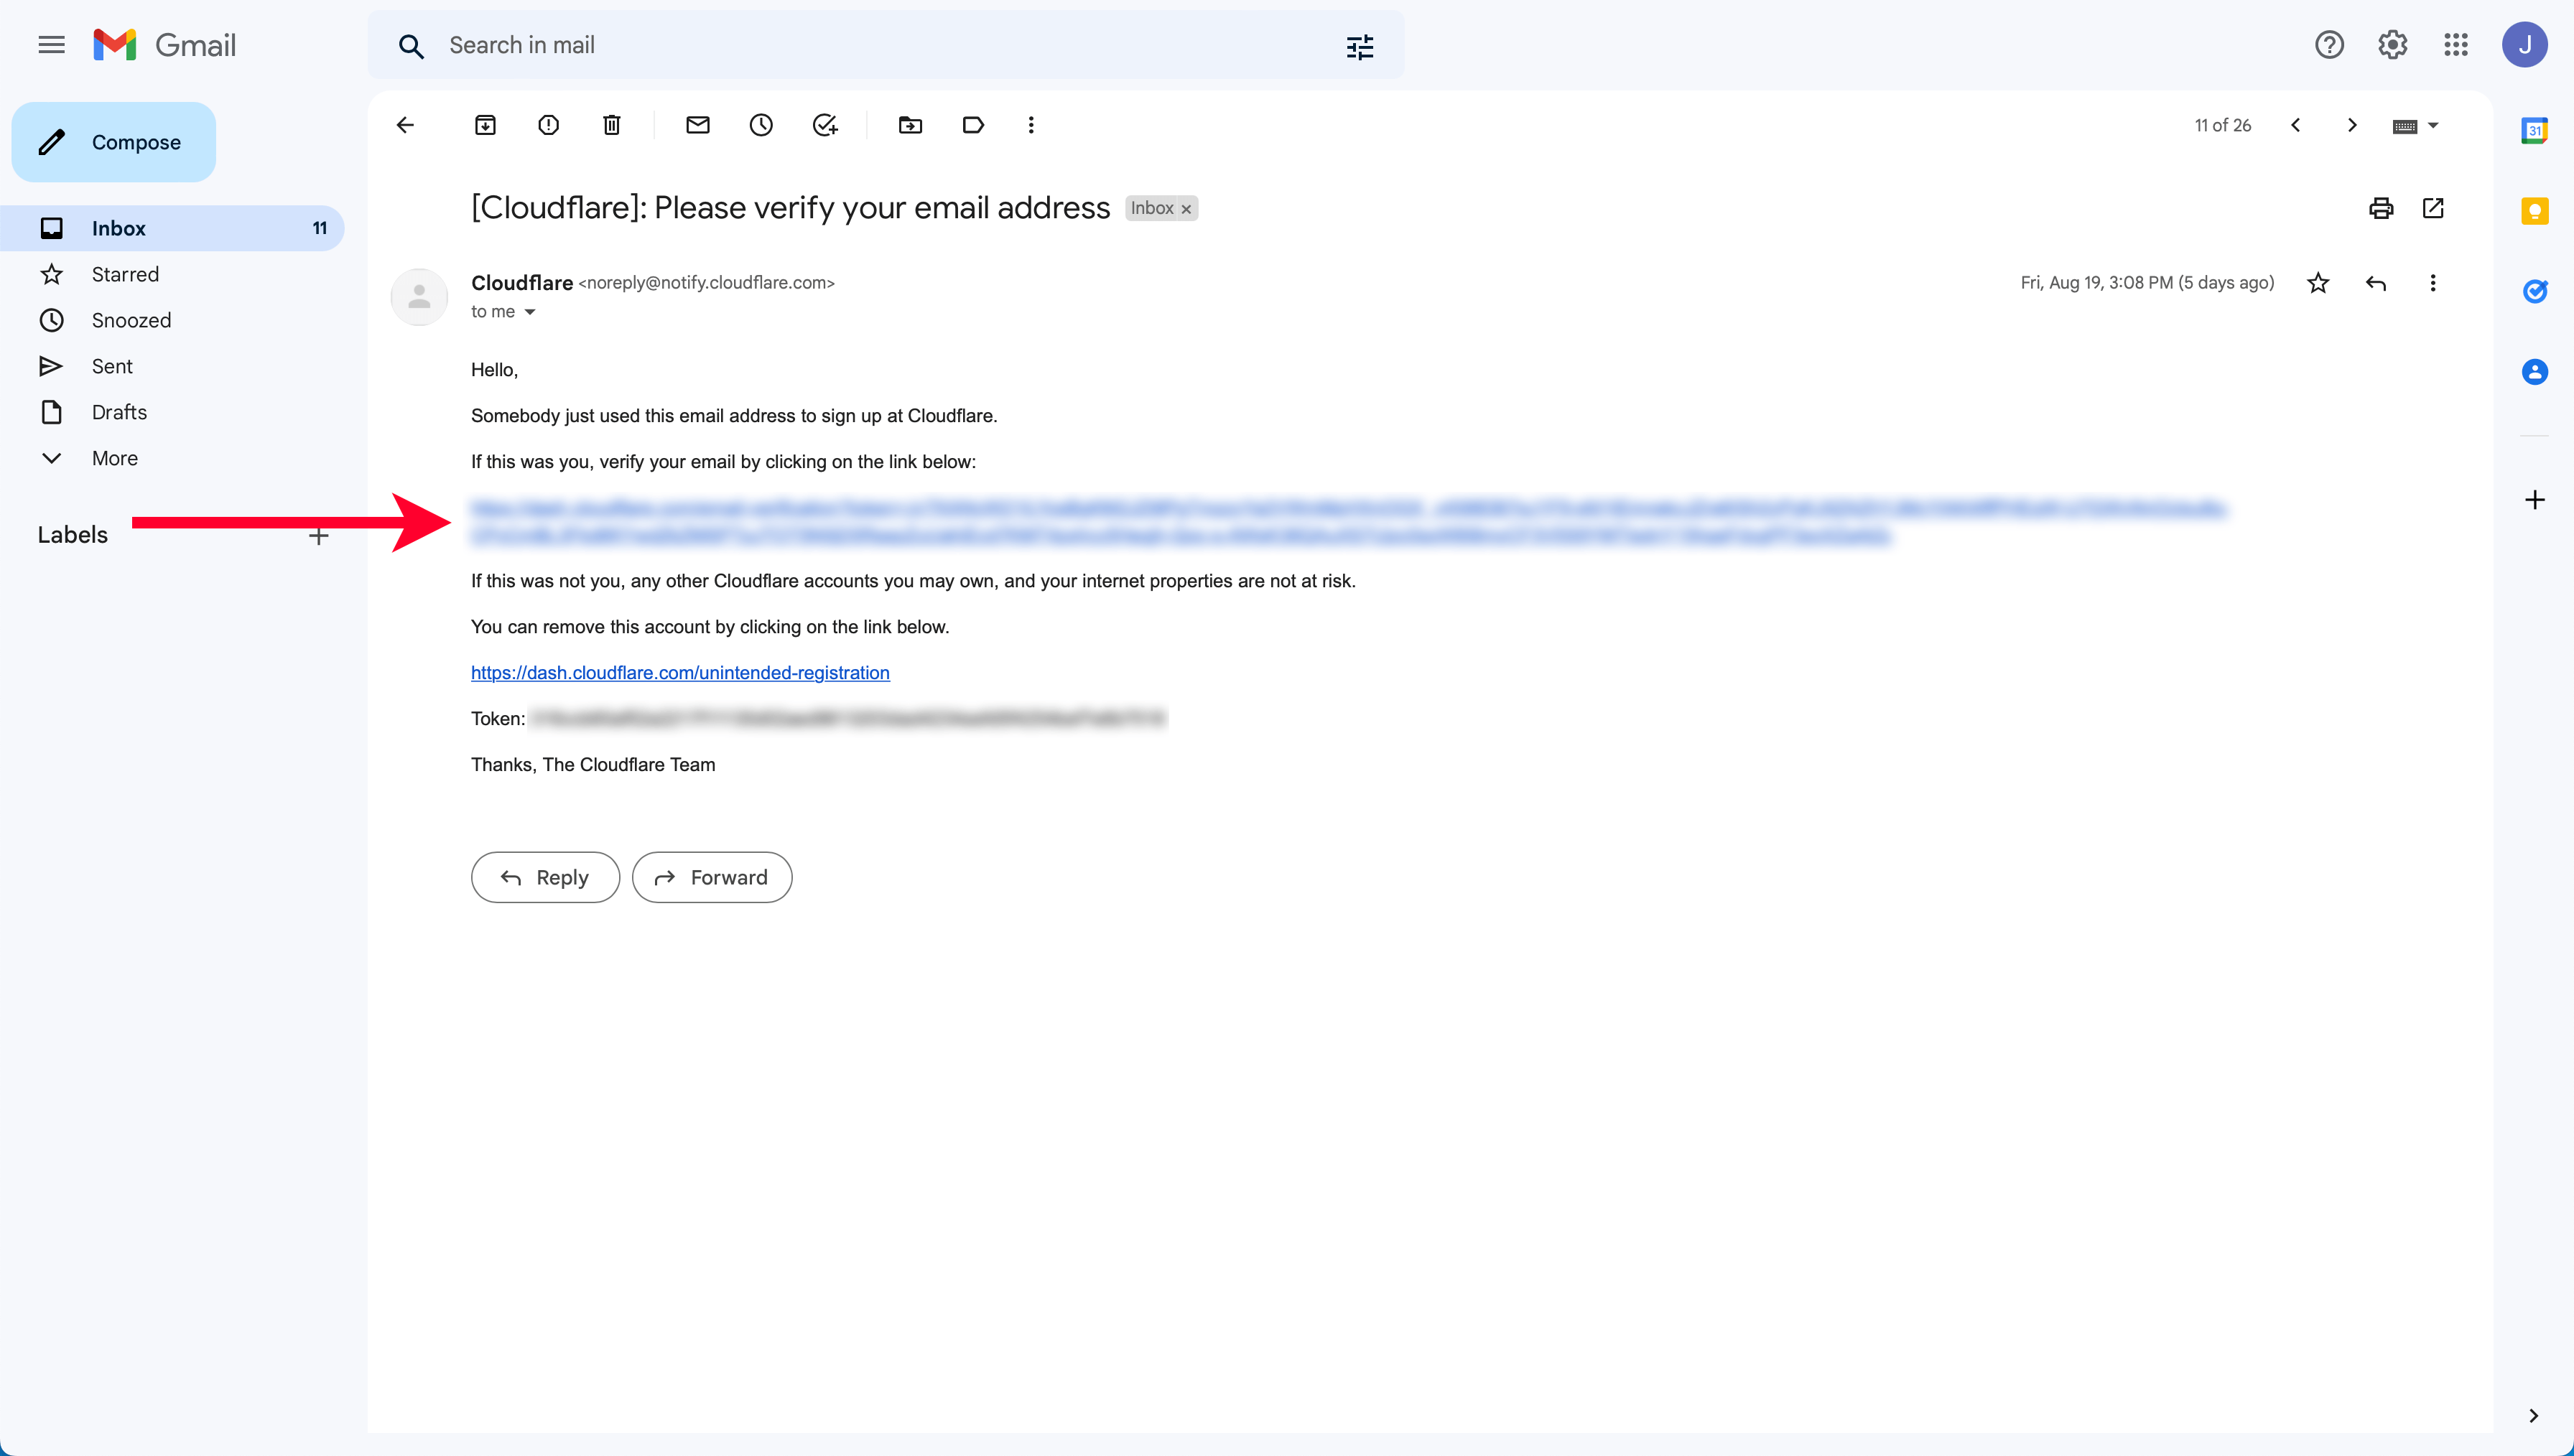
We have a few more steps to complete before we finish. First, head to the email inbox that you used to sign up for Cloudflare.
You should see a “Please verify your email address” email from Cloudflare. Open the email and click the link in the email to verify your email address.
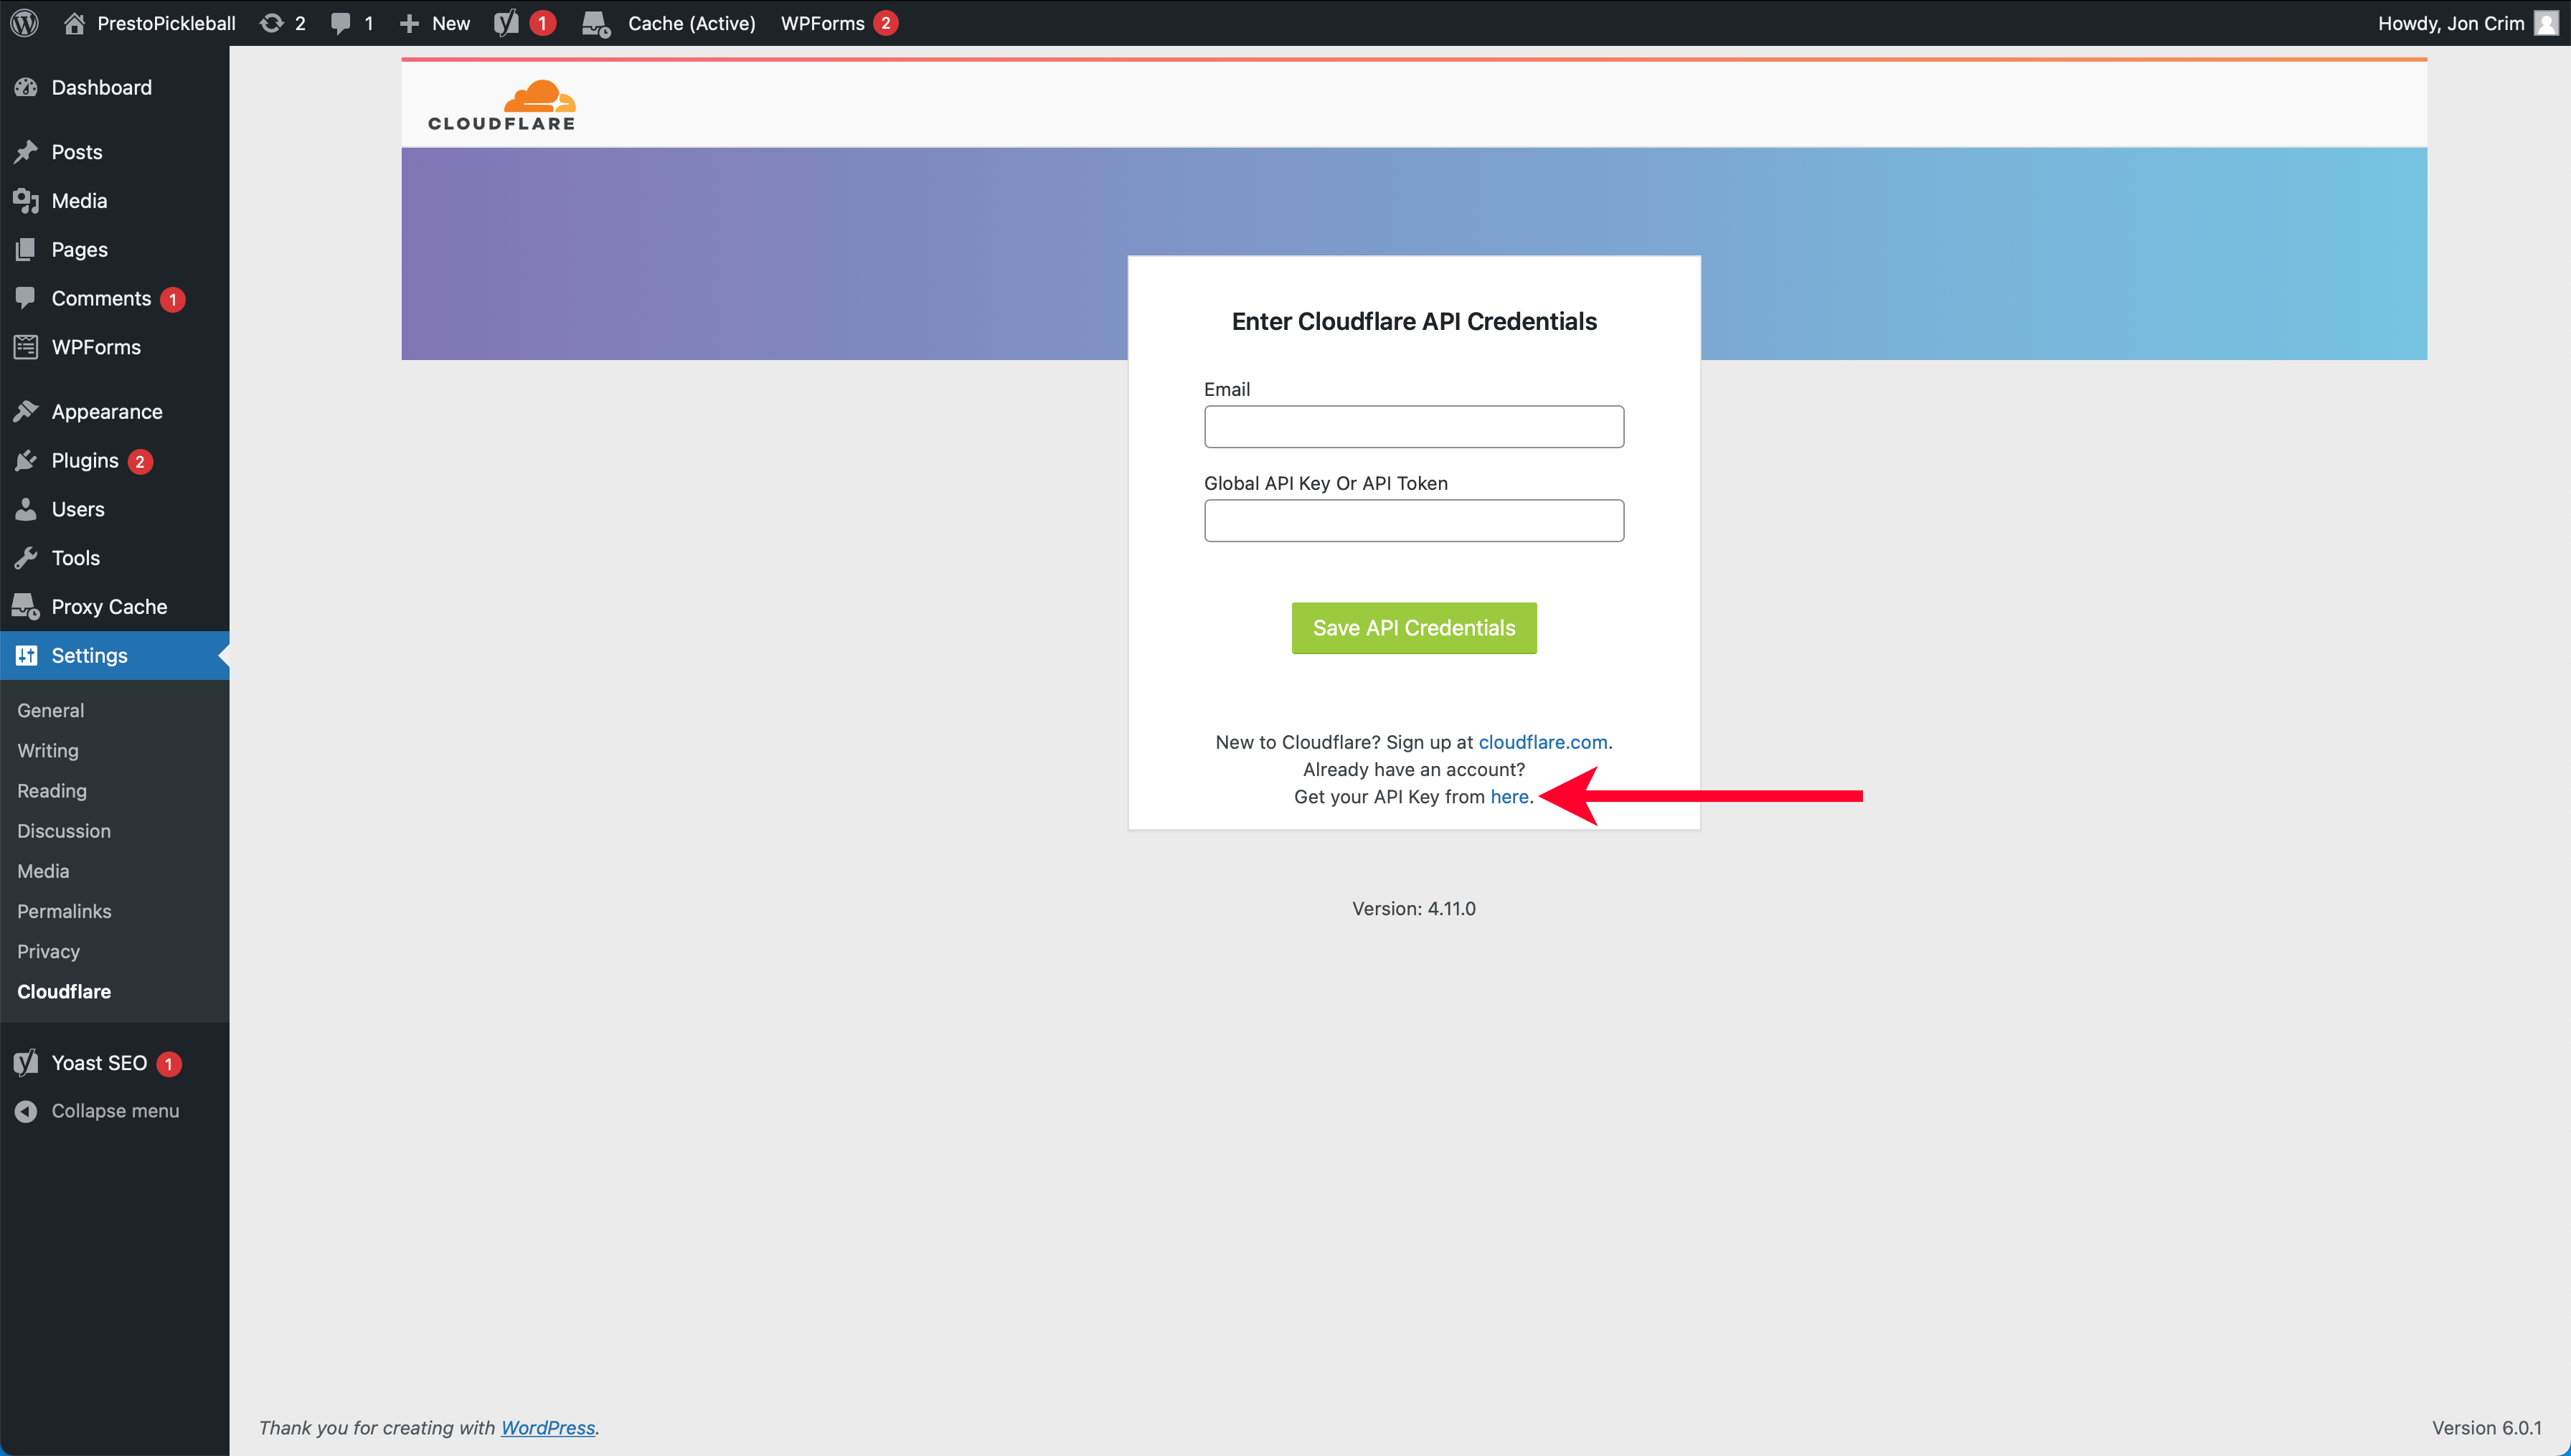
Next up, we need to log in to your Cloudflare account from within WordPress. Head back to your WordPress account and select “Settings” from the left-hand navigation, then click the “Cloudflare” menu item.
Click the “Sign in Here” link on this page.

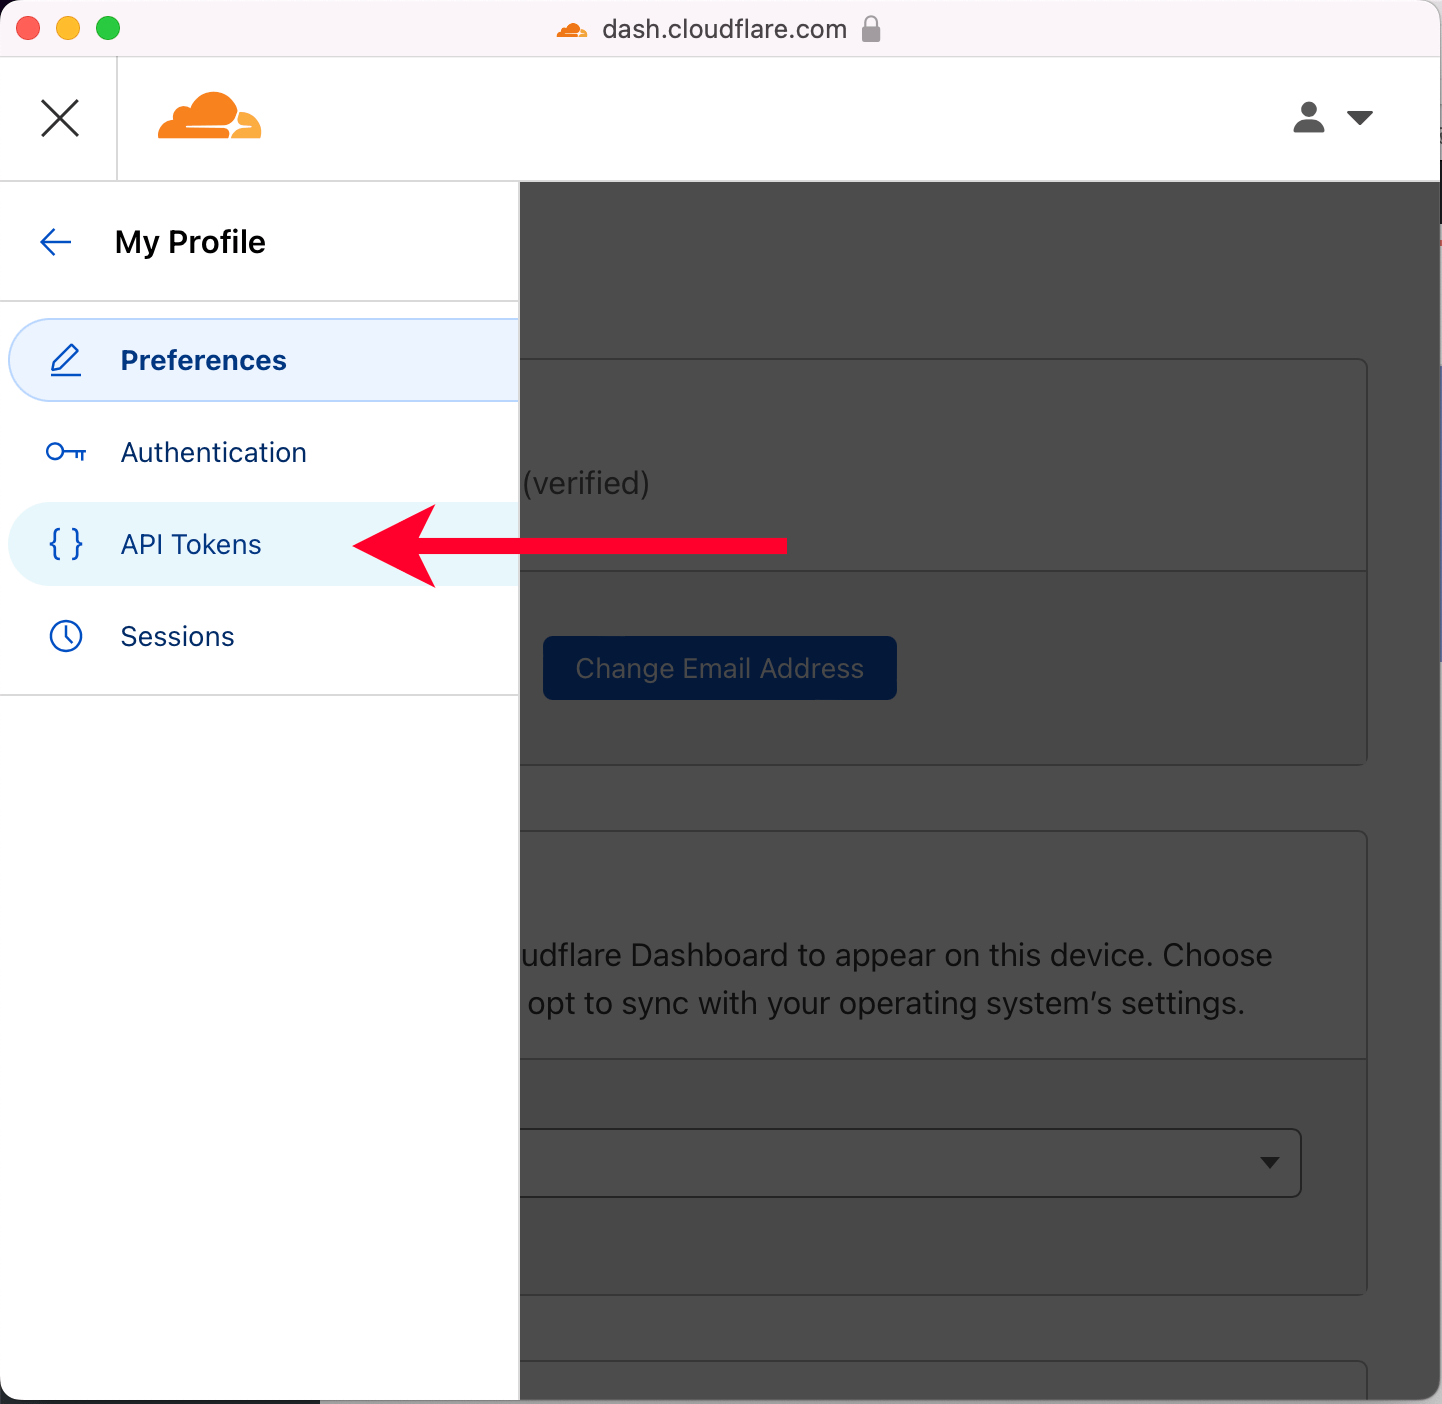
Next, click the “Get your API key from here” link.
A new Cloudflare window will display. Click the menu in the top left, then select “API Tokens.”
On the following screen, click the “View” button for the “Global API Key.”
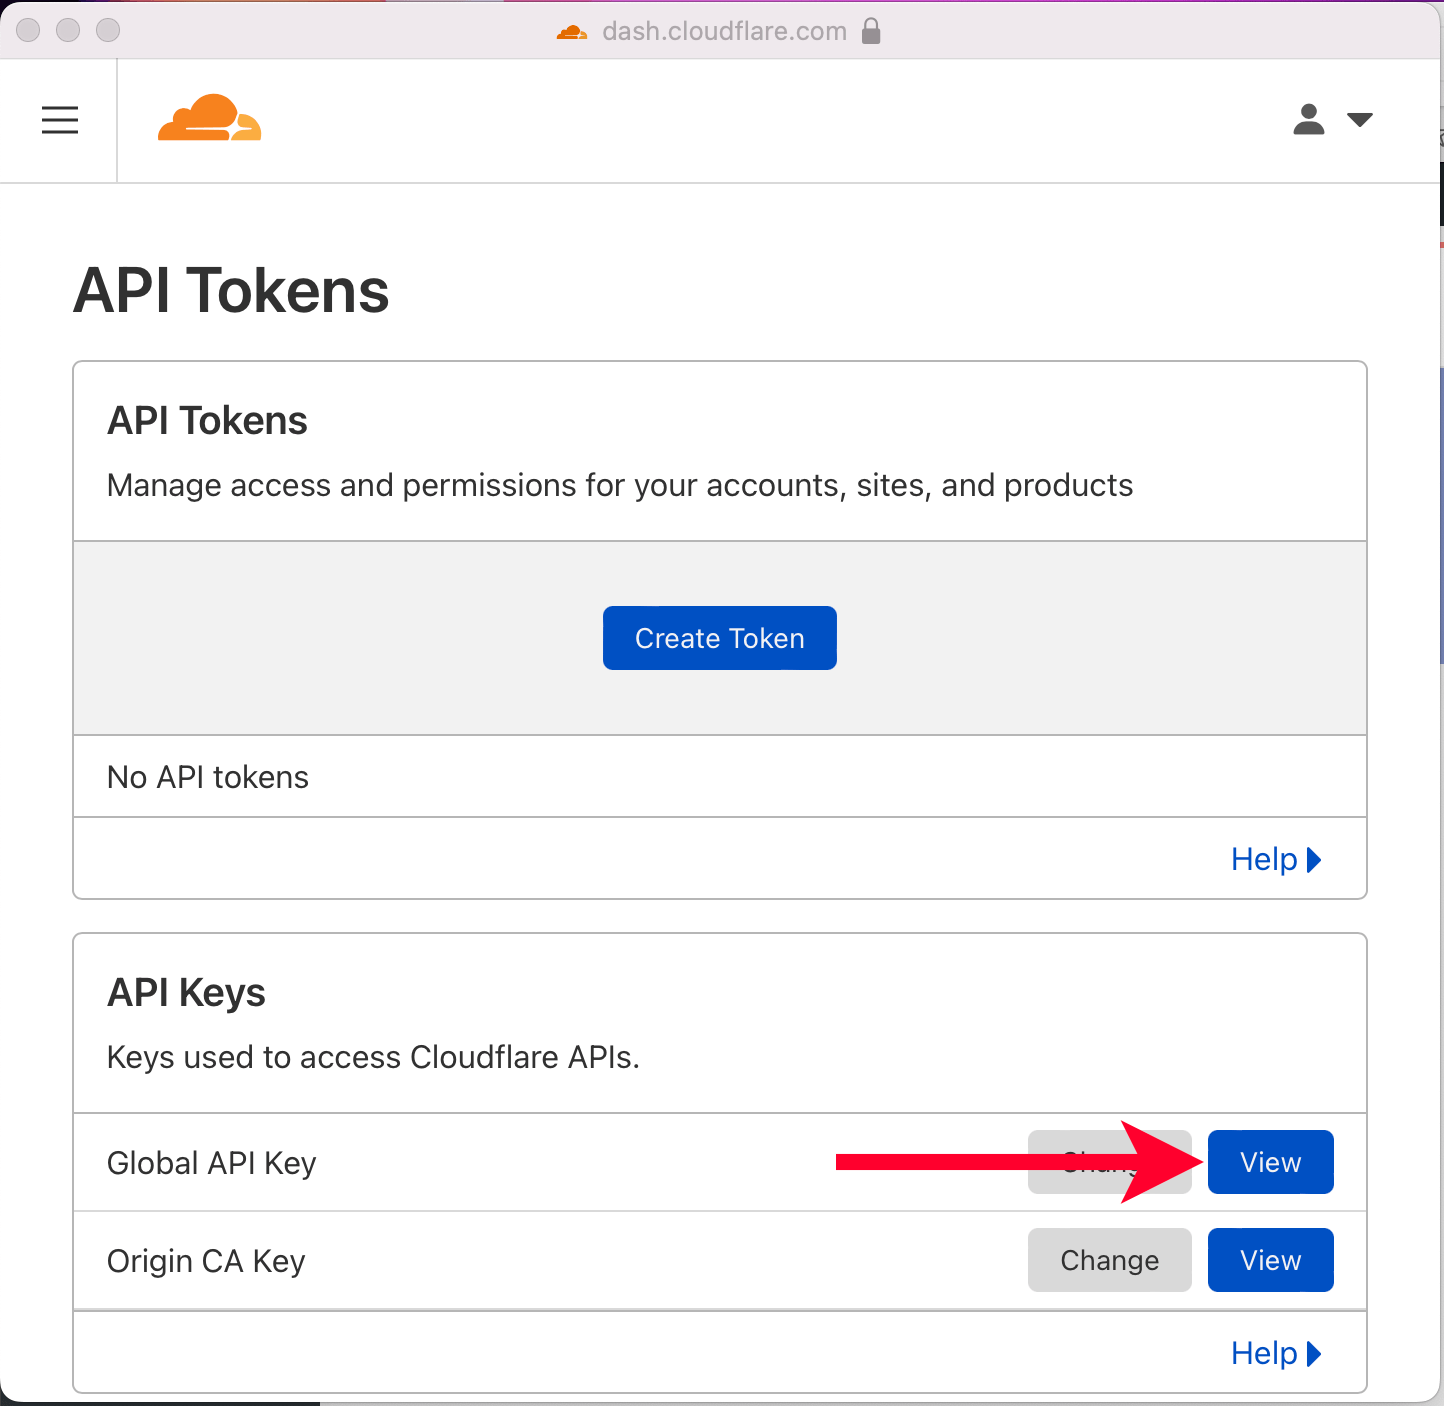
Enter your Cloudflare password and click the “View” button.
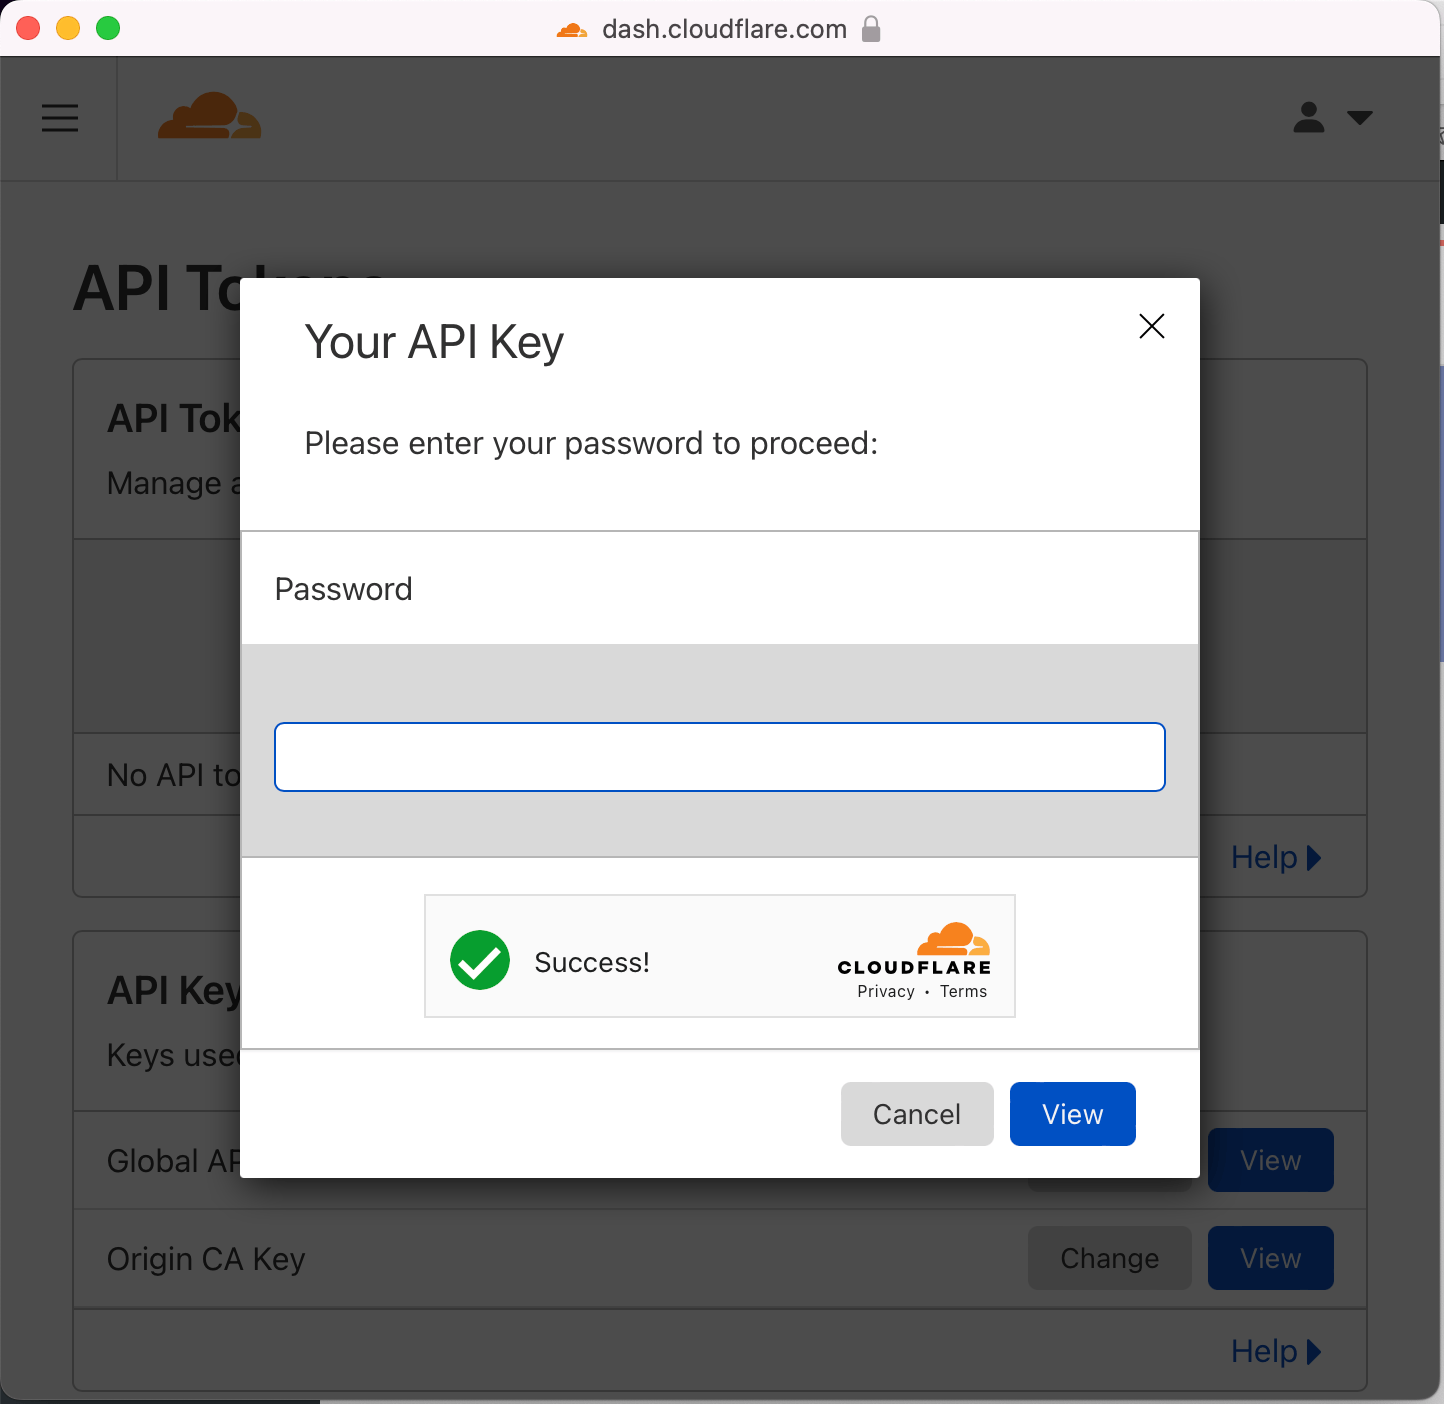
An API Key will display. Click to copy it.
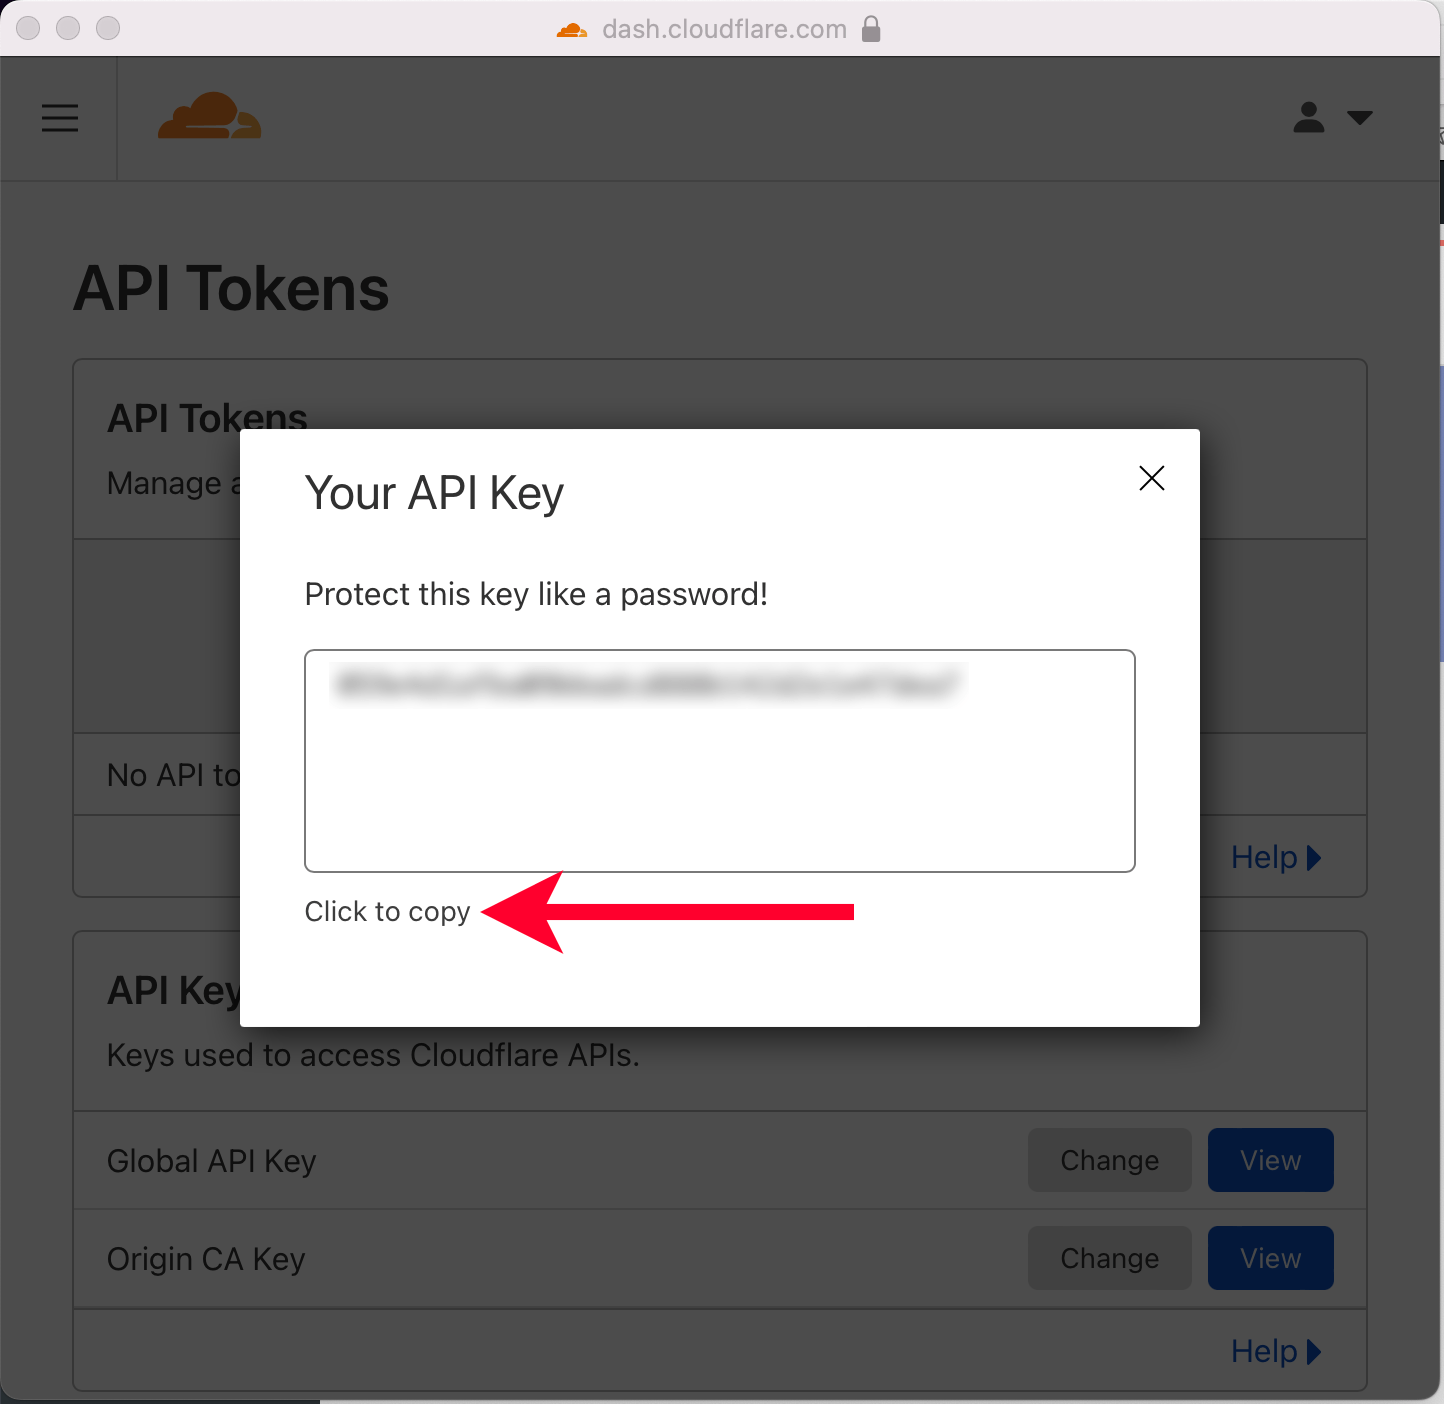
Now head back to your WordPress account, enter the email address you used to sign up for Cloudflare, and paste the API key in the API key field. Then click “Save API Credentials.”

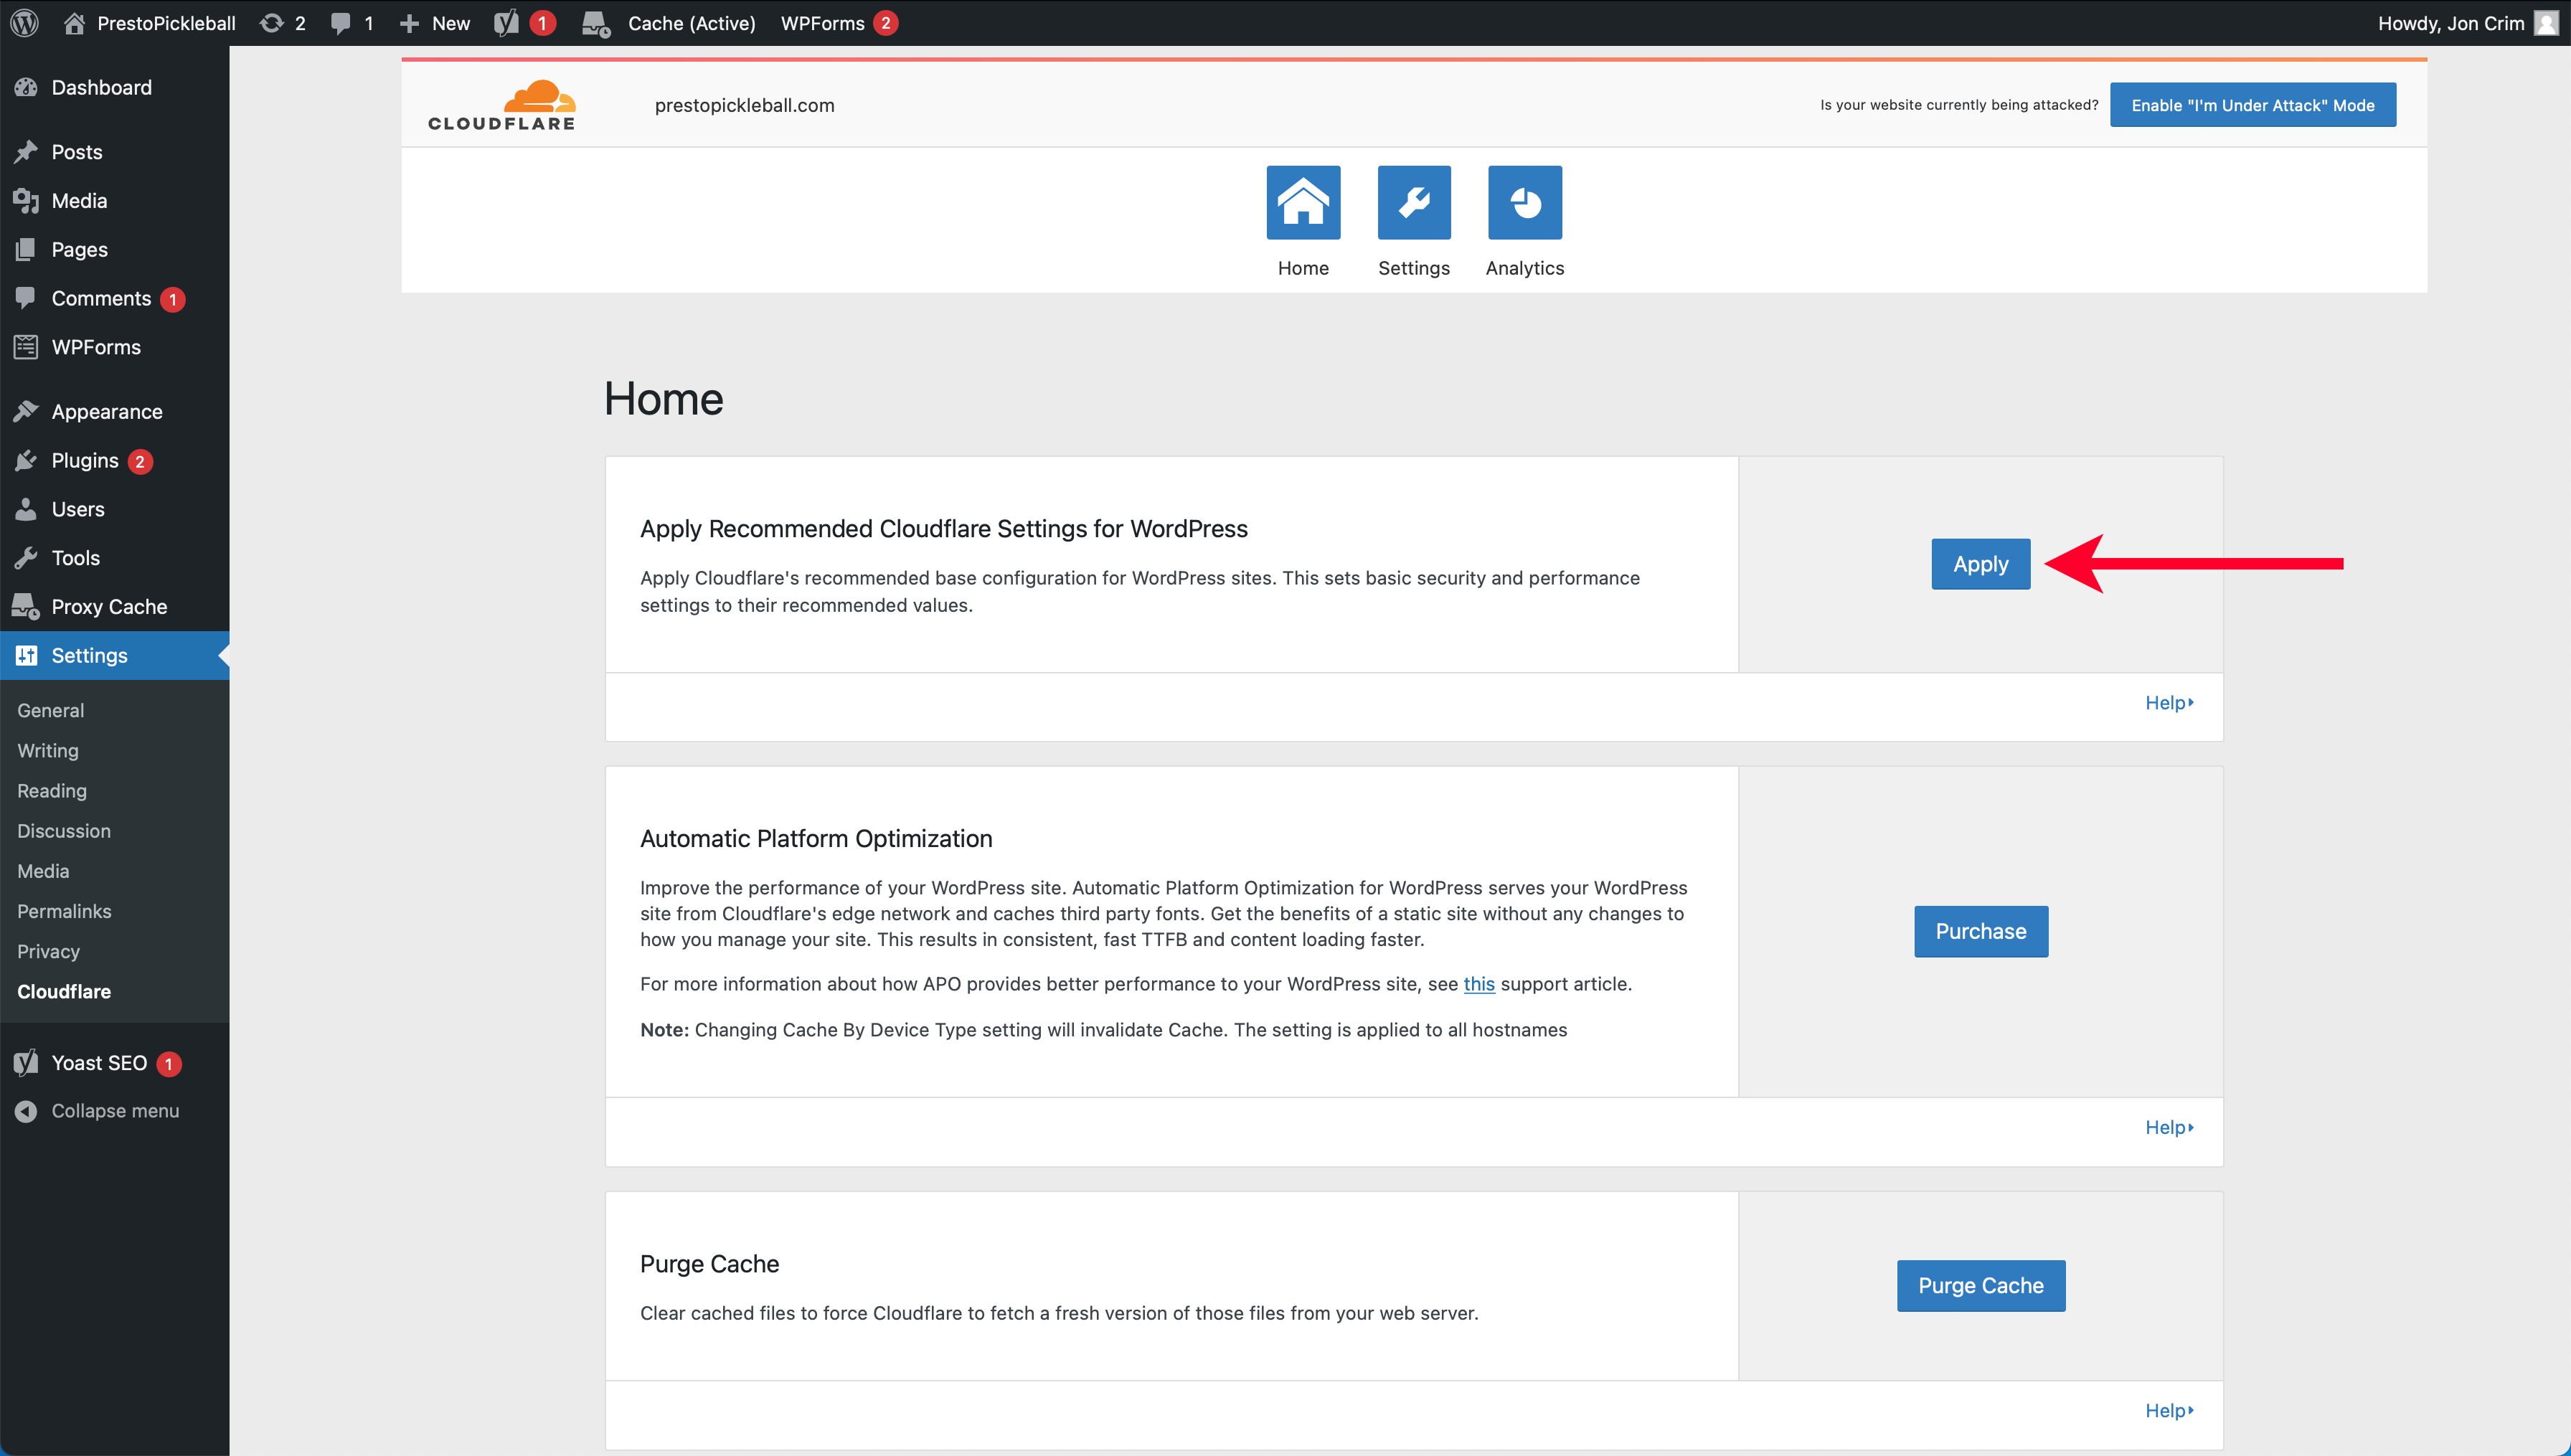
Click the “Apply” button on the following screen to “Apply Recommended Cloudflare Settings for WordPress.”
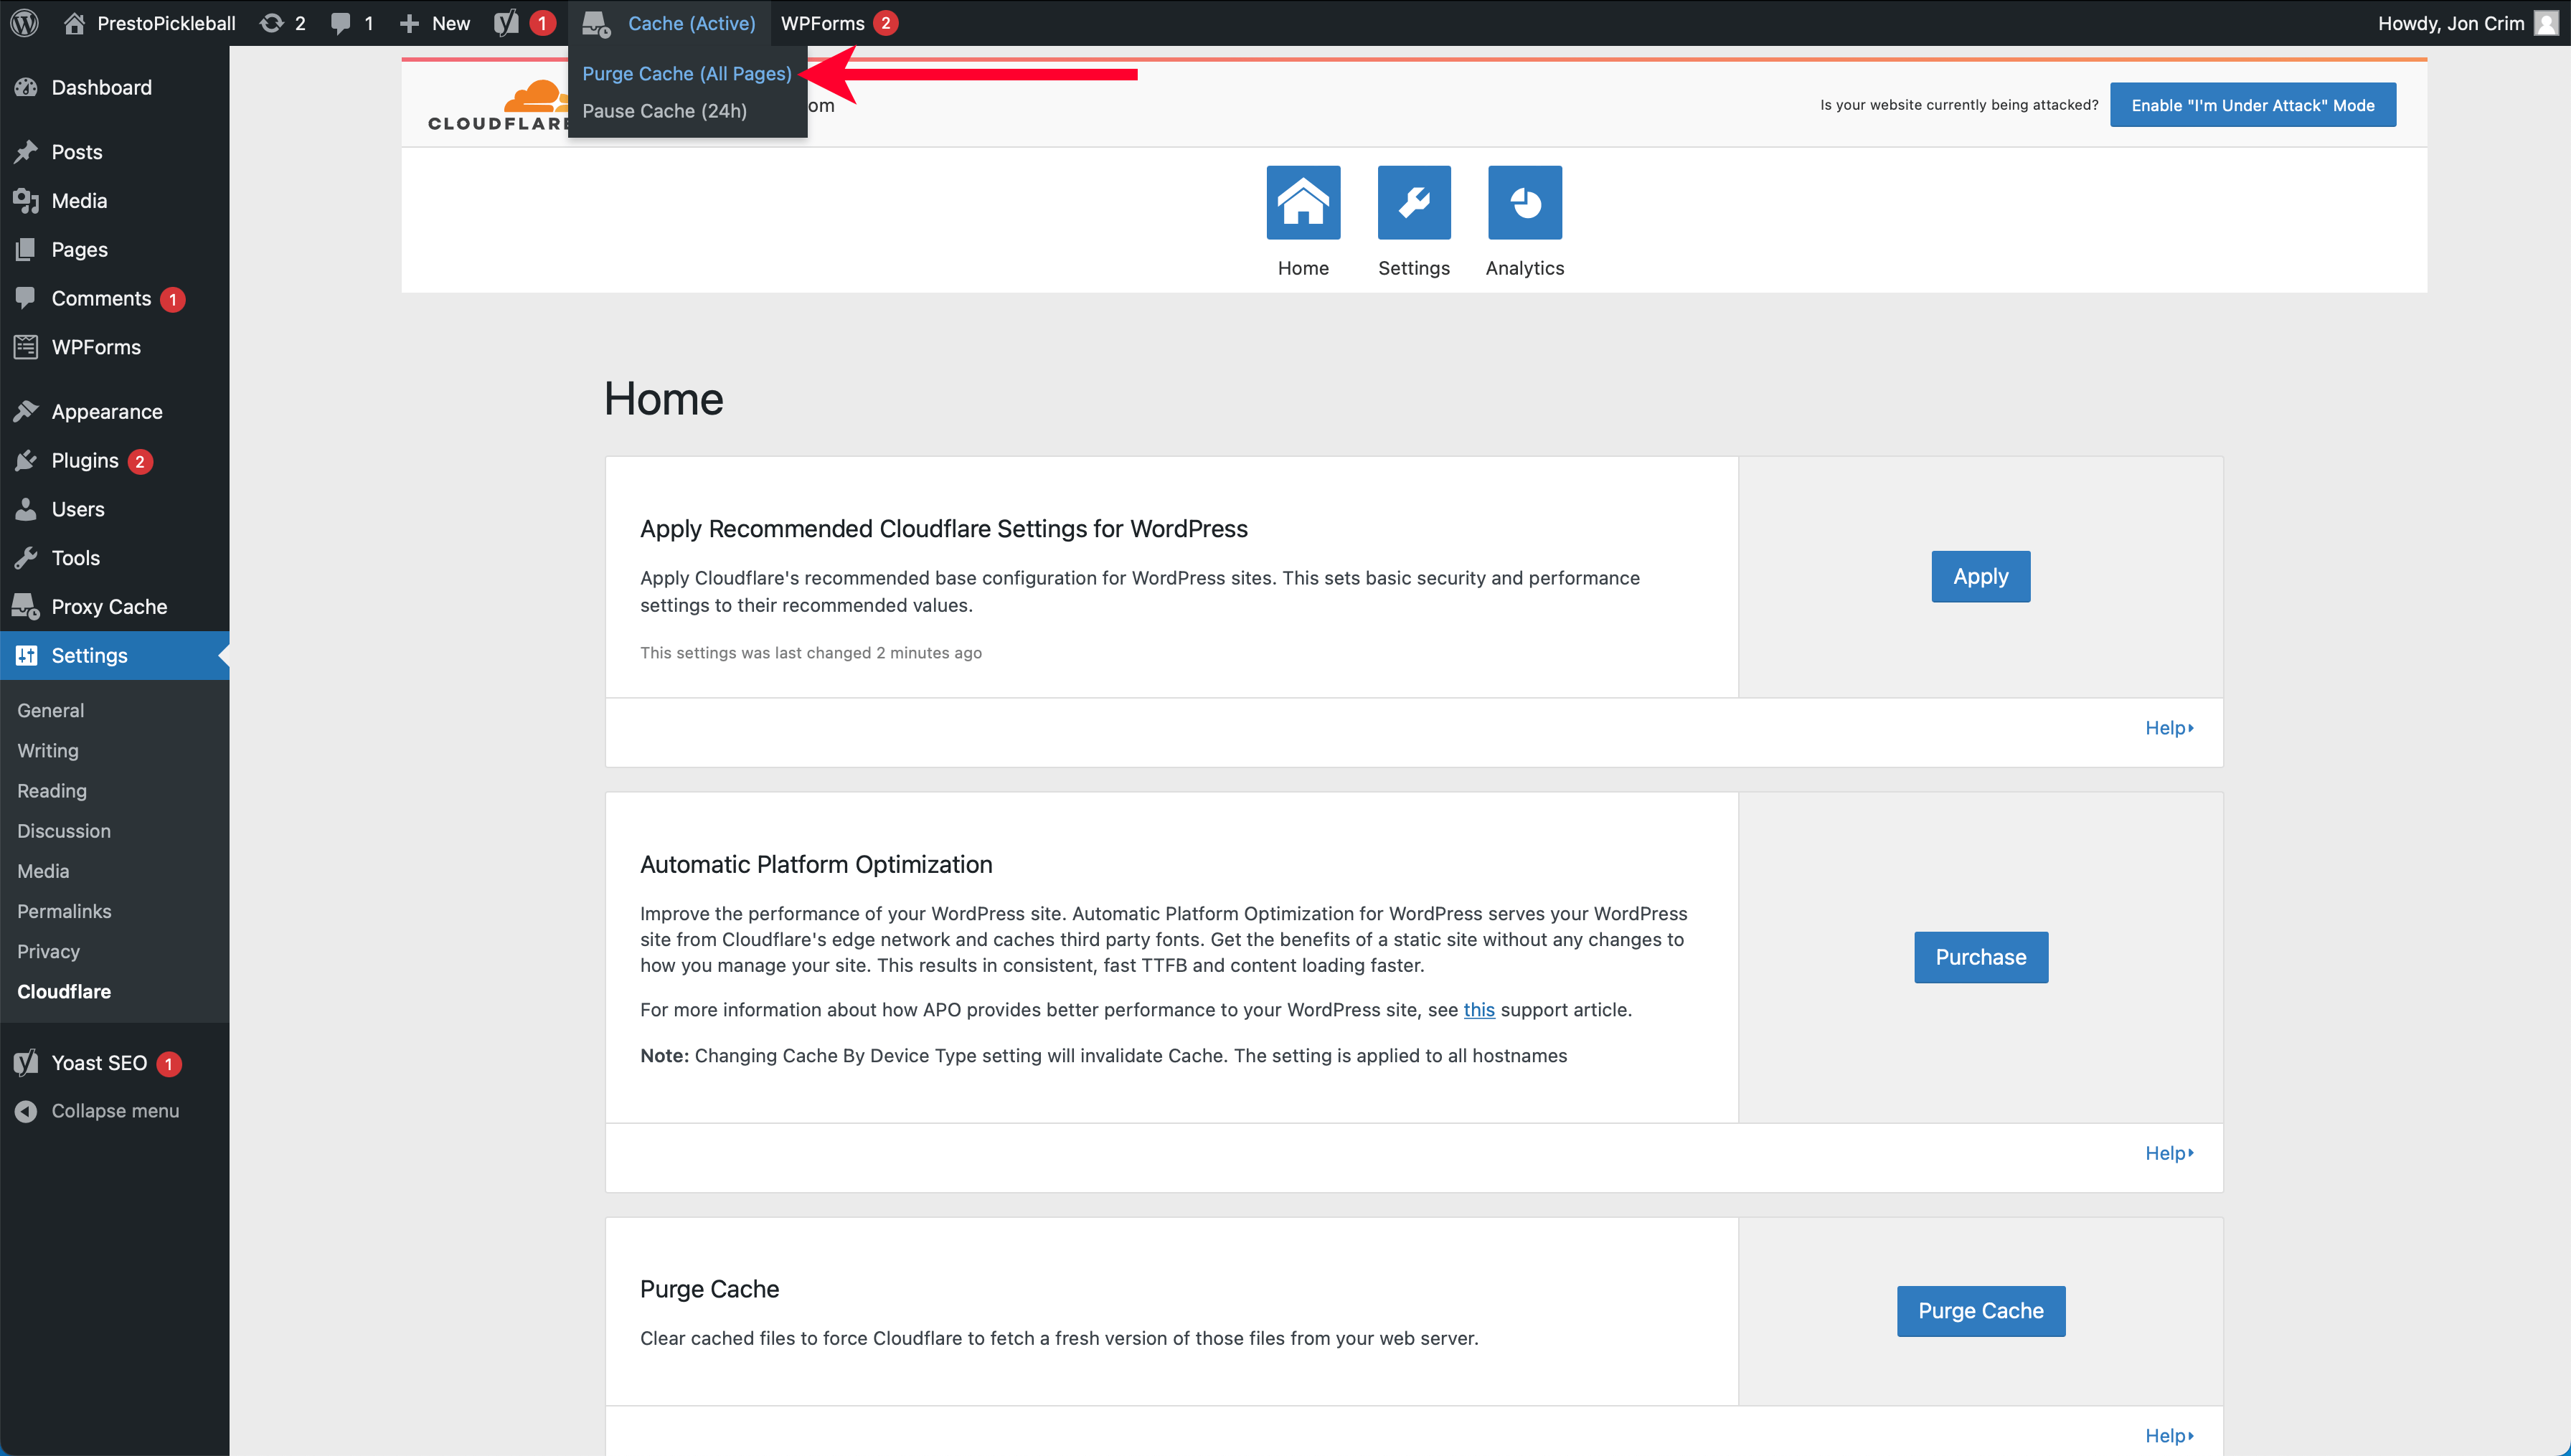
Finally, hover over the “Cache (Active)” menu at the top of your WordPress account and select “Purge Cache (All Pages).”
You’re all set! Cloudflare is good to go and is helping to improve your website’s performance and security.
Step 8: Install Google Analytics
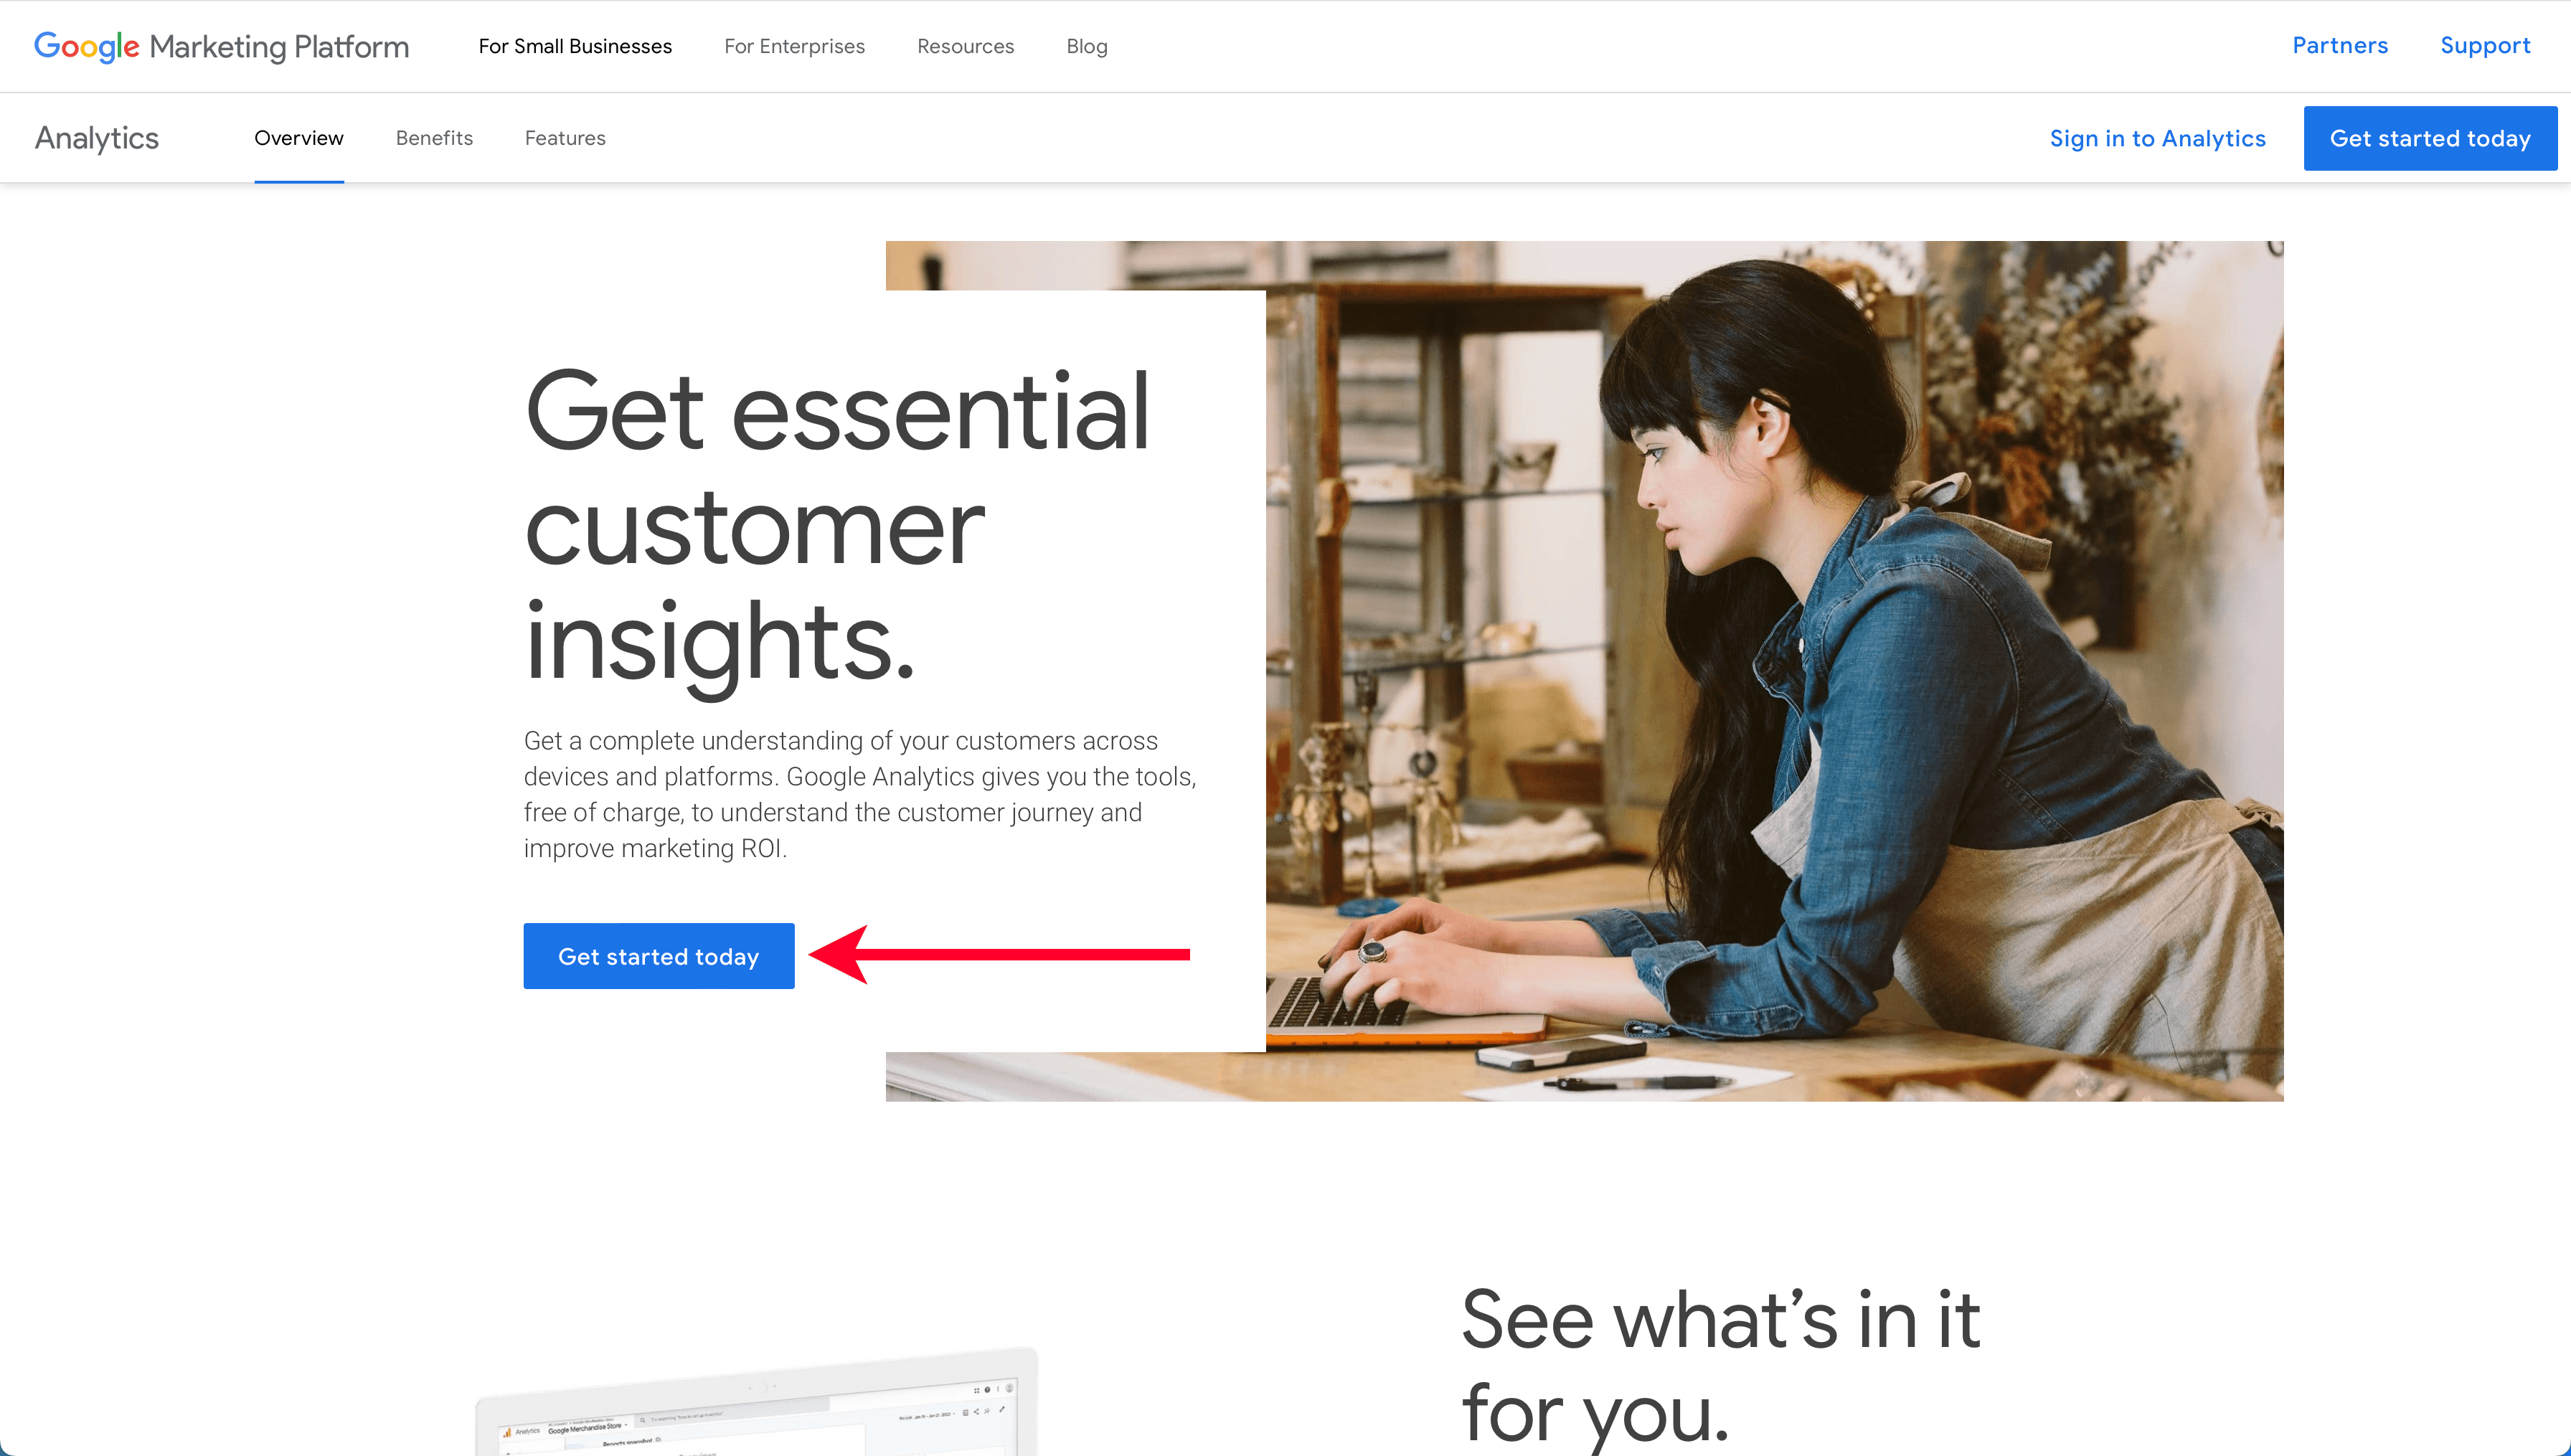
Hands down, the most popular web analytics tool for tracking visitors, user behavior, and understanding your website’s usage is Google Analytics, a free tool they offer for managing your website.
Google Analytics is essential because it will enable you to measure whether or not the effort you put into building your website and growing an audience is working and, if so, how effectively.
To keep things simple, we’ll use one of the plugins pre-installed for you, MonsterInsights.
Set Up a Google Analytics Account
Before starting with the MonsterInsights plugin, we need to set up your free Google Analytics account.
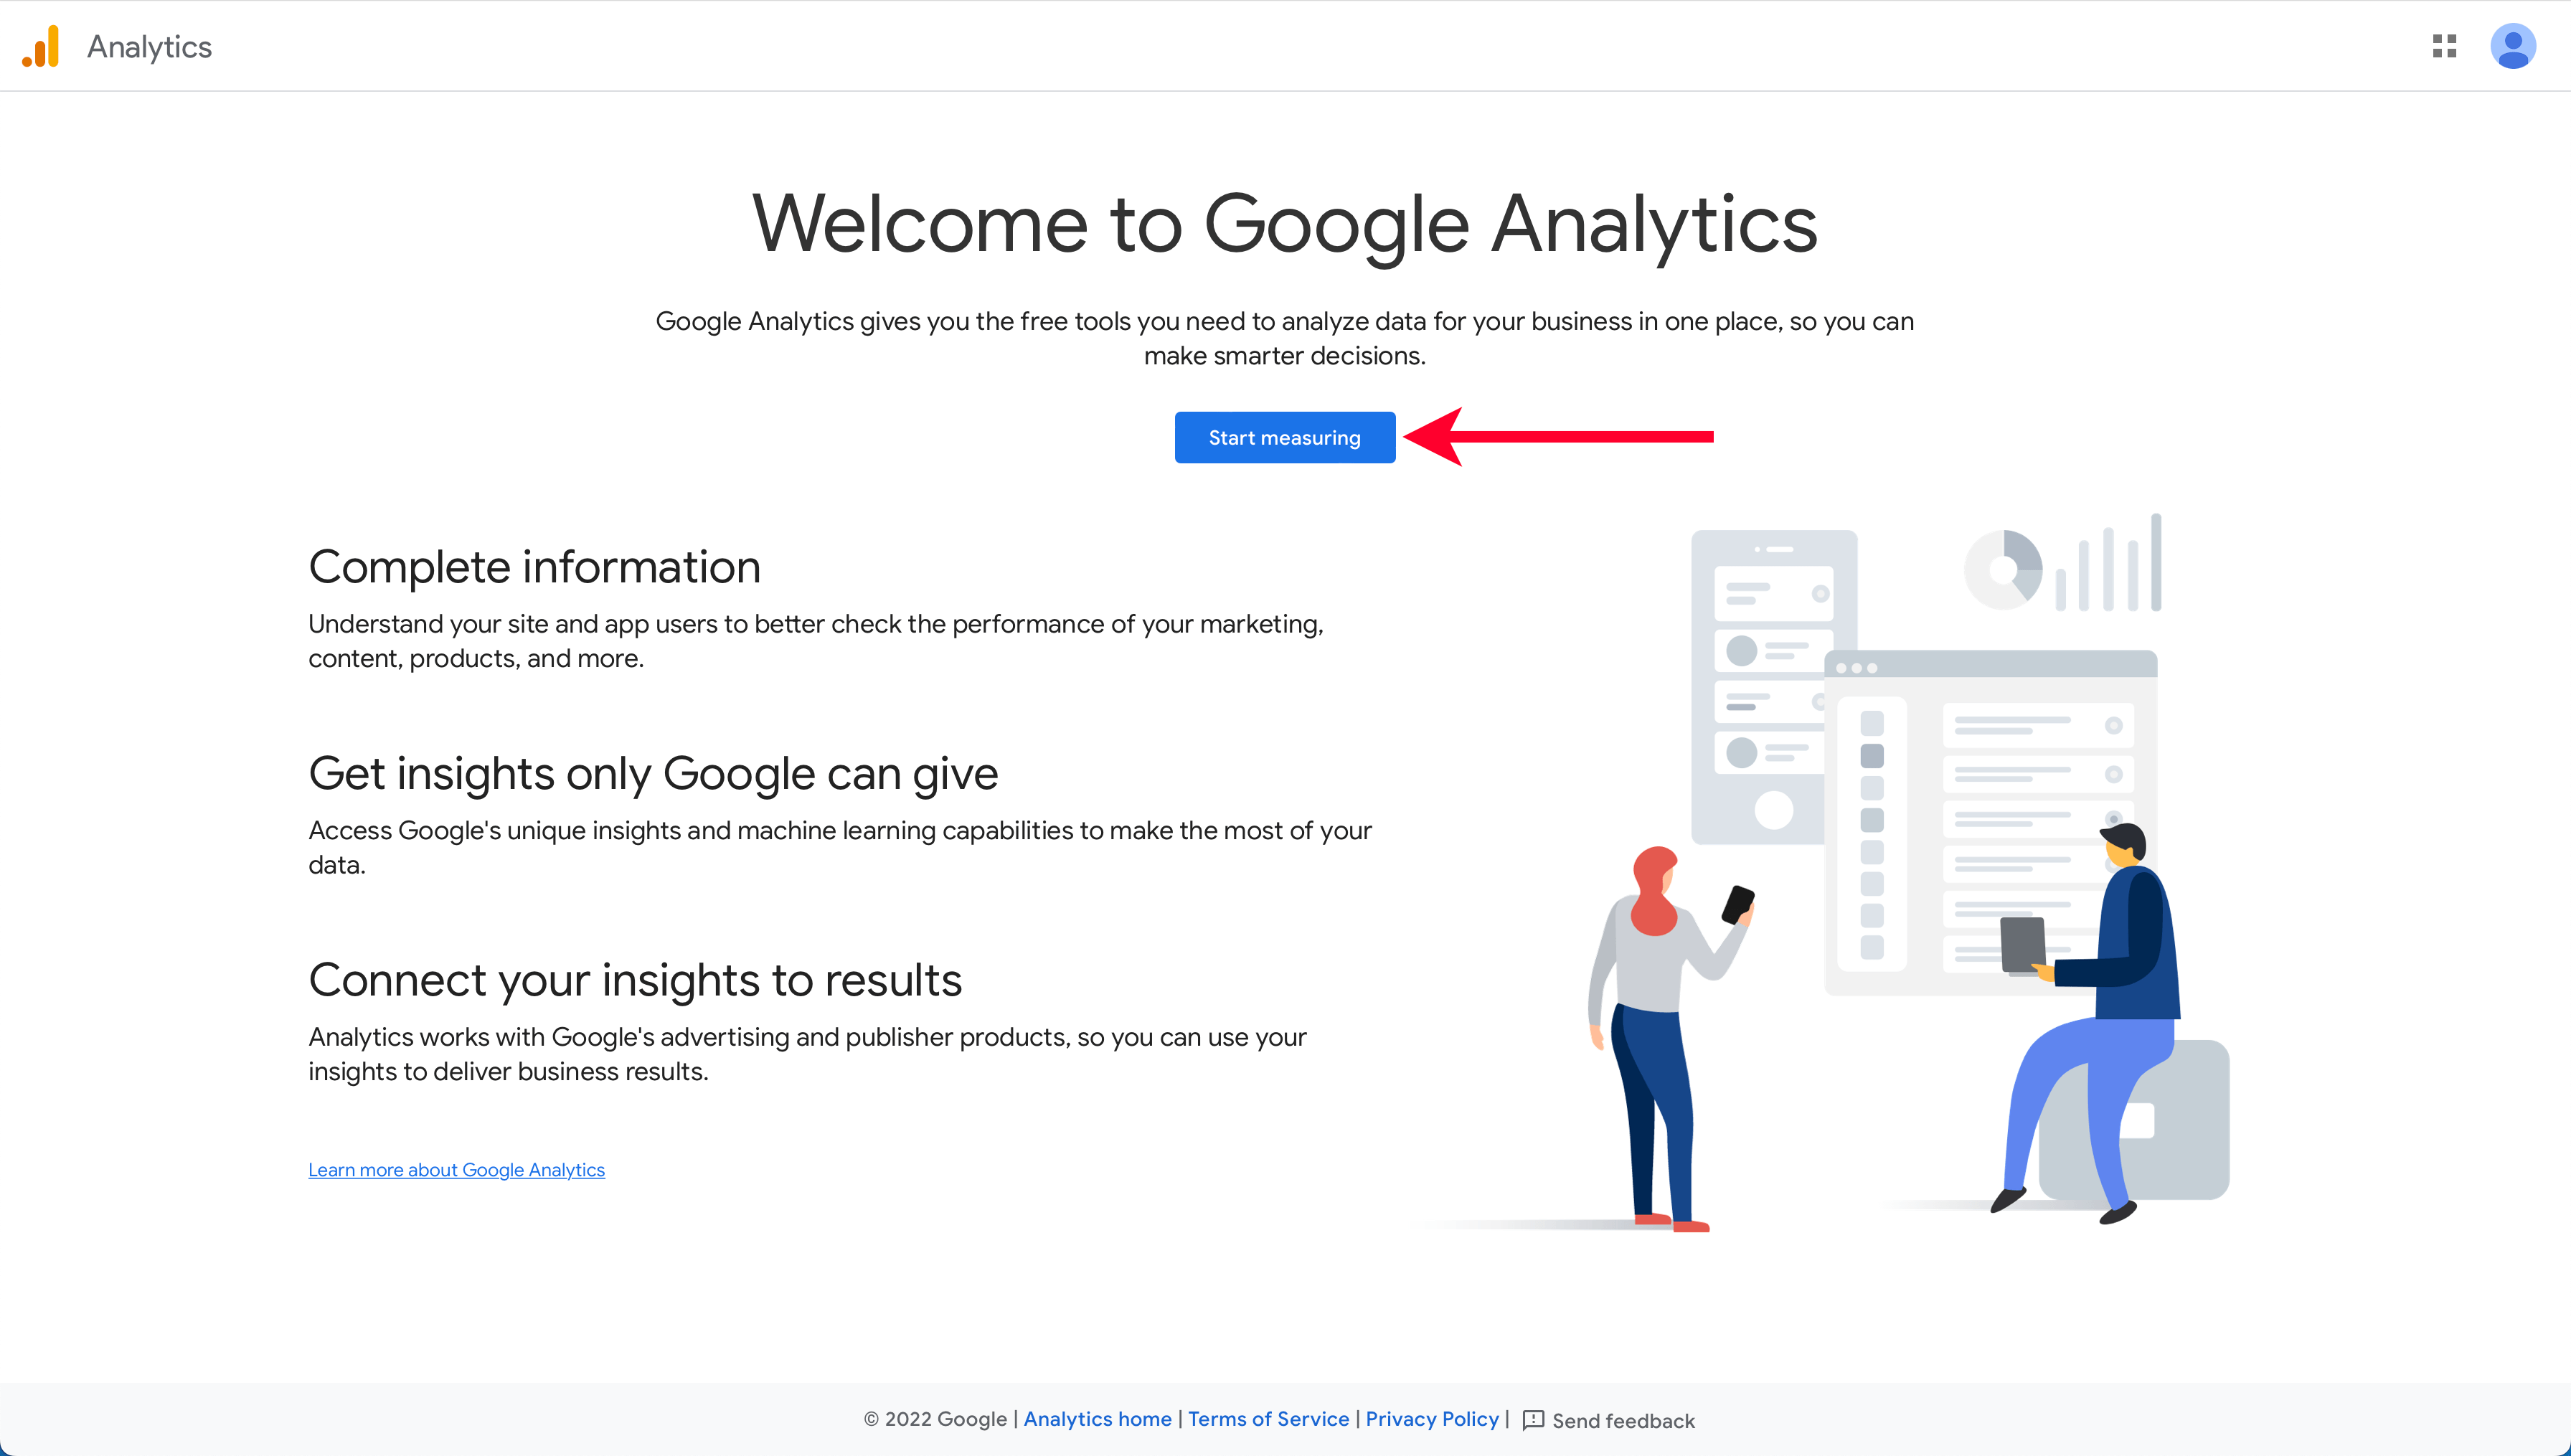
Start by navigating to the Google Analytics website and clicking the “Get Started Today” button.
On the next screen, you can sign in with an existing Google account or create a new one if you don’t have one.

After signing in, click the “Start Measuring” button.
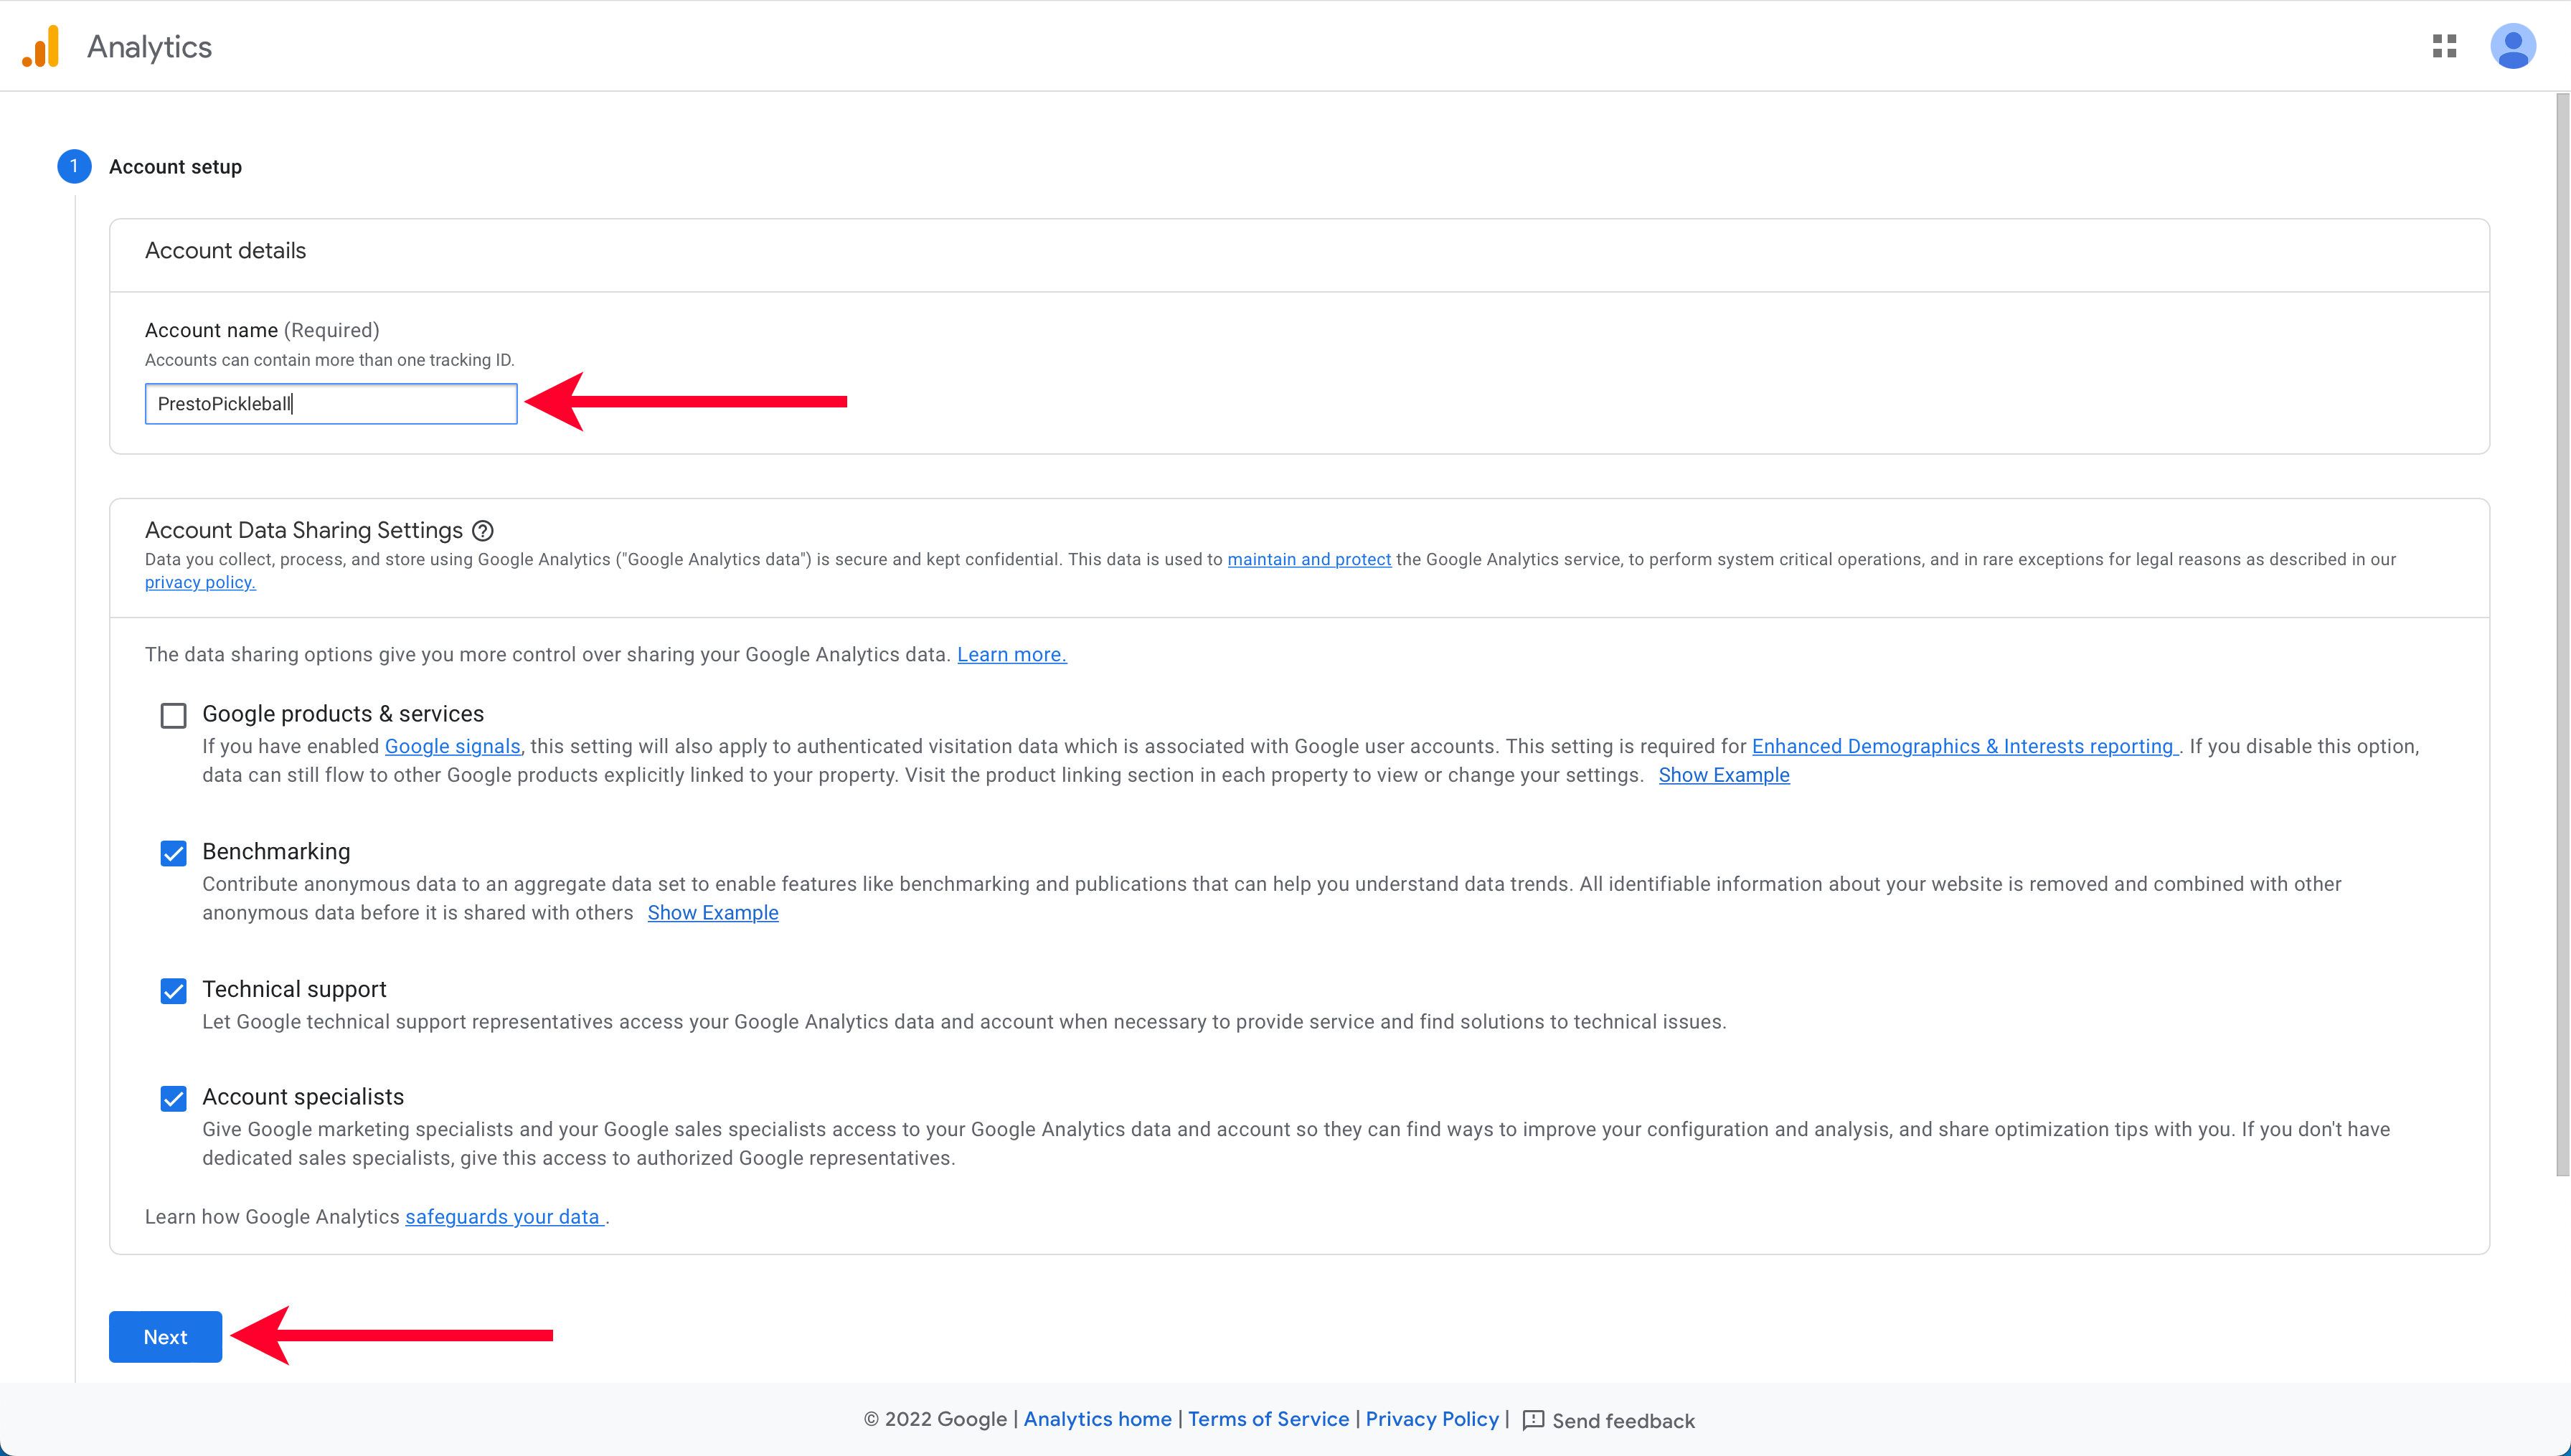
Next, enter an “Account Name” for Google Analytics. The name of your business or website will be sufficient, then click “Next.”
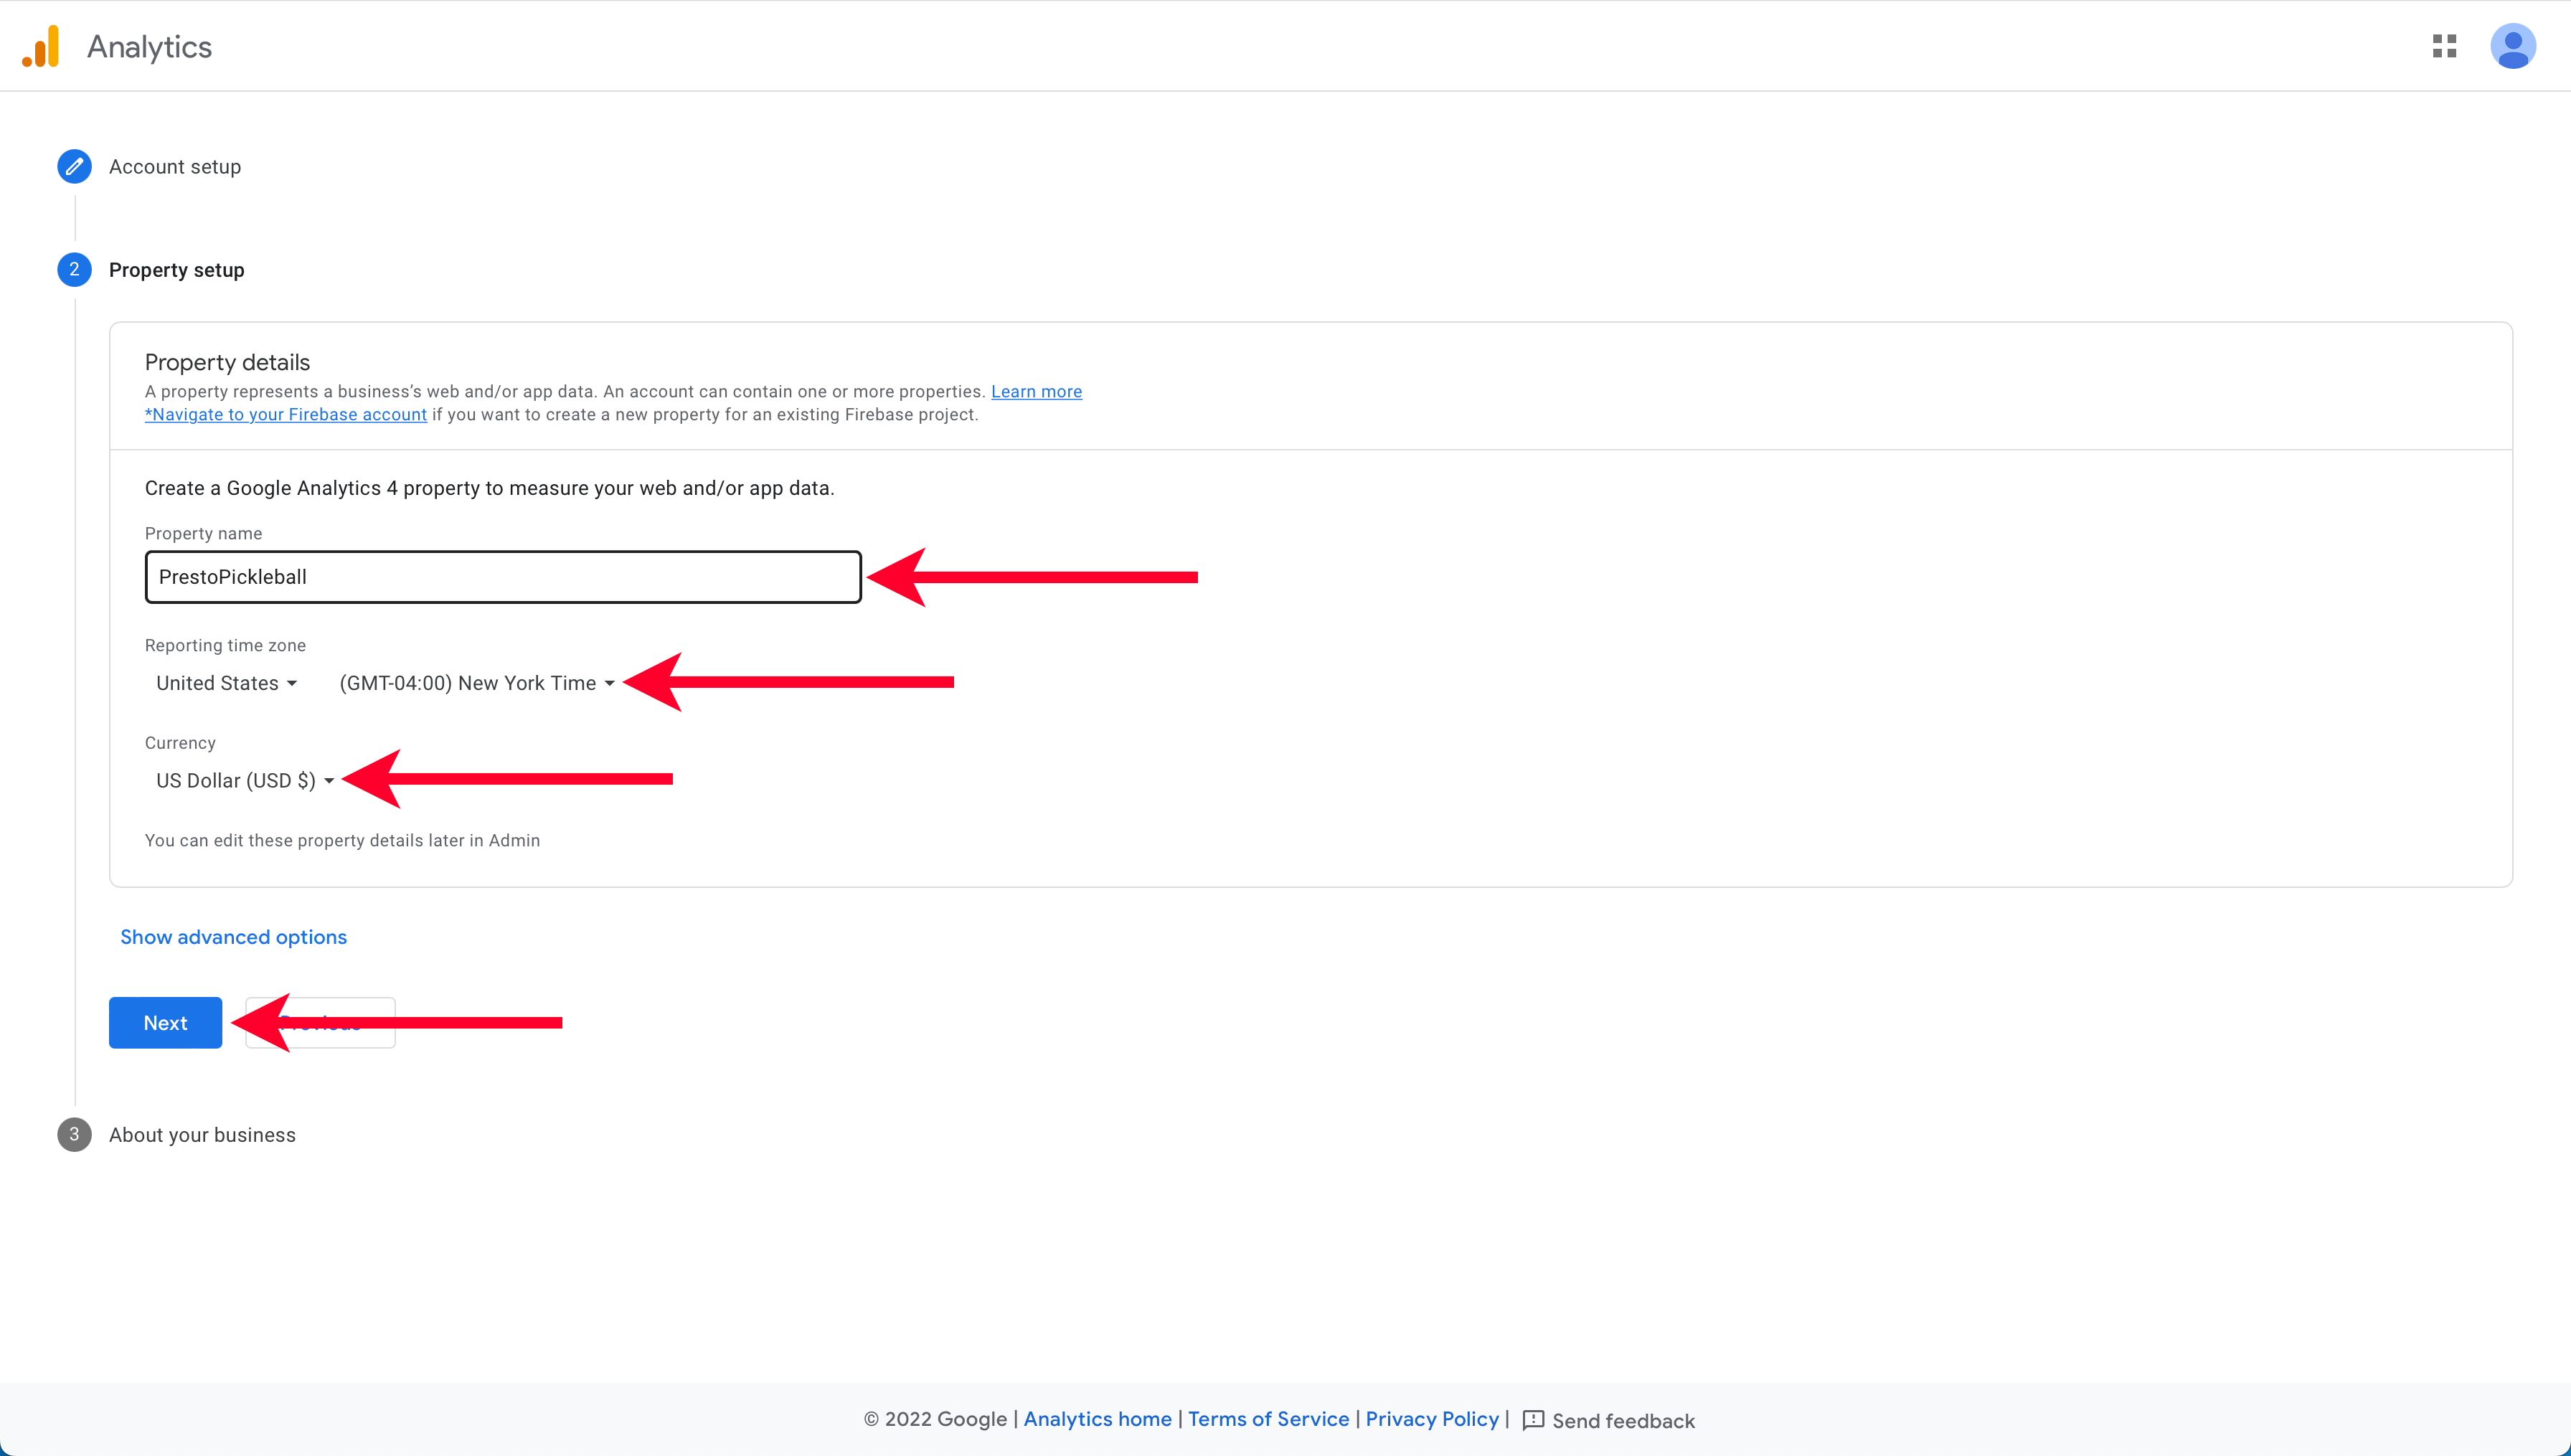
On the following screen, enter a property name, then select your reporting time zone and currency and click “Next.”
On the third step, select your industry category and business size, and check any relevant boxes for how you hope to use Google Analytics. Once you’ve set these options, click the “Create” button.
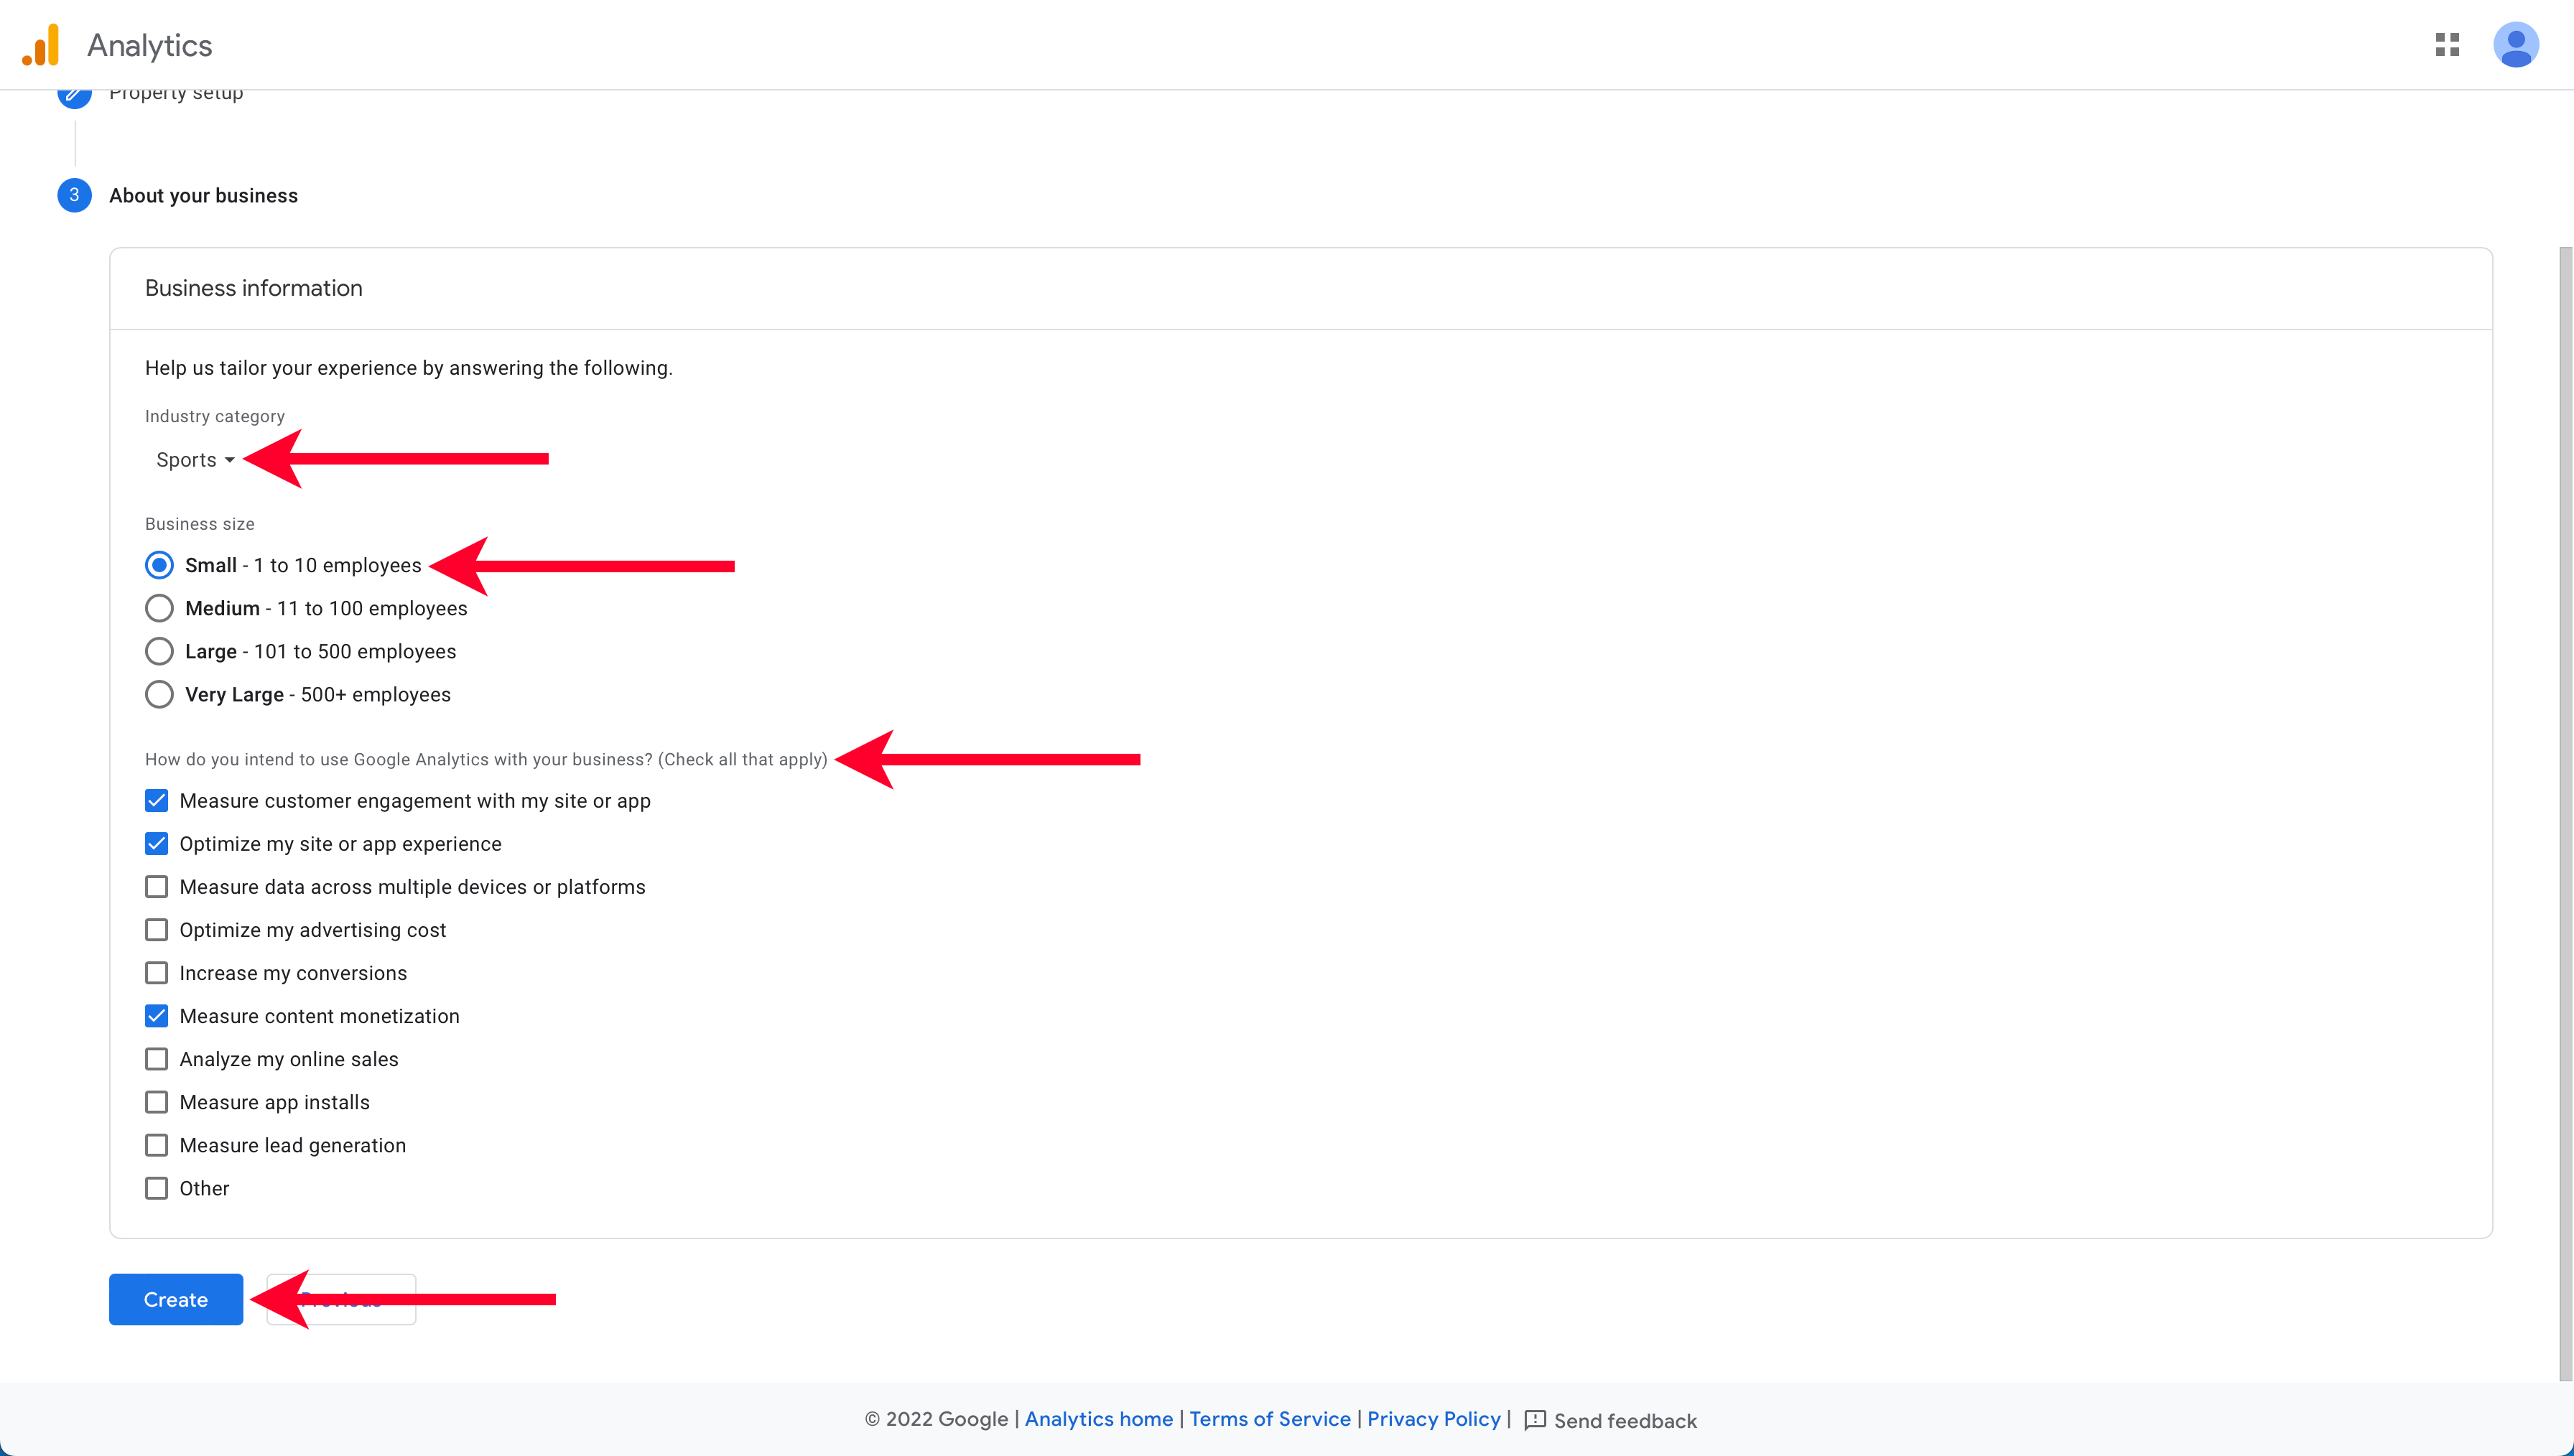
Accept their Terms of Service Agreement to move forward.
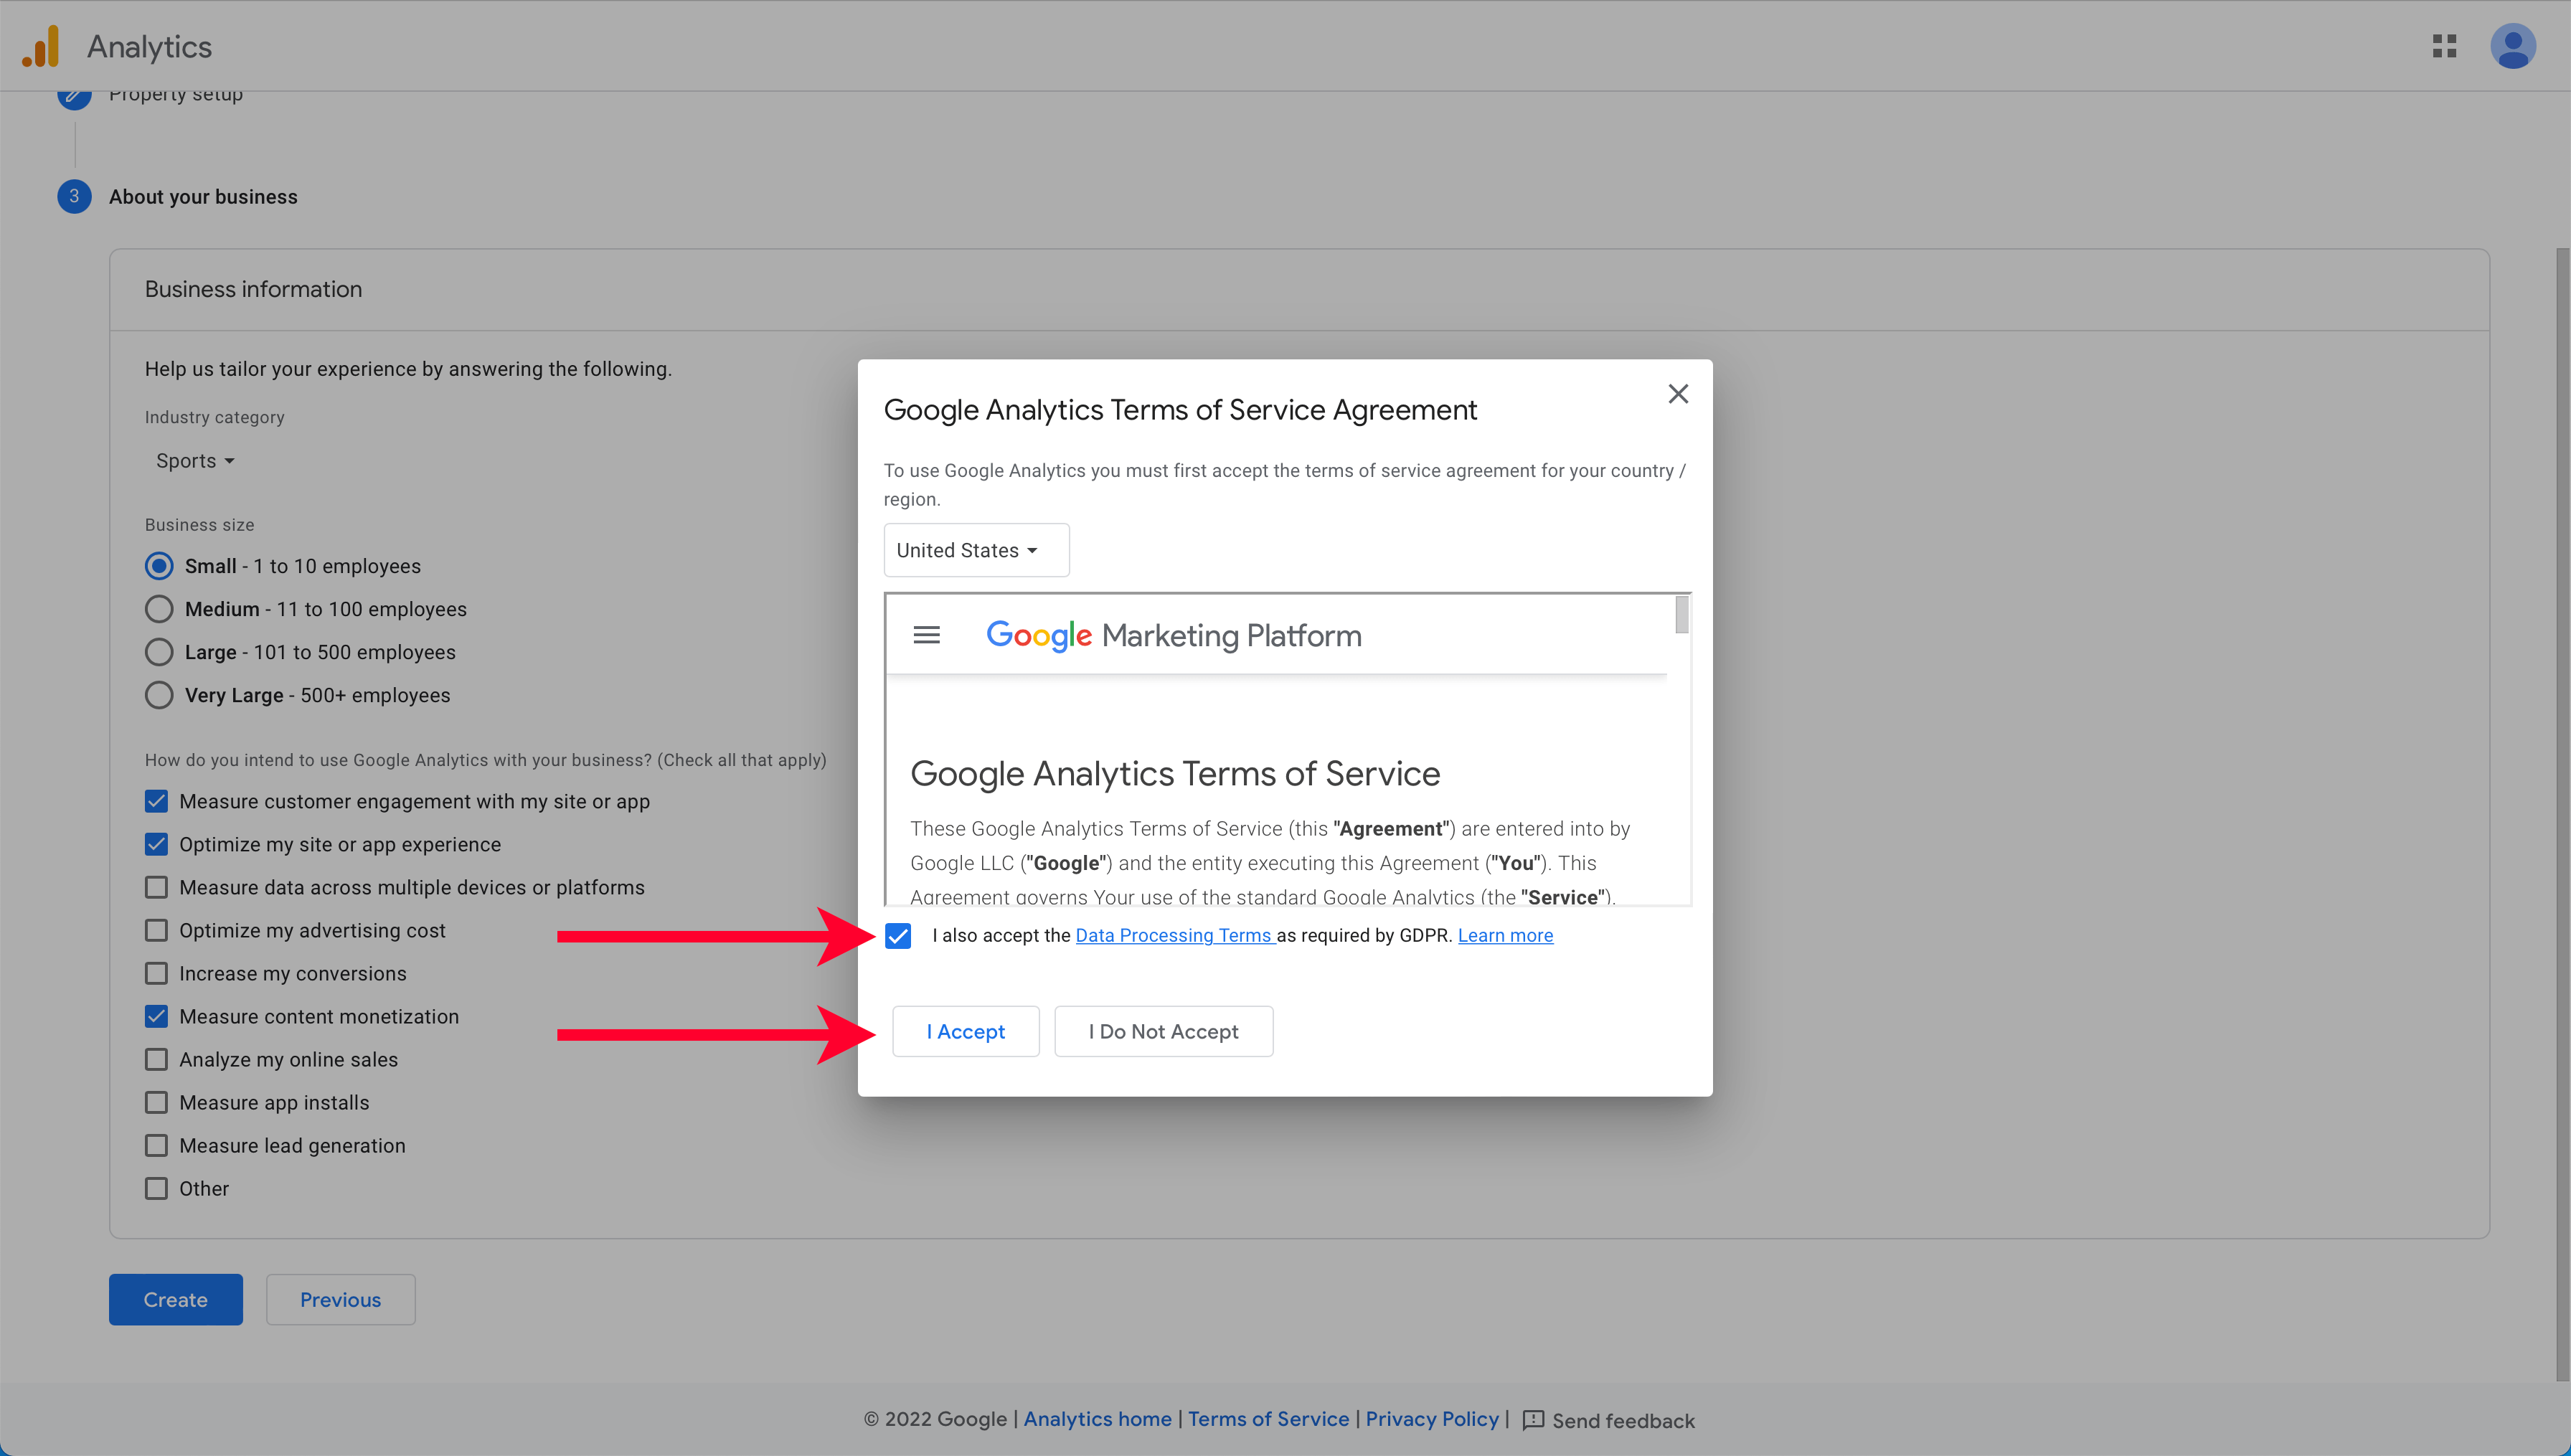
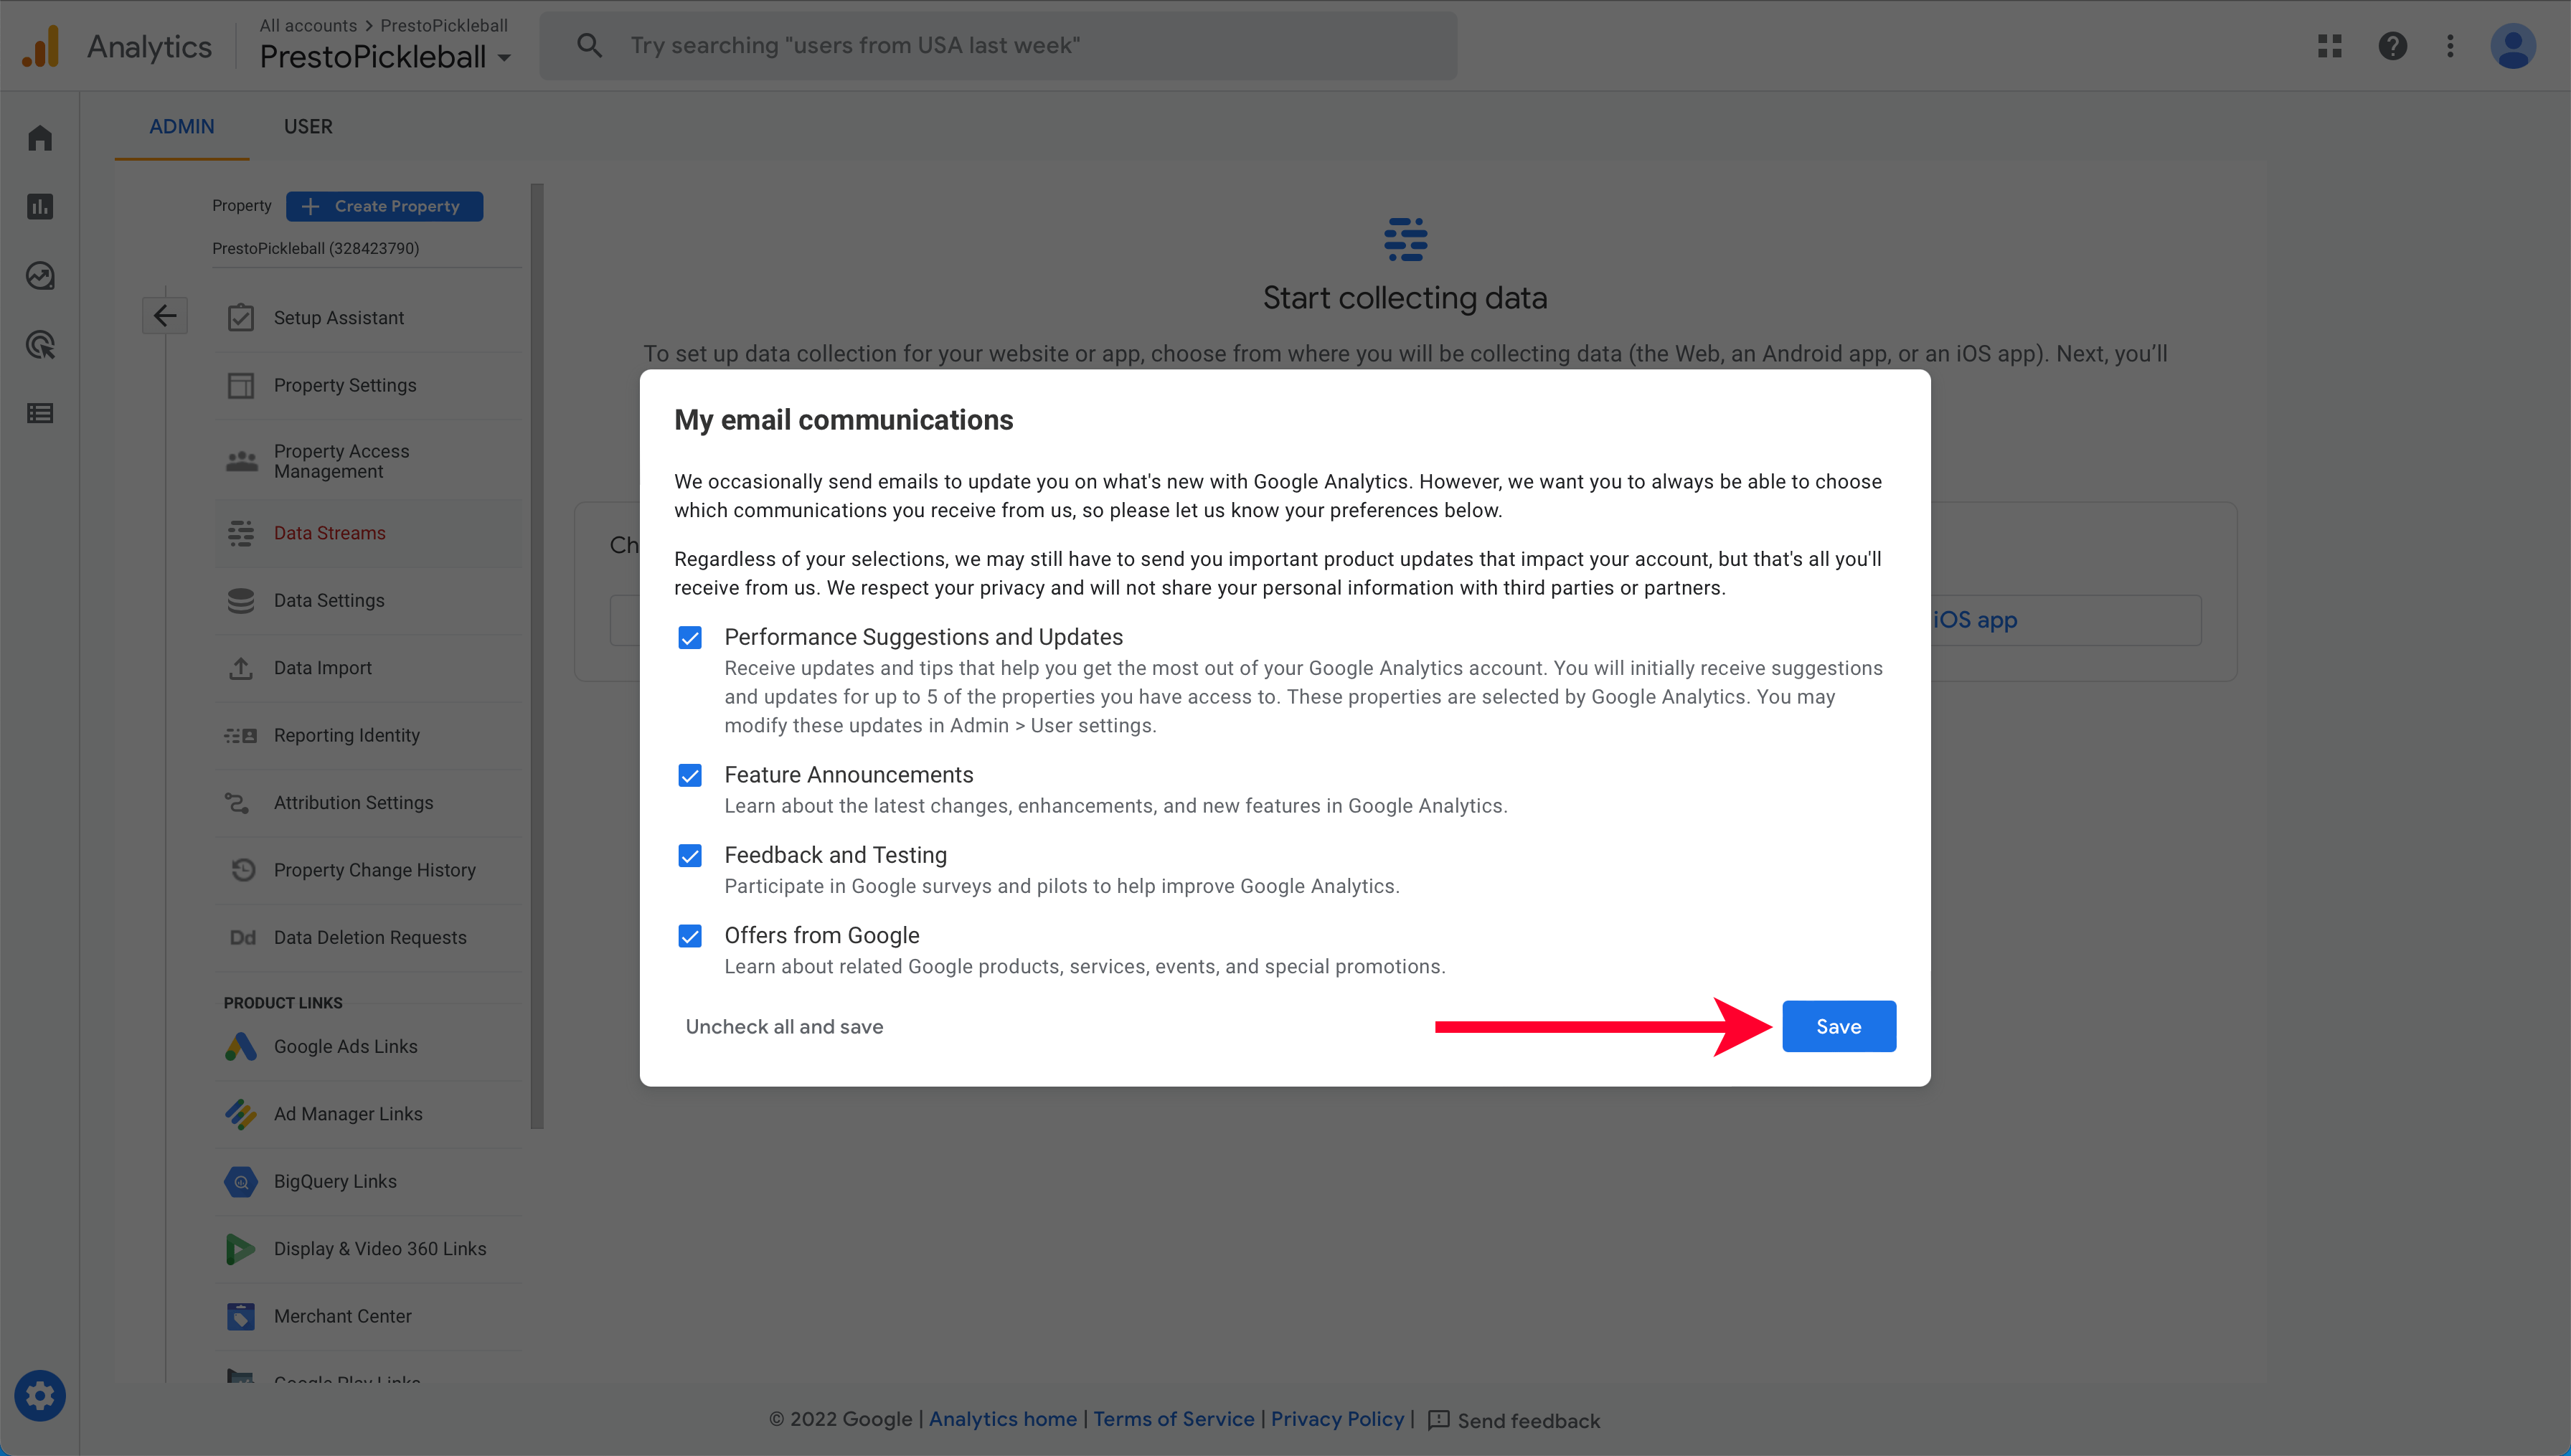
Finally, select any email communication you’d like to receive or opt-out if you don’t want to hear from them.
Your Google Analytics account is ready to go!
Set Up MonsterInsights
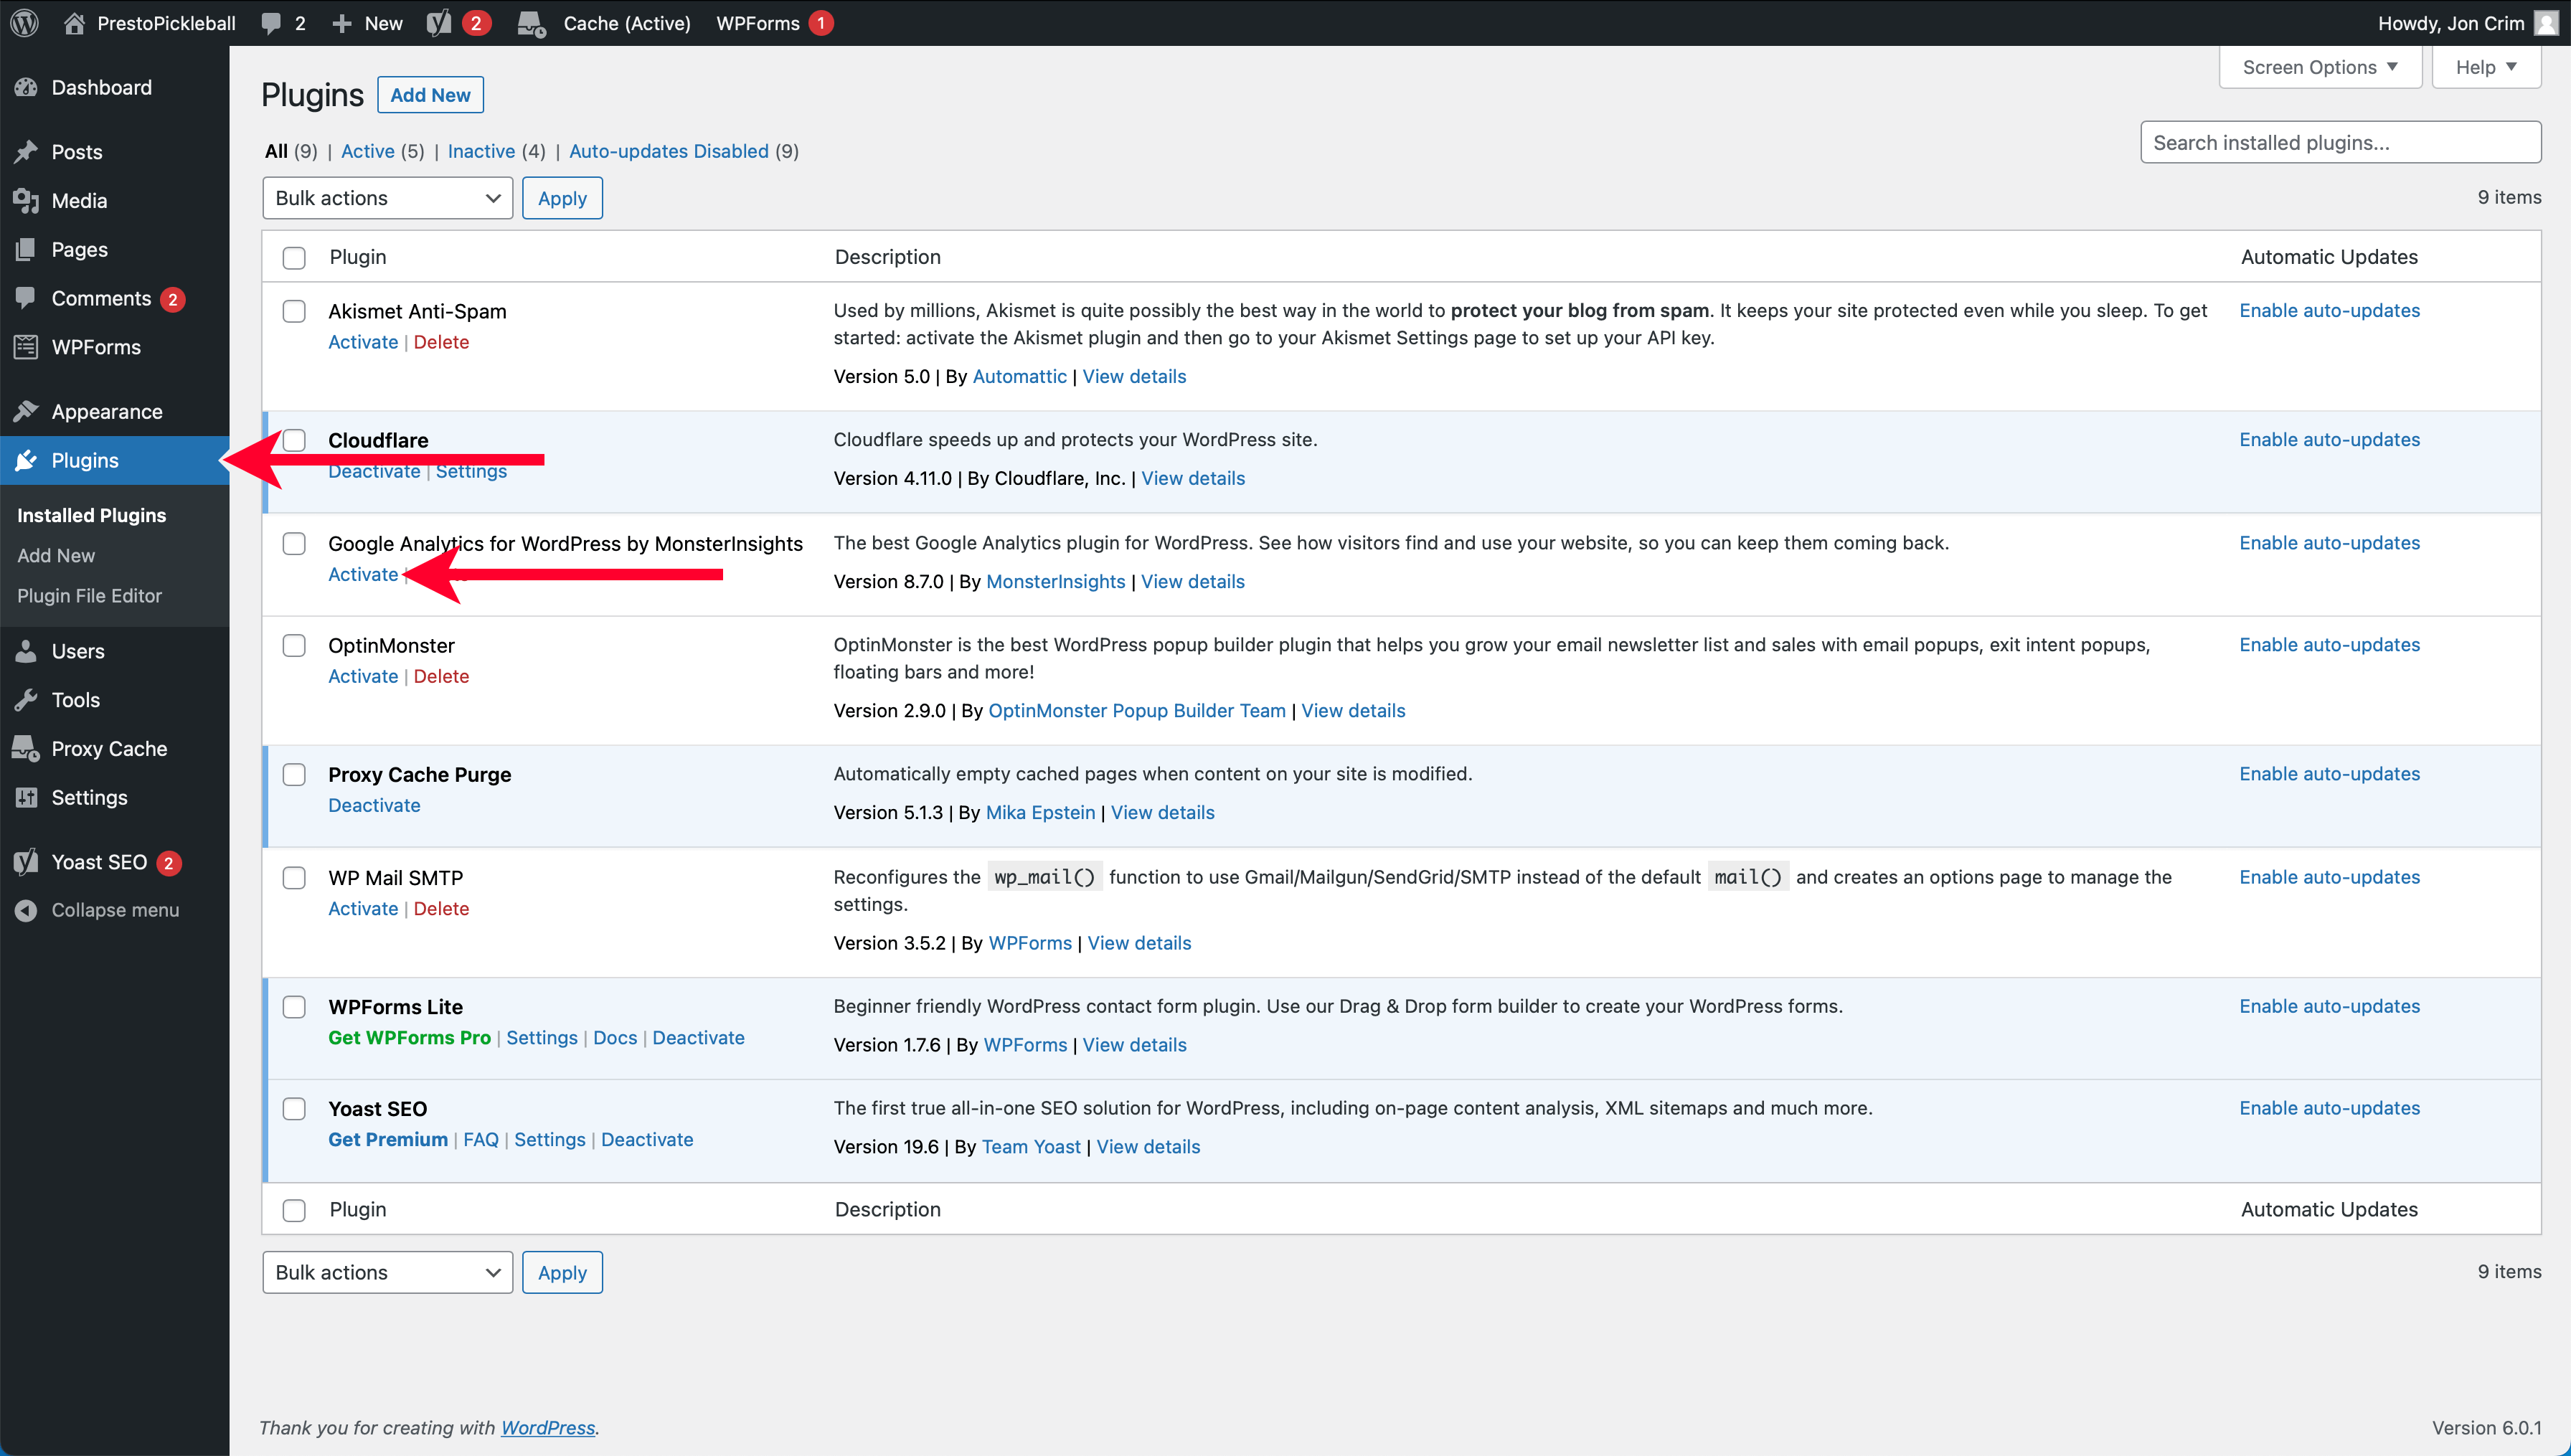
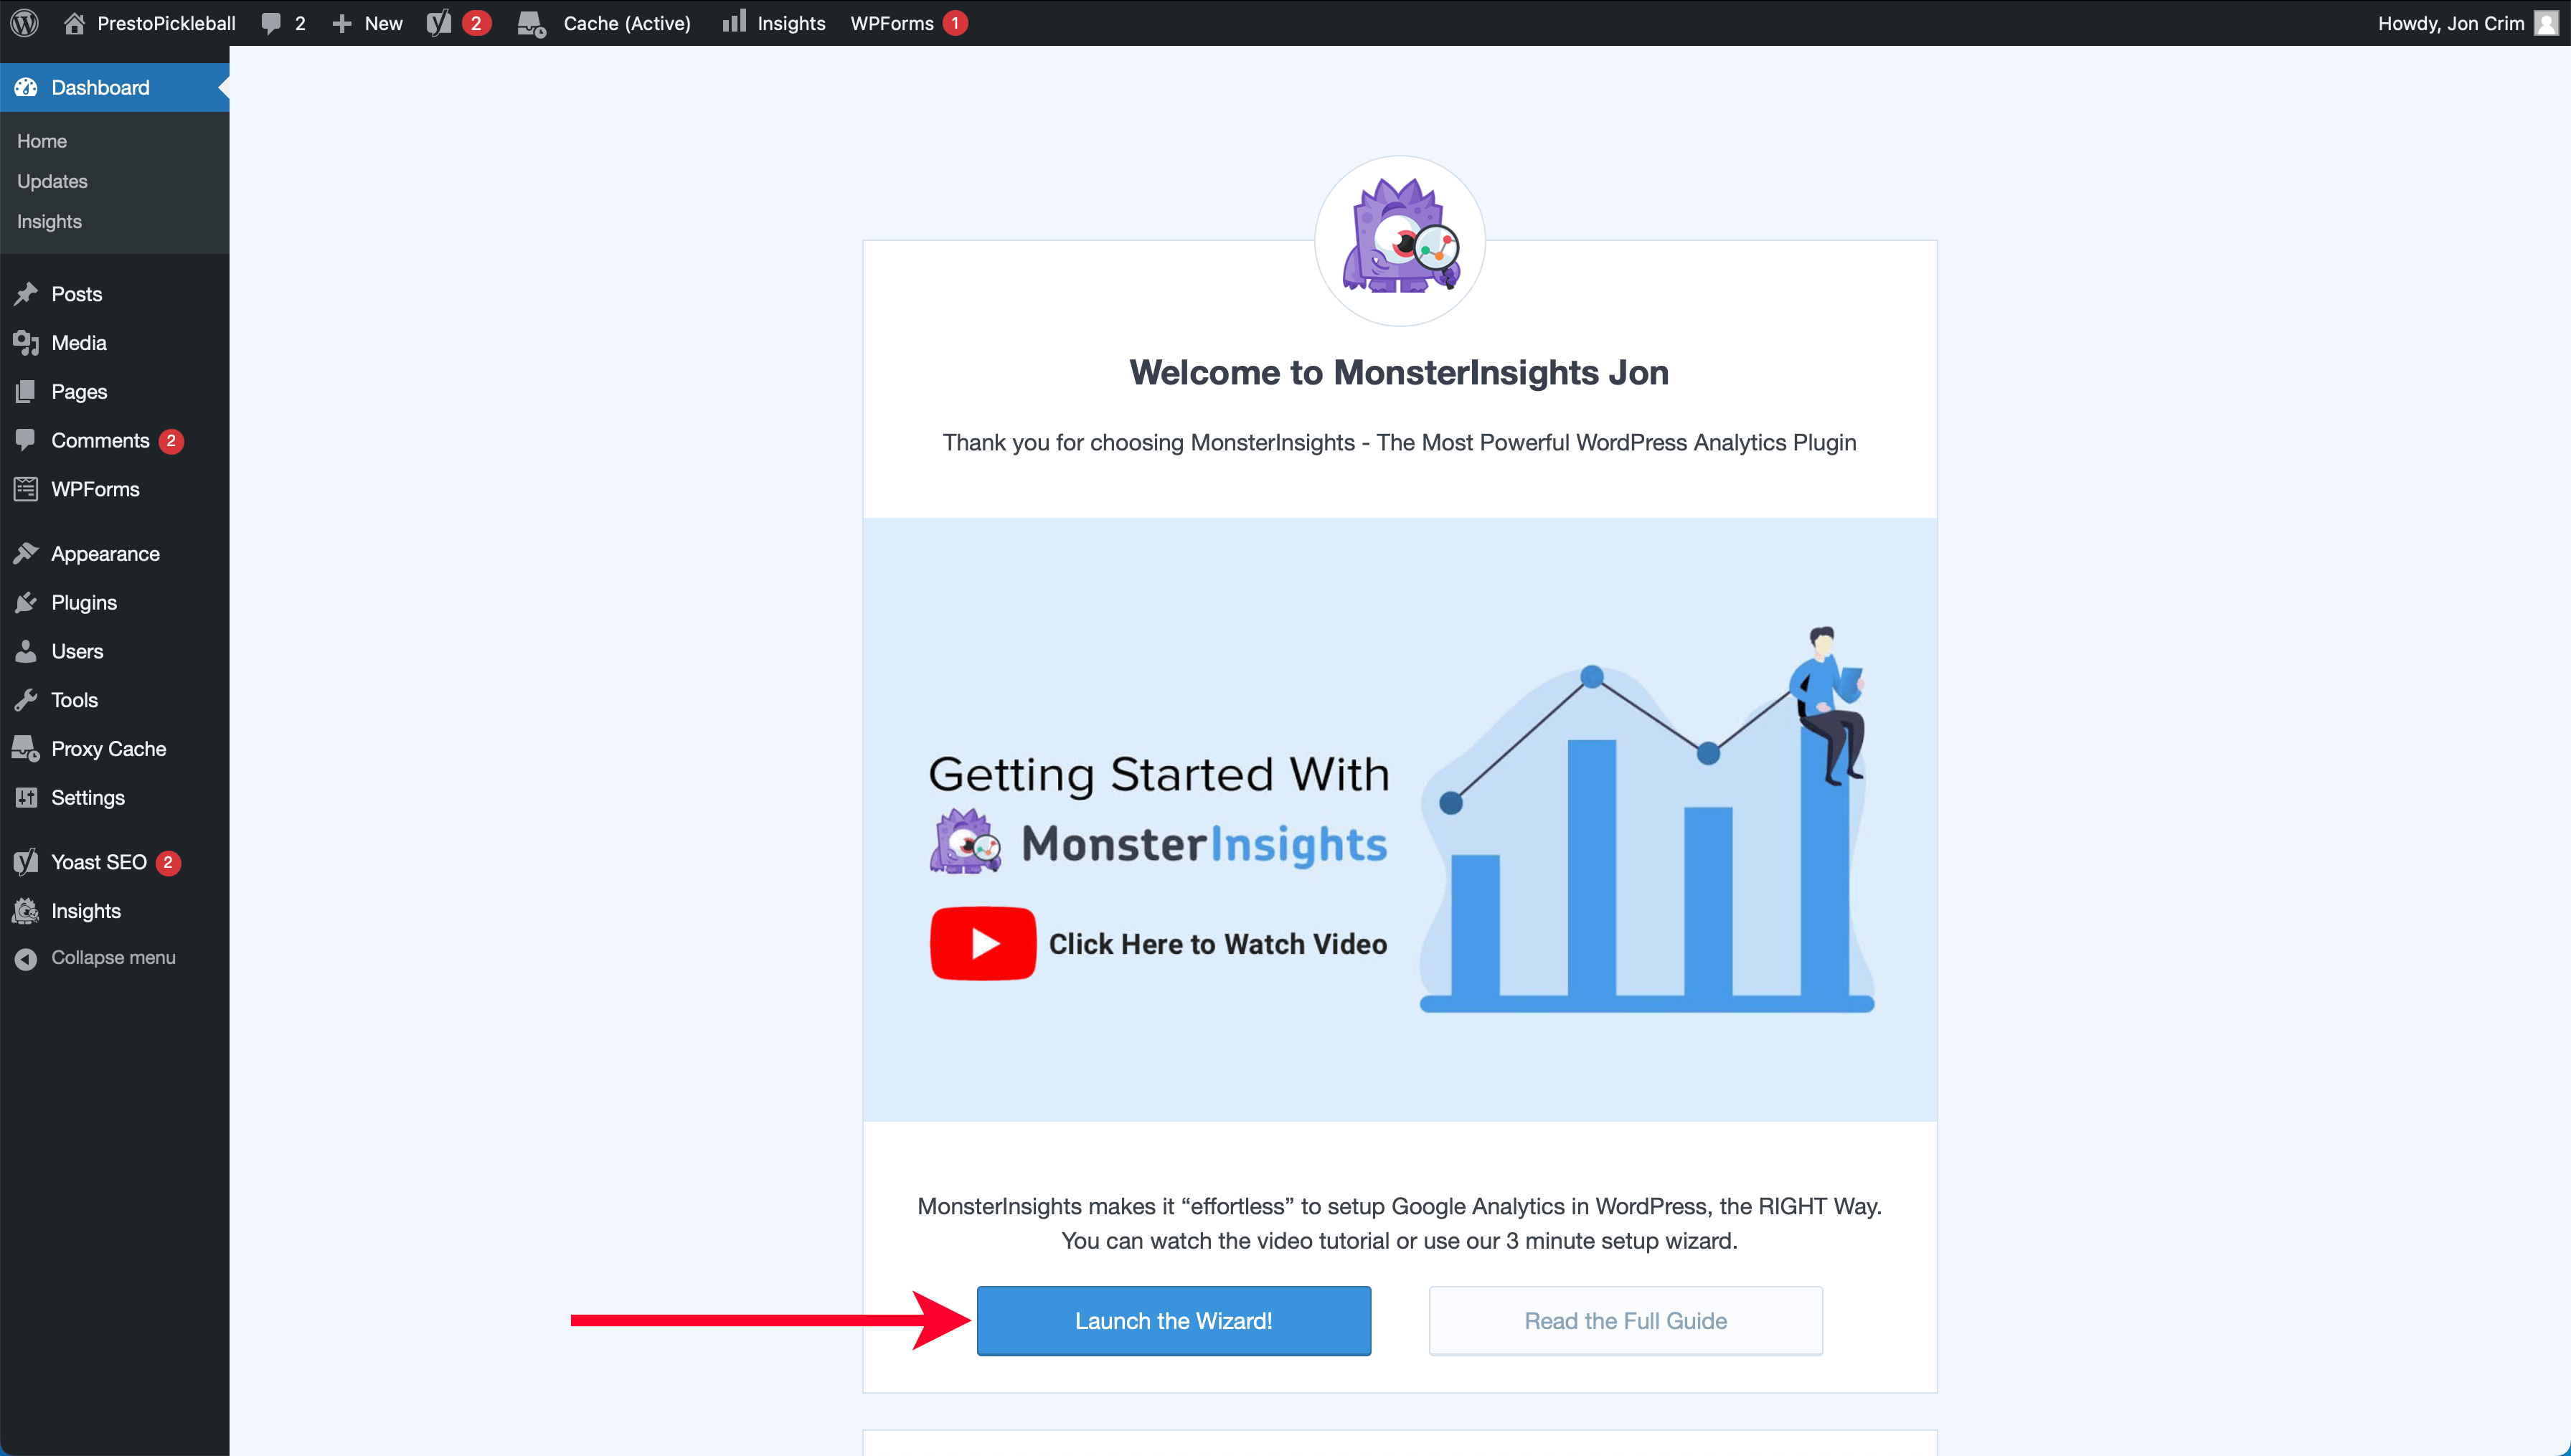
To get up and running with Google Analytics, we first need to activate the MonsterInsights plugin. Start by navigating to the “Plugins” menu in your WordPress account, find the plugin named “Google Analytics for WordPress by MonsterInsights,” and click the link to activate the plugin.
After activating the plugin, WordPress will take you to a new screen to set up MonsterInsights. If you’d like, you can play their “Getting Started with MonsterInsights” video for a quick overview of what to expect.
To start, click the “Launch the Wizard!” button.
Helpful Tip
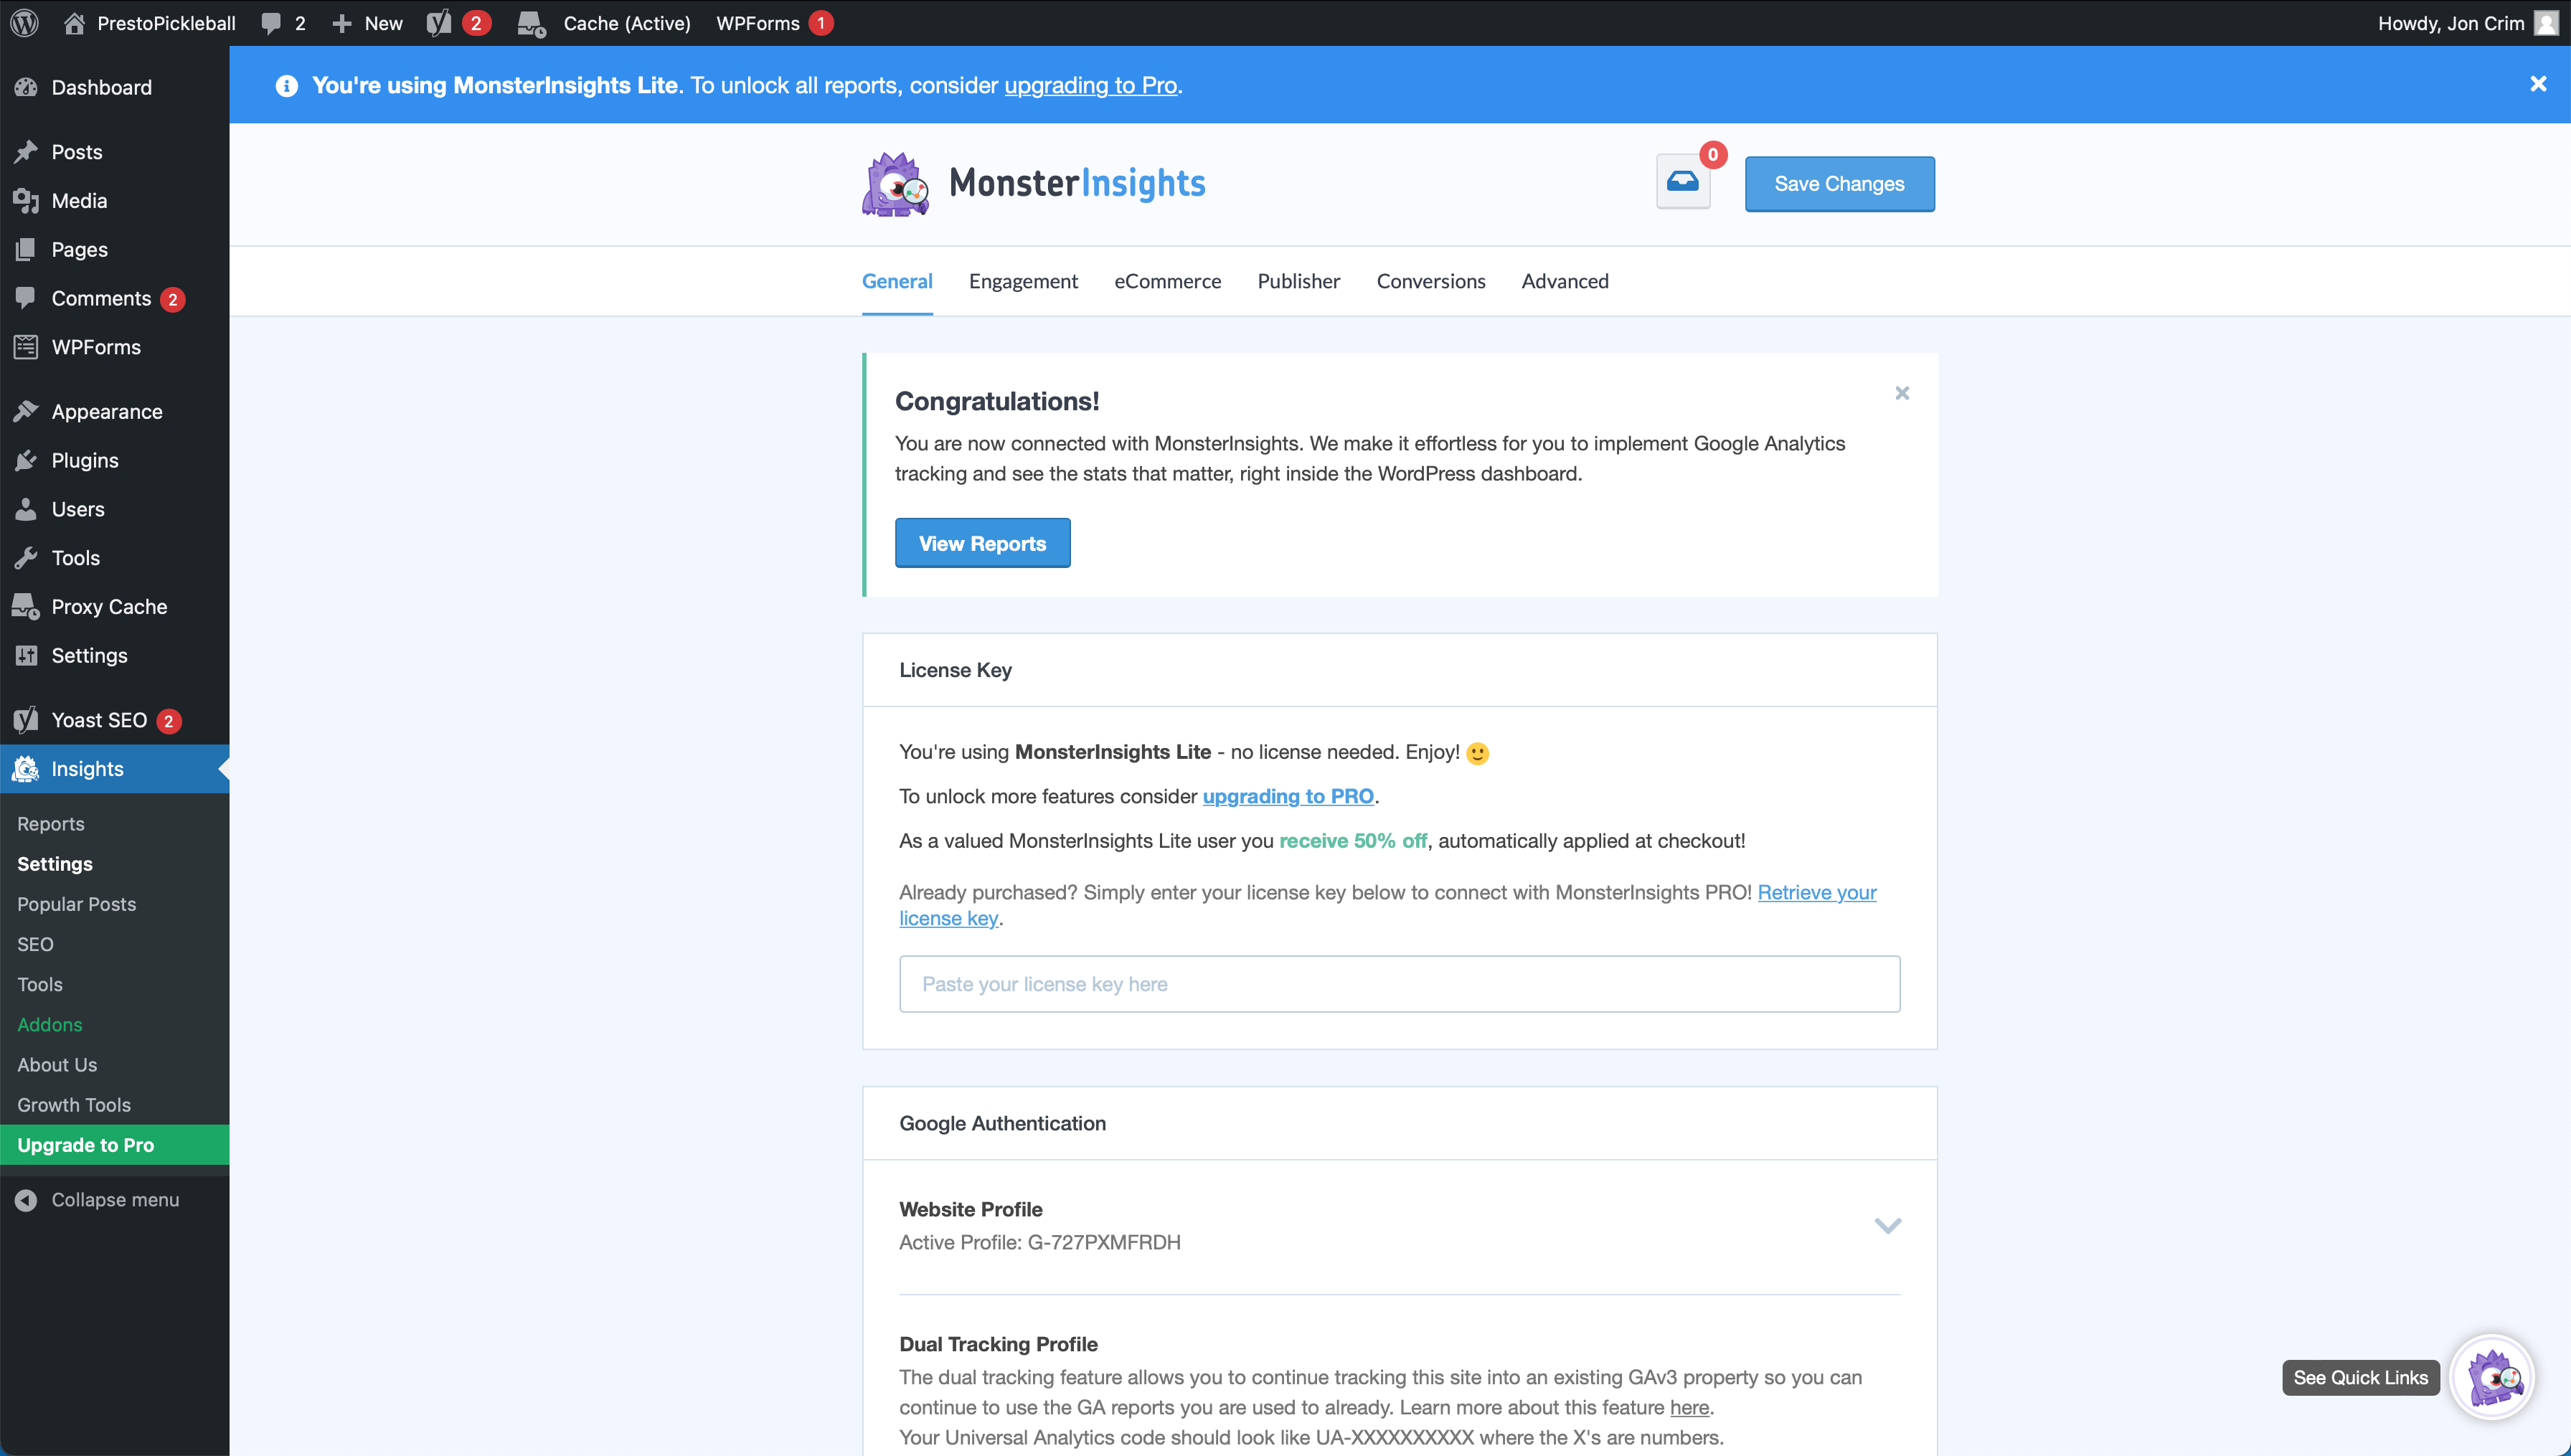
It’s worth noting that MonsterInsights is free, but they also offer paid features. If you deem any of their additional features worth exploring in the future, that’s a call you can make, but it’s not necessary to start. We’re going to rely solely on their free version.
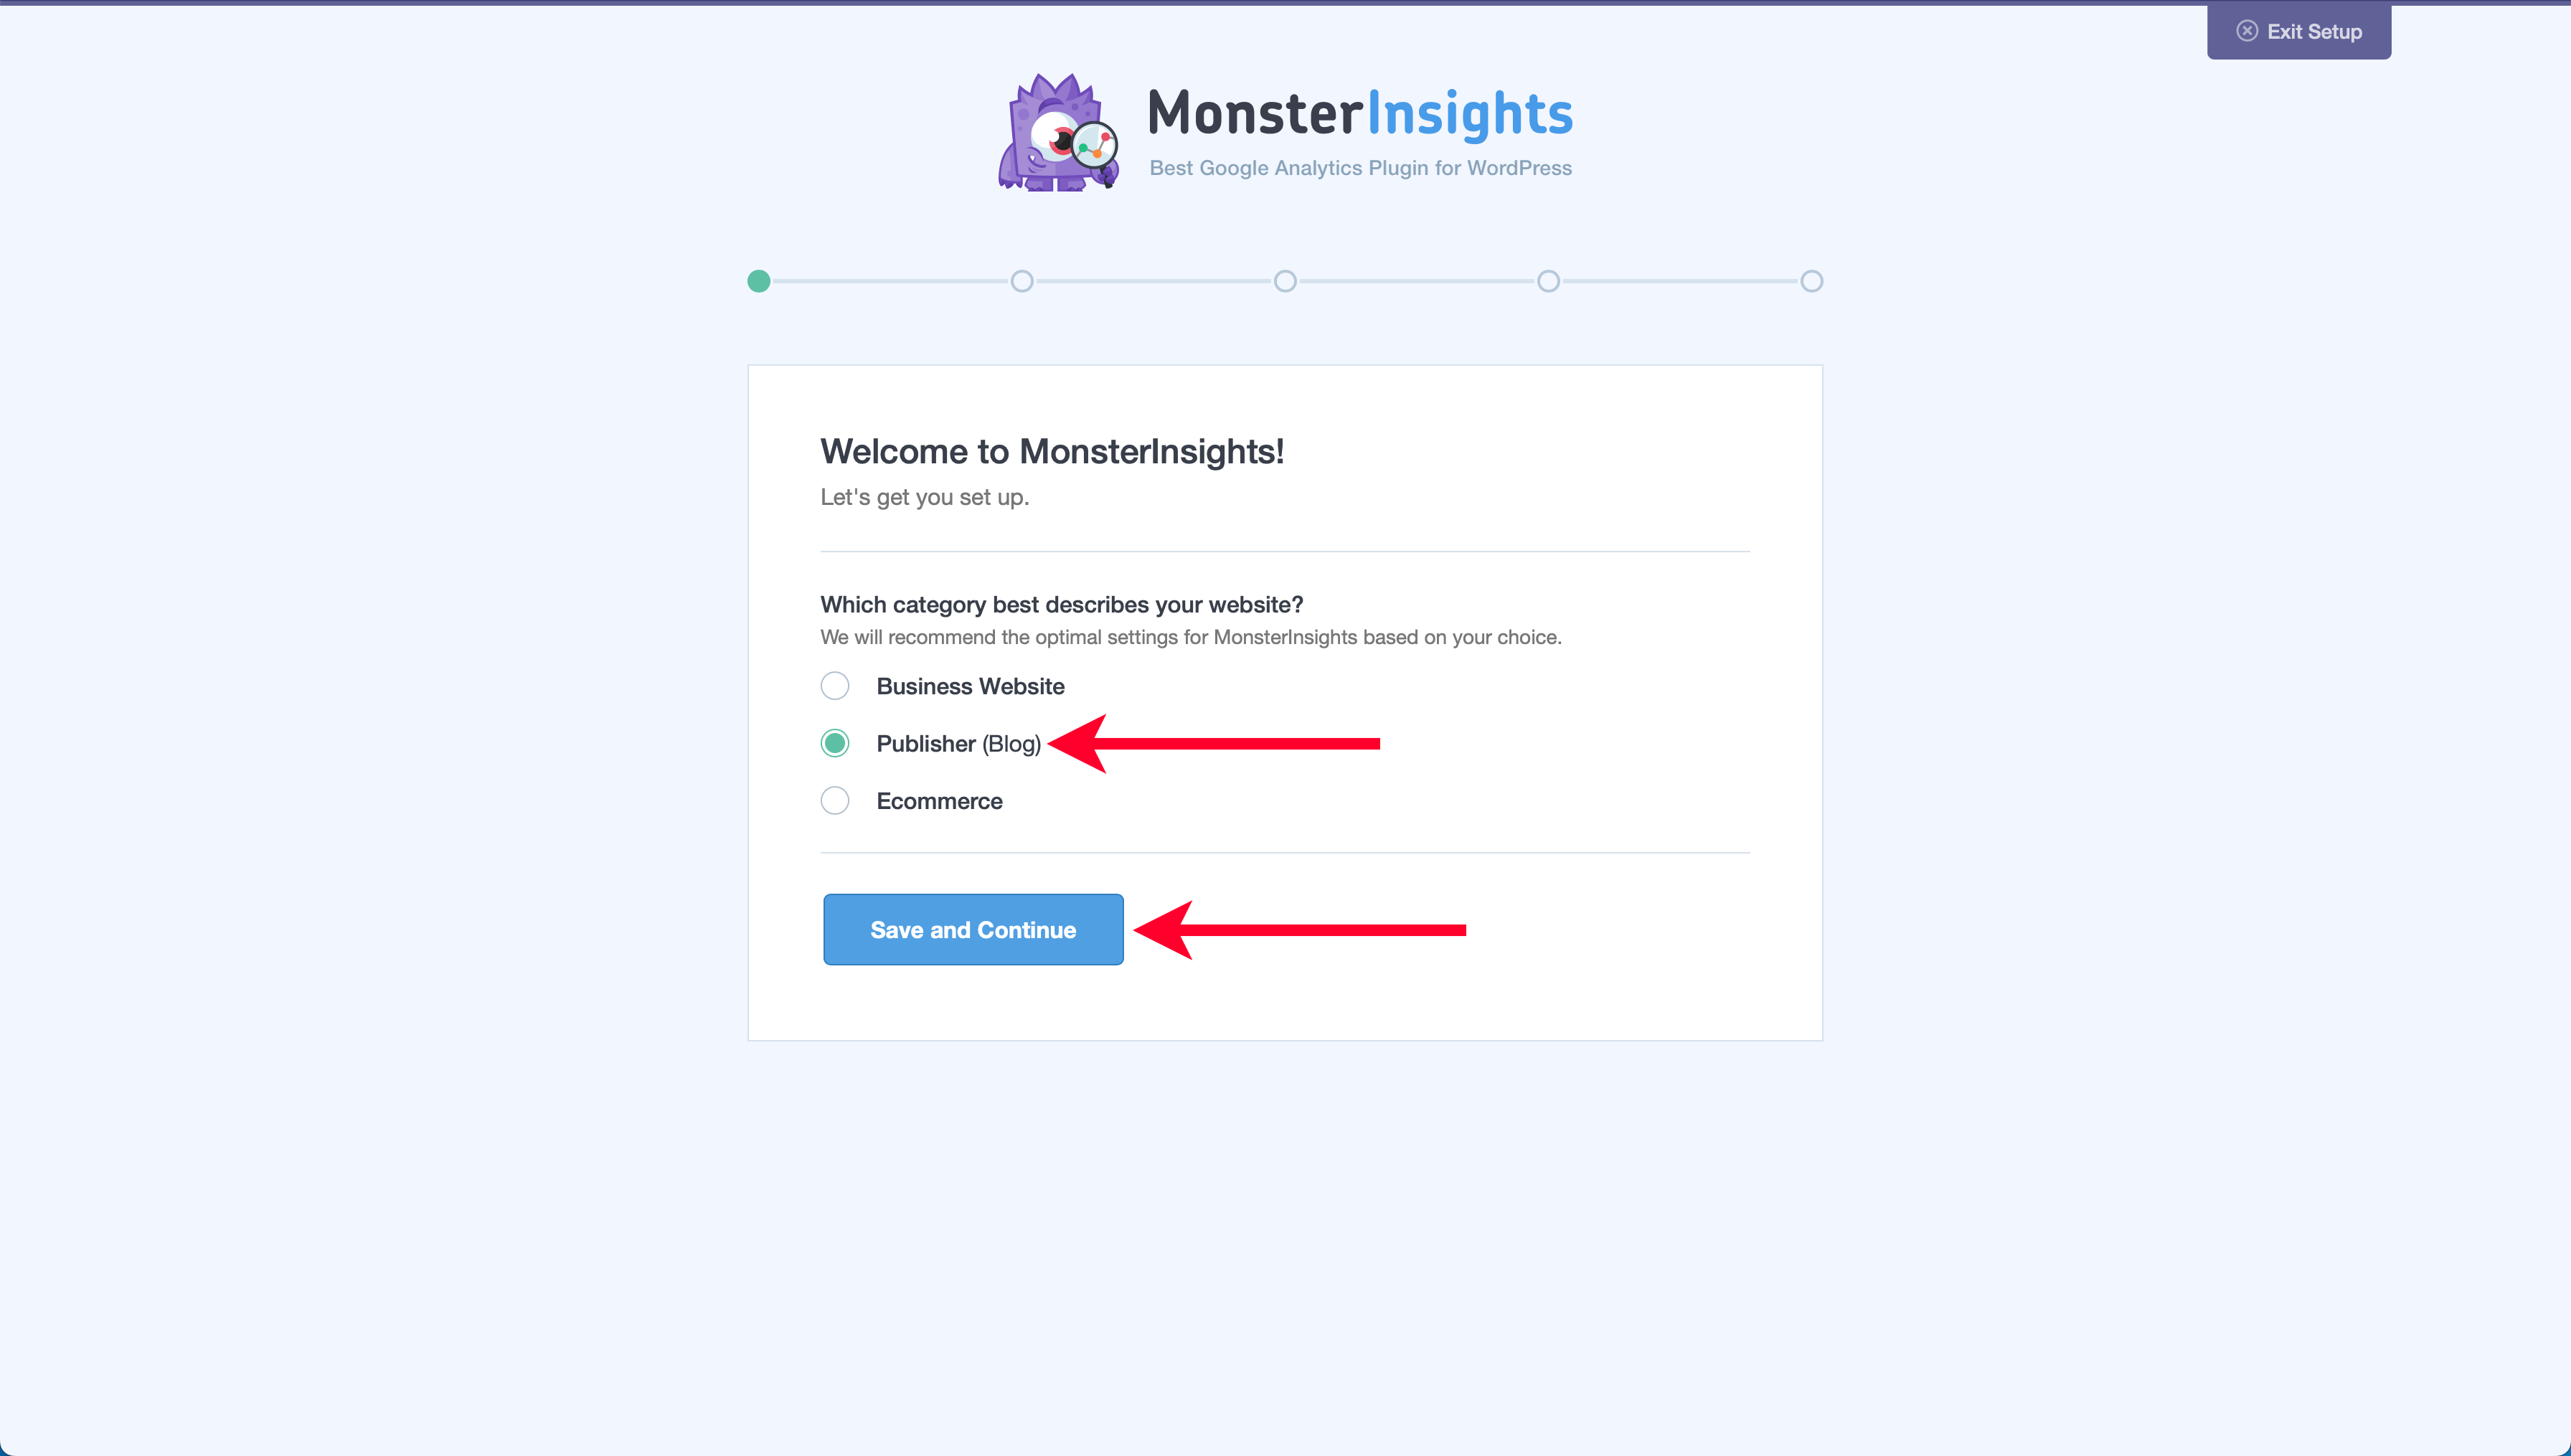
On the first step of the MonsterInsights wizard, select “Publisher (Blog),” then click “Save and Continue.”
Next, we’ll click the “Connet MonsterInsights” button.

Doing so will take you to a screen to select the Google Account you’d like to use with MonsterInsights. Select the account you used to set up your Google Analytics account or log in with that account if necessary.
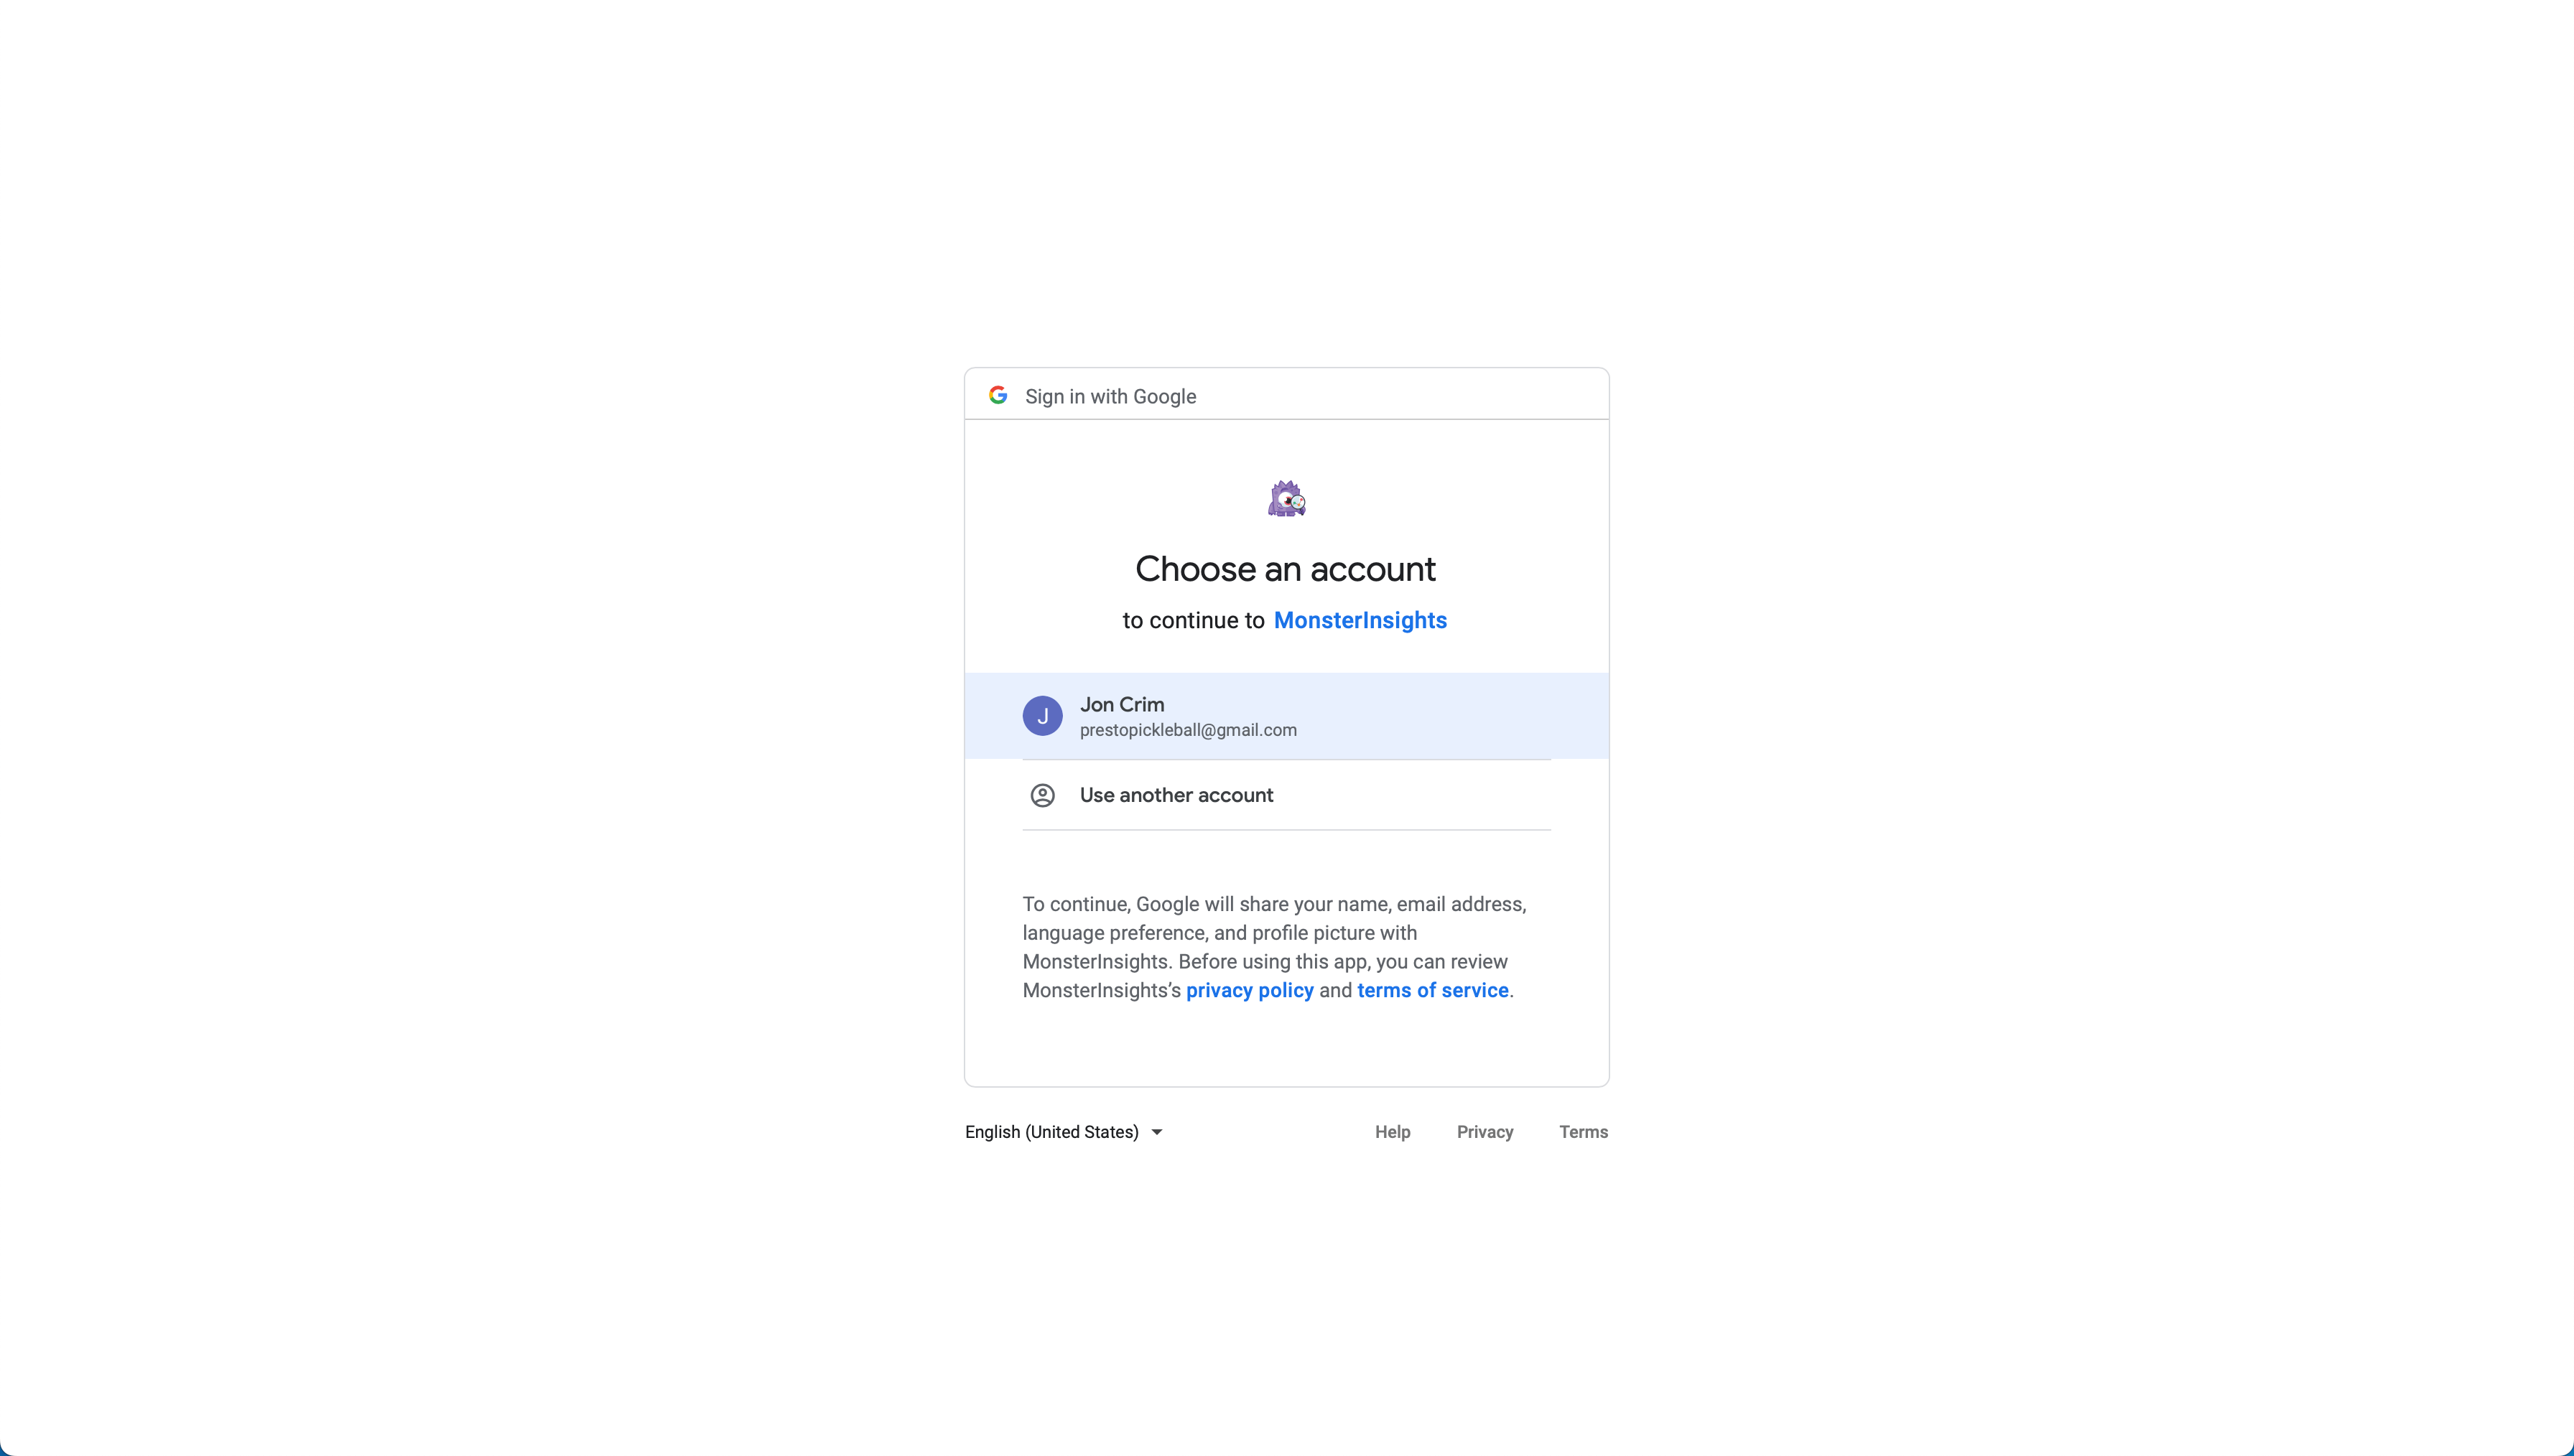
Then on the next step, click “Allow.”

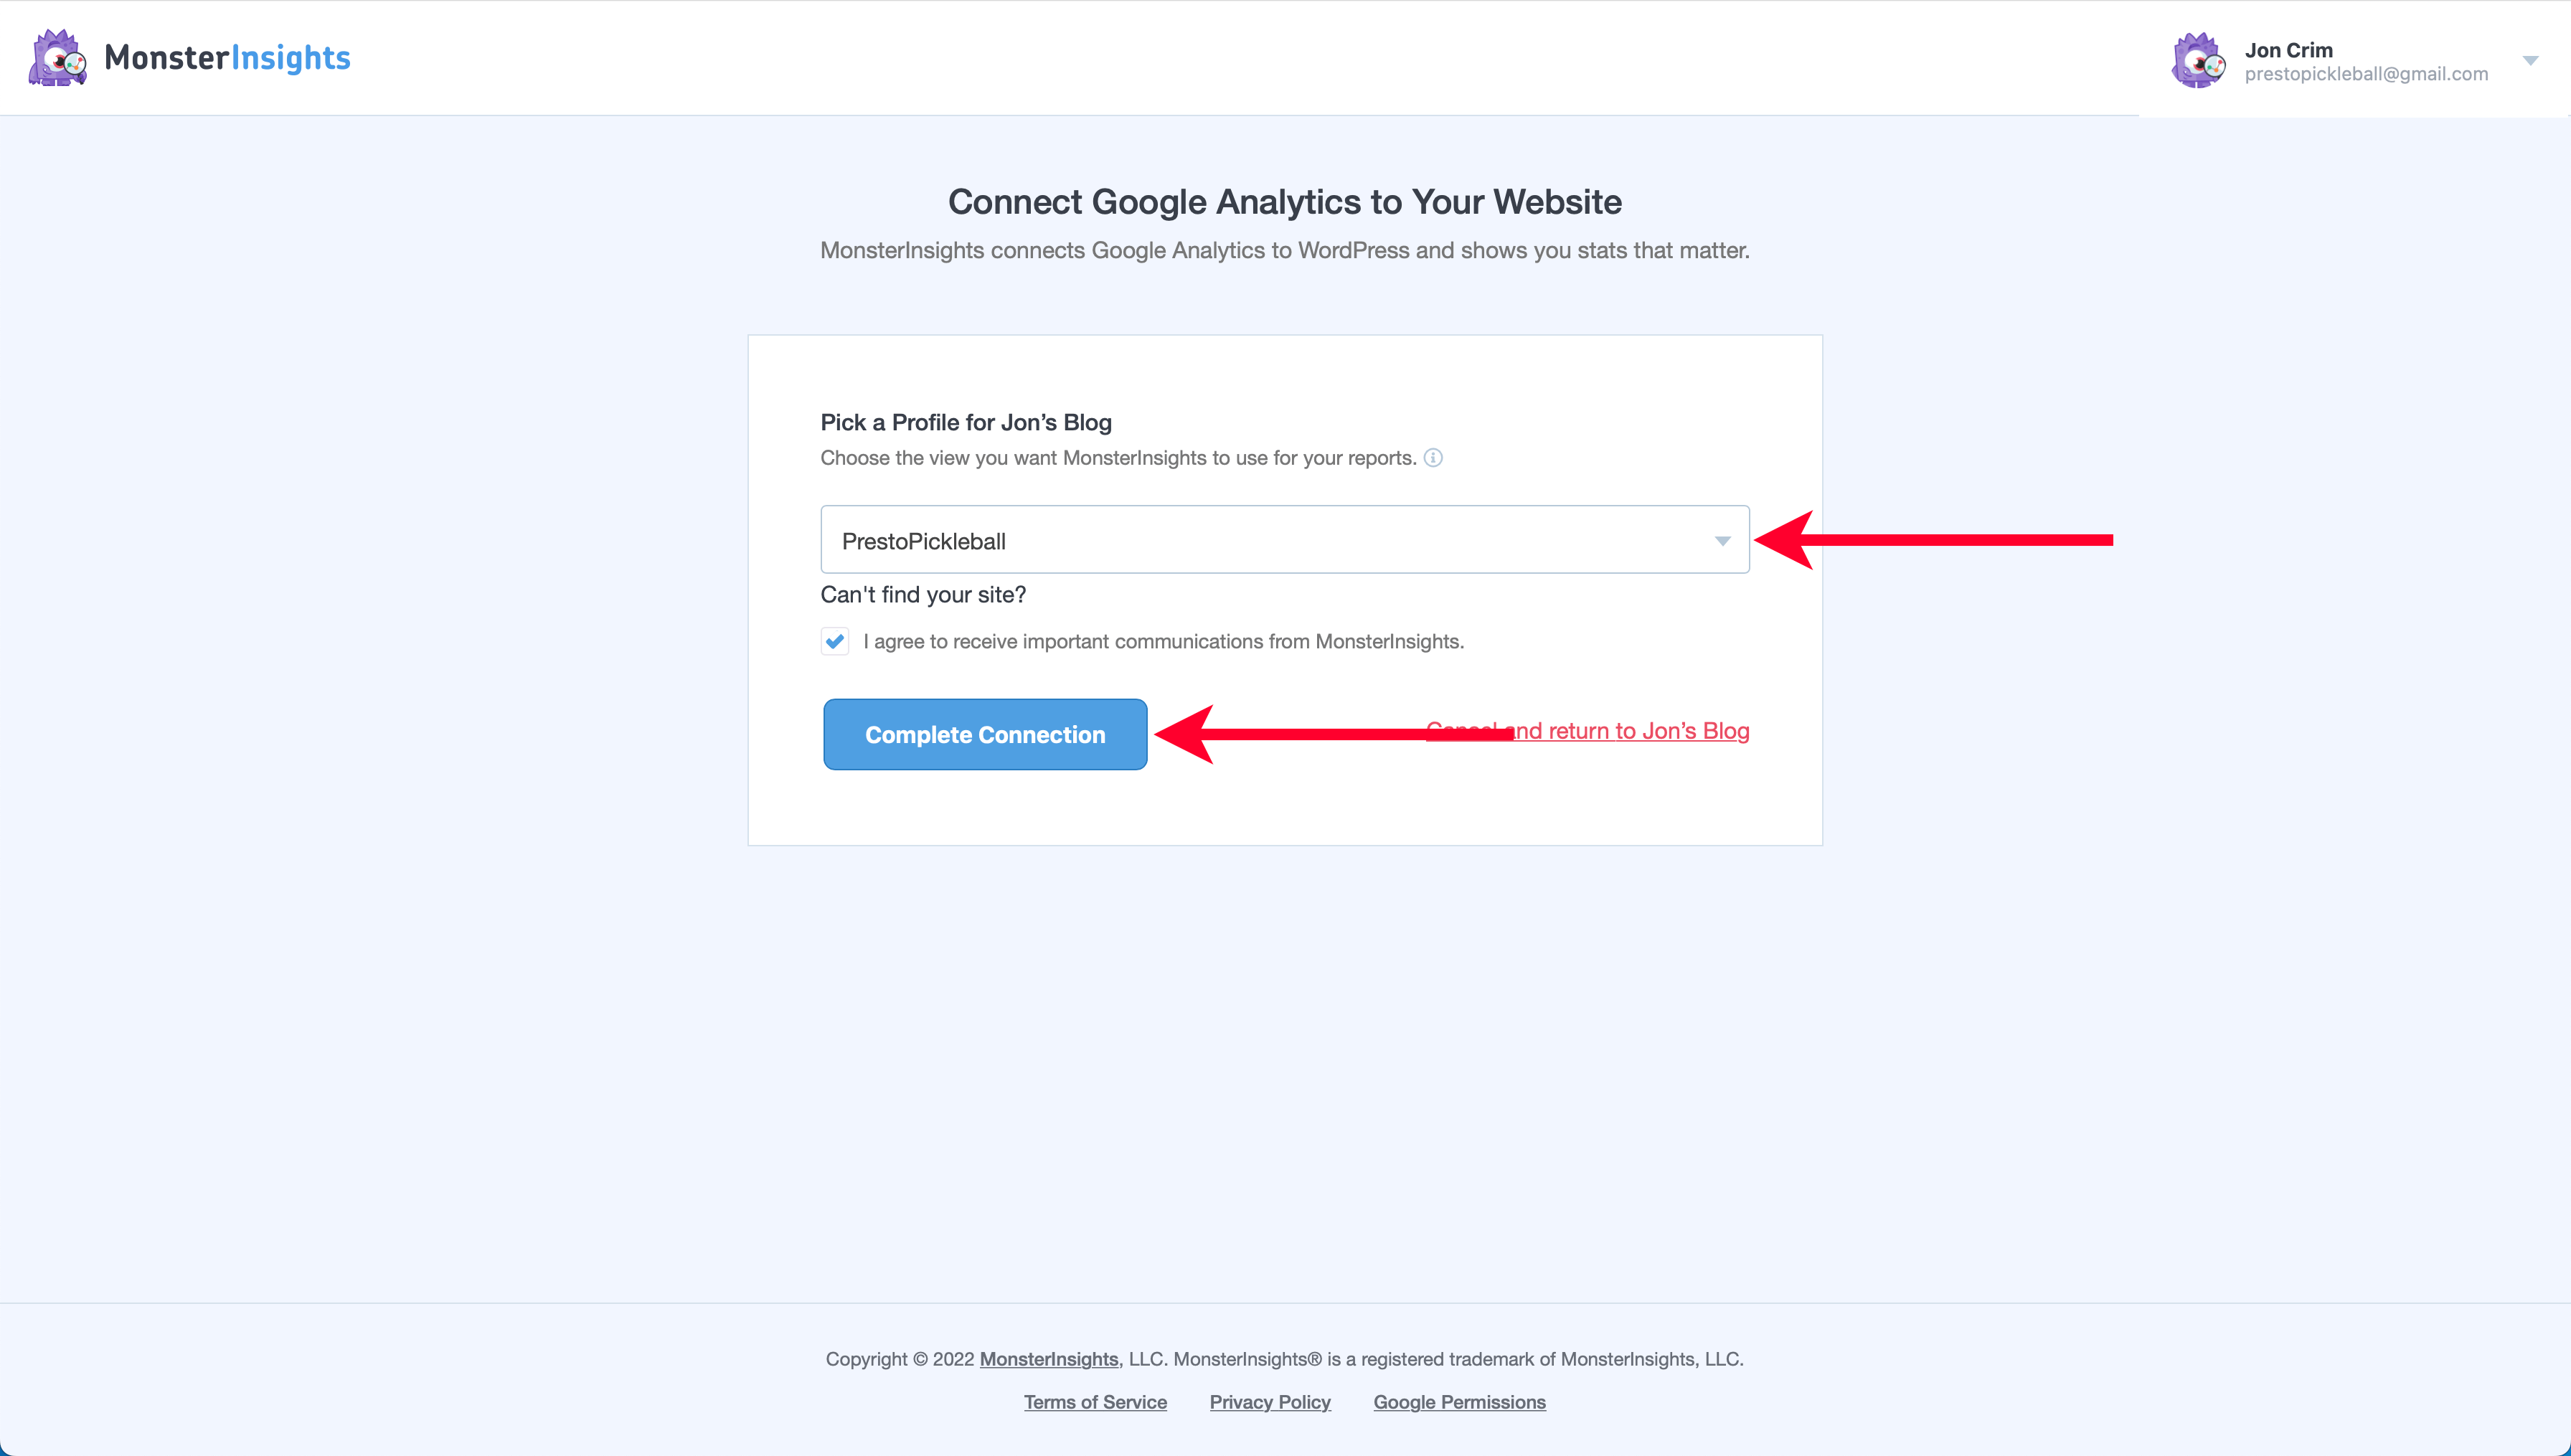
Doing so will bring you back to the MonsterInsights setup wizard with the “Profile” you created for Google Analytics selected in the dropdown. Now, click “Complete Connection.”
Once authenticated, you’ll arrive at a “Recommended Settings” setup.
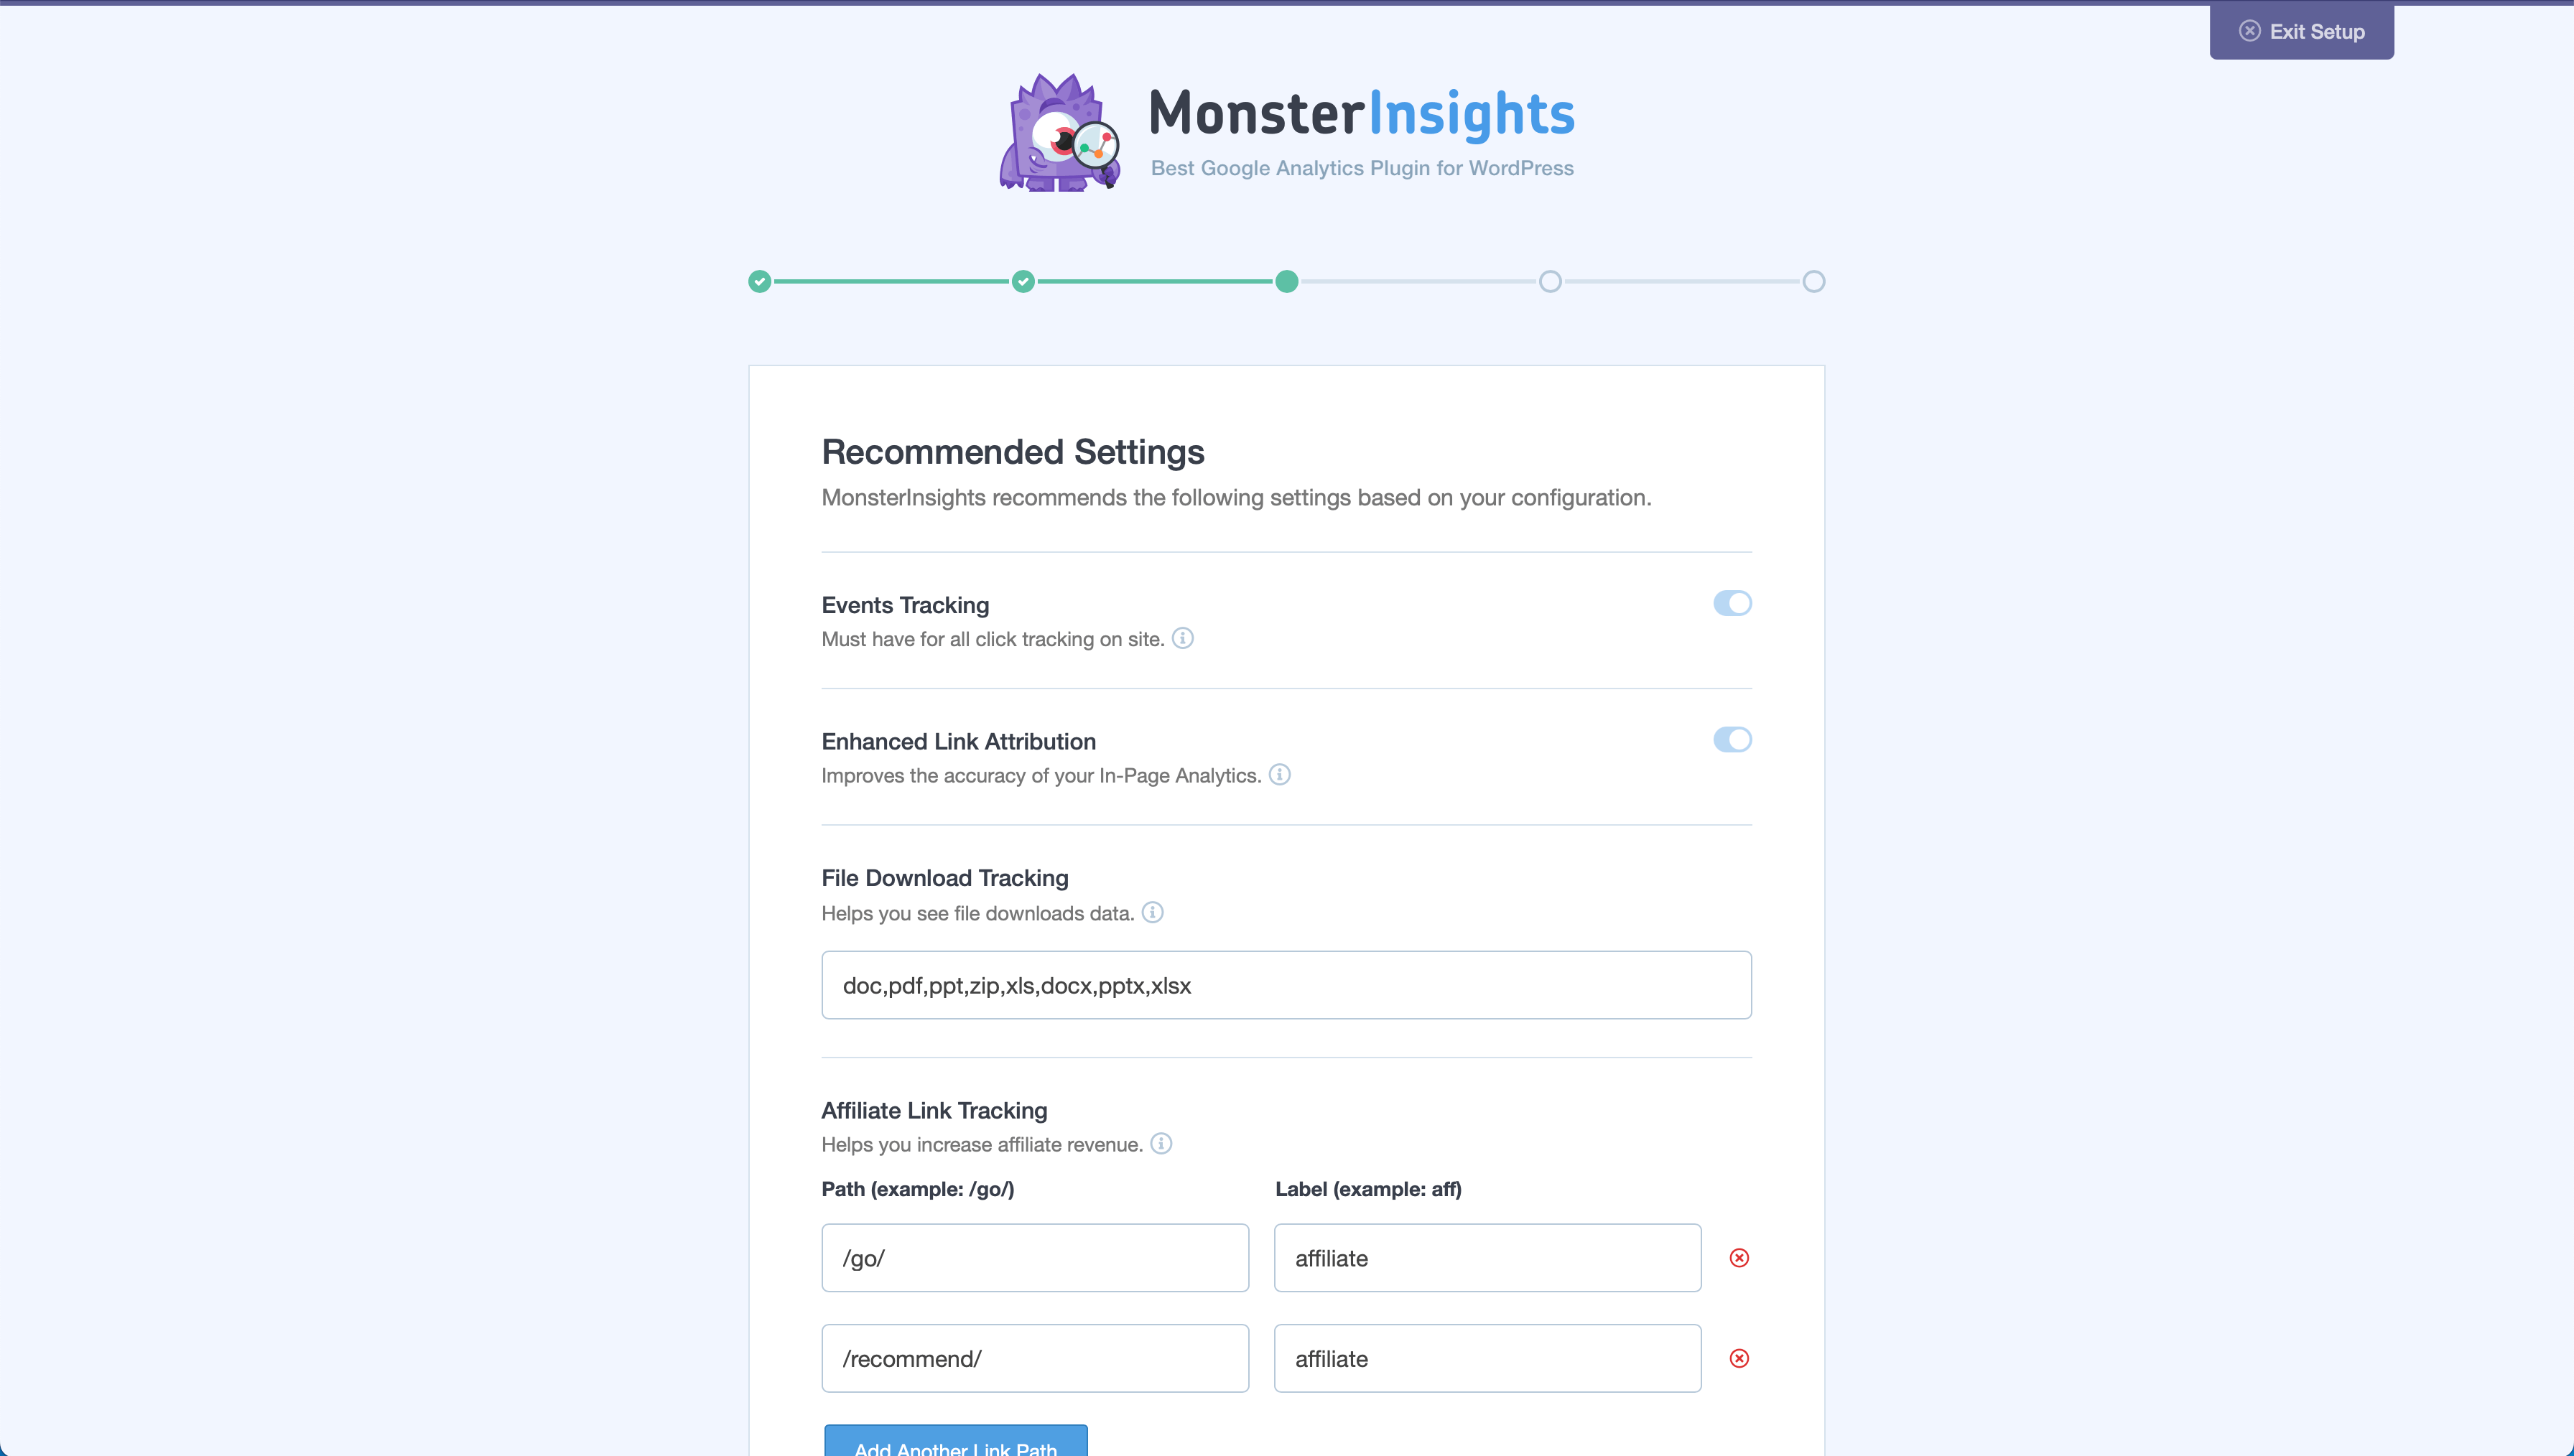
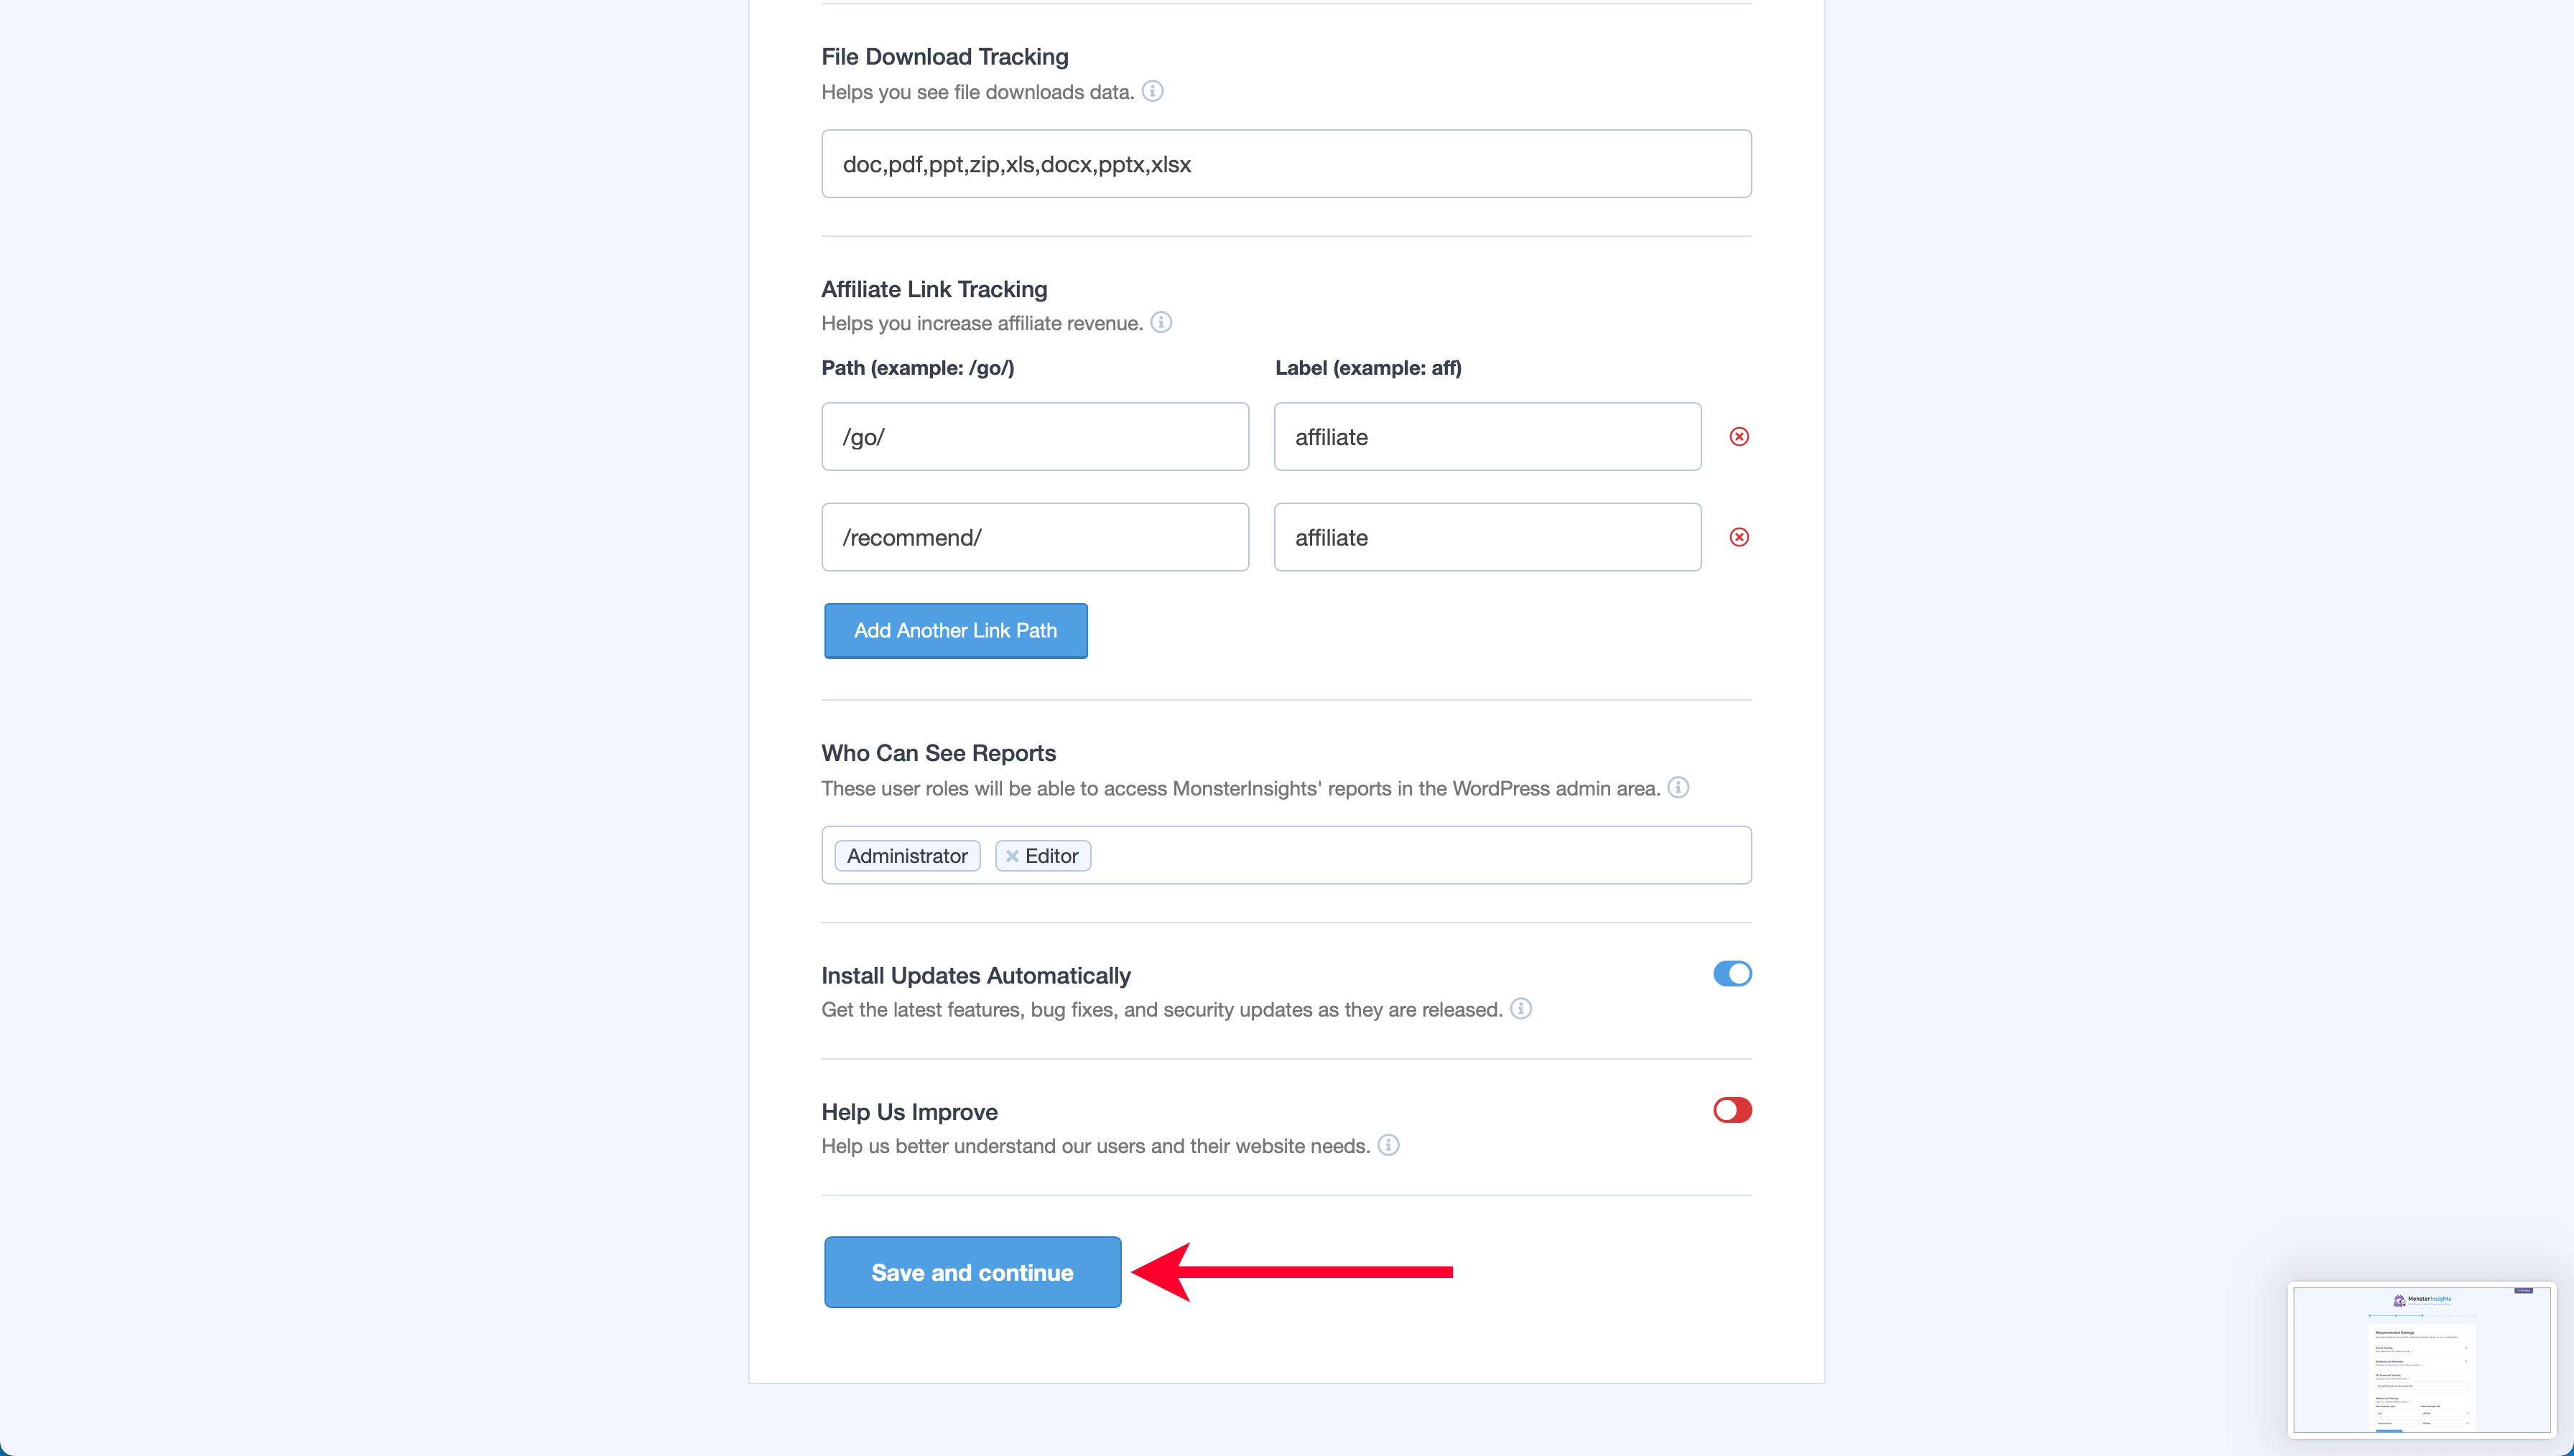
Scroll to the bottom and click “Save and Continue.”
In the next step for enabling features, we will uncheck the “All in One SEO Toolkit” option.
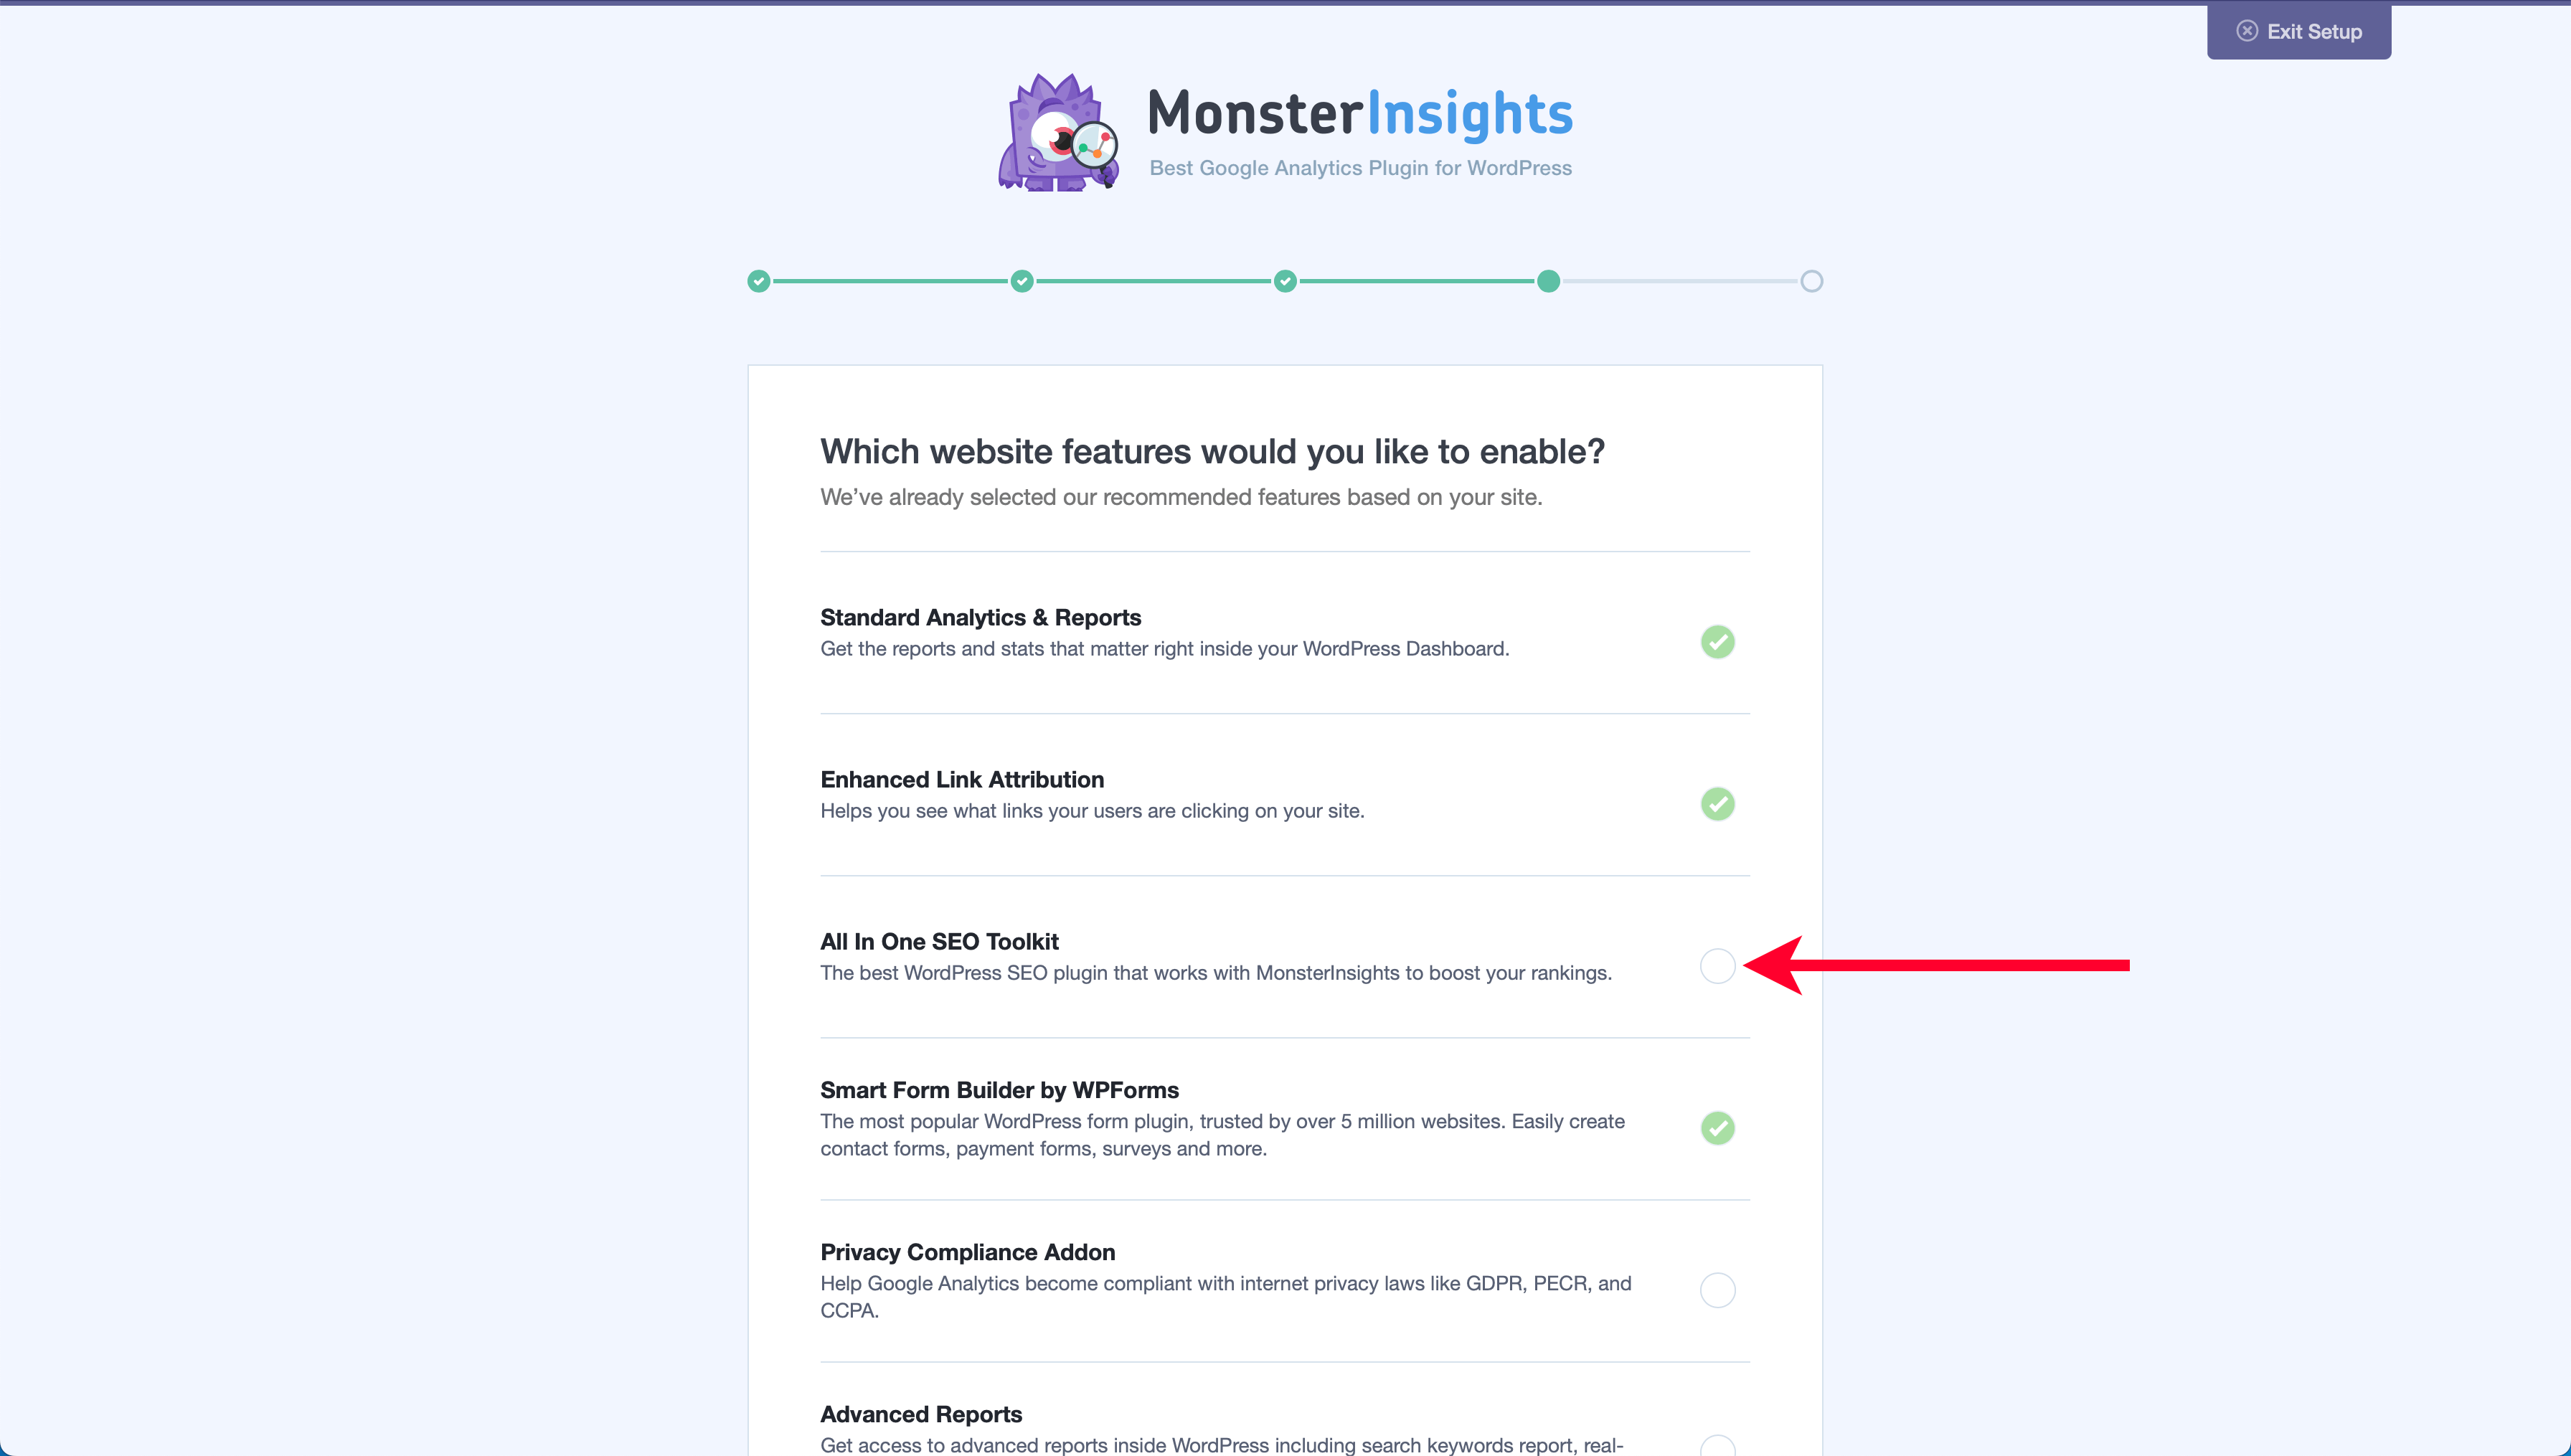
Then scroll to the bottom and click “Continue.”
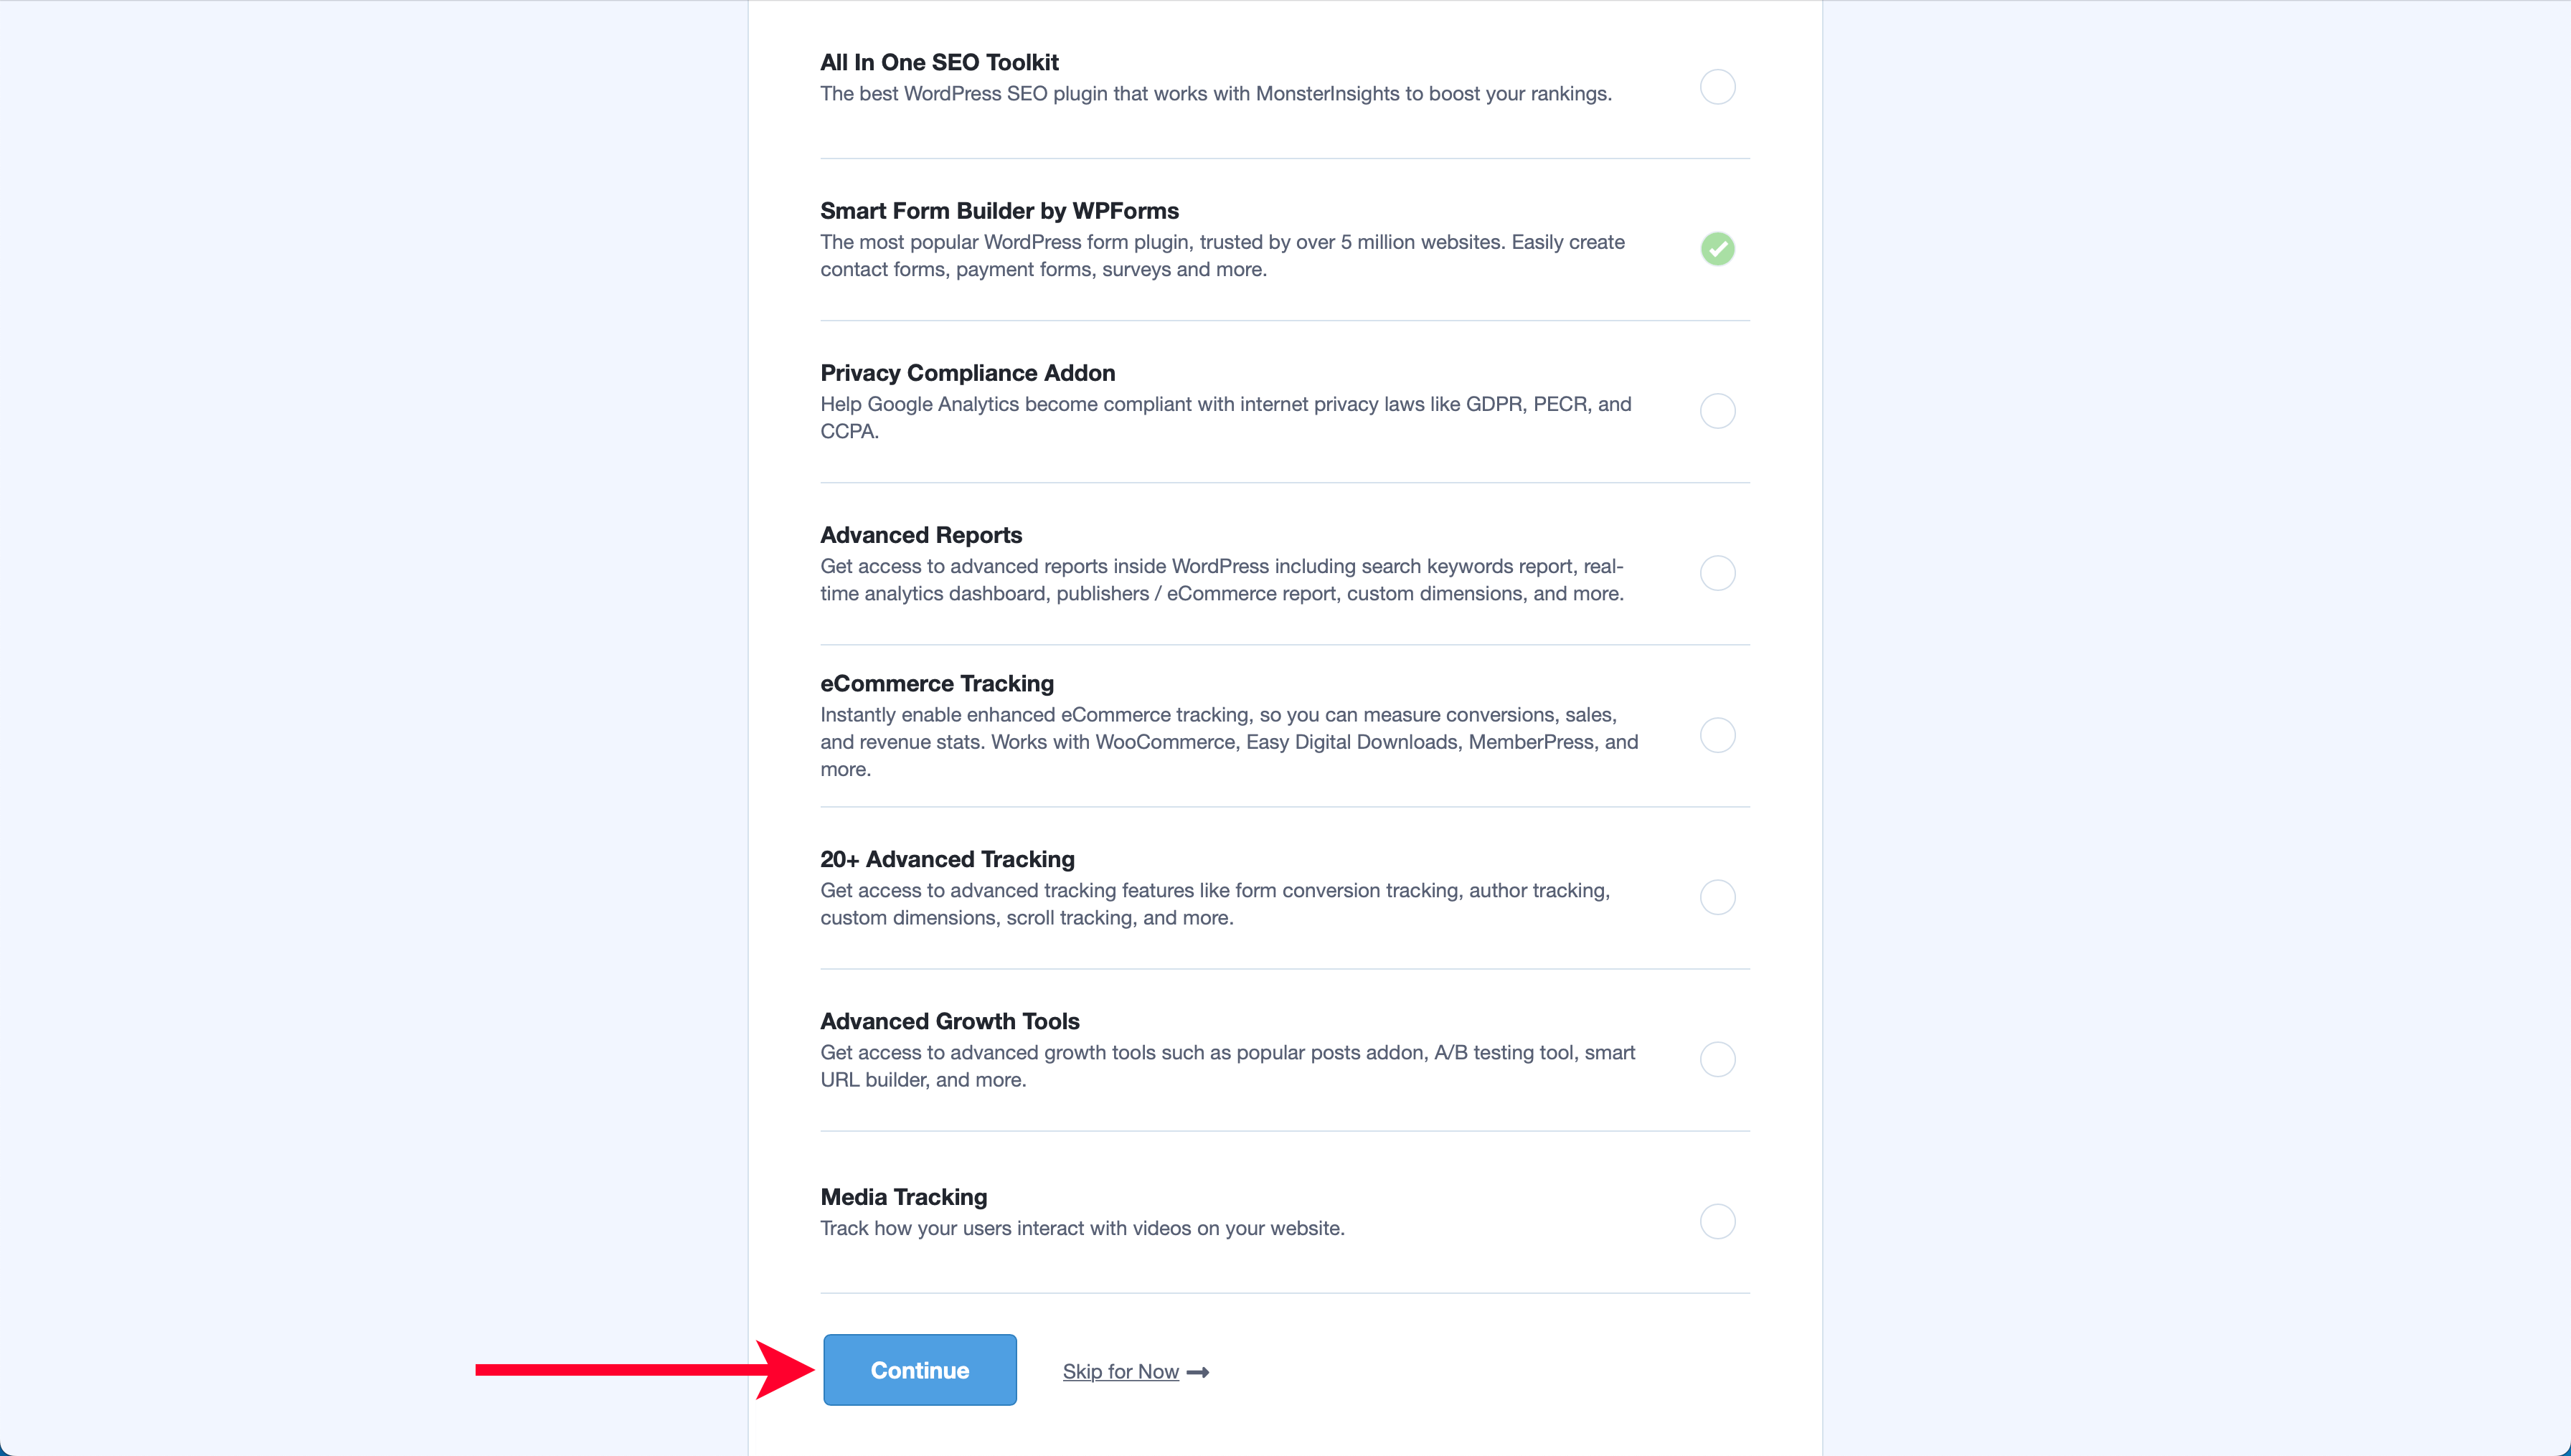
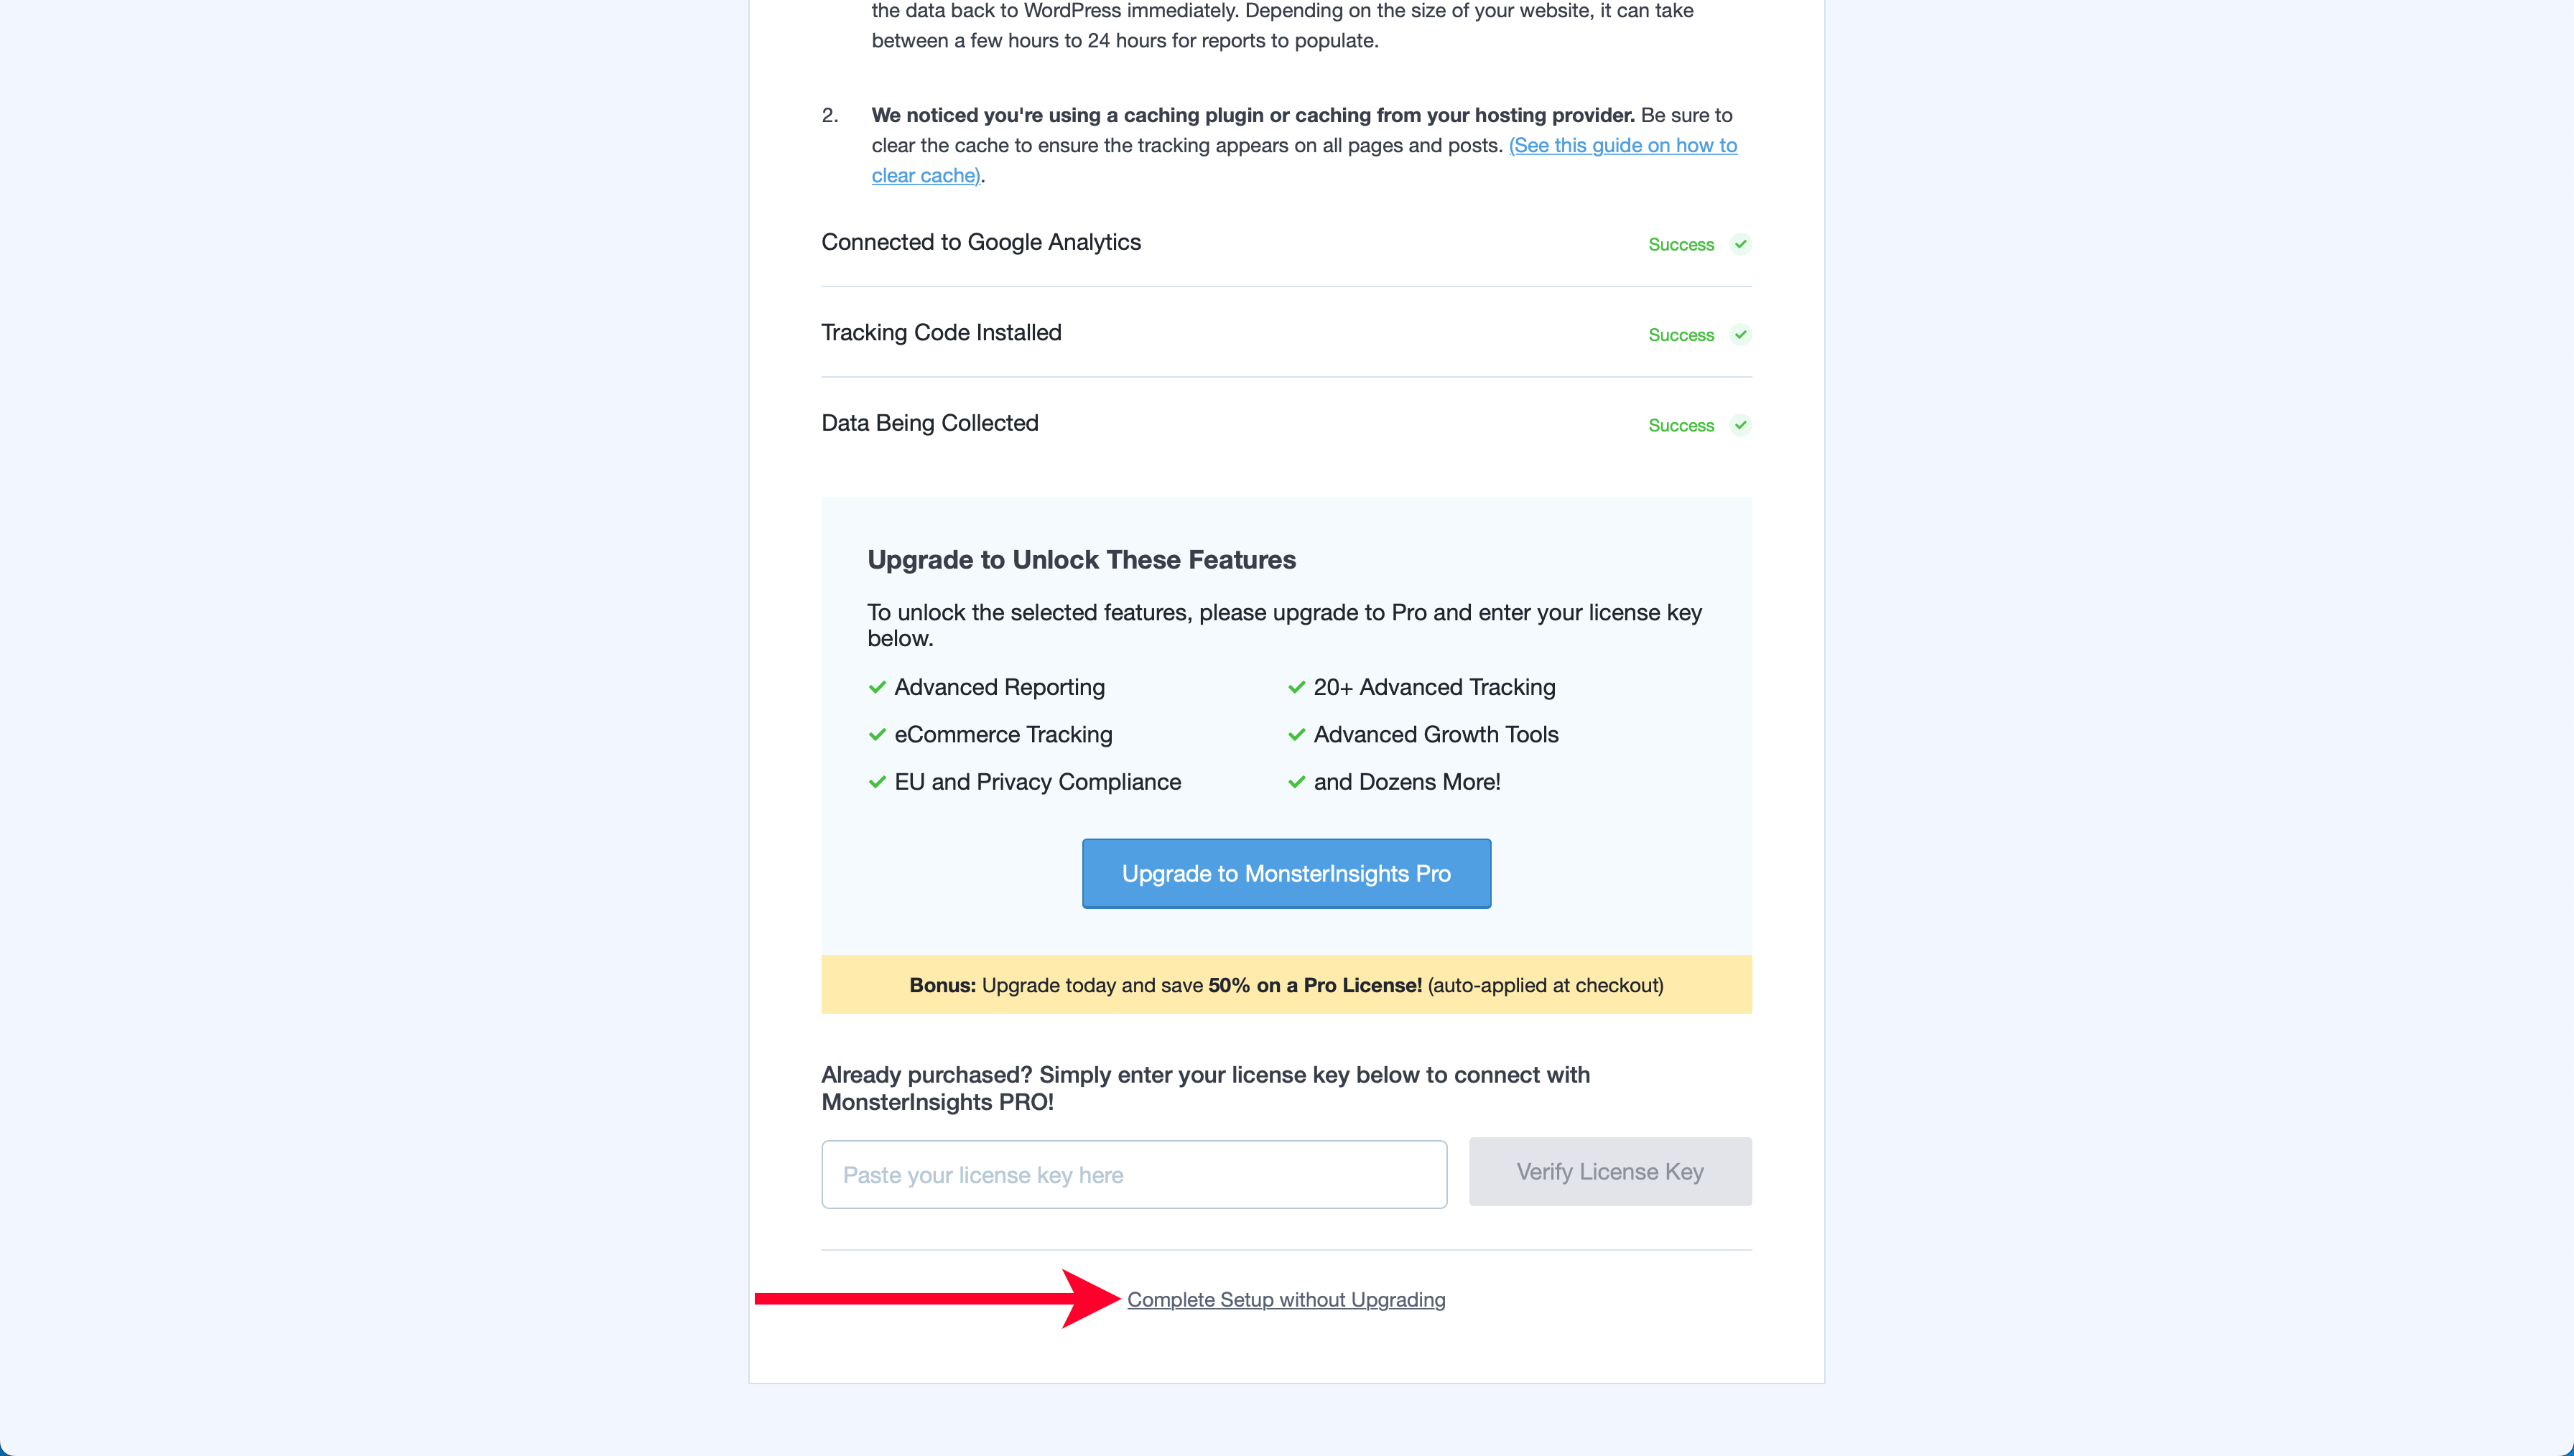
MonsterInsights is now ready to go.

Scroll to the bottom of the confirmation screen and click the link to “Complete Setup without Upgrading,” which will take you back to your WordPress account.
Nice work! You’ve set up your website to track with Google Analytics.
Step 9: Create Your First Pages
To give your website a professional touch, we’re going to create a few pages that I’d encourage you to have on your website at a minimum when first starting.
About Page
An about page gives visitors a short introduction to who you are and why you created your website. Doing so brings transparency and helps breed trust among your visitors, which is highly beneficial for a small business.
To create an about page, we’ll head to the “Pages” menu in your WordPress account, then click the “Add New” button.
Remember, you can always jump back to Step 5 if you need a refresher on how to log into your WordPress account.

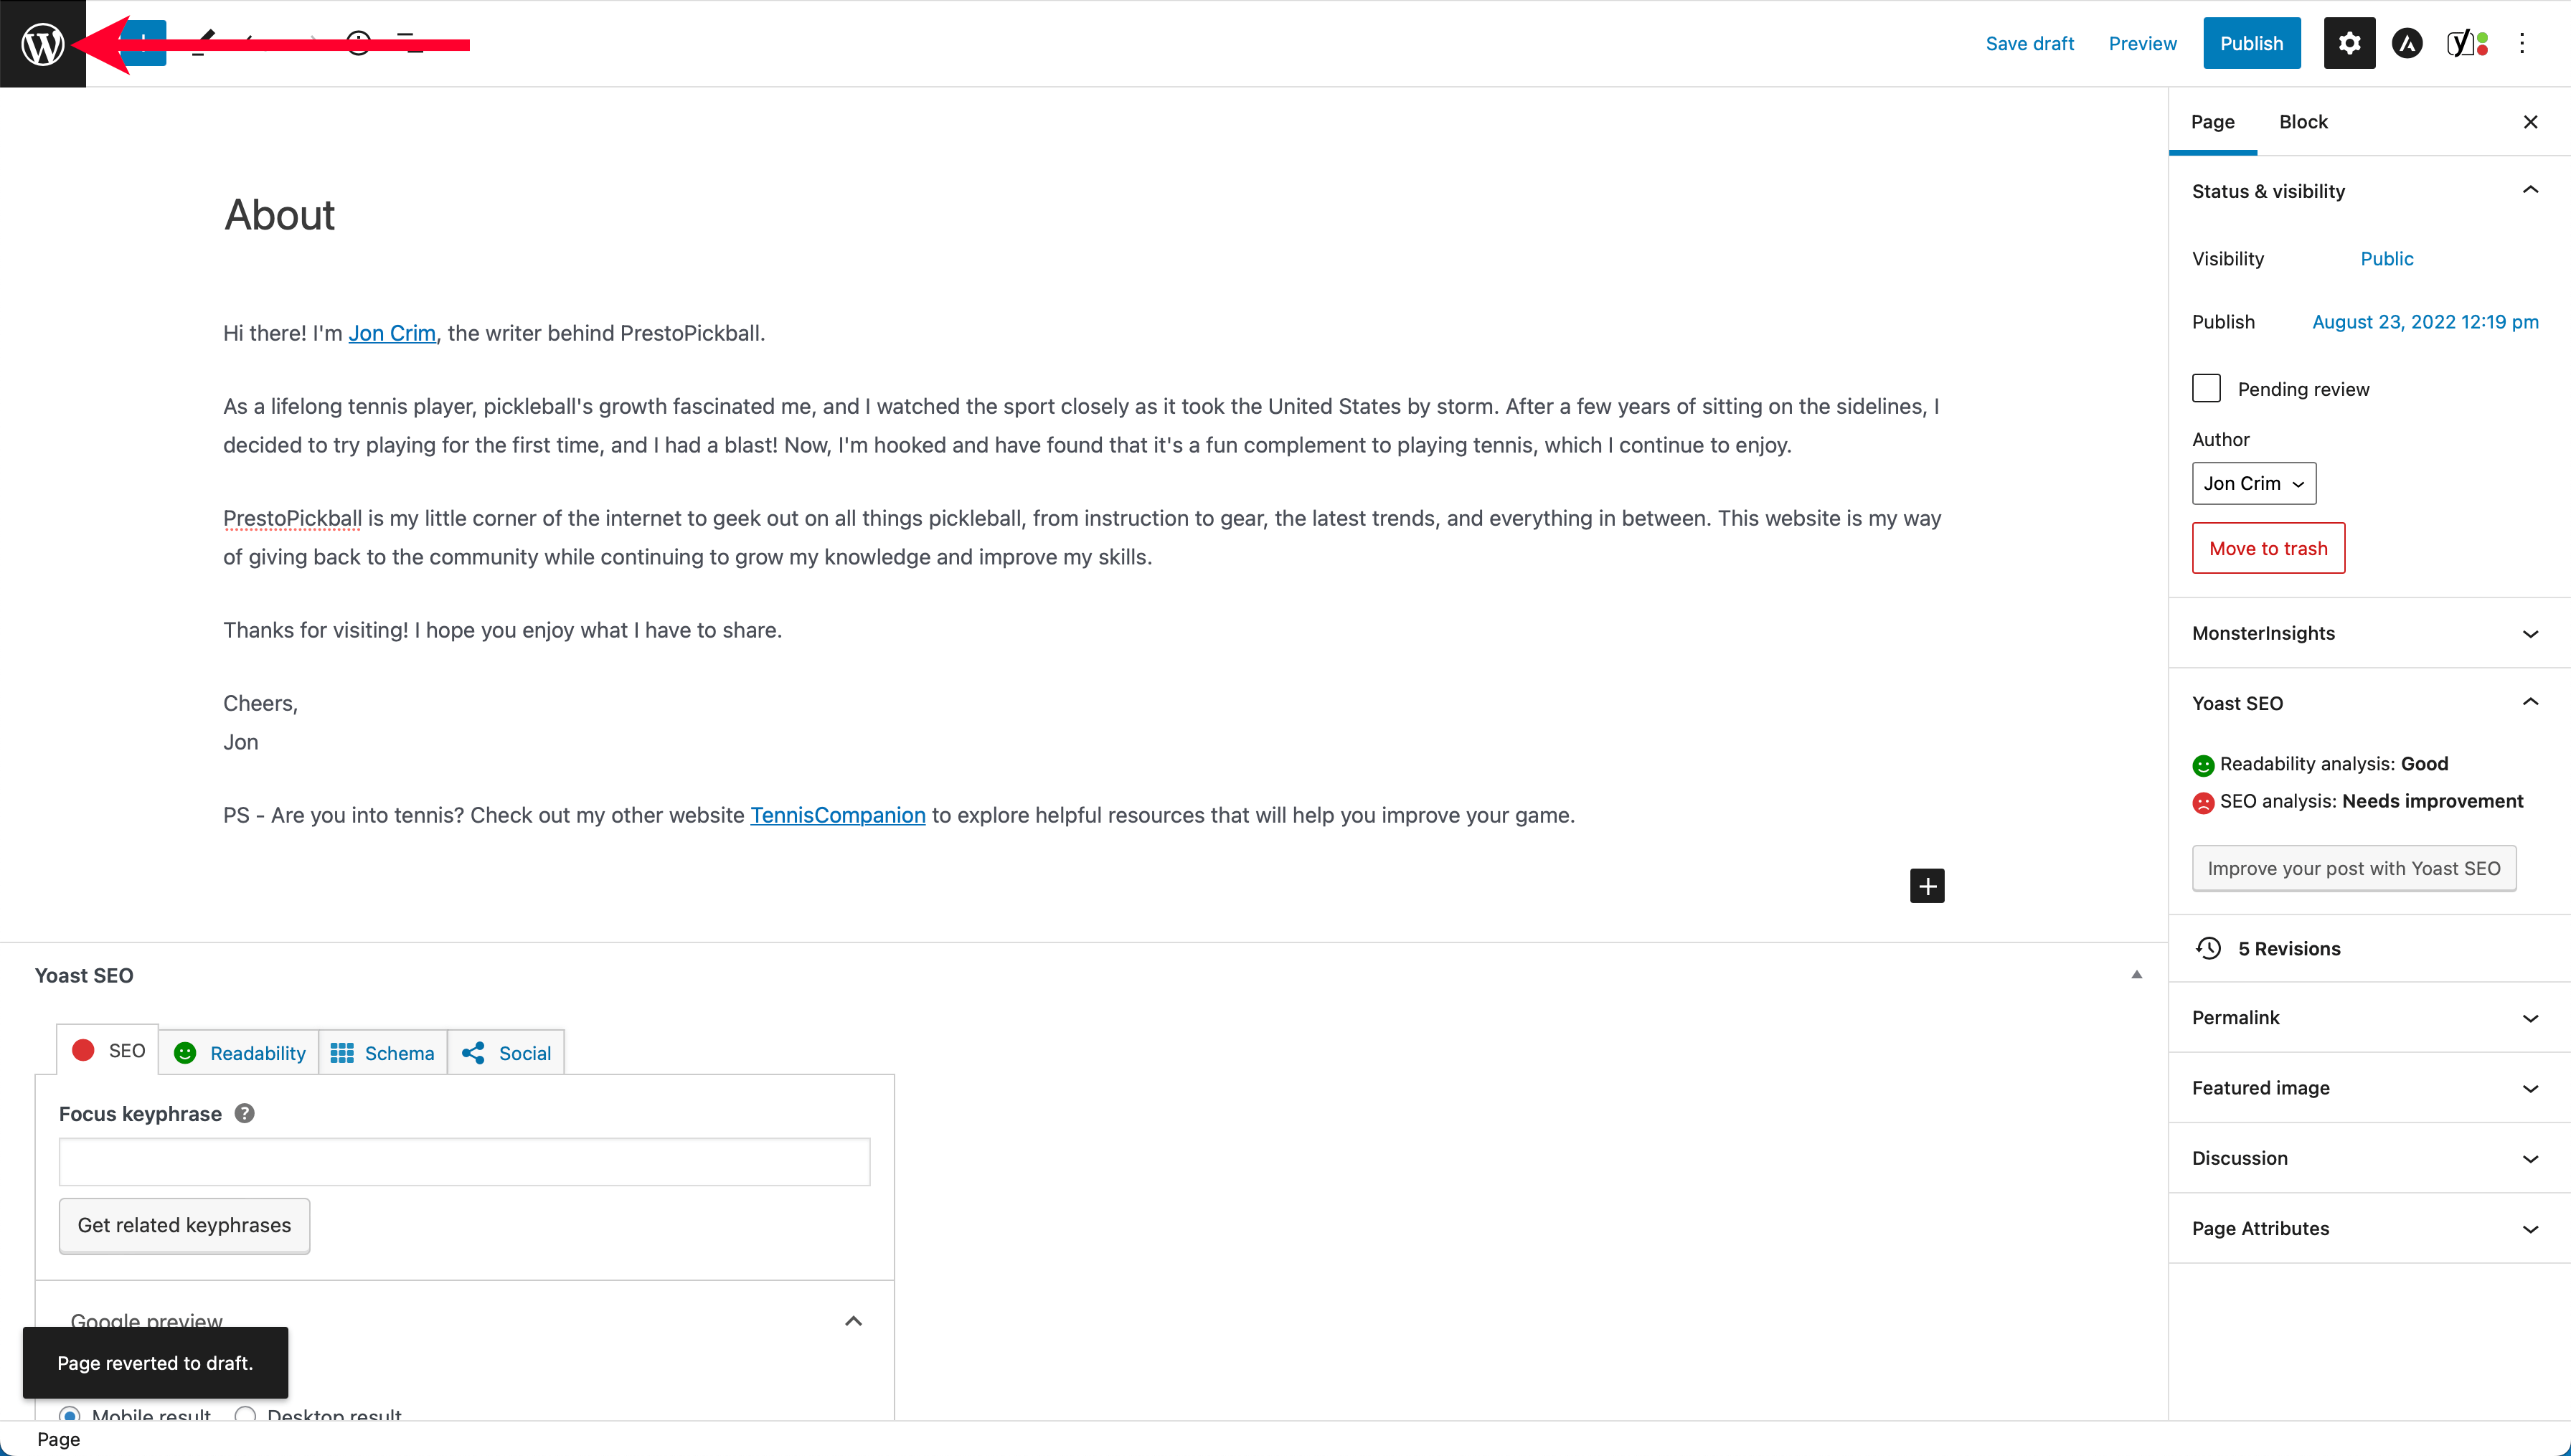
Adding a new page will present you with the WordPress page editor, where you can start by adding a “Title.” To do so, select “Add Title,” then type the word “About.”
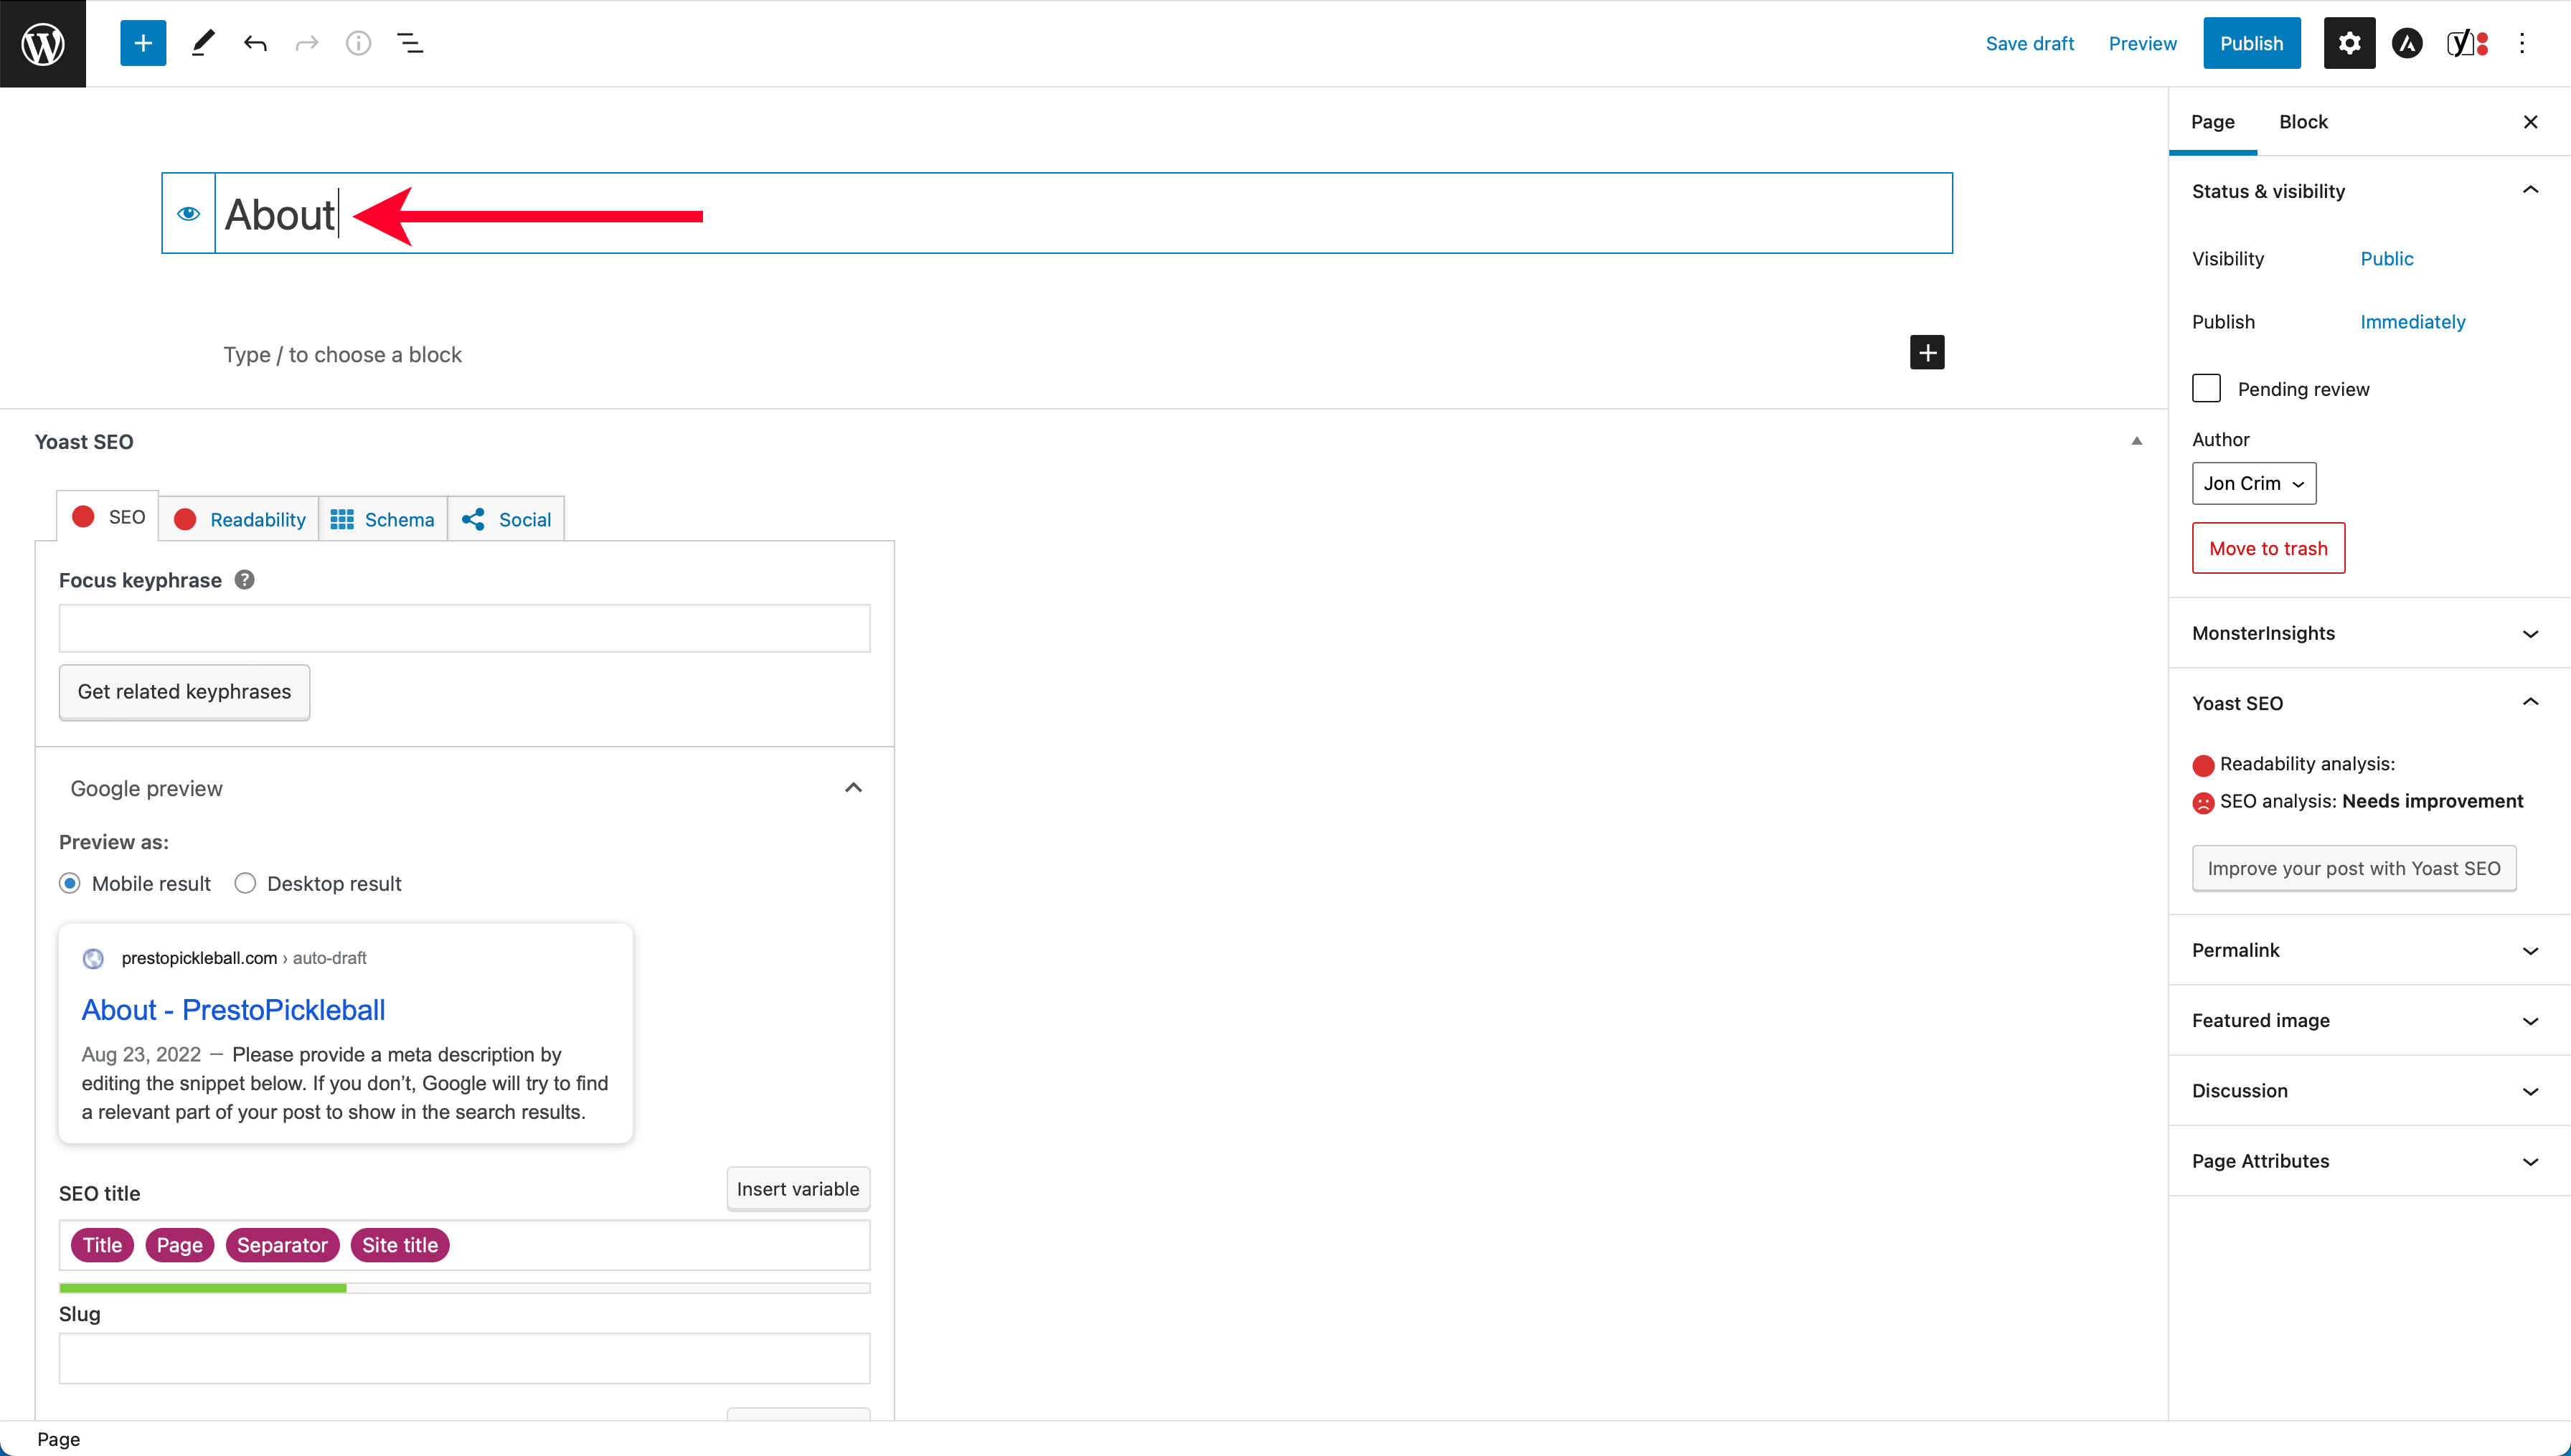
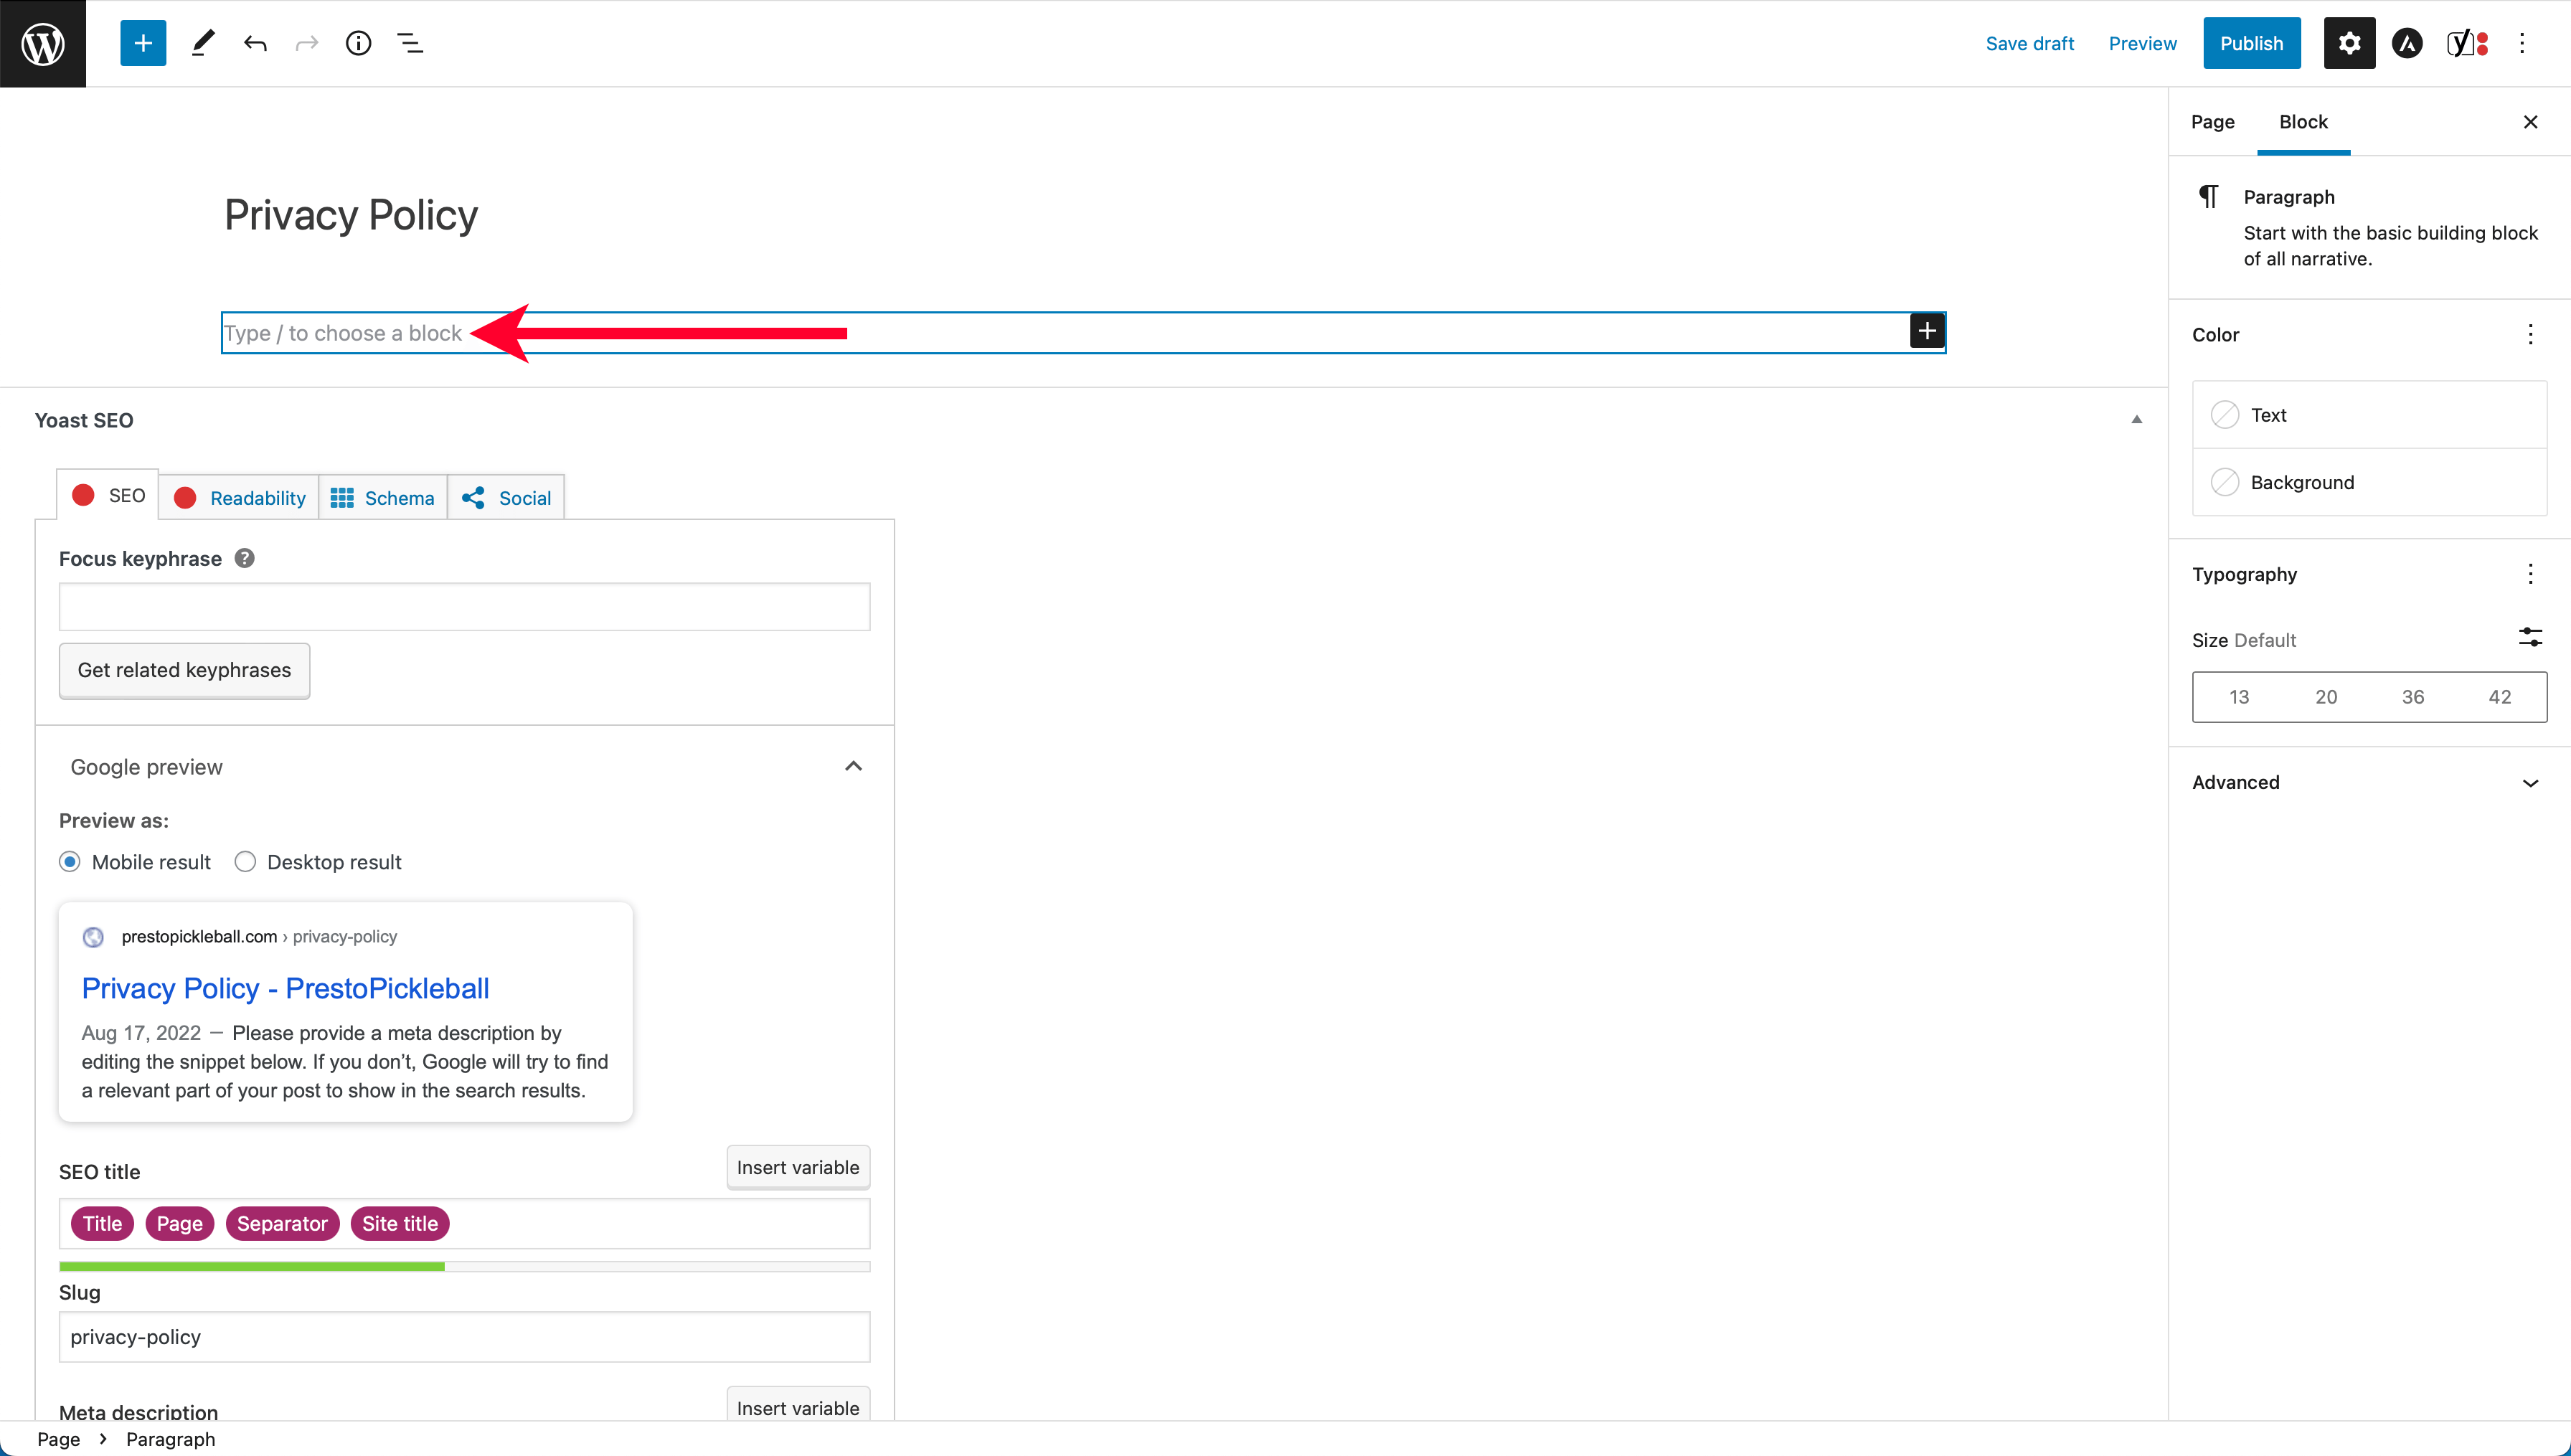
Below the title, you’ll see some help text that says, “Type / to choose a block.” Click that phrase and begin typing a few paragraphs about you and the website you’re creating.
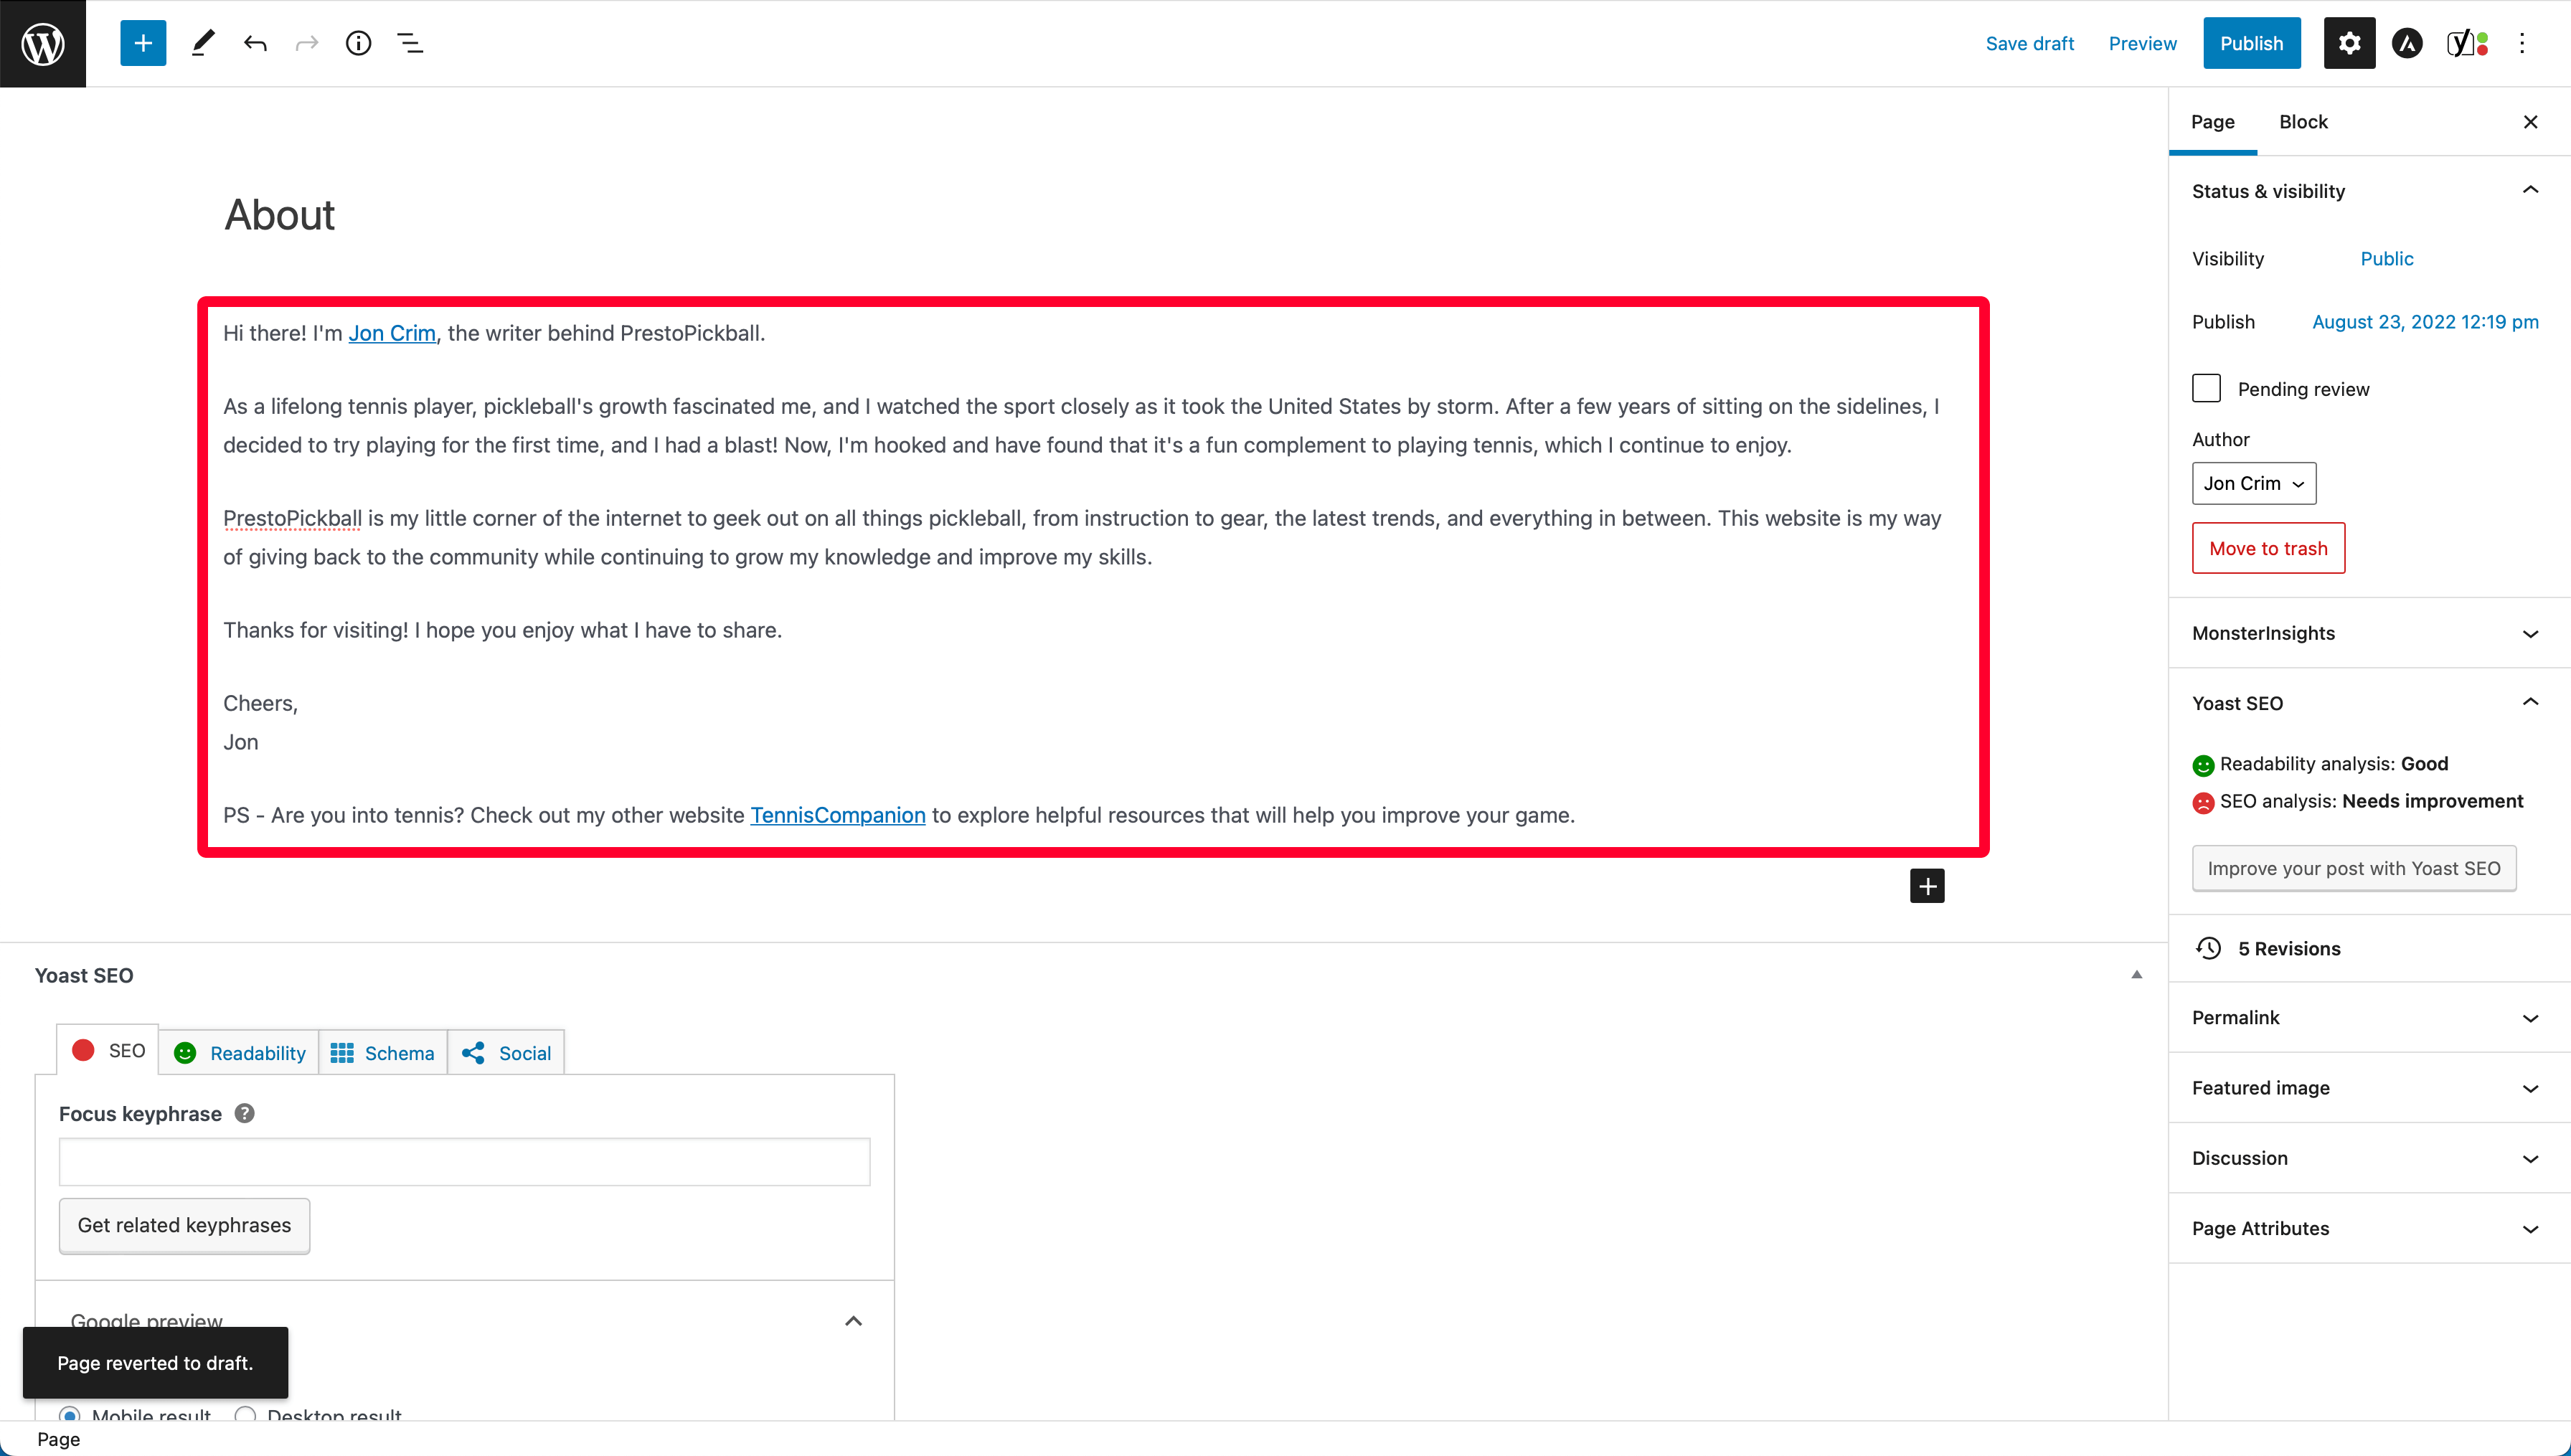
Here are a few questions you might consider asking yourself when writing a few paragraphs about yourself.
- Who are you?
- Why did you start this website? (Leave out the “I want to make money” part and focus on the value you hope to bring.)
- Why are you qualified to talk about the subject matter for your website? If you don’t have experience, why are you interested in creating a website on your selected topic?
Keep it simple to start. You can come back and edit it anytime. Once you finish writing your about page content, click the “Publish” link in the top right corner of the editor to create the page and, when asked, confirm that you’d like to “Publish” the page.

You’re about page is now live on your website! You can visit the following URL to bring up the page:
To return to your WordPress account, click the WordPress logo in the upper right corner of the page editor.
Next up, we’ll tackle your Privacy Policy page.
Privacy Policy Page
When you own a website, it’s critically important to let visitors know how and why you’re collecting data. Here are the top three reasons you need one on your business website.
- It’s required by law in most cases
- Many third-party services require it, including Google Analytics
- Users deserve to know how their information is used
For the best result, I’d recommend using a trusted privacy policy generator to help you create one quickly and easily.
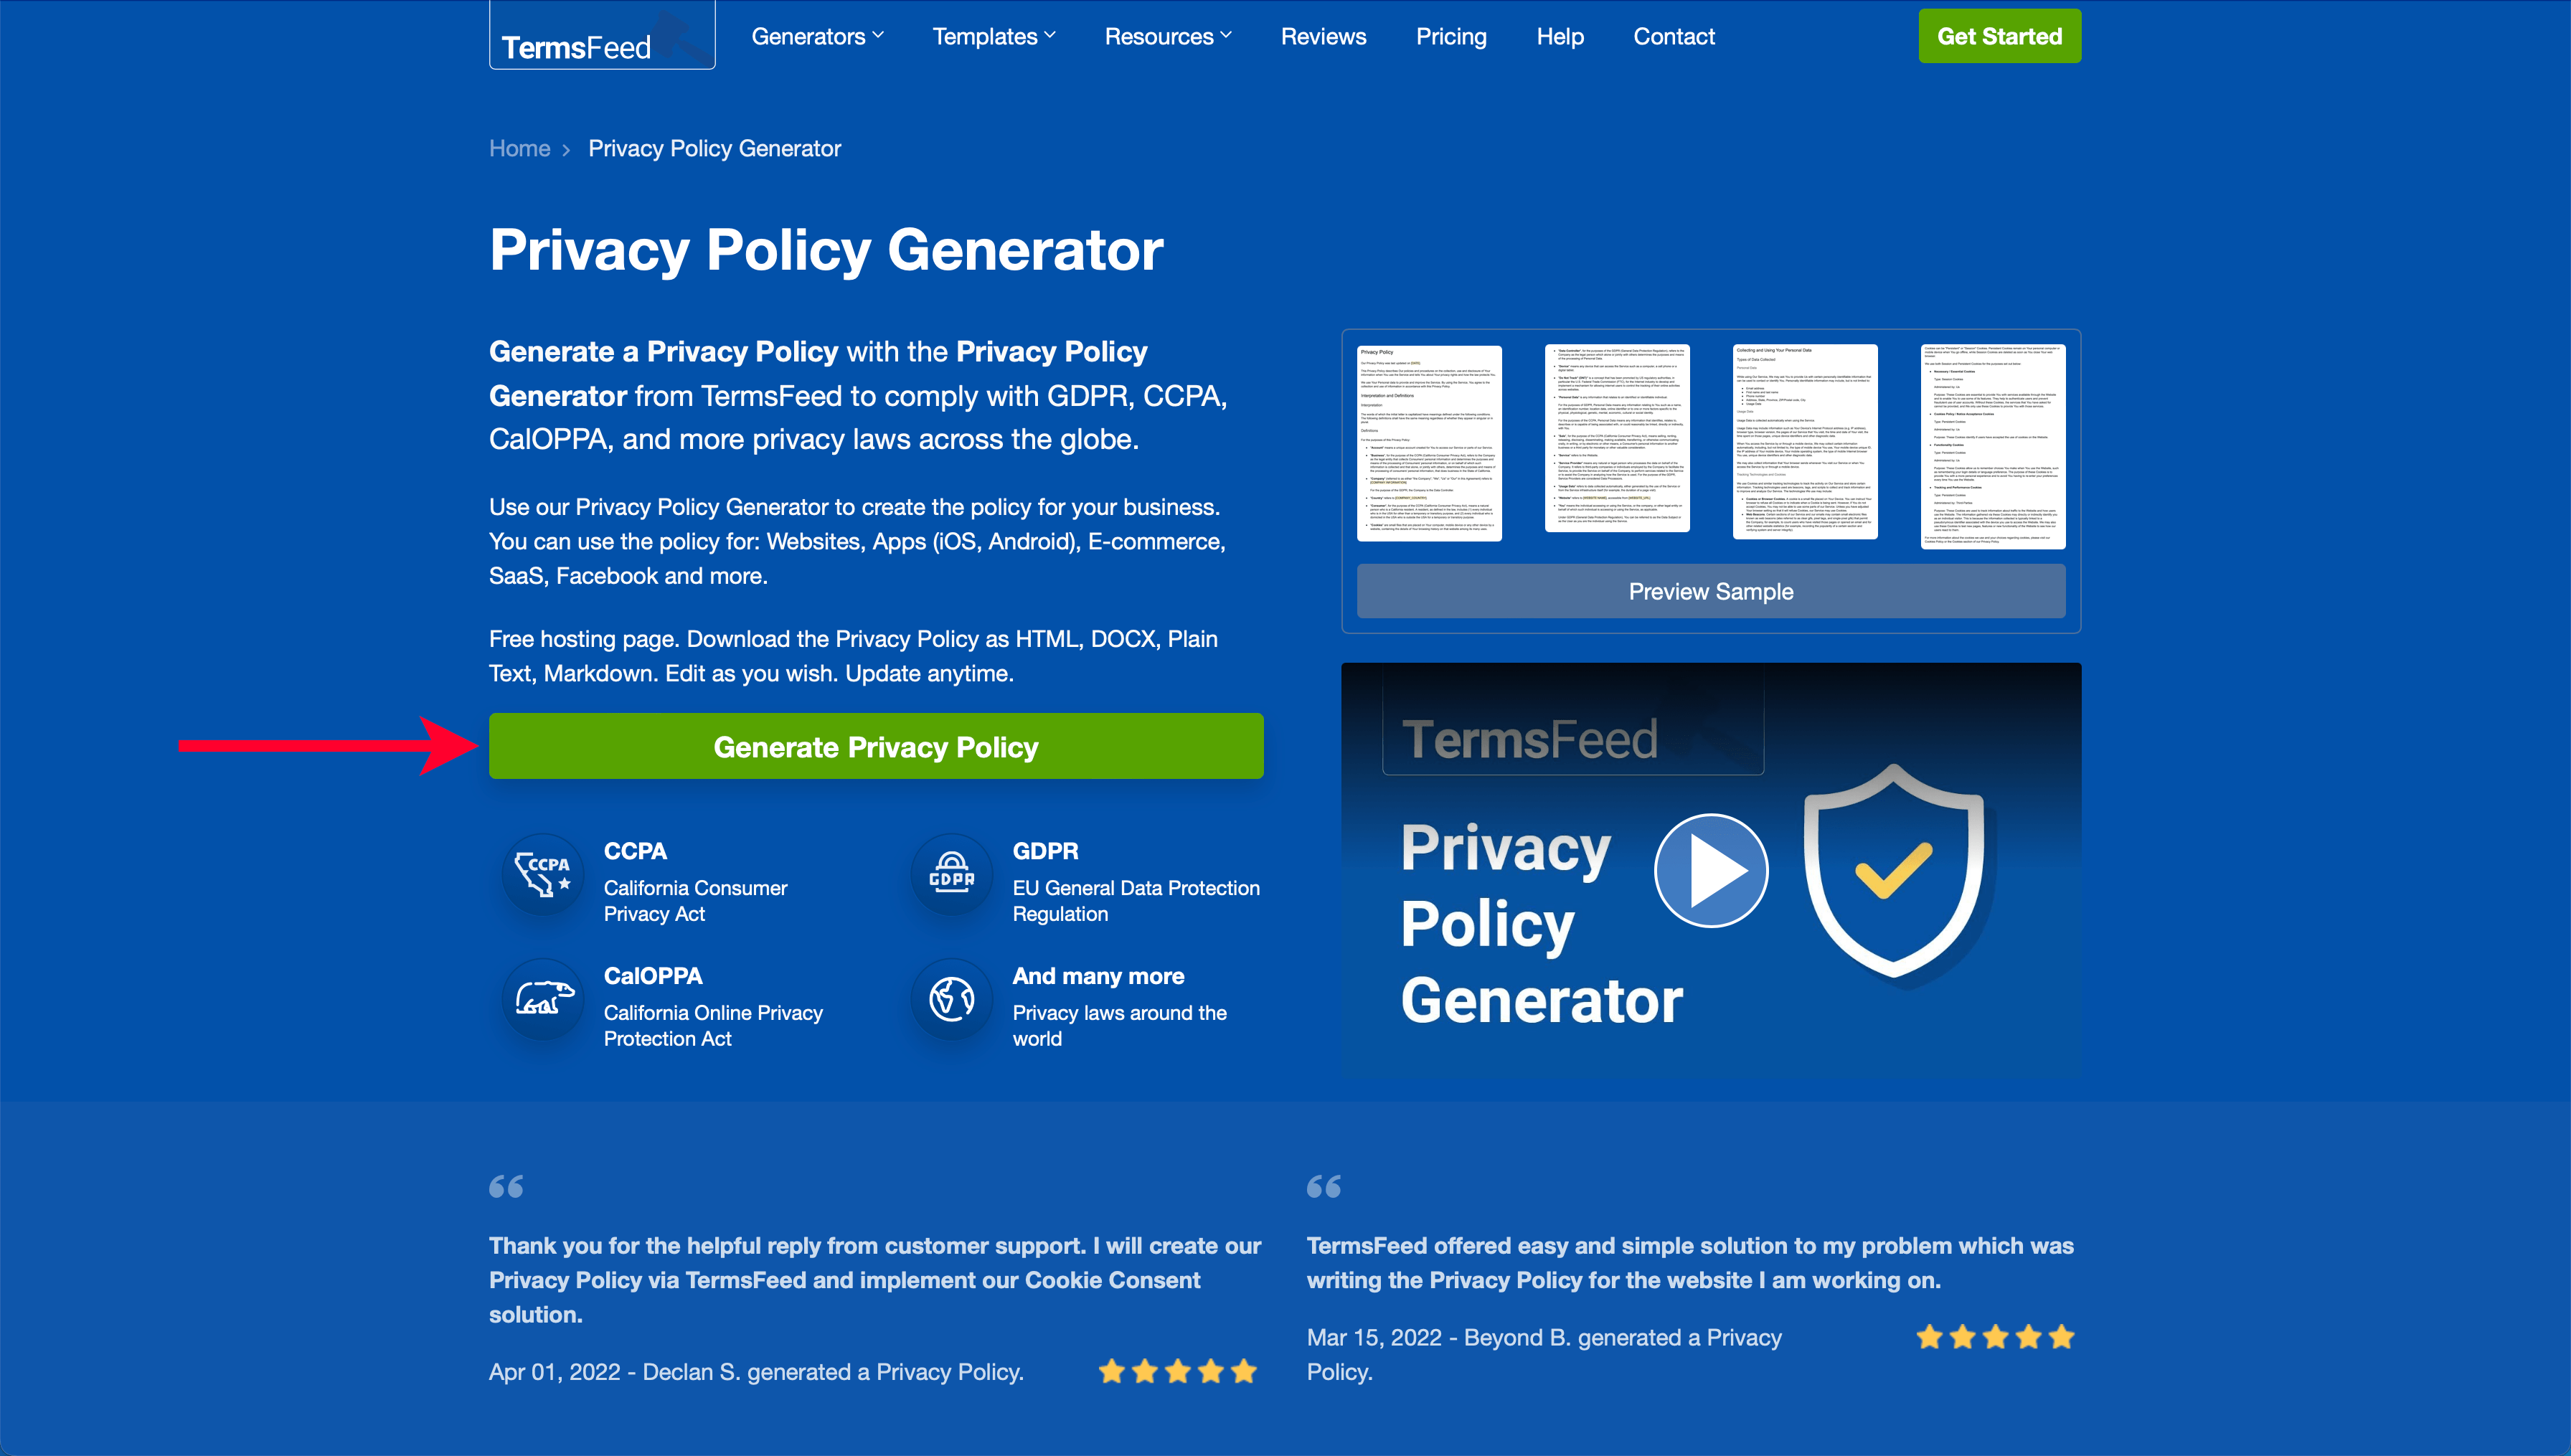
My favorite that I use for all my websites is TermsFeed, so jump to their website, and we’ll walk through creating one together.
When you arrive at the TermsFeed website, click the “Generate Privacy Policy” to start.
On the first step, select “Website,” then click “Next Step.”

In step 2, enter the full URL for your website and your website’s name, then select your country and state. Leave entity type as is, then click “Next Step.”

For step 3, we’ll start by answering the first question. “What kind of personal information do you collect from users?” We’ll click all the boxes except the “Social Media Profile Information.”

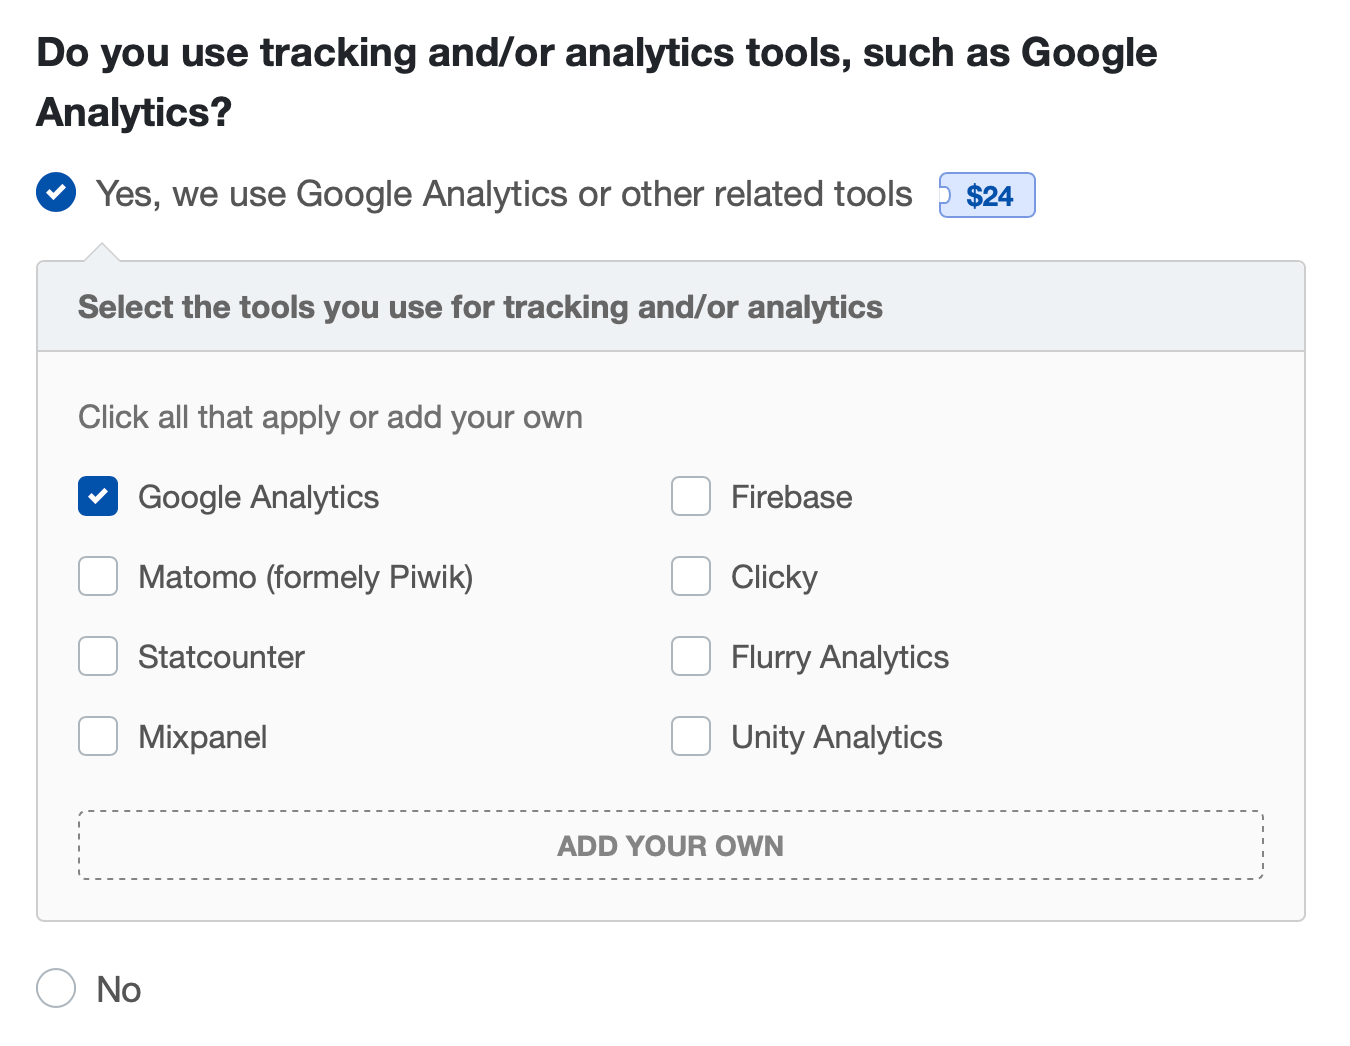
Select “Yes” for “Do you use tracking and/or analytics tools, such as Google Analytics?” Then we’ll click the “Google Analytics” checkbox.
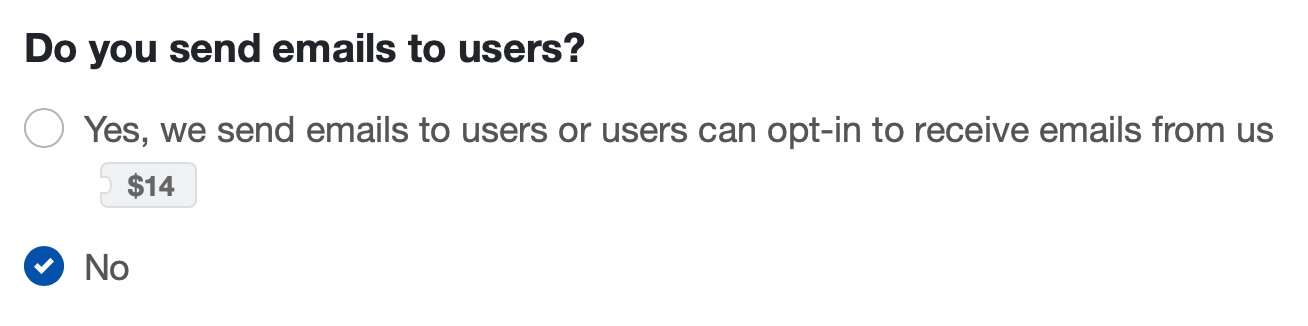
Select “No” for “Do you send emails to users?” Eventually, you’ll be doing this, but for now, we don’t need to pay for it.
Select “No” for “Do you show ads?” Again, we’ll do this eventually, but we can worry about this later.

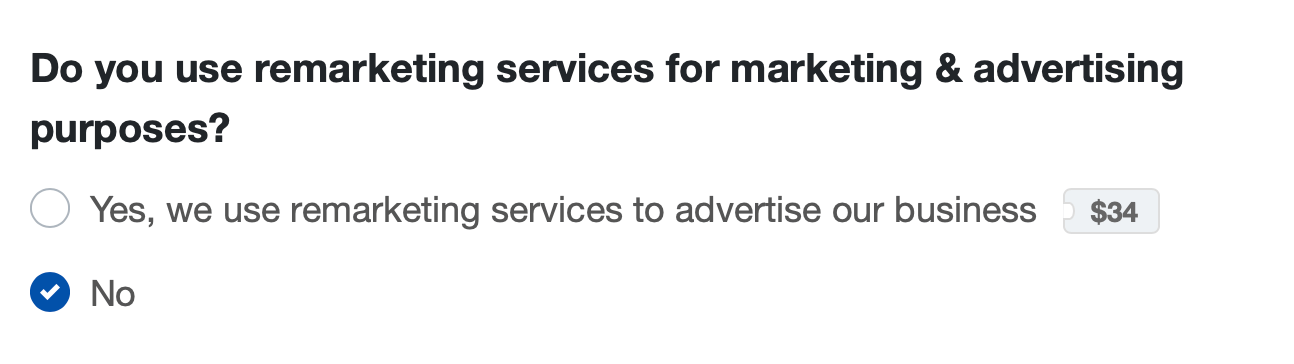
Select “No” for “Can users pay for products or services?” After, select “No” for “Do you use remarketing services for marketing & advertising purposes?”
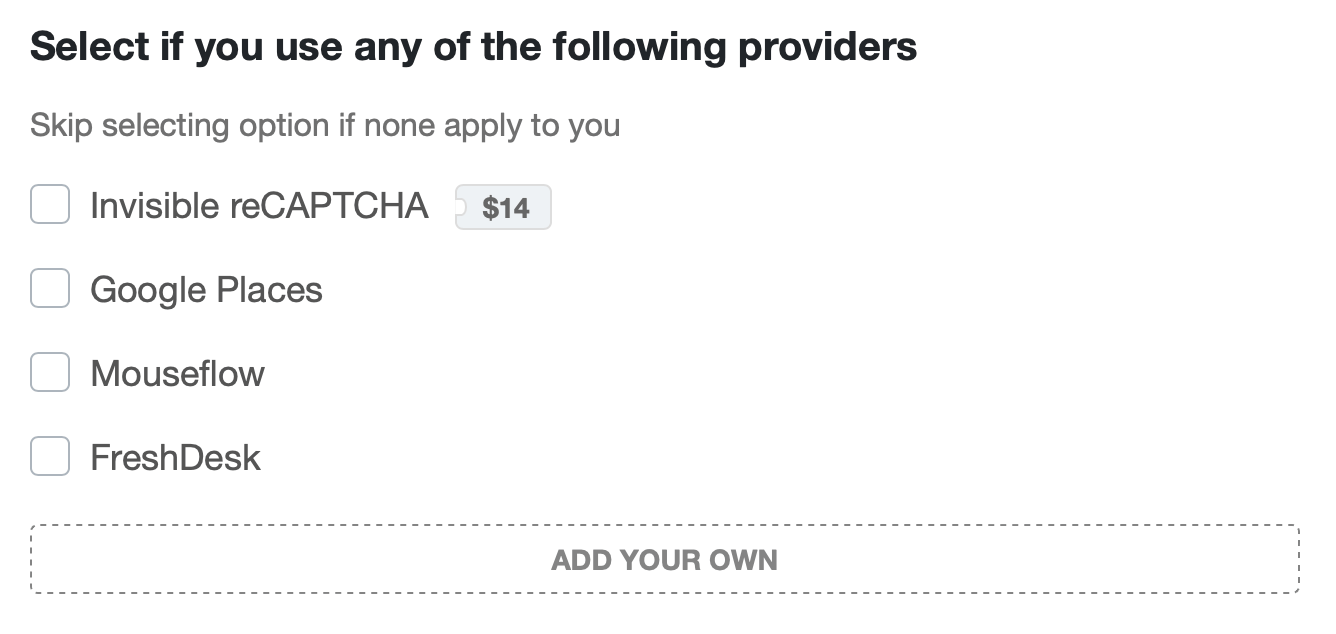
We’ll leave “Select if you use any of the following providers” blank.
Select “Yes” for “Do you want your Privacy Policy to include CCPA wording?”

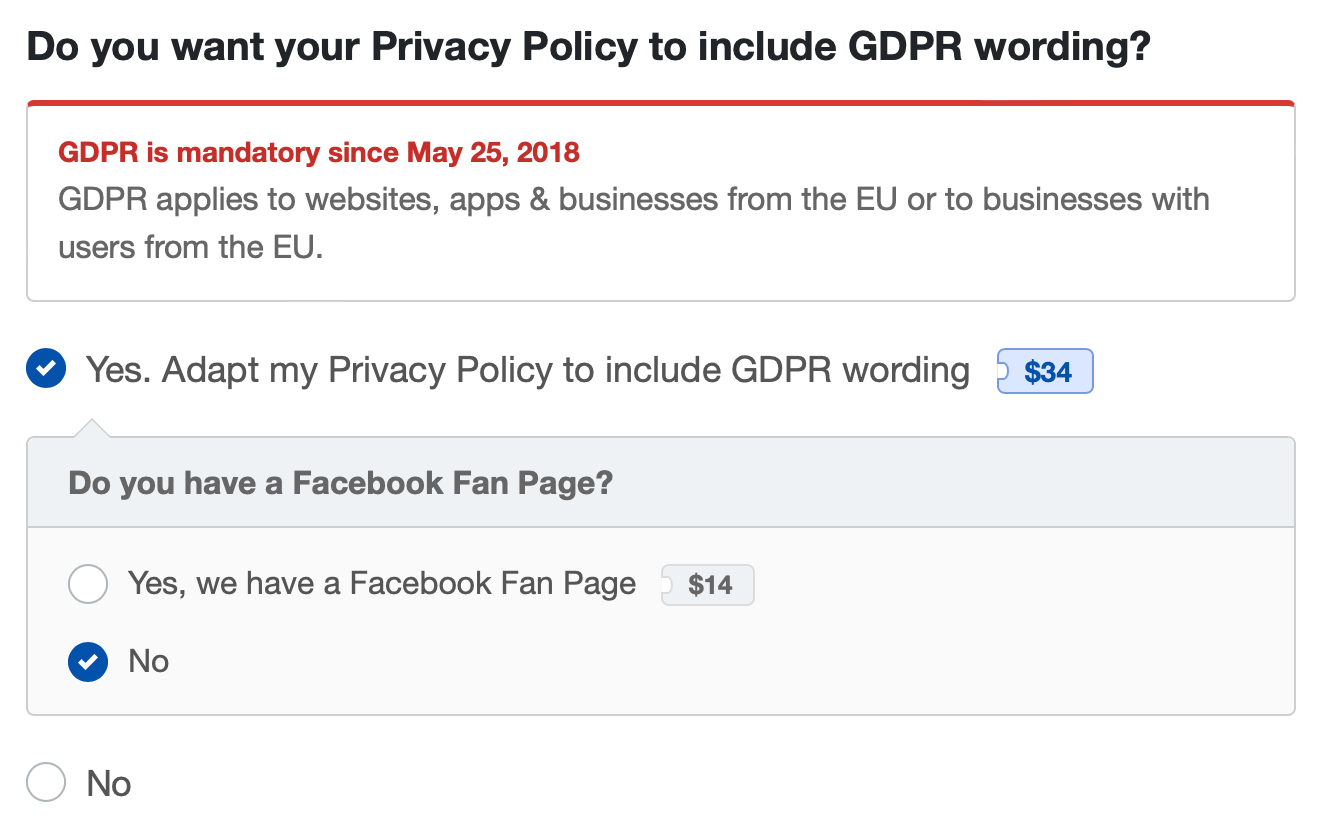
Select “Yes” for “Do you want your Privacy Policy to include GDPR wording?” then select “No” for “Do you have a Facebook Fan Page?”
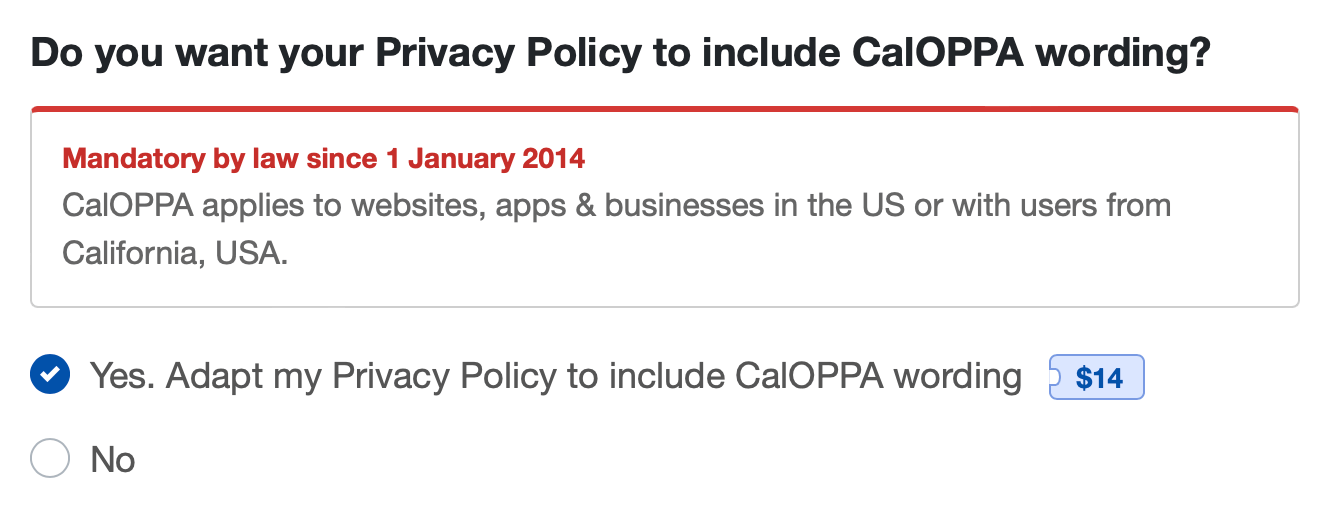
Select “Yes” for “Do you want your Privacy Policy to include CalOPPA wording?”
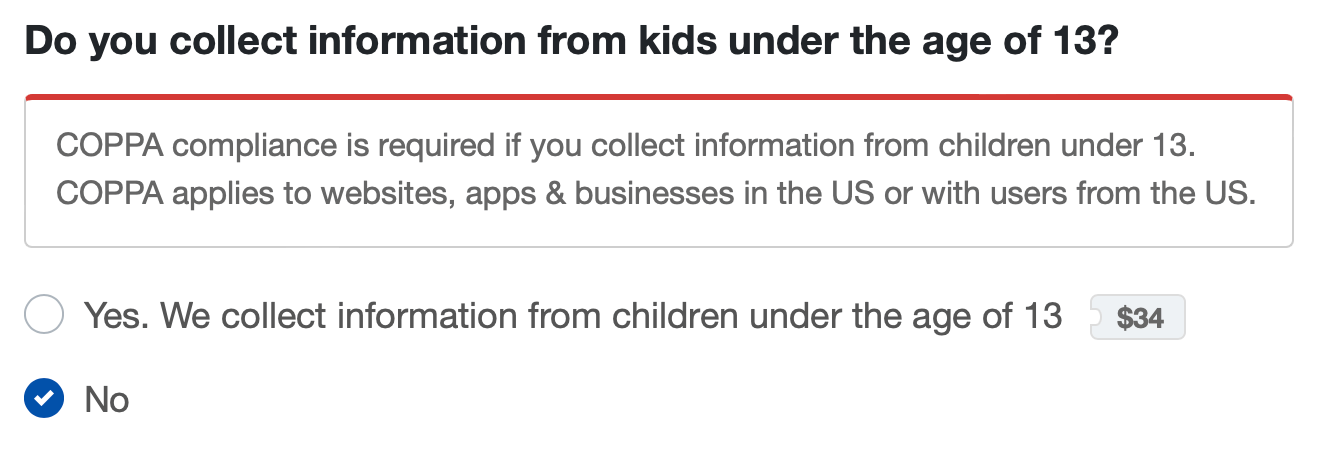
Select “No” for “Do you collect information from kids under the age of 13?”
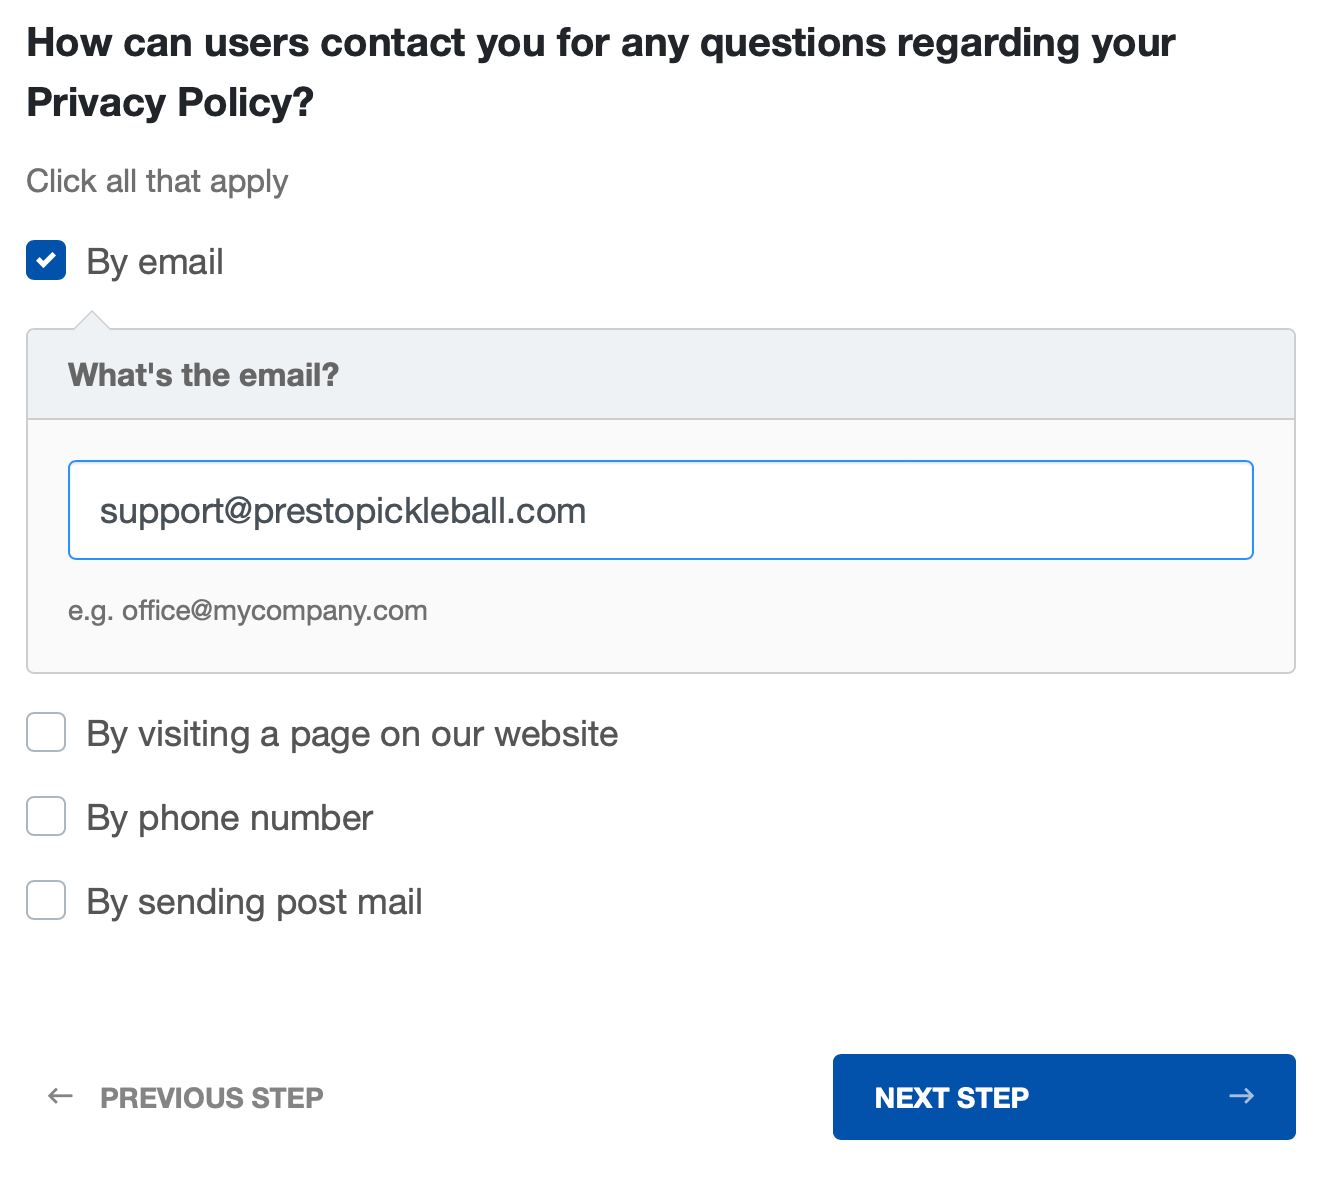
For “How can users contact you for any questions regarding your Privacy Policy?” select “By Email,” then enter the support email address we created for you in Step 4 of this guide, then click “Next Step.”
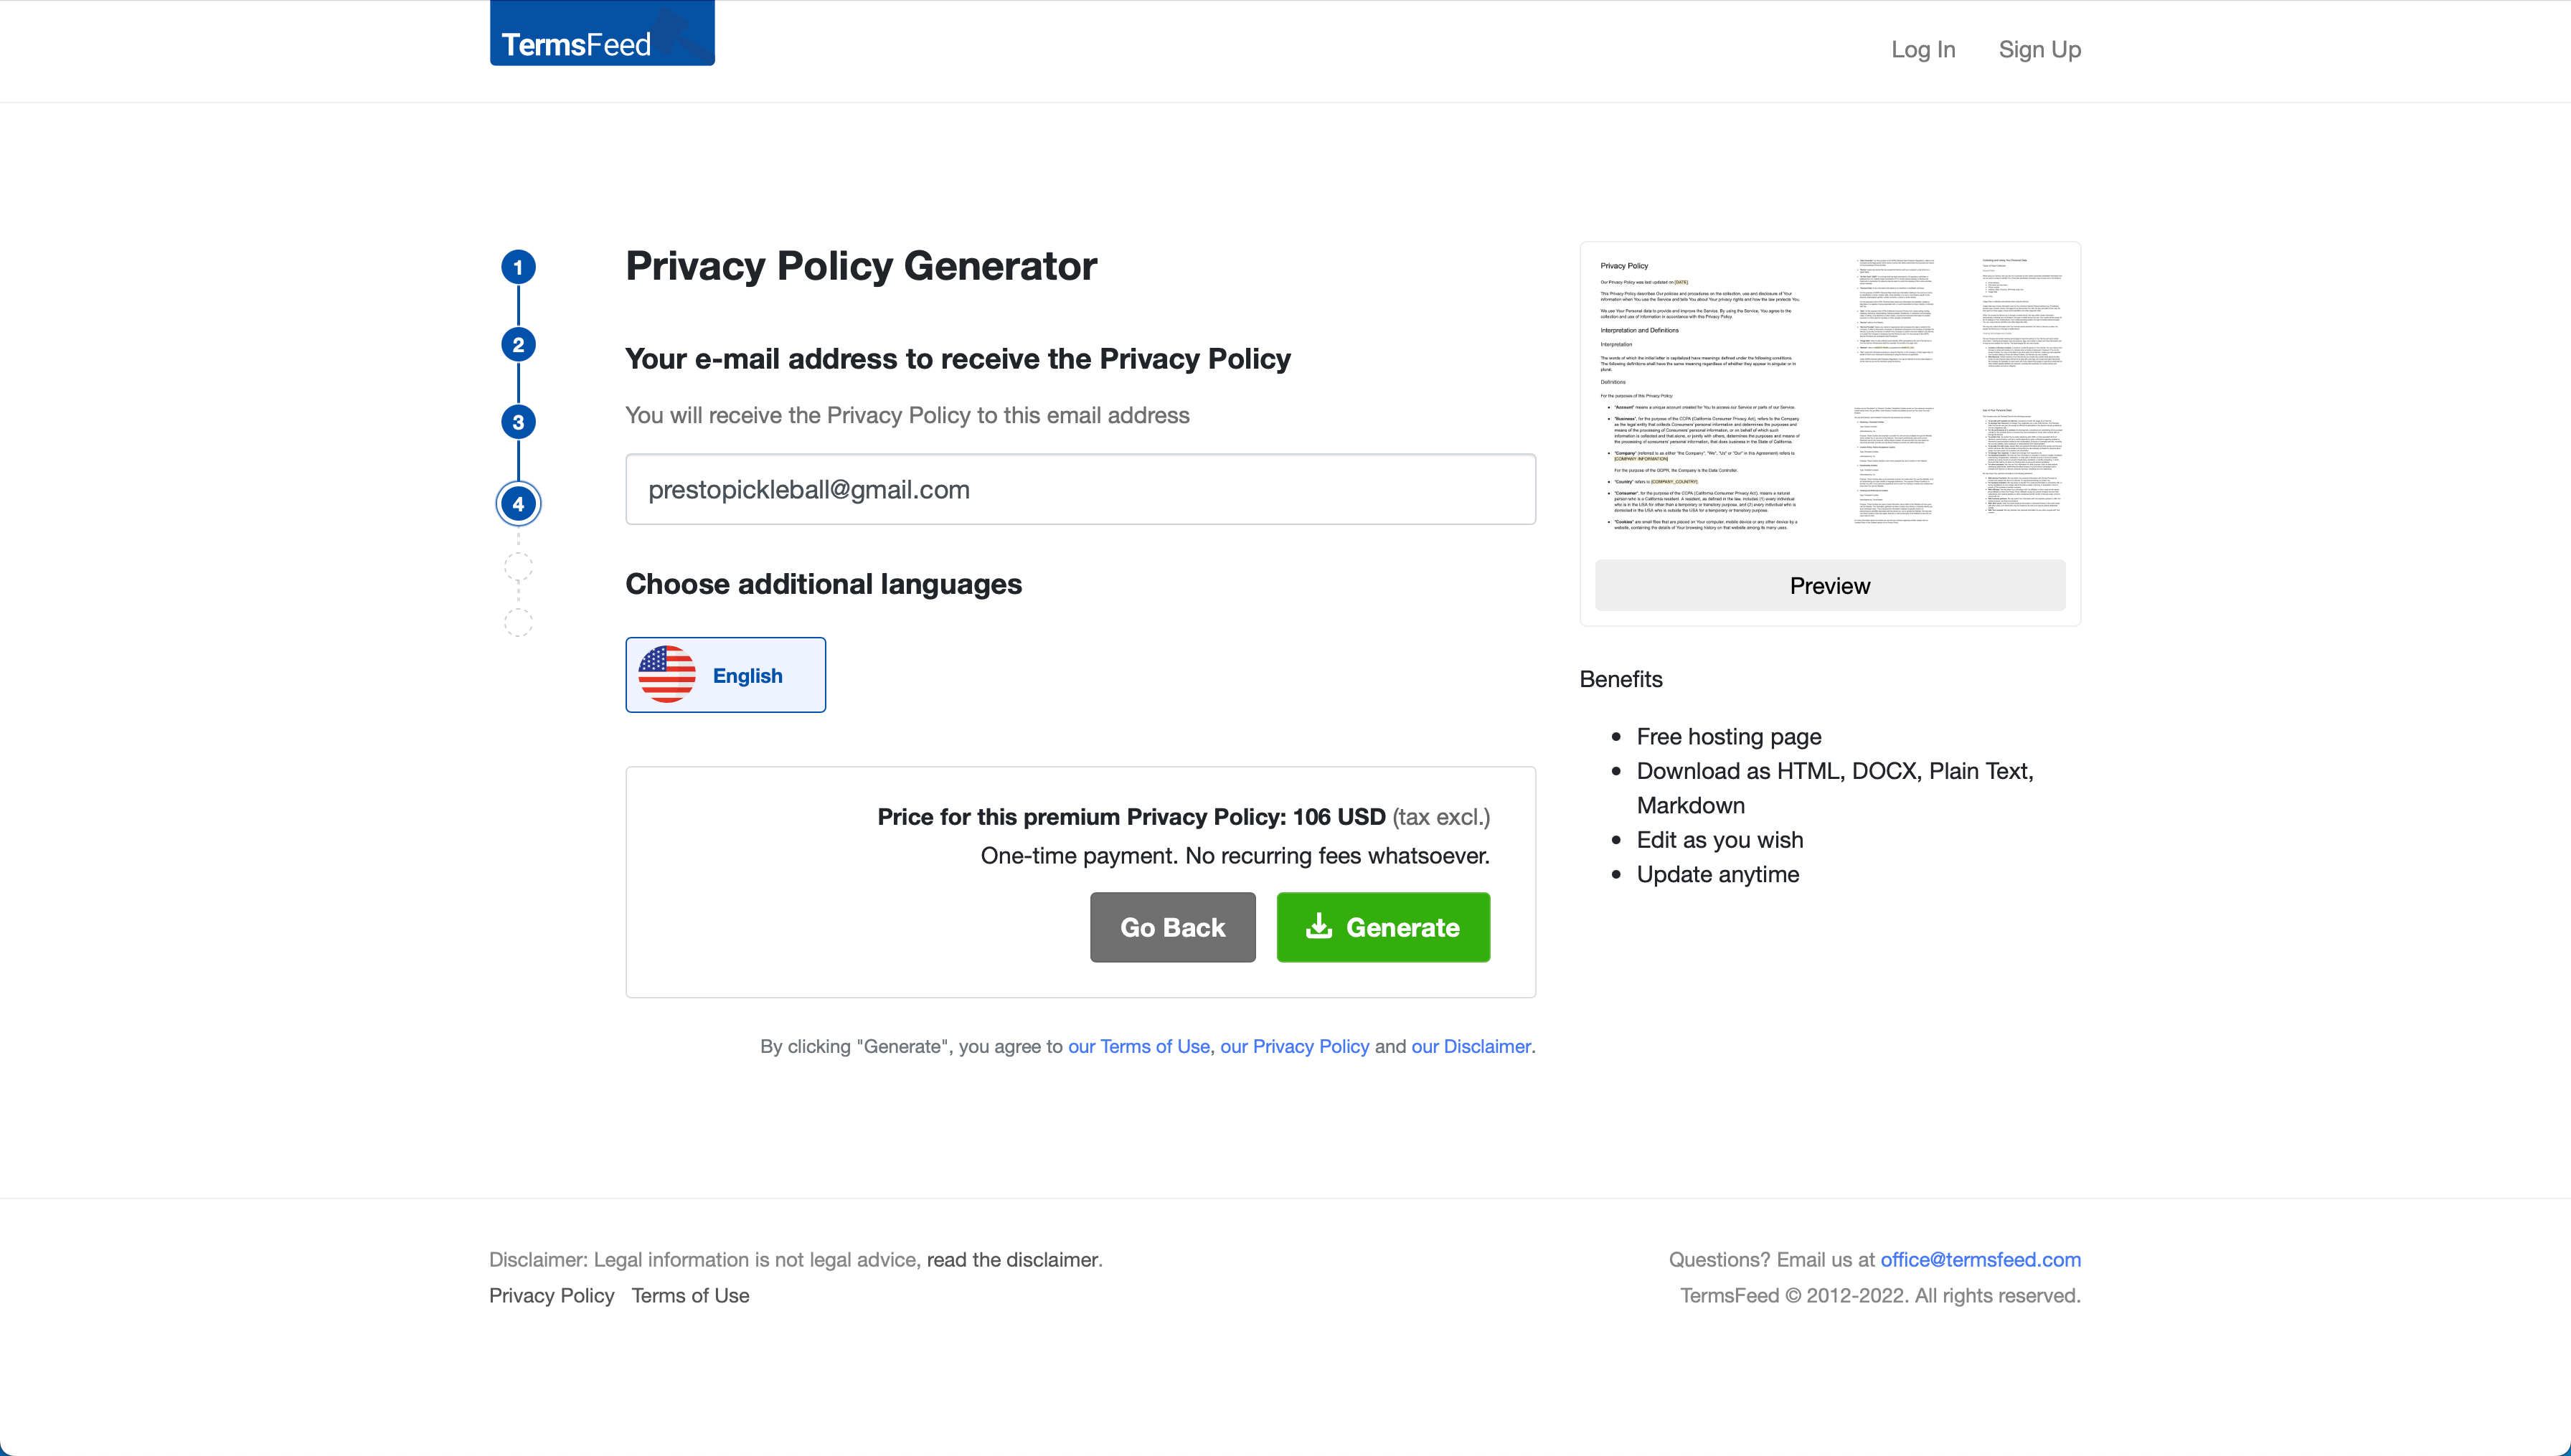
In step 4, enter the email address where you’d like to receive your privacy policy, then click “Generate.”
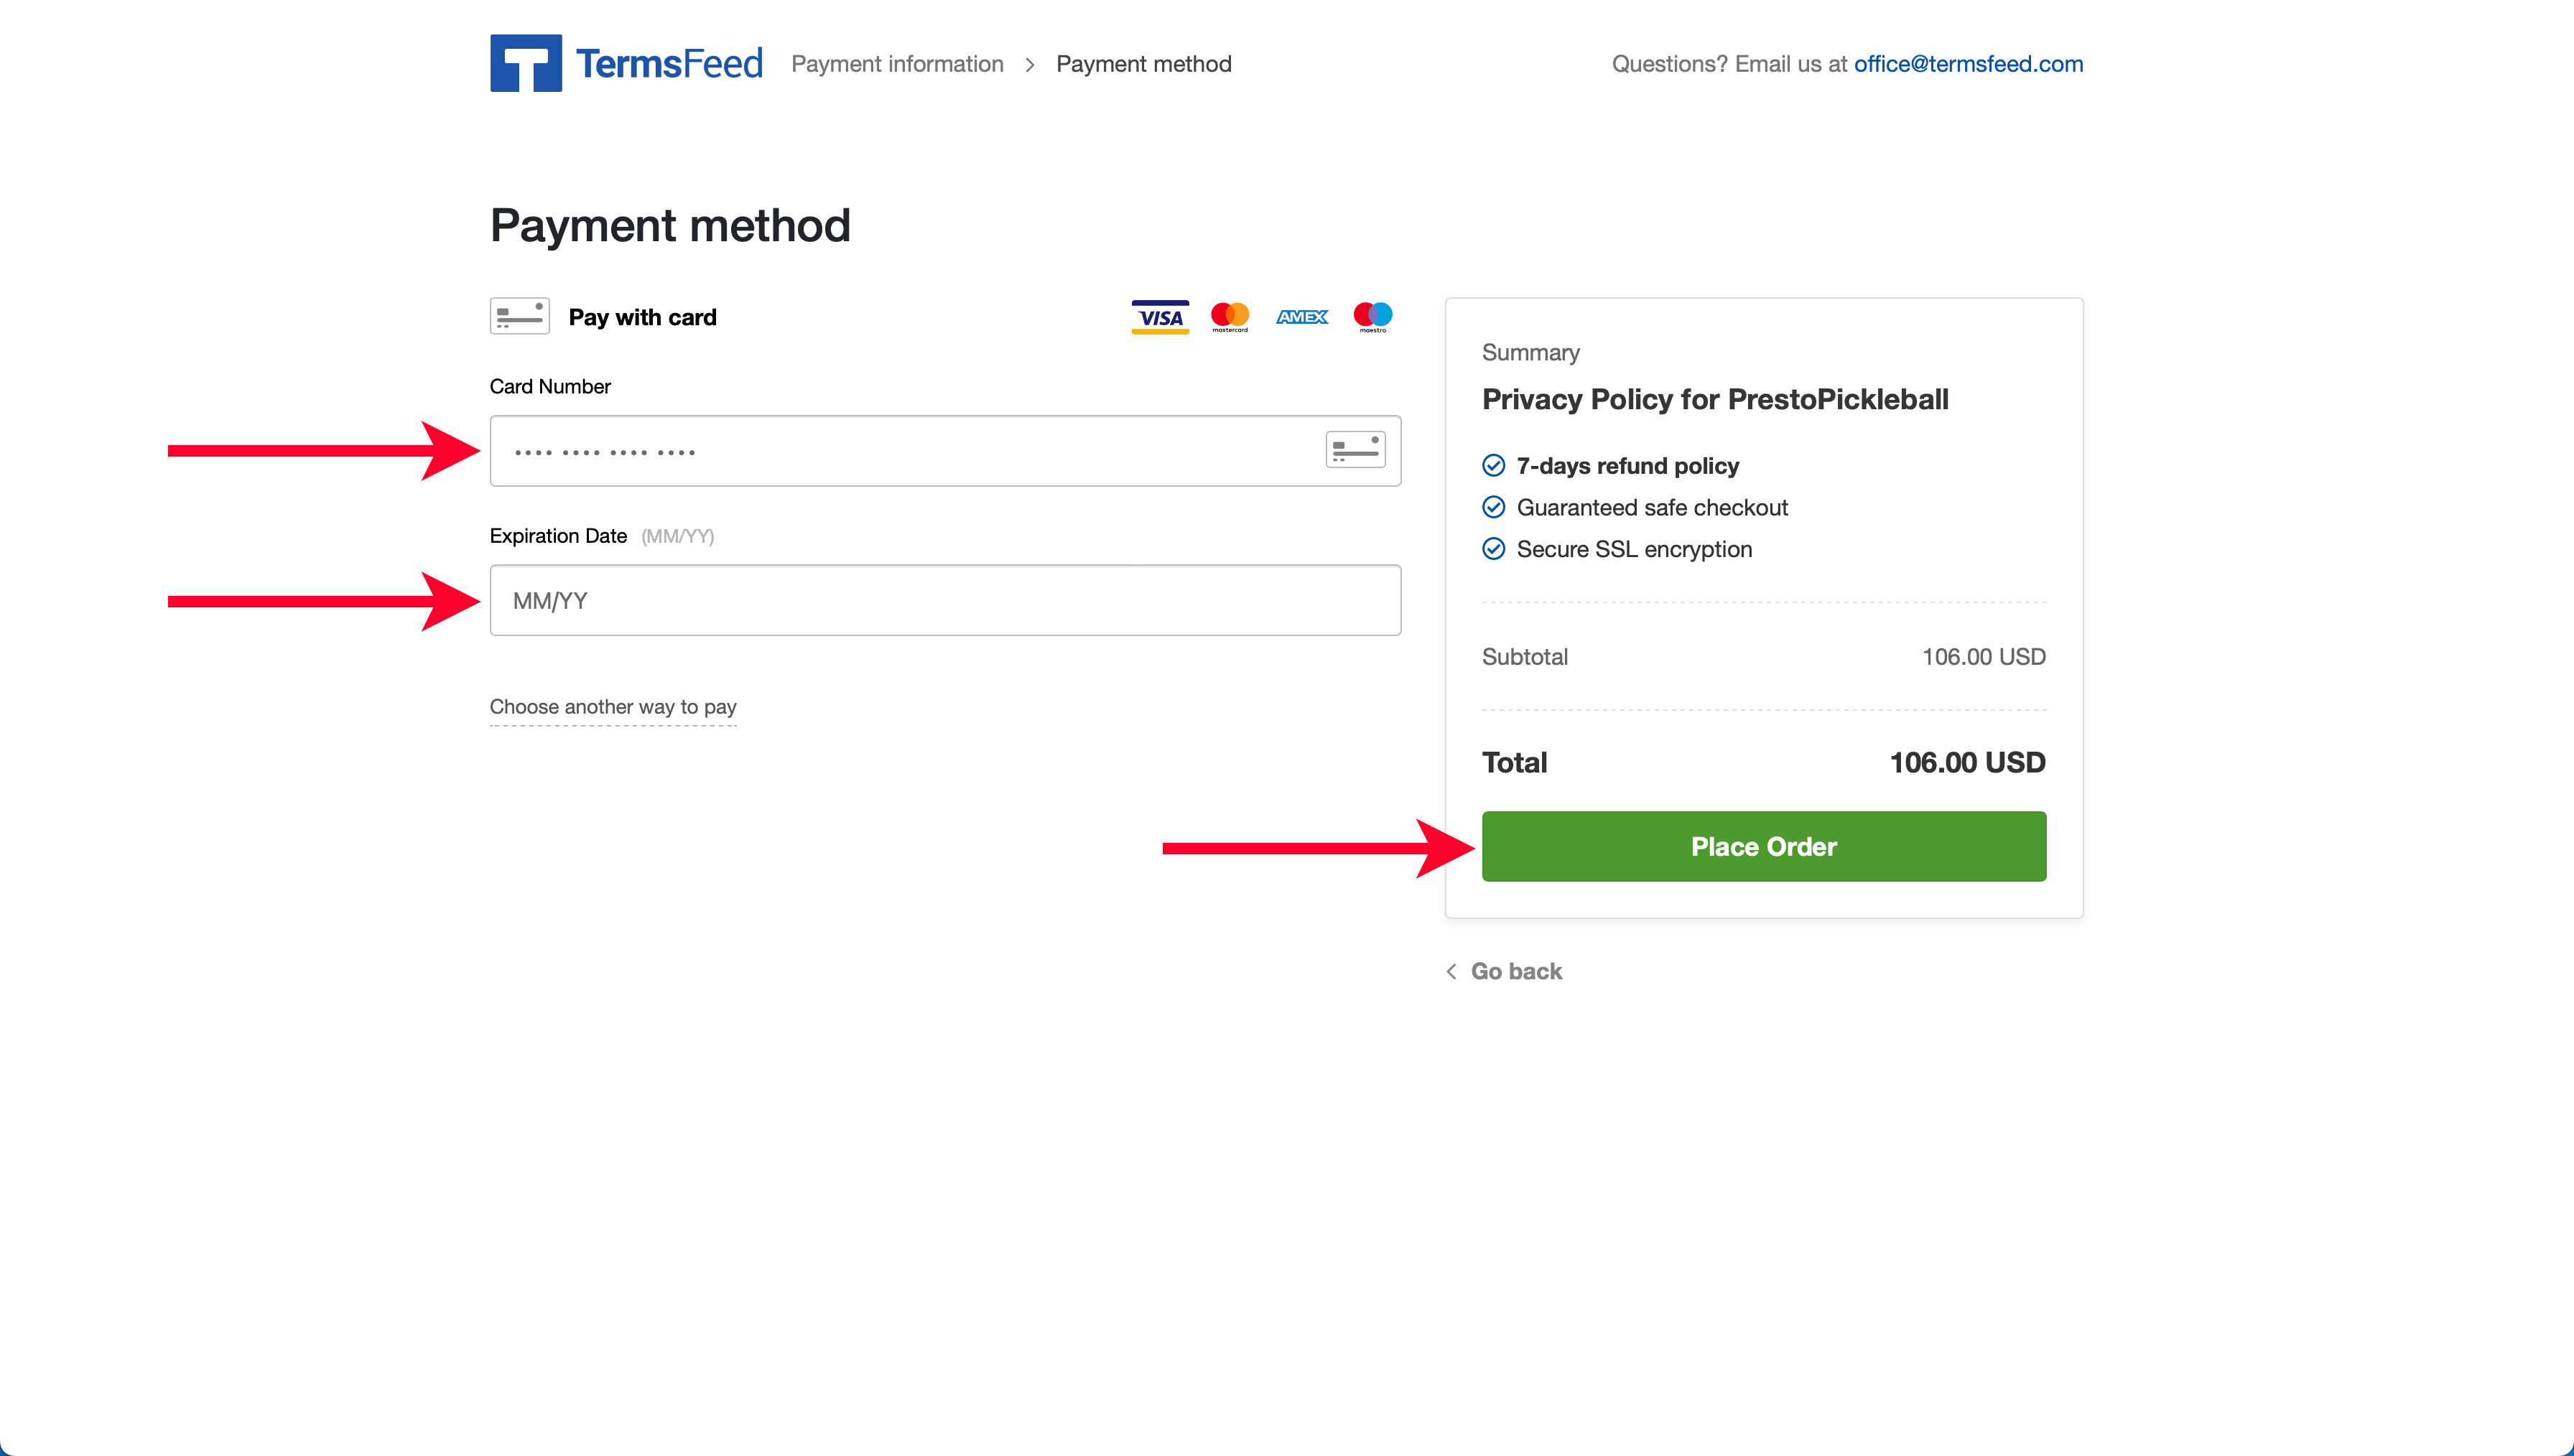
Fill out your “Payment information,” then click “Continue.”
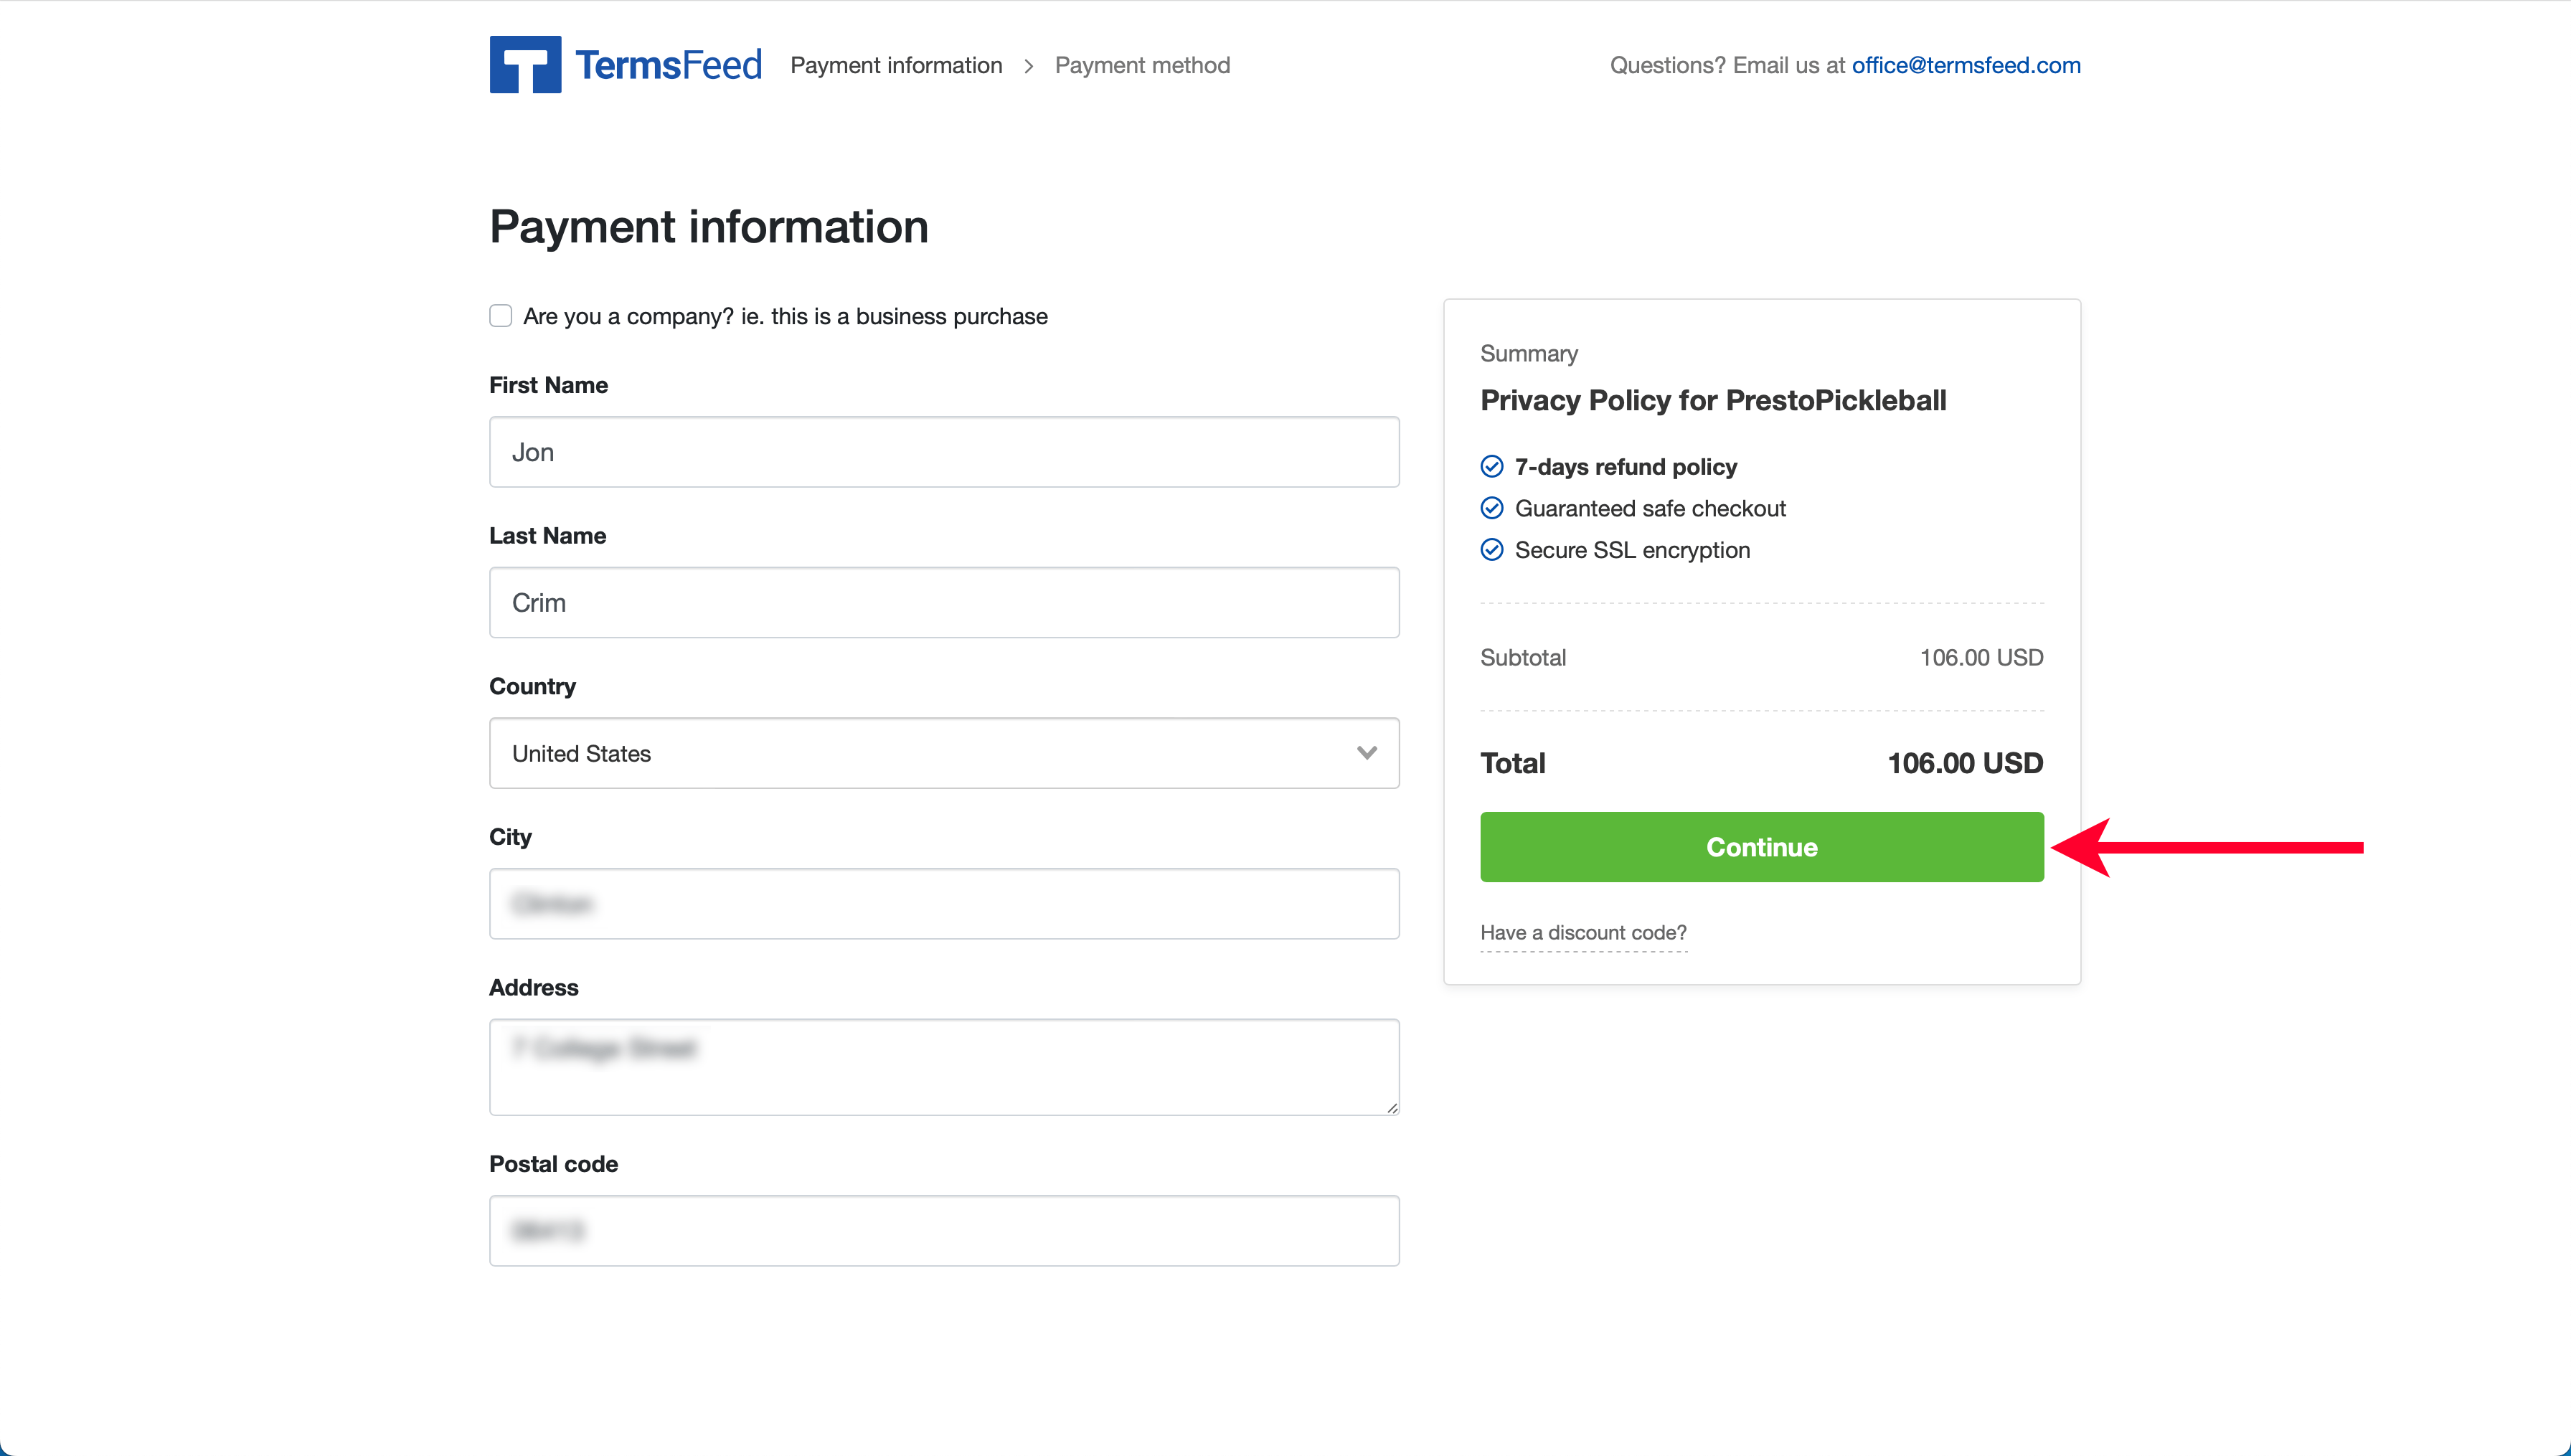
Add your “Payment method,” then click “Place Order.”
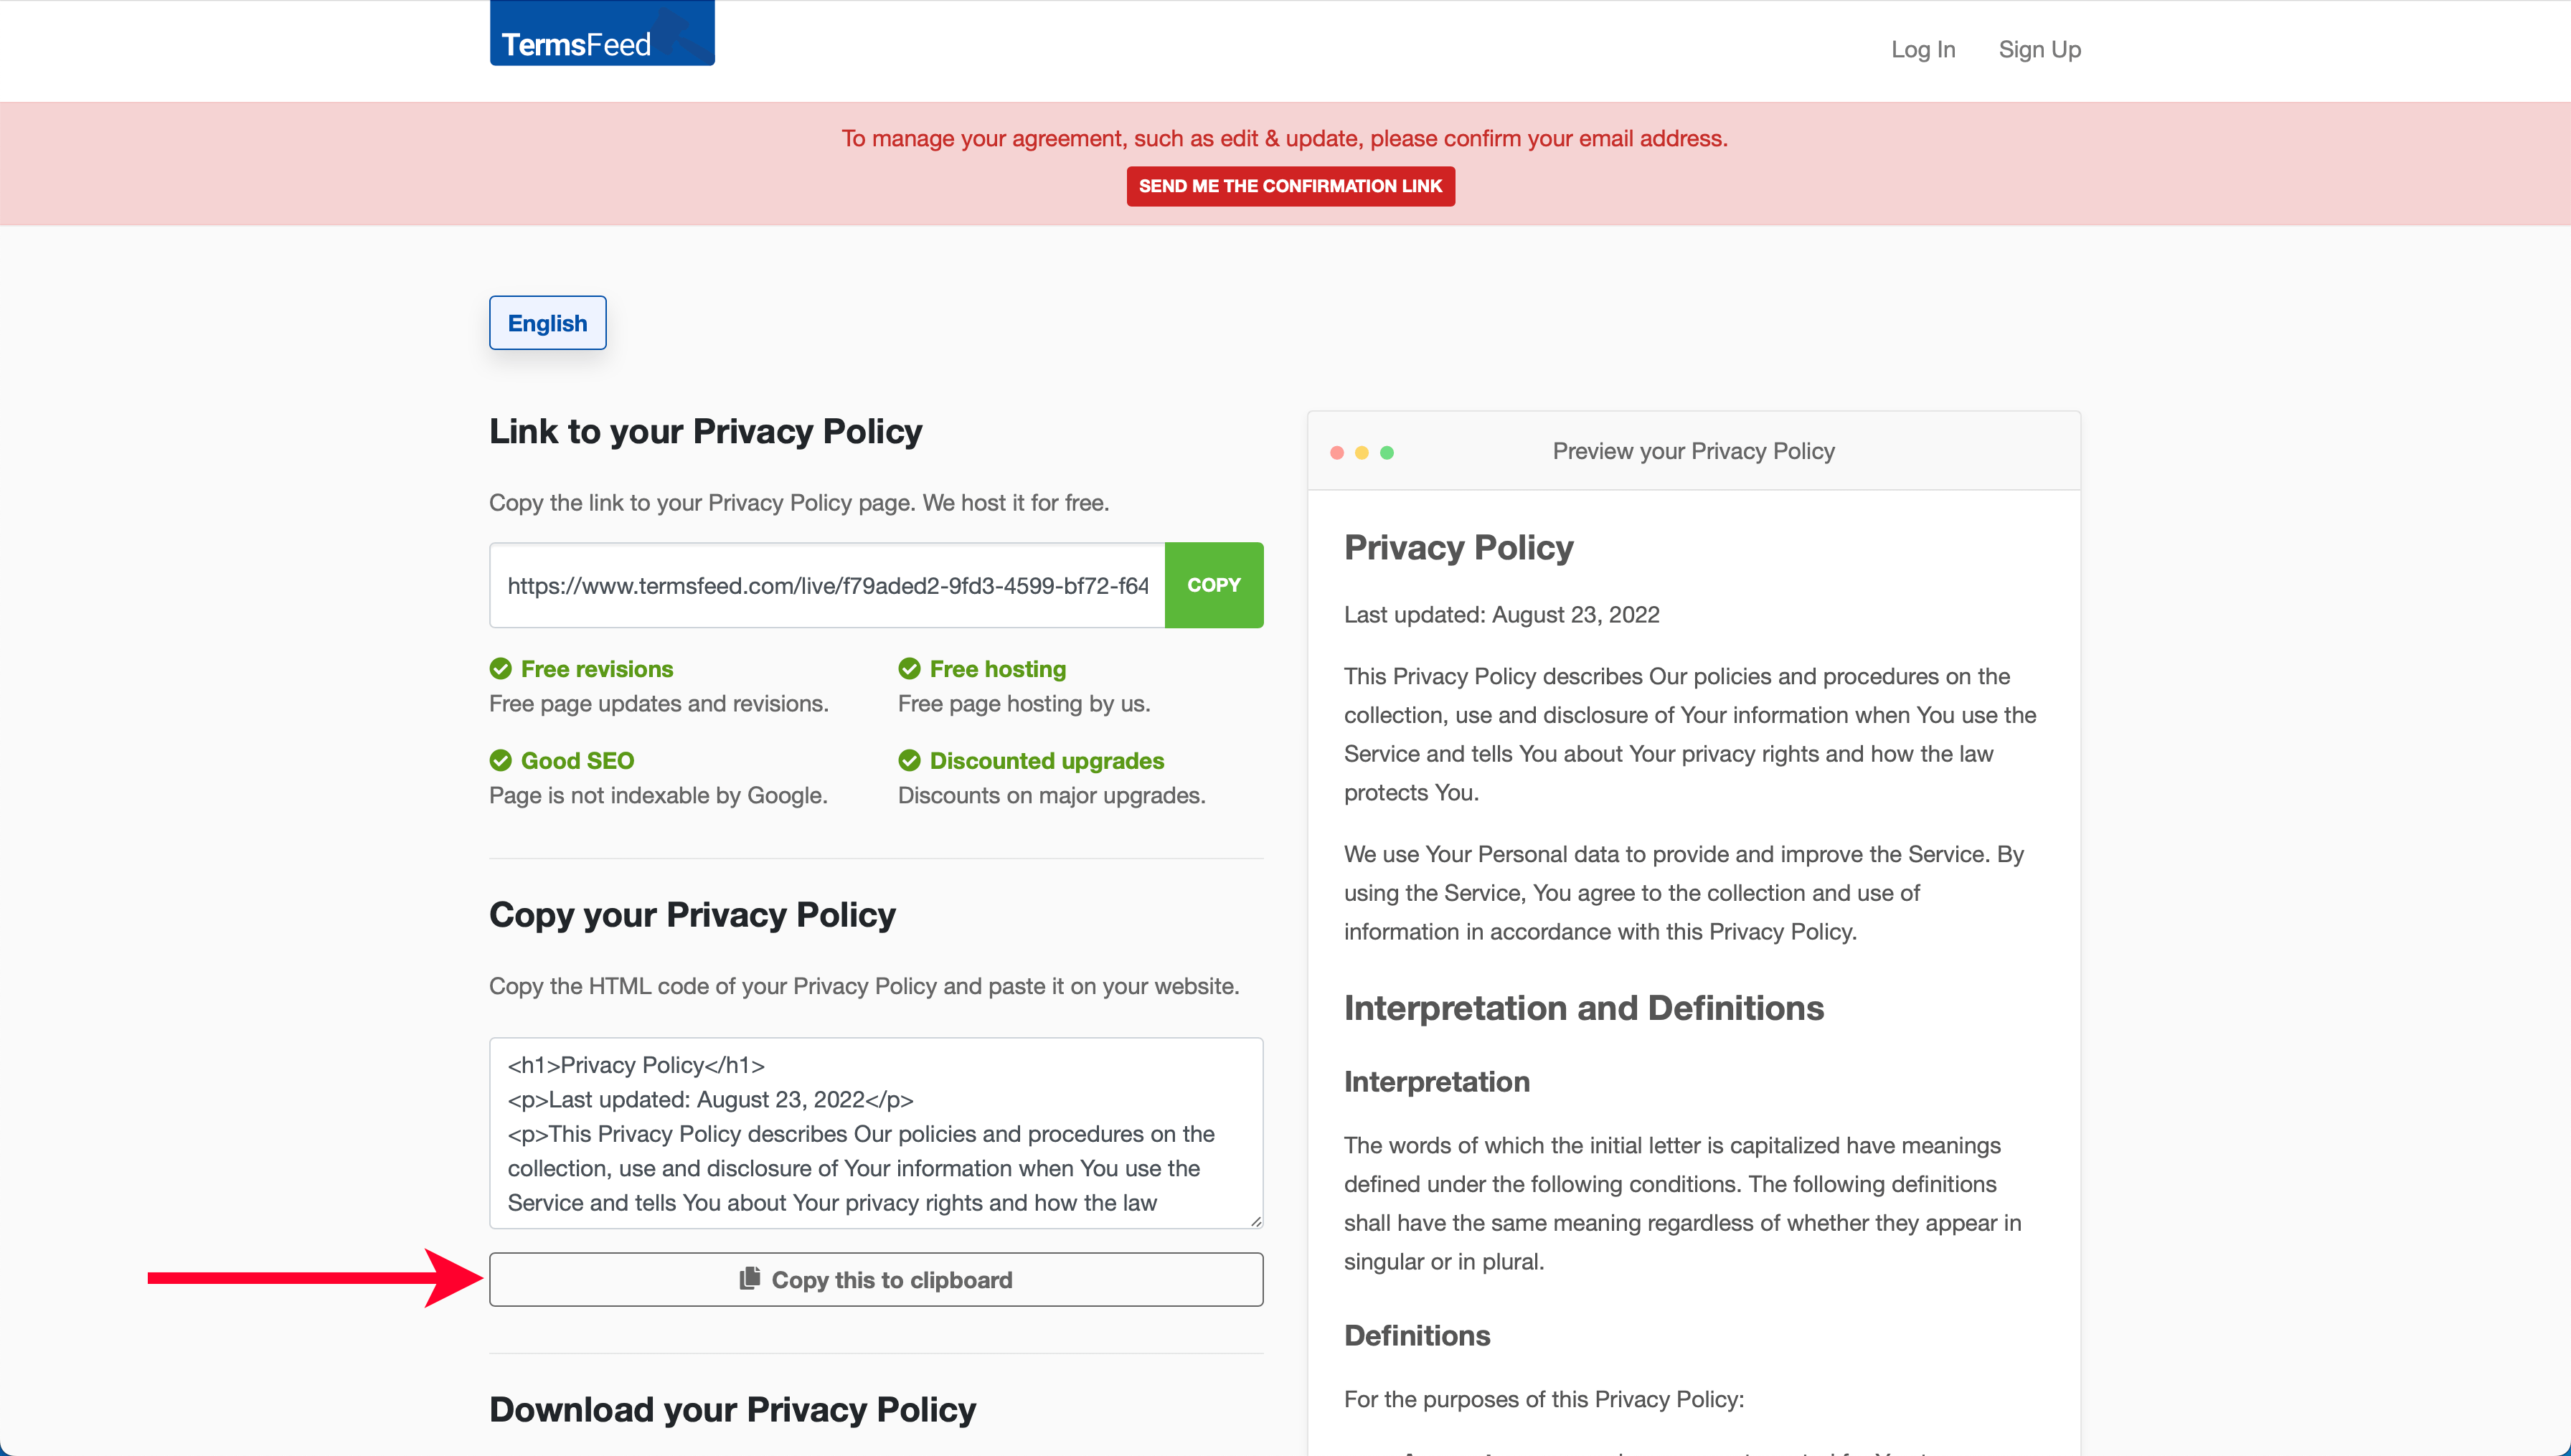
TermsFeed will generate your Privacy Policy for you. Click the “Copy this to Clipboard” button on the next page.
Helpful Tip
After making your purchase, TermsFeed emails you a copy of your privacy policy for future reference with a link you can use to access and update it anytime.
Add Your Privacy Policy to Your Website
Now that your Privacy Policy is copied and ready to go, let’s head to your WordPress account to add it to your website.
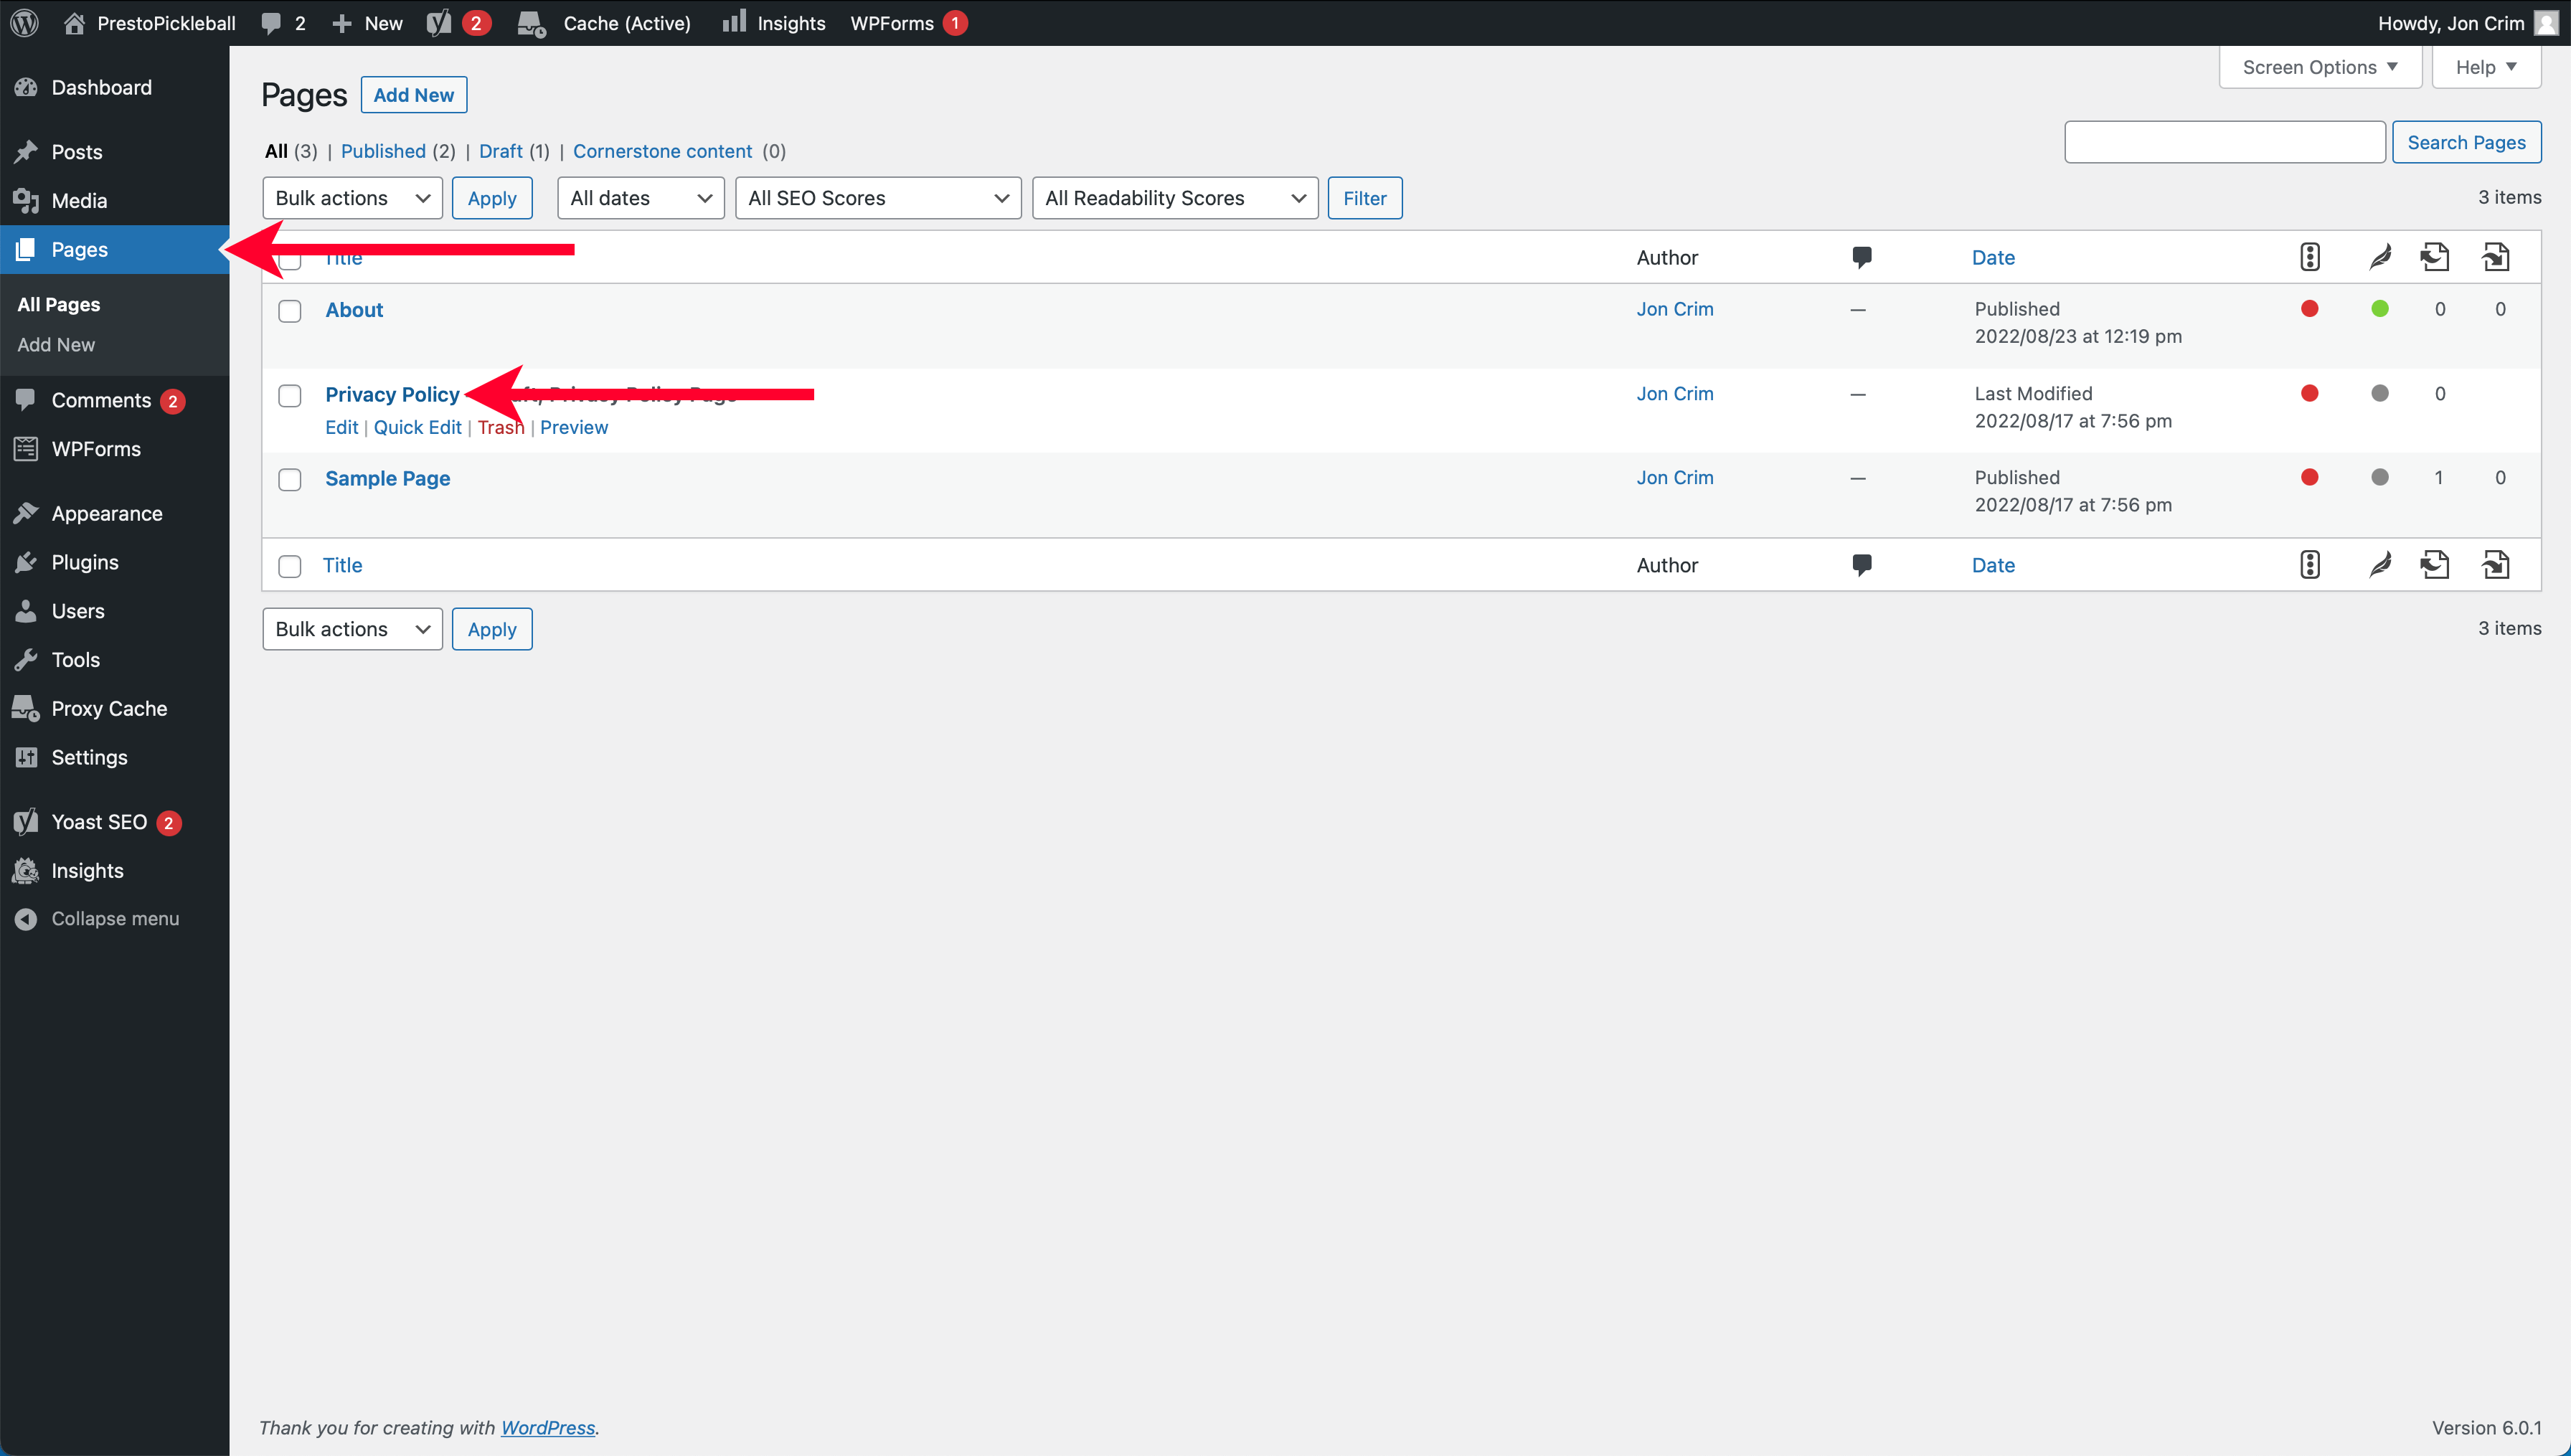
Open your WordPress account, navigate to the “Pages” menu, and click the link for the “Privacy Policy” page, which will bring up the WordPress page editor.
From the editor, we want to select the existing text of the draft privacy policy page that WordPress generated for you.

Next, click the icon with three stacked dots in the options menu that appears and select “Remove Blocks.”
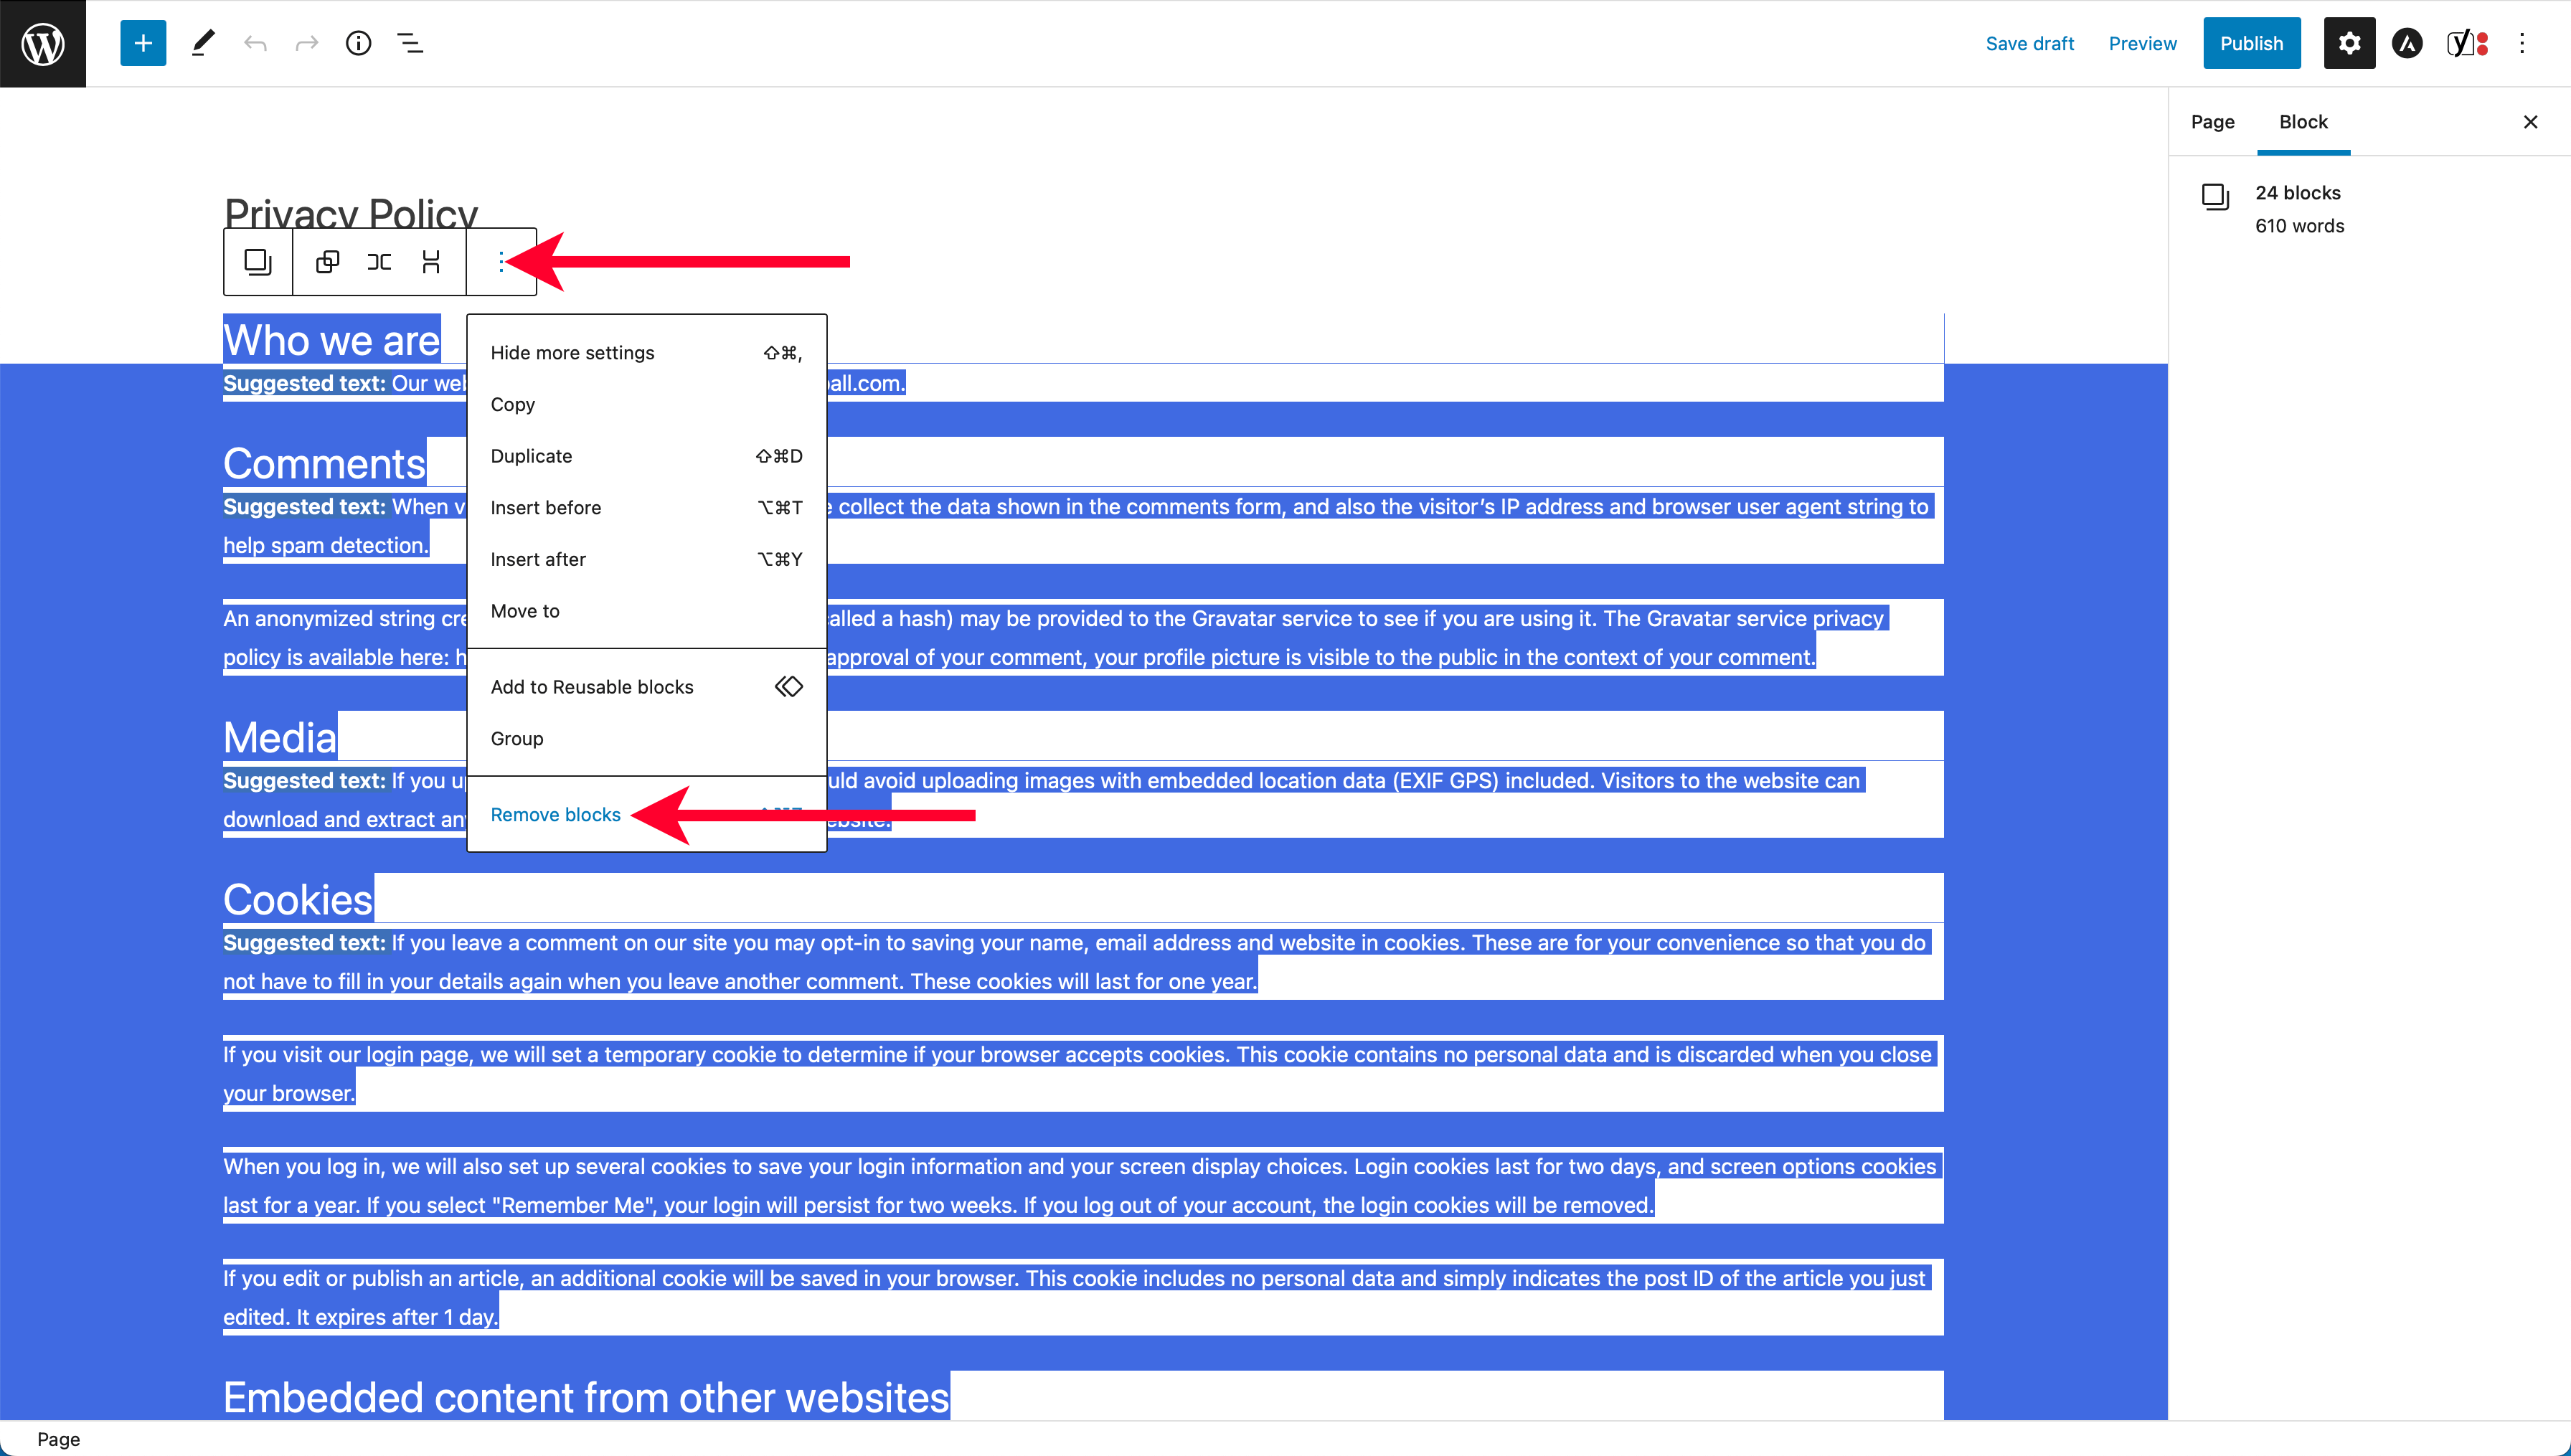
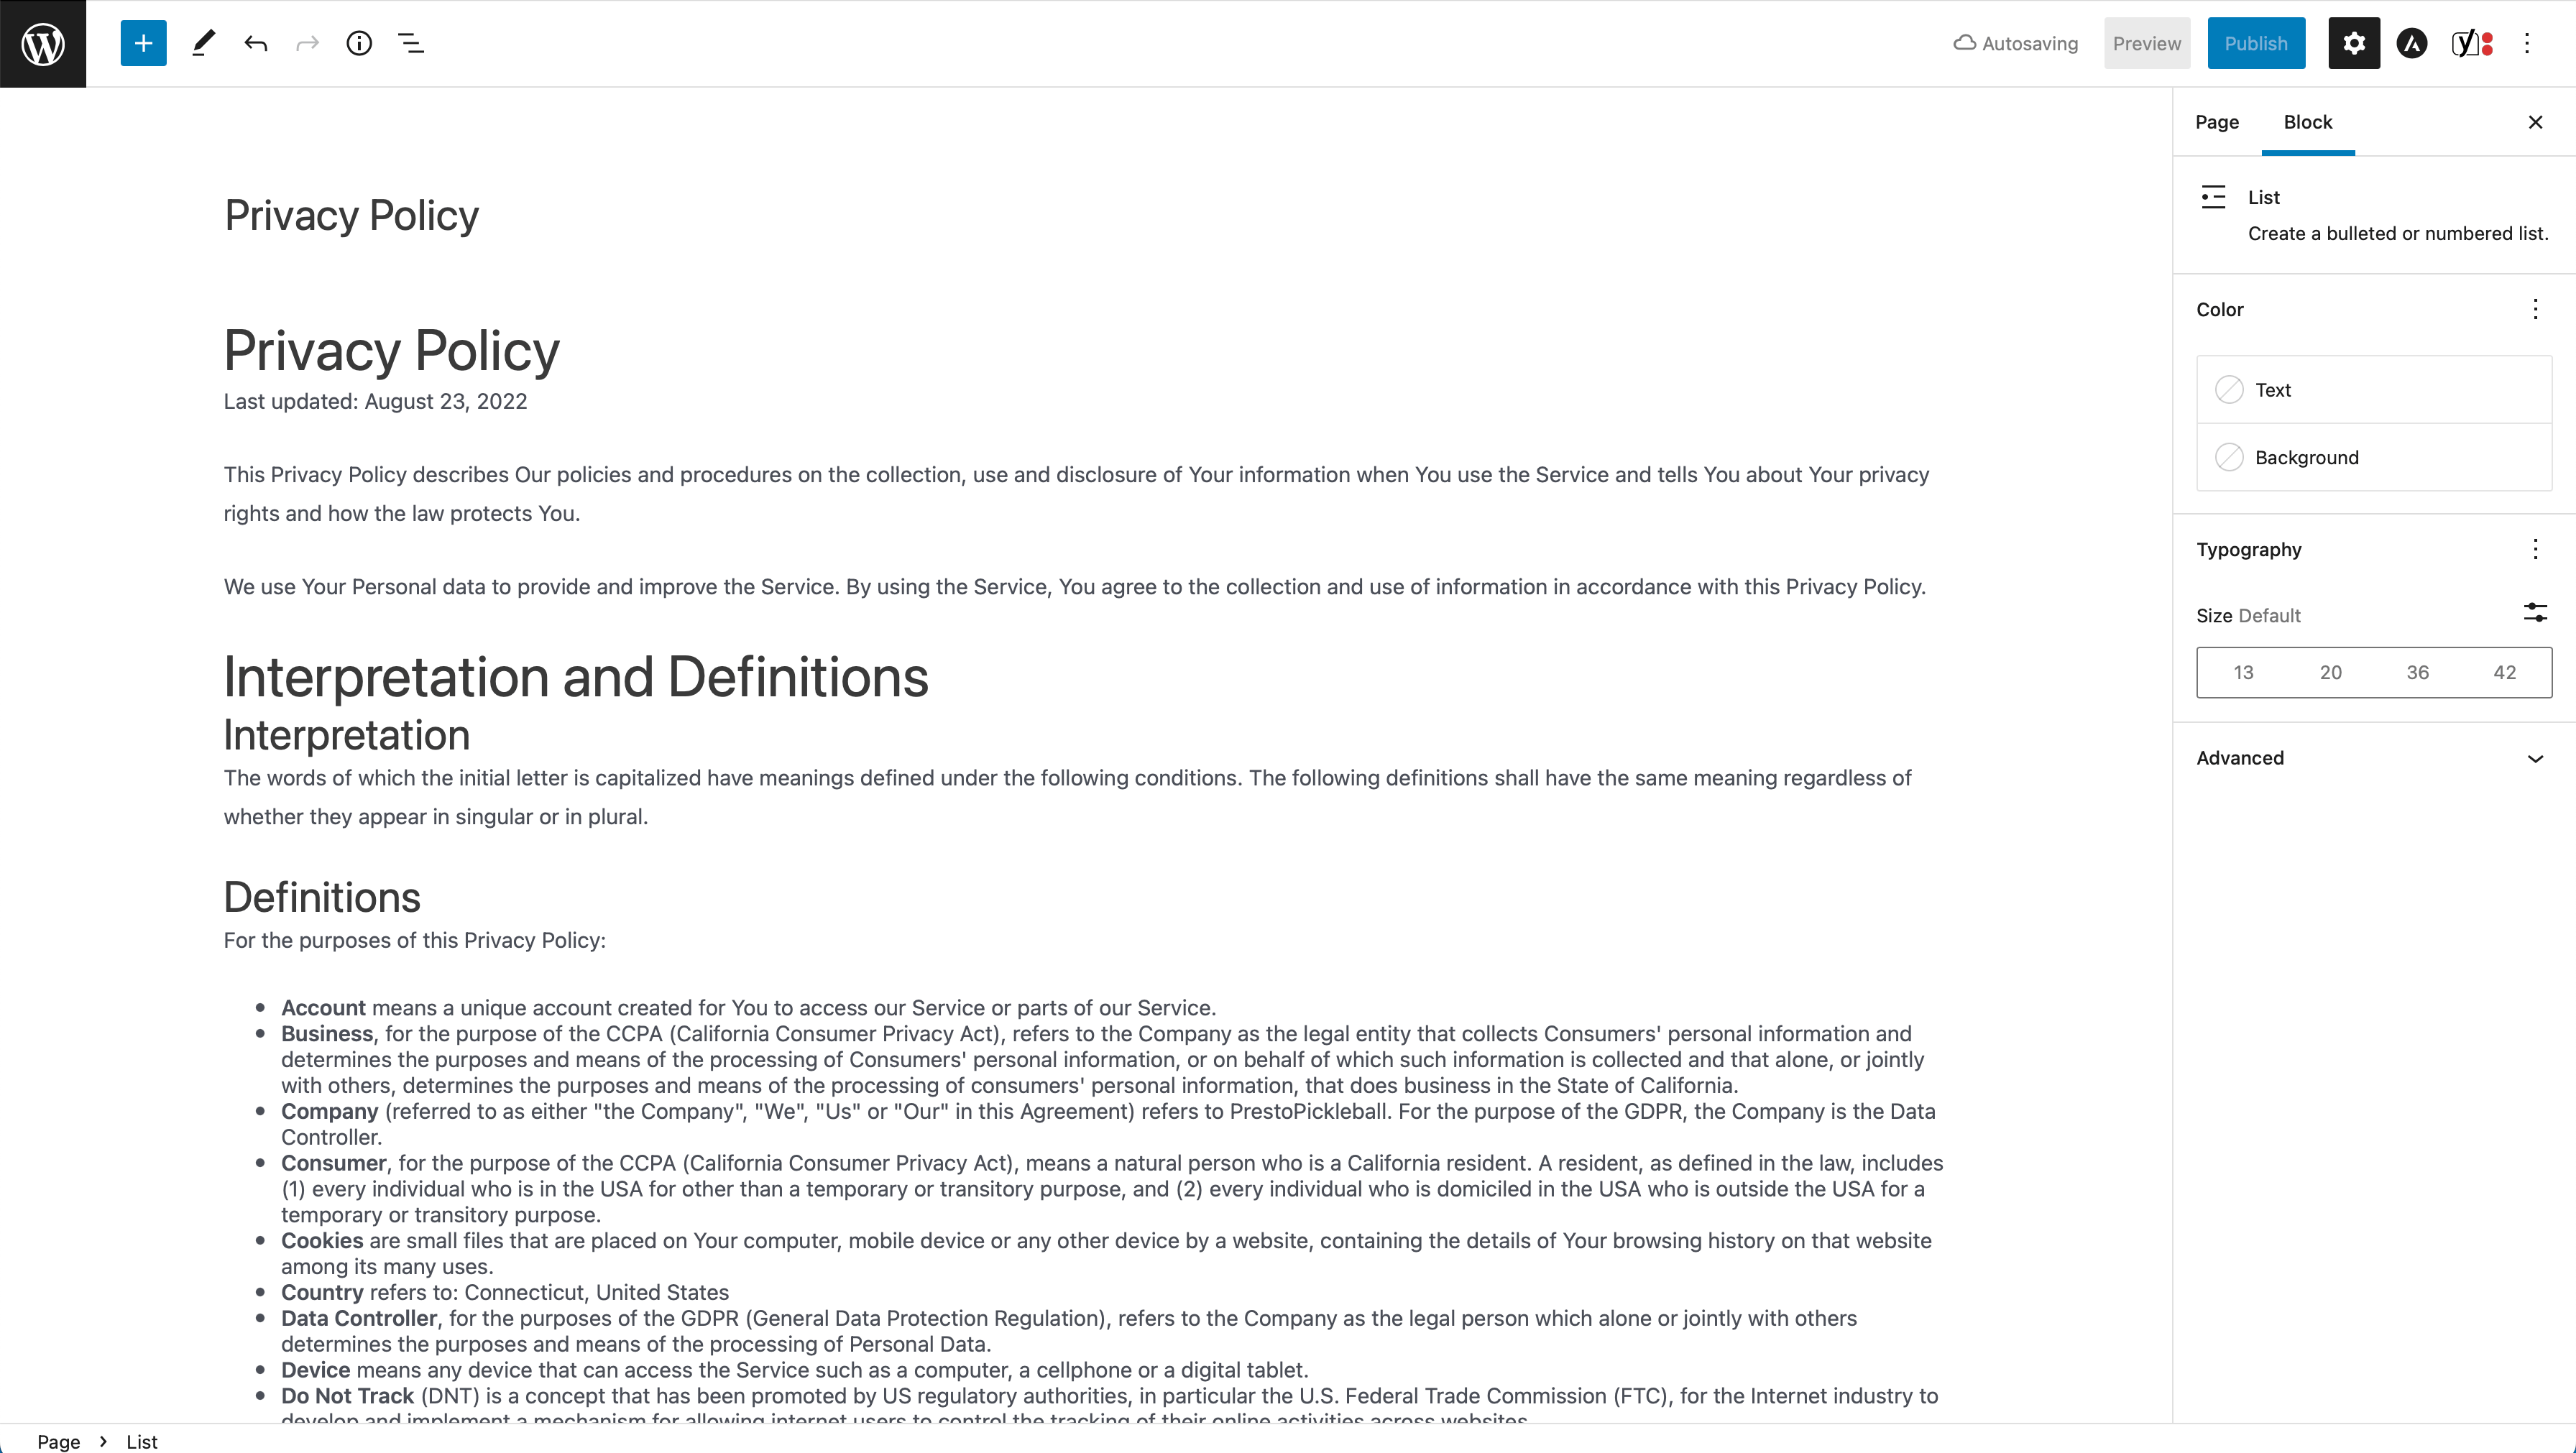
Now, click where it says “Type / to choose a block” and paste the privacy policy you copied from TermsFeed.
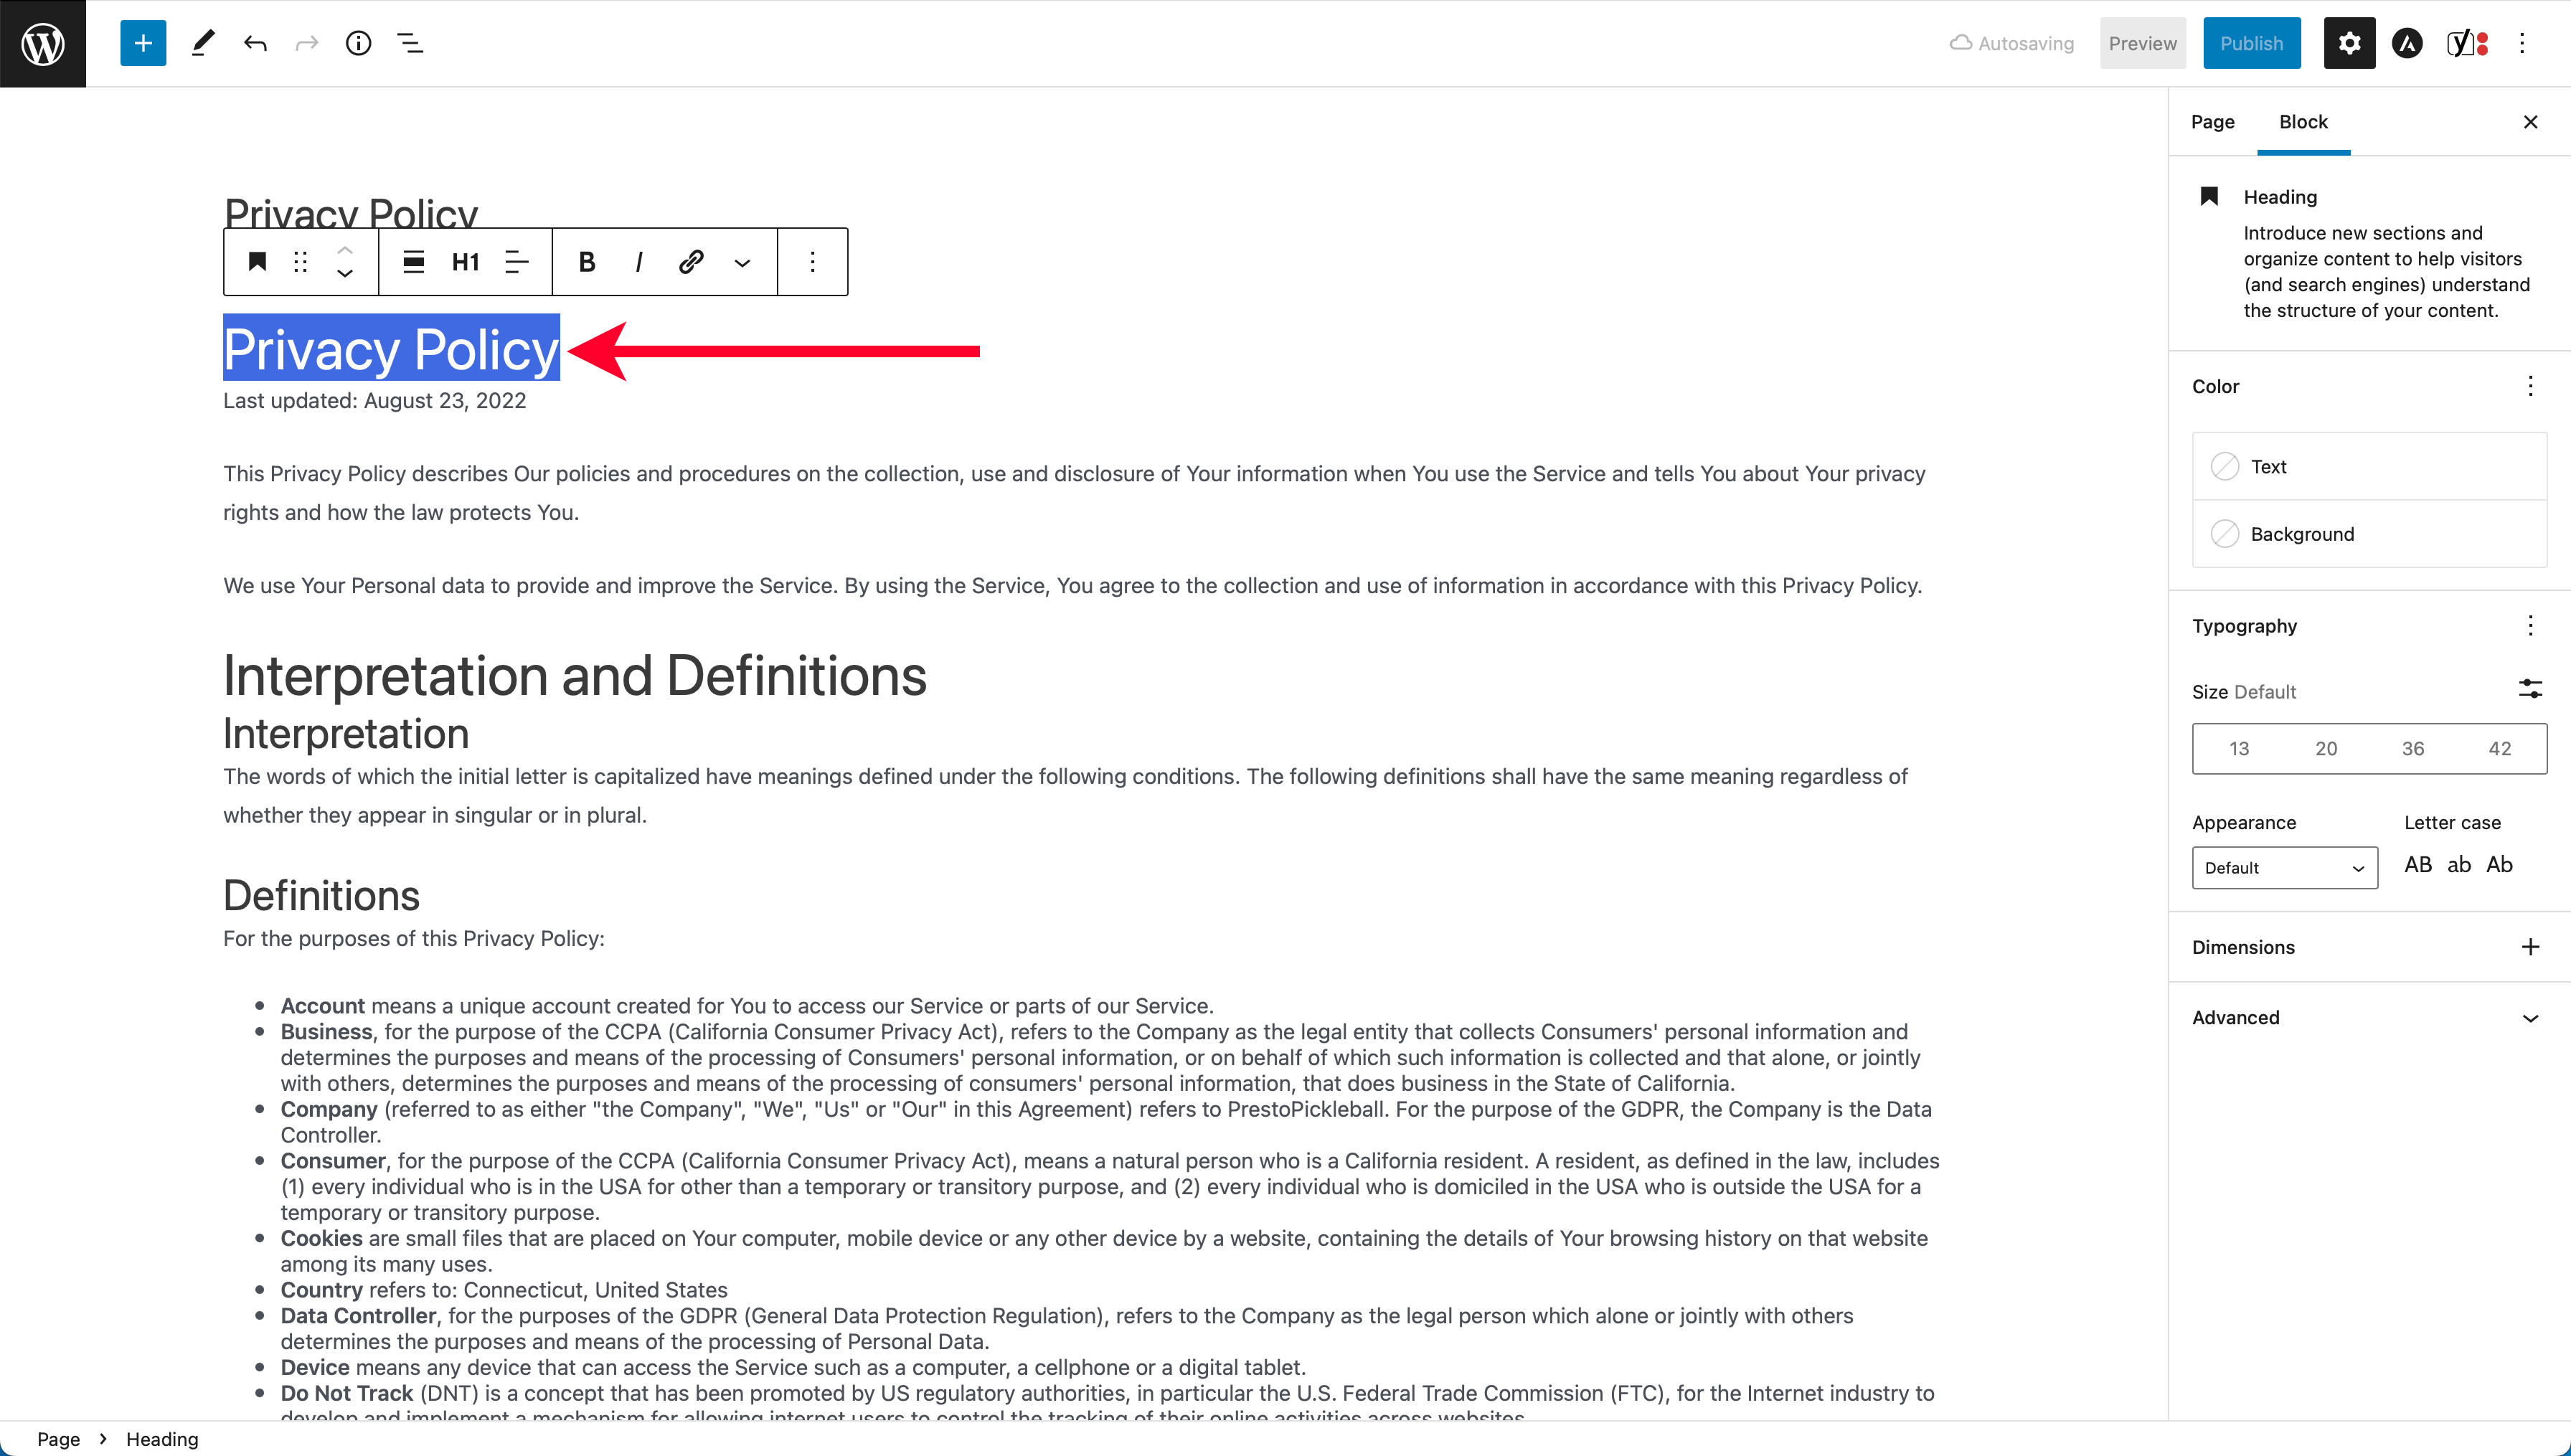
Since your page is already named “Privacy Policy,” we can highlight the second instance of the words “Privacy Policy” toward the top of the page and delete that text.
Finally, click the “Publish” button in the upper right corner of the editor and confirm you’d like to publish the page.

You’re all set! You can now view your privacy policy at the following URL:
To return to your WordPress account, click the WordPress logo in the upper right corner of the page editor.
We’ll wrap things up by creating a contact page.
Contact Page & Form (Optional)
A contact page helps give website visitors an easy way to get in touch with you if they have any questions. We’ll create this page and then add a contact form using the WordPress plugin WPForms.
This page is not required if you don’t want to provide visitors with a means to get in touch, but it’s an excellent trust signal, so I’d encourage you to add one if you’re comfortable with it.
Creating the Contact Page
We’re going to start by setting up a contact page. In your WordPress account, navigate to the “Pages” section, then click the “New Page” button toward the top of the screen.
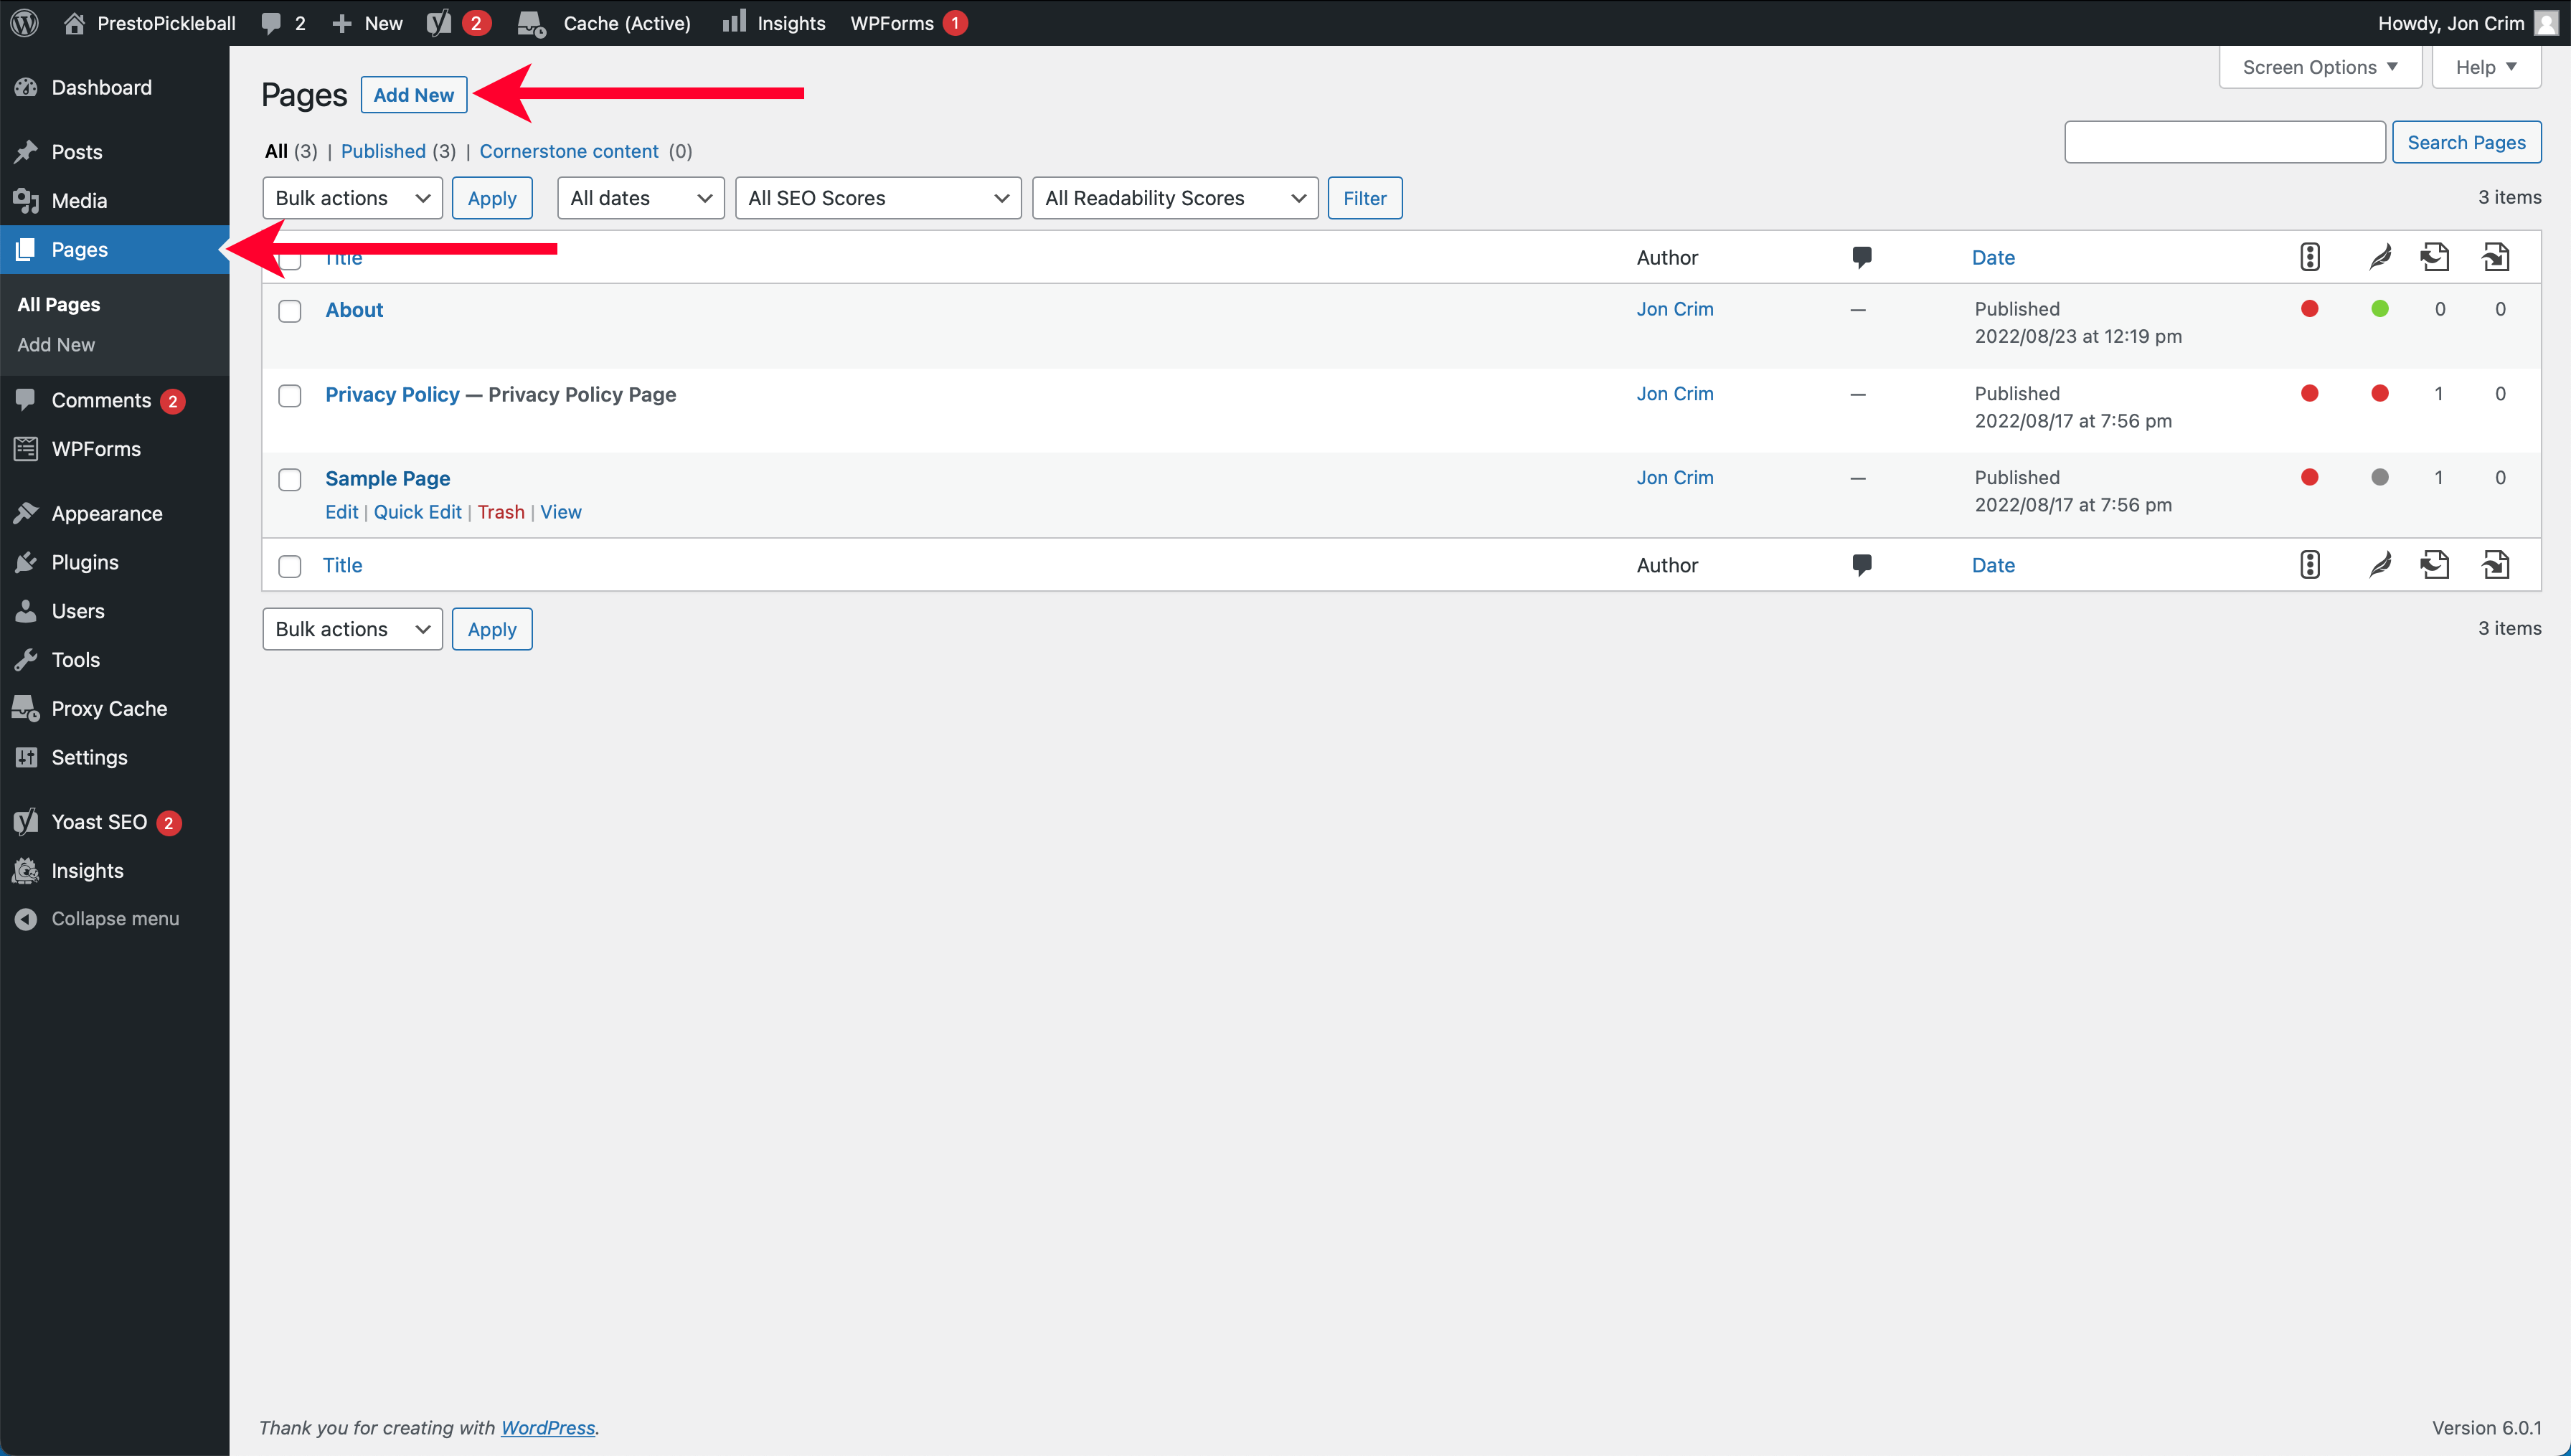
In the WordPress page editor that displays, click to add a title and enter the text “Contact.” After doing so, click the “Publish” button and confirm you’d like to publish the page.
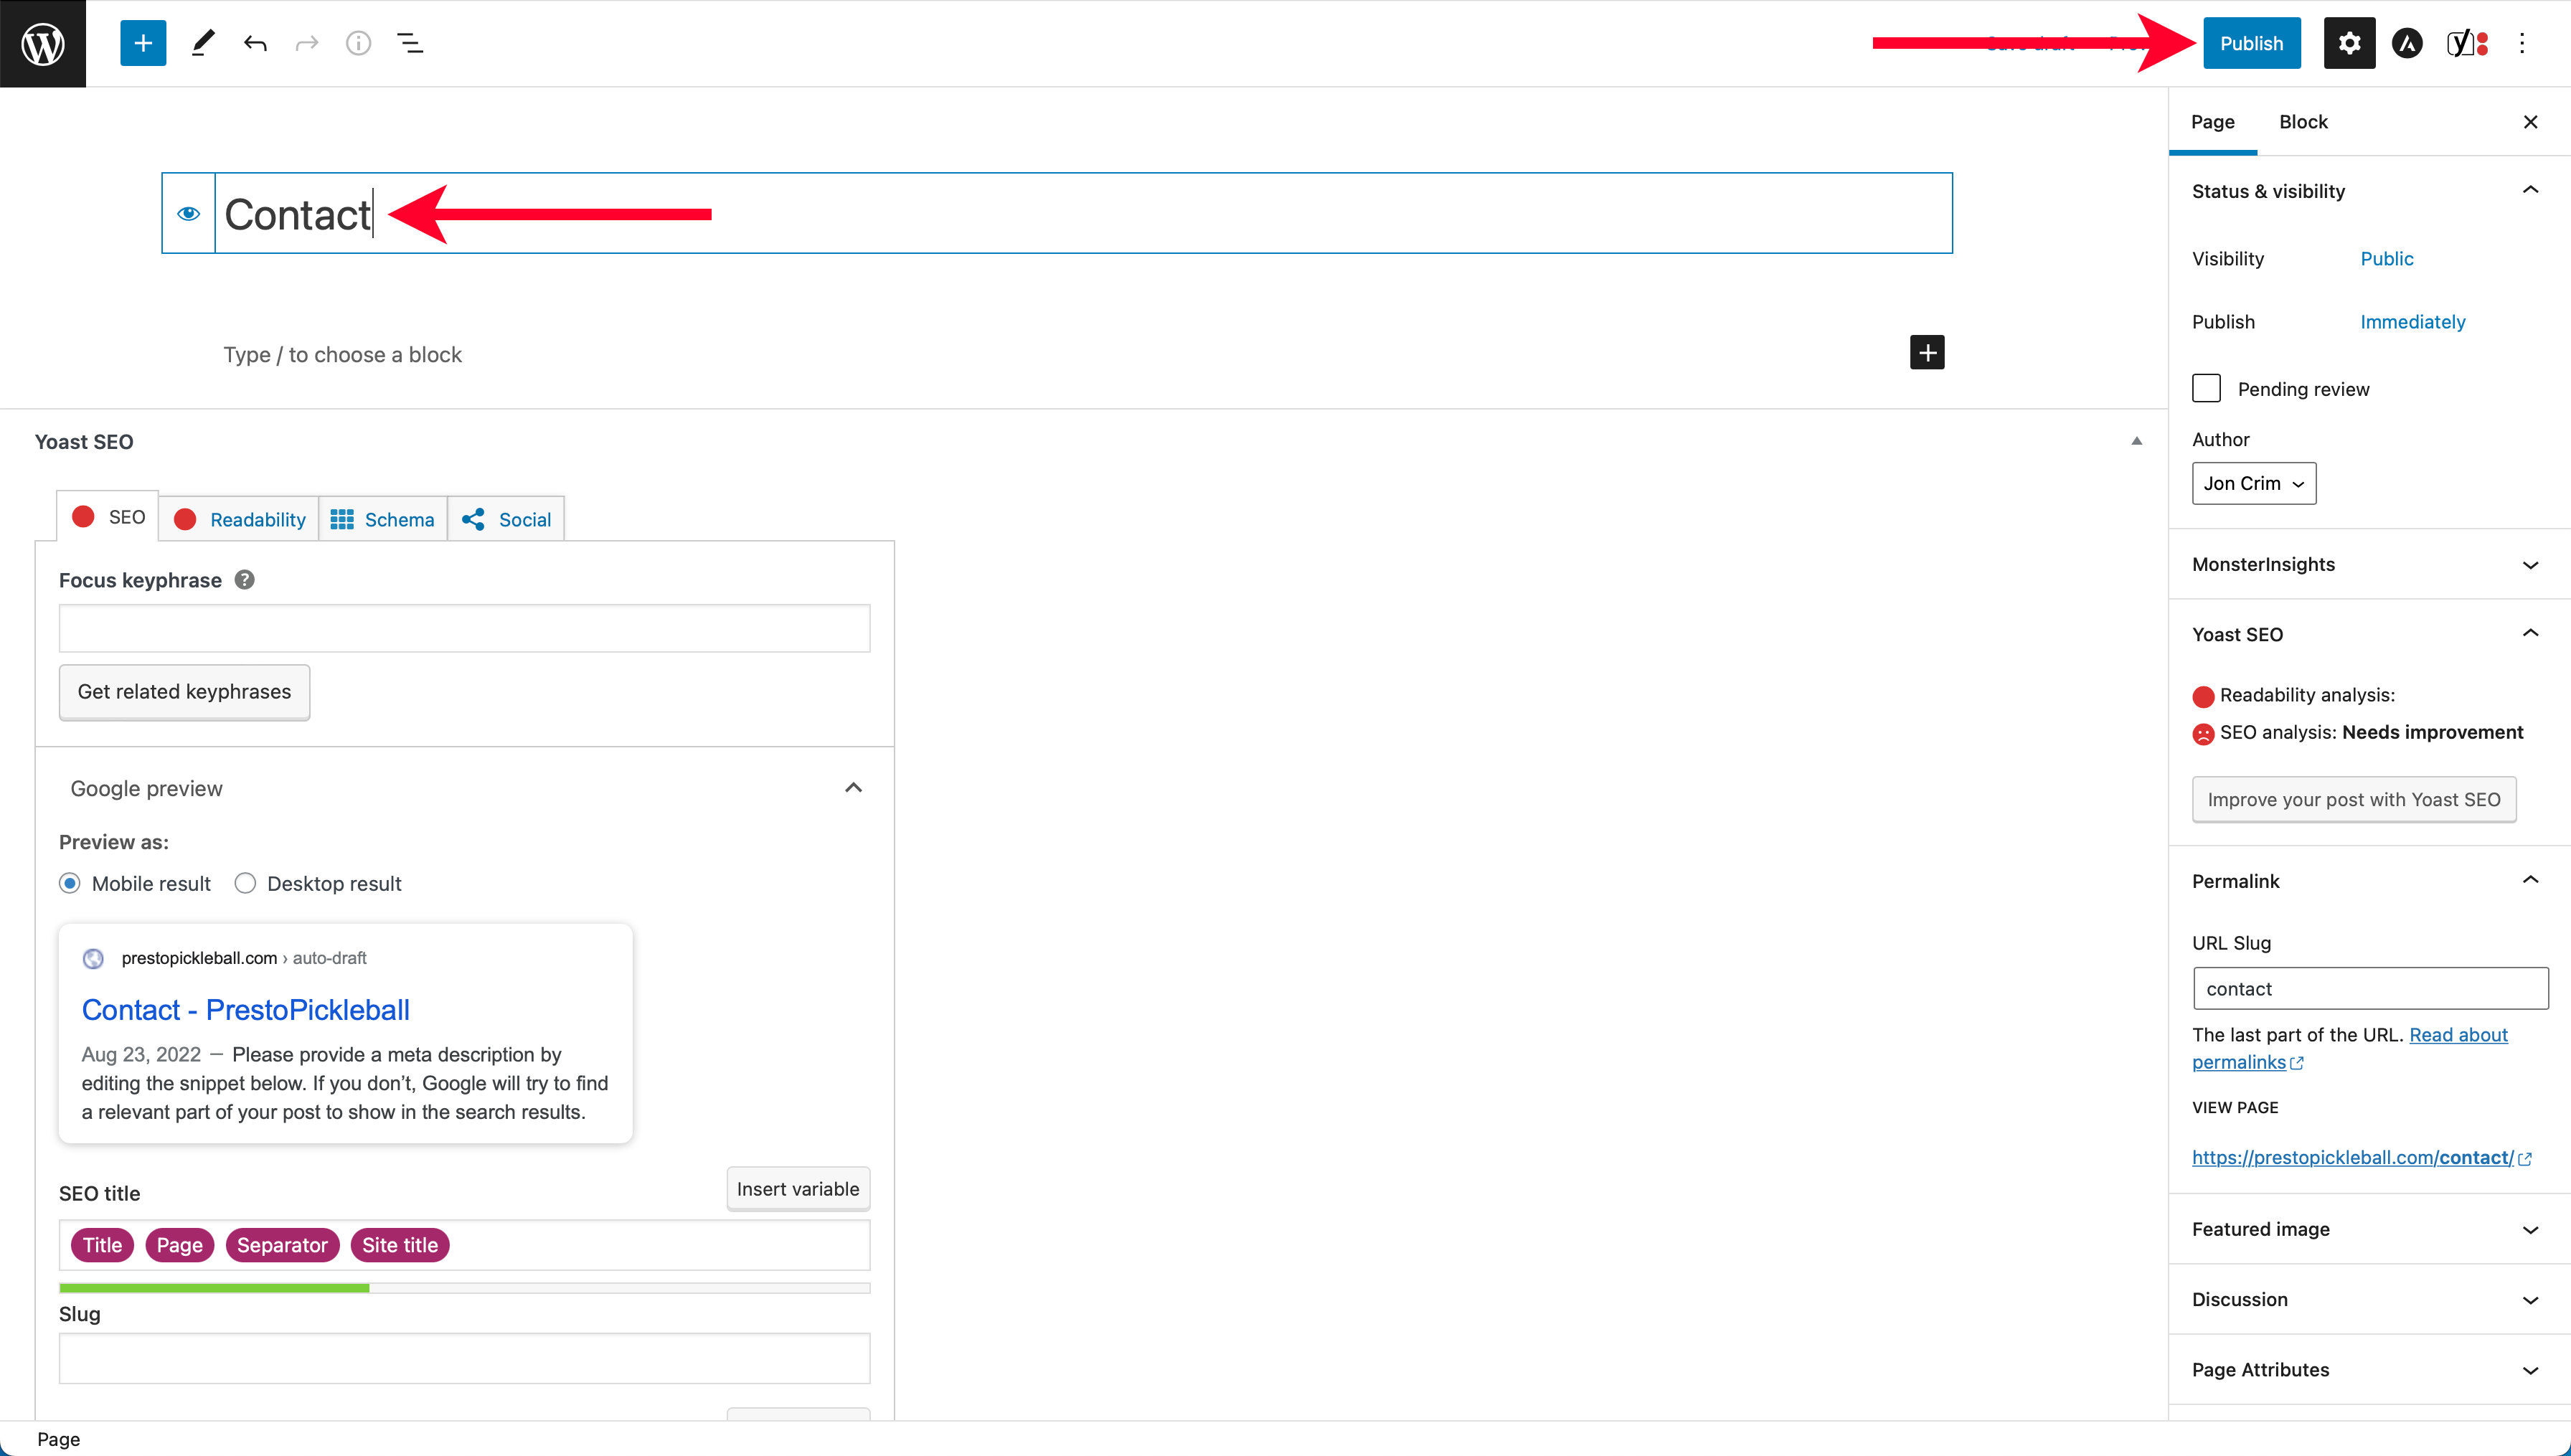
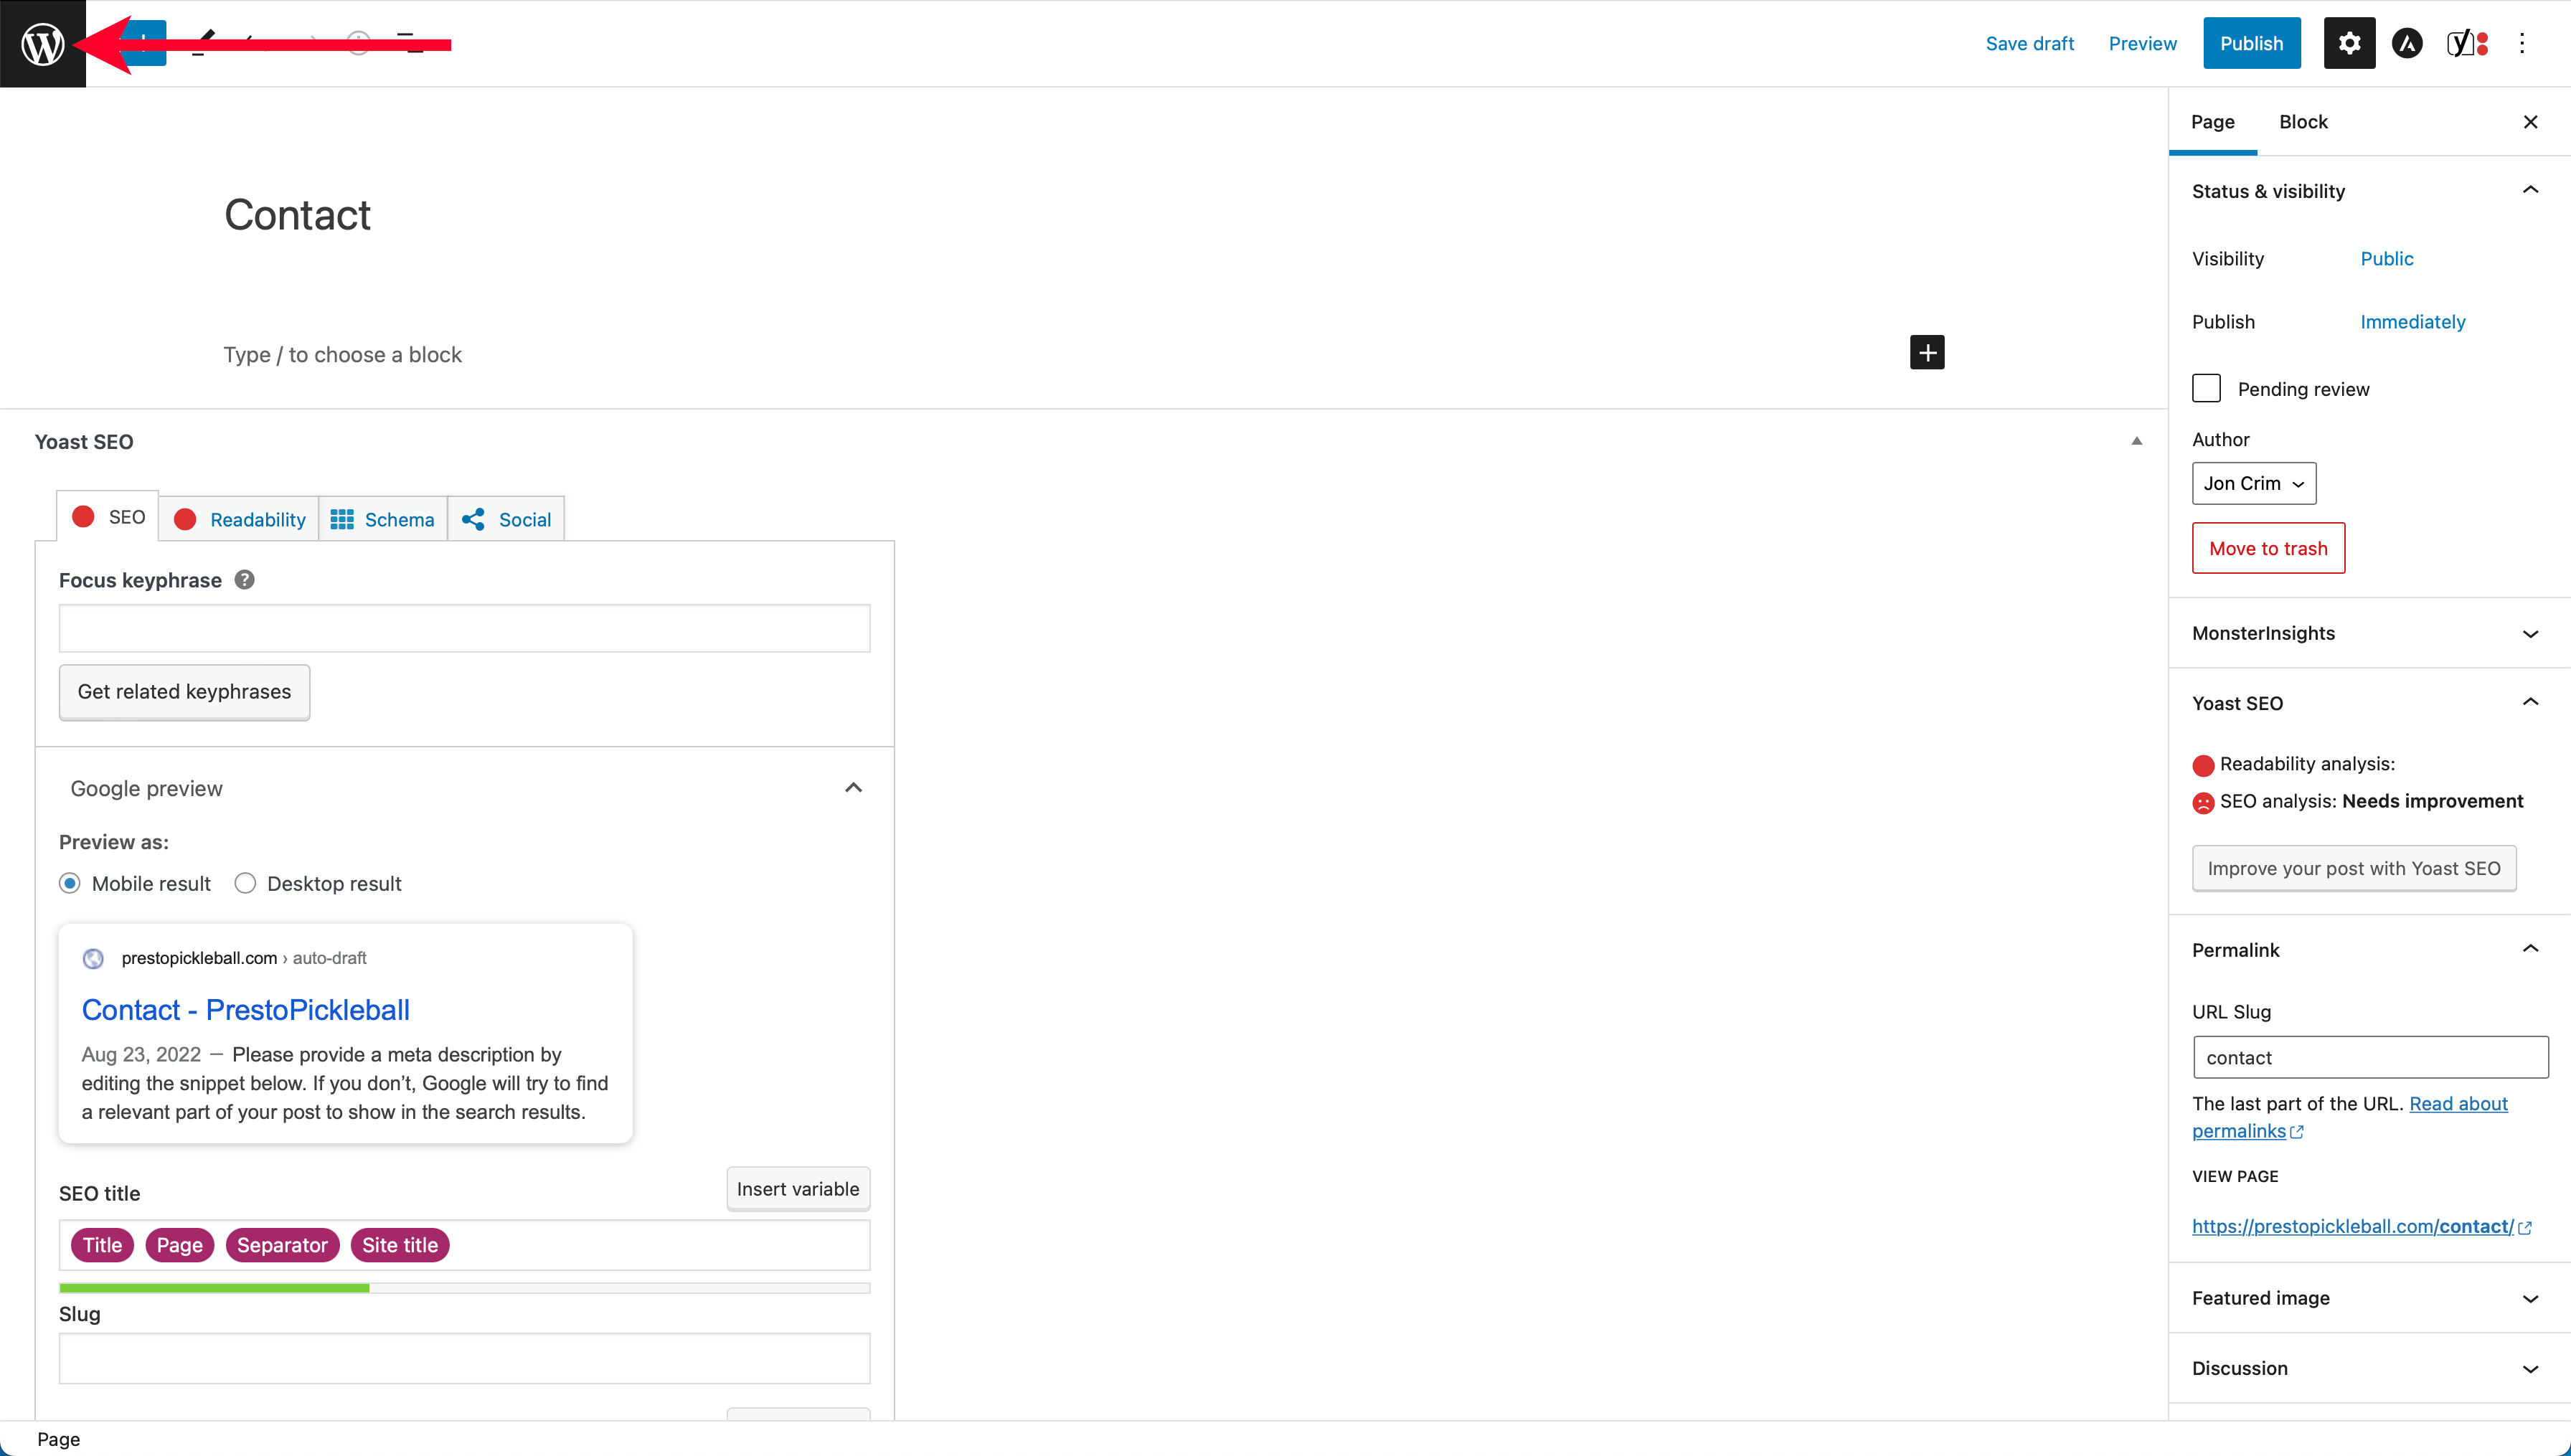
To return to your WordPress account, click the WordPress logo in the upper right corner of the page editor.
Creating the Contact Form
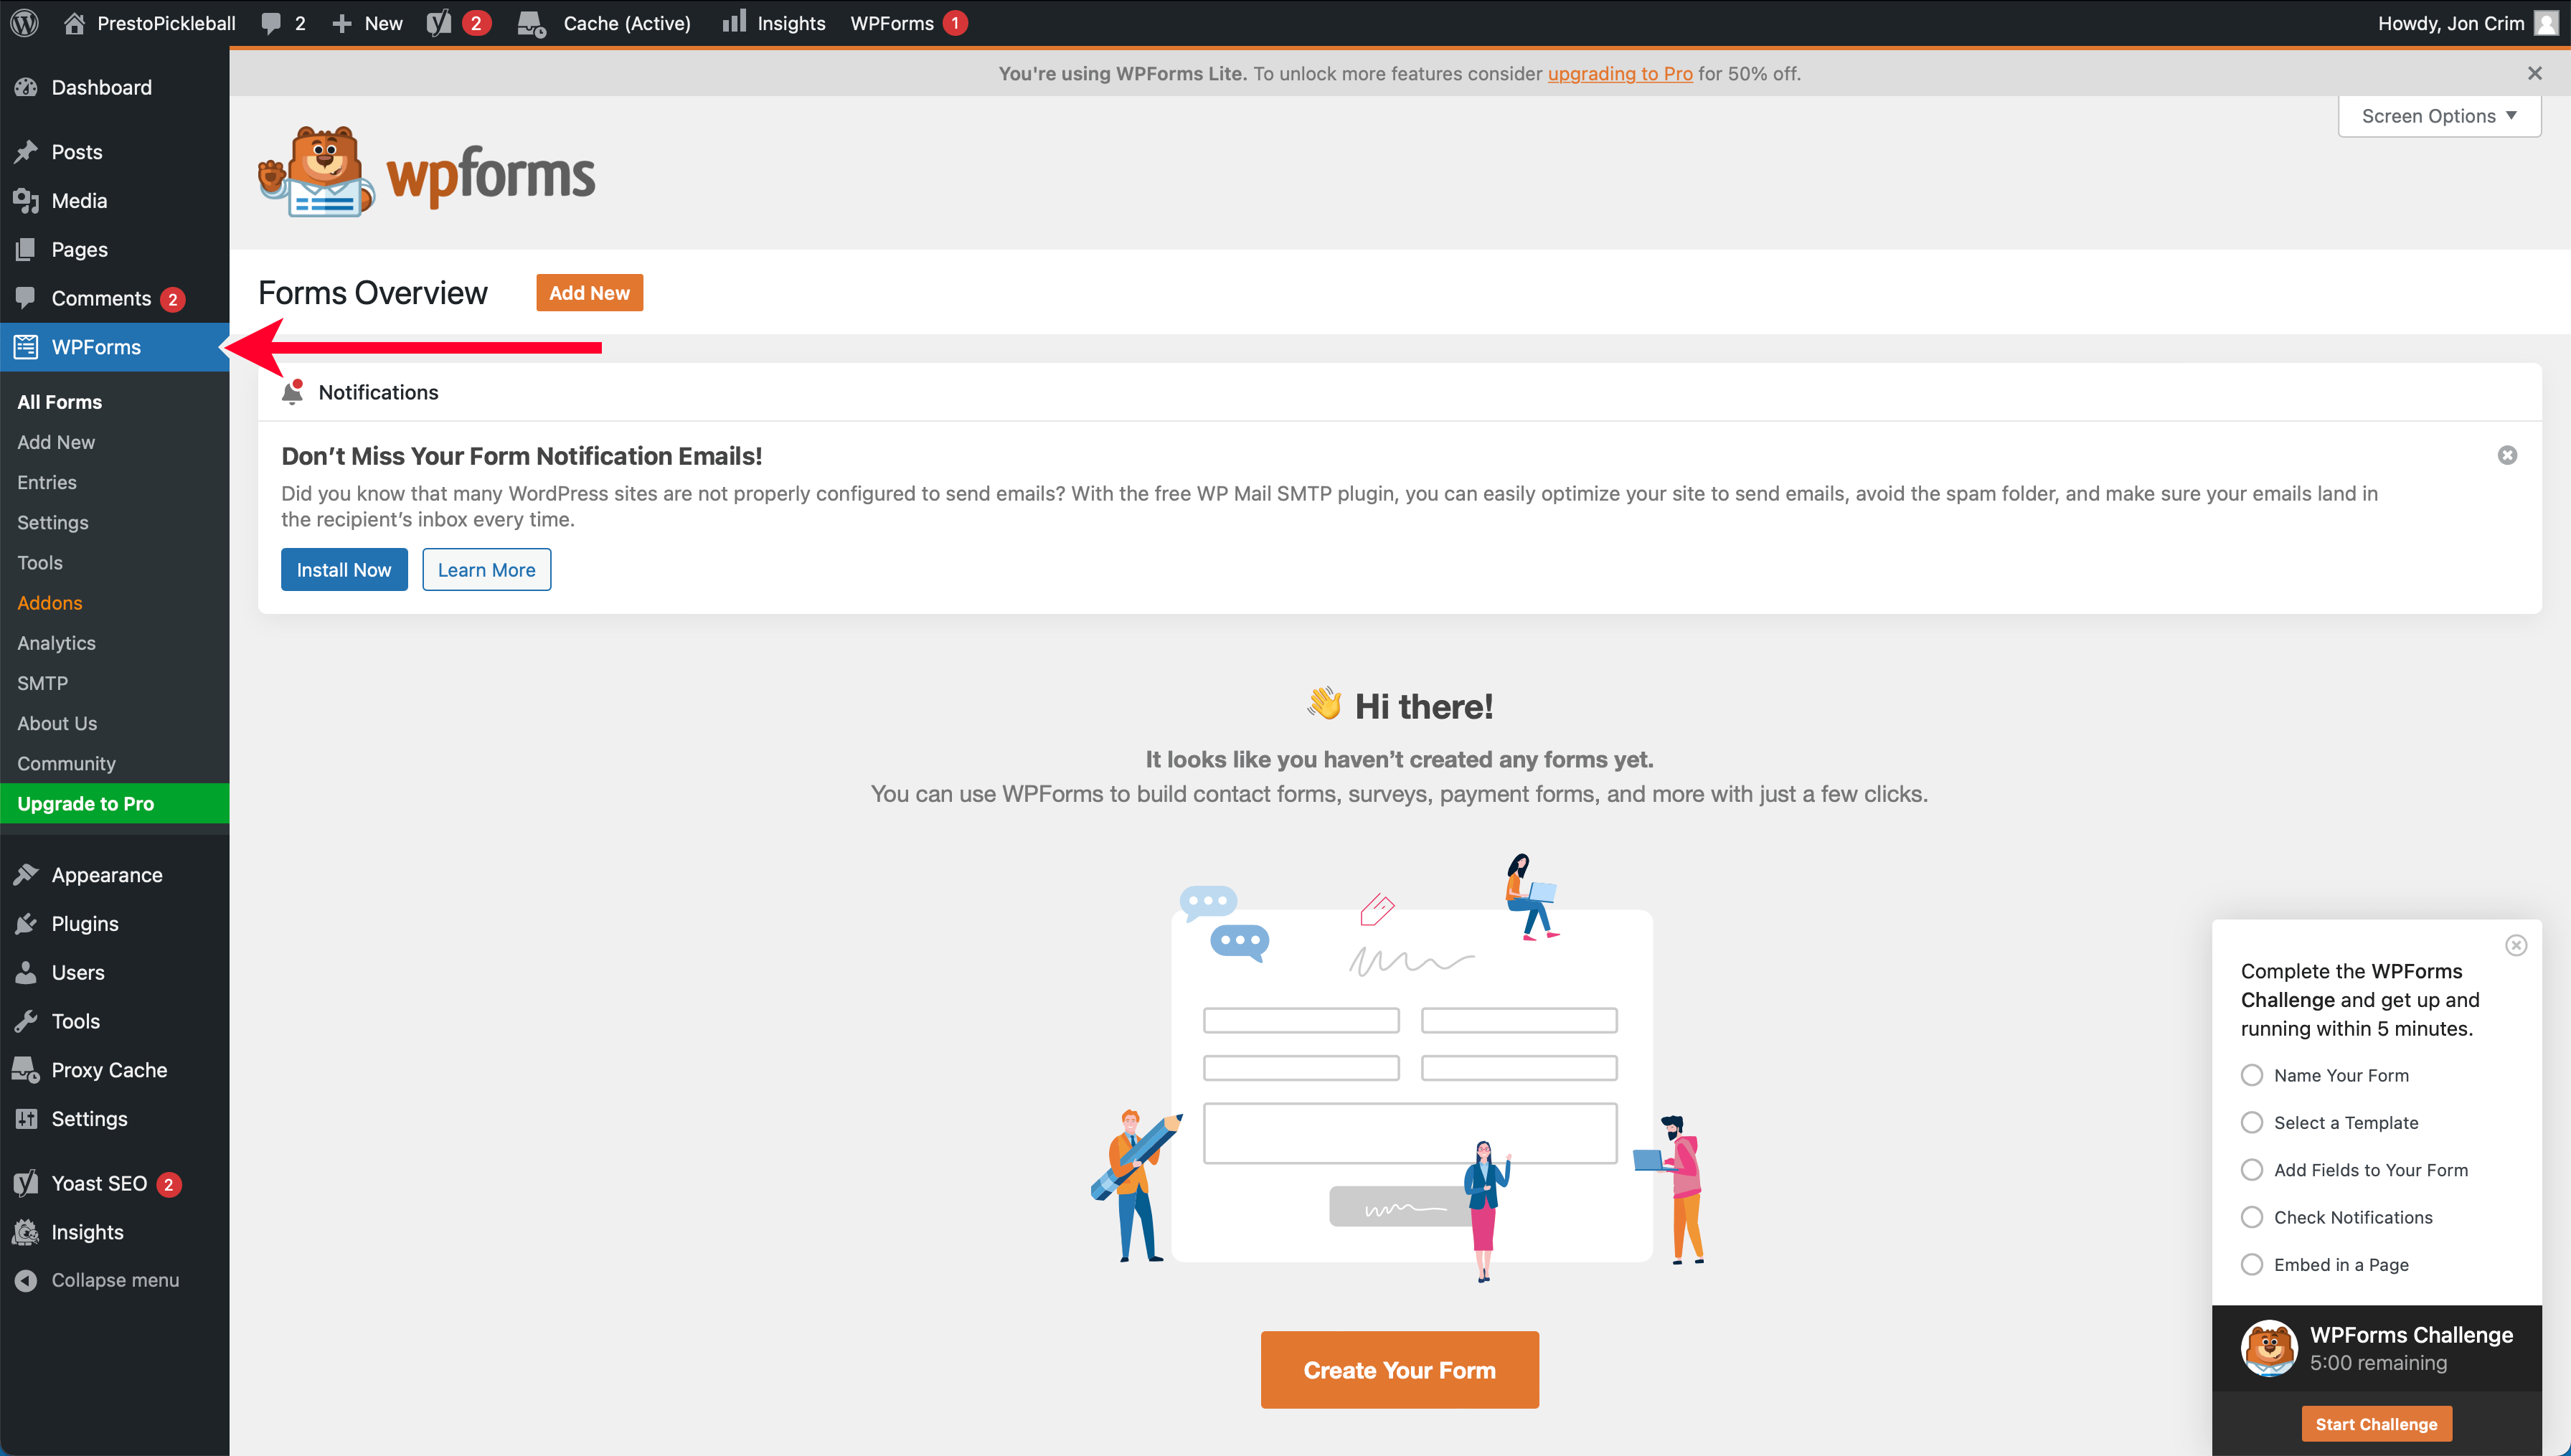
To create your contact form, we’ll use WPForms, so let’s select that menu item in your WordPress account’s left-hand navigation.
Before creating the form, we’ll set up CAPTCHA for your website to help protect your website from spam submissions.
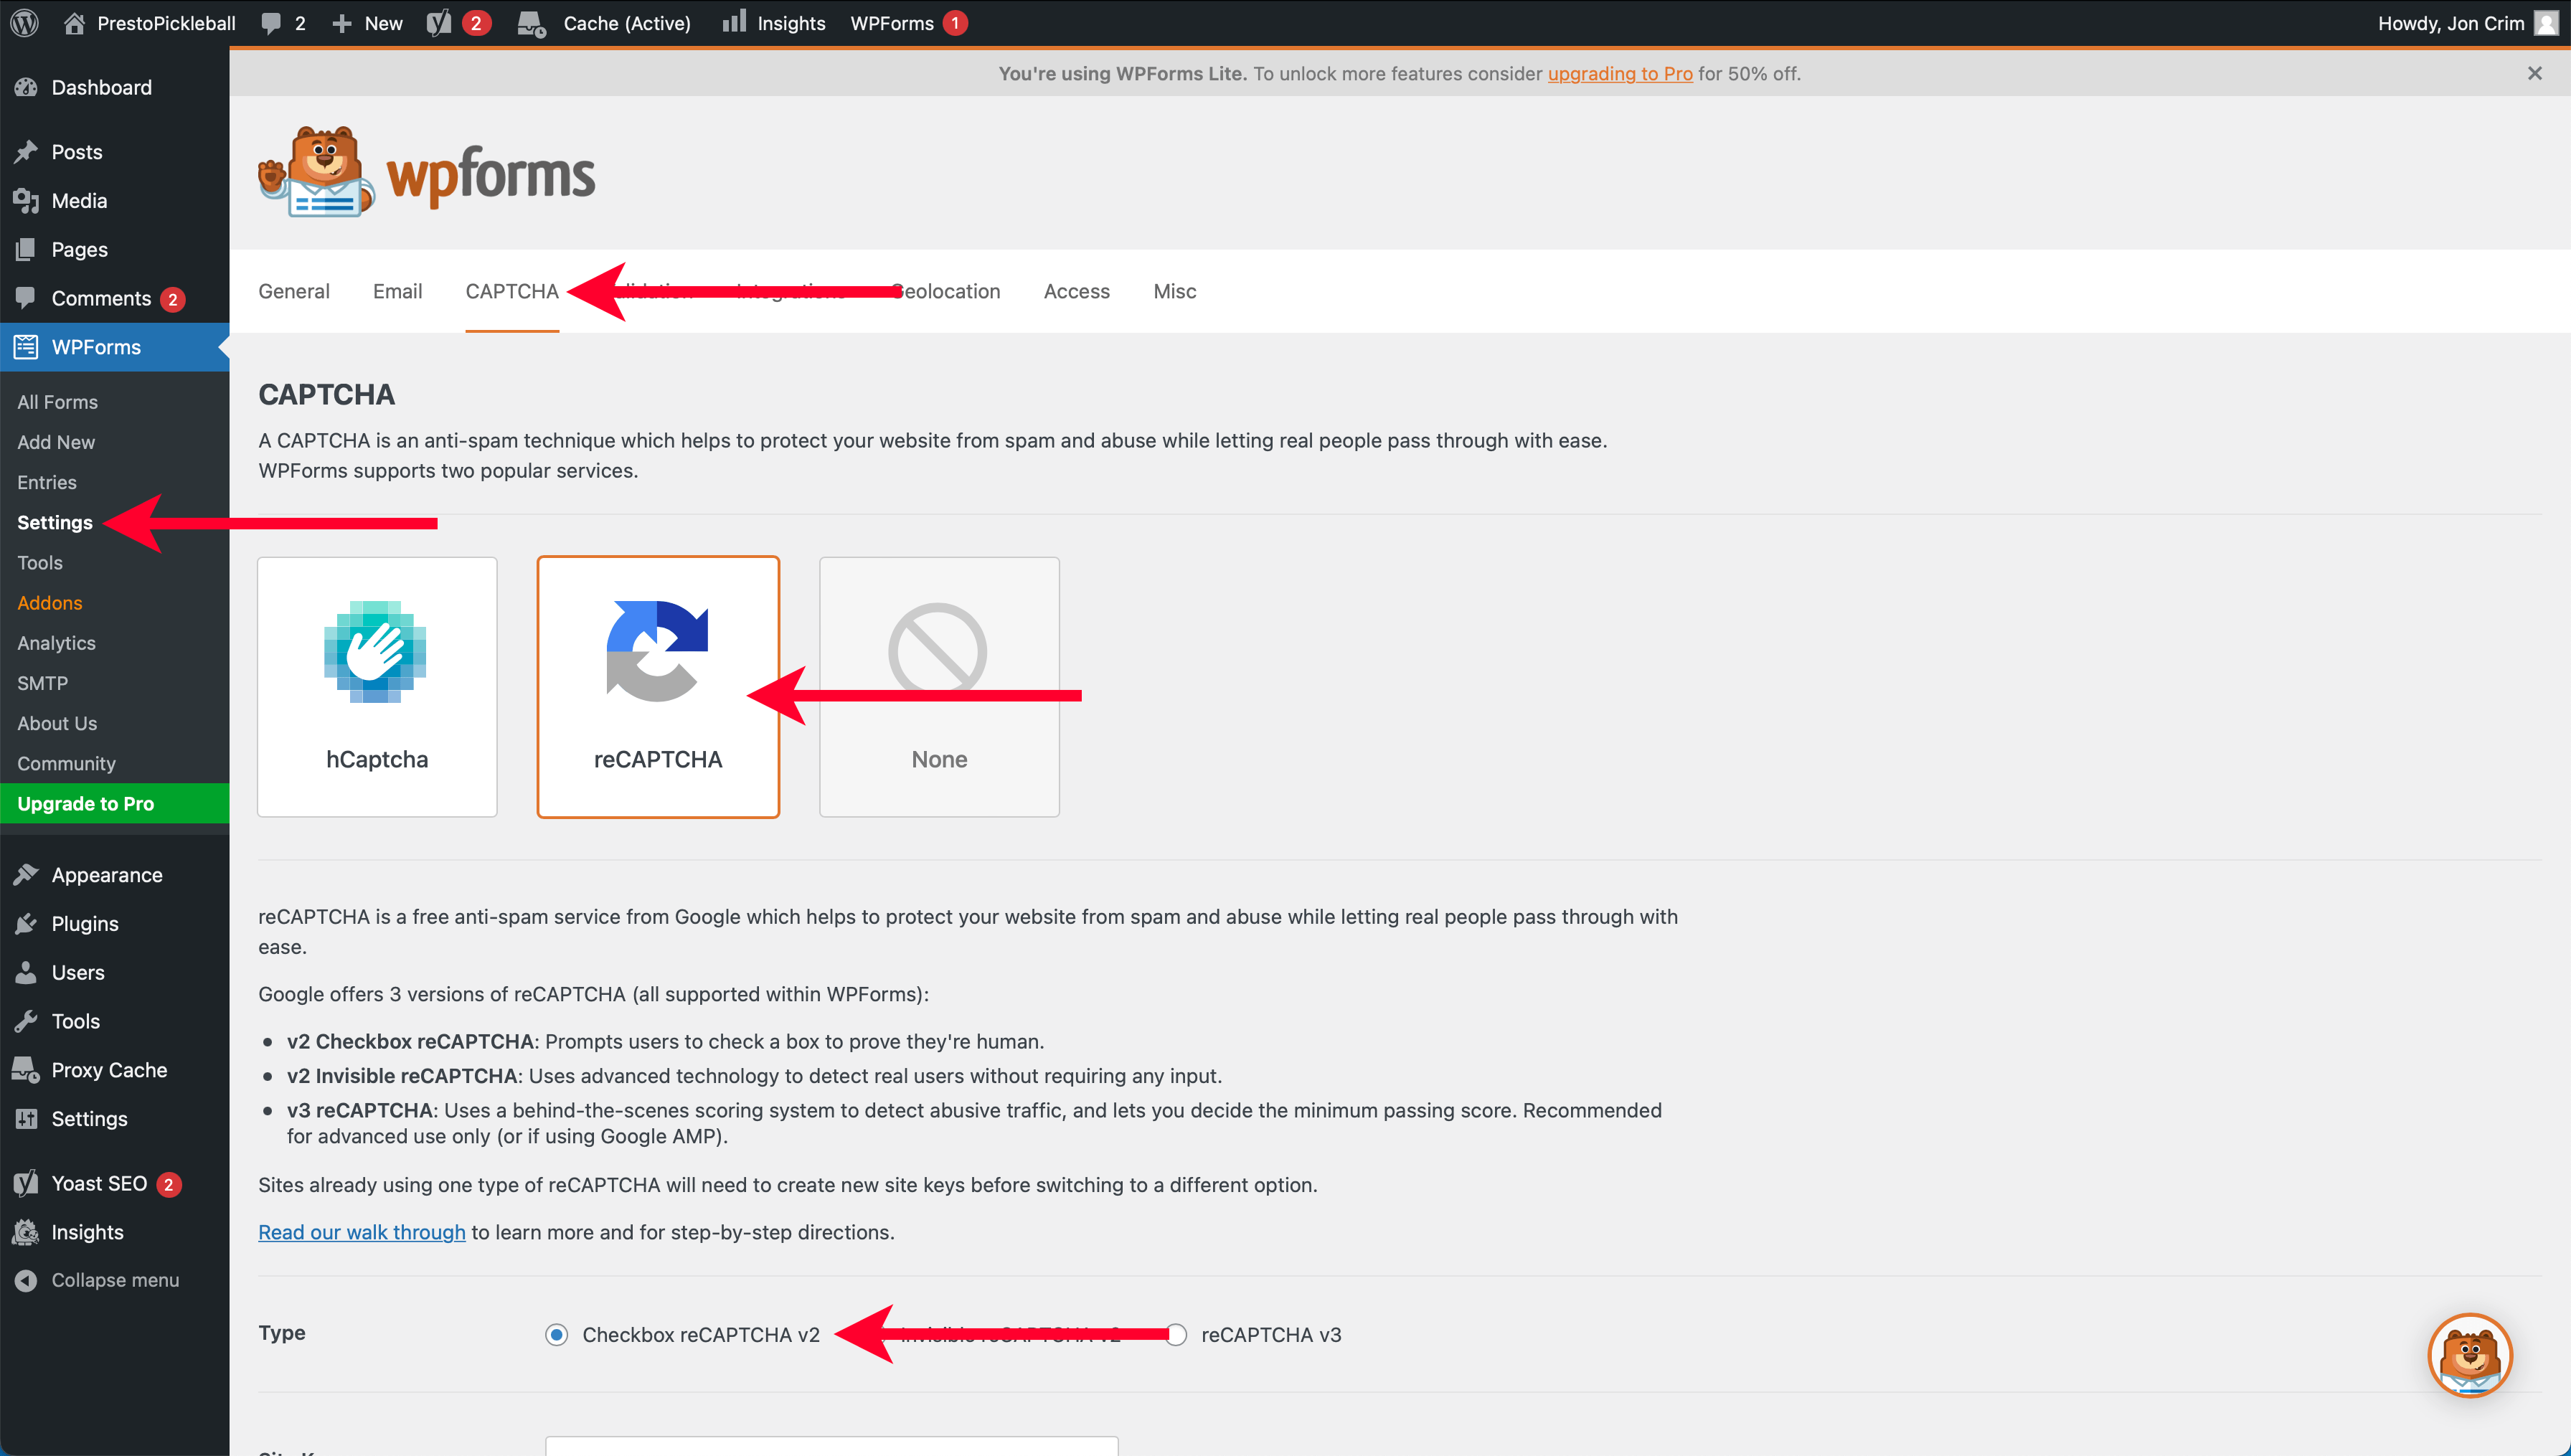
Set Up CAPTCHA
Under the “WPForms” menu, select “Settings,” then click the “CAPTCHA” tab. Next, select the “reCAPTCHA” tile and confirm the “Type” chosen is “Checkbox reCAPTCHA v2.”
Now visit Google’s reCAPTCHA setup page to generate a “Site Key” and “Secret Key.” If necessary, log in using the email address associated with your Google Analytics account that you set up earlier in this guide.
Enter the name of your website as the “Label,” select the “reCAPTCHA v2” radial, enter your domain, accept the terms, and click “Submit.”
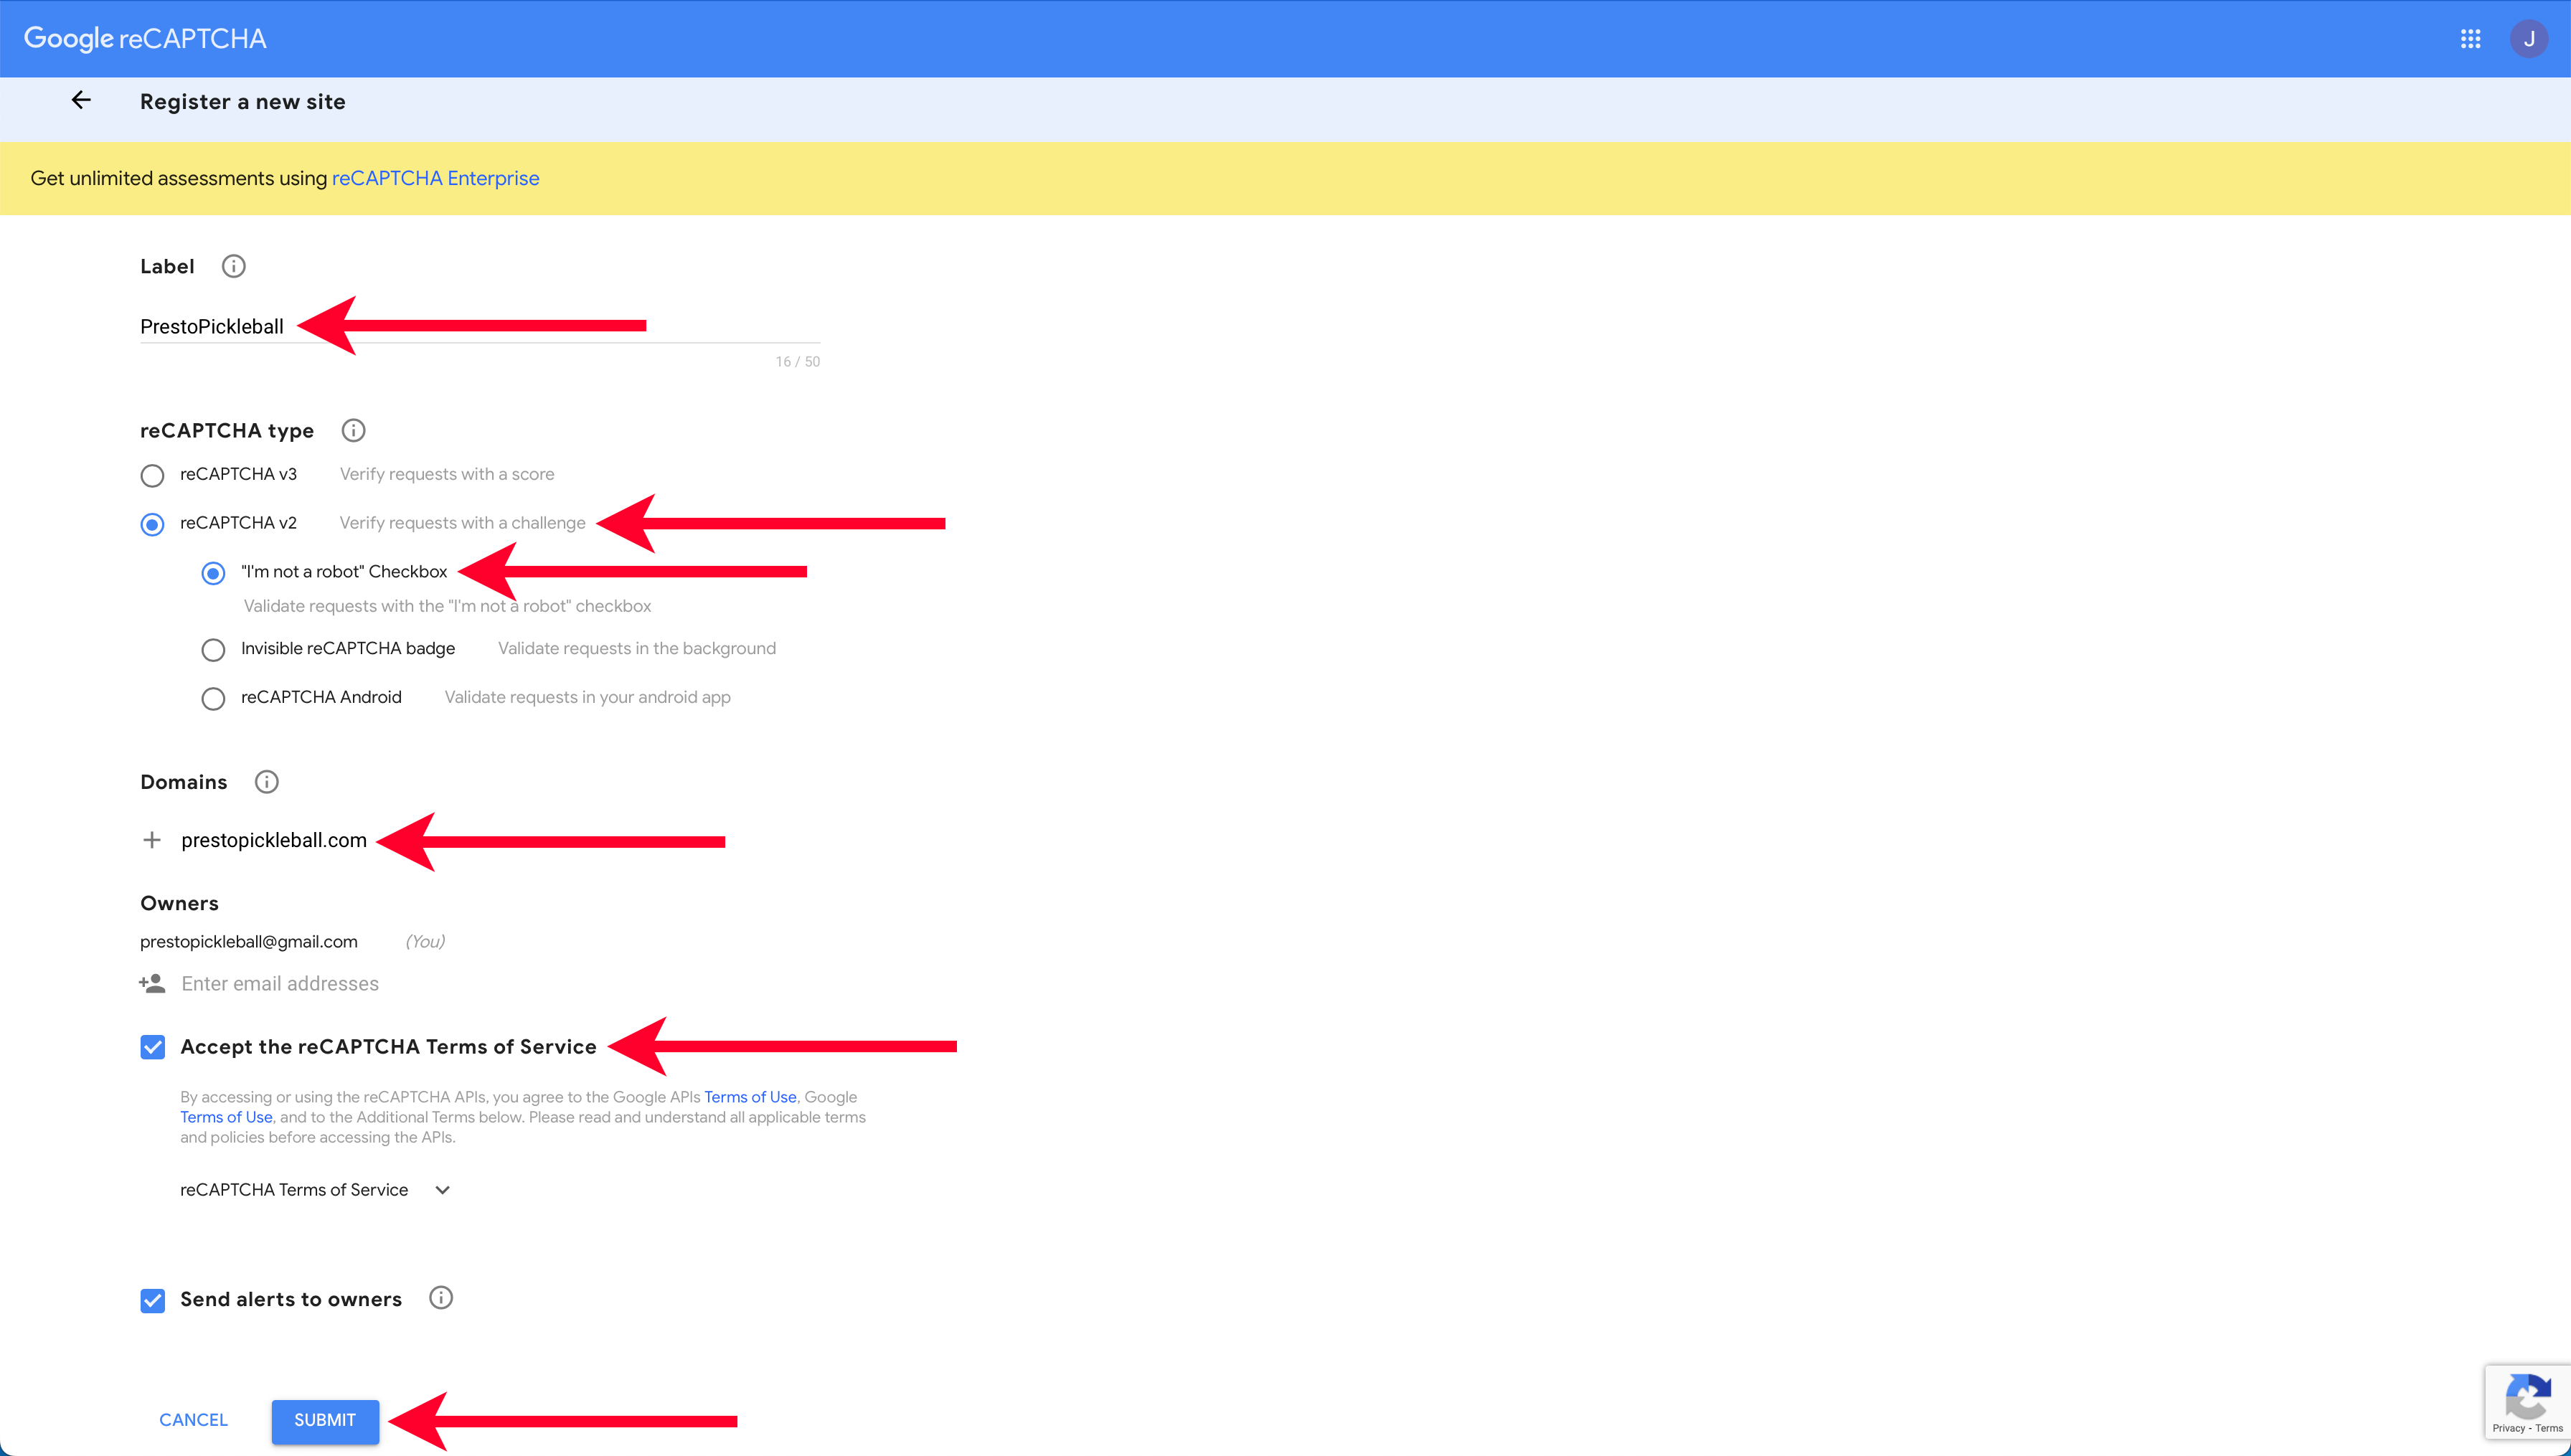
Now, click on “Copy Site Key” and return to your WordPress account.

Paste the “Site Key” into the corresponding field for WPForms CAPTCHA settings. Return to Google’s reCAPTCHA page and click “Copy Secret Key.” Then, jump back to your WordPress account, paste it into the corresponding field, and click “Save Settings.”

Now let’s create your contact form.
Creating a Contact Form
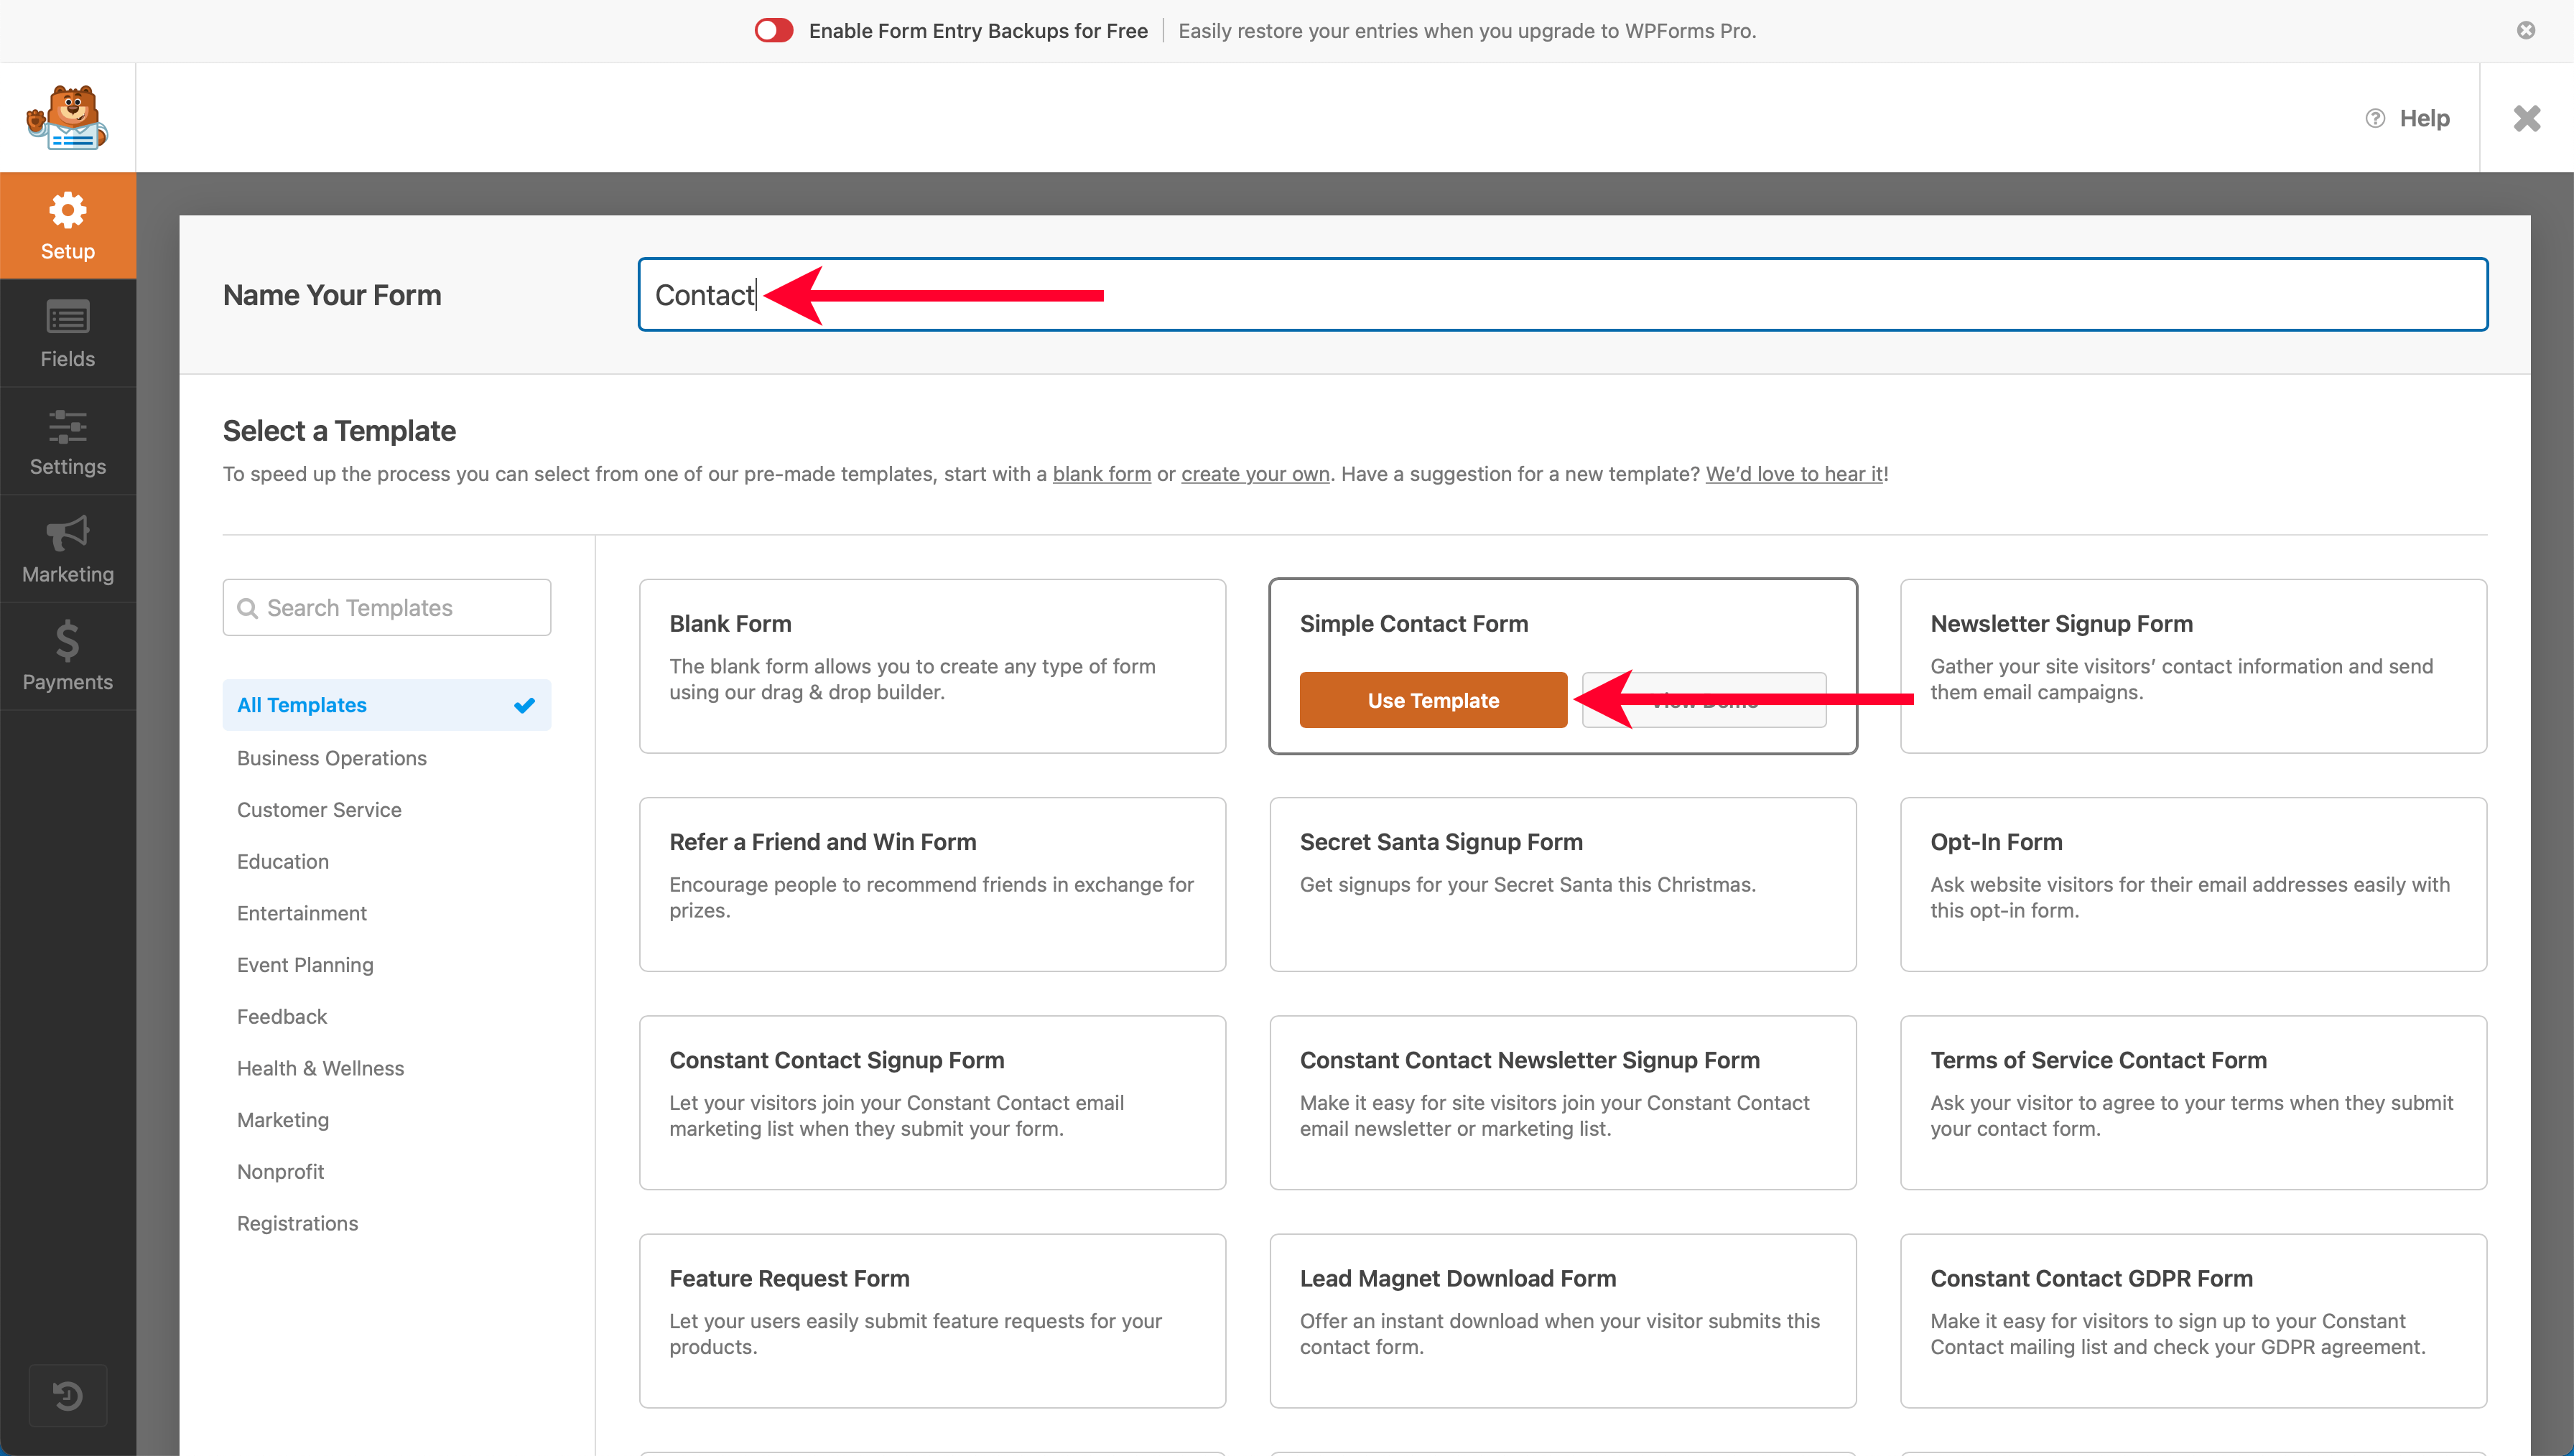
Select “WPForms” from your WordPress account’s left-hand navigation, then select the “All Forms” menu.

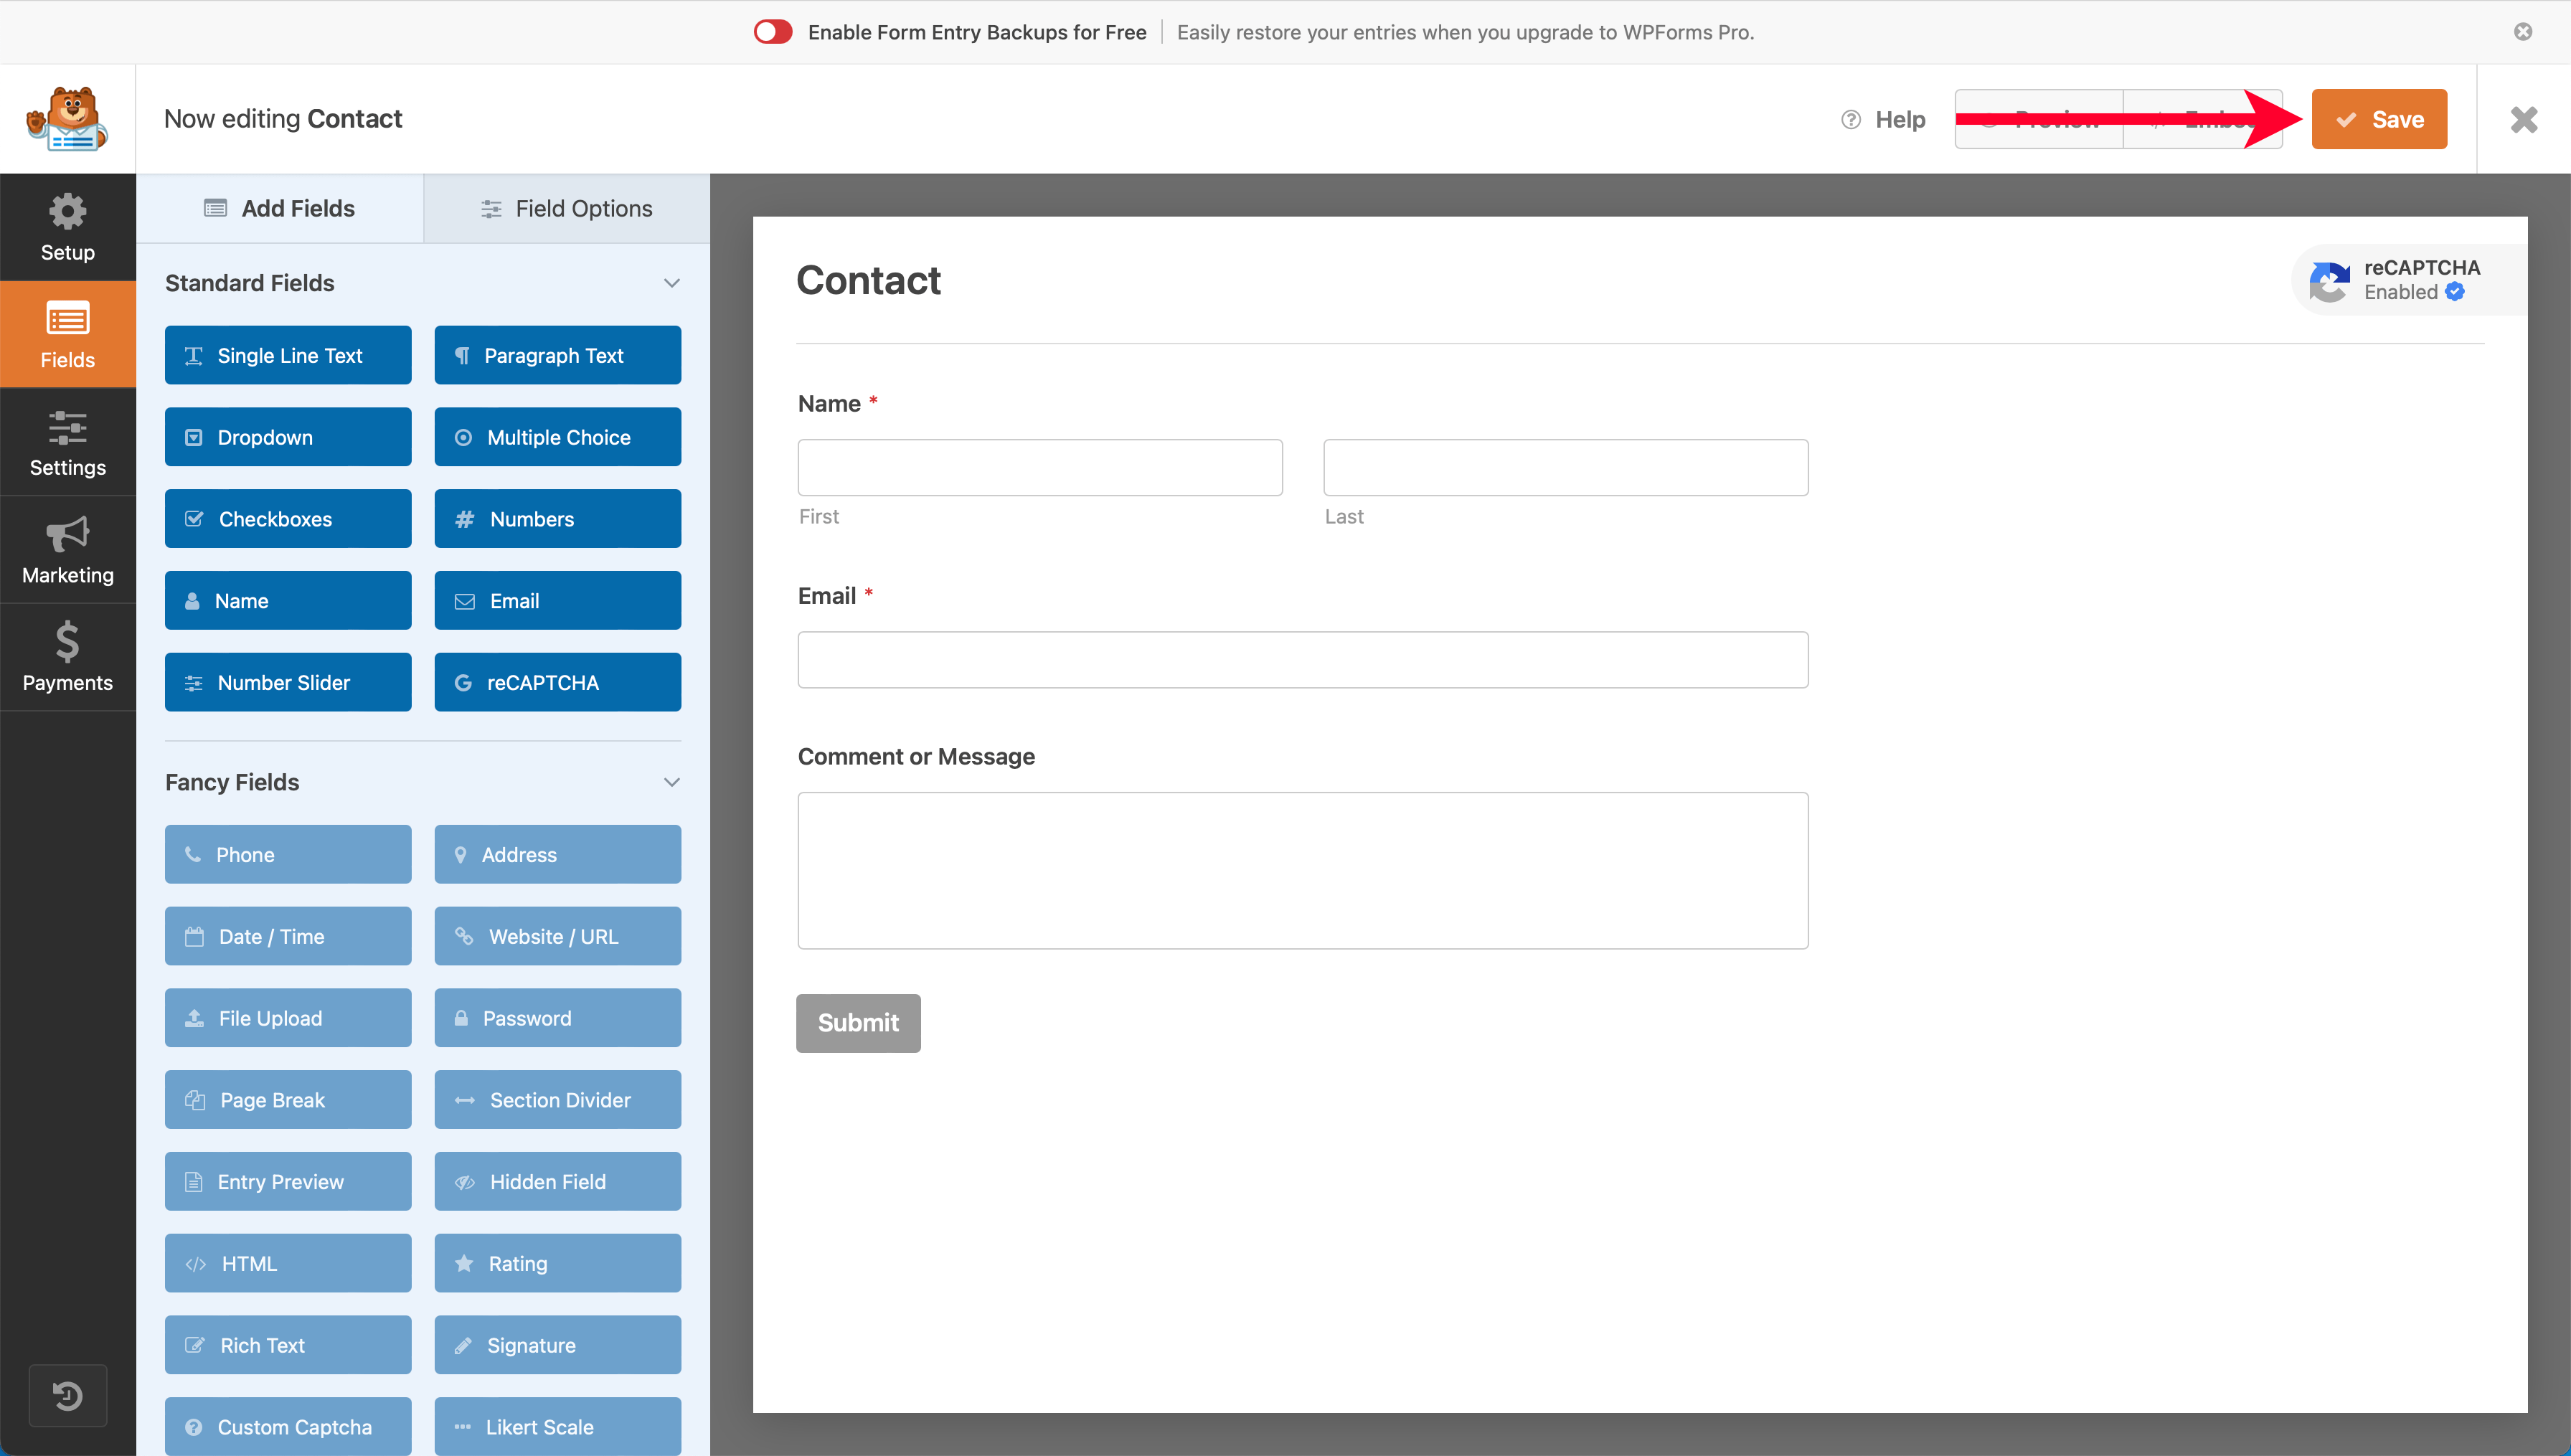
Start by giving your form a name, “Contact” will do. Next, hover over the “Simple Contact Form” tile and click “Use Template.”
WPForms will create your form. Next, select “CAPTCHA” from the list of “Standard Fields” options.
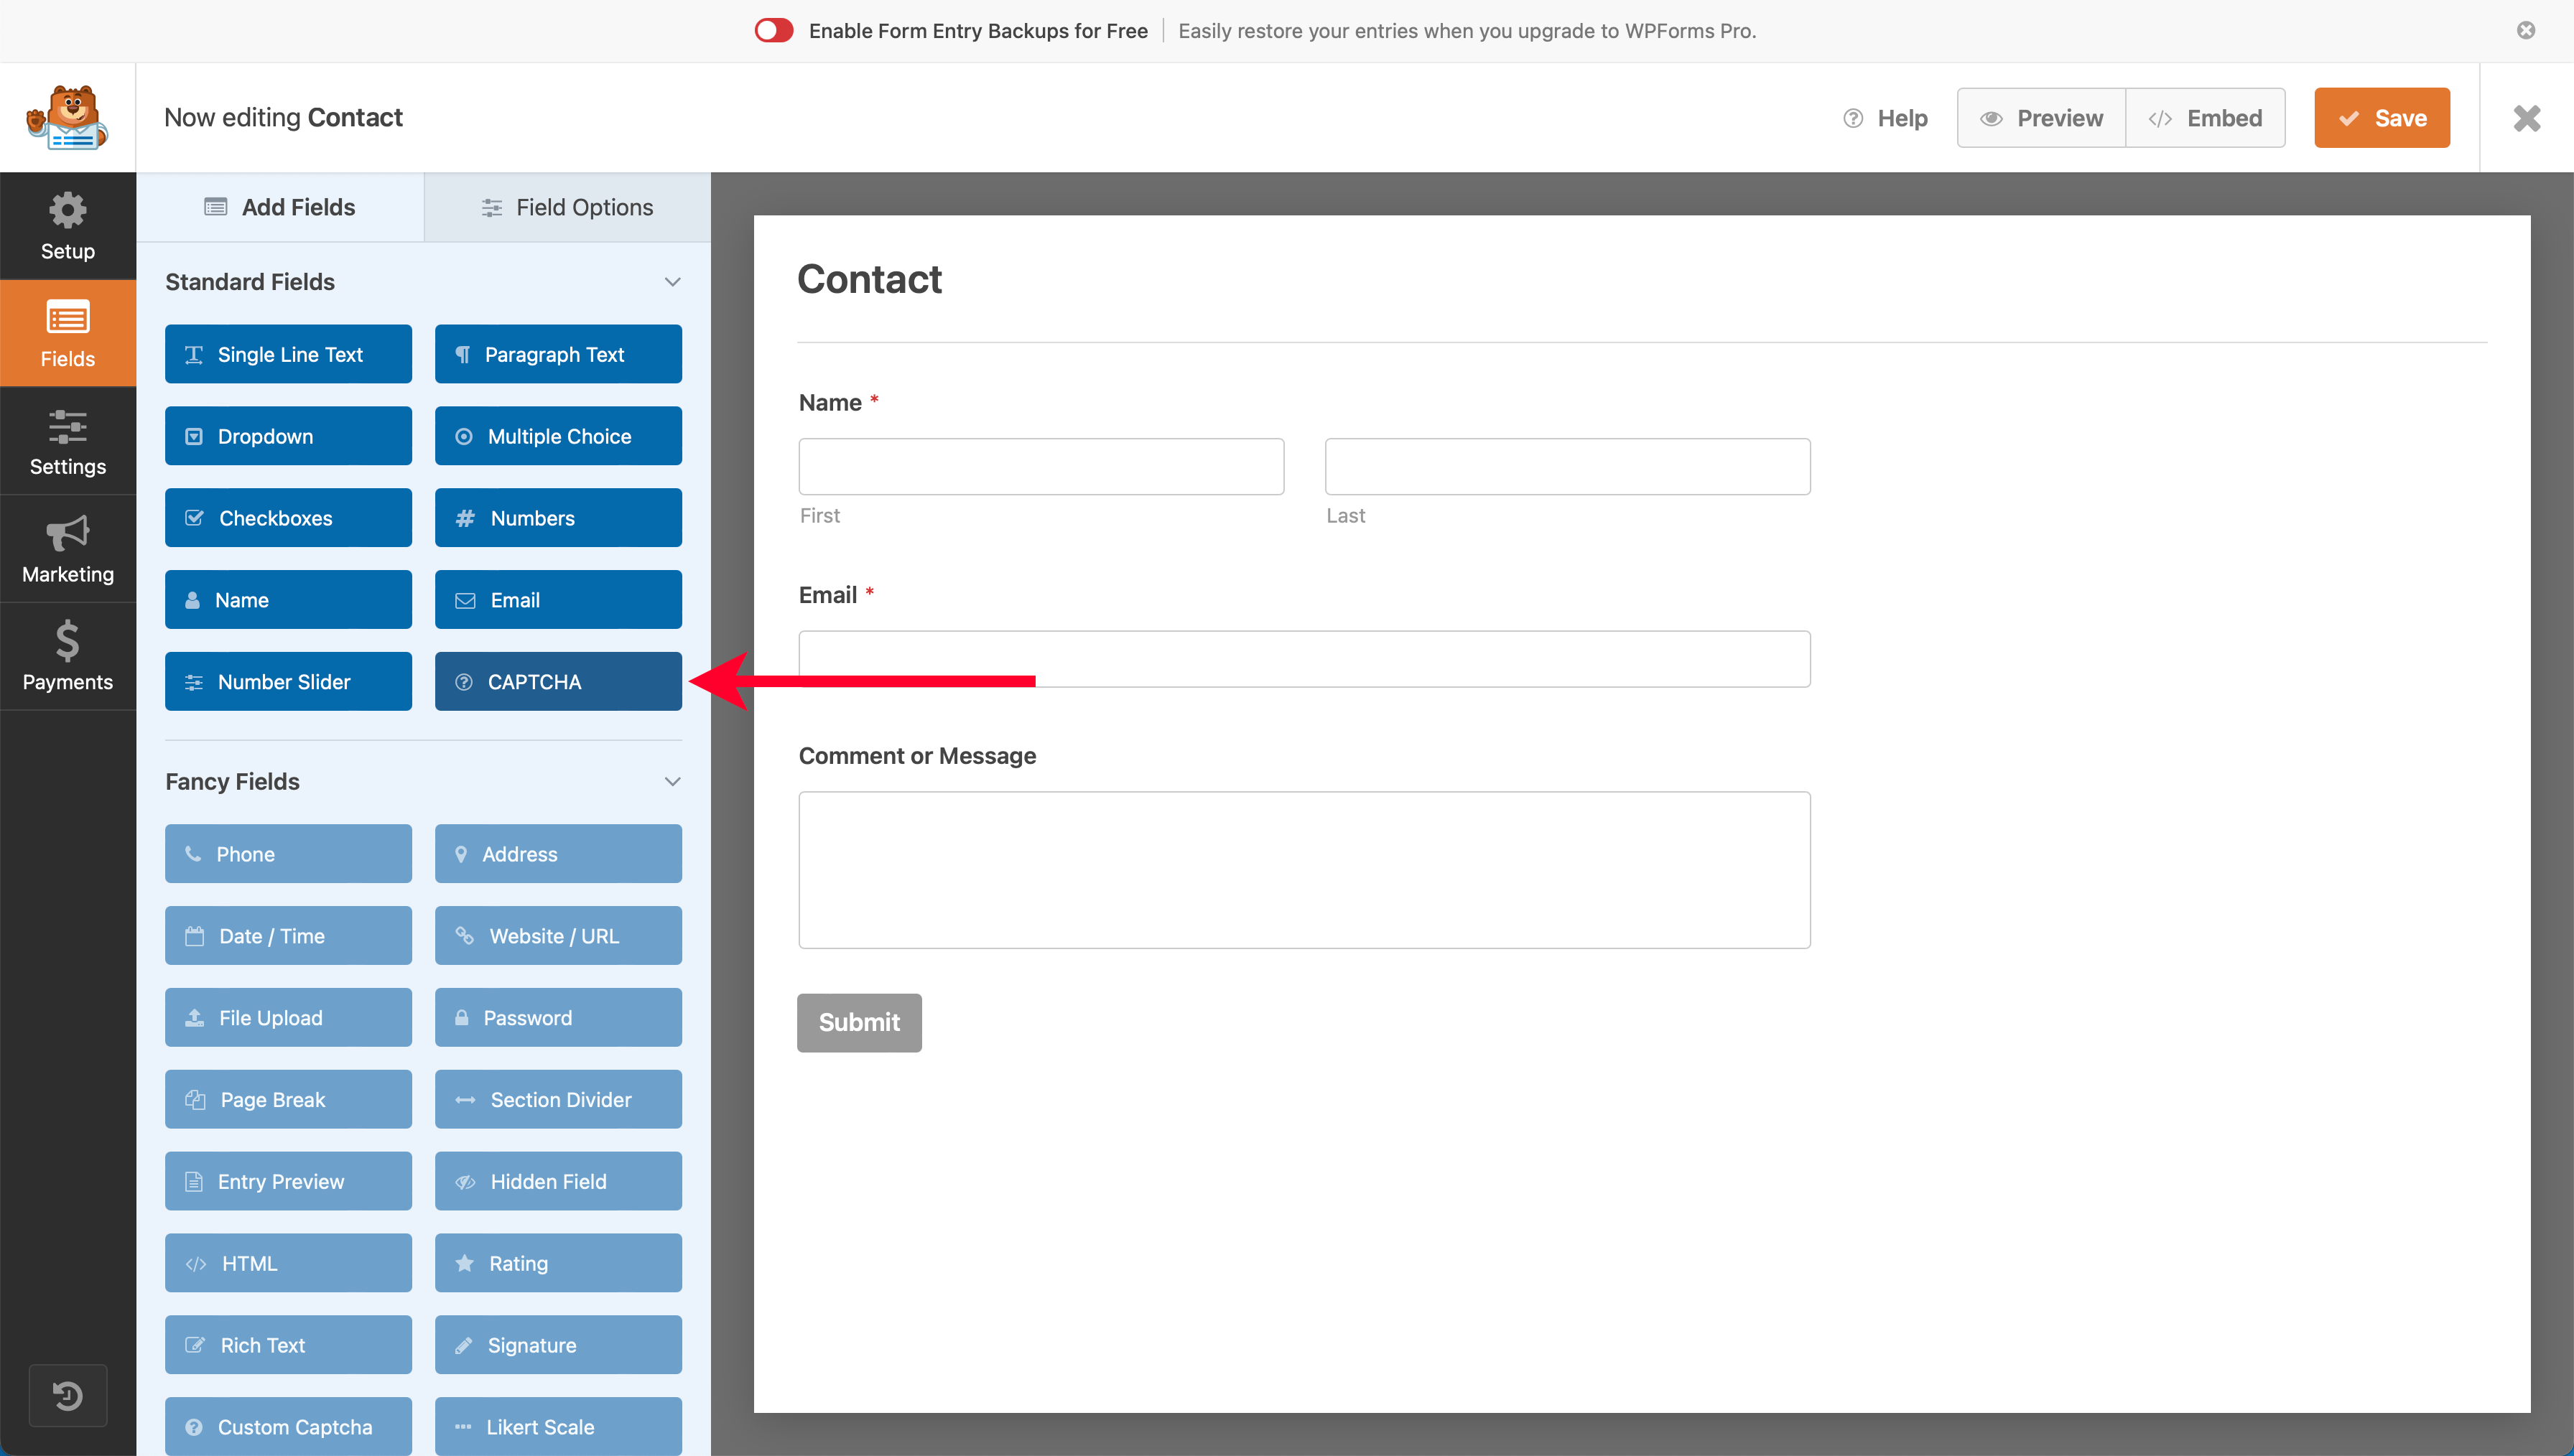
Now click the “Save” button in the upper right-hand corner of the page.
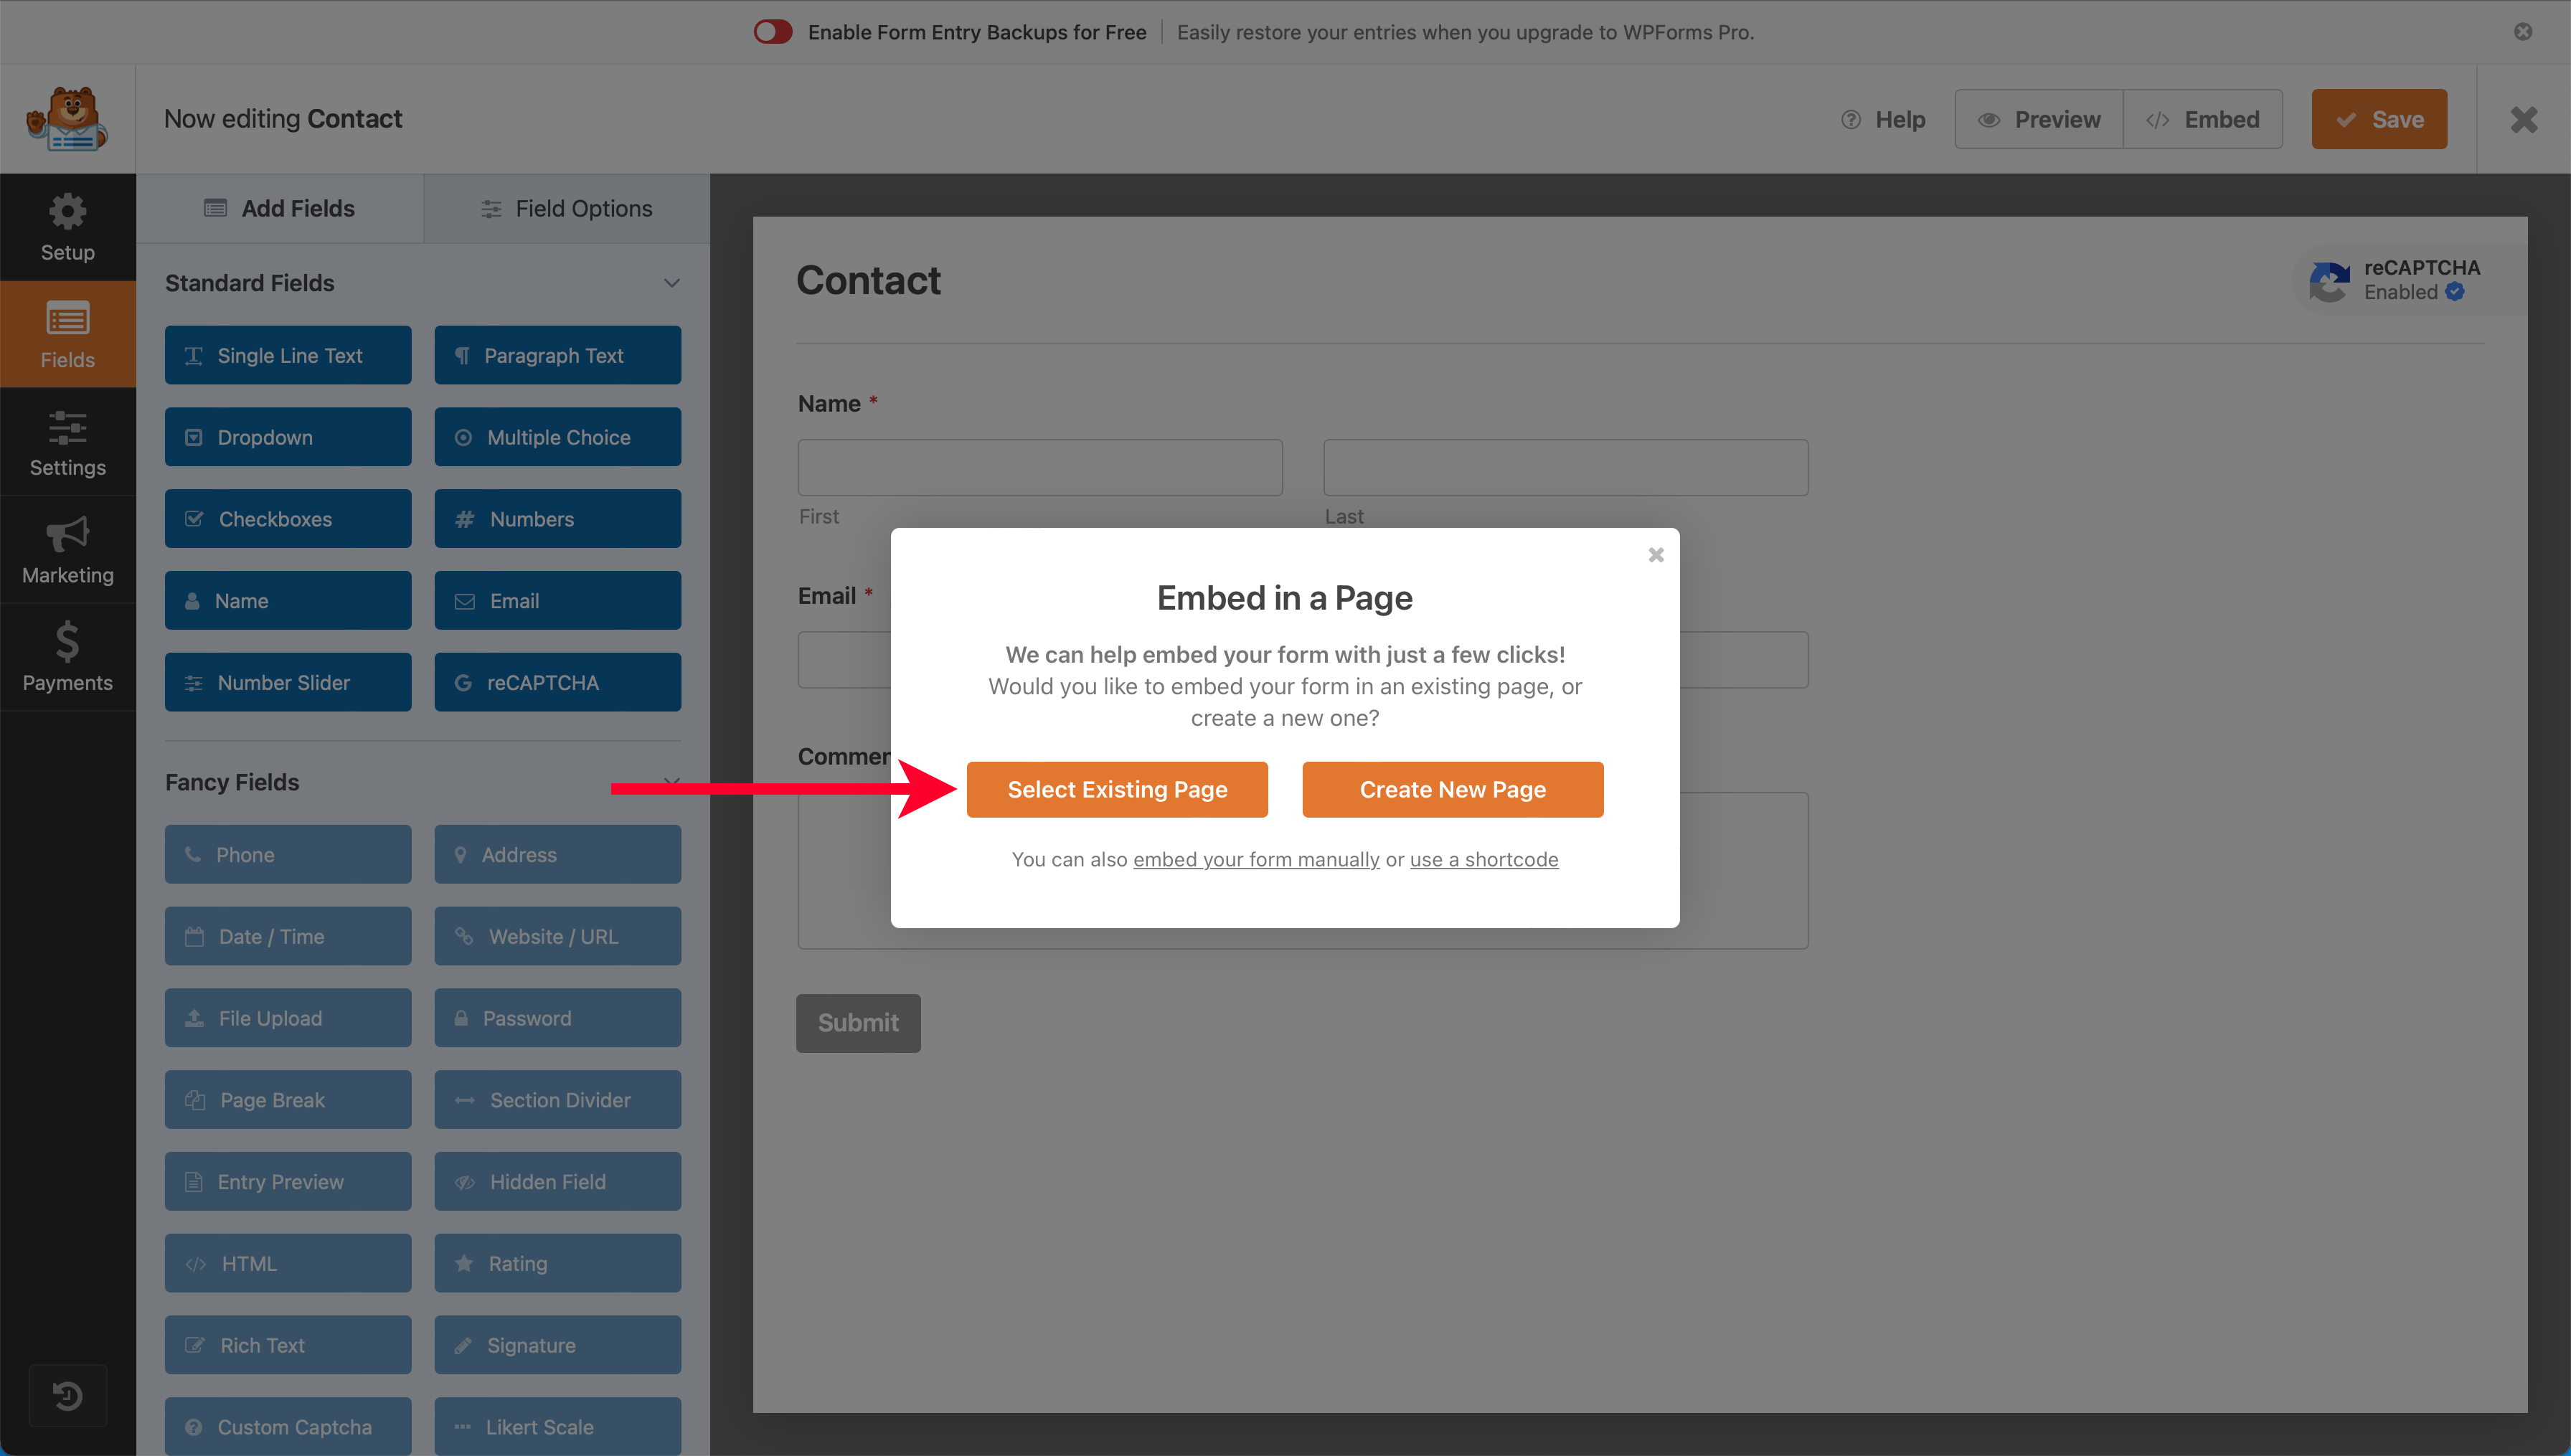
Next, click the “Embed” button.

From the popup, click “Select Existing Page.”
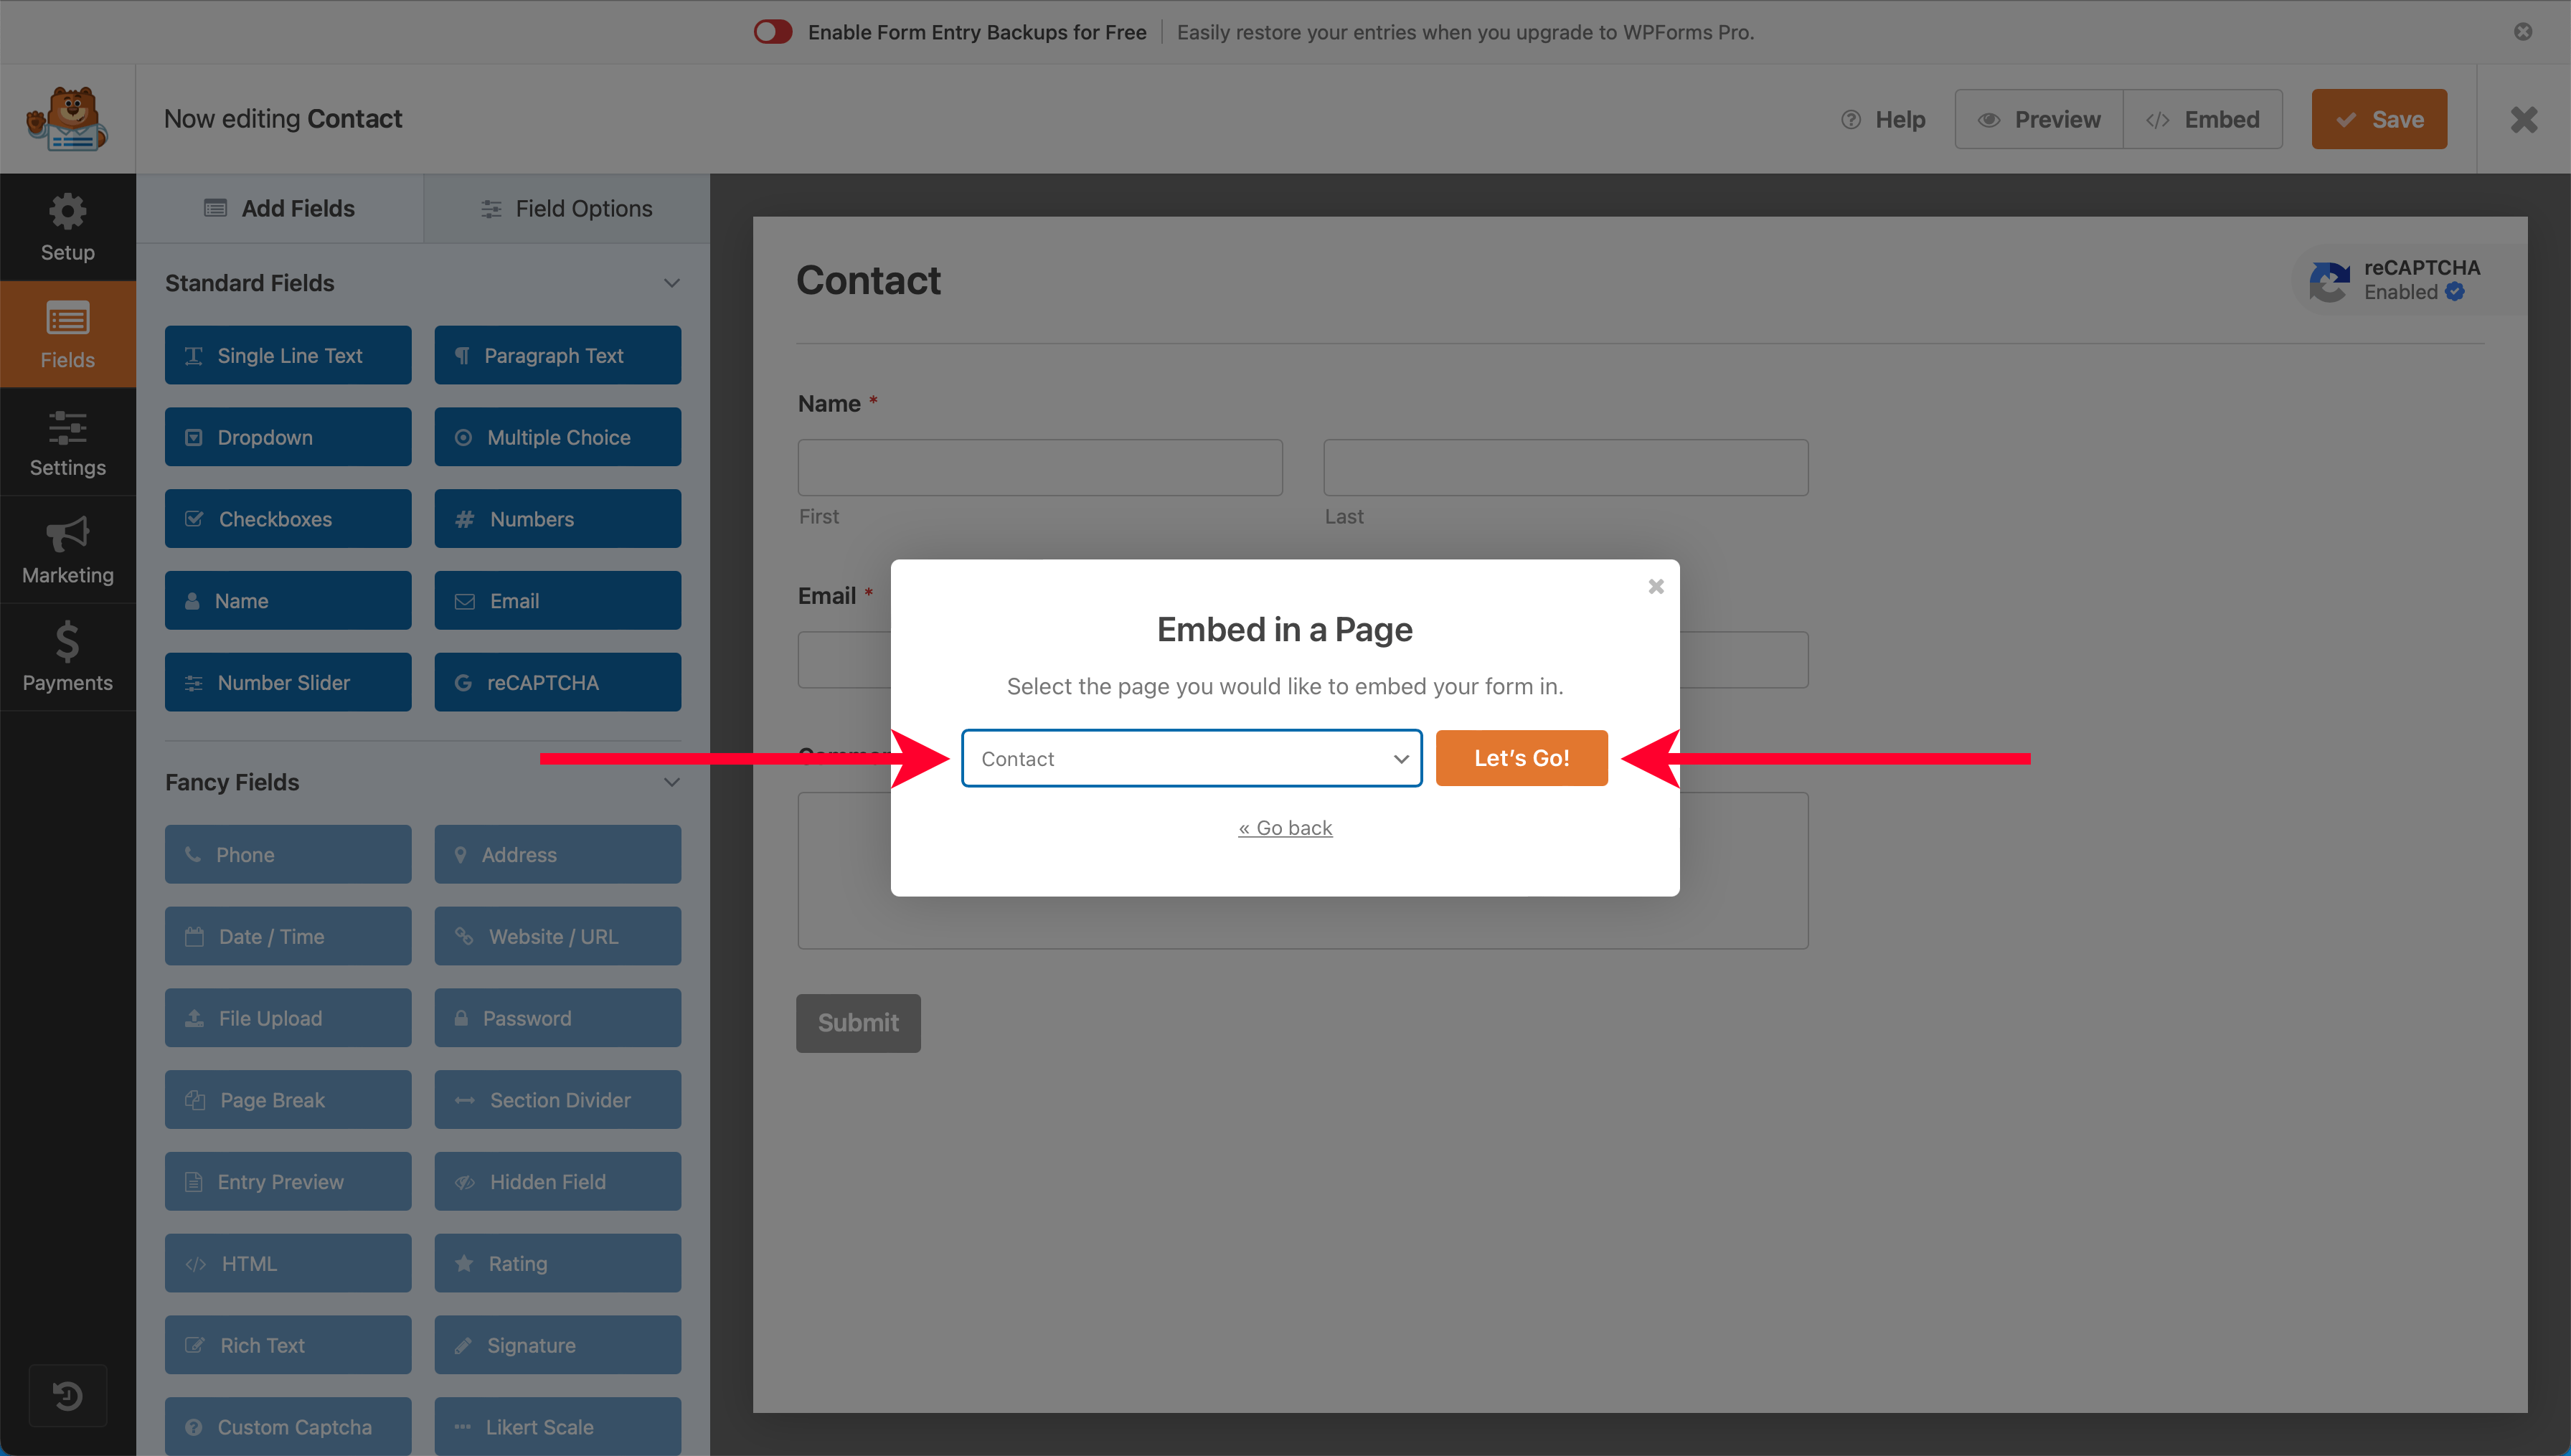
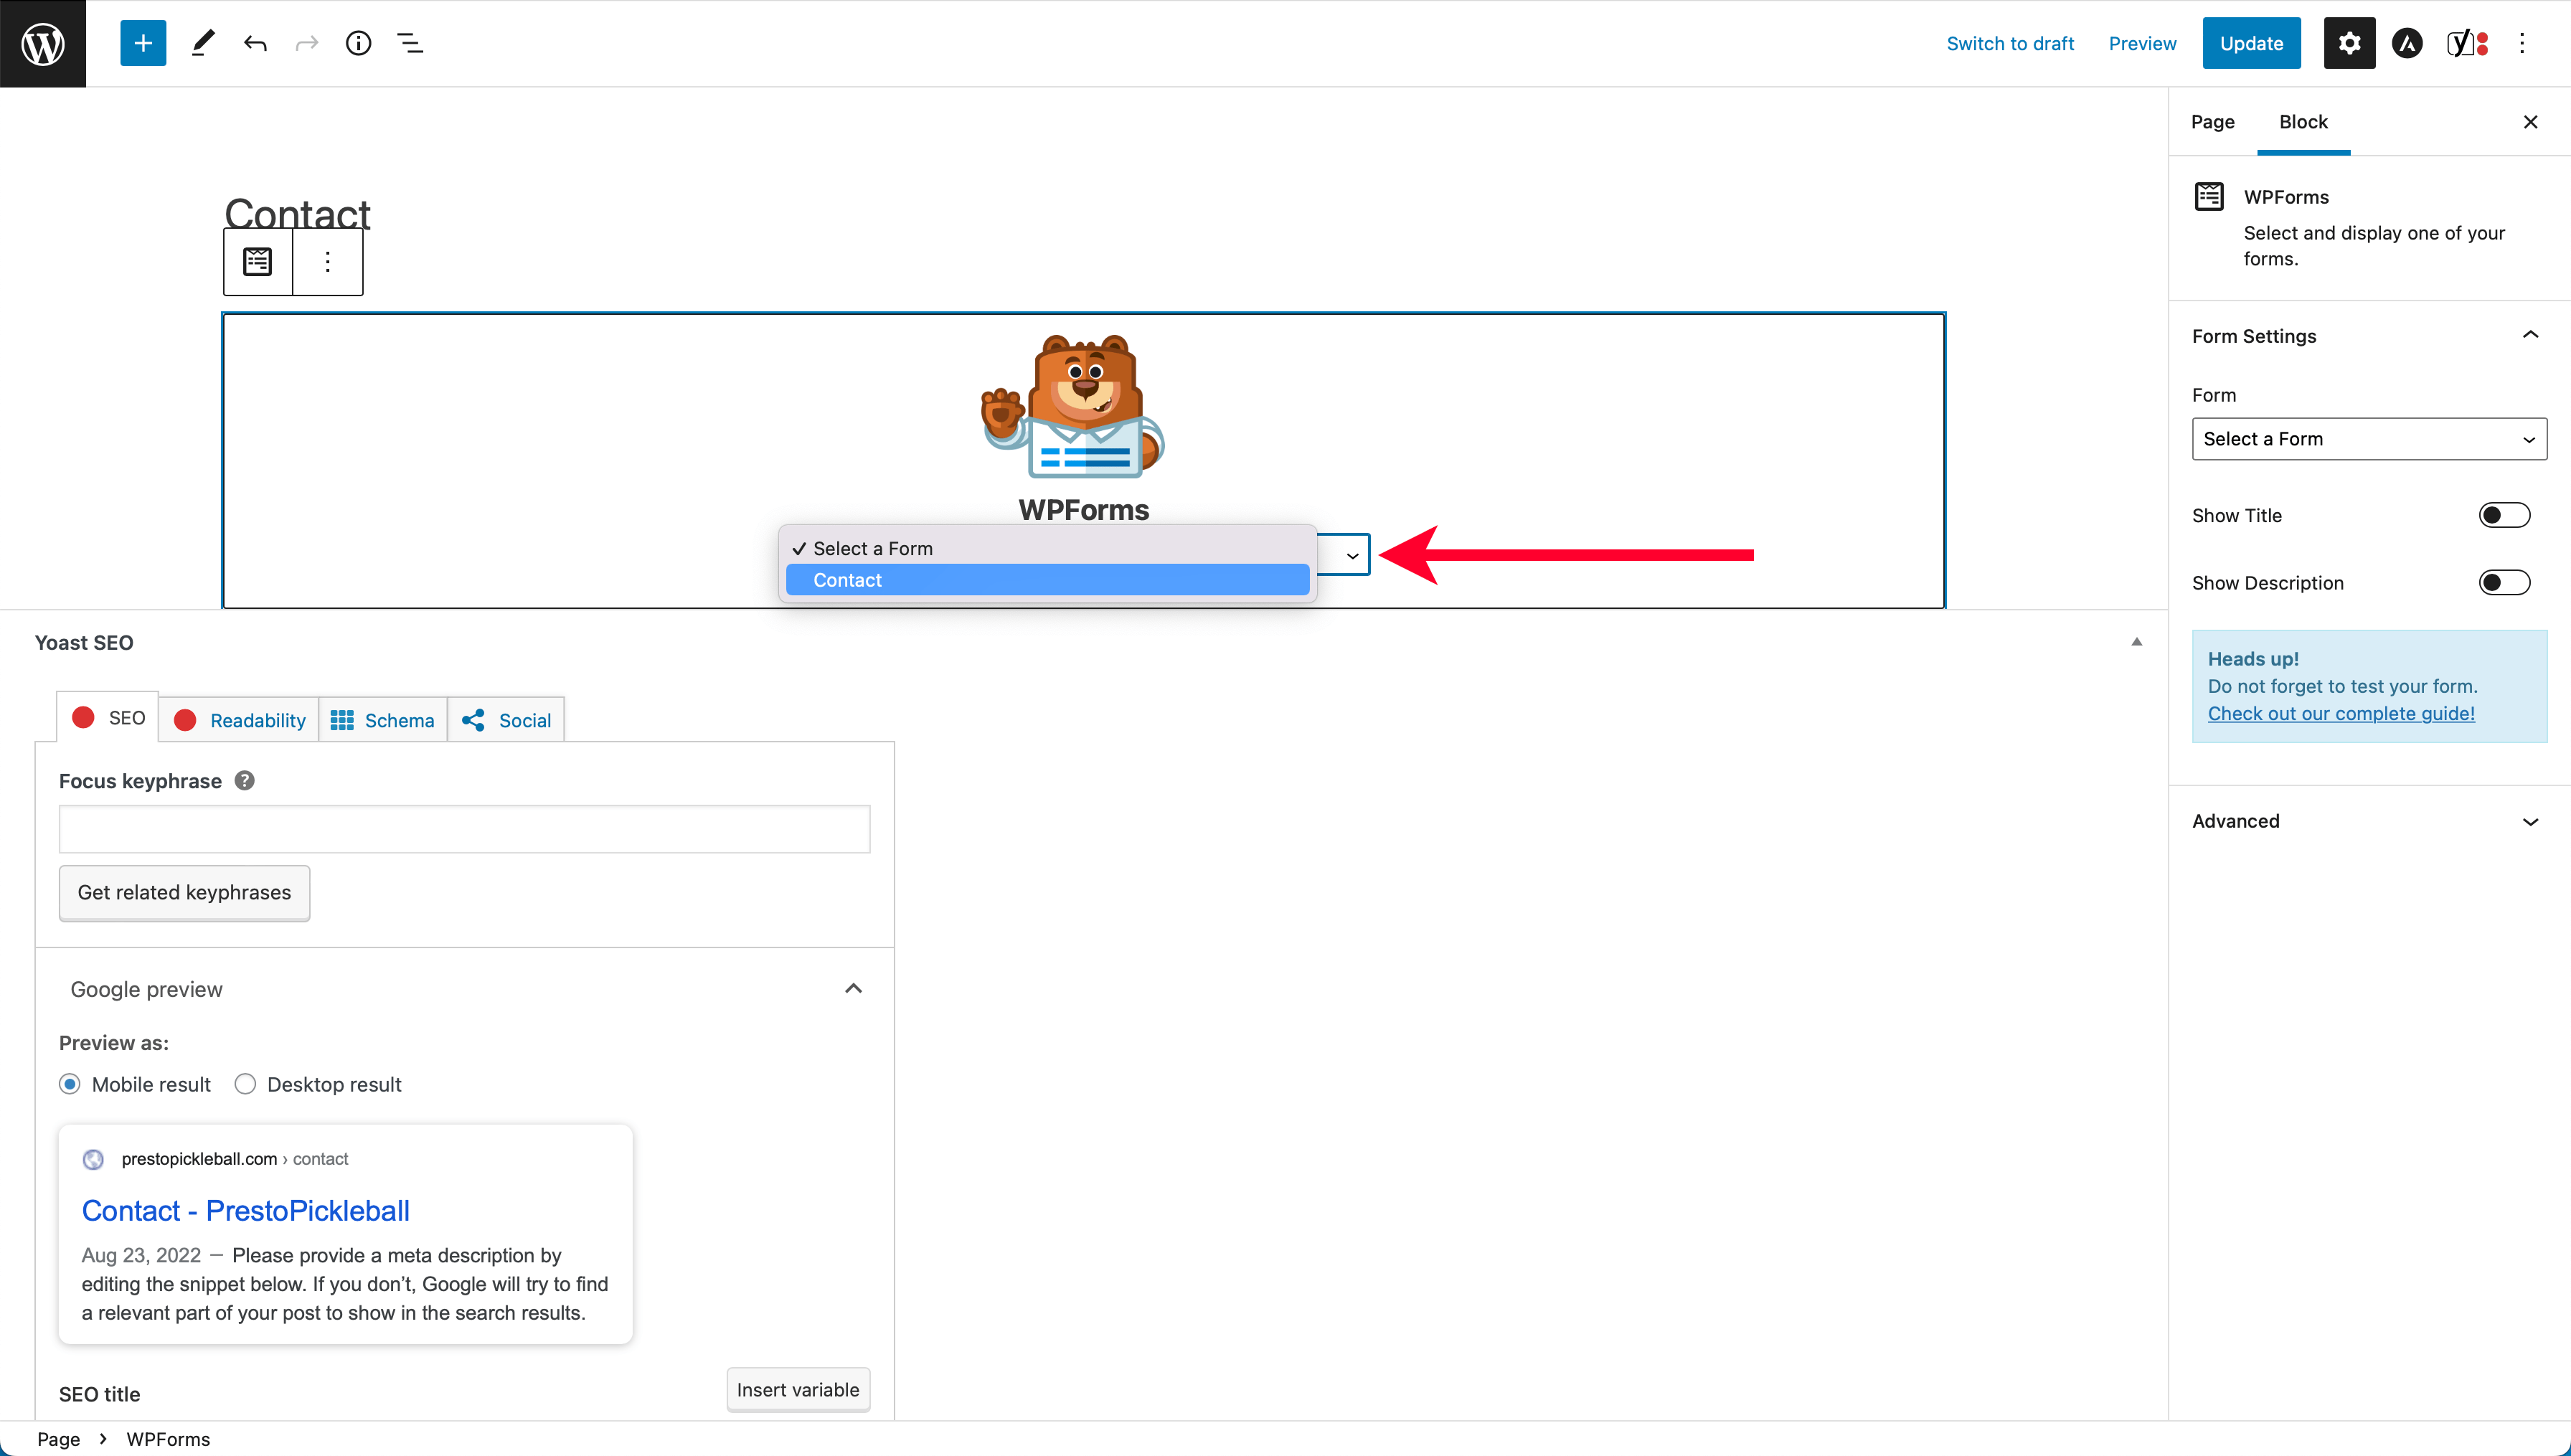
Select your “Contact” page from the dropdown and click “Let’s Go,” which will take you to the WordPress page editor for your contact page.
Follow the onscreen instructions by clicking the “Add a Block” button.
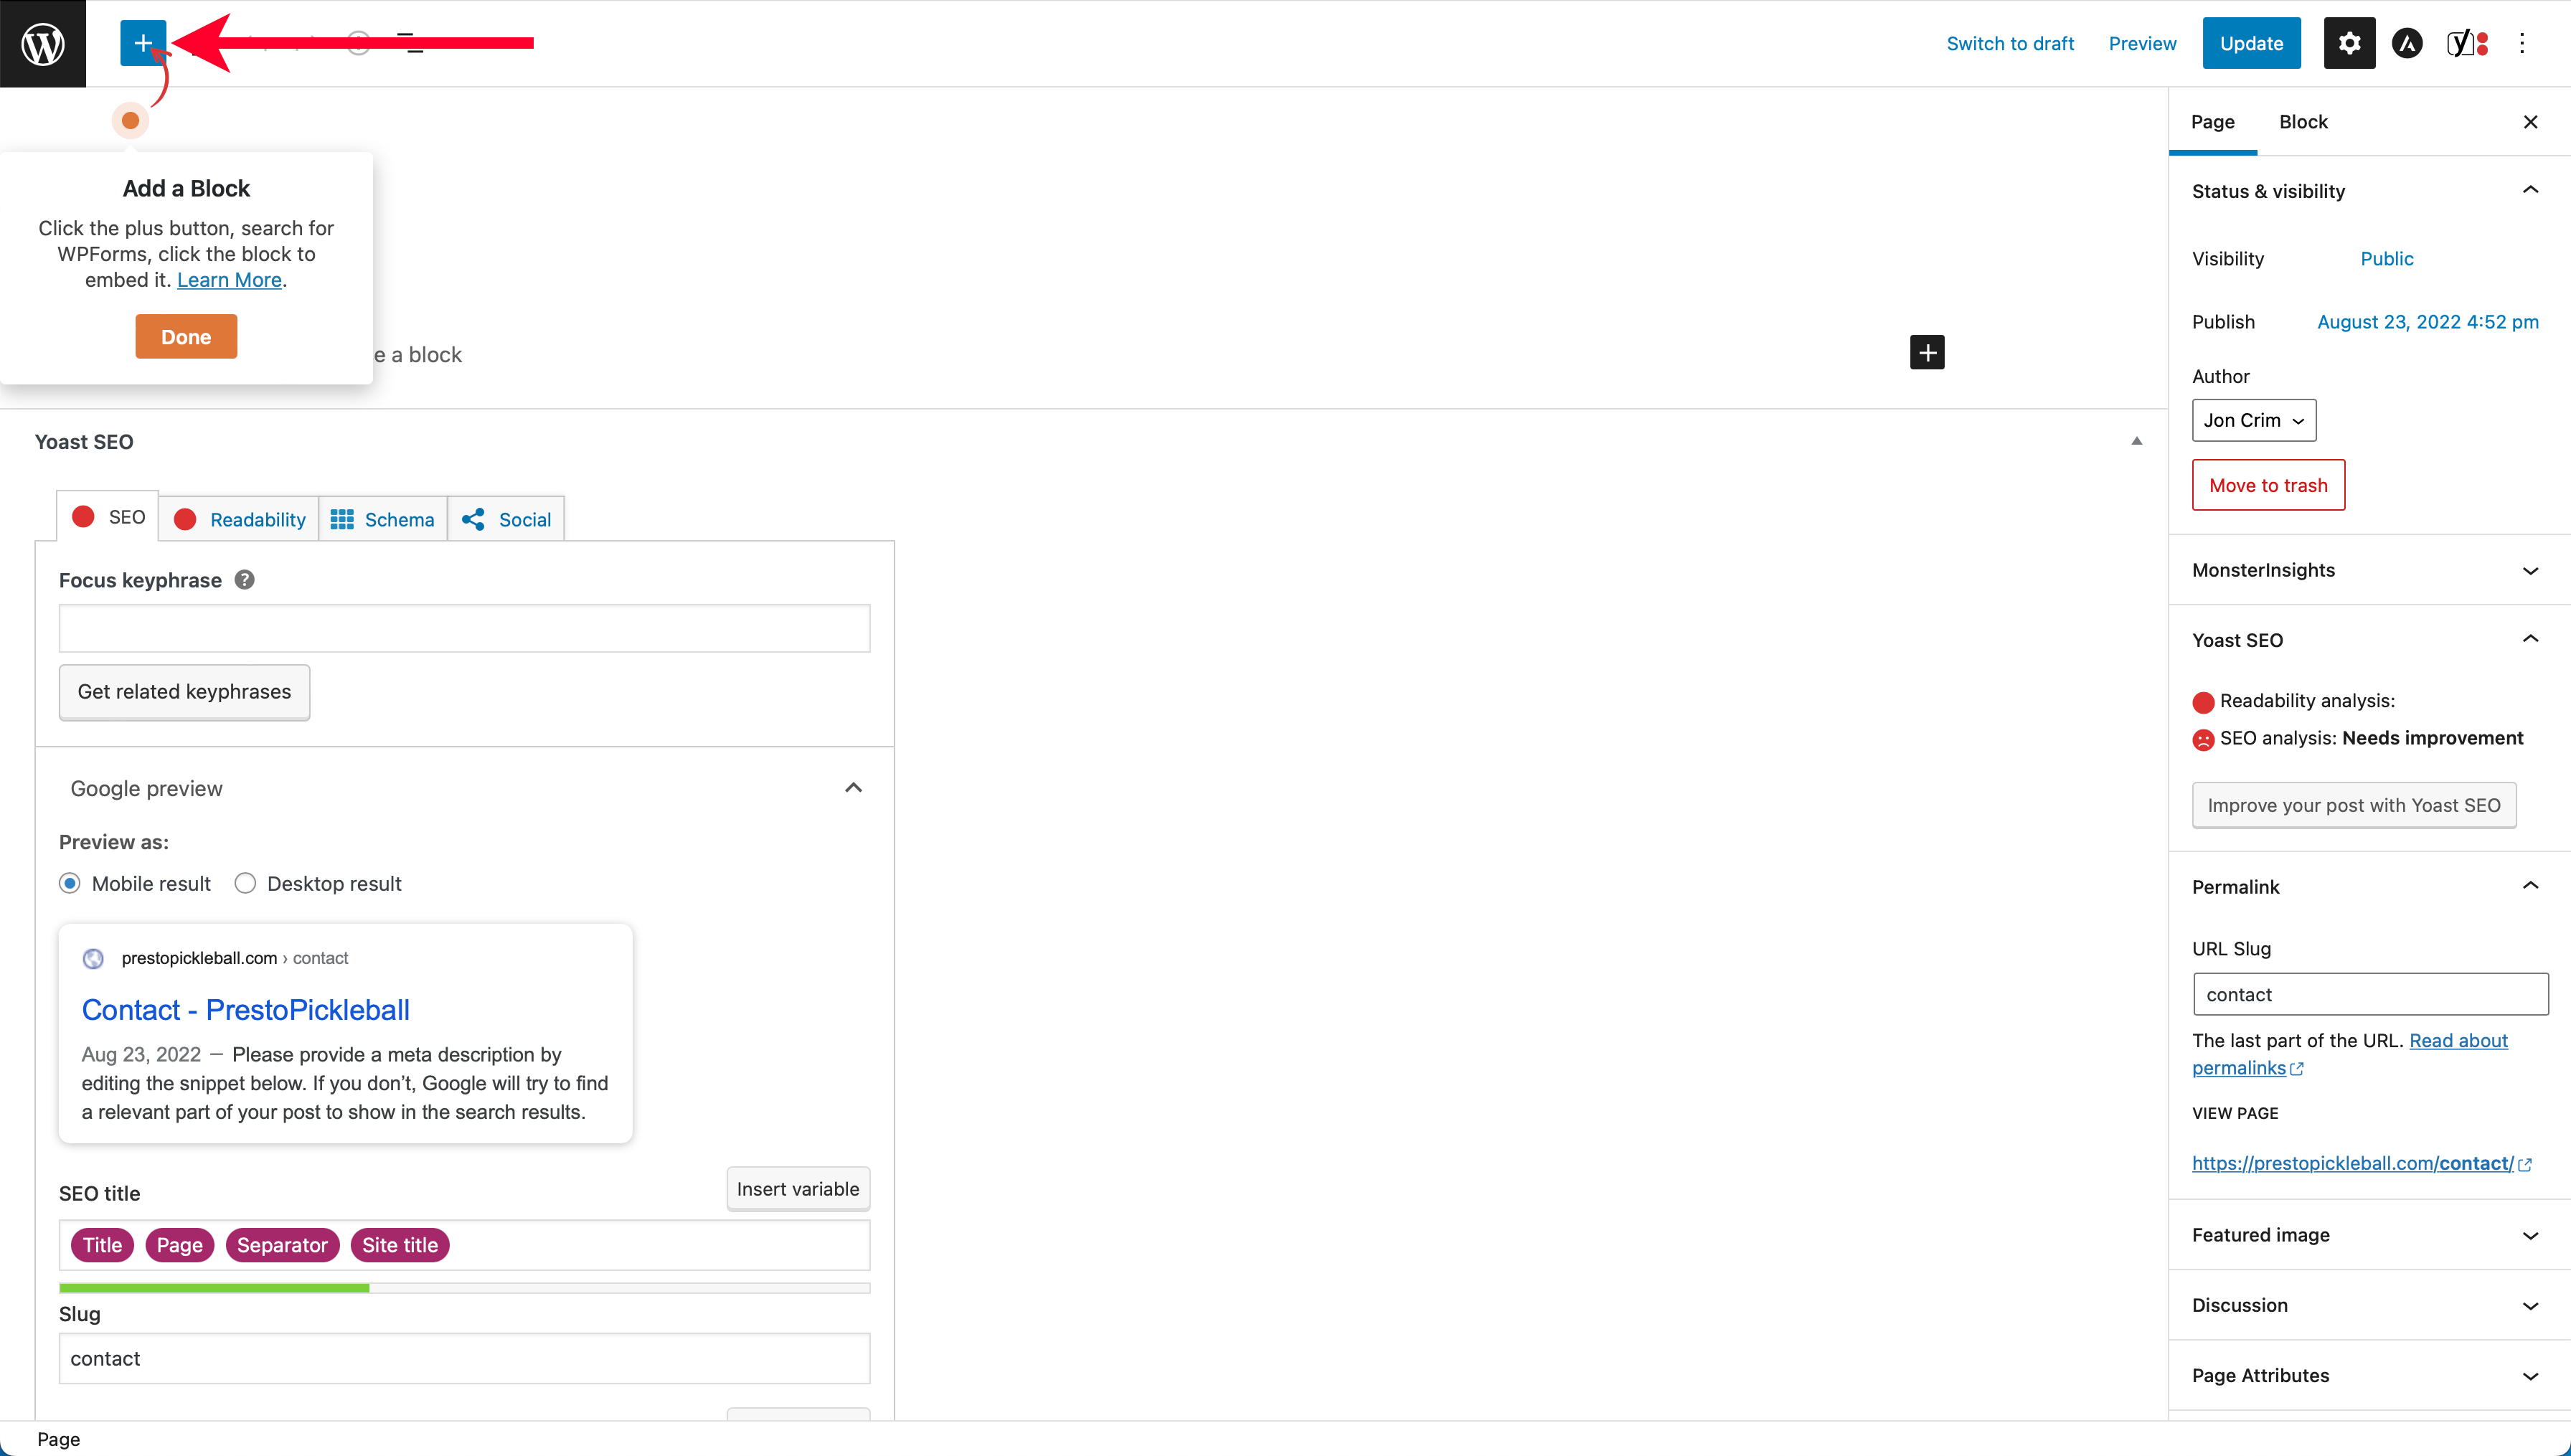
In the search box that appears, type “WPForms,” then click the “WPForms” icon.
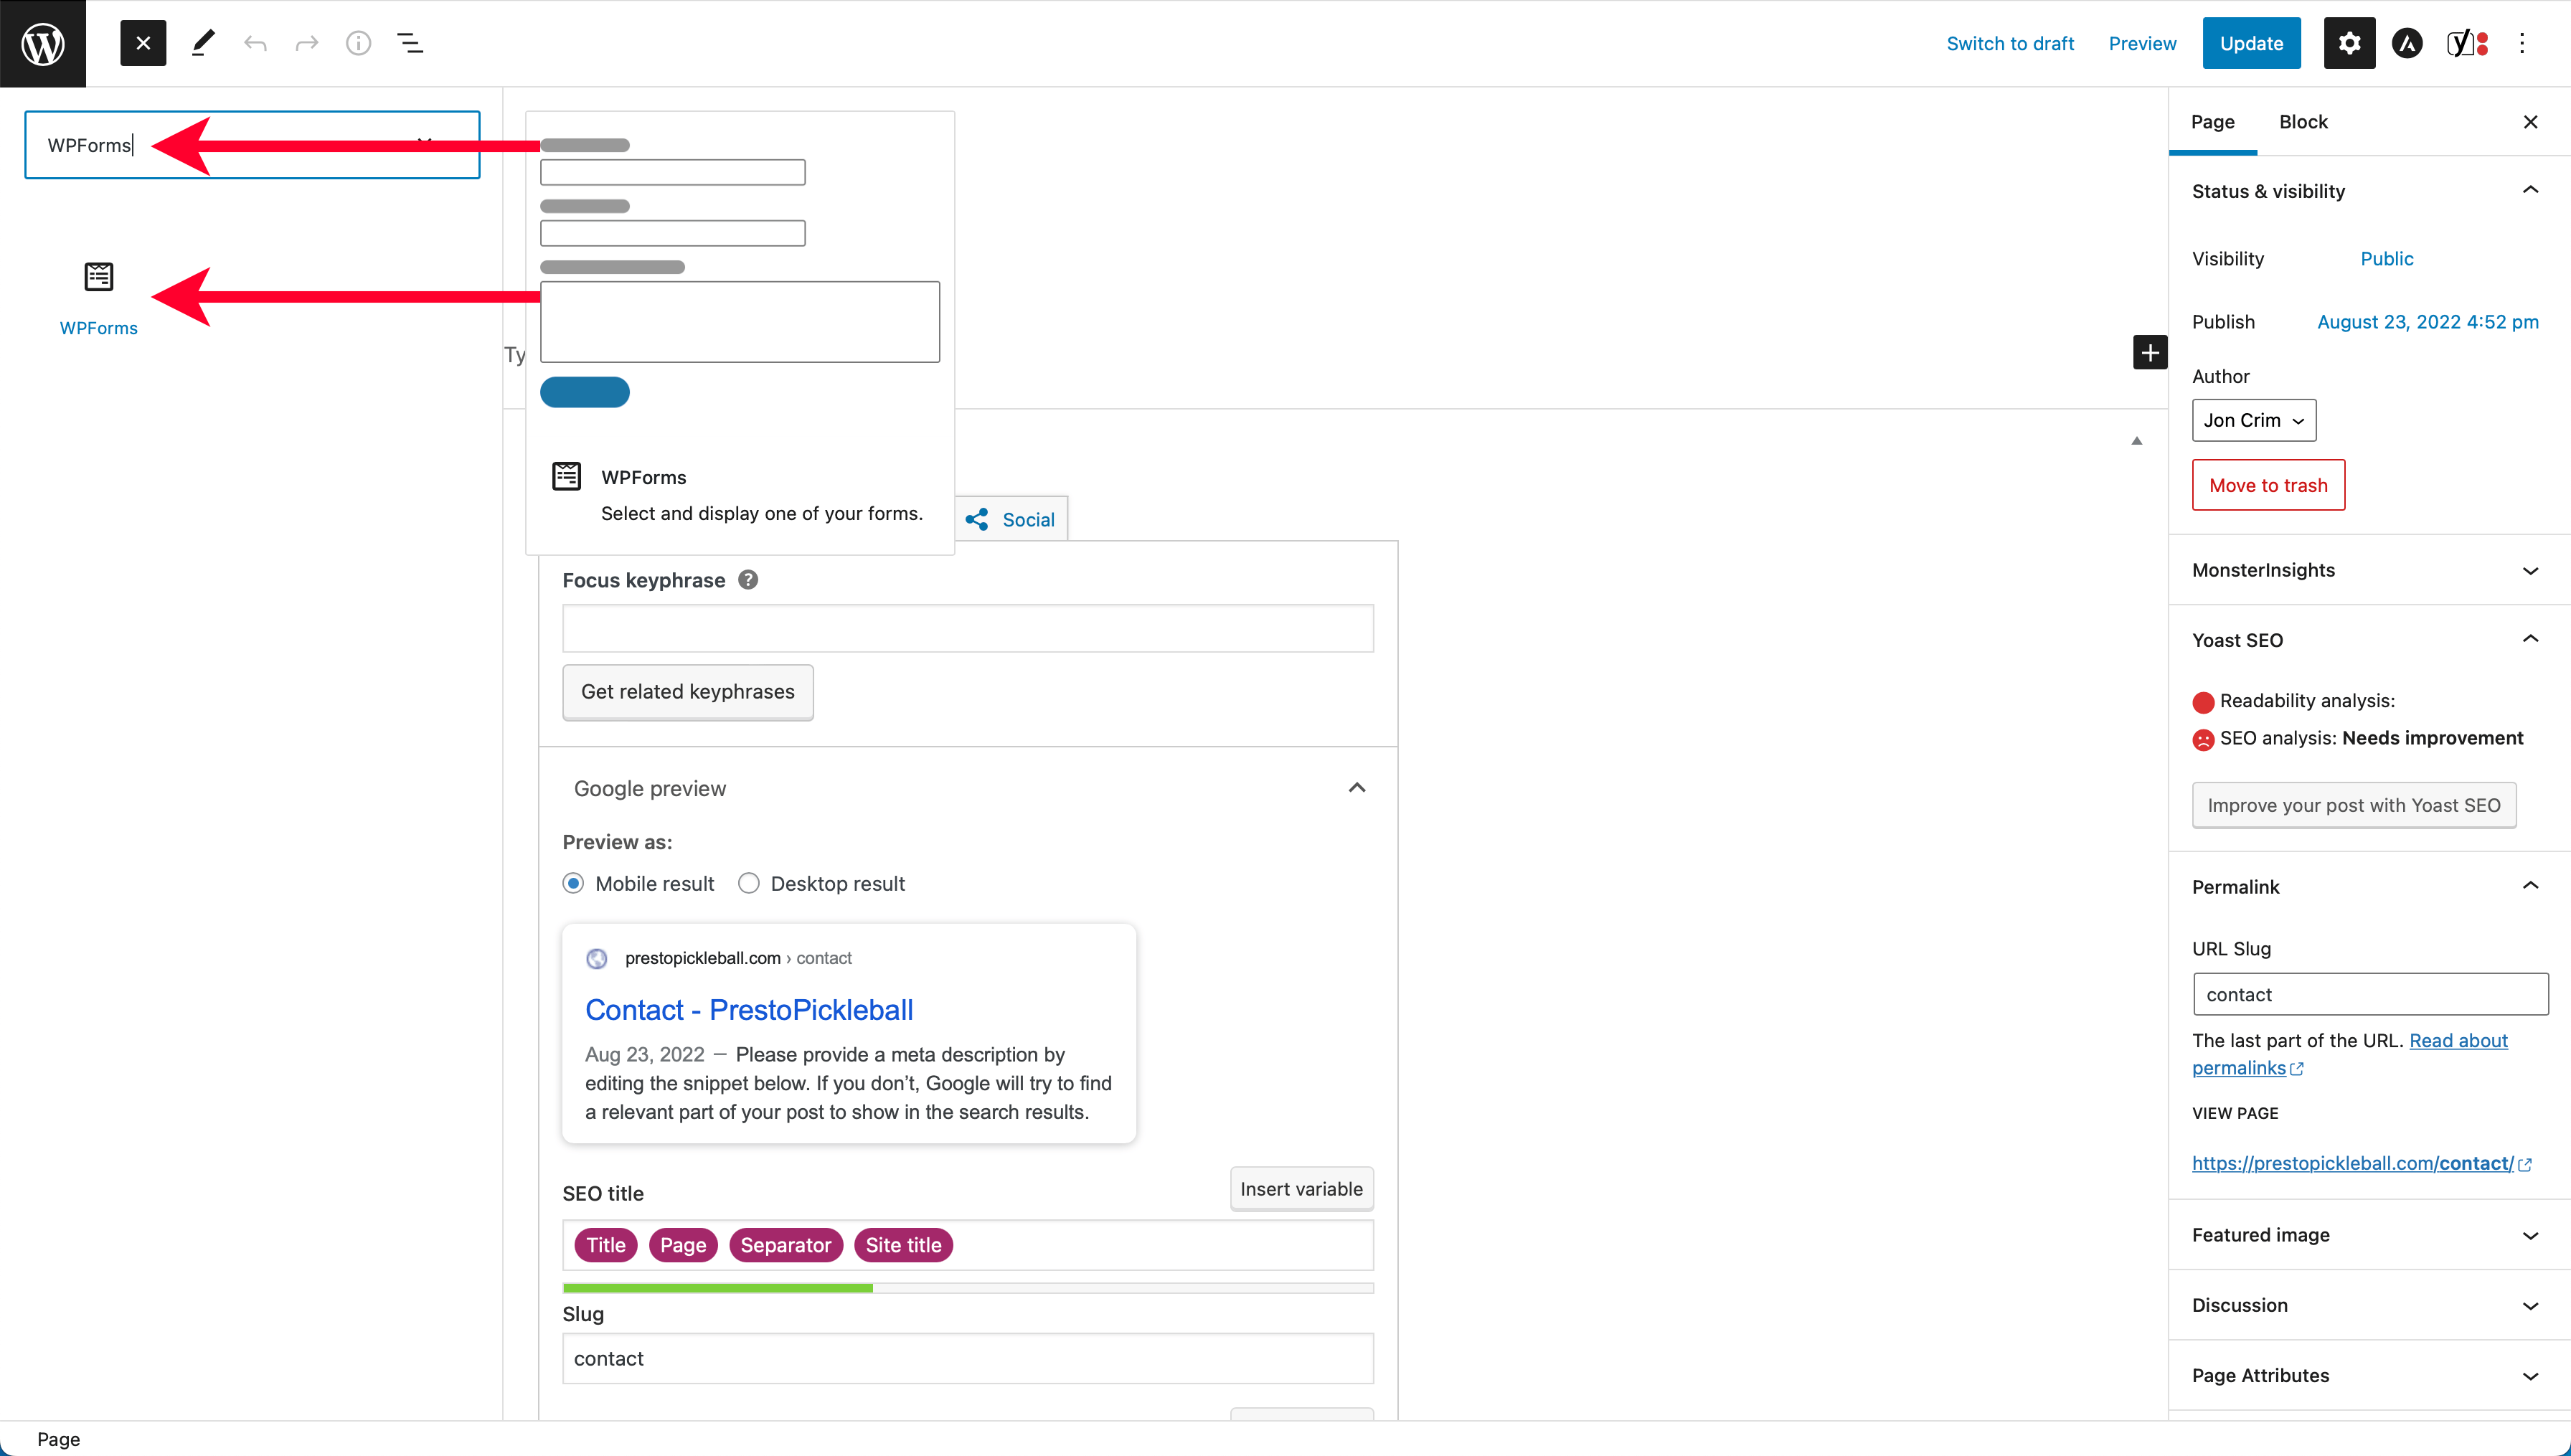
In the box that shows up, select your “Contact” form, which will automatically generate your new form.
To finish, click the “Update” button in the upper right-hand corner of the page.
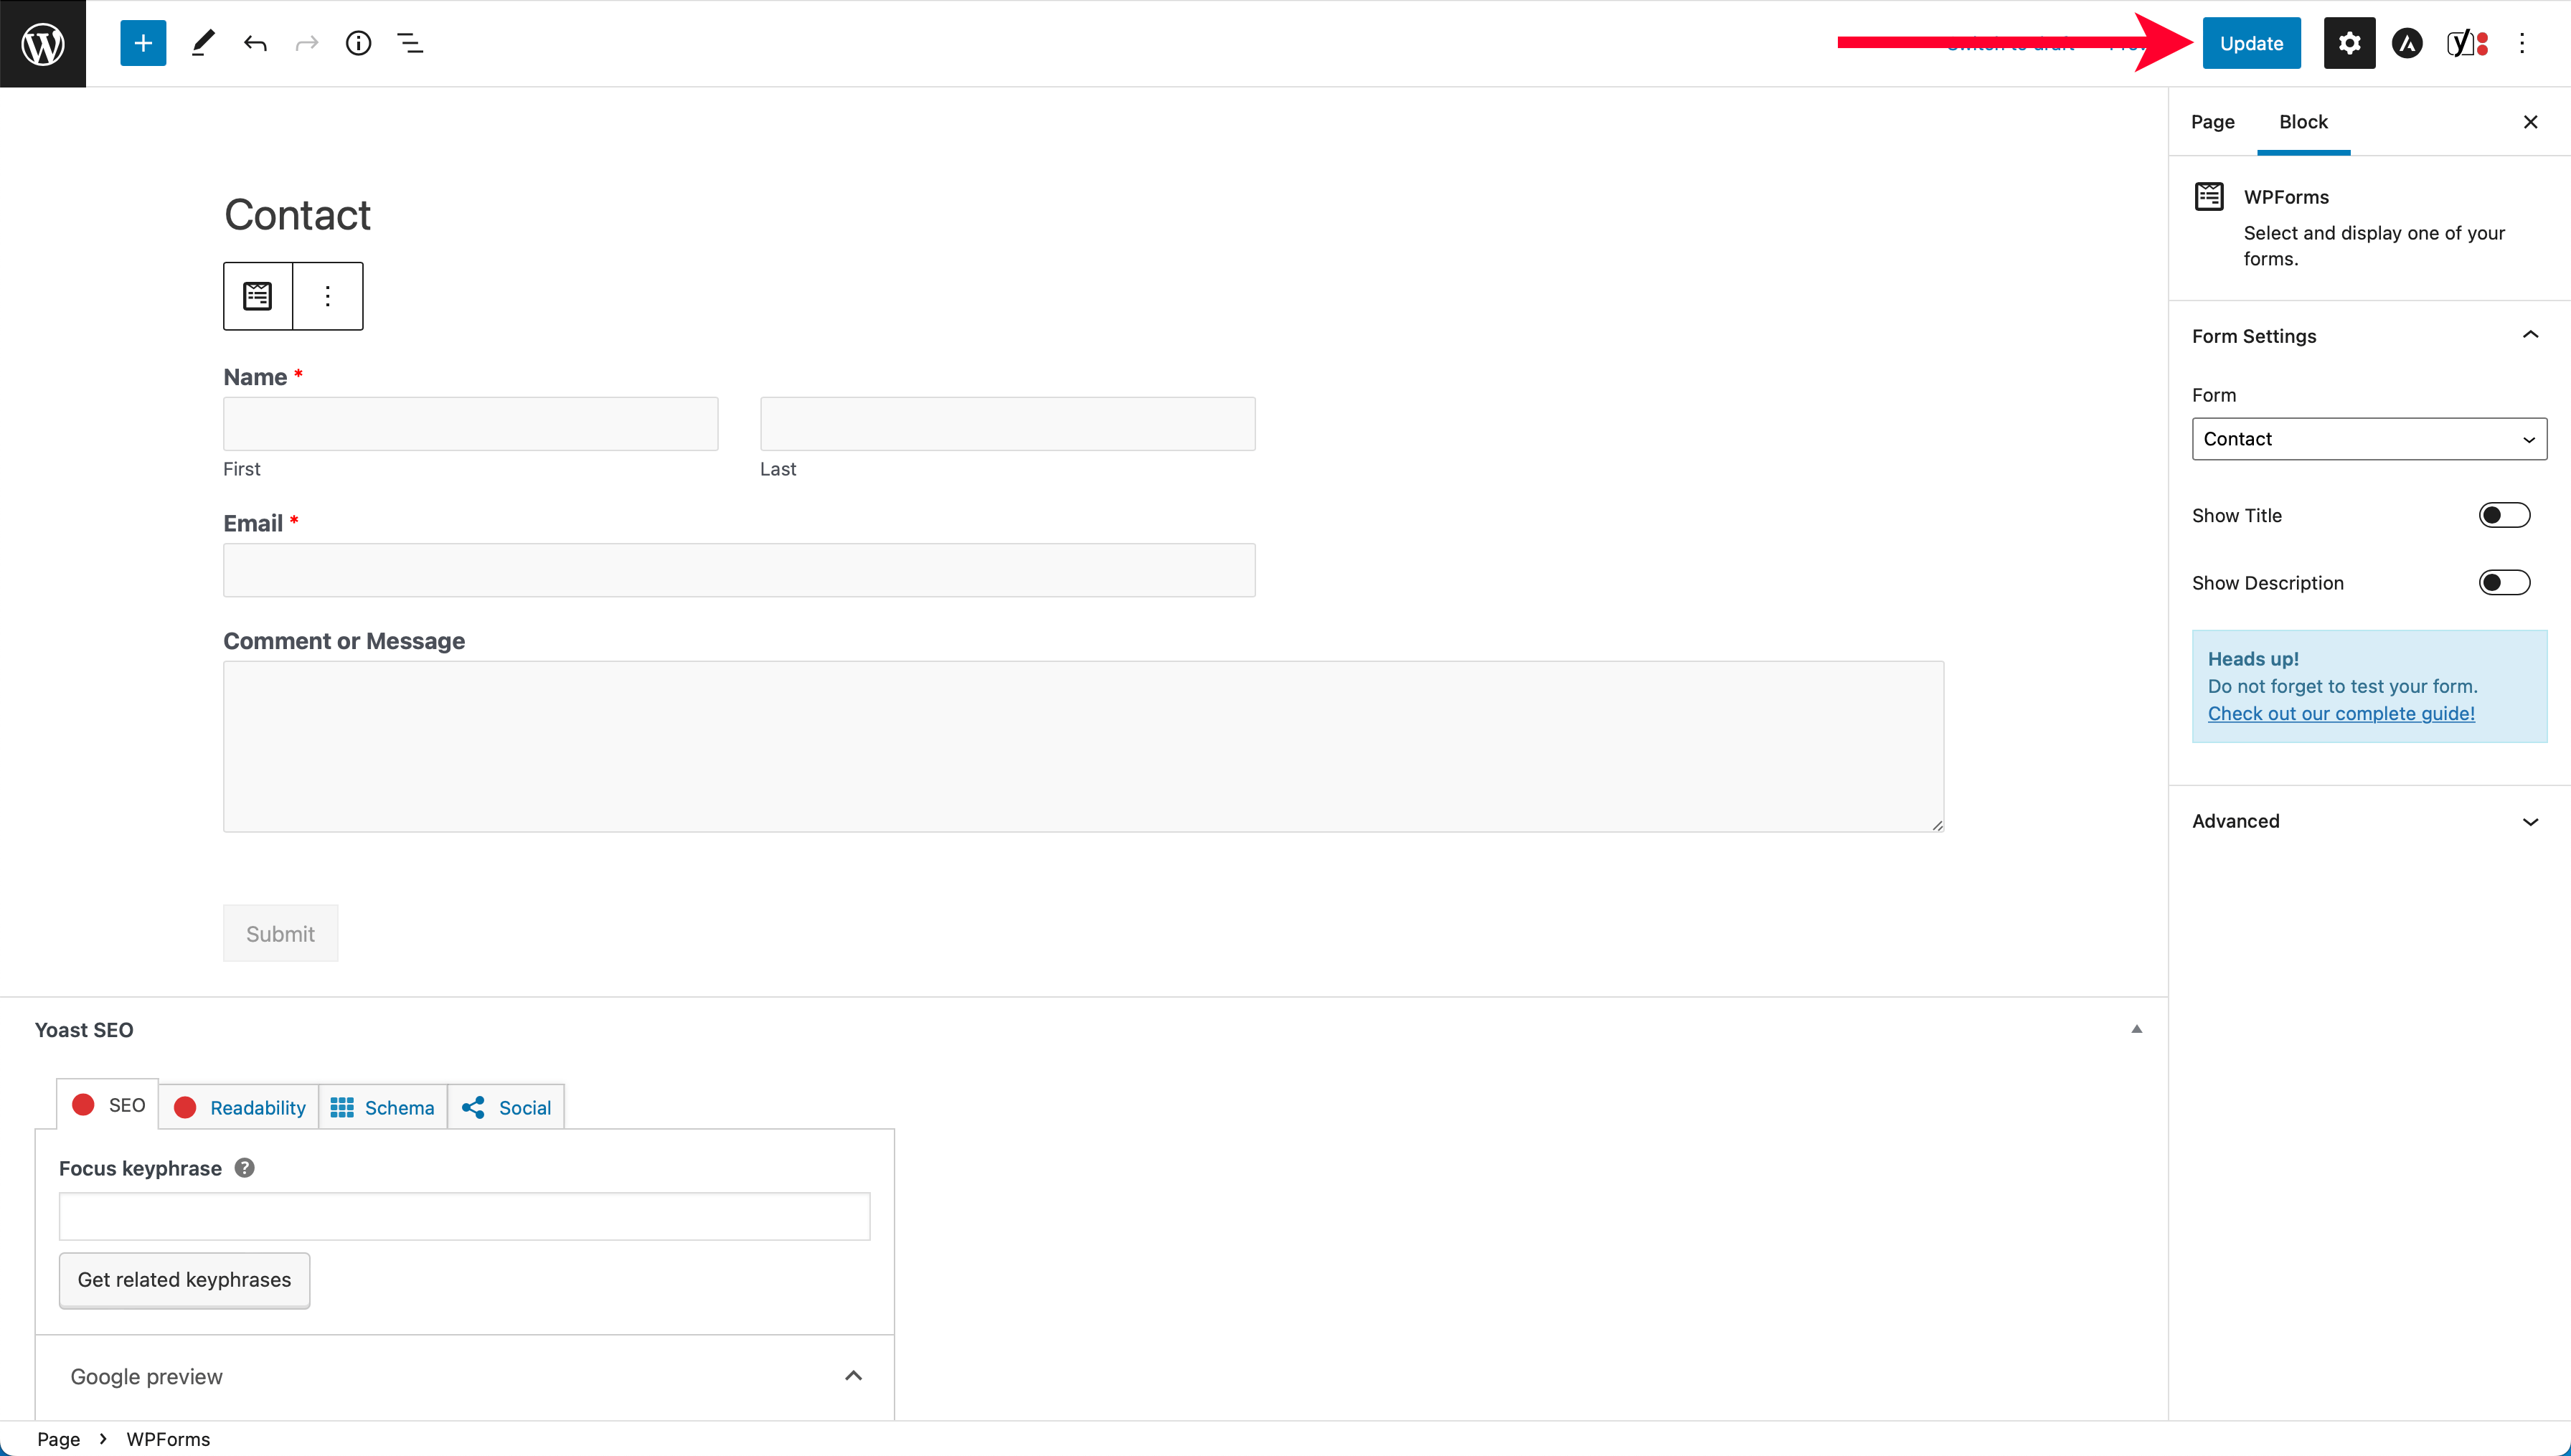
You’re all set! You can now view your contact page at the following URL:
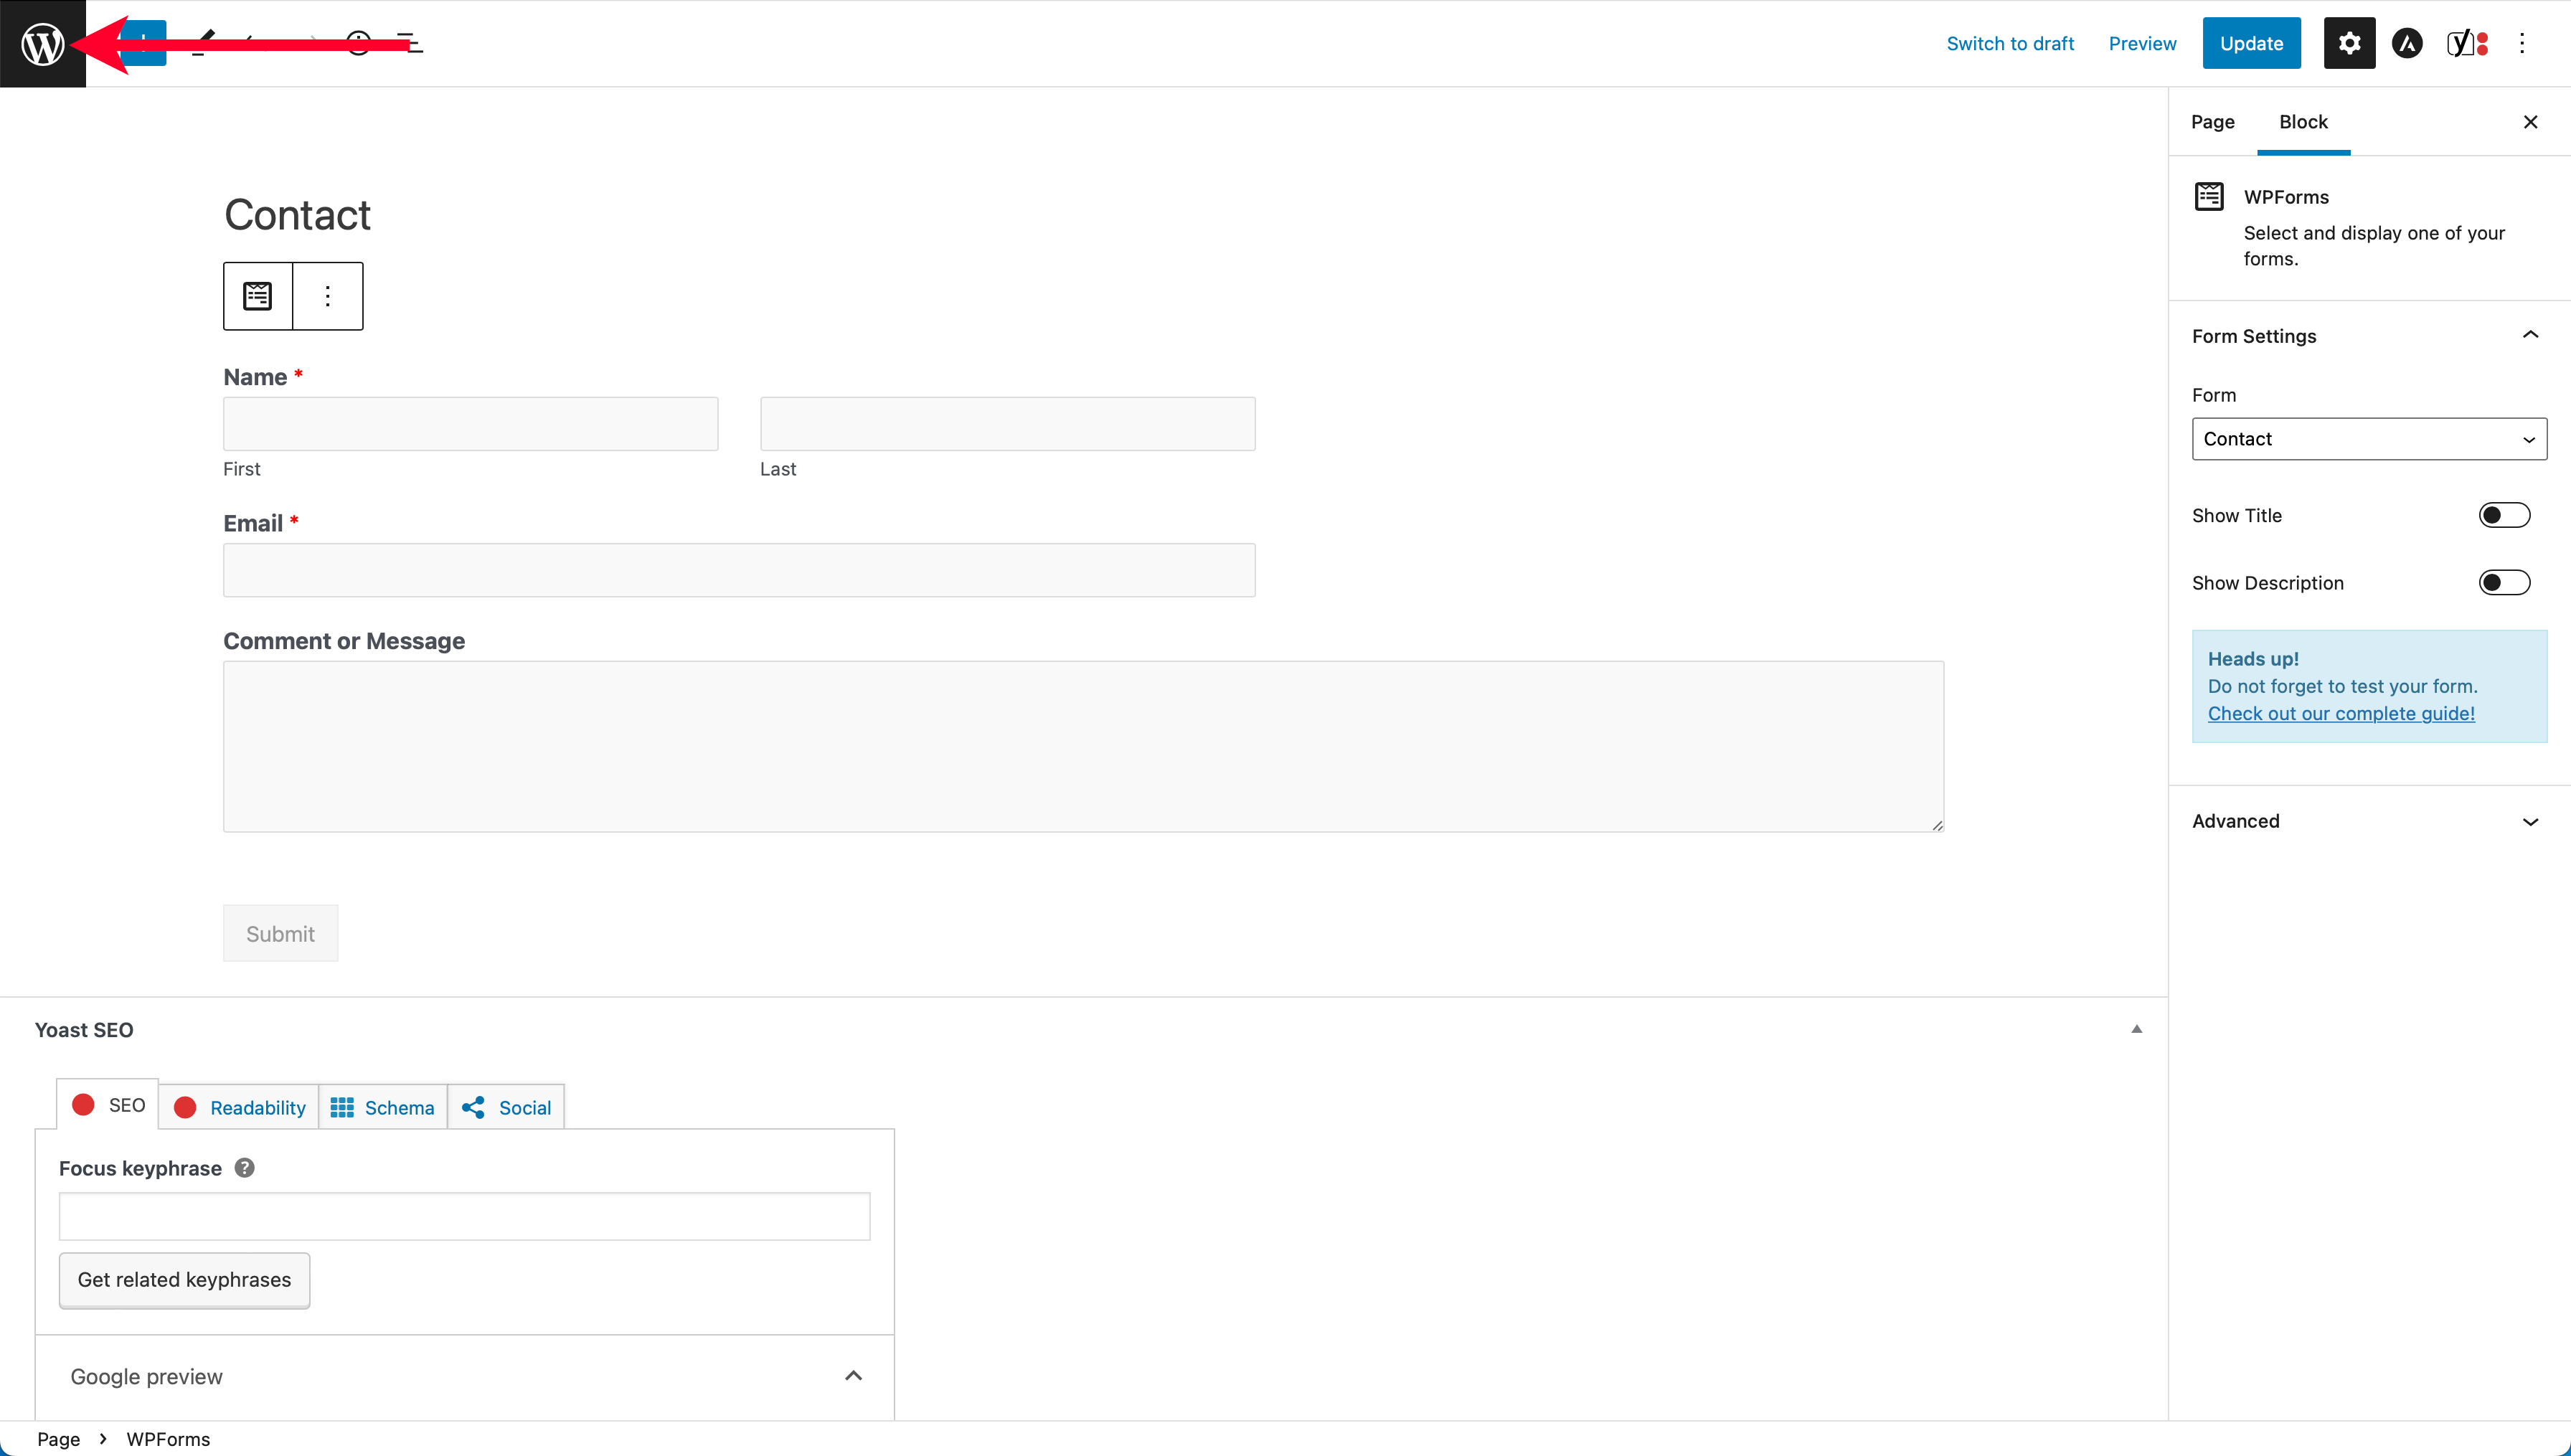
To return to your WordPress account, click the WordPress logo in the upper right corner of the page editor.
WordPress will send any emails submitted via the contact page to the email address you used when signing up for your DreamHost account, which is also the email address for your WordPress admin user.
One Last Update
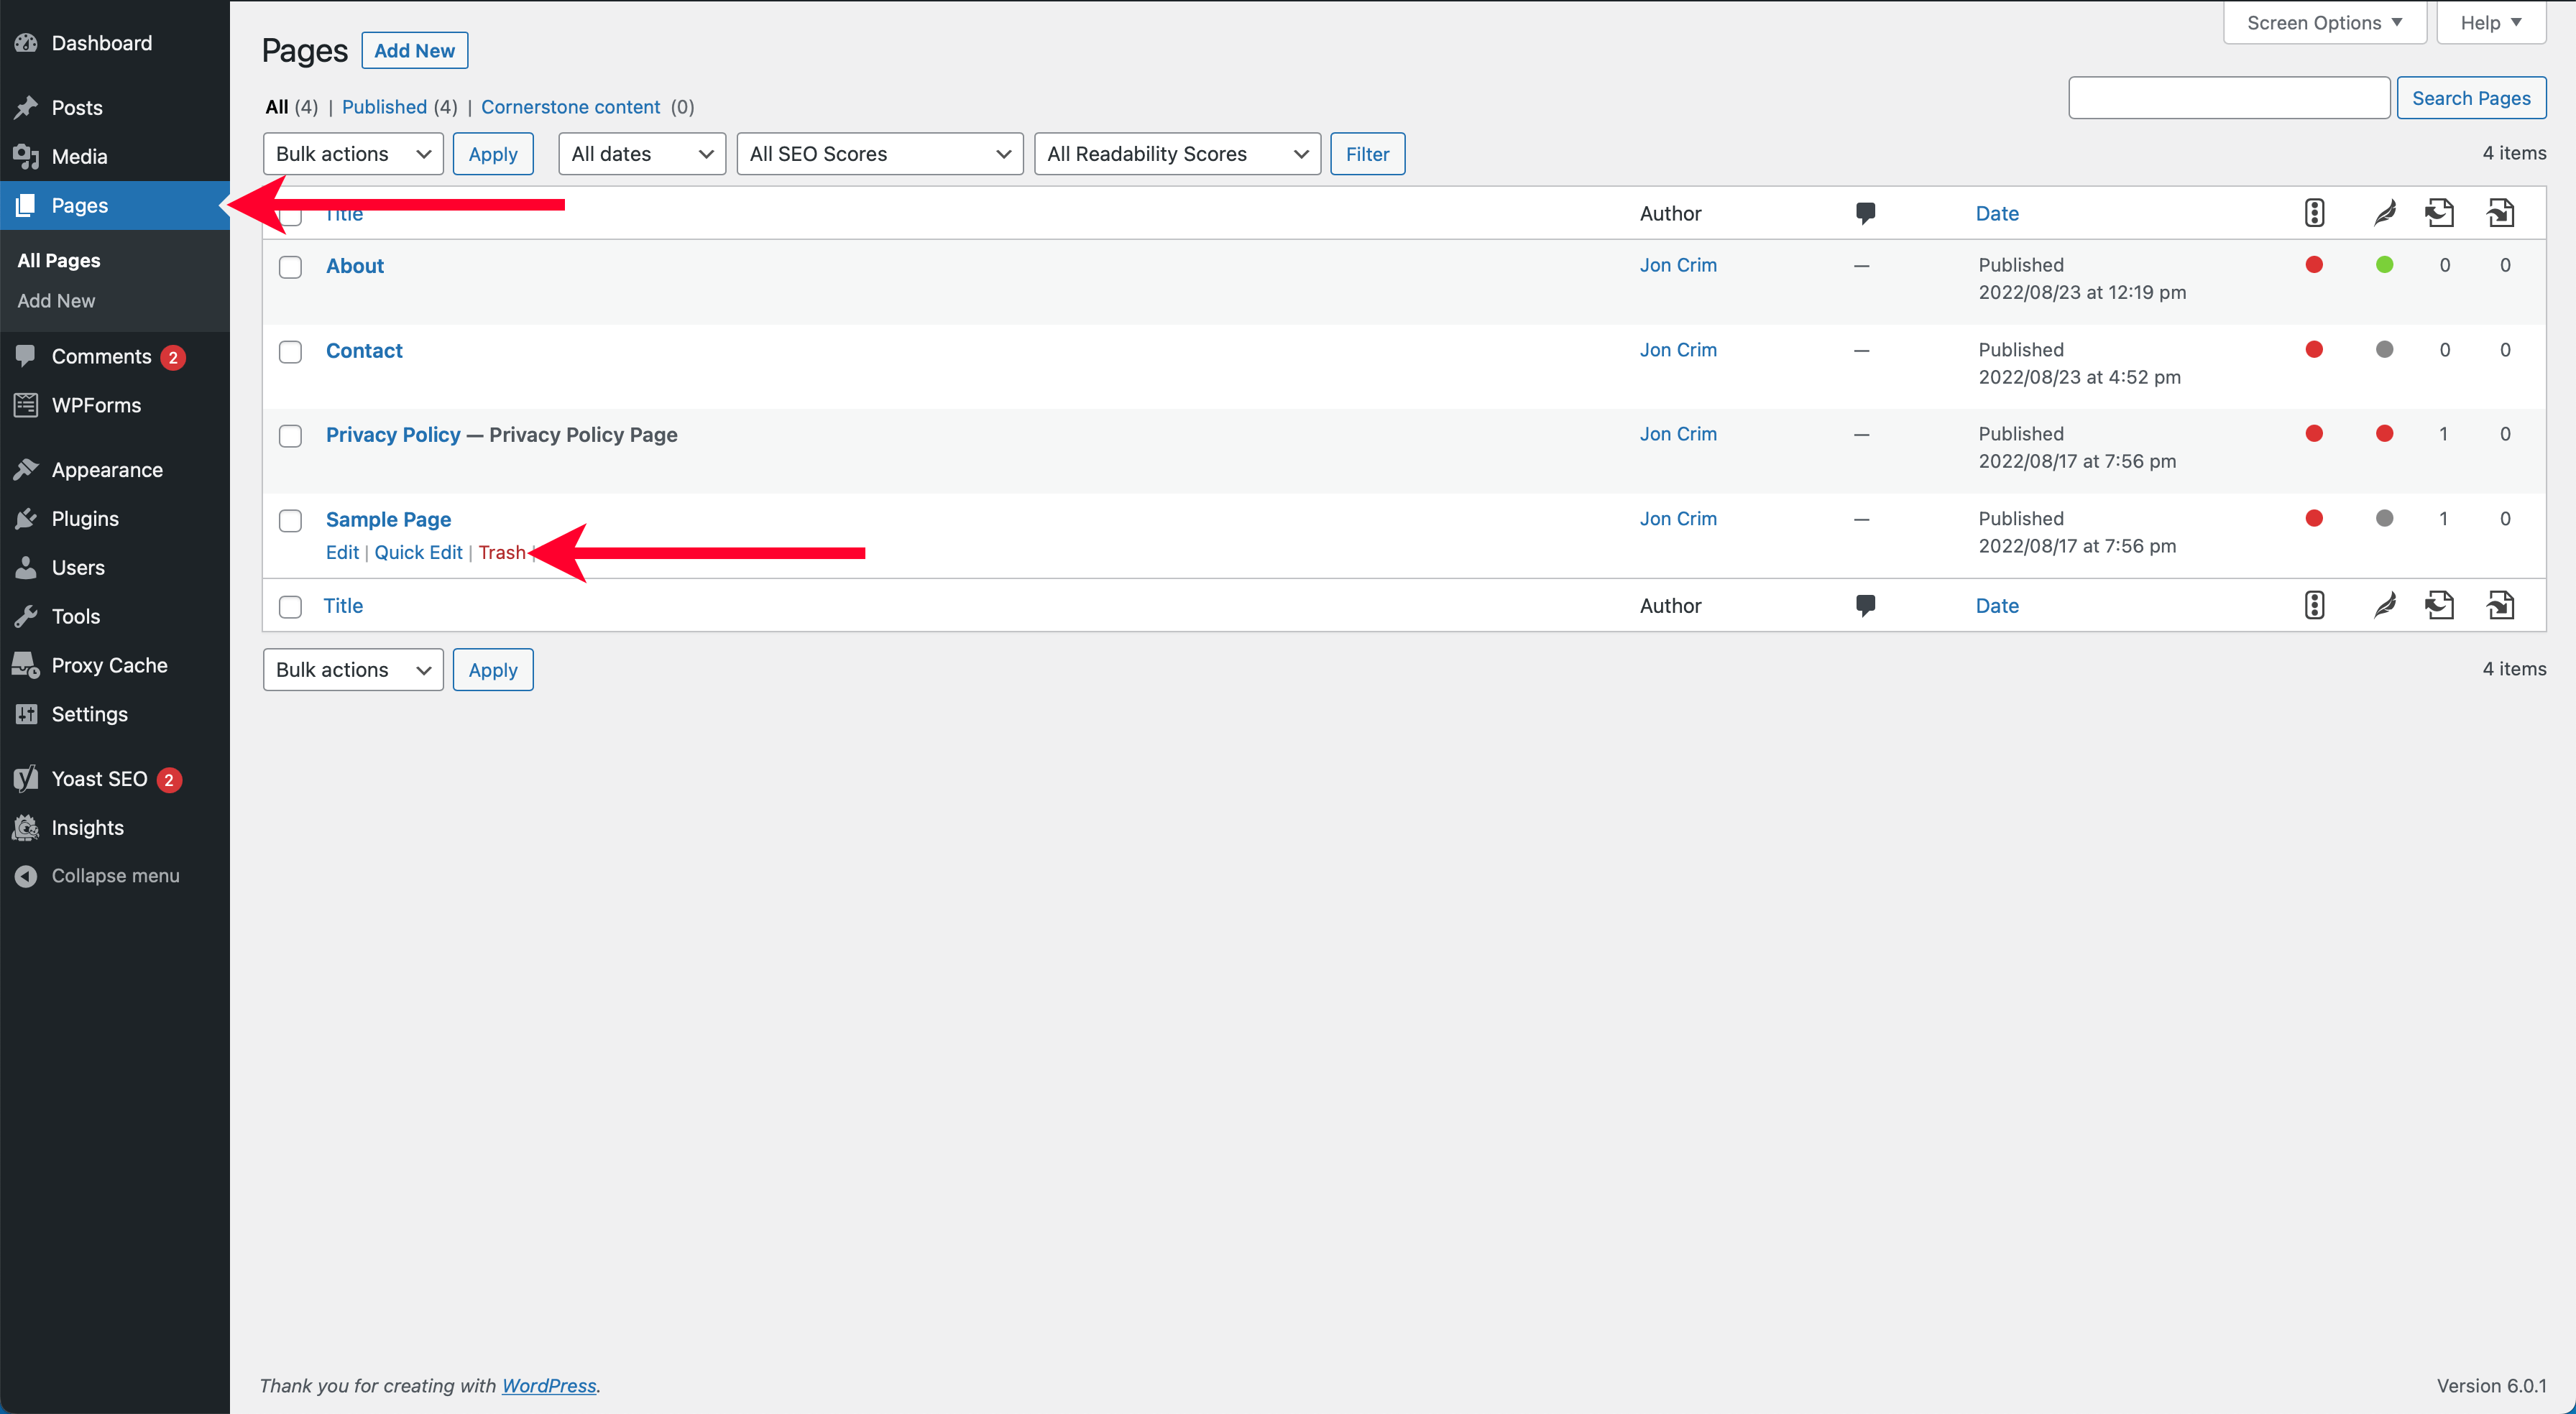
Before we move on to the next section, let’s delete the “Sample Page” WordPress automatically created that you don’t need.
Click the “Pages” menu from the left-hand sidebar navigation in your WordPress account. Then hover the text for “Sample Page” and click the red “Trash” link to delete the page.
Nice work! Let’s move on to building your menu navigation.
Step 10: Build Your Menu Navigation
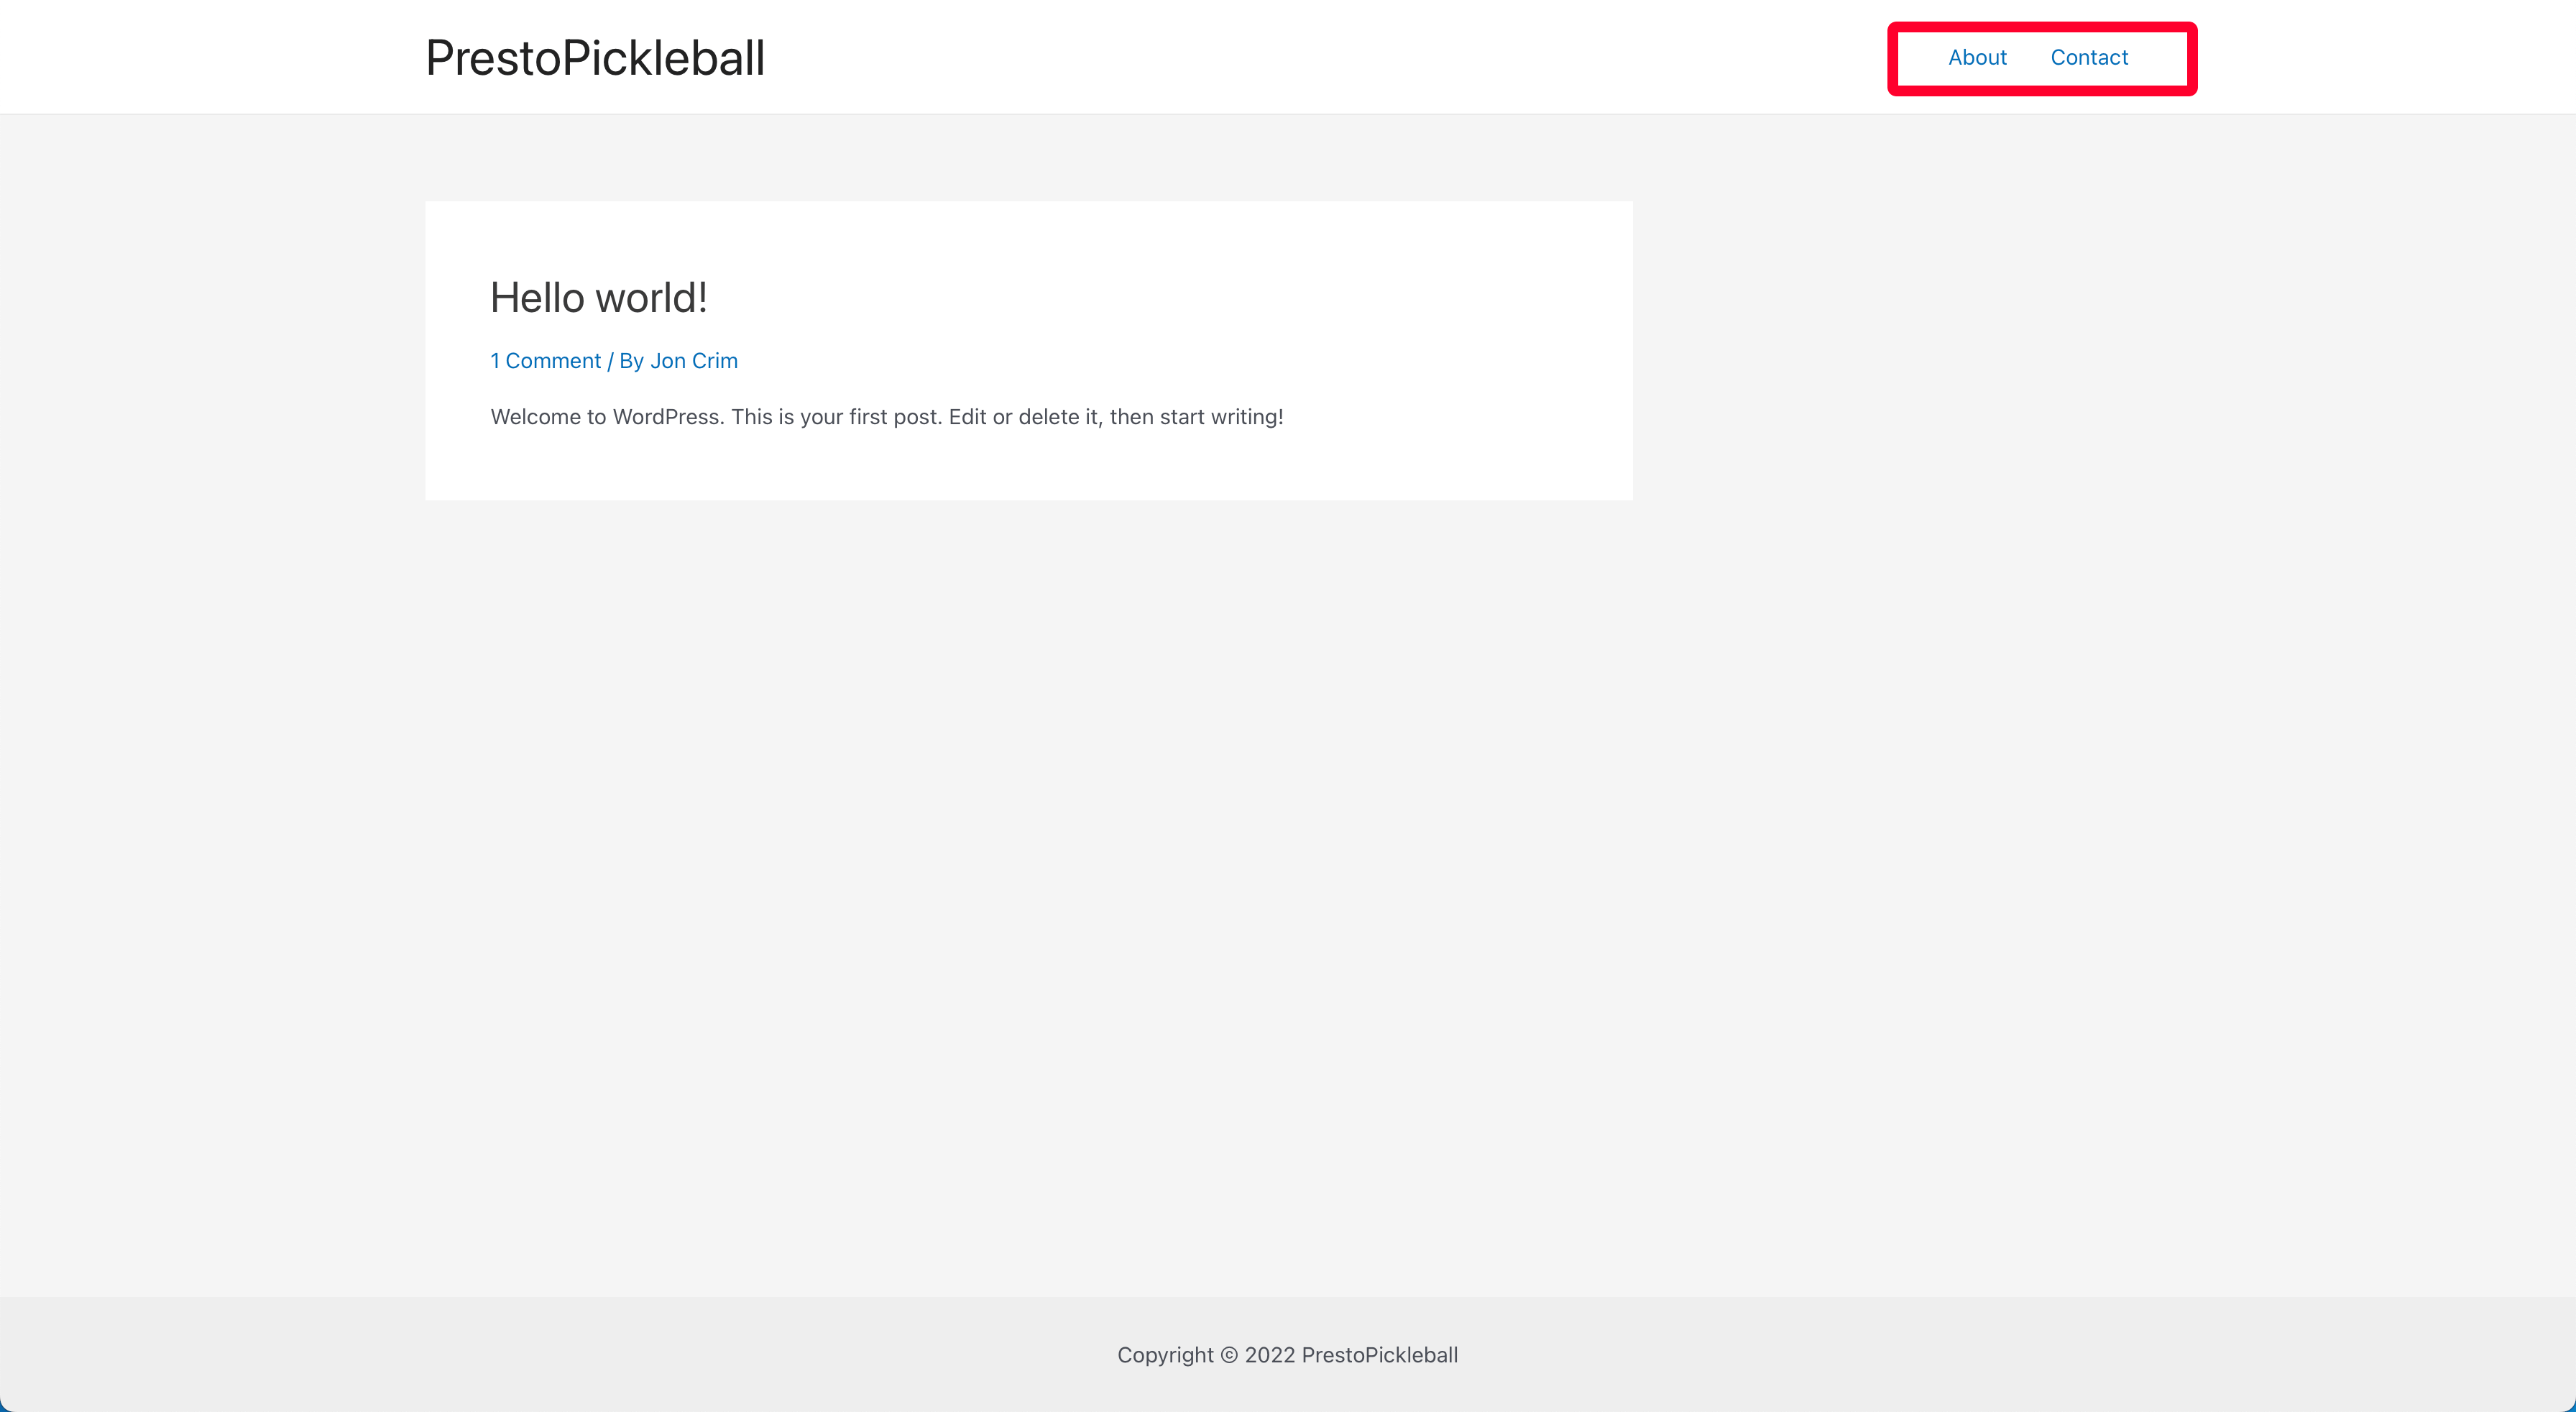
A website’s menu navigation provides visitors with an easy way to access various sections of your website. By default, your website will show all the pages of your website in a menu, as shown below.

However, we don’t need your privacy policy page to display in the main menu, so we’ll create a custom menu to remove it, then add the privacy policy to the footer where you’ll find it display on most websites.
Create a New Menu
From your WordPress account, select “Appearance” from the left-hand navigation, then click “Menus.”
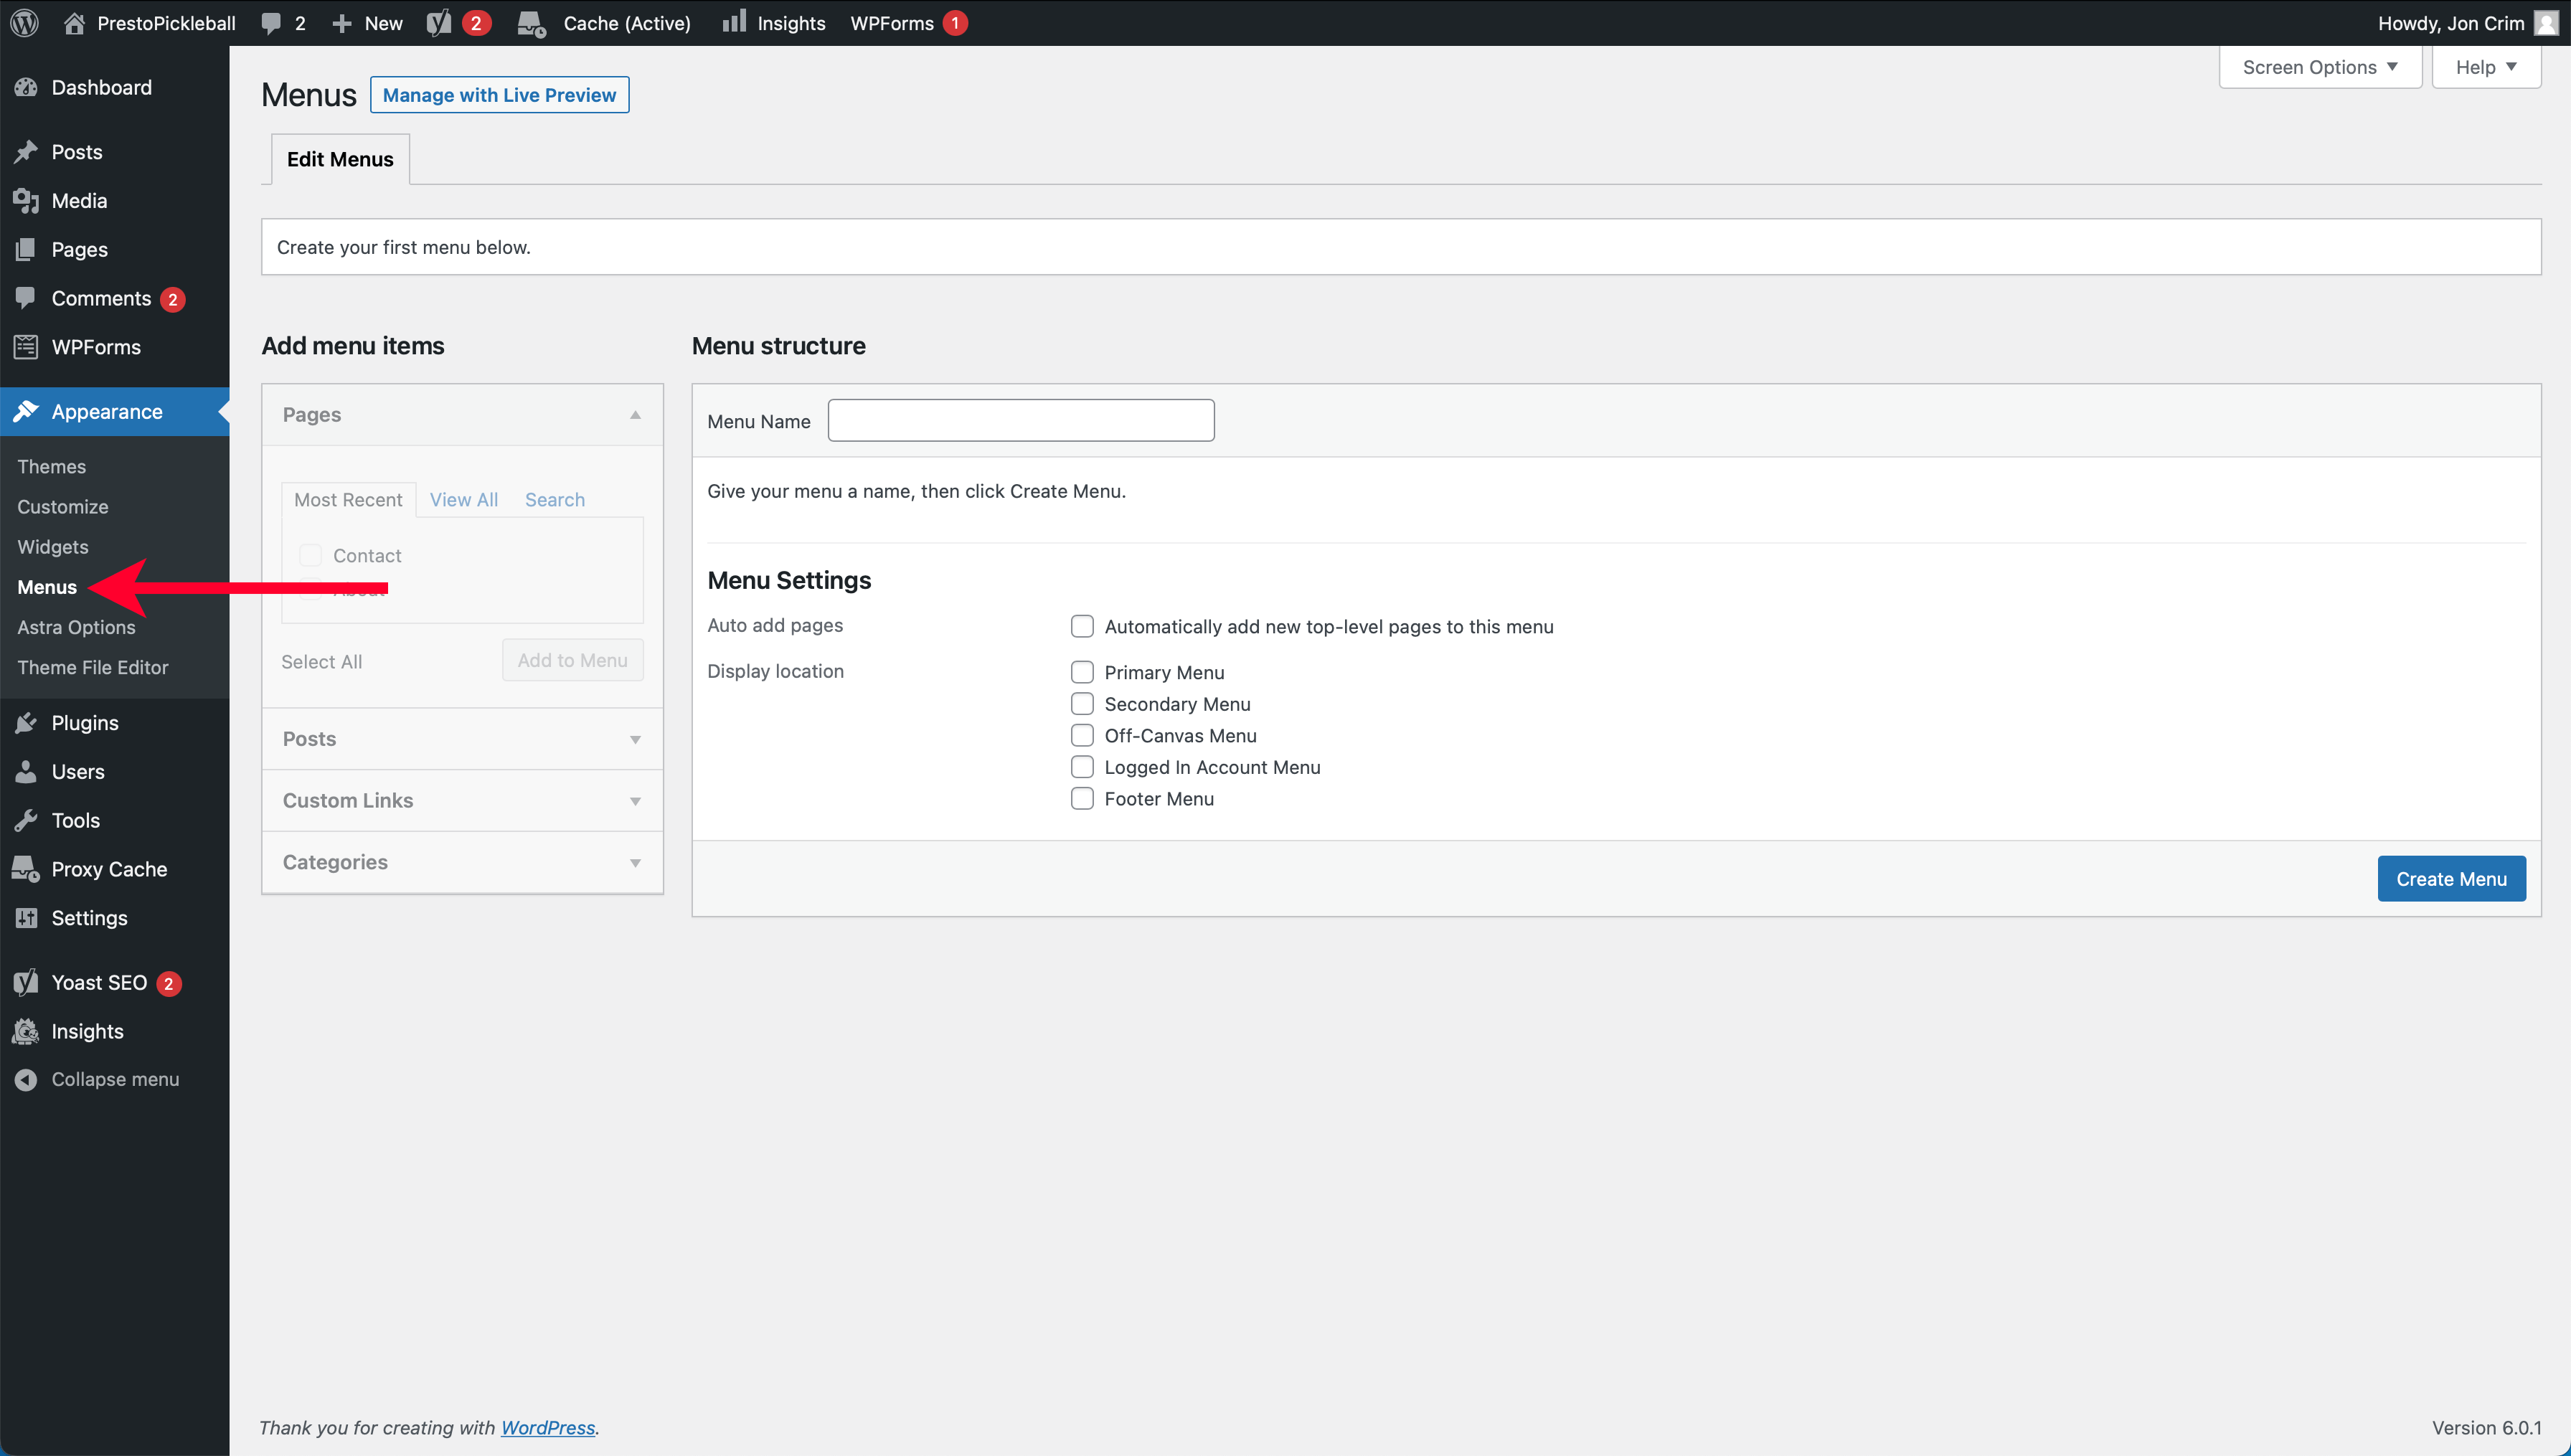
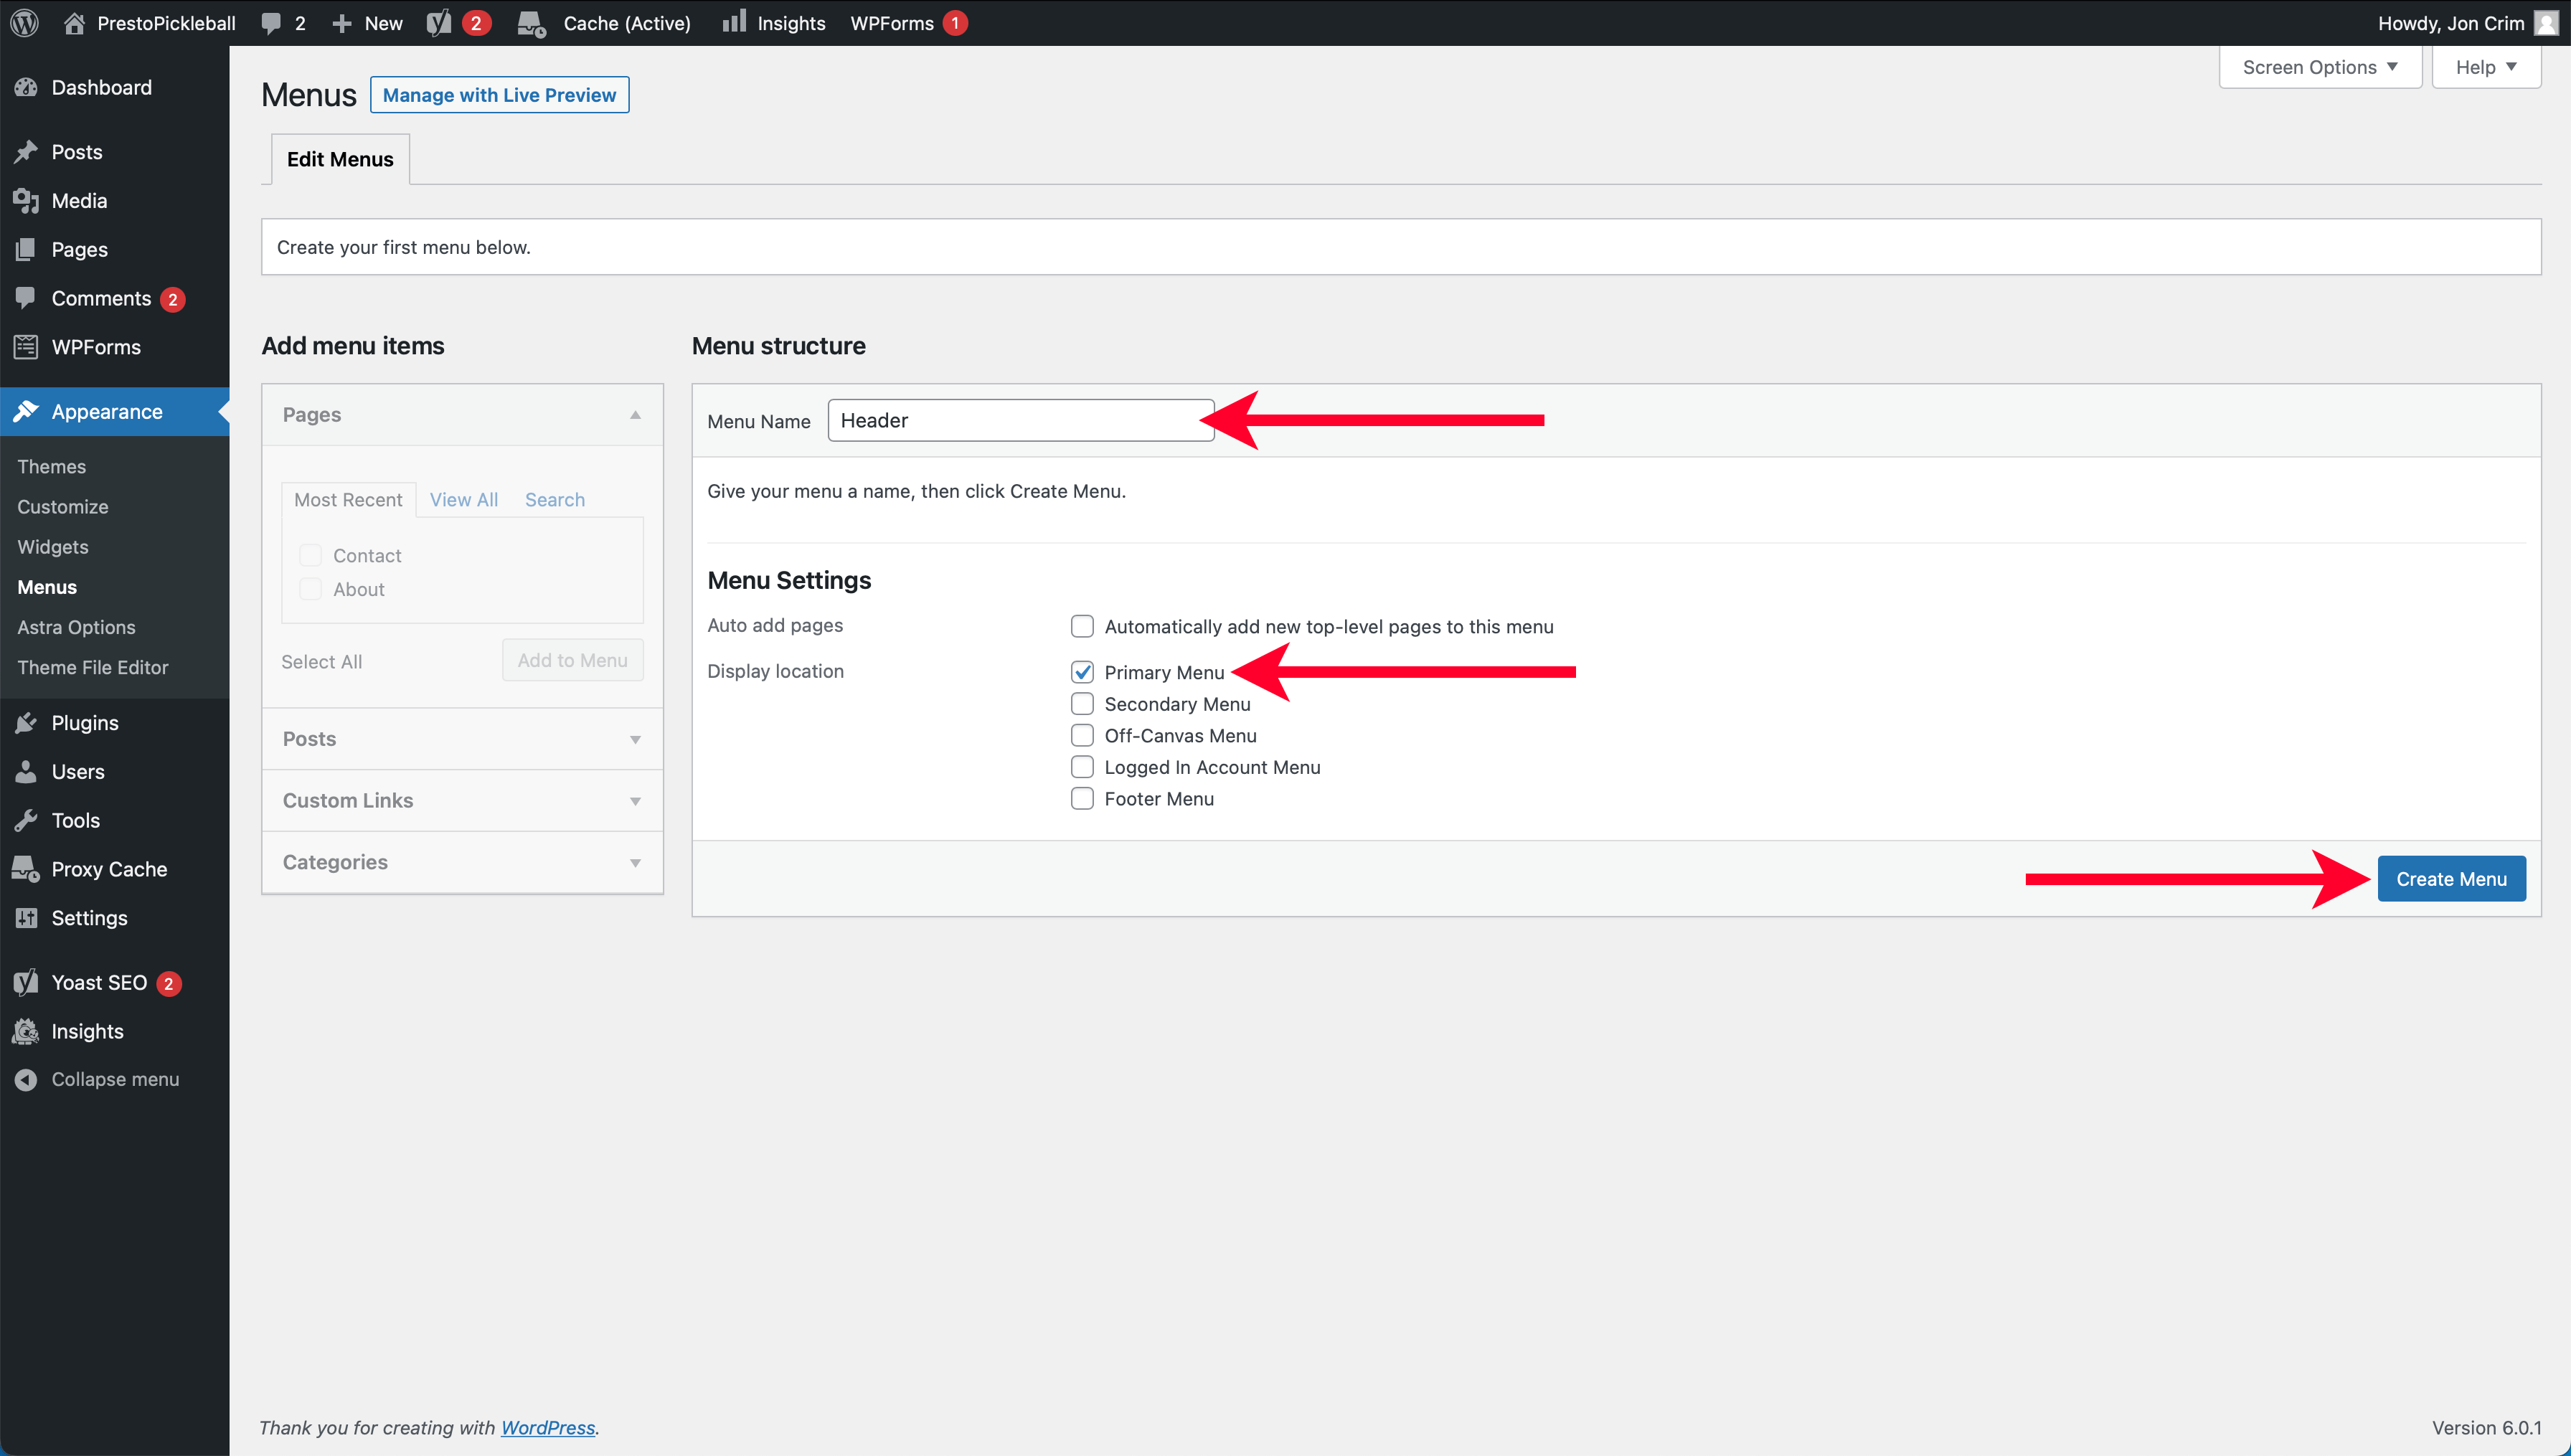
In the “Menu Name” field, enter “Header,” which will signify that this menu lives in the header at the top of your website. Next, click the “Primary Menu” checkbox under the “Menu Settings” and click the “Create Menu” button.
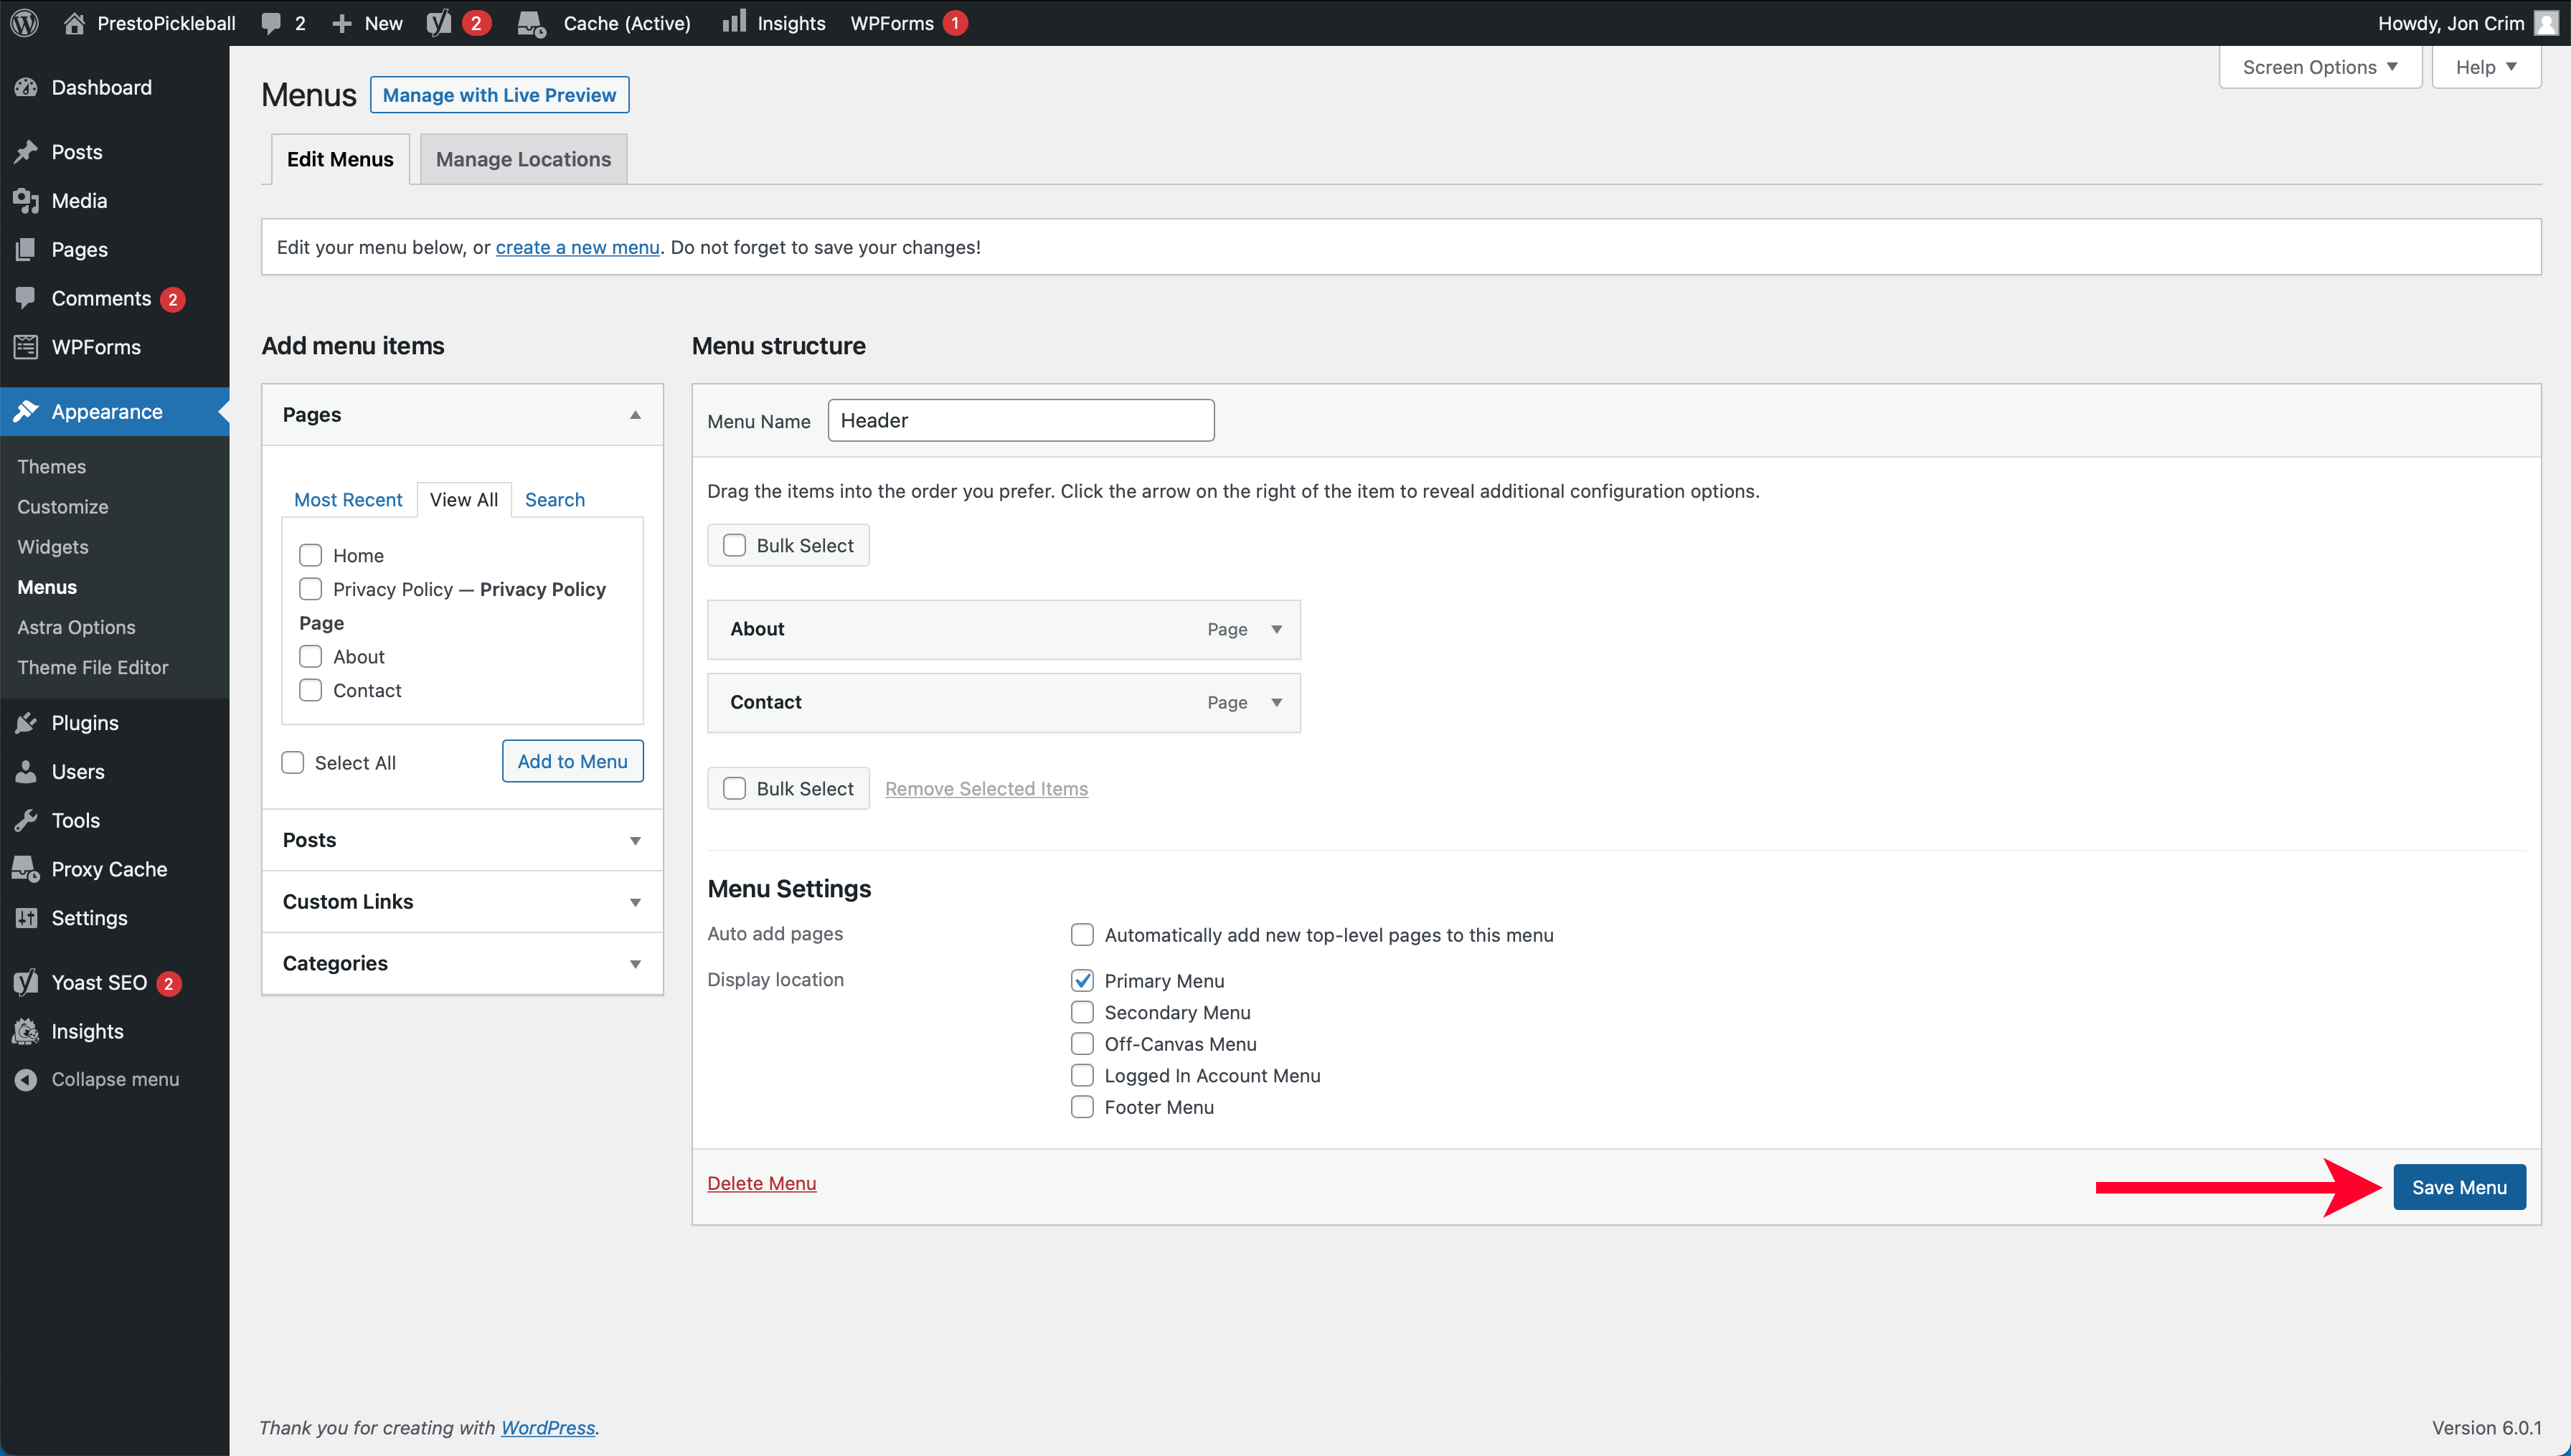
Under the “Add Menu Items” heading, we’ll select “View All,” then check the boxes for the “About” and “Contact” pages. Once selected, we’ll click the “Add to Menu” button.

After doing so, you can reorganize the added menu items by clicking and dragging them up or down. Finally, we’ll click the “Save Menu” button.
If you load your home page in your browser, you’ll see that only the “About” and “Contact” pages show in the main menu.
Before we wrap up, let’s add your privacy policy page to the website’s footer.
Update the Footer
From your WordPress account, click the “Appearance” menu, then select the sub-menu of “Customize” to bring up the WordPress theme editor.
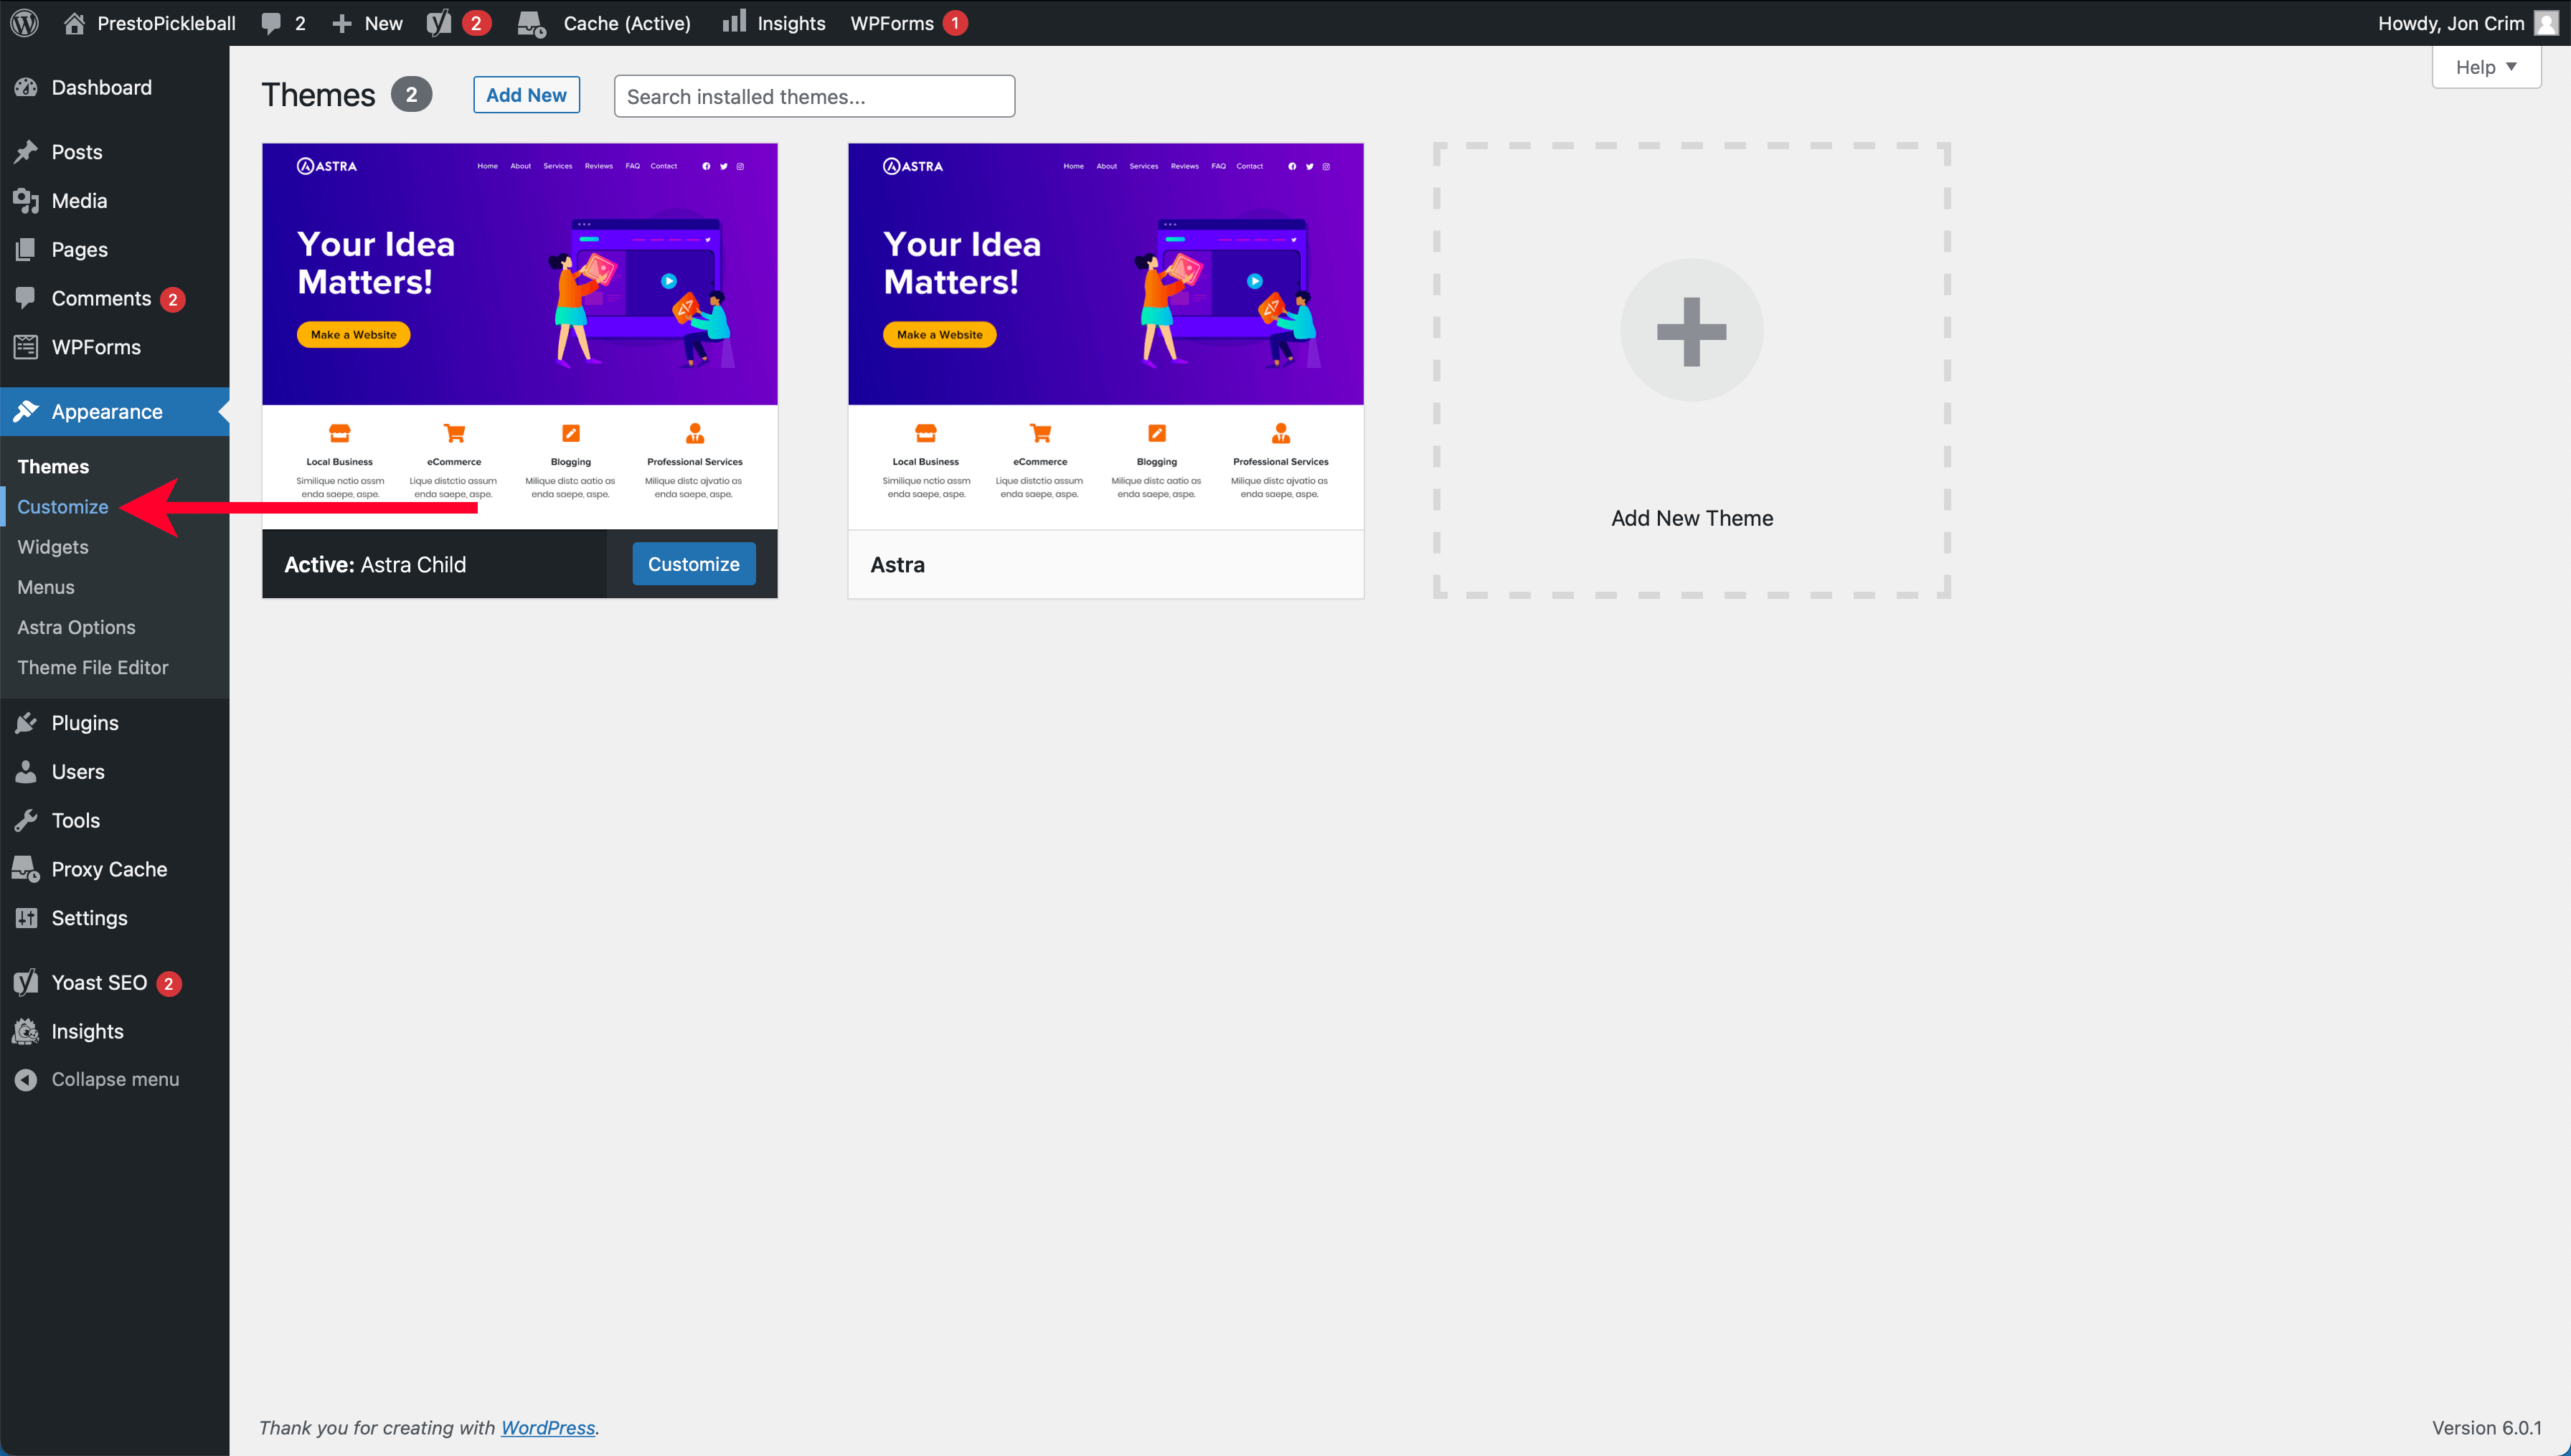
Next, click “Footer Builder” from the theme editor’s sidebar.

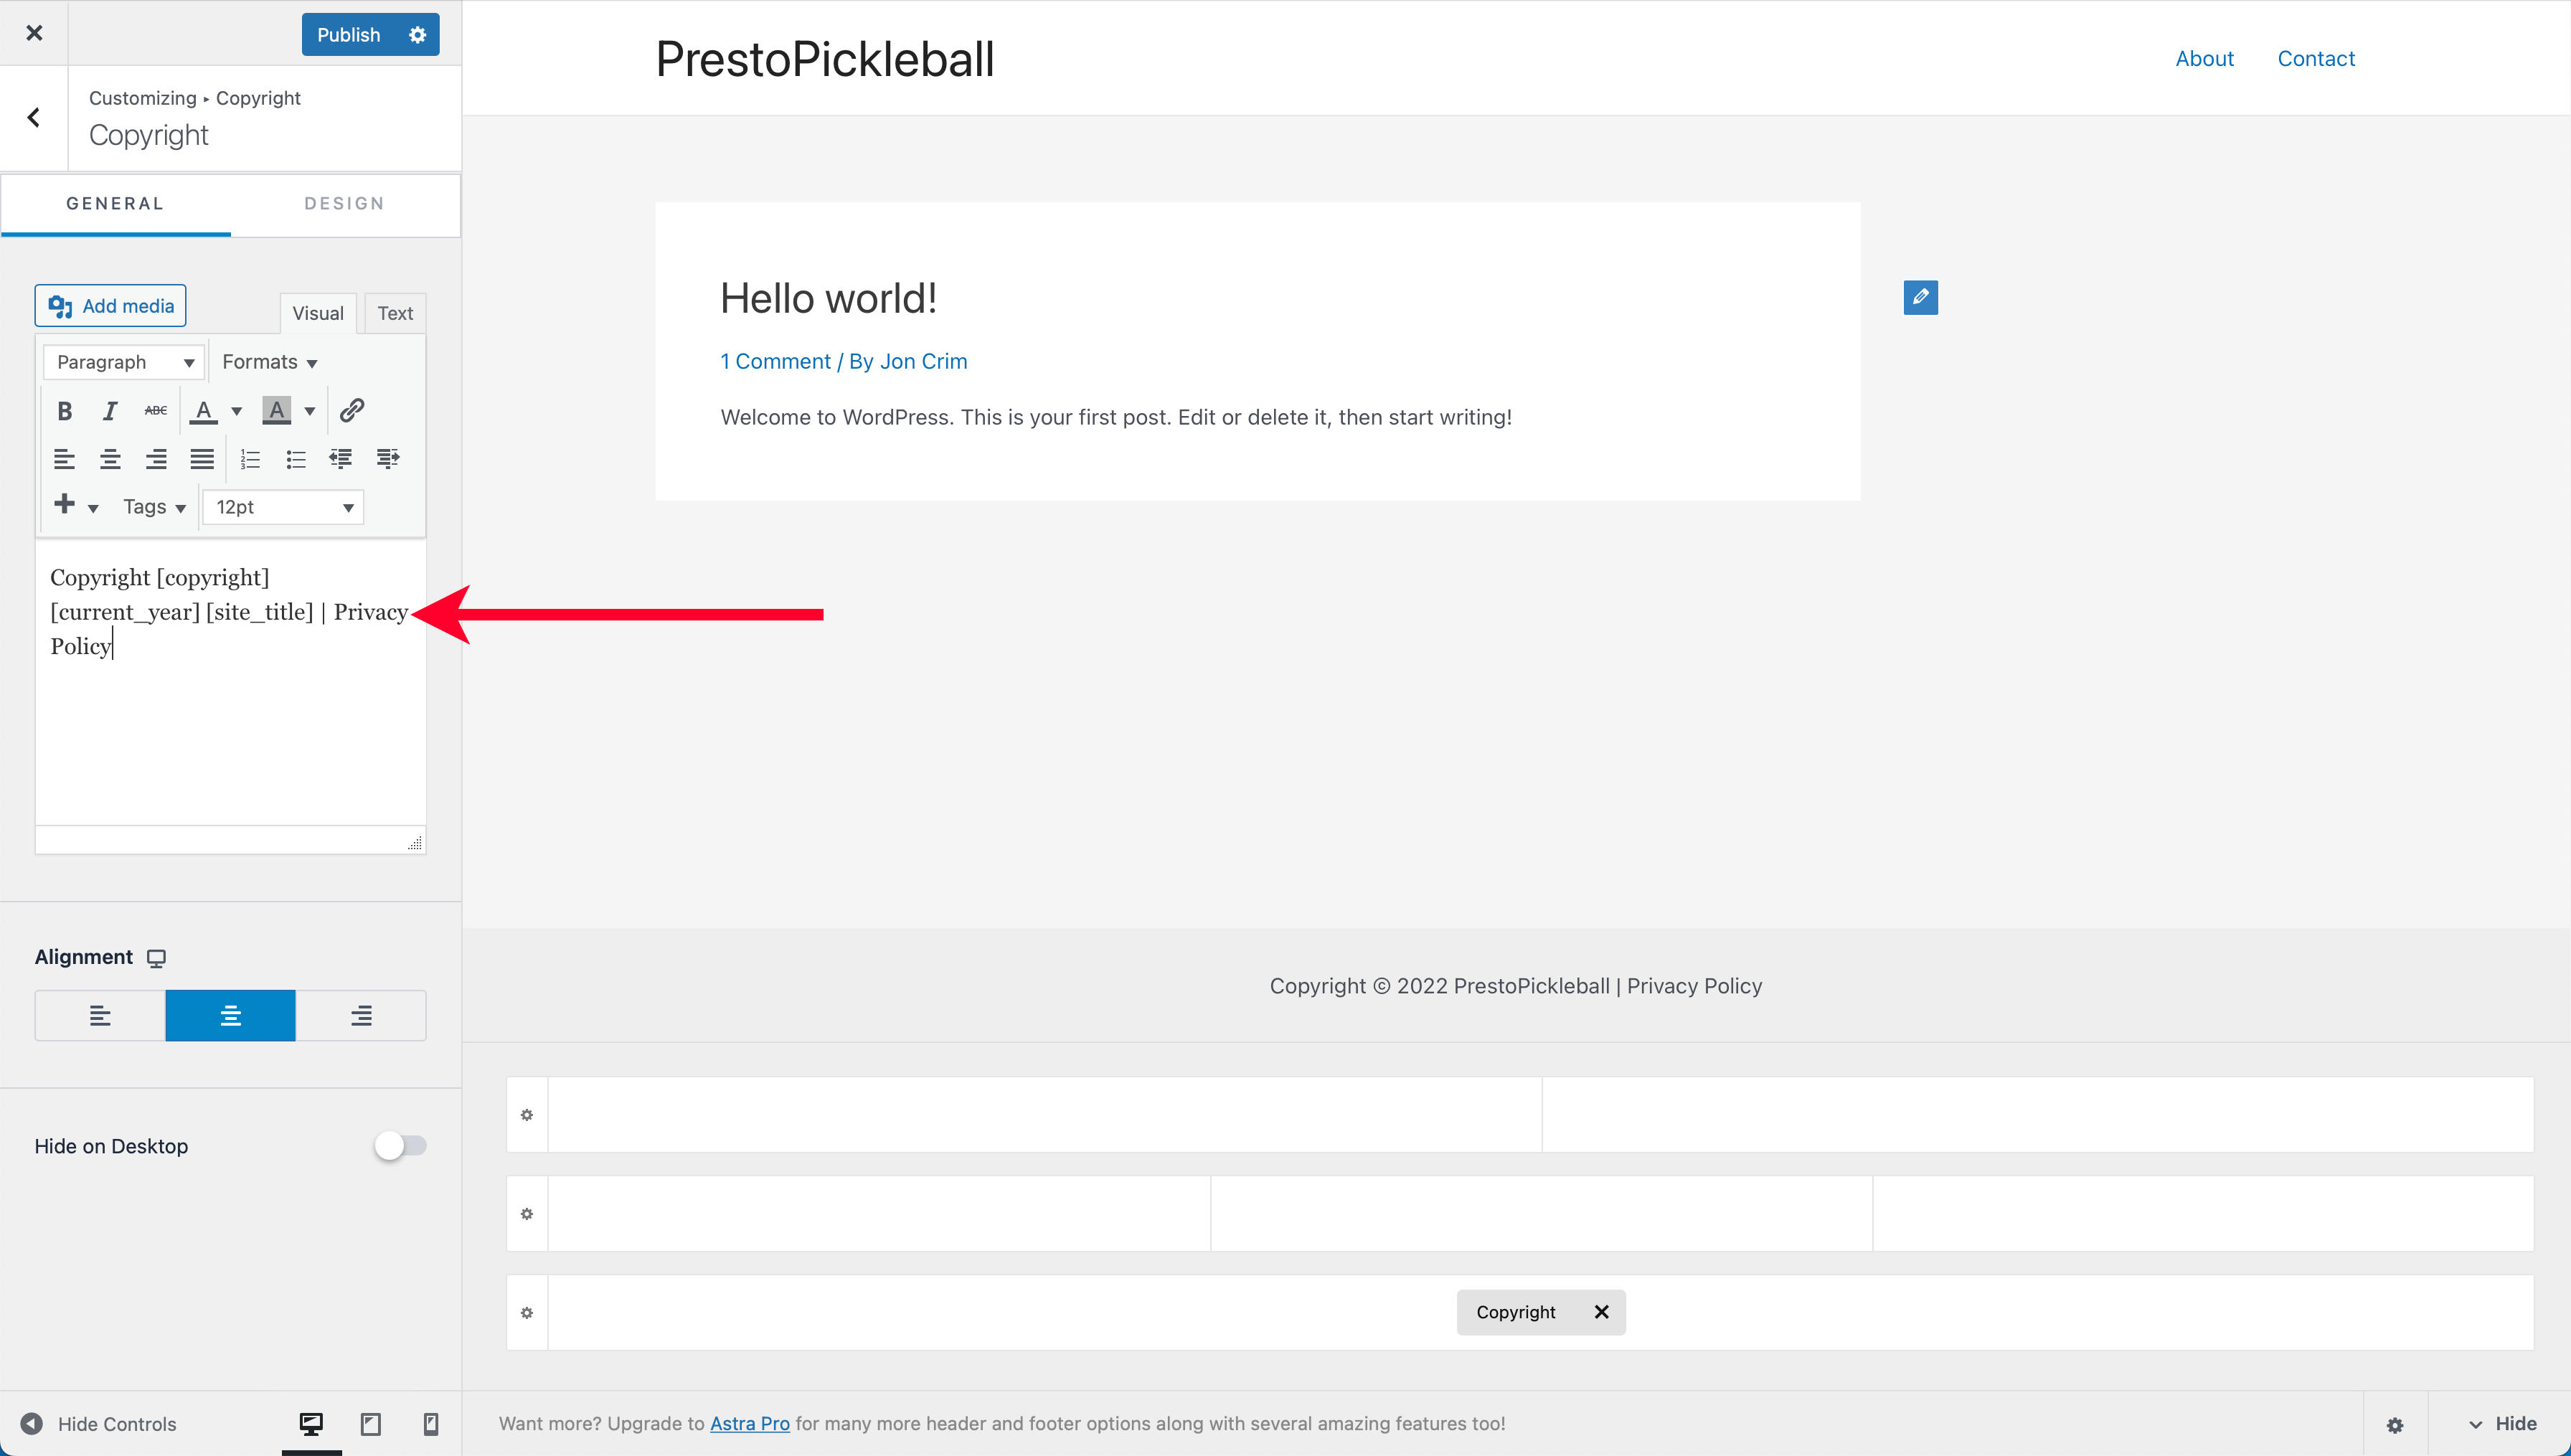
Now, click “Copyright” from the list of “Elements” in the sidebar.
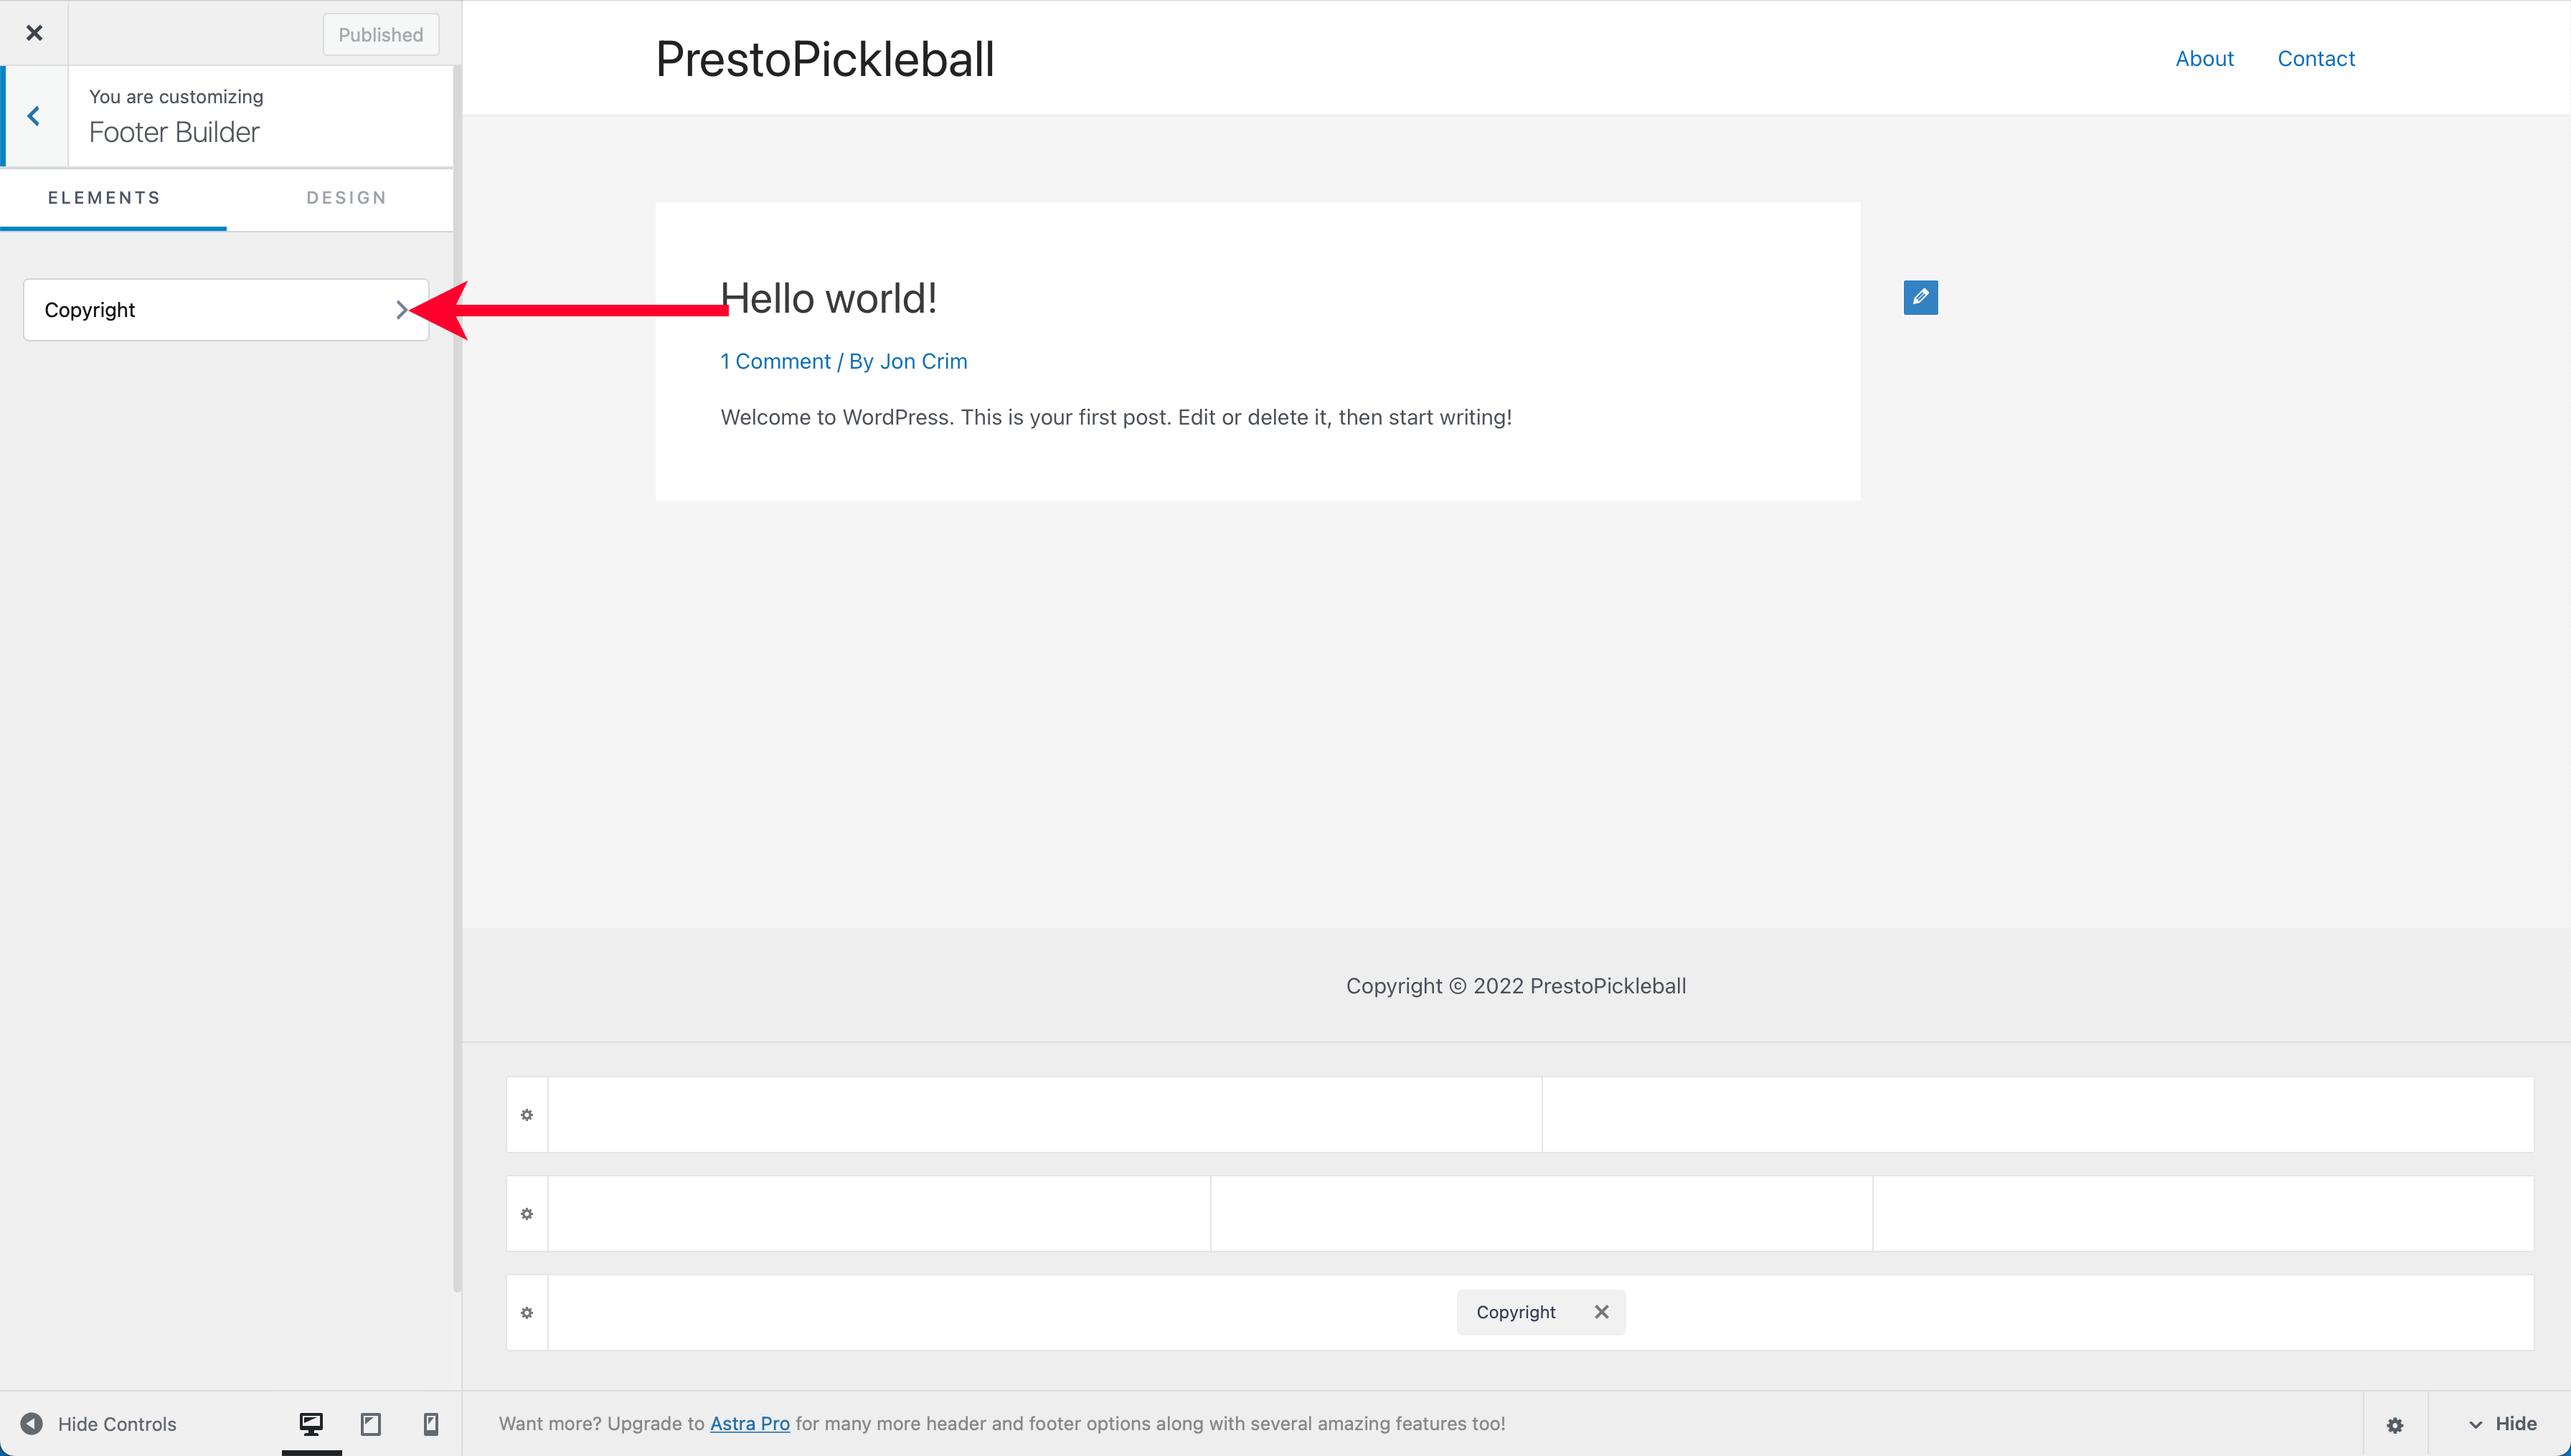
The theme editor’s sidebar will display a visual text editor in the sidebar, so let’s place our cursor at the end of the existing text.
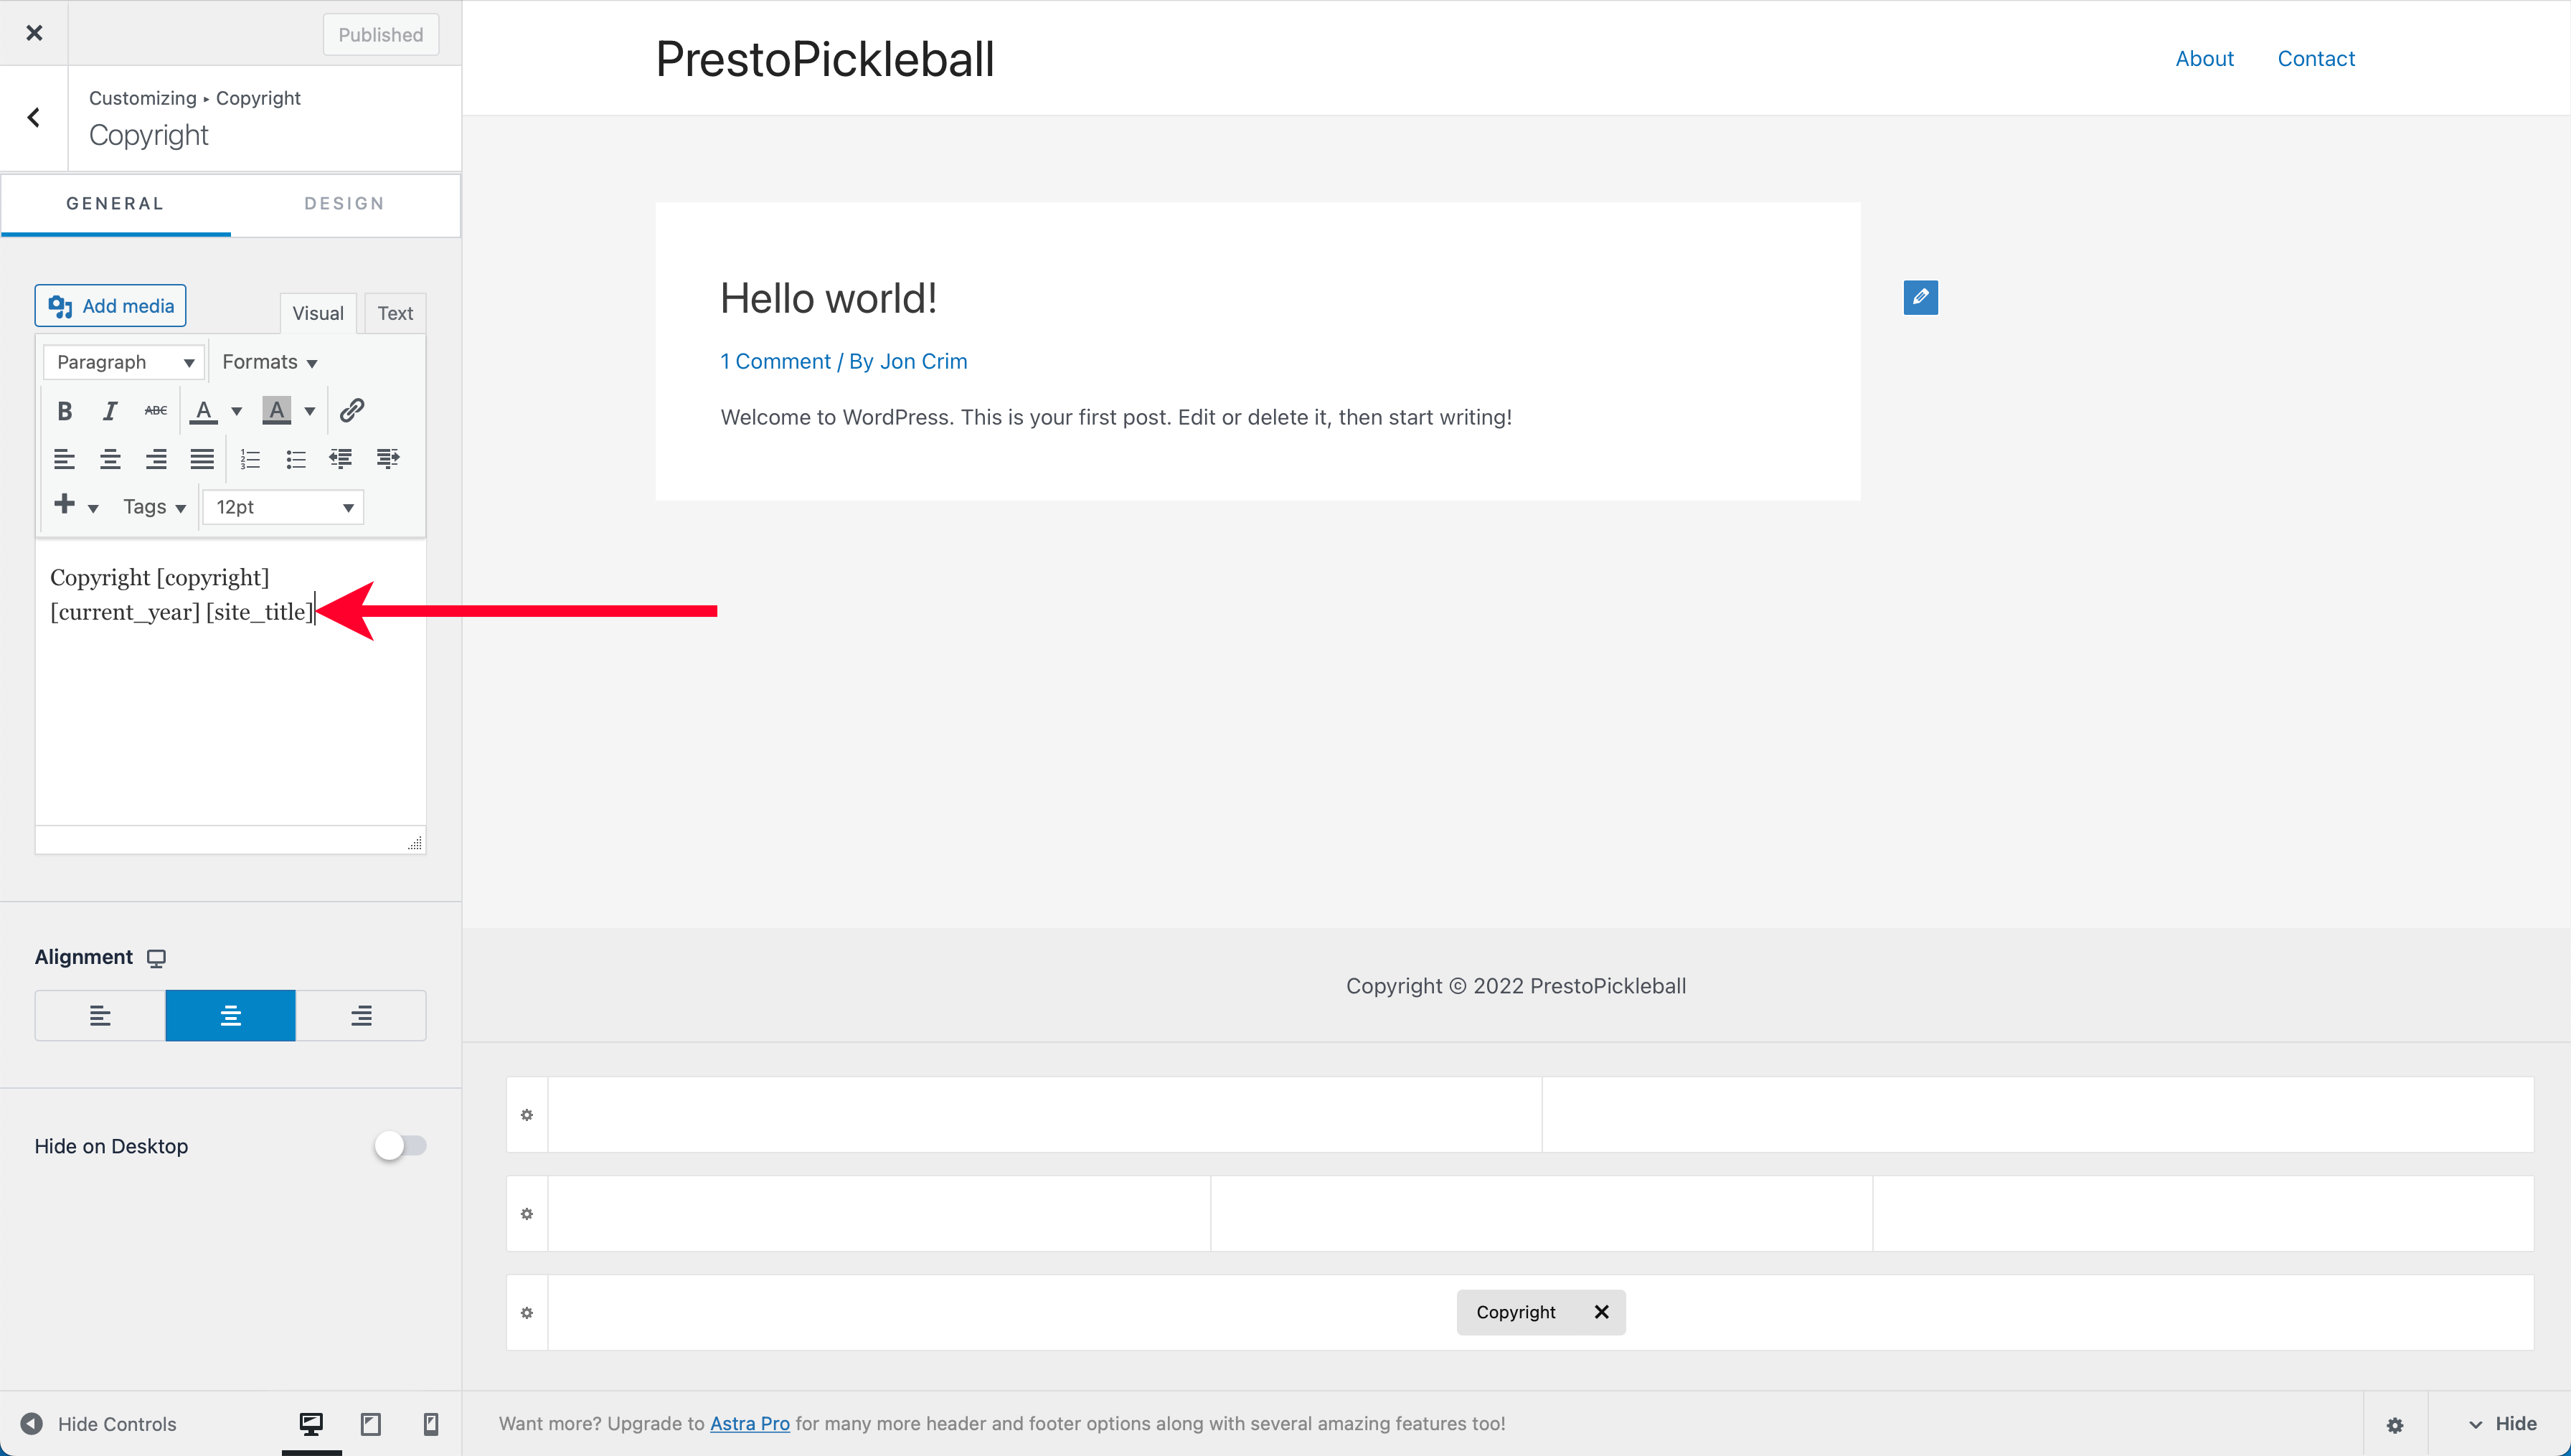
Type a space, a pipe, another space, then the words “Privacy Policy.”
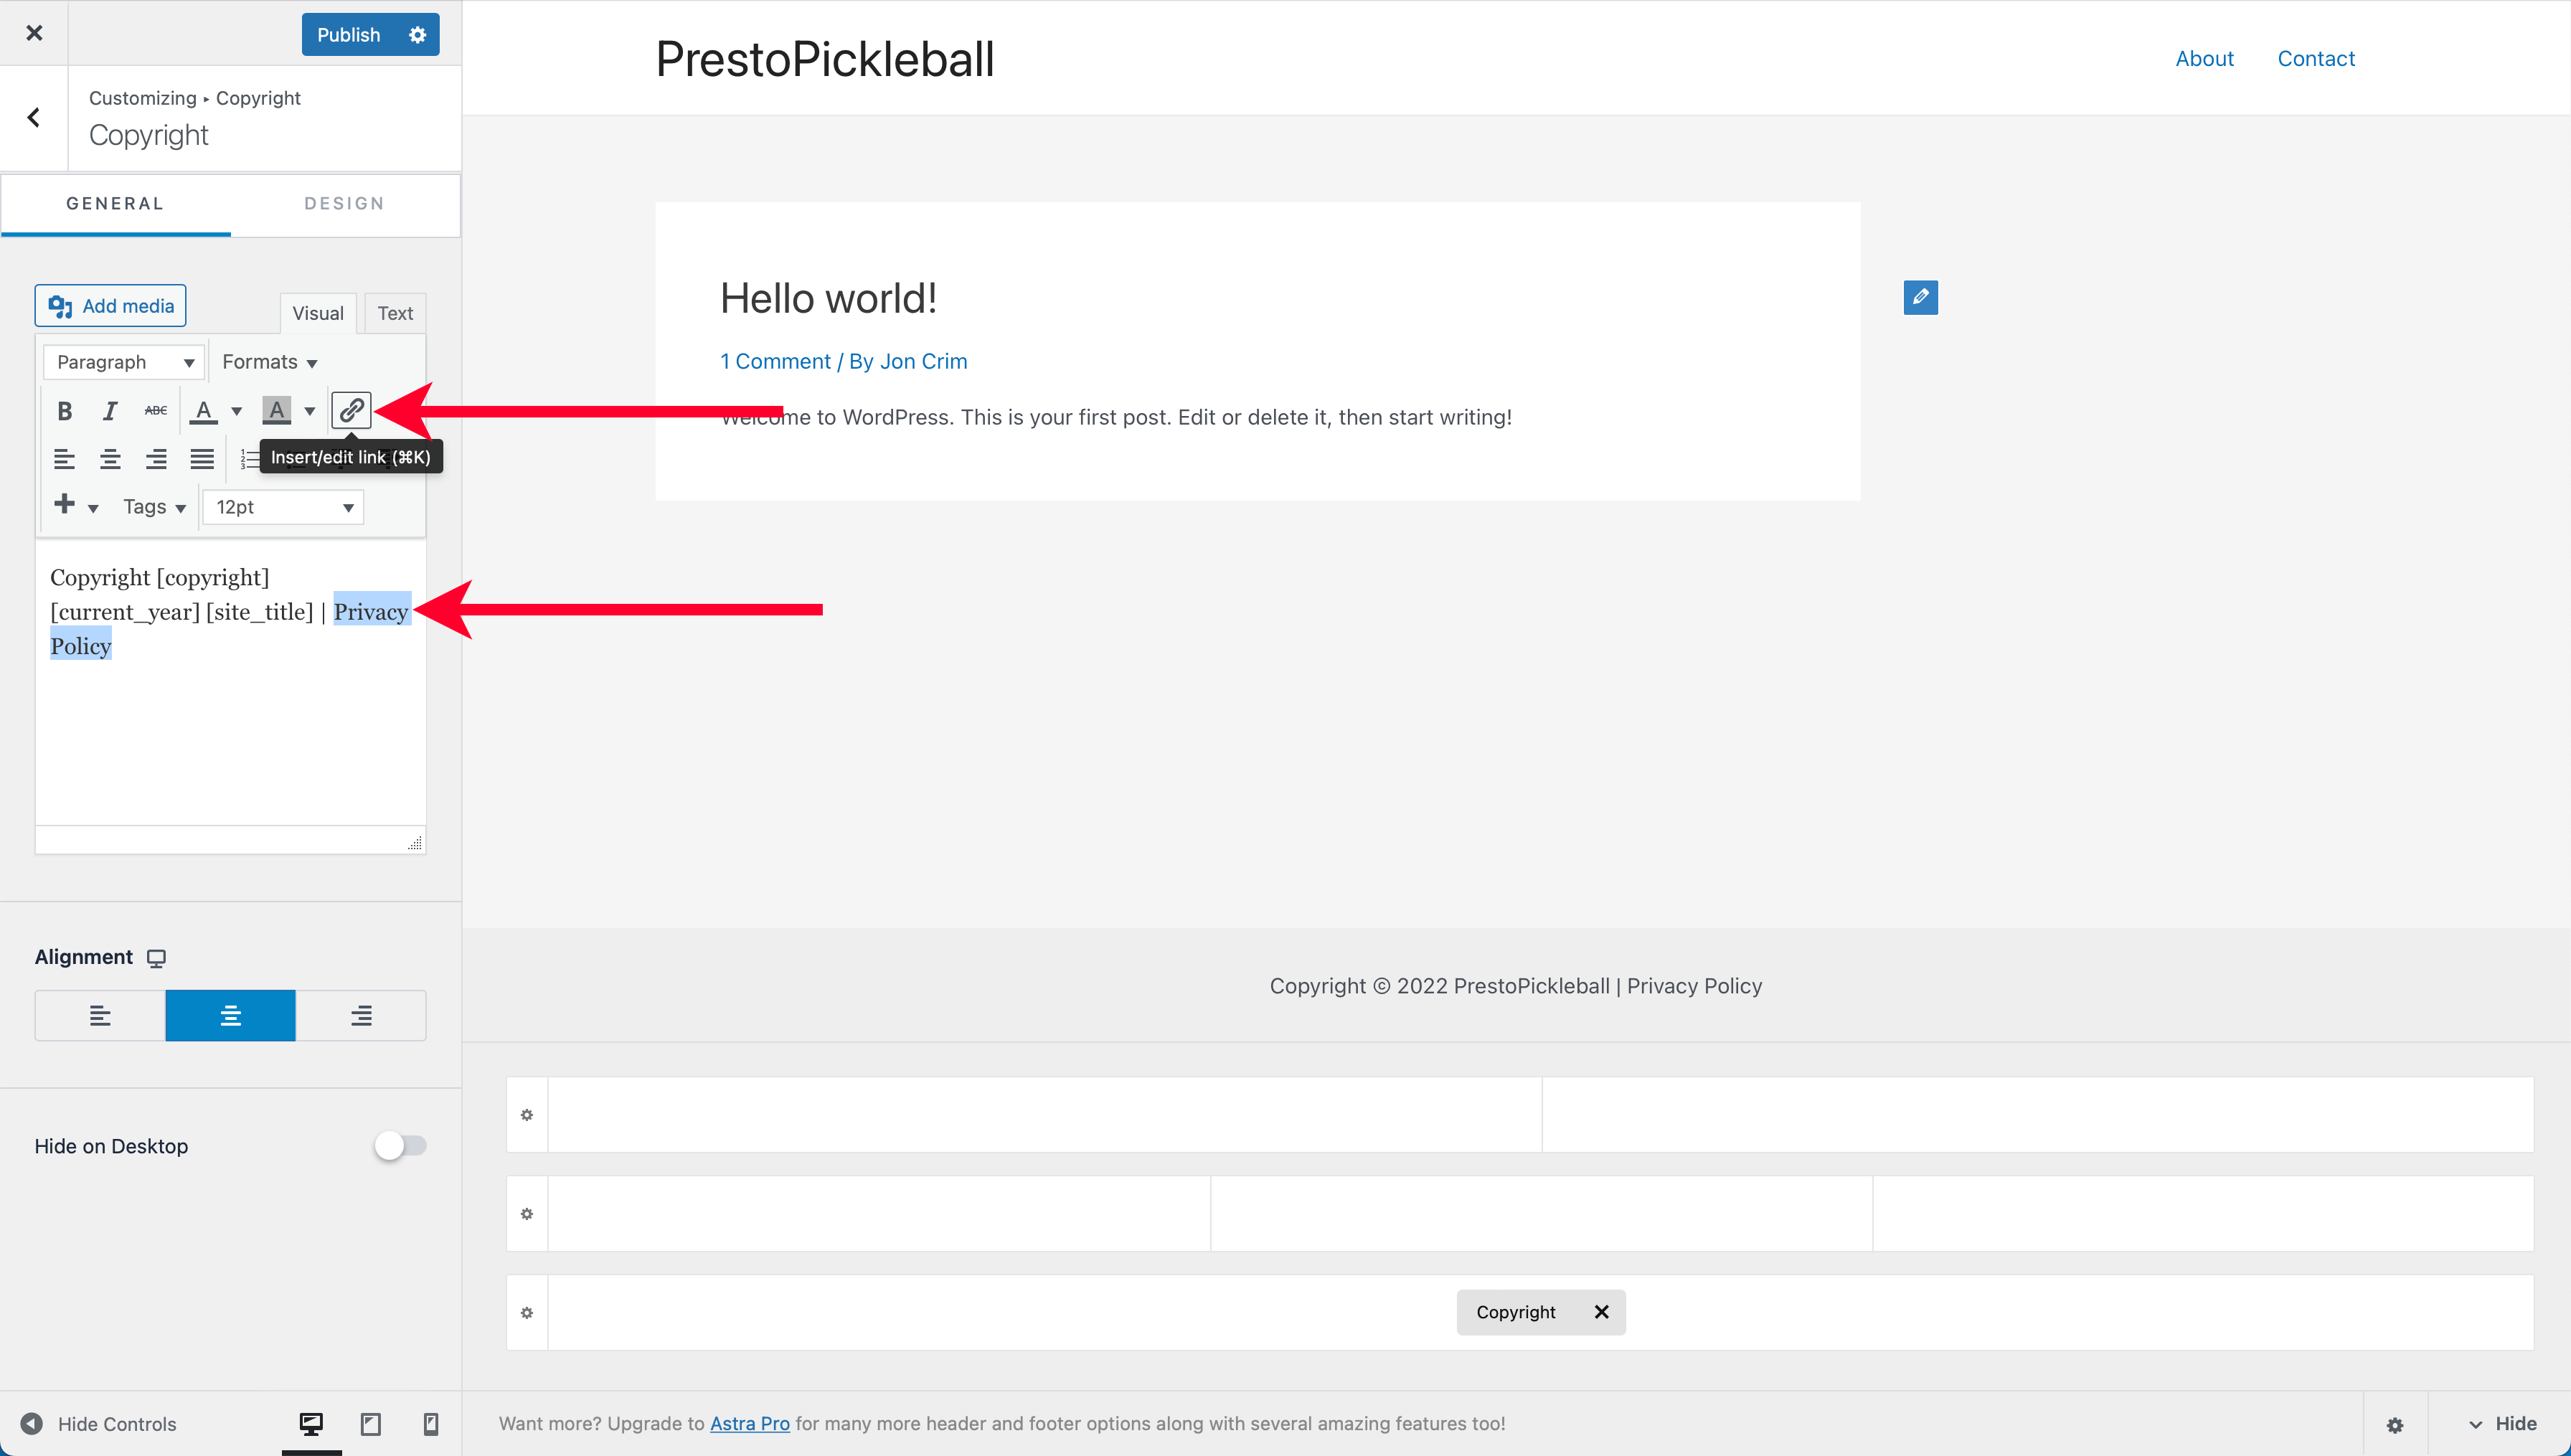
Now, highlight the text “Privacy Policy” and click the “Insert” link icon in the visual text editor’s options.
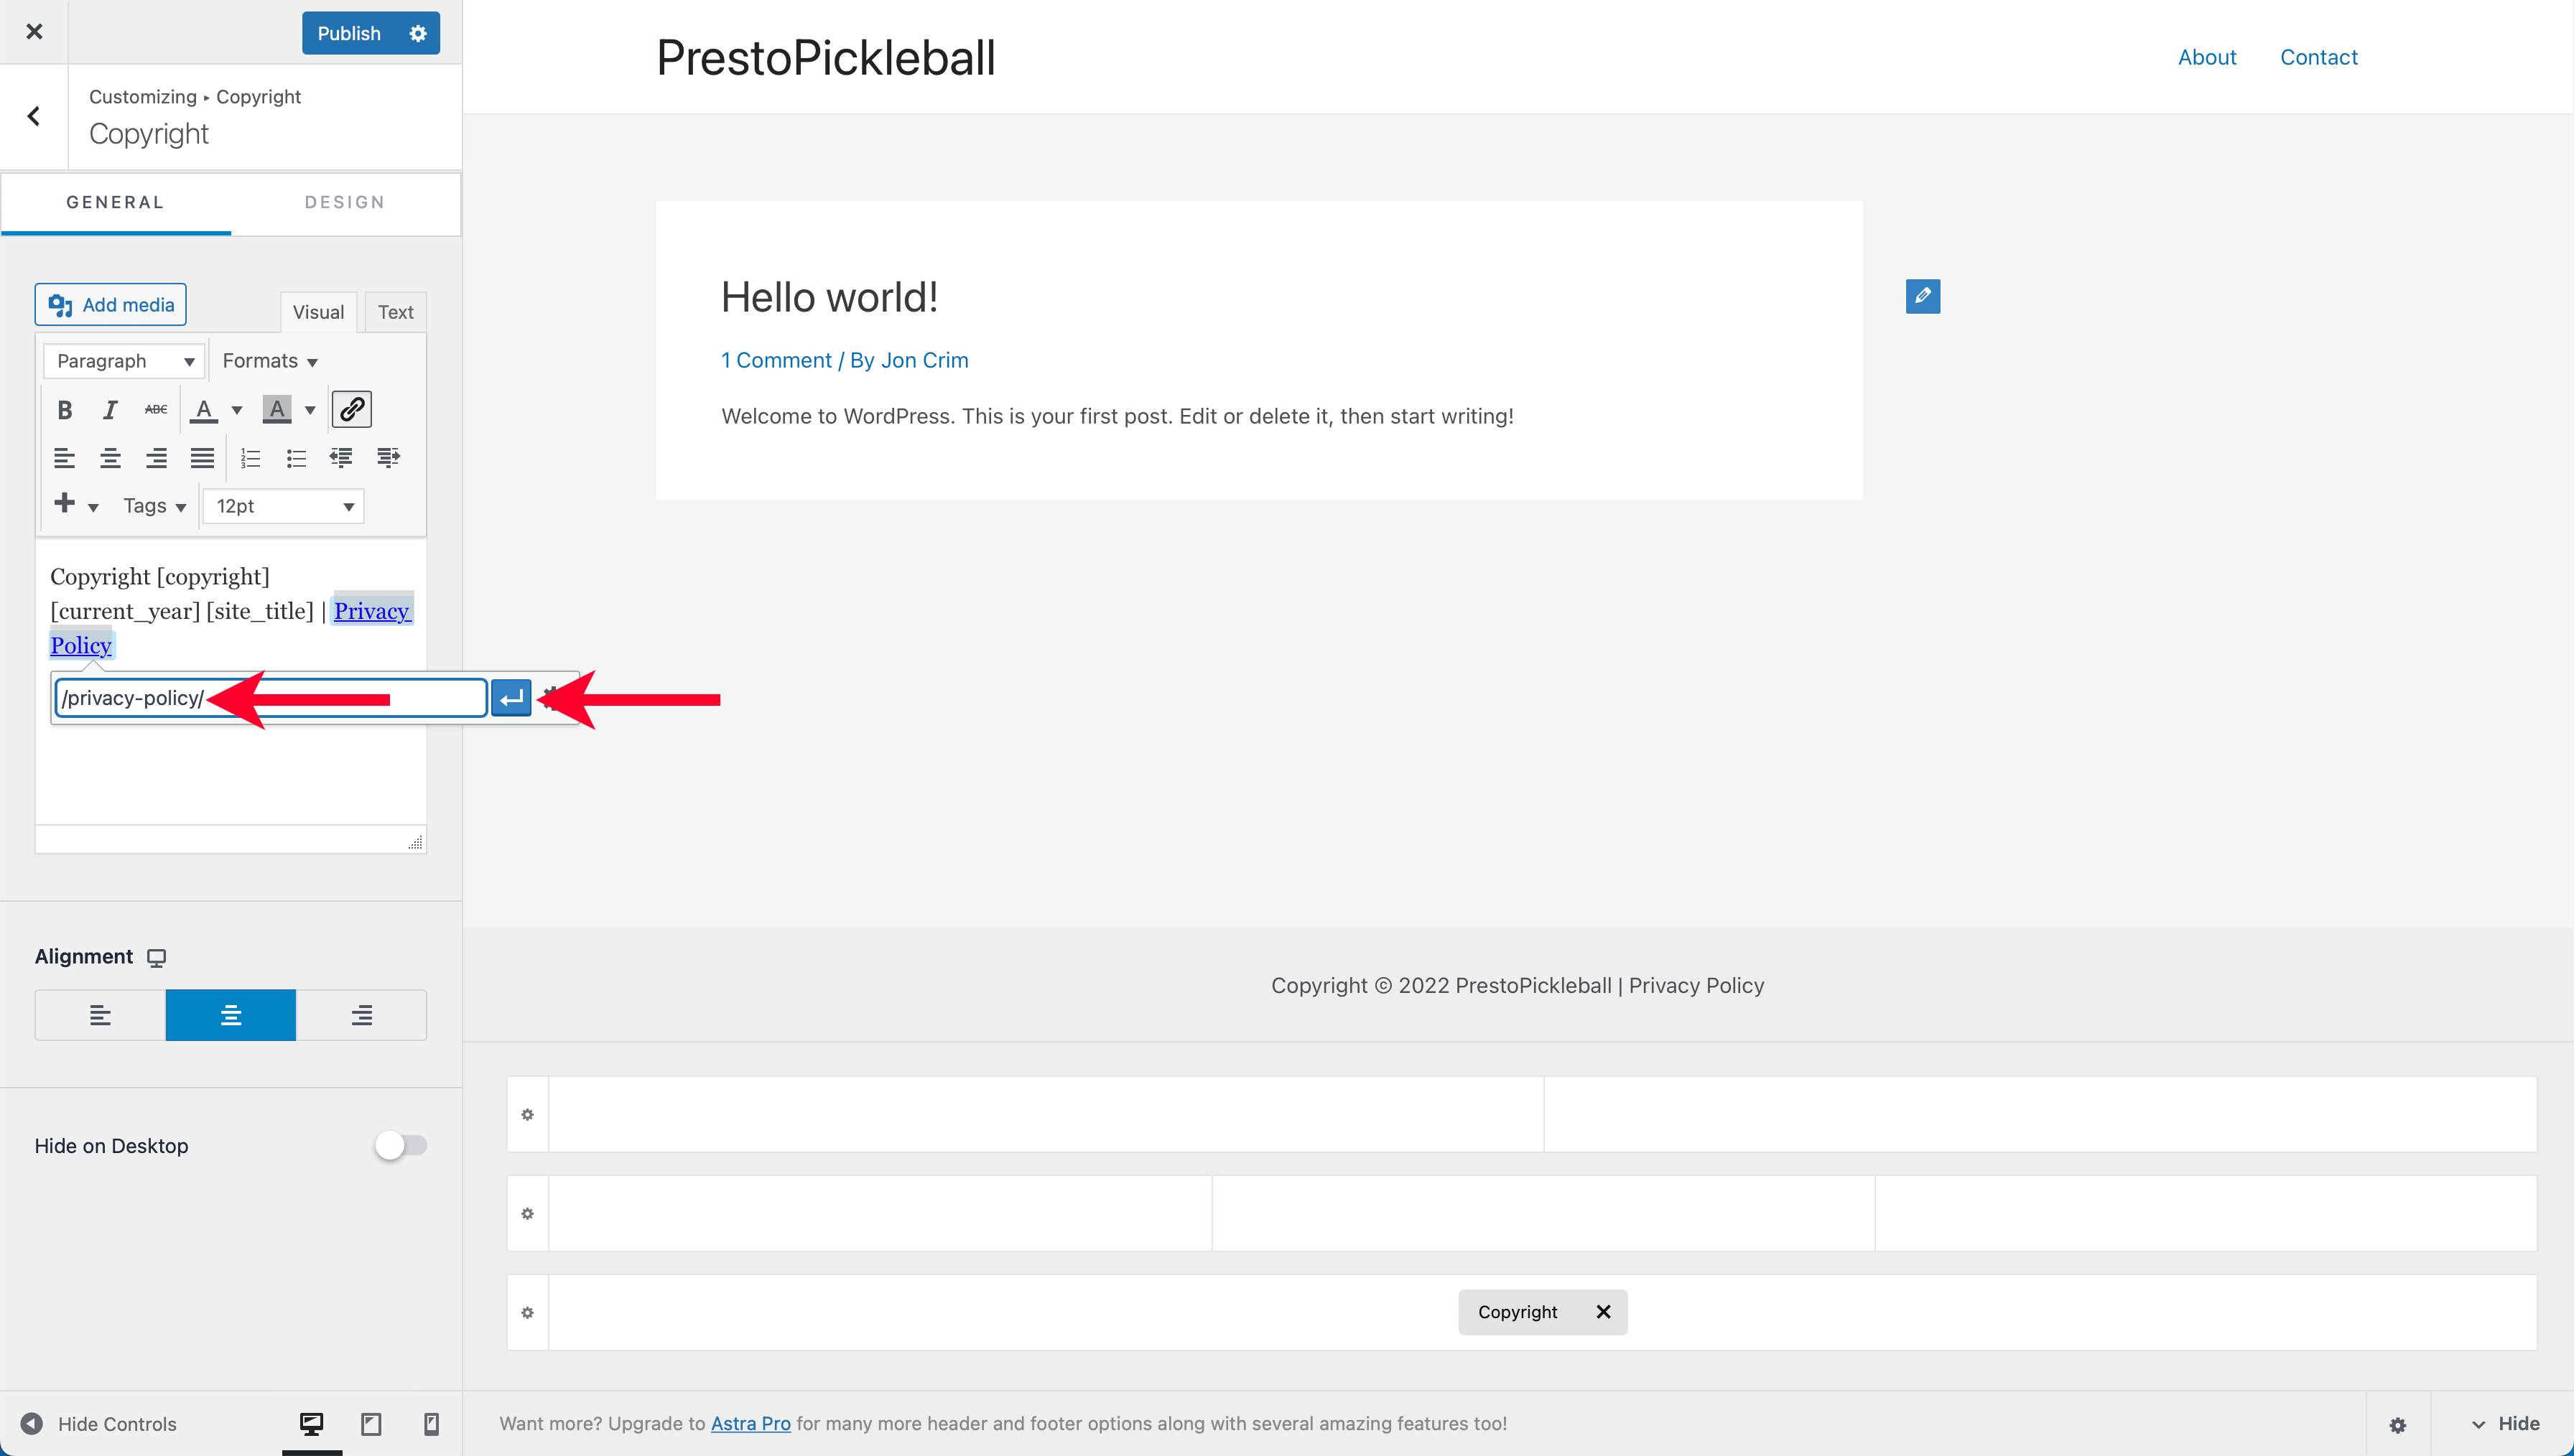
Type “/privacy-policy/” and click the enter arrow to save the link.
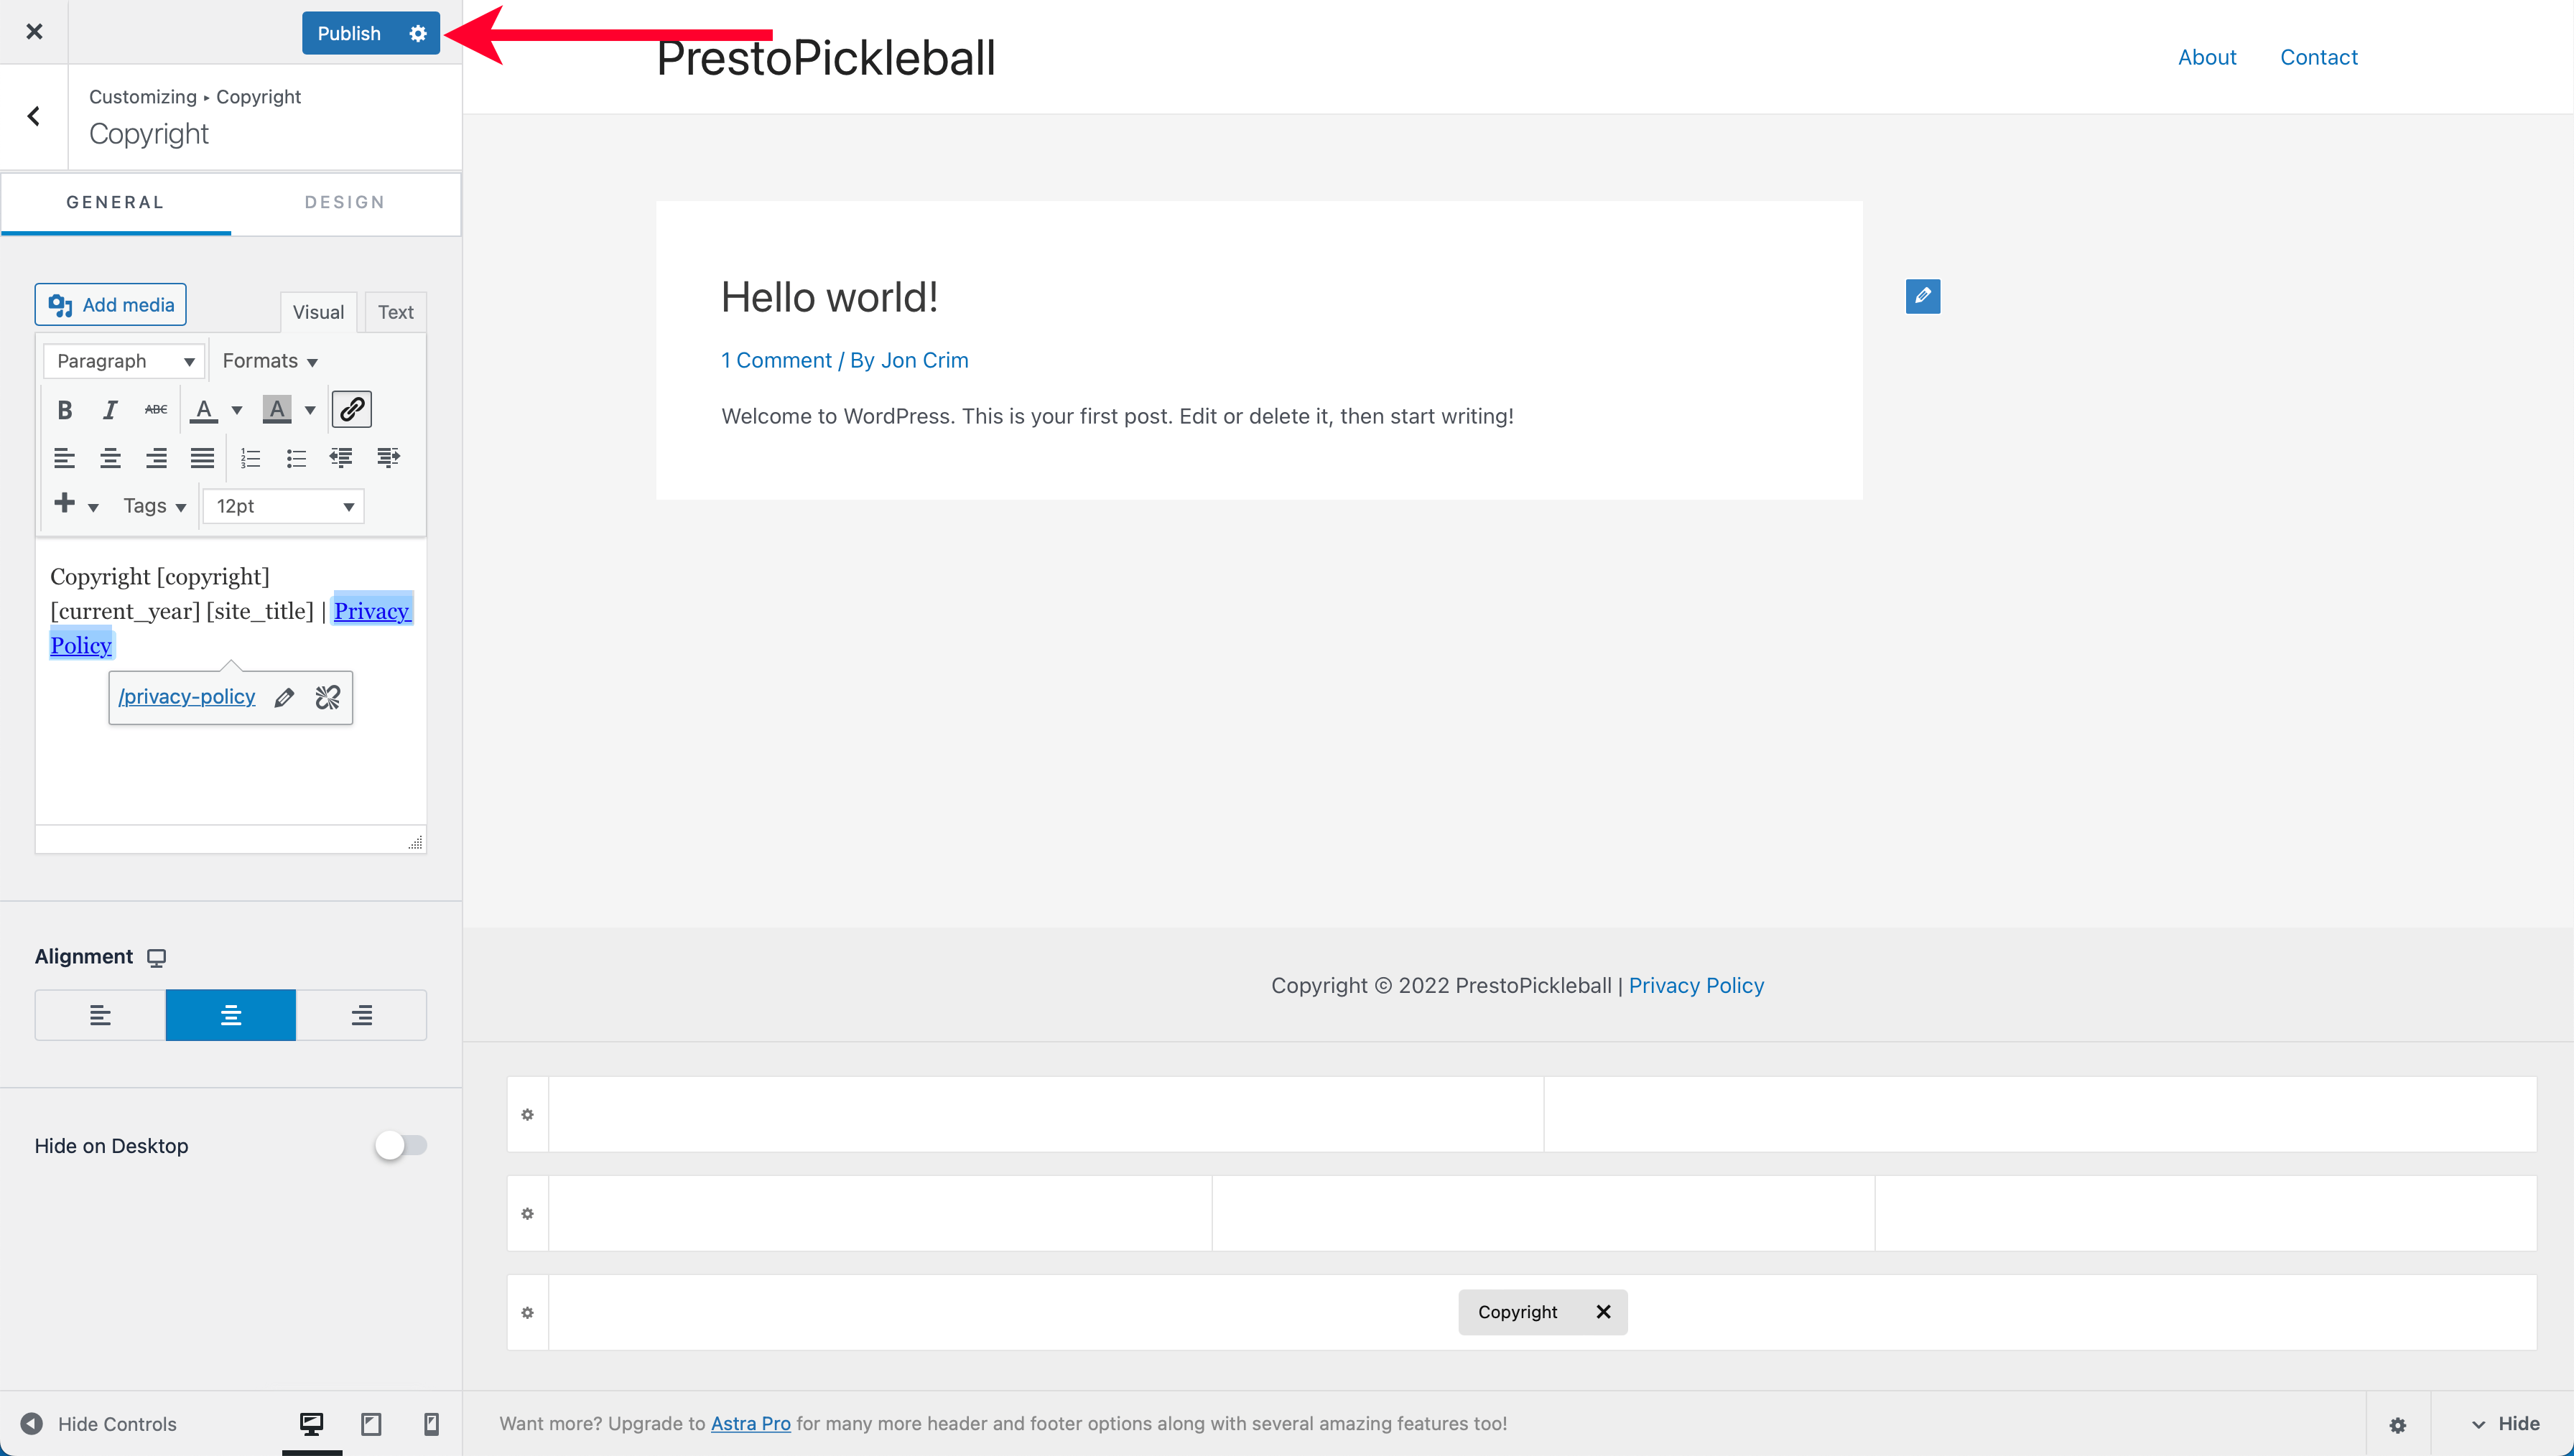
Lastly, click “Publish” at the top of the theme editors sidebar.
You can view the update by visiting your website’s home page:
That’s it! Your website is fully set up and ready for you to start building your online business.
Congrats!
If you’ve made it this far, you’re doing fantastic and have taken a massive step toward getting your business website up and running.
Although WordPress is likely new to you, and we’ve just scratched the surface, I hope you can start to gain a feel for how much you can accomplish with a website builder and zero development or coding knowledge – it’s a surprisingly powerful tool.
By walking through this guide, you’ve experienced quite a bit of the WordPress account, so hopefully, you’re starting to feel comfortable navigating around and finding things. Of course, I’d encourage you to explore more on your own.
Where to Next
Setting up your website is Step 2 in our online roadmap for starting an online business, which is a huge milestone. Now that you have an online presence, we can move on to one of the meatiest steps, building traffic.
To build traffic, you need to know what people are searching for online about your niche. Rather than guessing, we can research keywords using specialized tools to roughly understand how many people are searching while gleaning competition to pick topics that will give our content the best chance of standing out and generating traffic.
In my next article, we’ll explore keyword research further, and I’ll share my exact approach to uncovering winning topics that will help jumpstart success for your online business.
If you’d like to be one of the first to know when I publish my next article, you can enter your name and email below, and I’ll send you a note when it’s live. Thanks for stopping by!
PS – I hate spam, and I’ll never abuse my privilege to communicate with you. Plus, I take your privacy very seriously and will not share or sell your email to anyone. I promise.
Can I Ask a Quick Favor?
Your feedback is invaluable. Using this article, did you successfully create a website for your business? If not, where did you get stuck or struggle? If so, is there anything that I could have made more clear?
Please post a comment below to share your thoughts.
Photo Credit @Agk42